Req 3 — Create Your Animations
With your counselor’s approval, choose two animation techniques and do the following for each:
- Plan your animation using thumbnail sketches and/or layout drawings either on paper or using an animation software program.
- Create the animation.
- Share your animations with your counselor. Explain how you created each one, and discuss any improvements that could be made.
Choosing Your Two Techniques
This requirement asks you to create two separate animations, each using a different technique. The idea is to experience more than one way to animate. Here are some techniques to consider:
Flipbook Animation
A flipbook is the simplest form of animation — and one of the most satisfying. Draw a slightly different picture on each page of a small pad of paper, then flip through the pages rapidly. The drawings come alive in your hands.
- What you need: A pad of sticky notes or a small sketchbook, a pencil
- Best for: Simple, short animations — a bouncing ball, a waving hand, a character walking
- Time to create: 1–3 hours for a basic flipbook
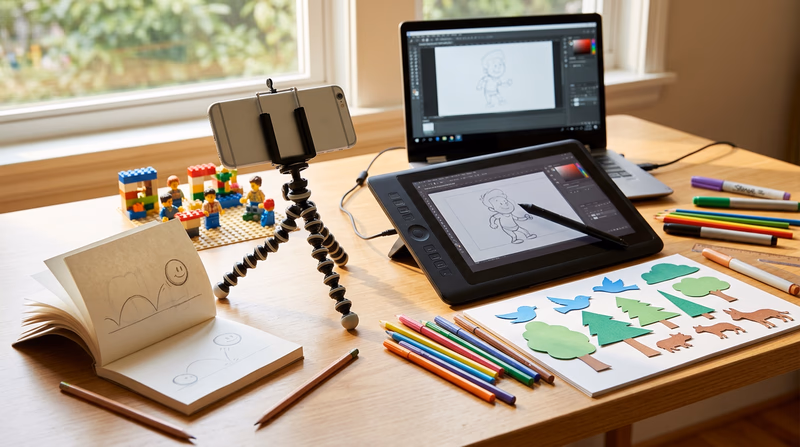
Stop-Motion Animation
Set up a camera (your phone works perfectly), arrange objects in a scene, take a photo, move the objects slightly, and take another photo. String the photos together into a video. Clay, LEGO bricks, action figures, paper cutouts, and even food all work as subjects.
- What you need: A phone or camera, a tripod or stable surface, objects to animate, video editing app
- Best for: 3D scenes, character stories, creative experimentation
- Time to create: 2–5 hours for a short clip
2D Digital Animation
Use free software to draw frames on a computer or tablet. Programs like Pencil2D, Krita, or the online tool FlipAnim let you draw each frame, add color, and play back your animation instantly.
- What you need: A computer or tablet, free animation software
- Best for: Colorful character animations, experimenting with the 12 principles
- Time to create: 2–4 hours for a short animation
Whiteboard Animation
Draw on a whiteboard or chalkboard, photograph each stage, and erase/add elements between shots. This technique is popular for explainer videos and educational content.
- What you need: A whiteboard or chalkboard, markers or chalk, a phone camera, a stable shooting position
- Best for: Explaining a concept, telling a simple story
- Time to create: 1–3 hours
Paper Cutout Animation
Cut out shapes from paper — characters, backgrounds, props — and move them around on a flat surface while photographing each position. This is a form of stop-motion, but it is flat (2D) and often faster to produce.
- What you need: Paper, scissors, a flat surface, a phone camera mounted above
- Best for: Simple stories, colorful scenes, younger Scouts who prefer crafts to drawing
- Time to create: 2–4 hours
Step 1: Plan Your Animation
Before you draw or shoot a single frame, plan. Professional animators spend a large portion of their time on planning because it prevents costly mistakes later.
Thumbnail Sketches
Thumbnail sketches are small, rough drawings that map out the key moments of your animation. They do not need to be pretty — they are a thinking tool.
Thumbnail Planning
For each of your two animations
- Decide on a subject: What will your animation show? (A ball bouncing, a character waving, a flower growing, a logo appearing)
- Sketch the key poses: Draw the starting position, the major actions, and the ending position.
- Number your thumbnails: Put them in order so you have a clear sequence.
- Add notes: Write timing ideas (“hold this pose for 5 frames”) or action notes (“arms swing up here”).
- Show your plan to your counselor: Get approval before you start creating.
Layout Drawings
If your animation has a background or a scene with multiple elements, a layout drawing shows where everything goes. Think of it as a map of your animated world — where the character stands, where the camera focuses, and what the background looks like.
Step 2: Create Your Animation
With your plan approved, it is time to bring your drawings to life. Here are some universal tips that apply to any technique:
- Work clean: Keep your camera steady (use a tripod or prop), maintain consistent lighting, and make small, deliberate movements between frames.
- Be consistent: Each frame should change only slightly from the one before it. Big jumps between frames create jerky, confusing movement.
- Apply the principles: Try to use at least one or two of the 12 principles you learned about. Even just adding squash and stretch to a bouncing ball makes a big difference.
- Save often: If you are working digitally, save your project frequently. Losing hours of work to a crash is painful.
Step 3: Share and Discuss
When you present your animations to your counselor, be ready to explain:
- What technique you used and why you chose it
- How you planned it — show your thumbnail sketches or layout drawings
- What principles you applied — point out specific moments where you used squash and stretch, anticipation, timing, or other principles
- What you would improve — every animator sees things they would change. Being able to identify improvements shows growth
Free Tools to Get Started
With two animations under your belt, you have experienced the creative process firsthand. Next, you will look at how professionals do it every day.