Req 5 — Compound Bow
Req 5a — Parts of the Compound Bow
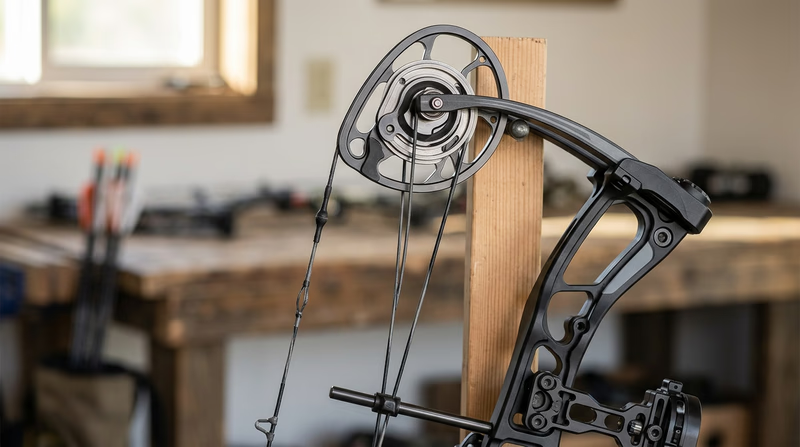
A compound bow looks more mechanical than a recurve, and that is because it is. Here are its main parts:
- Riser: The central frame of the bow. On a compound bow, the riser is typically made of machined aluminum or carbon and holds the grip, arrow rest, sight mount, and stabilizer mount.
- Upper Limb and Lower Limb: Shorter and stiffer than recurve limbs, compound limbs store energy through a cam-and-cable system rather than by bending dramatically.
- Cams (or Wheels): The round or oval pulleys at each limb tip. These are the defining feature of a compound bow. The cam system creates a mechanical advantage called “let-off” — once you pull past a peak weight, the holding weight drops dramatically (often to 20–15% of the peak), letting you hold at full draw more comfortably while aiming.
- Cables: Steel or synthetic cords that connect the cams and limbs. The cables work with the cams to create the let-off effect.
- Cable Guard/Cable Slide: A rod or roller system that routes the cables away from the arrow’s path so the fletchings do not hit them during the shot.
- Bowstring: The string that the archer pulls to draw the bow. On a compound bow, the string wraps around both cams.
- Nocking Point: The marked location on the string where the arrow clips on, just like on a recurve.
- Arrow Rest: A device on the riser that supports the arrow. Compound bows often use drop-away rests or whisker biscuit rests that fully contain the arrow.
- Grip: The handle section of the riser. As with a recurve, a relaxed, open grip is essential.
- Sight: Many compound archers use a pin sight — a bracket with one or more aiming pins set for specific distances. (Note: a sight is optional for merit badge work, depending on what your instructor provides.)
- Stabilizer: A weighted rod that extends from the front of the riser to reduce vibration and balance the bow during the shot.
Req 5b — Care and Storage
Care
- Leave the compound bow strung. Unlike a recurve or longbow, a compound bow is designed to stay strung at all times. The limbs and cams are engineered for constant tension. Do not attempt to unstring a compound bow yourself.
- Inspect the string and cables regularly for fraying, worn serving, or separated strands.
- Wax the bowstring with bowstring wax to keep it in good condition.
- Check the cams and axles for wear, alignment, and smooth rotation.
- Inspect the limbs for cracks or delamination.
- Never dry fire the bow. Dry firing a compound bow is even more dangerous than dry firing a recurve because of the higher forces involved.
- Check all bolts and screws periodically — the vibration from shooting can loosen them over time.
Storage
- Store in a hard-sided or padded bow case to protect the cams, cables, and accessories.
- Keep in a cool, dry place away from direct sunlight and extreme temperatures.
- Store vertically or horizontally — either is fine for a compound bow, as long as nothing is pressing against the cams or cables.
- Do not hang by the string or cables — use the riser or a proper bow hook.
Req 5c — The 11 Steps of Shooting
The 11 Steps of Shooting are the same sequence used for both recurve and compound bows. The core principles are identical, but a few steps have compound-specific details:
- Stance — Same as recurve: feet shoulder-width apart, body perpendicular to the target.
- Nock — Place the arrow on the rest and clip the nock onto the string at the nocking point.
- Set Draw Hand — If using a finger release, same as recurve. If using a mechanical release, clip the release aid onto the string loop (D-loop) or directly onto the string.
- Set Bow Hand — Same open, relaxed grip in the web of the hand.
- Pre-Draw — Raise the bow and begin the draw.
- Draw — Pull through the peak weight using your back muscles. You will feel the let-off engage as you pass the “wall” — the point where the cams roll over and the weight drops.
- Anchor — Bring the string to your anchor point. With a release aid, this is often the corner of your jaw or below your ear. With fingers, same as recurve.
- Aim — Align your sight pin with the target. The reduced holding weight at full draw gives you more time to aim steadily — this is one of the compound bow’s biggest advantages.
- Release — If using a release aid, squeeze the trigger smoothly with steady back tension. If using fingers, relax and let the string slide off.
- Follow-Through — Hold your position. Keep your bow arm up and draw hand in place until the arrow hits.
- Feedback — Evaluate the shot. Was the release clean? Did the pin stay on target?
Req 5d — String and Cable Replacement
Unlike a recurve or longbow, you cannot change the string on a compound bow by hand. Here is why:
- A bow press is required. To remove or install a string on a compound bow, the limbs must be compressed using a specialized device called a bow press. This safely releases the tension on the old string so it can be removed and the new one installed.
- The cam timing must be set. When new strings or cables are installed, the cams must be synchronized — if one cam rotates faster than the other, the arrow will not fly straight. An archery shop technician uses precise measurements and adjustment tools to time the cams.
- Incorrect installation is dangerous. If a string is installed wrong or at the wrong length, the bow can derail (the string slips off a cam), which can destroy the bow and injure the archer.
- Draw weight and draw length may need adjustment. New strings can change the draw weight and draw length. A pro shop technician will verify and adjust these settings after the replacement.
Req 5e — Marking the Nocking Point
Setting the nocking point on a compound bow follows the same principle as on a recurve — the arrow must leave the string at a consistent angle every time.
Many compound bows use a D-loop instead of a traditional nocking point. A D-loop is a small loop of cord tied onto the bowstring above and below the arrow nock position. The release aid clips onto the D-loop rather than the string itself, which protects the serving and provides a clean, consistent release.
Whether you use a crimp-on nock set, dental floss, or a D-loop, the process is the same:
- Attach a bow square to the string to find the correct height relative to the arrow rest.
- Position the nocking point so the arrow sits slightly above perpendicular (typically 1/8 to 1/4 inch).
- Secure the marker in place.
Your instructor will help you determine whether a traditional nock set or a D-loop is appropriate for your bow setup.
Req 5f — Shooting a Scored Round
For the final part of Option B, you shoot a scored round with a minimum score. Choose one of these paths:
Path 1: Shoot a Scored Round (Choose ONE)
Using a compound bow and arrows with a finger release, shoot a single round of one of the following and achieve the minimum score:
| Round | Minimum Score |
|---|---|
| NFAA field round (14 targets) | 70 points |
| Scouting America field round (14 targets) | 90 points |
| World Archery/USA Archery indoor round | 90 points |
| NFAA indoor round | 60 points |
Note that the minimum scores for compound bow are higher than for recurve, reflecting the compound bow’s mechanical advantages.
Path 2: Shoot at a Five-Color Target
Shoot at an 80-centimeter (32-inch) five-color target using the 10 scoring regions and make a minimum score of 160 points, accomplished as follows:
- 15 arrows in five-arrow ends at 10 yards
- 15 arrows in five-arrow ends at 15 yards
This tests your ability to maintain accuracy as the distance increases.
Archery 360 — Getting Started with Compound Bows Beginner-friendly resources for compound bow archers from the Archery Trade Association, including how to choose your first bow.