Req 5 — Recurve Bow or Longbow
Req 5a — Parts of the Recurve or Longbow
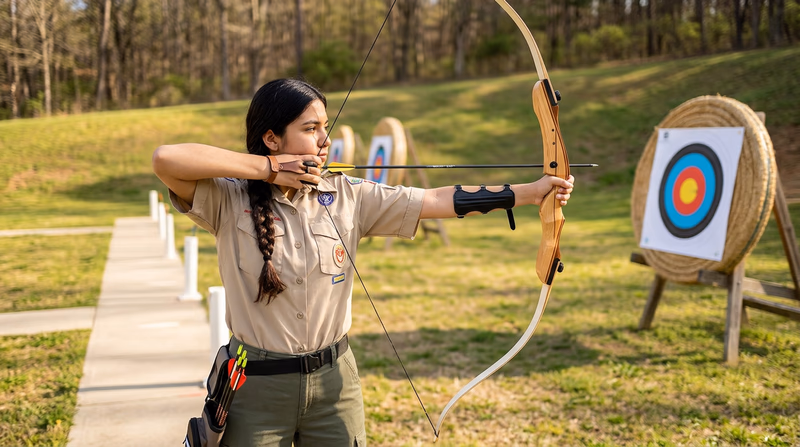
A recurve bow has these main parts:
- Riser: The center section of the bow where you grip it. The riser is usually made of wood, aluminum, or carbon and contains the grip, the arrow rest, and the sight window (a cutout section above the grip where the arrow passes).
- Upper Limb: The top limb of the bow, extending upward from the riser. The limbs store and release the energy that propels the arrow.
- Lower Limb: The bottom limb, extending downward from the riser.
- Limb Tips: The curved ends of each limb where the bowstring attaches. On a recurve bow, the tips curve away from the archer — this is what gives the “recurve” its name.
- Bowstring: The cord that connects the two limb tips. It is pulled back by the archer and releases the arrow when let go.
- Nocking Point: A marked spot on the bowstring where the arrow’s nock clips on. This ensures consistent arrow placement.
- Arrow Rest: A small shelf or device on the riser where the arrow sits before and during the draw.
- Grip: The part of the riser where your bow hand holds the bow. Proper grip is critical — you should use a relaxed, open hand to avoid torquing the bow.
A longbow is simpler. It typically has a one-piece design with a grip, upper limb, lower limb, string nocks (grooves cut into the limb tips for the string), and a bowstring. Most longbows do not have a separate arrow rest — the arrow sits on the shelf formed by the grip.
Req 5b — Care and Storage
Care
- Unstring the bow when not in use. Leaving a recurve or longbow strung for extended periods puts constant stress on the limbs and can cause them to lose their shape and power (this is called “following the string”).
- Inspect limbs regularly for cracks, splinters, delamination (layers separating), or twisting.
- Inspect the bowstring for fraying, broken strands, or worn serving (the wrapped thread around the center of the string where you nock the arrow).
- Wax the bowstring regularly with bowstring wax. This keeps the strands together, reduces friction, and extends the string’s life.
- Never dry fire the bow (release the string without an arrow). Dry firing sends all the stored energy back into the limbs instead of into an arrow, which can crack or shatter the limbs.
- Keep the bow dry. If it gets wet, wipe it down and let it air dry before storing.
Storage
- Store unstrung in a cool, dry place.
- Hang the bow horizontally on pegs or store it in a padded bow case. Do not lean it in a corner — this can cause warping.
- Avoid extreme temperatures. Never leave a bow in a hot car or in direct sunlight for extended periods.
- Wooden bows need extra care — wood can crack in very dry environments and warp in humid ones.
Req 5c — The 11 Steps of Shooting
USA Archery’s 11 Steps of Shooting break down the entire shot process into a repeatable sequence. Consistency is the key to accuracy — by following the same steps in the same order every time, you build muscle memory that leads to tight groups on the target.
The 11 Steps
Stance: Stand with your feet shoulder-width apart, straddling the shooting line or with your toes just behind it. Your body should be perpendicular to the target, with your non-dominant shoulder pointing at the target.
Nock: Place the arrow on the arrow rest and clip the nock onto the bowstring at the nocking point. Make sure the index fletching faces away from the bow.
Set Draw Hand: Place your drawing fingers on the string — index finger above the arrow, middle and ring fingers below. This is called a “split-finger” or “Mediterranean” grip.
Set Bow Hand: Place the bow grip into the web between your thumb and index finger. Your fingers should be relaxed and open — do not grip the bow tightly. A tight grip torques the bow and sends arrows off target.
Pre-Draw: Raise the bow toward the target with your bow arm while beginning to pull back slightly with your draw hand. Keep both shoulders down and relaxed.
Draw: Pull the bowstring back smoothly using your back muscles (not just your arm) until your draw hand reaches your anchor point.
Anchor: Your draw hand reaches a consistent position on your face — typically with the index finger touching the corner of your mouth or just below your jawbone. This is your anchor point, and it must be the same every single time.
Aim: With the bow at full draw and your anchor set, focus on the target and align your sight (or the tip of the arrow if shooting barebow) with where you want the arrow to hit.
Release: Relax your draw fingers smoothly and let the string slide off. Do not grab, pluck, or jerk the string. A clean release comes from simply relaxing.
Follow-Through: After the release, keep your bow arm up and your draw hand near your face. Do not drop the bow or pull your head away. Hold this position until the arrow hits the target.
Feedback: After the arrow lands, think about the shot. Did everything feel right? Where did the arrow hit? What would you adjust for the next shot? This mental review builds awareness and improvement.
Req 5d — Stringing the Bow
There are two common methods for stringing a recurve or longbow:
The Bow Stringer (Recommended Method)
A bow stringer is a cord with a pocket on each end. It is the safest and most reliable way to string a bow, and USA Archery recommends it for all archers.
- Slide the top loop of the bowstring onto the upper limb tip and let it rest partway down the limb.
- Seat the bottom loop in the lower limb’s string groove.
- Place the stringer’s pockets or saddles on the limb tips.
- Step on the stringer cord and lift the bow by the riser. This bends the limbs safely and evenly.
- Slide the top string loop into the upper limb tip’s string groove while the limbs are flexed.
- Carefully release the tension by lowering the bow. Check that both string loops are seated securely.
The Step-Through Method (Less Recommended)
Some archers use a step-through method where they step between the bow and the string, bracing the lower limb against their ankle and bending the upper limb with their hand to seat the string. While this works, it puts uneven stress on the limbs and carries a higher risk of the bow slipping and causing injury. Most instructors now teach the bow stringer method exclusively.
Req 5e — Marking the Nocking Point
The nocking point is the exact spot on the bowstring where the arrow’s nock clips on. Setting it precisely ensures that the arrow leaves the bow at a consistent angle every time.
How to Set a Nocking Point
- Attach a bow square (also called a T-square) to the bowstring. The bow square has a clip that attaches to the string and a ruler that extends to the arrow rest.
- Measure the position. The nocking point is typically set so that the arrow, when nocked, sits about 1/8 to 1/4 inch above a line perpendicular to the string at the arrow rest. Your instructor will help you determine the exact position.
- Mark the spot using one of these methods:
- Crimp-on nock set: A small brass ring that crimps onto the string above the arrow nock position. This is the most common and durable method.
- Dental floss or thread: Wrap several layers of dental floss or nylon thread around the string at the correct position and secure with a drop of glue. This is lighter than a crimp-on.
- Tape or other marker: Some archers use a small piece of tape or a tied-on indicator as a temporary nocking point during practice.
Req 5f — Shooting a Scored Round
For the final part of this option, you must shoot a scored round and meet a minimum score. You choose one of these paths:
Path 1: Shoot a Scored Round (Choose ONE)
Using a recurve bow or longbow with a finger release, shoot a single round of one of the following and achieve the minimum score:
| Round | Minimum Score |
|---|---|
| NFAA field round (14 targets) | 60 points |
| Scouting America field round (14 targets) | 80 points |
| World Archery/USA Archery indoor round | 80 points |
| NFAA indoor round | 50 points |
Indoor rounds may be shot outdoors if that is more convenient.
Path 2: Shoot at a Five-Color Target
Shoot 30 arrows in five-arrow ends at an 80-centimeter (32-inch) five-color target at 10 yards, using the 10 scoring regions, and make a score of 150 points.
That is an average of 5 points per arrow — which means consistently hitting at least the blue ring or better.
USA Archery — Find a Club Search for USA Archery-affiliated clubs near you where you can practice and shoot scored rounds under qualified supervision.