Astronomy Merit Badge — Complete Digital Resource Guide
https://merit-badge.university/merit-badges/astronomy/guide/
Introduction & Overview
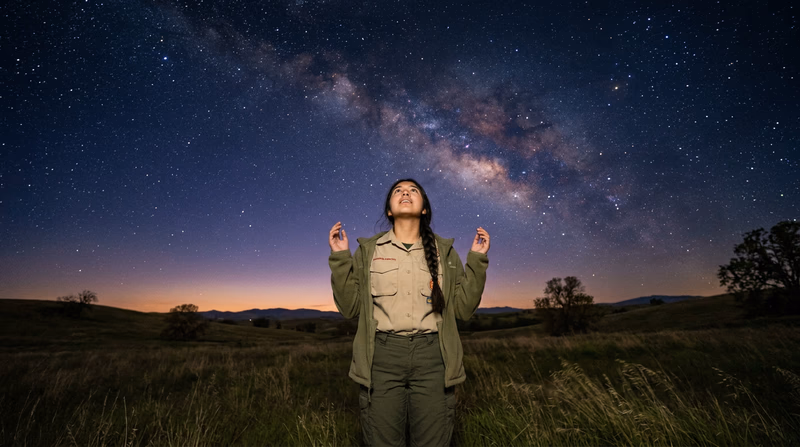
Look up on a clear night and you will see something that has fascinated humans for thousands of years — the universe itself. Stars, planets, the Moon, and distant galaxies are all on display, and the Astronomy merit badge is your guide to understanding what you are seeing. Whether you are camping under dark skies or stepping into your backyard, astronomy turns you into an explorer of the biggest frontier there is.
Astronomy is more than just stargazing. It is the science of everything beyond Earth’s atmosphere — from the dust on the Moon to the birth and death of stars billions of light-years away. This merit badge will teach you how to observe safely, use telescopes and binoculars, identify constellations and planets, and understand the forces that shape our solar system and beyond.
Then and Now
Then — Reading the Sky to Survive
Long before clocks, calendars, or GPS, humans relied on the sky to navigate and tell time. Ancient Babylonians tracked the movements of planets and recorded them on clay tablets over 3,000 years ago. Egyptian farmers watched for the star Sirius to rise before dawn because it signaled the annual flooding of the Nile — their entire agricultural season depended on it. Polynesian sailors crossed thousands of miles of open ocean using nothing but the positions of stars, the direction of waves, and the flight paths of birds.
- Purpose: Navigation, agriculture, timekeeping, religious ceremonies
- Mindset: The sky was a practical tool — read it correctly, and you could plant crops, find your way home, or predict the seasons
Now — Exploring the Universe with Technology
Today, astronomy is a high-tech science that pushes the boundaries of human knowledge. The James Webb Space Telescope orbits nearly a million miles from Earth and captures infrared images of galaxies that formed shortly after the Big Bang. Amateur astronomers contribute real scientific data by tracking asteroids, discovering comets, and monitoring variable stars from their own backyards. You can even control professional telescopes remotely through the internet.
- Purpose: Scientific discovery, exploration, education, personal wonder
- Mindset: The sky is a laboratory — every observation adds to our understanding of the universe, and anyone with curiosity can participate
Get Ready! The universe is waiting for you. All you need to begin is a clear night, your own eyes, and the willingness to look up. Let’s explore what is out there.
Kinds of Astronomy
Astronomy is a huge field with many branches. Here is a look at the different ways people study and enjoy the night sky.
Observational Astronomy
This is the heart of what you will do for this merit badge — looking at the sky and recording what you see. Observational astronomers use their eyes, binoculars, and telescopes to study stars, planets, the Moon, and deep-sky objects like nebulae and galaxies. You do not need expensive equipment to get started. Your own eyes are powerful instruments that can identify constellations, track planets, and watch meteor showers.
Solar Astronomy
Solar astronomy focuses on the closest star to Earth — our Sun. Solar astronomers study sunspots, solar flares, and the Sun’s corona (the glowing outer atmosphere visible during a total eclipse). You will learn about the Sun in Requirement 7 of this badge.
Planetary Astronomy
Planetary astronomers study the planets, moons, asteroids, and comets in our solar system. With a small telescope, you can see the rings of Saturn, the cloud bands of Jupiter, and the phases of Venus. You will explore the planets in Requirement 5.
Stellar Astronomy
Stellar astronomers study the stars themselves — how they are born in clouds of gas and dust, how they live for millions or billions of years, and how they die in spectacular explosions called supernovae. In Requirement 7, you will learn about star colors and what they reveal about a star’s temperature and age.
Deep-Sky Astronomy
Deep-sky astronomy goes beyond our solar system to study objects like star clusters, nebulae (clouds of gas where stars are born), and distant galaxies. The famous Andromeda Galaxy — the nearest large galaxy to our own Milky Way — is actually visible to the naked eye on a dark night. Through a telescope, deep-sky objects reveal incredible detail and beauty.
Astrophotography
Astrophotography combines astronomy with photography to capture images of celestial objects. Modern cameras and smartphone adapters make it easier than ever to photograph the Moon, planets, star trails, and even faint nebulae. Some amateur astrophotographers produce images that rival those from professional observatories. You will have the chance to try astrophotography in Requirement 8.
Now that you have a sense of how vast and exciting astronomy can be, it is time to start your journey through the requirements.
Req 1a — Stargazing Hazards
Astronomy takes you outdoors at night — sometimes to remote locations far from streetlights and help. That combination of darkness, unfamiliar terrain, and cold temperatures creates hazards you need to understand before you head out. The good news? Nearly every stargazing hazard is preventable with a little planning.
Planning Your Observation Session
The best way to anticipate hazards is to plan ahead. Before you set up your telescope or lay out your blanket, answer a few basic questions:
- Where will you observe? Is the site flat and clear of tripping hazards? Is it far from roads and traffic?
- What is the weather forecast? Will temperatures drop significantly after sunset? Is rain, fog, or lightning possible?
- Who is going with you? Never observe alone — always use the Buddy System.
- How long will you stay? Longer sessions mean colder temperatures and more fatigue.
- Who knows your plan? Tell a parent or adult leader where you will be and when you expect to return.
Common Stargazing Hazards
Here are the hazards you are most likely to encounter during astronomy activities:
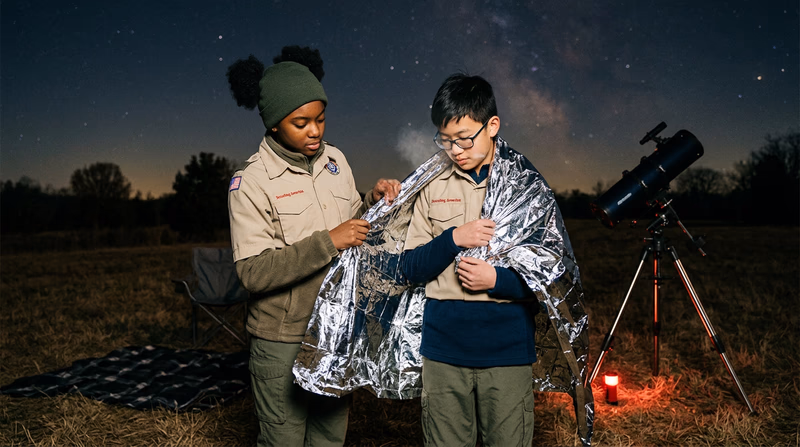
Trips and Falls in the Dark — This is the number one risk for nighttime observers. Your eyes need 20–30 minutes to fully adjust to the dark (called “dark adaptation”), and during that time — and even after — it is easy to trip over uneven ground, tent stakes, equipment cases, or tree roots.
Cold Exposure — Even on a summer night, temperatures can drop sharply after sunset. When you are standing or sitting still for hours, your body loses heat fast. Hypothermia and frostbite are real risks, especially in fall and winter.
Wildlife Encounters — Observing in fields, parks, or wilderness areas means sharing space with animals. Insects like mosquitoes and ticks are the most common concern, but depending on your location you may encounter skunks, snakes, or larger animals.
Eye Damage — If you observe during twilight or at sunrise, you risk looking at the Sun without realizing it. And if you ever observe a solar eclipse, you must use proper solar filters. Unfiltered sunlight through binoculars or a telescope can cause instant, permanent blindness.
Vehicle Hazards — If you set up near a road or parking area, passing headlights can ruin your night vision and vehicles may not see you in the dark.
Preventing and Mitigating Hazards
Stargazing Safety Checklist
Review before every observation session- Scout your site in daylight: Walk the area before dark to spot uneven ground, holes, or obstacles.
- Use red-light flashlights: Red light preserves your night vision while still letting you see the ground. White light destroys dark adaptation.
- Dress in layers: Bring more warm clothing than you think you need. You can always take a layer off.
- Apply insect repellent: Mosquitoes and ticks are active at dusk and throughout the night.
- Bring water and snacks: Dehydration and low blood sugar can make you clumsy and unfocused.
- Keep your gear organized: Lay out telescope cases, tripods, and bags in one area so nobody trips over them.
- Stay away from roads: Set up well away from traffic and wear reflective material if you must be near a road.
- Check weather before you go: Lightning, strong winds, and sudden storms can make outdoor observing dangerous.
Now that you know how to anticipate and prevent hazards, let’s learn what to do if someone gets hurt during an observation session.
Req 1b — First Aid for Observers
Knowing first aid is an essential part of being prepared for any outdoor activity, and stargazing is no exception. Because observation sessions often last several hours in darkness, injuries can sneak up on you. Here is what you need to know about treating the most common problems.
Heat Reactions
Even though most stargazing happens at night, you may set up during warm evenings or attend daytime solar observation events. Heat-related illnesses include:
Heat Exhaustion — Caused by losing too much water and salt through sweating. Signs include heavy sweating, cool and clammy skin, nausea, dizziness, and a fast but weak pulse.
- Move the person to a cool, shaded area.
- Have them lie down and elevate their feet slightly.
- Loosen tight clothing and apply cool, wet cloths to the skin.
- Give small sips of water if the person is conscious and not vomiting.
- If symptoms do not improve within 15 minutes, call for emergency help.
Heat Stroke — A life-threatening emergency. The body’s cooling system has failed. Signs include hot, red, dry skin (no sweating), a high body temperature (above 103°F), confusion, and loss of consciousness.
- Call 911 immediately.
- Move the person to the coolest area available.
- Cool them rapidly with any method available — wet sheets, cold water, fanning.
- Do NOT give them anything to drink.
Cold Reactions
Cold is the more common threat for astronomers. Standing or sitting still on a cold night causes your body to lose heat steadily.
Hypothermia — Occurs when your body temperature drops below 95°F. Early signs include uncontrollable shivering, slurred speech, clumsiness, and confusion. As it progresses, shivering may stop and the person may become drowsy.
- Move the person to a warm shelter or out of the wind.
- Remove any wet clothing and replace it with dry layers.
- Wrap them in blankets, sleeping bags, or emergency blankets.
- Give warm (not hot) drinks if they are conscious and alert.
- If symptoms are severe, call for emergency help.
Frostbite — Occurs when skin and tissue freeze, most commonly on fingers, toes, ears, and the nose. Signs include numbness, white or grayish-yellow skin, and skin that feels unusually firm or waxy.
- Move to a warm area and do not rub the affected skin.
- Warm the area gently using body heat (tuck fingers into your armpits) or warm water (100–104°F).
- Do not use direct heat like a campfire or heating pad.
- Seek medical attention for severe cases.
Dehydration
Dehydration happens when your body loses more fluids than it takes in. You may not feel thirsty on a cool night, but your body is still losing water through breathing and perspiration.
Signs of dehydration include thirst, dry mouth, dark-colored urine, headache, dizziness, and fatigue.
- Give the person small, frequent sips of water.
- Rest in a comfortable position.
- Avoid caffeine, which can increase fluid loss.
- If the person cannot keep fluids down or shows signs of severe dehydration (rapid heartbeat, confusion, fainting), seek medical help.
Bites and Stings
Outdoor observation sites are home to insects and other creatures that may bite or sting.
Mosquito and Tick Bites — Apply insect repellent before your session. After returning indoors, do a thorough tick check — pay special attention to your hairline, behind your ears, and around your waistband. If you find an attached tick, remove it with fine-tipped tweezers by grasping it close to the skin and pulling straight out with steady pressure.
Bee, Wasp, and Hornet Stings — If stung, scrape the stinger out with a flat edge (like a credit card) rather than squeezing it. Wash the area with soap and water. Apply a cold pack to reduce swelling.
Spider and Snake Bites — Stay calm. Note what the creature looked like if possible. Clean the wound and seek medical attention, especially if you suspect a venomous species.
Eye Damage
Your eyes are your most important astronomical instruments, and protecting them is critical.
Solar Eye Injury (Solar Retinopathy) — Looking at the Sun, even briefly, through binoculars or a telescope without a proper solar filter can burn the retina and cause permanent vision loss. Symptoms may not appear immediately but can include blurry vision, a dark spot in the center of your vision, and sensitivity to light.
- If someone complains of vision changes after looking at the Sun, seek medical attention immediately.
- There is no first aid you can perform for retinal burns — a doctor must evaluate the damage.
- Prevention is the only real treatment. Always use certified solar filters (ISO 12312-2 for eclipse glasses, or dedicated telescope solar filters).
Flash Blindness — A sudden bright light (like a car headlight or camera flash) can temporarily blind dark-adapted eyes. This is not permanent, but it can be disorienting and dangerous if you are near a cliff edge or uneven terrain.
- Close your eyes and wait. Vision usually returns within a few minutes.
- Sit down to avoid falling while your vision recovers.
Ready to learn what to wear for your nighttime observations? Let’s talk about clothing and precautions.
Req 1c — Clothing & Night Precautions
When you are stargazing, you are not hiking or running — you are standing or sitting still for long periods. That makes a huge difference in how cold you get. A temperature that feels comfortable while you are walking can feel freezing when you have been motionless for an hour. Dressing properly and taking smart precautions will keep you comfortable so you can focus on the sky instead of your shivering.
The Layering System for Astronomers
The layering system used by hikers and campers works perfectly for stargazing, but with one key difference: you need more insulation than you think because you are not generating body heat through movement.
Base Layer (Next to Skin) — Wear moisture-wicking fabric like merino wool or synthetic polyester. This layer pulls sweat away from your skin so you do not get chilled. Avoid cotton — once it gets damp, it stays damp and makes you colder.
Mid Layer (Insulation) — A fleece jacket, down vest, or insulated sweater traps your body heat. On very cold nights, consider wearing two mid layers. A puffy down jacket is excellent for standing still at the eyepiece.
Outer Layer (Shell) — A windproof and water-resistant jacket blocks wind chill and keeps moisture out. Even if rain is not in the forecast, dew can soak your outer clothing during long sessions.
Cold-Weather Stargazing Gear
What to wear and bring for nighttime observations- Warm hat or beanie: You lose significant heat through your head. A hat with ear coverage is best.
- Insulated gloves or mittens: Fingerless gloves or “flip-top” mittens let you adjust telescope controls without freezing.
- Warm socks (wool or synthetic): Bring an extra pair in case your feet get damp. Double up on very cold nights.
- Insulated boots: Standing on cold ground pulls heat from your feet. Boots with thick soles insulate you from the ground.
- Neck gaiter or scarf: Seals the gap between your jacket and hat where heat escapes.
- Hand and toe warmers: Chemical warmers are inexpensive and can make the difference between comfort and misery.
Nighttime Precautions Beyond Clothing
Staying warm is important, but there are several other precautions that will make your nighttime observation sessions safer and more enjoyable.
Protect Your Night Vision — Your eyes need 20–30 minutes to fully adapt to the dark. Once adapted, you can see far more stars and detail. Protect this adaptation by using only red-light flashlights and avoiding phone screens (or use a red-filter app). If you must use a white light, close one eye to preserve at least partial adaptation.
Bring a Ground Cover or Chair — Sitting or lying directly on cold or damp ground pulls heat from your body fast. A foam pad, folding camp chair, or even a piece of cardboard under your feet provides insulation from the ground.
Stay Fueled — Warm (non-caffeinated) drinks in a thermos and high-energy snacks help your body produce heat. Trail mix, granola bars, and hot cocoa are stargazing staples.
Watch Your Footing — Dew makes grass and rocks slippery after dark. Walk slowly and deliberately. Keep pathways to and from your observing area clear of equipment and cables.
Warm-Weather Nighttime Precautions
Not all stargazing happens in the cold. Summer nights bring their own challenges:
- Insect protection: Apply repellent and consider wearing long sleeves and pants to reduce exposed skin.
- Hydration: Bring plenty of water even on warm nights. Dehydration creeps up when you are focused on the sky.
- Sudden storms: Summer weather can change quickly. Watch for building clouds and distant lightning, and have a plan to pack up and move to shelter.
Now that you know how to dress and prepare for nighttime observing, let’s tackle the most important safety topic in astronomy — how to safely observe the Sun.
Req 1d — Safe Solar Observation
The Sun is the most spectacular object you can observe, but it is also the most dangerous. The Sun emits intense visible light, ultraviolet radiation, and infrared radiation — all of which can damage your eyes in a fraction of a second if you look at it without proper protection. This is the one area of astronomy where there is absolutely no room for shortcuts or mistakes.
The Golden Rule of Solar Observation
Never look at the Sun with your naked eyes, binoculars, or a telescope without a certified solar filter. This rule has no exceptions. Even during a partial solar eclipse, the remaining sliver of Sun is bright enough to cause permanent retinal damage. Regular sunglasses, stacked sunglasses, smoked glass, exposed film, and CDs are NOT safe solar filters — they let through invisible infrared and ultraviolet radiation that burns your retina.
Safe Methods for Solar Observation
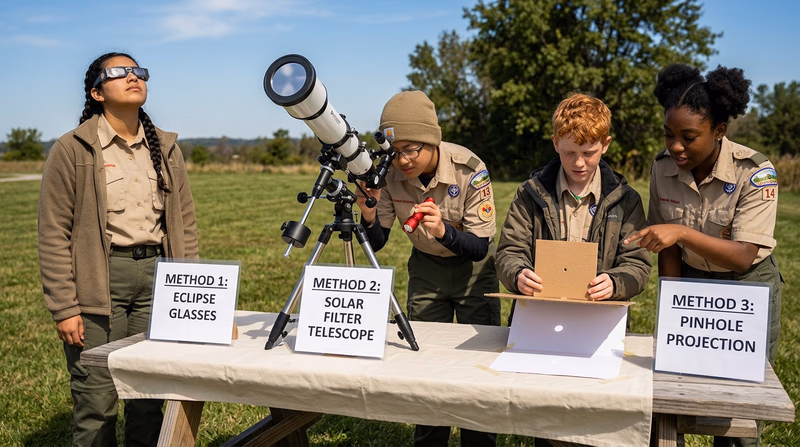
There are several proven, safe ways to observe the Sun. Each method has its advantages:
Eclipse Glasses (ISO 12312-2 Certified) — These special-purpose glasses block 99.997% of visible light and all harmful ultraviolet and infrared radiation. They allow you to look directly at the Sun and see sunspots, eclipses, and planetary transits. Make sure your glasses meet the ISO 12312-2 international safety standard — the certification should be printed on the glasses.
- Inspect glasses before each use. If they are scratched, wrinkled, or more than three years old, discard them.
- Put the glasses on before looking up, and look away before removing them.
- Do NOT use eclipse glasses with binoculars or a telescope — the concentrated light will melt through them.
Solar Telescope Filters — These are special filters that fit over the front of a telescope’s aperture (the big end). They reduce the Sun’s light before it enters the telescope, making it safe to view through the eyepiece. Only use filters specifically designed for your telescope — generic filters can crack from heat and fail without warning.
Solar Projection — This method does not require looking at the Sun at all. Point a telescope or one side of a pair of binoculars at the Sun (without looking through it!) and project the image onto a white card or screen held a foot or so behind the eyepiece. You will see a clear image of the Sun’s disk, including sunspots. This is the safest method and works great for groups because everyone can see the projected image at once.
Pinhole Projection — The simplest method of all. Poke a small hole in a piece of cardboard and hold it so sunlight passes through the hole onto a second piece of white paper. The hole acts like a tiny lens and projects a small image of the Sun. During a partial eclipse, you will see the Moon’s shadow taking a bite out of the Sun’s disk.
Observing Solar Eclipses
A solar eclipse happens when the Moon passes directly between Earth and the Sun, blocking some or all of the Sun’s light. There are three types:
Partial Eclipse — The Moon covers part of the Sun. You MUST use eclipse glasses or another safe solar filter for the entire duration. The exposed portion of the Sun is still dangerously bright.
Annular Eclipse — The Moon is too far from Earth to completely cover the Sun, leaving a bright ring (“annulus”) of sunlight visible. You must use eclipse glasses for the entire event — the ring is still the full intensity of the Sun.
Total Eclipse — The Moon completely covers the Sun’s disk. During the brief period of totality — and ONLY during totality — it is safe to look at the Sun with your naked eyes. You will see the Sun’s corona, a ghostly white halo of superheated gas that is normally invisible. The moment the Sun begins to reappear (called “third contact”), you must immediately put your eclipse glasses back on.
Objects Near the Sun
Planets like Mercury and Venus sometimes appear very close to the Sun in the sky, especially around dawn and dusk. When searching for these objects:
- Never sweep your binoculars or telescope toward the Sun while searching. The Sun could enter your field of view without warning.
- Wait until the Sun is fully below the horizon before scanning that region of the sky.
- Use a planetarium app to know exactly where Mercury or Venus will appear relative to the Sun.
You now have a solid understanding of all the safety fundamentals for astronomy. Next, let’s explore a different kind of threat to stargazing — light pollution.
Req 2 — Light Pollution
Have you ever looked up at the night sky from a city and wondered where all the stars went? On a truly dark night away from civilization, you can see thousands of stars, the Milky Way stretching across the sky, and faint fuzzy patches that are actually distant galaxies. But from most towns and cities, you might only see a few dozen bright stars. The culprit? Light pollution.
What Is Light Pollution?
Light pollution is excessive, misdirected, or unnecessary artificial light that brightens the night sky and makes it harder to see celestial objects. It comes from streetlights, parking lot lights, building lights, signs, and even the glow from your neighbor’s porch light. When all of this light scatters off particles and moisture in the atmosphere, it creates a dome of brightness over populated areas called skyglow.
There are four main types of light pollution:
- Skyglow — The orange or whitish dome of light visible over cities, sometimes from dozens of miles away. This is the biggest problem for astronomers.
- Glare — Excessive brightness from a light source that causes visual discomfort. An unshielded streetlight blasting light in every direction is a common example.
- Light trespass — Light falling where it is not needed or wanted, like a neighbor’s floodlight shining into your yard or bedroom.
- Clutter — Excessive groupings of lights, like a strip mall with dozens of uncoordinated bright signs, that create confusing and unnecessary brightness.
The Bortle Scale
Astronomers use the Bortle Dark-Sky Scale to rate how dark a location’s sky is, from 1 (the darkest skies on Earth) to 9 (the brightest city centers).
| Class | Description | What You Can See |
|---|---|---|
| 1 | Excellent dark site | The Milky Way casts visible shadows; zodiacal light is brilliant |
| 2 | Typical dark site | The Milky Way is highly structured and detailed |
| 3 | Rural sky | Some light pollution visible on the horizon |
| 4 | Rural/suburban transition | The Milky Way is visible but lacks detail |
| 5 | Suburban sky | The Milky Way is faint and washed out |
| 6 | Bright suburban sky | The Milky Way is only visible near the zenith (straight up) |
| 7 | Suburban/urban transition | The sky has a grayish-white background; Milky Way invisible |
| 8 | City sky | Only the Moon, planets, and a few bright stars visible |
| 9 | Inner-city sky | Only the Moon and planets visible |
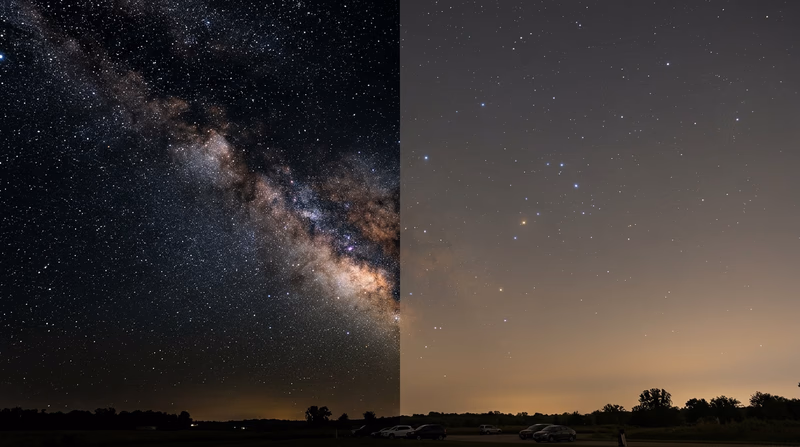
How Light Pollution Affects Astronomy
Light pollution does not just hide stars — it makes serious astronomical work much harder:
- Reduces contrast. Faint objects like nebulae, galaxies, and dim stars are washed out by the bright background sky.
- Limits deep-sky observing. Many of the most interesting objects (the Andromeda Galaxy, the Orion Nebula, star clusters) become invisible from light-polluted areas.
- Affects professional observatories. Several major observatories that were built in remote locations decades ago now struggle with encroaching city lights. Some have had to relocate.
- Impacts scientific research. Astronomers studying faint objects need the darkest possible skies. Light pollution reduces the number of usable observing nights.
How Air Pollution Affects Astronomy
Air pollution — smoke, smog, dust, and industrial haze — also degrades the quality of what you can see in the sky.
- Scattering. Particles in the air scatter starlight, making stars appear dimmer and blurrier. This is the same reason sunsets are often more vivid (and redder) over polluted cities.
- Absorption. Some pollutants absorb certain wavelengths of light, changing the apparent color and brightness of celestial objects.
- Poor “seeing.” Astronomers use the word “seeing” to describe how steady and clear the atmosphere is. Air pollution, along with heat and moisture, creates turbulence that makes stars twinkle and telescope images shimmer. Ironically, twinkling stars may look pretty, but to an astronomer they signal poor observing conditions.
- Haze and reduced transparency. On hazy nights, even bright objects appear dimmed. The atmospheric “transparency” — how clearly you can see through the air — drops significantly with pollution.
What You Can Do About Light Pollution
The good news is that light pollution is the most reversible form of pollution. Unlike chemical spills or air pollution, you can fix it instantly by turning off or shielding a light. Here are ways you can help:
- Use shielded outdoor lights at home. Fully shielded fixtures point light downward where it is needed instead of up into the sky.
- Turn off unnecessary lights at night. If you do not need a light on, turn it off.
- Use warm-colored LEDs. Blue-white LEDs scatter more in the atmosphere and create worse skyglow than warm amber lights.
- Support dark-sky initiatives. The International Dark-Sky Association certifies “Dark Sky Parks” and “Dark Sky Communities” that commit to reducing light pollution.
- Educate others. Many people do not realize light pollution is a problem. Share what you have learned.
Now that you understand how light and air pollution affect the sky, let’s learn about the tools astronomers use to see beyond what the naked eye can detect.
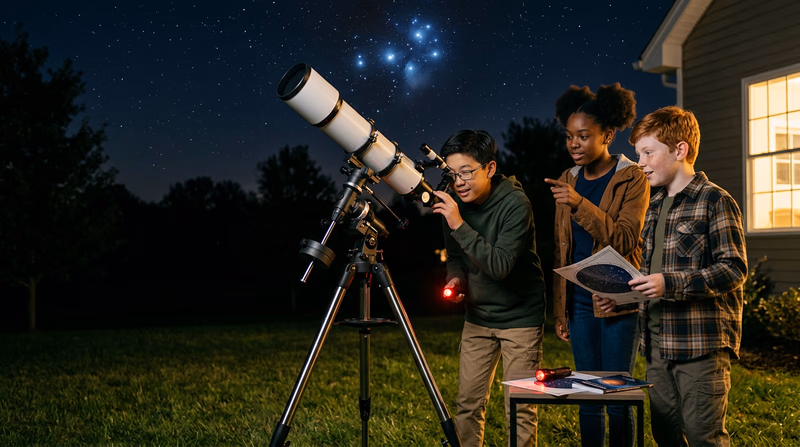
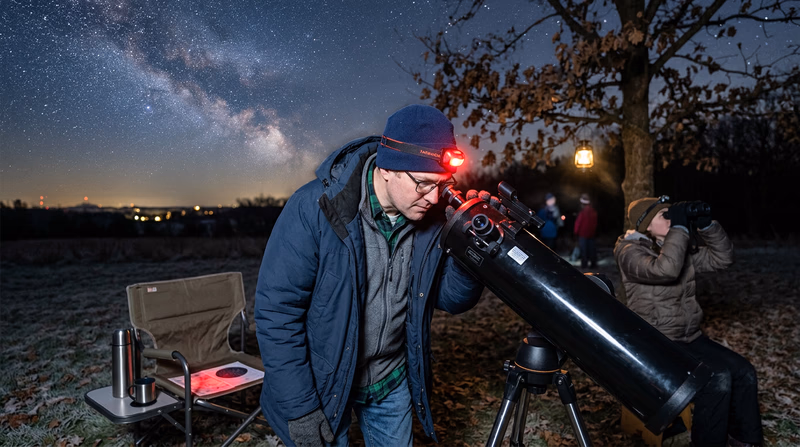
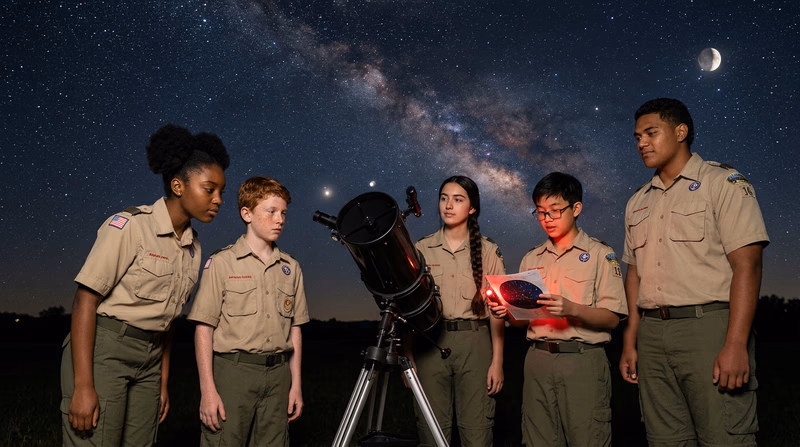
Req 3a — Binoculars & Telescopes
Your eyes are amazing instruments — they can detect individual photons of light in ideal conditions. But even the best human eyes have limits. The pupil of your eye opens to about 7 millimeters in the dark, which means it can only collect a small amount of light. Binoculars and telescopes solve this problem by using much larger lenses or mirrors to gather far more light than your eye alone, revealing objects that are too faint, too small, or too distant to see unaided.
Why These Tools Matter
Astronomical optics do three key things:
Light Gathering — This is the most important function. A telescope with a 6-inch (150mm) mirror collects about 450 times more light than your unaided eye. That means objects that are completely invisible to you become clearly visible through the telescope. The bigger the aperture (the diameter of the main lens or mirror), the more light it gathers and the fainter the objects you can see.
Magnification — Telescopes and binoculars make distant objects appear larger and closer. You can see the rings of Saturn, the cloud bands of Jupiter, and craters on the Moon in stunning detail. However, magnification is actually less important than light gathering — a telescope that gathers lots of light at low magnification shows more than one that magnifies a lot but gathers little light.
Resolution — This is the ability to show fine detail and separate objects that are very close together. With good resolution, you can split a point of light that looks like one star into two separate stars, or see the gap in Saturn’s rings. Larger apertures provide better resolution.
Binoculars: Your First Astronomical Tool
Binoculars are described by two numbers, like 7x50 or 10x50:
- The first number is the magnification (7x means objects appear 7 times closer).
- The second number is the aperture in millimeters (50mm is the diameter of each front lens).
For astronomy, bigger aperture matters more than higher magnification. A pair of 7x50 binoculars is an excellent choice because:
- The 50mm lenses gather plenty of light for seeing star clusters, nebulae, and lunar features.
- The 7x magnification is low enough to hold steady by hand (higher magnification amplifies hand shake).
- They provide a wide field of view, making it easy to find objects and sweep across the Milky Way.
How to use binoculars for astronomy:
- Brace your elbows against your body or lean against a solid surface to steady the image.
- For even steadier views, rest the binoculars on a fence post, car roof, or mount them on a tripod with a binocular adapter.
- Start by aiming at the Moon — it is easy to find and the detail will amaze you.
- Slowly scan along the Milky Way to see how it breaks into millions of individual stars.
Telescopes: Reaching Deeper
Telescopes gather far more light than binoculars and can magnify objects much more. A basic telescope with a 4–8 inch aperture will show you:
- Hundreds of craters and mountain ranges on the Moon
- The rings of Saturn and the gap between them (Cassini Division)
- Jupiter’s cloud bands and its four largest moons
- Star clusters with dozens to hundreds of individual stars
- Nebulae — glowing clouds of gas where stars are born
- Galaxies millions of light-years away
How to use a telescope:
- Set up on level ground. A wobbly telescope is frustrating to use.
- Start with the lowest magnification eyepiece (the one with the highest number, like 25mm). Low magnification gives you a wider field of view, making it easier to find objects.
- Use the finder scope to aim at your target. The finder scope is the small scope mounted on top of the main telescope. Line up the crosshairs on your target, and it should appear in the main eyepiece.
- Focus carefully. Turn the focus knob slowly until the image is sharp. Stars should look like points of light, not fuzzy blobs.
- Increase magnification gradually. Once you have found your target, switch to higher-magnification eyepieces (lower numbers, like 10mm) for a closer view.
- Let the telescope adjust to outdoor temperature. If you bring a telescope from a warm house into cold air, the optics need 15–30 minutes to reach the same temperature as the air. Until then, the image will shimmer and blur.
Next, let’s explore the different types of telescopes and how they work.
Req 3b — Types of Telescopes
Not all telescopes are created equal. Different designs use different methods to collect and focus light, and each type has strengths and trade-offs. Understanding the main types will help you talk knowledgeably about telescopes with your counselor and make smart choices if you ever buy one.
Optical Telescopes
All optical telescopes collect visible light — the same light your eyes can see — and focus it to create a magnified image. There are three main designs:
Refractor Telescope — Uses a large glass lens at the front of a tube to bend (refract) incoming light and focus it at the eyepiece at the back. This is the classic telescope shape that most people picture.
- Strengths: Sharp, high-contrast images. Great for the Moon, planets, and double stars. Low maintenance — the sealed tube keeps dust out.
- Weaknesses: Good large lenses are expensive to make. Larger refractors become very long and heavy. They can suffer from “chromatic aberration” — faint color fringes around bright objects caused by different colors of light bending at slightly different angles.
- Best for: Planetary viewing, lunar observation, and beginners who want a low-maintenance scope.
Reflector Telescope (Newtonian) — Uses a curved mirror at the bottom of an open tube to reflect and focus light. A small secondary mirror near the top of the tube bounces the focused light to an eyepiece on the side.
- Strengths: Mirrors are cheaper to make than lenses at large sizes, so you get more aperture for your money. No chromatic aberration. Excellent for faint deep-sky objects.
- Weaknesses: The open tube lets in dust, requiring occasional mirror cleaning. The mirrors need periodic alignment (called “collimation”). The eyepiece position on the side of the tube can be awkward at some angles.
- Best for: Deep-sky observing (galaxies, nebulae, star clusters) and anyone who wants the most aperture on a budget.
Compound (Catadioptric) Telescope — Combines lenses and mirrors in a compact design. The two most common types are the Schmidt-Cassegrain and Maksutov-Cassegrain. Light enters through a thin corrector lens, bounces off a primary mirror at the back, then off a secondary mirror, and finally out through a hole in the primary mirror to the eyepiece at the back.
- Strengths: Very compact and portable for their aperture. Versatile — good for planets, deep-sky objects, and astrophotography. Often come with computerized “GoTo” mounts that find objects automatically.
- Weaknesses: More expensive than reflectors of the same aperture. The secondary mirror blocks some incoming light. Can take longer to cool down to ambient temperature.
- Best for: Observers who want portability and versatility, and those interested in astrophotography.
What They Have in Common
Despite their differences, all three optical telescope types share these features:
- They all collect and focus visible light to create a magnified image.
- They all use eyepieces that can be swapped to change magnification.
- They all need a sturdy mount to keep the image steady.
- The larger the aperture, the more light they gather and the more detail they reveal.
- They all perform best after adjusting to the outdoor temperature.
Beyond Visible Light
Visible light is only a tiny sliver of the electromagnetic spectrum. The universe emits energy across the entire spectrum — from radio waves to gamma rays. Telescopes designed to detect these invisible forms of light reveal aspects of the cosmos that optical telescopes cannot see at all.
Radio Telescopes — These use large dish antennas (some over 300 feet across) to detect radio waves from space. Radio waves pass through clouds and dust that block visible light, so radio telescopes can “see” into the hearts of galaxies and the dense clouds where stars are born. The famous Very Large Array (VLA) in New Mexico uses 27 dish antennas working together to create incredibly detailed radio images. In 2019, a worldwide network of radio telescopes produced the first-ever image of a black hole’s shadow.
Infrared Telescopes — Infrared light is the “heat radiation” just beyond red in the spectrum. Infrared telescopes detect heat from cool objects like dust clouds, newly forming stars, and distant galaxies whose light has been stretched into the infrared by the expansion of the universe. The James Webb Space Telescope (JWST) is the most powerful infrared telescope ever built, orbiting nearly a million miles from Earth to escape our planet’s own infrared glow.
X-ray and Gamma-Ray Telescopes — These detect the most energetic forms of light, emitted by extreme objects like neutron stars, black holes, and supernova explosions. Earth’s atmosphere blocks X-rays and gamma rays (which is good for us!), so these telescopes must operate in space. NASA’s Chandra X-ray Observatory orbits Earth and captures stunning X-ray images of exploding stars and galaxy clusters.
Ultraviolet Telescopes — UV light comes from very hot objects like young stars and active galaxies. Like X-rays, most UV light is absorbed by Earth’s atmosphere, so UV telescopes are usually space-based. The Hubble Space Telescope can observe in ultraviolet, visible, and near-infrared light, making it one of the most versatile observatories ever launched.
Telescopes: Crash Course Astronomy Crash Course video explaining how different types of telescopes work and what they reveal about the universe. Link: Telescopes: Crash Course Astronomy — https://youtu.be/mYhy7eaazIk Hubble Space Telescope Instruments NASA's guide to the instruments aboard the Hubble Space Telescope. Link: Hubble Space Telescope Instruments — https://science.nasa.gov/mission/hubble/observatory/design/instruments/Now let’s look at the instruments astronomers attach to their telescopes to unlock even more information from starlight.
Req 3c — Telescope Instruments
A telescope by itself is just a light-gathering tool. What makes it truly powerful is the instruments astronomers attach to it. These instruments analyze the light in ways that reveal far more than what you can see with your eye alone — the temperature of a star, the composition of a distant galaxy, or the speed at which an object is moving. Here are some of the most important instruments used in astronomy.
Eyepieces
The eyepiece is the most basic and most common telescope instrument. It magnifies the focused image created by the telescope’s main lens or mirror so your eye can see it in detail. Eyepieces are interchangeable — by swapping one eyepiece for another, you change the magnification of the telescope.
Eyepieces are identified by their focal length in millimeters. A longer focal length (like 25mm) gives lower magnification and a wider field of view — great for finding objects and viewing large areas of sky. A shorter focal length (like 10mm) gives higher magnification for detailed views of planets and the Moon.
Different eyepiece designs also offer different fields of view and eye relief (how far your eye can be from the lens and still see the full image). Common designs include Plössl, wide-angle, and ultra-wide-angle eyepieces, each offering trade-offs between cost, sharpness, and viewing comfort.
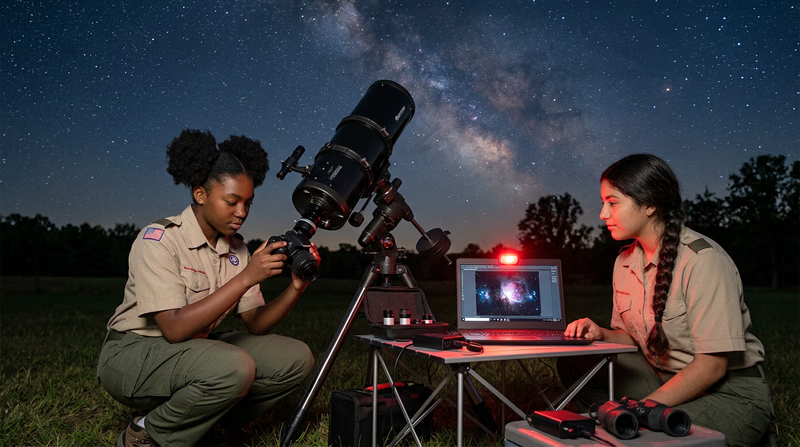
CCD Cameras and Imaging Sensors
A CCD (Charge-Coupled Device) camera replaces the eyepiece and records the light electronically, creating digital images of celestial objects. Modern CCD and CMOS sensors are far more sensitive than the human eye — they can collect light over minutes or even hours, building up images of objects too faint for any eye to see.
CCD cameras are essential for:
- Astrophotography — Capturing detailed images of galaxies, nebulae, and planets.
- Scientific measurement — Precisely measuring the brightness of stars (photometry), which reveals information about variable stars, eclipsing binaries, and exoplanet transits.
- Discovery — Many asteroids, comets, and supernovae are discovered by amateur astronomers using CCD cameras on their backyard telescopes.
Professional observatories use massive CCD arrays with hundreds of millions of pixels. The camera on the Vera C. Rubin Observatory in Chile will have a 3.2-billion-pixel sensor — the largest digital camera ever built.
Spectrographs
A spectrograph (or spectrometer) is one of the most powerful tools in all of astronomy. It splits incoming light into its individual wavelengths — essentially creating a rainbow from starlight. By studying this rainbow (called a spectrum), astronomers can determine an astonishing amount of information:
- Chemical composition — Every element produces a unique pattern of bright or dark lines in the spectrum, like a fingerprint. By matching these patterns, astronomers can identify exactly which elements are present in a star, nebula, or galaxy.
- Temperature — The overall shape and color of the spectrum reveals the surface temperature of a star.
- Motion — If an object is moving toward or away from us, its spectral lines shift slightly. Lines shift toward blue if the object approaches and toward red if it recedes. This is the Doppler effect, and it is how astronomers measure the speeds of stars, galaxies, and the expansion of the universe itself.
- Density and pressure — The width and shape of spectral lines tell astronomers about conditions in a star’s atmosphere.
Filters
Astronomical filters are precisely manufactured pieces of glass or film that block certain wavelengths of light while allowing others through. They serve different purposes:
- Light-pollution filters — Block the specific wavelengths produced by sodium and mercury streetlights, improving contrast from suburban locations.
- Narrowband filters — Pass only a very narrow range of wavelengths, such as the red light of hydrogen-alpha (Hα) emission. These make it possible to photograph faint nebulae even from light-polluted areas.
- Color filters — Enhance specific features on planets. A blue filter brings out cloud bands on Jupiter. A red filter improves contrast on Mars. A yellow filter sharpens detail on Saturn.
- Solar filters — Block nearly all the Sun’s light, making safe solar observation possible (as discussed in Requirement 1d).
Telescope Mounts
While not an instrument in the traditional sense, the mount is a critical part of any telescope system. There are two main types:
- Alt-azimuth (Alt-az) — Moves up-down (altitude) and left-right (azimuth). Simple and intuitive, but celestial objects drift out of view because the sky rotates at an angle.
- Equatorial — One axis is aligned with Earth’s rotation axis (pointed at the North Star). This lets you track objects across the sky by turning just one axis at a constant rate. Equatorial mounts are essential for long-exposure astrophotography.
Modern GoTo mounts include computers with databases of thousands of celestial objects. You select an object from the handset, and the telescope slews (moves) to point at it automatically. This is incredibly helpful for beginners and experienced observers alike.
What Astronomers Use to Explore the Universe Quick video overview of the key instruments astronomers use to study the cosmos. Link: What Astronomers Use to Explore the Universe — https://youtube.com/shorts/Y5lAHoiWGBc?si=o5t6cgN-LmUHOKErNow that you know what instruments go on a telescope, let’s learn how to take care of your equipment so it lasts for years.
Req 3d — Care & Storage
Telescopes and binoculars are precision optical instruments. Their lenses and mirrors are ground to incredibly exact shapes — sometimes accurate to within a fraction of a wavelength of light. Proper care protects that precision and ensures your equipment performs well for decades. The good news is that caring for optics is mostly about what you do NOT do.
The Golden Rules of Optics Care
1. Touch the glass as little as possible. Fingerprints leave oils that etch into optical coatings over time. If you accidentally touch a lens or mirror, clean it as soon as possible using proper methods.
2. Keep lens caps on. When you are not actively observing, put the dust caps back on all lenses and eyepieces. This is the single easiest thing you can do to protect your equipment.
3. Let dew dry naturally. After an observing session, dew will often form on your optics. Do NOT wipe wet optics — you will grind dust particles across the surface. Instead, bring the equipment indoors and let it dry on its own with the lens caps off for air circulation.
4. Never disassemble optics. Telescope mirrors and lens assemblies are aligned with extreme precision at the factory. Taking them apart will almost certainly ruin that alignment, and reassembly requires specialized equipment.
Cleaning Optics
Cleaning should be rare — only when debris actually interferes with your view. A few specks of dust on a lens or mirror have virtually no effect on image quality. Aggressive cleaning does more damage than dust ever will.
Optics Cleaning Steps
When cleaning is truly necessary, follow this order- Blow off loose dust with a hand-squeeze air blower (not canned air, which can leave residue).
- Gently brush remaining particles with a soft camel-hair brush or lens pen brush.
- For stubborn smudges, apply a drop of optical cleaning fluid to a clean microfiber cloth or lens tissue.
- Wipe gently in one direction — never in circles, which can create swirl marks.
- Use a fresh section of the cloth or tissue for each wipe to avoid spreading contaminants.
Storage at Home
Where and how you store your equipment matters just as much as how you handle it.
Telescope Storage:
- Store upright or on its mount in a cool, dry area. Avoid attics (extreme heat), basements (dampness), and garages (dust and temperature swings).
- If the telescope came with a case, use it. Otherwise, cover the optical tube with a cloth or fitted cover.
- Store eyepieces in a padded case or pouch with their individual caps on.
- If you have a reflector telescope, store it with the mirror end down so dust settles away from the mirror surface.
- Loosen clamp screws on the mount slightly to relieve tension on the gears during long-term storage.
Binocular Storage:
- Keep binoculars in their case when not in use.
- Store with lens caps on both ends.
- Hang the strap in a way that does not put pressure on the barrels.
- Add a silica gel packet to the case to absorb moisture and prevent fungus growth on internal optics.
Care in the Field
The field — whether it is your backyard, a campsite, or a dark-sky park — presents its own challenges.
Field Care Checklist
Protect your equipment during observation sessions- Set up on firm, level ground where the telescope will not tip over.
- Keep all equipment cases closed when not retrieving items — dew, dust, and insects get in fast.
- Place eyepieces on a clean towel or in a case, never directly on the ground.
- Use a dew shield (a tube extension) on refractors and compound telescopes to delay dew formation on the front lens.
- If dew forms, use a low-power dew heater strip or simply cap the optics and wait. Do not wipe.
- Keep red-light flashlights handy so you can see your equipment without tripping over it in the dark.
- Watch where you step — tripod legs are invisible in the dark and a collision can send your telescope crashing.
Transporting Equipment
Getting your telescope to a dark-sky site safely requires some thought:
- Use the original packaging or a purpose-built telescope case for car trips.
- Pad the telescope with blankets or foam in the trunk to prevent it from shifting during the drive.
- Remove eyepieces and store them separately — they can work loose and rattle around.
- Never leave a telescope in a hot car. Extreme heat can damage optical coatings and warp plastic components.
- Carry binoculars around your neck or in a padded case, never swinging loosely by the strap.
Excellent — you now have a solid foundation in telescope technology. Let’s head outside and put that knowledge to use by learning the night sky.
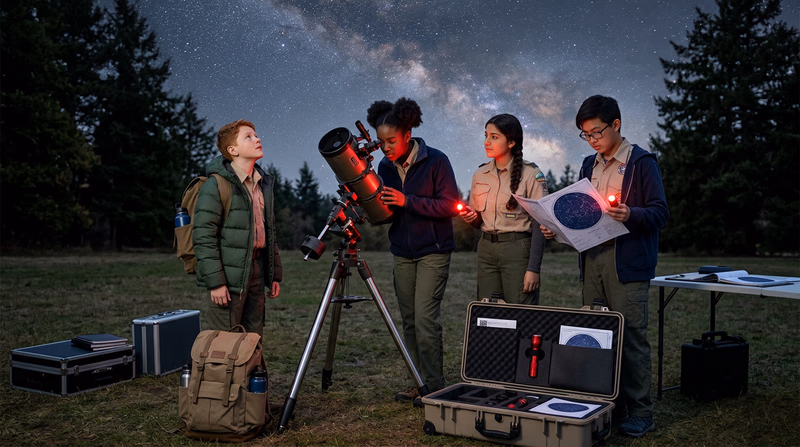
Req 4a — Constellations
Constellations are patterns of stars that humans have grouped together and named for thousands of years. Today, the International Astronomical Union officially recognizes 88 constellations that divide the entire sky into regions, like countries on a map. Learning constellations is the first step to navigating the night sky — once you can recognize a few key patterns, you can use them to find stars, planets, and deep-sky objects.
What Is a Constellation?
A constellation is not a physical group of stars — the stars in a constellation are usually at vastly different distances from Earth and have no real connection to each other. They just happen to appear near each other from our viewpoint. Think of it like looking at a city skyline: buildings that appear side by side from where you stand may actually be blocks apart.
The patterns we see today were mostly defined by ancient Greek, Roman, and Arab astronomers, though cultures around the world created their own star patterns and stories. The official 88 constellations were standardized in 1922.
The Zodiac Constellations
The zodiac is a belt of 12 constellations that lies along the ecliptic — the path the Sun, Moon, and planets follow across the sky. Because the planets move through these constellations, you have probably heard their names: Aries, Taurus, Gemini, Cancer, Leo, Virgo, Libra, Scorpius, Sagittarius, Capricornus, Aquarius, and Pisces.
You need to identify at least four zodiac constellations. Here are some of the easiest ones to find:
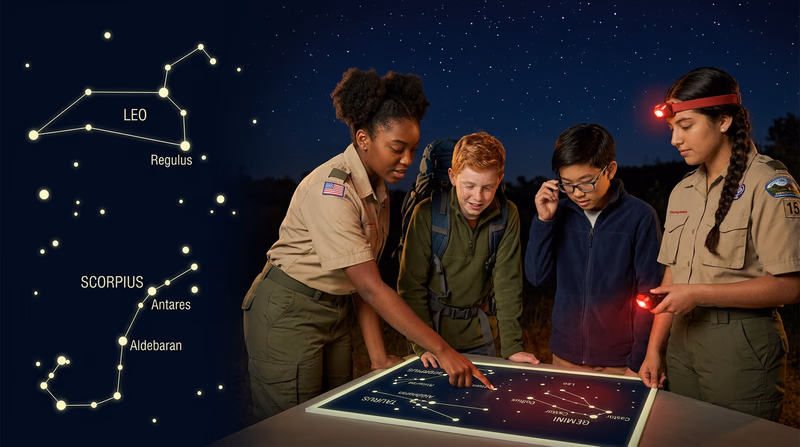
Leo (the Lion) — Look for a backwards question mark of stars (called “the Sickle”) that forms the lion’s head and mane. The bright star Regulus marks the bottom of the Sickle. Best seen in spring evenings.
Scorpius (the Scorpion) — One of the most recognizable constellations in the sky. Look for the bright red star Antares in its heart, with a curving tail of stars extending to the south. Best seen in summer evenings.
Taurus (the Bull) — Look for the bright orange star Aldebaran, which marks the bull’s eye. A V-shaped cluster of stars (the Hyades) forms the bull’s face. The famous Pleiades star cluster sits on the bull’s shoulder. Best seen in winter evenings.
Gemini (the Twins) — Two parallel lines of stars topped by the bright stars Castor and Pollux, which represent the heads of the twin brothers. Best seen in winter and spring evenings.
Sagittarius (the Archer) — Its brightest stars form a shape that looks more like a teapot than an archer. When you look toward Sagittarius, you are looking toward the center of the Milky Way. Best seen in summer evenings.
Non-Zodiac Constellations Worth Knowing
Beyond the zodiac, these constellations are among the easiest to find and most useful for sky navigation:
Orion (the Hunter) — Perhaps the most famous constellation. Three bright stars in a row form Orion’s Belt, with the red supergiant Betelgeuse marking his shoulder and the blue-white star Rigel at his knee. Below the belt, the fuzzy patch of the Orion Nebula is visible to the naked eye. Best seen in winter.
Ursa Major (the Great Bear) — Contains the Big Dipper asterism (a recognizable star pattern within a constellation). The two stars at the end of the Big Dipper’s “bowl” point directly to Polaris, the North Star. Visible year-round from most of the Northern Hemisphere.
Cassiopeia (the Queen) — A distinctive W-shape (or M, depending on orientation) of five bright stars. Like Ursa Major, Cassiopeia is circumpolar — it never sets and is visible every clear night from northern latitudes.
Cygnus (the Swan) — Also called the Northern Cross. The bright star Deneb marks the tail of the swan. Cygnus flies along the Milky Way, making it a beautiful area to scan with binoculars. Best seen in summer and fall.
Canis Major (the Great Dog) — Contains Sirius, the brightest star in the entire night sky. Sirius is easy to find by following Orion’s Belt downward and to the left. Best seen in winter.
Lyra (the Harp) — A small constellation anchored by the brilliant blue-white star Vega. Along with Deneb (in Cygnus) and Altair (in Aquila), Vega forms the Summer Triangle — a huge pattern that dominates summer and fall skies.
Tips for Finding Constellations
Constellation-Finding Strategy
A step-by-step approach for your observation session- Start with constellations you already know (most people can find the Big Dipper or Orion).
- Use “pointer stars” to hop from known constellations to new ones (e.g., the Big Dipper points to Polaris and Leo).
- Use a star chart or planetarium app. Hold the chart above your head and match it to the sky.
- Let your eyes adapt to the dark for at least 20 minutes before trying to find faint constellations.
- Focus on one region of the sky at a time rather than spinning around looking everywhere.
- Note the date and time — different constellations are visible in different seasons.
Now let’s learn to identify some of the sky’s brightest individual stars.
Req 4b — Bright Stars
Once you can find constellations, the next step is learning to identify individual stars by name. The brightest stars have been known by name for thousands of years — many of their names come from Arabic, Greek, and Latin. Learning to recognize these stars by sight builds your confidence navigating the sky and helps you find dimmer objects nearby.
Understanding Star Magnitude
Astronomers measure a star’s brightness using a system called apparent magnitude. The scale works backwards from what you might expect:
- Lower numbers = brighter. A magnitude 1 star is bright. A magnitude 6 star is about the faintest you can see with the naked eye.
- Negative numbers = very bright. Sirius, the brightest star in the night sky, has a magnitude of -1.46.
- Each magnitude step is about 2.5 times brighter. A magnitude 1 star is about 2.5 times brighter than a magnitude 2 star, and about 100 times brighter than a magnitude 6 star.
This system was invented by the ancient Greek astronomer Hipparchus around 130 BC. He ranked the brightest stars as “first magnitude” and the faintest visible stars as “sixth magnitude.” Modern astronomers refined the scale but kept his basic idea.
Stars of Magnitude 1 or Brighter
Here are some of the brightest stars in the sky. You need to identify at least five of these:
| Star | Magnitude | Constellation | Season | How to Find It |
|---|---|---|---|---|
| Sirius | -1.46 | Canis Major | Winter | Follow Orion’s Belt down and to the left |
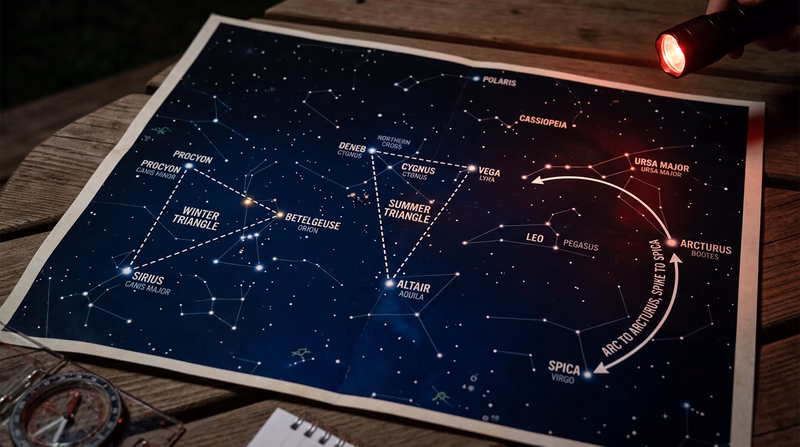
| Arcturus | -0.05 | Boötes | Spring/Summer | Follow the arc of the Big Dipper’s handle (“arc to Arcturus”) |
| Vega | 0.03 | Lyra | Summer/Fall | Brilliant blue-white star nearly overhead in summer |
| Rigel | 0.13 | Orion | Winter | Blue-white star at Orion’s left knee |
| Procyon | 0.34 | Canis Minor | Winter | Forms a triangle with Sirius and Betelgeuse |
| Betelgeuse | ~0.42* | Orion | Winter | Reddish-orange star at Orion’s right shoulder |
| Altair | 0.77 | Aquila | Summer/Fall | Southern point of the Summer Triangle |
| Aldebaran | 0.87 | Taurus | Winter | Reddish-orange star in the V-shape of the bull’s face |
| Antares | 1.06 | Scorpius | Summer | Reddish star in the heart of the Scorpion |
| Spica | 1.04 | Virgo | Spring/Summer | “Arc to Arcturus, speed on to Spica” |
| Pollux | 1.14 | Gemini | Winter/Spring | Brighter of the two “twin” stars |
| Deneb | 1.25 | Cygnus | Summer/Fall | Northern point of the Summer Triangle |
| Regulus | 1.40 | Leo | Spring | Bottom of the “Sickle” pattern in Leo |
*Betelgeuse is a variable star — its brightness changes over time.
Star-Hopping Patterns
The easiest way to find stars is to use patterns that connect them:
The Winter Triangle — Sirius, Betelgeuse, and Procyon form a large triangle dominating winter evenings. Start with Orion’s Belt, follow it down-left to Sirius, then look to the upper left for Procyon.
The Summer Triangle — Vega, Deneb, and Altair form an enormous triangle overhead on summer nights. Vega is the brightest and appears almost directly overhead. Deneb is to the northeast, and Altair is to the south.
Arc to Arcturus, Speed on to Spica — Follow the curved handle of the Big Dipper in an arc and you will reach the bright orange star Arcturus. Continue that arc in a straight line and you will reach Spica.
Telling Stars Apart
How do you tell one bright dot from another? Here are some clues:
Color — Stars are not all white. Betelgeuse and Aldebaran are distinctly orange-red. Rigel and Vega appear blue-white. Arcturus has a warm golden hue. Star color tells you about the star’s surface temperature — you will learn more about this in Requirement 7c.
Brightness — Compare nearby stars. Sirius is unmistakably the brightest star in the sky. In the Summer Triangle, Vega is noticeably brighter than Deneb.
Position relative to constellations — If you can identify the constellation, the star’s position within it confirms its identity. Regulus is always at the base of Leo’s Sickle. Antares is always in the heart of Scorpius.
Twinkling — Stars twinkle because their light passes through Earth’s turbulent atmosphere. Planets do not twinkle as much because they appear as tiny disks rather than points of light. If a bright “star” shines with a steady light, it might actually be a planet.
Star Magnitude Explained Video explanation of the magnitude system and how astronomers measure star brightness. Link: Star Magnitude Explained — https://youtu.be/JIXFXGiDa4Y?si=5HjKlDF8xRcEJPtLReady to put your observation skills into practice? Next, you will sketch the Big Dipper or Cassiopeia and see how the sky moves.
Req 4c — Sketching the Big Dipper
This requirement gets you doing real observational astronomy — recording what you see, when you see it, and noticing how the sky changes over time. Sketching is one of the oldest astronomical traditions. Before cameras existed, every astronomical discovery was recorded by hand. You are following in the footsteps of Galileo, who sketched the Moon and Jupiter’s moons in his notebook more than 400 years ago.
Why the Sky Appears to Rotate
Before you start sketching, it helps to understand what you are about to observe. The stars appear to move across the sky because Earth is rotating on its axis. We complete one full rotation every 24 hours, so the sky appears to spin at a rate of about 15 degrees per hour (360 degrees ÷ 24 hours).
There is one star that barely moves at all — Polaris, the North Star. Polaris sits almost exactly above Earth’s North Pole, so as Earth spins, Polaris stays nearly fixed while everything else appears to circle around it. That is what makes the Big Dipper and Cassiopeia perfect subjects for this activity — they circle Polaris and never set below the horizon from most of the United States.
Finding Your Subjects
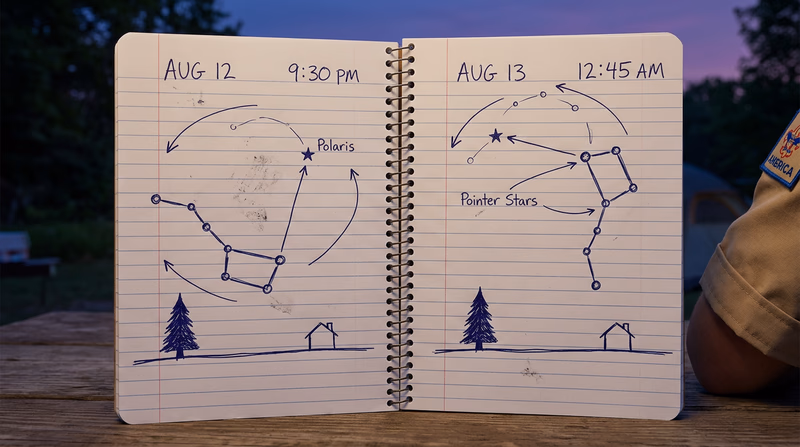
The Big Dipper — Seven bright stars forming a shape that looks like a large soup ladle or water dipper. Four stars form the “bowl” and three form the “handle.” The two stars at the outer edge of the bowl (Merak and Dubhe, called the “Pointer Stars”) point directly to Polaris.
Cassiopeia — Five bright stars forming a distinctive W-shape (or M-shape, depending on its orientation). Cassiopeia is on the opposite side of Polaris from the Big Dipper. If the Big Dipper is high, Cassiopeia is low, and vice versa.
How to Make Your Sketches
Here is a step-by-step approach for creating accurate, useful sketches:
Sketch 1 — Early Evening:
- Go outside at least an hour after sunset so the sky is fully dark. Note the exact date and time.
- Face north. Use a compass or compass app, or find Polaris using the Big Dipper’s pointer stars.
- Draw the horizon first as a horizontal line across the bottom of your paper. Include any landmarks you can see — a tree line, rooftop, hill, or building. These give your sketch a reference point.
- Mark Polaris on your sketch. It will be roughly the same height above the horizon as your latitude (for example, about 40 degrees up if you live at 40°N latitude).
- Sketch the Big Dipper or Cassiopeia in its current position relative to Polaris and the horizon. Pay attention to:
- The angle and orientation of the pattern
- How high above the horizon it appears
- Which direction the “handle” or “W” points
- Label everything: constellation name, individual star names if you know them, Polaris, horizon landmarks, date, and time.
Sketch 2 — Several Hours Later:
- Return to the same spot at least 2–3 hours later. The more time between sketches, the more obvious the change will be.
- Repeat the same process from the same position, facing north.
- You will notice that the constellation has rotated around Polaris — the handle or W will be pointing in a different direction, and the constellation may be higher or lower relative to the horizon.
What You Should Observe
When you compare your two sketches, you should notice:
- The Big Dipper (or Cassiopeia) has rotated counterclockwise around Polaris.
- The constellation may have risen higher, sunk lower, or moved sideways depending on the time and season.
- Polaris has barely moved — it stays in nearly the same position in both sketches.
- The amount of rotation should be roughly 15 degrees per hour times the number of hours between your sketches. (For a 3-hour gap, expect about 45 degrees of rotation.)
This apparent rotation is direct evidence that Earth is spinning. You have just observed one of the most fundamental motions in all of astronomy.
Sketching Supplies
What to bring to your observation session- Clipboard with white paper (or a dedicated astronomy sketchbook).
- Pencil (not pen — you will want to erase and adjust).
- Red-light flashlight or headlamp so you can see your paper without losing dark adaptation.
- A watch or phone for recording accurate times.
- A compass or compass app for confirming which direction is north.
Now let’s look at the most spectacular feature visible on any clear dark night — the Milky Way.
Req 4d — The Milky Way
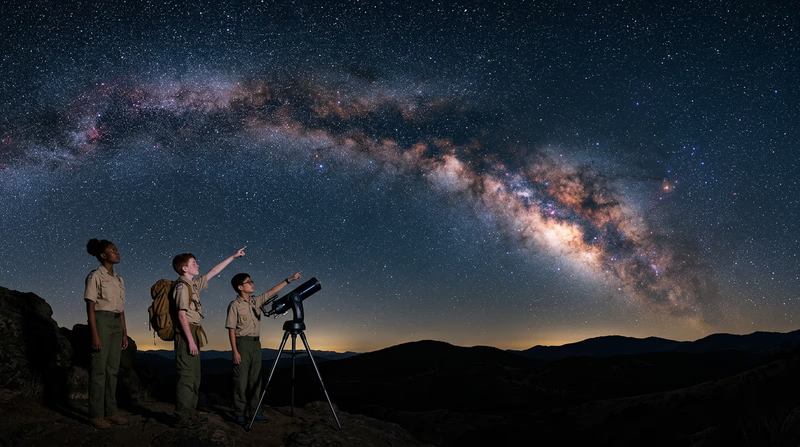
On a truly dark night, far from city lights, a pale band of light stretches across the sky from horizon to horizon. It looks like a river of soft, glowing clouds — but it is not clouds at all. That glowing band is the Milky Way, and what you are seeing is the combined light of hundreds of billions of stars in our own galaxy, so far away and so densely packed that your eyes blend them into a continuous glow.
Our Galaxy from the Inside
The Milky Way is the galaxy we live in. A galaxy is a vast collection of stars, gas, dust, and dark matter held together by gravity. Our galaxy contains an estimated 100 to 400 billion stars, and our Sun is just one of them.
The Milky Way is a barred spiral galaxy — it has a central bar-shaped core surrounded by sweeping spiral arms that wrap around like a pinwheel. If you could see it from above, it would look like a giant cosmic hurricane made of stars. But we are inside it, roughly two-thirds of the way out from the center, embedded in one of the spiral arms. So instead of seeing a pinwheel, we see the galaxy edge-on — that is why it appears as a band of light stretching across the sky.
Think of it this way: imagine standing inside a huge, flat, round room packed with millions of candles. If you look toward the walls, you see an overwhelming glow of candlelight in every direction along the floor. If you look straight up at the ceiling, you see far fewer candles. That is exactly what happens with the Milky Way — when you look along the plane of the galaxy, you see the combined glow of billions of distant stars. When you look above or below the plane, you see fewer stars and more empty space.
What You See in the Milky Way
Through binoculars, the smooth glow of the Milky Way breaks apart into countless individual stars. You will also notice:
Dark Lanes and Rifts — The Milky Way is not a uniform band of light. It is split and mottled by dark patches and lanes. These are not gaps between stars — they are enormous clouds of interstellar dust that block the light of the stars behind them. The most prominent is the Great Rift, a dark lane that splits the Milky Way from Cygnus to Sagittarius.
Star Clouds — In some areas, especially toward Sagittarius and Scutum, the Milky Way is noticeably brighter. These are star clouds — regions where you are looking through especially dense concentrations of stars in the spiral arms.
The Galactic Center — The brightest, widest part of the Milky Way lies in the direction of the constellation Sagittarius. This is because you are looking toward the center of the galaxy, where stars are packed most densely. The actual center is hidden behind thick clouds of dust, but radio and infrared telescopes can peer through and have revealed a supermassive black hole lurking there.
Nebulae and Star Clusters — Scattered along the Milky Way are glowing nebulae (like the Lagoon Nebula and Eagle Nebula) and dense star clusters. These are regions where new stars are being born from clouds of gas and dust within the spiral arms.
Where and When to See the Milky Way
The Milky Way is visible year-round, but the most spectacular part — the galactic center — is only visible during certain months:
- Best viewing: June through September, when the galactic center in Sagittarius rises high in the sky.
- Best time of night: After astronomical twilight (when the Sun is more than 18 degrees below the horizon).
- Best location: A dark site with a Bortle scale rating of 4 or lower. The Milky Way is invisible from most cities. Even in the suburbs, you may only see the faintest hint.
- Moon matters: Avoid nights near the full Moon, which brightens the sky and washes out the Milky Way.
Our Place in the Galaxy
Here are some key facts about our galaxy and our position within it:
- Diameter: The Milky Way is roughly 100,000 light-years across. A light-year is the distance light travels in one year — about 5.88 trillion miles.
- Our location: The Sun is about 26,000 light-years from the galactic center, in a region called the Orion Arm (or Orion Spur) of the spiral structure.
- Orbital speed: The Sun — and our entire solar system — is orbiting the galactic center at about 515,000 miles per hour. Even at that incredible speed, one orbit takes about 230 million years.
- Nearest large neighbor: The Andromeda Galaxy (M31) is our closest large galactic neighbor, about 2.5 million light-years away. It is actually visible to the naked eye from a dark site as a faint fuzzy patch in the constellation Andromeda.
Now that you have learned to navigate the night sky, it is time to focus on our closest planetary neighbors.
Req 5a — Visible Planets & Phases
Five planets in our solar system are bright enough to see with your naked eyes, and humans have watched them wander among the stars for thousands of years. In fact, the word “planet” comes from the Greek word planetes, meaning “wanderer,” because these objects move against the fixed background of stars.
The Five Visible Planets
These are the planets you can see without any telescope or binoculars:
Mercury — The closest planet to the Sun and the smallest. Because it orbits so close to the Sun, Mercury is always low on the horizon, visible only briefly after sunset or before sunrise. It is the hardest of the five to spot.
Venus — The brightest planet and the third-brightest object in the sky (after the Sun and Moon). Venus is often called the “Morning Star” or “Evening Star” because it appears in the east before sunrise or in the west after sunset. It is unmistakable — far brighter than any star.
Mars — Recognizable by its reddish-orange color, caused by iron oxide (rust) on its surface. Mars varies dramatically in brightness depending on where it is in its orbit relative to Earth. At its closest approach (called “opposition”), it can be almost as bright as Jupiter.
Jupiter — The largest planet in the solar system and the second-brightest planet after Venus. Jupiter appears as a steady, brilliant white point of light. Through binoculars, you can see its four largest moons.
Saturn — The farthest visible planet and the faintest of the five, but still brighter than most stars. Saturn has a warm, golden color. Through a telescope, its famous rings are visible.
Why Some Planets Show Phases
Here is the key concept: only planets that orbit between Earth and the Sun can show a full range of phases like the Moon does. These are called inferior planets, and there are two of them — Mercury and Venus.
Mercury and Venus show phases because their orbits are closer to the Sun than Earth’s orbit. As they move around the Sun, we see them from different angles:
- When Mercury or Venus is on the far side of the Sun from us, we see its full sunlit face (like a full Moon), but it appears small because it is far away.
- When it is between us and the Sun, the sunlit side faces away from us (like a new Moon), and it is invisible.
- At positions in between, we see crescent and half phases, just like the Moon.
Galileo’s discovery of Venus’s phases in 1610 was revolutionary — it proved that Venus orbits the Sun, not Earth, and helped confirm the Sun-centered model of the solar system.
Mars, Jupiter, and Saturn do NOT show a full range of phases. These are superior planets — they orbit farther from the Sun than Earth does. Because we are always between them and the Sun (or close to it), we always see most of their sunlit side. Mars can show a slight “gibbous” phase (slightly less than full), but it never appears as a crescent. Jupiter and Saturn are so far away that they always look essentially full from our perspective.
A Simple Way to Remember
Think of it like standing in a room with a lamp (the Sun) in the center:
- If your friend (Venus) is between you and the lamp, you see their dark silhouette — a “new” phase.
- If your friend moves to the side, the lamp illuminates half their face — a “quarter” phase.
- If your friend is on the far side of the lamp, you see their fully lit face — a “full” phase.
Now imagine a friend (Jupiter) who is always on the far side of the room from the lamp. No matter where they stand, the lamp always illuminates most of their face from your viewpoint. You never see their dark side because the lamp is always between you and them.
Phases of Planets — Wolfram Demonstrations Interactive demonstration showing how the phases of Venus and Mercury change as they orbit the Sun. Link: Phases of Planets — Wolfram Demonstrations — https://demonstrations.wolfram.com/PhasesOfPlanets/Next, let’s find out when you can actually see these planets in the sky.
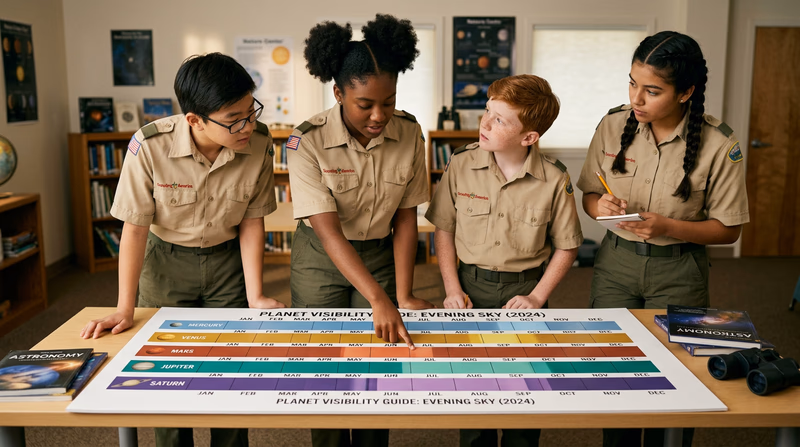
Req 5b — Planet Visibility Chart
This requirement puts you in the role of a real astronomer — researching, planning, and organizing data about upcoming celestial events. When you are finished, you will have a personalized guide to planet-watching for the next year.
Where to Find Visibility Information
Several reliable websites provide planet visibility data that is updated regularly. Here are the best resources to use:
NASA Skywatching NASA's monthly skywatching guide with planet visibility, meteor showers, and other celestial events. Link: NASA Skywatching — https://science.nasa.gov/skywatching/ EarthSky — Visible Planets Tonight Updated daily with information about which planets are visible and where to look for them. Link: EarthSky — Visible Planets Tonight — https://earthsky.org/astronomy-essentials/visible-planets-tonight-mars-jupiter-venus-saturn-mercury/ The Sky Live — Planets Visible Tonight Shows which planets are visible from your location right now, with rise and set times. Link: The Sky Live — Planets Visible Tonight — https://theskylive.com/planets-visible-tonightHow to Build Your Chart
Your chart should cover the next 12 months and include the following information for each planet:
Chart Information
What to include for each planet, each month- Planet name.
- Whether it is visible in the evening sky that month (Yes/No or Evening/Morning/Not Visible).
- Which constellation it appears in.
- Approximate brightness (magnitude) if available.
- Any special events (opposition, conjunction, closest approach).
Here is a suggested format for your chart:
| Month | Mercury | Venus | Mars | Jupiter | Saturn |
|---|---|---|---|---|---|
| Month 1 | Evening/Not visible | Evening (in Pisces) | Morning | Evening (in Taurus) | Evening (in Aquarius) |
| Month 2 | … | … | … | … | … |
Key Planetary Events to Look For
As you research, watch for these special events and note them on your chart:
Opposition — When a superior planet (Mars, Jupiter, or Saturn) is directly opposite the Sun in our sky. At opposition, the planet rises at sunset, is visible all night, and is at its brightest and closest. Oppositions happen roughly once a year for Jupiter and Saturn, and about every 26 months for Mars.
Conjunction — When a planet appears very close to another planet, the Moon, or a bright star. These events are beautiful to observe and photograph.
Greatest Elongation — For Mercury and Venus, this is when they appear farthest from the Sun in our sky, making them easiest to spot. There are “greatest eastern elongation” (visible in the evening after sunset) and “greatest western elongation” (visible in the morning before sunrise).
Inferior Conjunction / Superior Conjunction — When Mercury or Venus passes between us and the Sun (inferior) or behind the Sun (superior). The planet is not visible during these times.
Understanding Why Visibility Changes
Planets are not always visible because they orbit the Sun at different speeds:
- Mercury completes an orbit in just 88 days, so it swings between evening and morning visibility several times a year. It is never visible for more than a few weeks at a time.
- Venus orbits in 225 days and alternates between being a brilliant “Evening Star” for several months and a “Morning Star” for several months.
- Mars orbits in about 2 years, so it spends many months close to the Sun (and invisible) before emerging for several months of visibility around its opposition.
- Jupiter orbits in about 12 years, so it is visible in the evening sky for roughly 6–8 months at a time, shifting to a new constellation each year.
- Saturn orbits in about 29 years, so like Jupiter it is visible for extended periods and moves slowly through the zodiac.
Now let’s explore how planets actually move through the sky — including one very strange trick they seem to play.
Req 5c — Planetary Motion
Planets do not stay in one spot in the sky like stars do. Over weeks and months, they slowly drift through the constellations of the zodiac, following the same general band of sky as the Sun and Moon. But their motion is not as simple as just moving in one direction — planets occasionally do something strange that puzzled astronomers for thousands of years.
The Nightly Motion
On any single night, planets appear to move across the sky from east to west, just like the Sun, Moon, and stars. This is not real motion — it is caused by Earth’s rotation. A planet that rises in the east at sunset will be in the south at midnight and set in the west by dawn. This nightly east-to-west sweep happens to everything in the sky and is not what makes planets special.
The Long-Term Drift
What makes planets different from stars is their motion over weeks and months. If you observe a planet’s position among the background stars night after night, you will see it slowly shift. This is the planet’s real orbital motion as seen from Earth.
Most of the time, planets move eastward (called prograde motion) through the constellations. This makes sense — all planets orbit the Sun in the same direction, and their progress around their orbits is visible as a slow eastward drift against the stars. Jupiter, for example, moves roughly one constellation per year as it completes its 12-year orbit.
Retrograde Motion — The Great Puzzle
Occasionally, a planet appears to stop its eastward drift, reverse direction, and move westward (called retrograde motion) for several weeks before stopping again and resuming its eastward path. This creates a loop or zigzag pattern against the stars.
Ancient astronomers were baffled by retrograde motion. In the Earth-centered model of the universe, they had to invent complicated systems of circles-within-circles (called epicycles) to explain it. The explanation turned out to be much simpler.
Retrograde motion is an optical illusion caused by Earth overtaking a slower outer planet.
Think of it like passing a car on the highway. When you are far behind the other car, it appears to move forward relative to the distant mountains. As you catch up and pass it, the other car appears to move backward against the mountains — even though it is still going forward. Once you have pulled well ahead, it appears to move forward again.
The same thing happens with planets:
For superior planets (Mars, Jupiter, Saturn): Earth, moving faster in its closer orbit, periodically catches up and passes them. During this time, the outer planet appears to move backward against the stars. Retrograde motion for Mars, Jupiter, and Saturn always happens around opposition (when the planet is opposite the Sun in our sky and closest to Earth).
For inferior planets (Mercury, Venus): These planets orbit faster than Earth and periodically overtake us. When Mercury or Venus is on the near side of the Sun and moving “past” Earth, it appears to move retrograde briefly.
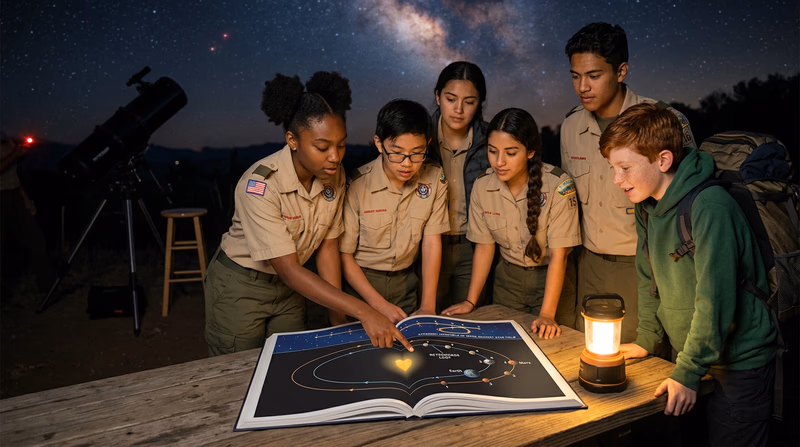
The Ecliptic — The Planetary Highway
All planets orbit the Sun in roughly the same flat plane, like marbles rolling on a tabletop. From Earth, this means planets always appear within a narrow band of sky called the ecliptic. The ecliptic passes through the 12 zodiac constellations, which is why planets are always found in or near a zodiac constellation.
The Moon also follows the ecliptic closely, which is why the Moon, Sun, and planets sometimes appear very close together or even eclipse each other.
Speed Differences
Not all planets move at the same rate:
- Mercury zips through the zodiac in about 3 months per orbit and changes position noticeably from week to week.
- Venus takes about 7.5 months to cross the zodiac and is easy to track over weeks.
- Mars completes the zodiac in about 2 years and moves noticeably from month to month.
- Jupiter takes about 12 years, moving roughly one constellation per year.
- Saturn takes about 29 years, creeping through the zodiac so slowly that it takes 2–3 years to cross a single constellation.
Time to go outside and actually observe a planet for yourself.
Req 5d — Observing a Planet
This is where all your learning comes together — you are going outside and looking at a real planet. Whether you use your naked eyes, binoculars, or a telescope, you will be amazed at what you can see. Here is how to plan a successful planet observation and what to report to your counselor.
Choosing Your Planet
Check your planet visibility chart (from Requirement 5b) or one of the recommended websites to see which planets are currently visible in the evening sky. Here is what each planet looks like:
Venus — The easiest planet to find. Look low in the west after sunset or low in the east before sunrise. It is so bright it is unmistakable. Through a telescope, you can see its phases (crescent, half, full) because it orbits between us and the Sun.
Jupiter — A brilliant, steady white point of light. Through binoculars, you can see up to four tiny dots lined up near it — those are its Galilean moons (Io, Europa, Ganymede, and Callisto). Through a telescope, you can see cloud bands crossing the planet’s disk.
Saturn — A golden point of light, fainter than Jupiter. Even a small telescope at 30x magnification will reveal its rings — one of the most breathtaking sights in astronomy. You may also spot its largest moon, Titan, as a small dot nearby.
Mars — Look for its distinctive orange-red color. During opposition (when Mars is closest to Earth), a telescope may reveal dark surface markings and a bright white polar ice cap. At other times, Mars may be too small and distant to show much detail.
Mercury — The trickiest to observe. It is always close to the horizon and visible only briefly during twilight. Look for it low in the west just after sunset or low in the east just before sunrise during its greatest elongation.
Preparing for Your Observation
Planet Observation Prep
Before heading out- Check which planets are visible tonight using your chart or an app.
- Note the planet’s approximate location: which direction to look, how high above the horizon, and which constellation it is in.
- Choose a viewing spot with a clear view toward the planet’s direction. Avoid areas with bright lights or tall obstructions.
- If using a telescope, set it up at least 20 minutes early so the optics can cool to the outdoor temperature.
- Bring a notebook and red-light flashlight to record your observations.
What to Record
When you observe your planet, note the following details for your discussion with your counselor:
- Date and time of observation
- Which planet you observed
- Location — where you were observing from
- Direction and height — which direction you were looking and how high above the horizon the planet appeared
- Naked-eye appearance — color, brightness, whether it twinkled or shone steadily
- Telescope/binocular appearance (if used) — any features you could see (moons, rings, phases, cloud bands, surface features)
- Nearby objects — what constellation was the planet in? Were any stars or the Moon nearby?
- Conditions — was the sky clear, hazy, or partly cloudy? Was there much light pollution?
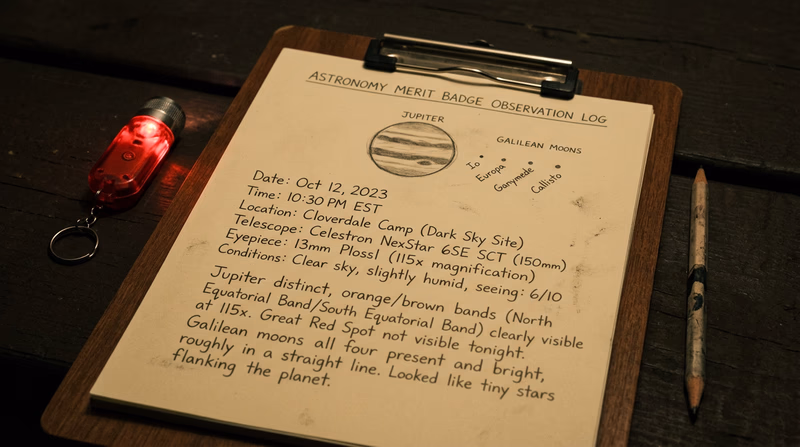
What You Might See with Different Equipment
| Equipment | Venus | Jupiter | Saturn | Mars |
|---|---|---|---|---|
| Naked eye | Brilliant white dot | Bright steady dot | Golden dot | Orange-red dot |
| Binoculars | Visible phase (crescent/gibbous) | 1–4 tiny moons in a line | Slightly elongated shape (rings!) | Small orange disk |
| Small telescope | Clear phase shape | Cloud bands, 4 moons with positions changing nightly | Rings clearly visible, Cassini Division possible, Titan | Surface markings, polar cap at opposition |
You have explored the planets — now let’s turn our attention to Earth’s closest companion in space.
Req 6a — Lunar Seas & Craters
The Moon is the easiest and most rewarding celestial object to observe. Even your naked eyes can see large features on its surface, and binoculars or a small telescope reveal a landscape of stunning detail — craters, mountain ranges, valleys, and vast dark plains. For this requirement, you will sketch the Moon and label some of its most prominent features.
The Dark Patches — Lunar “Seas” (Maria)
The most obvious features on the Moon are the large, dark, smooth areas visible to the naked eye. Early astronomers thought they were oceans, so they named them “maria” (the Latin plural of “mare,” meaning “sea”). We now know they are not seas at all — they are vast plains of solidified lava that flooded ancient impact basins billions of years ago. The lava cooled into dark basalt rock, which is why they appear darker than the surrounding highlands.
Here are some of the most prominent maria you can identify and label on your sketch:
Mare Tranquillitatis (Sea of Tranquility) — Located in the Moon’s eastern half (right side as you look at it). This is where Apollo 11 landed in 1969, making it the site of the first human footsteps on another world.
Mare Serenitatis (Sea of Serenity) — A roughly circular dark area just north of Mare Tranquillitatis. It is one of the most distinct and easy-to-find maria.
Mare Imbrium (Sea of Rains) — The largest clearly defined mare, occupying a huge area in the upper-left quadrant of the Moon’s face. It is bordered by mountain ranges created by the enormous impact that formed the basin.
Mare Crisium (Sea of Crises) — A dark oval near the Moon’s eastern edge (right side). It stands somewhat alone, making it one of the easiest maria to identify.
Oceanus Procellarum (Ocean of Storms) — The largest dark area on the Moon, sprawling across much of the western (left) side. It is not a single impact basin like most maria but a vast region of lava flows.
Mare Nubium (Sea of Clouds) — A dark area in the southern part of the Moon, below Mare Imbrium.
Mare Fecunditatis (Sea of Fertility) — A large dark area in the southeastern part of the Moon’s face, south of Mare Crisium.
The Bright Spots — Craters
Craters are circular depressions created by the impact of asteroids and comets over billions of years. The Moon has no atmosphere to burn up incoming objects and no weather to erode craters, so impacts from billions of years ago still look fresh. Here are five prominent craters to identify:
Tycho — Located in the Moon’s southern highlands. It is relatively young (85 million years old) and has a dramatic system of bright rays — streaks of ejected material that radiate outward for hundreds of miles. Tycho’s rays are especially visible during the full Moon.
Copernicus — A large, prominent crater near the center of the Moon’s visible face, on the southern edge of Mare Imbrium. It has terraced walls and a system of bright rays, though less extensive than Tycho’s.
Kepler — A bright crater west of Copernicus, also with a ray system. Smaller than Copernicus but easy to spot because of its brightness.
Plato — A dark-floored crater on the northern edge of Mare Imbrium. Its floor was flooded with lava, making it appear smooth and dark compared to the bright, rough highlands around it.
Aristarchus — The brightest spot on the entire Moon. This crater is so reflective that it is sometimes visible on the unlit (earthshine) portion of the Moon. It sits on the western edge of a large plateau.
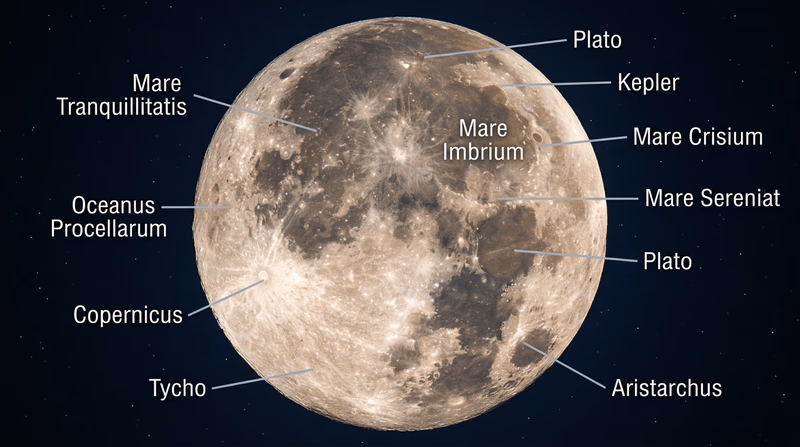
How to Sketch the Moon
Moon Sketching Steps
Creating your lunar portrait- Observe the Moon through binoculars or a telescope for the clearest view of features.
- Draw a circle to represent the Moon’s disk.
- Lightly shade in the dark maria areas first — they form the overall pattern you see on the Moon’s face.
- Add major craters as small circles. Note their positions relative to the maria.
- Label at least five seas and five craters with their names.
- The best time to observe detail is during a half Moon (first or last quarter phase), when shadows along the terminator (the line between light and dark) dramatically reveal crater walls and mountain peaks.
Now let’s track the Moon over several nights and watch it change.
Req 6b — Sketching Moon Phases
This requirement asks you to be a careful observer over several nights. By recording the Moon’s phase and position at the same time from the same location, you will see two changes happening at once — the Moon’s shape is changing and its position in the sky is shifting. These changes reveal important clues about the Moon’s orbit around Earth.
Planning Your Observations
Before you start, pick the right week and prepare your approach:
Timing your week: Check a Moon phase calendar to choose a good week. The best period is between the new Moon and full Moon (the waxing phases), when the Moon is visible in the evening sky and its illuminated portion grows each night. The first quarter (half Moon) phase is an excellent midpoint to aim for.
Pick your spot: Choose a location with a clear view of the sky and identifiable landmarks on the horizon — a building, a tree, a hill, or a flagpole. You will include these in every sketch so you can compare the Moon’s position relative to fixed objects.
Same time each night: Observe at the same clock time on each of your four nights. This is important because it lets you see how the Moon’s position shifts from night to night at a consistent time.
What You Will Observe
Over the course of your week, you should notice two things:
1. The phase is changing. Each night, the illuminated portion of the Moon grows (if waxing) or shrinks (if waning). The Moon gains or loses about one-seventh of its full illumination per day, so over four nights you will see a clear change. For example, a thin crescent early in the week may become a fat half Moon by the end.
2. The Moon’s position shifts eastward. If you look at the Moon at the same time each night, it will appear farther east (to the left in the Northern Hemisphere) and higher in the sky than the night before. This is because the Moon orbits Earth from west to east, completing one full orbit in about 29.5 days. Each day, the Moon moves roughly 12–13 degrees eastward against the star background.
Because the Moon moves eastward in its orbit, it also rises about 50 minutes later each day. If you observe at the same time each night, the Moon will have risen 50 minutes later, which means it will be in a slightly different position.

How to Make Your Sketches
For each of your four observation nights:
- Stand in your chosen spot at your chosen time.
- Draw the horizon line across the bottom of your paper, including the same landmarks each night.
- Note where the Moon is relative to those landmarks — how high above the horizon and in which direction.
- Draw the Moon at that position. Show its phase carefully: which side is illuminated and how much of the disk is lit.
- Record the date and time on each sketch.
Moon Sketch Checklist
Include these on every sketch- Date and time of observation.
- Horizon line with at least 2–3 identifiable landmarks.
- Moon drawn at its correct position relative to the landmarks.
- Moon’s phase shown accurately (which side is lit, how much is lit).
- Direction you are facing (e.g., “Looking South”).
- Any nearby bright stars or planets visible near the Moon.
Explaining the Changes
When you discuss your sketches with your counselor, explain:
- Why the phase changes: The Moon orbits Earth, and as it moves, the angle between the Sun, Moon, and Earth changes. We see different amounts of the Moon’s sunlit side depending on where it is in its orbit. More detail on this comes in Requirement 6d.
- Why the position changes: The Moon orbits Earth in the same direction Earth rotates (eastward), so each night it has moved a little farther in its orbit. At the same clock time, it appears farther east.
- The connection: Both changes — phase and position — are caused by the same thing: the Moon orbiting Earth. As it moves in its orbit, both its position in the sky and the angle of sunlight hitting it change together.
Next, let’s explore the forces that keep the Moon orbiting Earth.
Req 6c — Moon's Orbit
Why does the Moon circle Earth instead of flying off into space or crashing into us? The answer involves a beautiful balance between two factors — gravity pulling the Moon inward and the Moon’s velocity carrying it forward. Together, they create a stable orbit that has lasted for billions of years.
Factor 1: Gravity
Gravity is the force of attraction between any two objects with mass. The more massive an object is, the stronger its gravitational pull. Earth is much more massive than the Moon, so Earth’s gravity constantly pulls the Moon toward it.
Without any other factor, gravity alone would pull the Moon straight into Earth. But the Moon does not fall into Earth because of the second factor.
Factor 2: The Moon’s Orbital Velocity
The Moon is moving sideways — it has a velocity of about 2,288 miles per hour (3,683 km/h) along its orbital path. This sideways motion means the Moon is constantly “falling” toward Earth but also constantly moving forward, so it keeps missing.
Think of it this way: imagine throwing a ball horizontally from the top of a tall building. The ball falls toward the ground (gravity), but it also moves forward (velocity). If you could throw it fast enough — and the Earth’s surface curved away beneath it — the ball would fall around the Earth instead of into it. That is exactly what the Moon is doing. It is perpetually falling toward Earth but moving forward fast enough that Earth’s surface curves away beneath it at the same rate.
The Balance Between Gravity and Velocity
The Moon’s orbit is stable because these two factors are in balance:
- If the Moon moved faster, it would gradually spiral outward and eventually escape Earth’s gravity.
- If the Moon moved slower, gravity would pull it closer and it would eventually spiral inward.
- At its current speed, the inward pull of gravity exactly matches the Moon’s tendency to fly off in a straight line. The result is a nearly circular orbit about 239,000 miles (384,400 km) from Earth.
This balance is not a coincidence — it is a natural outcome of the laws of physics. If the Moon had ever been moving at a speed that did not match gravity’s pull, its orbit would have adjusted over time until it reached a stable configuration or was flung away. Our Moon achieved that stable balance early in the solar system’s history.
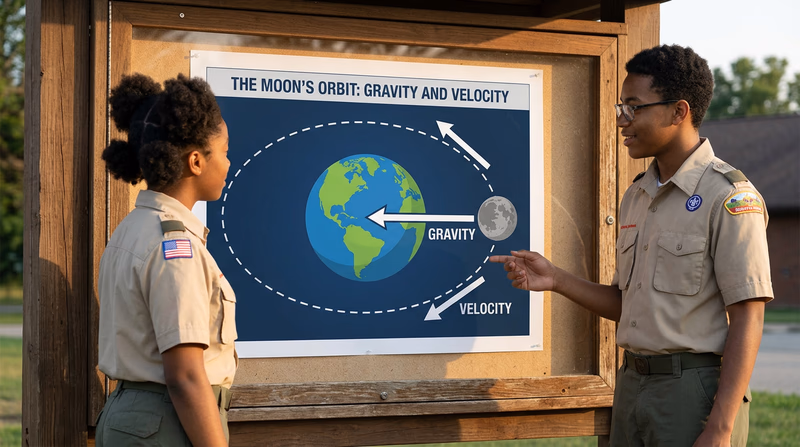
Inertia — The Hidden Factor
There is one more concept that ties this together: inertia. Inertia is the tendency of a moving object to keep moving in a straight line at a constant speed unless a force acts on it. This is Newton’s First Law of Motion.
The Moon’s inertia keeps it moving forward in a straight line. Gravity constantly bends that straight-line path into a curve. The combination of straight-line inertia and the curved pull of gravity produces the Moon’s elliptical orbit.
The Orbit Is Not a Perfect Circle
The Moon’s orbit is actually an ellipse (a slightly squished circle). At its closest point to Earth (perigee), the Moon is about 226,000 miles away. At its farthest point (apogee), it is about 252,000 miles away. This difference in distance is why the Moon appears slightly larger and brighter at perigee (sometimes called a “supermoon” in the media) and slightly smaller at apogee.
Summary of Factors
To summarize for your counselor, the Moon stays in orbit because of:
- Gravity — Earth’s gravitational pull constantly attracts the Moon inward.
- Orbital velocity — The Moon’s sideways speed of about 2,288 mph keeps it from falling straight into Earth.
- Inertia — The Moon’s tendency to keep moving in a straight line, as described by Newton’s First Law.
- The balance between these forces — Gravity bends the Moon’s straight-line path into a closed curve (an ellipse), creating a stable orbit.
Now let’s bring everything together by exploring eclipses and the phases of the Moon in detail.
Req 6d — Eclipses & Moon Phases
Understanding the geometry of the Sun, Earth, and Moon is the key to understanding both Moon phases and eclipses. Everything comes down to one simple idea: we see the Moon by reflected sunlight, and the amount of the sunlit side we can see depends on the Moon’s position relative to Earth and the Sun.
The Moon’s Phases
The Moon takes about 29.5 days to orbit Earth (this is called a synodic period or lunar month). As it orbits, the angle between the Sun, Earth, and Moon changes, and we see different amounts of the Moon’s sunlit half. Here are the four primary phases:
New Moon — The Moon is between Earth and the Sun (Sun → Moon → Earth). The sunlit side faces away from us, so the Moon is invisible or nearly invisible. The Moon rises and sets with the Sun, so it is in the daytime sky and cannot be seen at night.
First Quarter (Half Moon) — The Moon is 90 degrees from the Sun (a right angle). We see exactly half of the sunlit side. The Moon rises around noon and sets around midnight, making it visible in the afternoon and evening sky.
Full Moon — Earth is between the Sun and Moon (Sun → Earth → Moon). We see the entire sunlit face. The Moon rises at sunset and is visible all night long. It sets around sunrise.
Last Quarter (Half Moon) — The Moon is 90 degrees from the Sun on the opposite side from the first quarter. Again we see half the sunlit face, but the opposite half is lit. The Moon rises around midnight and is visible in the morning sky.
Between these four phases are the transitional phases: waxing crescent (between new and first quarter), waxing gibbous (between first quarter and full), waning gibbous (between full and last quarter), and waning crescent (between last quarter and new).
Waxing means the lit portion is growing. Waning means it is shrinking.
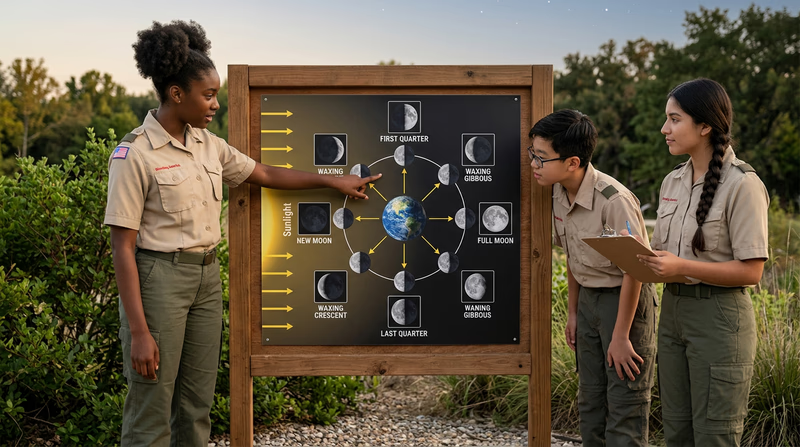
Why We Do Not Get Eclipses Every Month
If the Moon orbits Earth every 29.5 days, you might wonder: why do we not get a solar eclipse every new Moon and a lunar eclipse every full Moon? The answer is that the Moon’s orbit is tilted about 5 degrees relative to Earth’s orbit around the Sun. Most months, the Moon passes slightly above or below the Sun (at new Moon) or slightly above or below Earth’s shadow (at full Moon).
Eclipses only happen when the Moon crosses the plane of Earth’s orbit (at points called nodes) at exactly the time of new Moon or full Moon. This alignment happens two to five times per year.
Solar Eclipses
A solar eclipse occurs at new Moon when the Moon passes directly between Earth and the Sun, casting a shadow on Earth’s surface.
Position: Sun → Moon → Earth (aligned, with the Moon crossing the orbital plane)
There are three types:
- Total Solar Eclipse — The Moon completely covers the Sun’s disk. Observers in the Moon’s small, dark central shadow (umbra) see the Sun’s corona. The path of totality is narrow — typically only 60–100 miles wide.
- Partial Solar Eclipse — Only part of the Sun is covered. Observers in the Moon’s lighter outer shadow (penumbra) see a partial eclipse.
- Annular Eclipse — The Moon is near apogee (its farthest point from Earth) and appears too small to fully cover the Sun, leaving a bright ring (“annulus”) of sunlight visible.
Lunar Eclipses
A lunar eclipse occurs at full Moon when Earth passes directly between the Sun and Moon, and Earth’s shadow falls on the Moon.
Position: Sun → Earth → Moon (aligned, with the Moon crossing the orbital plane)
There are three types:
- Total Lunar Eclipse — The Moon moves entirely into Earth’s umbra (dark central shadow). The Moon does not go completely dark — instead, it turns a dramatic reddish-copper color because Earth’s atmosphere bends some red sunlight into the shadow. This is sometimes called a “Blood Moon.”
- Partial Lunar Eclipse — Only part of the Moon enters Earth’s umbra. Part of the Moon appears darkened while the rest remains bright.
- Penumbral Lunar Eclipse — The Moon passes through Earth’s faint outer shadow (penumbra). The dimming is subtle and hard to notice with the naked eye.
Comparing Solar and Lunar Eclipses
| Feature | Solar Eclipse | Lunar Eclipse |
|---|---|---|
| Occurs at | New Moon | Full Moon |
| Alignment | Sun → Moon → Earth | Sun → Earth → Moon |
| What is blocked | The Sun’s light is blocked by the Moon | The Moon enters Earth’s shadow |
| Who can see it | Only along a narrow path on Earth | Anyone on the nighttime side of Earth |
| Duration | Totality lasts 1–7 minutes | Totality can last over an hour |
| Safety | Requires solar filters (except during totality) | Safe to watch with naked eyes |
| Frequency | 2–5 per year (at any location, much rarer) | 2–3 per year (visible from half of Earth) |
Now let’s turn from reflected light to the original source — our Sun.
Req 7a — Composition of the Sun
The Sun is the star at the center of our solar system — a massive ball of hot gas (plasma) that produces energy through nuclear fusion. It is the source of almost all light, heat, and energy on Earth. Understanding the Sun helps you understand every other star you see in the night sky, because the Sun is a star, just like those distant points of light, only much closer.
What the Sun Is Made Of
The Sun is composed almost entirely of two elements:
- Hydrogen — About 73% of the Sun’s mass. Hydrogen is the lightest and most abundant element in the universe.
- Helium — About 25% of the Sun’s mass. Helium was actually discovered in the Sun before it was found on Earth (its name comes from “Helios,” the Greek god of the Sun).
- Everything else — About 2%. This includes small amounts of oxygen, carbon, neon, iron, and dozens of other elements.
The Sun generates energy through nuclear fusion in its core, where temperatures reach about 27 million degrees Fahrenheit (15 million degrees Celsius). At these extreme temperatures and pressures, hydrogen atoms are squeezed together so hard that they fuse into helium, releasing enormous amounts of energy in the process. Every second, the Sun converts about 600 million tons of hydrogen into helium — and the “missing” mass is converted directly into energy, following Einstein’s famous equation E = mc².
The Sun’s Structure
The Sun has several distinct layers:
- Core — Where fusion happens. Temperature: ~27 million °F.
- Radiative Zone — Energy slowly works its way outward through dense plasma. It can take a photon 100,000 years to travel through this zone.
- Convective Zone — Energy rises through churning convection currents, like water boiling in a pot.
- Photosphere — The visible “surface” of the Sun. Temperature: ~10,000 °F. This is what you see (safely, with proper filters!).
- Chromosphere — A thin layer above the photosphere, visible as a reddish glow during total solar eclipses.
- Corona — The Sun’s outer atmosphere, extending millions of miles into space. It is visible as a ghostly white halo during total solar eclipses. Strangely, the corona is far hotter than the photosphere — over 1 million °F — and scientists are still working to fully explain why.
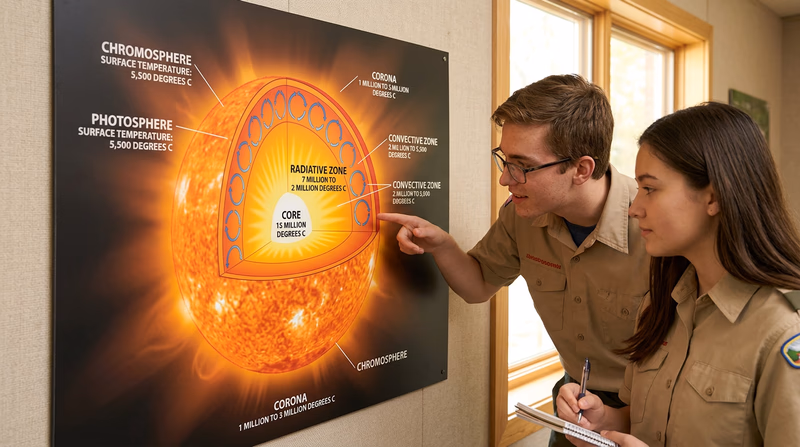
The Sun Among the Stars
The Sun is classified as a G-type main-sequence star (also called a “yellow dwarf,” though it is actually white). It is a very ordinary star — not particularly large, hot, or luminous compared to the full range of stars in the galaxy. This is actually good news for us, because more extreme stars tend to be unstable or short-lived.
- Size comparison: The Sun is about 109 times the diameter of Earth. However, compared to giant stars like Betelgeuse (which is about 700 times the Sun’s diameter) or Rigel (about 79 times), the Sun is modest.
- Temperature comparison: The Sun’s surface temperature of about 10,000 °F (5,500 °C) makes it a medium-temperature star. Blue stars like Rigel are much hotter (over 20,000 °F), while red stars like Betelgeuse are cooler (about 6,000 °F).
- Age: The Sun is about 4.6 billion years old — roughly middle-aged for a star of its type. It has enough hydrogen fuel to last another 5 billion years.
- Luminosity: The Sun is brighter than about 85% of stars in the Milky Way, most of which are small, dim red dwarf stars.
Effects on Earth’s Weather
The Sun drives virtually all weather on Earth:
- Heating the atmosphere — Solar radiation heats Earth’s surface unevenly (more at the equator, less at the poles), creating temperature differences that drive wind patterns, ocean currents, and storm systems.
- The water cycle — Solar energy evaporates water from oceans and lakes, which rises as water vapor, forms clouds, and falls as rain or snow. Without the Sun, there would be no water cycle and no weather.
- Seasonal changes — Earth’s tilted axis means different hemispheres receive more or less direct sunlight throughout the year, creating seasons. This tilt — not our distance from the Sun — is why we have summer and winter.
Effects on Communications
The Sun also affects Earth’s technology, especially during periods of high solar activity:
- Solar flares — Sudden bursts of energy from the Sun’s surface can release intense radiation that reaches Earth in minutes. This radiation can disrupt high-frequency radio communications, especially those used by airlines and military.
- Coronal mass ejections (CMEs) — Massive clouds of charged particles ejected from the Sun. When they hit Earth’s magnetic field (1–3 days after leaving the Sun), they can cause geomagnetic storms that disrupt GPS signals, damage satellites, and even overload power grids.
- The ionosphere — Solar UV and X-ray radiation creates a layer of charged particles (the ionosphere) high in Earth’s atmosphere. Radio signals bounce off this layer, enabling long-distance radio communication. Changes in solar activity alter the ionosphere and can improve or degrade radio reception.
- Aurora — When charged particles from the Sun interact with Earth’s magnetic field, they produce the Northern Lights (Aurora Borealis) and Southern Lights (Aurora Australis) — beautiful curtains of colored light in the polar skies. During strong solar storms, aurorae can be visible from much lower latitudes.
Next, let’s zoom in on one of the most interesting features on the Sun’s surface — sunspots.
Req 7b — Sunspots
If you safely observe the Sun through a solar filter or by projection (as described in Requirement 1d), you may notice dark patches on its surface. These are sunspots — one of the most fascinating and important features of solar astronomy.
What Are Sunspots?
Sunspots are temporary regions on the Sun’s photosphere (visible surface) that appear darker than the surrounding area. They are caused by intense magnetic activity that inhibits convection — the normal process of hot gas rising to the surface. Because the magnetic field suppresses this flow, the sunspot region is cooler than the surrounding photosphere.
A typical sunspot has two parts:
- Umbra — The dark center, with a temperature of about 6,500 °F (3,600 °C).
- Penumbra — A lighter, striated halo surrounding the umbra, with temperatures between the umbra and the normal photosphere.
Despite appearing dark, sunspots are still incredibly hot and bright — they only look dark by contrast with the even brighter photosphere around them (which is about 10,000 °F). If you could isolate a sunspot and view it against the black sky, it would still be blindingly bright.
Sunspots can be enormous. A single sunspot can be larger than Earth, and sunspot groups can stretch across hundreds of thousands of miles of the Sun’s surface.
The Solar Cycle
Sunspot numbers are not constant — they rise and fall in a roughly 11-year cycle called the solar cycle (or sunspot cycle):
- Solar Minimum — The Sun has very few sunspots (sometimes none). Solar activity is quiet.
- Solar Maximum — The Sun is covered with sunspot groups, and solar activity (flares, CMEs) is at its peak.
The current solar cycle (Cycle 25) began around December 2019. Scientists track the number and size of sunspots to predict solar activity and its effects on Earth.
Effects on Solar Radiation
Sunspots themselves are cooler and emit less light than the surrounding photosphere. However, paradoxically, the Sun is actually slightly brighter overall during solar maximum (when sunspots are numerous). This is because sunspot regions are surrounded by bright areas called faculae that emit extra radiation, more than compensating for the dark spots.
More importantly, sunspots are associated with several types of energetic events that significantly affect solar radiation:
Solar Flares — Sudden, intense bursts of electromagnetic radiation (light, UV, X-rays) from the Sun’s surface, often originating near sunspot groups. Flares can increase the Sun’s X-ray output by a factor of 1,000 or more for brief periods. The radiation reaches Earth at the speed of light (about 8 minutes), and can:
- Disrupt shortwave radio communications
- Cause radio blackouts on the sunlit side of Earth
- Increase radiation exposure for astronauts and high-altitude aircraft passengers
- Temporarily alter Earth’s ionosphere
Coronal Mass Ejections (CMEs) — Massive eruptions of magnetized plasma from the Sun’s corona, often associated with sunspot regions. CMEs travel through space at 1–5 million miles per hour and can reach Earth in 1–3 days. When they interact with Earth’s magnetic field, they can:
- Trigger geomagnetic storms
- Damage satellites and spacecraft electronics
- Induce electrical currents in power grids, potentially causing blackouts
- Produce spectacular aurora displays at unusually low latitudes
Increased UV Output — During solar maximum, the Sun’s ultraviolet radiation output increases by up to 10%. While this is a small percentage change, UV radiation has significant effects on Earth’s upper atmosphere, ozone layer, and atmospheric chemistry.
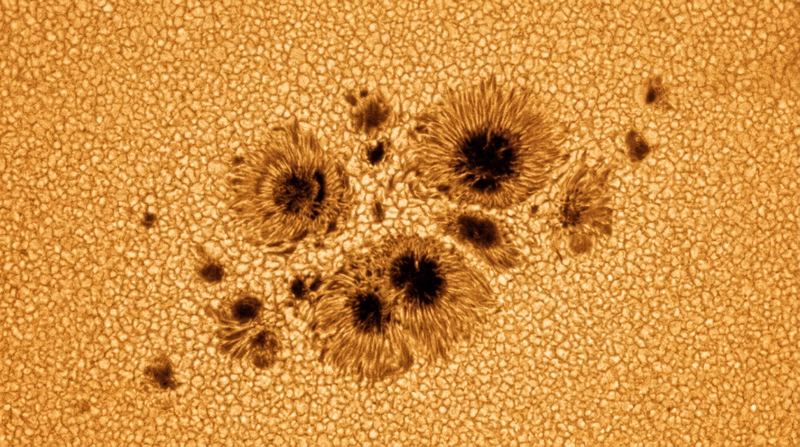
Historical Effects of Solar Activity
Some of the most dramatic effects of sunspot-related solar activity include:
- The Carrington Event (1859) — The most powerful geomagnetic storm ever recorded. A massive CME hit Earth, causing telegraph systems worldwide to spark and catch fire. If a similar event happened today, it could cause trillions of dollars in damage to power grids and satellites.
- The Halloween Storms (2003) — A series of powerful solar flares and CMEs disrupted GPS systems, forced airlines to reroute flights away from the poles, and caused a power blackout in Sweden.
- Space weather monitoring — Today, NASA and NOAA continuously monitor the Sun for potentially dangerous solar activity and issue warnings to protect satellites, power grids, and astronauts.
Now let’s look at something you can observe with just your eyes — the different colors of stars and what they tell us.
Req 7c — Star Colors
Look carefully at the stars on a clear night and you will notice they are not all the same color. Some glow warm orange-red, others shine bright white, and a few blaze blue-white. These colors are not random — they tell you something fundamental about each star: its surface temperature.
What Star Colors Mean
Star color is directly related to surface temperature:
- Blue and blue-white stars are the hottest, with surface temperatures of 18,000–50,000+ °F (10,000–30,000+ °C). They burn through their fuel very fast and live relatively short lives (millions of years).
- White stars have temperatures of about 13,000–18,000 °F (7,000–10,000 °C).
- Yellow-white and yellow stars (like the Sun) have temperatures of about 9,000–13,000 °F (5,000–7,000 °C). They are middle-of-the-road stars with long, stable lifetimes (billions of years).
- Orange stars have temperatures of about 6,500–9,000 °F (3,500–5,000 °C).
- Red stars are the coolest visible stars, with surface temperatures of 3,500–6,500 °F (2,000–3,500 °C). They can be either small, dim red dwarfs (the most common type of star) or enormous, bloated red supergiants near the end of their lives.
This relationship between color and temperature works just like heating a piece of metal. If you heat iron, it first glows dull red, then orange, then yellow, then white, and eventually blue-white as it gets hotter and hotter. Stars follow the same physics.
Astronomers classify stars by their color/temperature using a system of spectral types: O (hottest/blue) → B → A → F → G → K → M (coolest/red). The Sun is a G-type star.
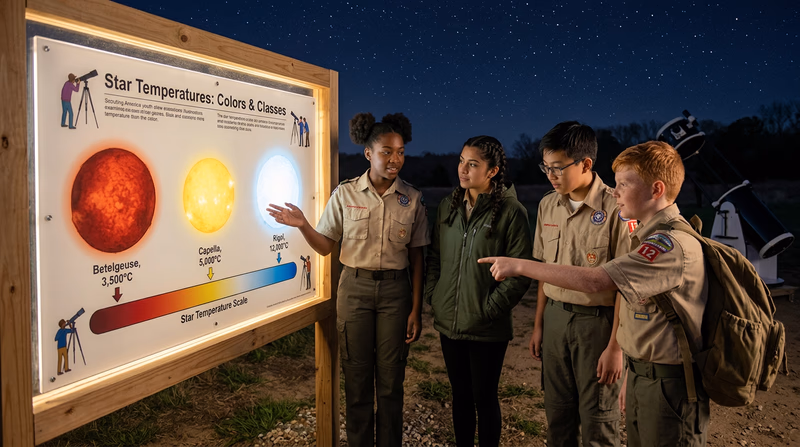
Stars to Identify
Here are excellent examples of each color that you can find in the night sky:
Red Stars
Betelgeuse (in Orion) — A red supergiant at Orion’s upper-left shoulder. Its reddish-orange color is easy to see with the naked eye. Betelgeuse is enormous — if placed at the center of our solar system, it would extend past the orbit of Jupiter. It is near the end of its life and will eventually explode as a supernova.
Antares (in Scorpius) — The “heart of the Scorpion.” Its name literally means “rival of Mars” (anti-Ares) because its red color resembles the Red Planet. Antares is another red supergiant, about 700 times the diameter of the Sun. Best seen in summer.
Aldebaran (in Taurus) — An orange-red giant star that marks the bull’s eye. While not as red as Betelgeuse, its warm color is clearly visible. Best seen in winter.
Blue Stars
Rigel (in Orion) — A brilliant blue-white supergiant at Orion’s lower-right knee. Rigel is one of the brightest stars in the sky and about 120,000 times more luminous than the Sun. Compare its color directly to Betelgeuse — they are in the same constellation, making the contrast obvious.
Spica (in Virgo) — A hot blue-white star about 12,000 times more luminous than the Sun. Best seen in spring and early summer.
Vega (in Lyra) — One of the brightest stars overhead during summer, with a distinctive blue-white color. Vega was the first star (other than the Sun) to be photographed and the first to have its spectrum recorded.
Yellow Stars
Capella (in Auriga) — A brilliant golden-yellow star, the sixth-brightest in the night sky. It is actually a system of four stars, but the two dominant ones are both yellow giants similar in temperature to our Sun but much larger. Best seen in winter and spring.
Pollux (in Gemini) — An orange-yellow giant star, the brighter of the two “twin” stars in Gemini. Its warm golden hue is easy to see. Best seen in winter.
Alpha Centauri A — The brightest component of the nearest star system to our Sun. It is a yellow star very similar to our Sun in temperature and color. However, it is only visible from the southern United States and points farther south.
How to See Star Colors
Star colors are subtle — your eyes need to be dark-adapted, and you need to know where to look:
- Compare side by side. The easiest way to see color is to compare two stars. Look at Betelgeuse and Rigel in Orion — the red-orange vs. blue-white contrast is dramatic.
- Use binoculars. Binoculars gather more light than your eye and make star colors more vivid.
- Slightly defocus. If you deliberately defocus your binoculars slightly, stars become small colored disks instead of points, making colors easier to see.
- Avoid light-polluted skies. Light pollution washes out the subtle colors of fainter stars.
You have completed the core knowledge requirements. Now it is time for the most exciting part — choosing a hands-on astronomy project.
Req 8 — Choose Your Adventure
This is your chance to go beyond learning about astronomy and actually do astronomy. You will choose one of six hands-on projects, each offering a different way to engage with the night sky. Read through all the options, pick the one that excites you most, and get your counselor’s approval before you begin.
Remember: you only need to complete ONE of these options.
Option A: Visit a Planetarium or Observatory
A planetarium projects a realistic night sky onto a domed ceiling, letting you learn constellations and celestial events in a comfortable setting. An observatory houses real telescopes used for observation and research. Many observatories have public viewing nights.
Report Checklist
What to include in your report, scrapbook, or video- The name and location of the facility you visited.
- What activities were going on (public viewing, show, lecture, research).
- What exhibits or displays you saw and what you learned from them.
- What telescopes and instruments you saw, including their type and size.
- What celestial objects you observed (if applicable) and what they looked like.
- Your personal highlights — what surprised or excited you most.
Option B: Extended Observation Session
This option is for Scouts who want to go deeper into observing. You will plan a session targeting at least 10 objects you have not yet observed for this badge.
Great objects to target:
- Messier objects — Charles Messier cataloged 110 deep-sky objects including nebulae, star clusters, and galaxies. Many are visible with binoculars or a small telescope:
- M31 (Andromeda Galaxy), M42 (Orion Nebula), M45 (Pleiades), M13 (Hercules Cluster), M44 (Beehive Cluster)
- Double stars — Stars that appear close together, like Albireo in Cygnus (a beautiful gold and blue pair through a telescope)
- Lunar features — Craters, mountains, and rilles beyond the five you identified in Req 6a
- The International Space Station — Track it at spotthestation.nasa.gov
Option C: Host a Star Party for Your Troop
A star party is an event where you invite others to observe the sky with you. Hosting one means you are the guide — sharing your knowledge and excitement about astronomy.
Star Party Planning
Steps to a successful event- Choose a date near new Moon for the darkest skies.
- Pick a location away from bright lights with a clear view of the sky.
- Check the weather forecast and have a rain date.
- Plan 3–5 objects to show your group (the Moon, a planet, a star cluster, and a bright double star are great choices).
- Practice finding your targets before the event.
- Prepare brief explanations for each object — share interesting facts.
- Remind attendees to bring warm clothing and use red-light flashlights.
- Consider having a star chart or app demonstration to start the evening.
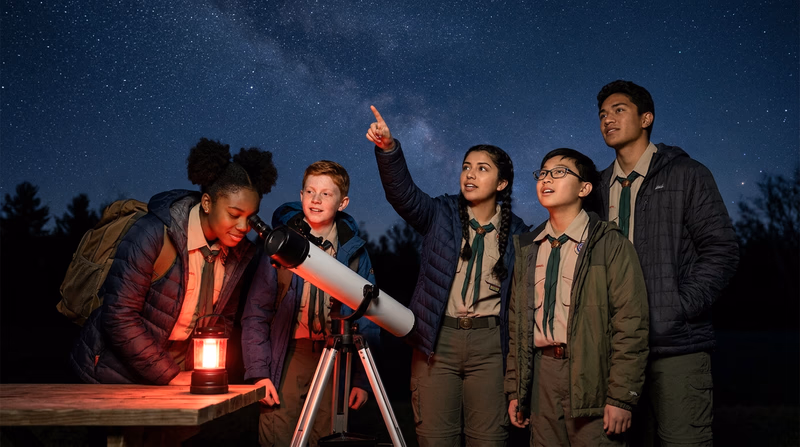
Option D: Help an Astronomy Club Star Party
Local astronomy clubs regularly host public star parties where experienced members share their telescopes and knowledge with the community. Volunteering with a club lets you learn from experienced astronomers while helping introduce others to the sky.
How to find a club:
- Search for “astronomy club” + your city or state online
- Check the Astronomical League’s member club directory at astroleague.org
- Ask at your local planetarium, science museum, or library
How you can help:
- Set up and take down telescopes and equipment
- Guide visitors to viewing stations
- Help explain what people are looking at
- Manage lines and answer basic questions
- Distribute star charts or handouts
Option E: Astrophotography Project
This option combines astronomy with photography. You will document the movement of a celestial object over time and create a visual display.
Suggested projects:
- Moon movement: Photograph the Moon at the same time several nights in a row to show its changing phase and position.
- Planet tracking: Photograph a bright planet’s position among the stars over several weeks.
- Meteor shower: Set up a camera on a tripod during a meteor shower and capture streaks of light.
Option F: Online Observing
Several programs let you control real, professional-grade telescopes remotely through the internet. This is an incredible opportunity — you can observe objects that might be impossible from your location due to weather, light pollution, or geographic limitations.
Online observing resources:
Skynet Robotic Telescope Network University of North Carolina's network of robotic telescopes available for educational use. Request observations of galaxies, nebulae, and more. Link: Skynet Robotic Telescope Network — https://skynet.unc.edu/ MicroObservatory — Harvard Free robotic telescopes operated by Harvard-Smithsonian Center for Astrophysics, designed for students. Link: MicroObservatory — Harvard — https://mo-www.cfa.harvard.edu/MicroObservatory/Which Option Should You Choose?
| Option | Best for… | Requires… |
|---|---|---|
| A — Planetarium/Observatory | Learning from experts, seeing professional equipment | Access to a facility, travel |
| B — Extended Observation | Going deeper into observing, building skills | Binoculars or telescope, dark sky |
| C — Host Star Party | Sharing knowledge, leadership practice | Equipment, a group to invite |
| D — Help Club Star Party | Learning from experienced astronomers | Finding a local club |
| E — Astrophotography | Photography enthusiasts, visual learners | Camera (smartphone works!), patience |
| F — Online Observing | Areas with bad weather or light pollution | Internet access, parent permission |
Talk with your counselor about which option works best for your situation, interests, and available resources.
You are almost done. One more requirement to go — exploring astronomy as a career or hobby.
Req 9 — Astronomy Careers or Hobbies
This final requirement asks you to think about how astronomy could fit into your future — either as a career or as a lifelong hobby. You only need to complete ONE of the two options below.
Option A: Astronomy Careers
Astronomy opens doors to many career paths — not just “astronomer.” The skills you develop in astronomy (observation, data analysis, math, physics, problem-solving, and technical writing) are valuable across many fields.
Career paths to consider:
Astronomer / Astrophysicist — Research scientists who study celestial objects, develop theories about the universe, and analyze data from telescopes and space missions. They typically work at universities, research institutions, or government agencies like NASA or the National Science Foundation.
- Education: Ph.D. in astronomy, astrophysics, or physics (typically 5–7 years after a bachelor’s degree).
- Key skills: Advanced mathematics, physics, computer programming, data analysis.
- Starting salary: $60,000–$80,000 for postdoctoral positions; $90,000–$120,000+ for faculty positions.
- Outlook: Competitive but growing, especially in data science applications.
Aerospace Engineer — Designs spacecraft, satellites, telescopes, and instruments used in space exploration. Aerospace engineers apply physics and engineering to build the hardware that makes space science possible.
- Education: Bachelor’s degree in aerospace engineering, mechanical engineering, or physics. Master’s degree helpful for advanced positions.
- Key skills: Mathematics, physics, computer-aided design, materials science.
- Starting salary: $75,000–$95,000.
- Outlook: Strong demand, especially with growing commercial space industry.
Planetarium Director / Educator — Develops and presents astronomy programs for the public, manages planetarium facilities, and creates educational content. This career combines astronomy knowledge with communication and teaching skills.
- Education: Bachelor’s degree in astronomy, physics, education, or science communication. Master’s degree preferred for director roles.
- Key skills: Public speaking, multimedia production, curriculum design, astronomy knowledge.
- Starting salary: $40,000–$60,000 for educators; $60,000–$90,000 for directors.
Data Scientist (Astronomy Applications) — Analyzes massive datasets from telescopes and space missions. Modern astronomy generates enormous amounts of data — more than humans can review — so data scientists create algorithms to find patterns, classify objects, and make discoveries.
- Education: Bachelor’s or master’s degree in computer science, statistics, physics, or data science.
- Key skills: Programming (Python, SQL), machine learning, statistics, visualization.
- Starting salary: $80,000–$110,000.
Science Journalist / Writer — Translates complex astronomical discoveries into stories that the public can understand and get excited about. Works for media outlets, science publications, museums, or as freelancers.
- Education: Bachelor’s degree in journalism, science communication, or a science field.
- Key skills: Writing, interviewing, research, understanding scientific concepts.
- Starting salary: $40,000–$60,000.
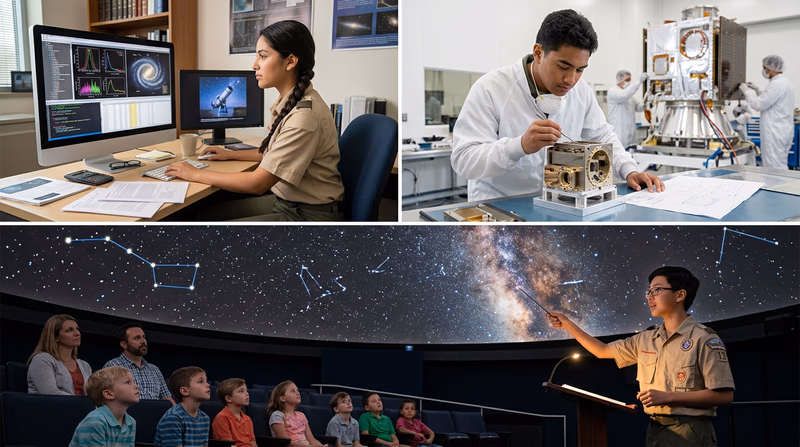
Option B: Astronomy as a Hobby
Astronomy is one of the most accessible and rewarding hobbies in the world. You can start with nothing more than your eyes and a curiosity about the sky, and over time build a sophisticated personal observatory in your own backyard. Here are some hobby paths to explore:
Visual Observing — The traditional approach: you and a telescope under a dark sky. Many amateur astronomers work through observing programs like the Astronomical League’s Messier Certificate, which challenges you to find all 110 Messier objects. It is a lifelong pursuit that gets richer with experience.
- Startup cost: $200–$500 for a quality beginner telescope; $0 if you start with binoculars you already own.
- Ongoing costs: Star charts, eyepieces, travel to dark sites, astronomy club dues ($20–$50/year).
Astrophotography — Capturing images of celestial objects with cameras, from simple smartphone Moon shots to deep-sky images that rival professional observatories. This hobby blends technical skills (optics, image processing, equipment setup) with artistic vision.
- Startup cost: $0 (smartphone + tripod) to $2,000+ (dedicated camera, tracking mount, telescope).
- Ongoing costs: Software subscriptions, equipment upgrades, travel.
Citizen Science — Contributing to real scientific research. Programs like Galaxy Zoo, Planet Hunters, and the American Association of Variable Star Observers (AAVSO) let amateur astronomers contribute to real discoveries from their own observations.
- Startup cost: $0 for online programs; same as visual observing if doing your own observations.
- Ongoing costs: Minimal.
Outreach and Education — Sharing your knowledge with others by volunteering at public star parties, teaching astronomy classes, or mentoring younger Scouts. Many astronomy clubs have active outreach programs.
Getting Started as a Hobbyist
Short-term and long-term goals to discuss with your counselor- Short-term: Join a local astronomy club and attend a meeting or star party.
- Short-term: Download a planetarium app and learn 20 constellations.
- Short-term: Save for and purchase a pair of 10x50 binoculars.
- Medium-term: Complete an observing program (like the Astronomical League’s Constellation Hunter list).
- Medium-term: Purchase a telescope and learn to use it confidently.
- Long-term: Build a personal observatory or permanent observing setup.
- Long-term: Contribute to a citizen science project or mentor new observers.
Congratulations — you have worked through all nine requirements! Head to the Extended Learning section for resources that will help you continue your astronomical journey.
Extended Learning
A. Introduction
Congratulations — you have completed all the requirements for the Astronomy merit badge! You can now identify constellations, explain how telescopes work, understand the Moon’s phases and eclipses, and speak knowledgeably about our Sun, planets, and stars. But this is just the beginning. The universe is vast, and there is always more to discover. Here are some deeper dives and resources to fuel your continued exploration.
B. Deep Dive: Choosing Your First Telescope
Buying a telescope is one of the most exciting steps for a new astronomer, but the market is filled with options that can be overwhelming. Understanding a few key principles will help you make a smart choice and avoid common mistakes.
The most important specification is aperture — the diameter of the telescope’s main lens or mirror. Aperture determines how much light the telescope collects and how much detail it can show. A telescope with a 6-inch (150mm) aperture will show you far more than one with a 3-inch (76mm) aperture, regardless of the magnification advertised on the box. Beware of telescopes marketed with high magnification numbers (like “525x power!”) — this is a common sales tactic for low-quality telescopes. High magnification without sufficient aperture produces dim, blurry images.
For a first telescope, consider these three options:
Tabletop Dobsonian (4–6 inch) — An affordable reflector telescope on a simple swivel base. Dobsonians offer the most aperture per dollar and are incredibly easy to use — just push the tube to point where you want and look. They sit on a table or sturdy surface and require almost zero setup. A 6-inch tabletop Dobsonian ($200–$350) will show you lunar craters, Jupiter’s cloud bands and moons, Saturn’s rings, star clusters, bright nebulae, and even nearby galaxies.
Full-size Dobsonian (8–10 inch) — A larger reflector on a floor-standing rocker box. The 8-inch Dobsonian ($300–$500) is widely considered the single best telescope for serious beginners. Its large aperture reveals stunning detail on planets and hundreds of deep-sky objects. The trade-off is size and weight — an 8-inch Dob weighs about 40 pounds and needs a car to transport.
Computerized GoTo Telescope (4–5 inch) — A compound (Schmidt-Cassegrain or Maksutov) telescope on a motorized mount with a built-in database of thousands of objects. Press a button, and the telescope finds the object automatically. These are more expensive ($400–$800+) but incredibly convenient, especially if you have limited dark-sky access and want to spend your time observing rather than hunting.
Avoid department store telescopes with flimsy tripods and plastic eyepieces — they produce frustrating images and often end up collecting dust. Instead, buy from a reputable astronomy retailer or consider a quality used telescope from a local astronomy club.
C. Deep Dive: Navigating with the Stars
Long before GPS, sailors, explorers, and travelers found their way using the stars. Learning celestial navigation connects you to one of humanity’s oldest skills and gives you a backup navigation method that never runs out of batteries.
The most basic celestial navigation technique is finding north using Polaris. Because Polaris sits almost directly above Earth’s North Pole, its height above the horizon equals your latitude. A Scout standing at 40° north latitude will see Polaris 40° above the northern horizon. At the equator, Polaris sits right on the horizon. At the North Pole, it is directly overhead.
Beyond Polaris, you can use the celestial sphere concept. Imagine the sky as a giant dome with Earth at the center. The stars rise in the east and set in the west, just like the Sun. If you face south and watch a star, it will move from left (east) to right (west) across the sky. This east-west motion provides direction even when Polaris is hidden by clouds or terrain.
For more precise navigation, historical navigators used a sextant — an instrument that measures the angle between a celestial object and the horizon. By measuring the altitude of the Sun at local noon, or the altitude of known stars at a known time, a navigator could calculate both latitude and longitude. Sextant navigation was the primary method of ocean navigation from the 1700s until GPS became widespread in the 1990s.
If you earn both the Astronomy and Orienteering merit badges, you will have a powerful combination of celestial and terrestrial navigation skills — the kind of knowledge that builds true self-reliance in the outdoors.
D. Deep Dive: What Hubble and Webb Have Revealed
Two space telescopes have transformed our understanding of the universe more than any other instruments in history.
The Hubble Space Telescope, launched in 1990, orbits 340 miles above Earth. Free from atmospheric distortion, Hubble has produced some of the most iconic images in science: the Pillars of Creation in the Eagle Nebula, the Ultra Deep Field (revealing thousands of galaxies in a patch of sky the size of a grain of sand held at arm’s length), and detailed views of planets, nebulae, and galaxies across the observable universe. Hubble observes in visible, ultraviolet, and near-infrared light.
The James Webb Space Telescope (JWST), launched on Christmas Day 2021, is the most powerful space telescope ever built. It orbits nearly a million miles from Earth at a point called L2, where it is shielded from the Sun, Earth, and Moon’s heat. Webb’s 21-foot gold-coated mirror (over 6 times the collecting area of Hubble) observes primarily in infrared light, allowing it to peer through cosmic dust clouds that block visible light, study the atmospheres of planets orbiting other stars, and see galaxies that formed less than 300 million years after the Big Bang.
Together, Hubble and Webb have helped determine the age of the universe (13.8 billion years), confirmed the accelerating expansion of the universe, discovered thousands of exoplanets, and revealed the earliest galaxies ever seen. Their discoveries are freely available — you can browse and download full-resolution images at hubblesite.org and webbtelescope.org.
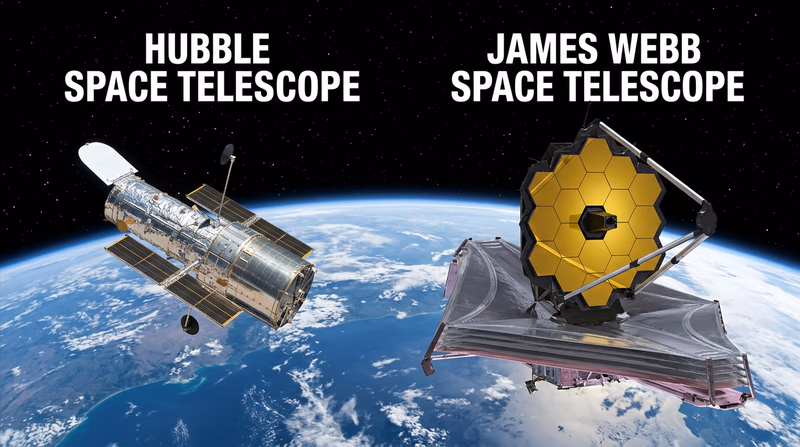
E. Real-World Experiences
Dark Sky Parks
Star Parties and Astronomy Festivals
NASA Visitor Centers
Major Observatories with Public Programs
Meteor Shower Watching
F. Organizations
The largest federation of amateur astronomy clubs in the United States, offering observing programs, awards, and a network of local clubs.
Organization: Astronomical League — https://www.astroleague.org/
Works to protect the night sky from light pollution through education, advocacy, and dark-sky place designations.
Organization: International Dark-Sky Association — https://www.darksky.org/
Coordinates citizen science observations of variable stars, enabling amateurs to contribute to real astronomical research.
Organization: American Association of Variable Star Observers (AAVSO) — https://www.aavso.org/
The world’s largest space advocacy organization, founded by Carl Sagan. Promotes space exploration, planetary science, and the search for life beyond Earth.
Organization: The Planetary Society — https://www.planetary.org/
A nationwide coalition of astronomy clubs that bring the wonders of space to the public through events and educational programs.
Organization: NASA Night Sky Network — https://nightsky.jpl.nasa.gov/
One of the world’s oldest astronomy organizations, offering resources for both professional and amateur astronomers.
Organization: Royal Astronomical Society — https://ras.ac.uk/