Req 4c — Sketching the Big Dipper
This requirement gets you doing real observational astronomy — recording what you see, when you see it, and noticing how the sky changes over time. Sketching is one of the oldest astronomical traditions. Before cameras existed, every astronomical discovery was recorded by hand. You are following in the footsteps of Galileo, who sketched the Moon and Jupiter’s moons in his notebook more than 400 years ago.
Why the Sky Appears to Rotate
Before you start sketching, it helps to understand what you are about to observe. The stars appear to move across the sky because Earth is rotating on its axis. We complete one full rotation every 24 hours, so the sky appears to spin at a rate of about 15 degrees per hour (360 degrees ÷ 24 hours).
There is one star that barely moves at all — Polaris, the North Star. Polaris sits almost exactly above Earth’s North Pole, so as Earth spins, Polaris stays nearly fixed while everything else appears to circle around it. That is what makes the Big Dipper and Cassiopeia perfect subjects for this activity — they circle Polaris and never set below the horizon from most of the United States.
Finding Your Subjects
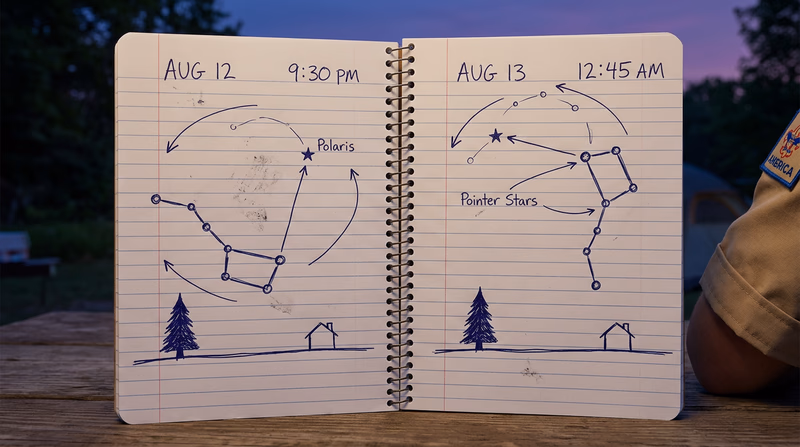
The Big Dipper — Seven bright stars forming a shape that looks like a large soup ladle or water dipper. Four stars form the “bowl” and three form the “handle.” The two stars at the outer edge of the bowl (Merak and Dubhe, called the “Pointer Stars”) point directly to Polaris.
Cassiopeia — Five bright stars forming a distinctive W-shape (or M-shape, depending on its orientation). Cassiopeia is on the opposite side of Polaris from the Big Dipper. If the Big Dipper is high, Cassiopeia is low, and vice versa.
How to Make Your Sketches
Here is a step-by-step approach for creating accurate, useful sketches:
Sketch 1 — Early Evening:
- Go outside at least an hour after sunset so the sky is fully dark. Note the exact date and time.
- Face north. Use a compass or compass app, or find Polaris using the Big Dipper’s pointer stars.
- Draw the horizon first as a horizontal line across the bottom of your paper. Include any landmarks you can see — a tree line, rooftop, hill, or building. These give your sketch a reference point.
- Mark Polaris on your sketch. It will be roughly the same height above the horizon as your latitude (for example, about 40 degrees up if you live at 40°N latitude).
- Sketch the Big Dipper or Cassiopeia in its current position relative to Polaris and the horizon. Pay attention to:
- The angle and orientation of the pattern
- How high above the horizon it appears
- Which direction the “handle” or “W” points
- Label everything: constellation name, individual star names if you know them, Polaris, horizon landmarks, date, and time.
Sketch 2 — Several Hours Later:
- Return to the same spot at least 2–3 hours later. The more time between sketches, the more obvious the change will be.
- Repeat the same process from the same position, facing north.
- You will notice that the constellation has rotated around Polaris — the handle or W will be pointing in a different direction, and the constellation may be higher or lower relative to the horizon.
What You Should Observe
When you compare your two sketches, you should notice:
- The Big Dipper (or Cassiopeia) has rotated counterclockwise around Polaris.
- The constellation may have risen higher, sunk lower, or moved sideways depending on the time and season.
- Polaris has barely moved — it stays in nearly the same position in both sketches.
- The amount of rotation should be roughly 15 degrees per hour times the number of hours between your sketches. (For a 3-hour gap, expect about 45 degrees of rotation.)
This apparent rotation is direct evidence that Earth is spinning. You have just observed one of the most fundamental motions in all of astronomy.
Sketching Supplies
What to bring to your observation session
- Clipboard with white paper (or a dedicated astronomy sketchbook).
- Pencil (not pen — you will want to erase and adjust).
- Red-light flashlight or headlamp so you can see your paper without losing dark adaptation.
- A watch or phone for recording accurate times.
- A compass or compass app for confirming which direction is north.
Now let’s look at the most spectacular feature visible on any clear dark night — the Milky Way.