Automotive Maintenance Merit Badge — Complete Digital Resource Guide
https://merit-badge.university/merit-badges/automotive-maintenance/guide/
Introduction & Overview
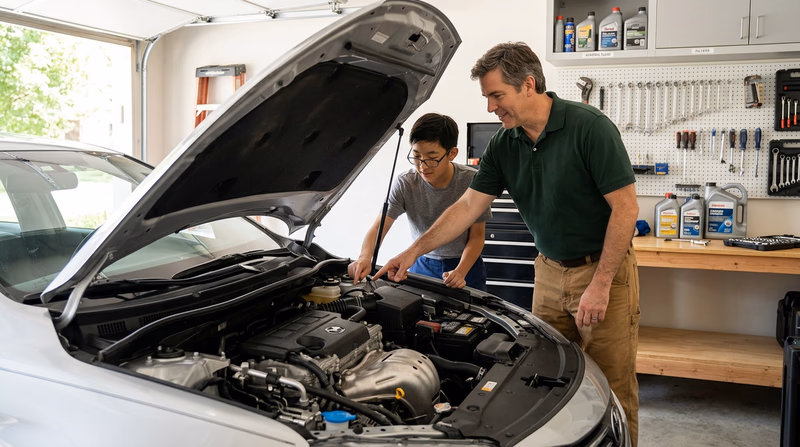
Pop the hood of any car and you will find an incredible machine — thousands of parts working together to get you where you need to go. The Automotive Maintenance merit badge teaches you how to understand, care for, and maintain a motor vehicle. Whether your family drives a pickup truck, a sedan, an SUV, or an electric car, learning how vehicles work is a skill that will serve you for the rest of your life.
Cars and trucks are some of the most complex machines most people interact with every day, yet many drivers have no idea what is happening under the hood. By earning this badge, you will gain the confidence to check fluids, inspect tires, understand dashboard warnings, and even perform basic repairs. That knowledge saves money, keeps you safe, and might just get you out of a tough spot on the side of the road someday.
Then and Now
Then — Shade-Tree Mechanics
When the first automobiles rolled onto American roads in the early 1900s, every car owner was also a mechanic. The Ford Model T came with a basic toolkit right in the car because breakdowns were expected. Engines had just a few moving parts, there were no computers, and repairs could be done on the side of the road with a wrench and some determination. Neighborhood “shade-tree mechanics” — people who worked on cars in their driveways — were everywhere. Changing your own oil, adjusting your own brakes, and even rebuilding an engine at home were common skills passed down from parent to child.
- Vehicles: Simple engines, manual everything, no electronics
- Maintenance: Done at home with basic hand tools
- Knowledge: Learned by doing — watching, helping, getting your hands dirty
Now — High-Tech Machines
Today’s vehicles are rolling computers. A modern car can have over 100 million lines of software code — more than a fighter jet. Engines are precisely tuned by electronic control units (ECUs), hybrid and electric powertrains have replaced many traditional systems, and advanced safety features like automatic emergency braking rely on cameras and sensors. While some maintenance tasks still require just a wrench and a drain pan, diagnosing many problems now requires specialized scanners and software.
- Vehicles: Computer-controlled engines, electric and hybrid powertrains, advanced driver-assistance systems
- Maintenance: Blend of traditional hands-on work and high-tech diagnostics
- Knowledge: Combines mechanical skills with an understanding of electronics and software
Get Ready! You are about to learn how a vehicle works from bumper to bumper. From checking your oil to understanding how brakes stop a two-ton machine, this badge will give you real-world skills that matter. Let’s get under the hood!
Kinds of Vehicle Maintenance
Not all maintenance is the same. Understanding the different types helps you know when — and why — certain work needs to be done on a vehicle.
Preventive Maintenance
This is the maintenance you do on a schedule to keep problems from happening in the first place. Think of it like brushing your teeth — you do it regularly so you do not end up with cavities. Oil changes, tire rotations, fluid top-offs, and filter replacements all fall into this category. Your vehicle’s owner’s manual has a maintenance schedule that tells you exactly when each service is due, usually based on mileage or time.
Corrective Maintenance
This is the “fix it when it breaks” category. A flat tire, a dead battery, a burned-out headlight — these are problems that show up unexpectedly and need to be repaired. Corrective maintenance is often more expensive and inconvenient than preventive maintenance, which is exactly why staying on top of your schedule matters.
Diagnostic Maintenance
Modern vehicles are constantly monitoring themselves. When a sensor detects something unusual — low oil pressure, a misfire, an emissions problem — the vehicle turns on a warning light or displays a message. Diagnostic maintenance uses tools like an OBD-II scanner (On-Board Diagnostics) to read trouble codes from the vehicle’s computer and figure out what is wrong before a small issue becomes a big one.
Seasonal Maintenance
Different seasons put different demands on your vehicle. Before winter, you might check your antifreeze concentration, inspect your battery (cold weather is hard on batteries), and switch to winter tires. Before summer, you might check your air conditioning system and make sure your cooling system is ready for high temperatures. Seasonal maintenance is about preparing your vehicle for the conditions it is about to face.

Now let’s start with the most important topic of all — safety.
Req 1a — Shop Safety Hazards
Working on vehicles is rewarding, but a garage or shop is full of real dangers. Heavy parts, toxic chemicals, hot surfaces, and moving components can cause serious injuries if you are not careful. The good news is that almost every accident in a shop is preventable. Knowing the hazards before you start is the first step to staying safe.
Chemical Hazards
You will encounter many chemicals when working on a car. Engine oil, brake fluid, coolant (antifreeze), transmission fluid, and battery acid are all hazardous in different ways.
- Coolant/antifreeze has a sweet smell and taste that attracts animals and small children, but it is highly toxic. Even a small amount can be fatal if swallowed. Always clean up spills immediately and store containers with tight lids.
- Brake fluid is corrosive — it can damage paint and irritate your skin and eyes. Wear gloves and safety glasses whenever you handle it.
- Battery acid (sulfuric acid) can cause severe chemical burns. Never tip a battery on its side, and always wear eye protection when working near one.
- Used motor oil contains carcinogens (cancer-causing compounds) absorbed during engine operation. Avoid prolonged skin contact and always wash your hands thoroughly after handling it.
Physical Hazards
Cars are heavy — a typical sedan weighs around 3,500 pounds. When you lift a vehicle with a jack, you are holding thousands of pounds overhead. If the jack fails or the car slips, the results can be fatal.
- Crushing injuries are the most serious risk. Never work under a vehicle supported only by a jack. Always use jack stands rated for the vehicle’s weight.
- Burns can come from hot engine parts, exhaust components, or radiator fluid. An engine that has been running can have surface temperatures above 200°F. Let the engine cool before working near hot components.
- Cuts and scrapes from sharp metal edges, broken parts, and hand tools are common. Keep your tetanus vaccination up to date.
- Back injuries happen when you lift heavy parts like batteries, wheels, or engine components without proper technique. Lift with your legs, not your back, and ask for help with heavy items.
Electrical Hazards
A standard car battery operates at 12 volts, which is not enough to shock you through dry skin — but it can deliver hundreds of amps of current. That is enough to heat a wrench red-hot in seconds if it accidentally bridges the battery terminals, potentially causing burns or starting a fire.
Hybrid and electric vehicles present a much greater electrical danger. Their high-voltage battery packs operate at 200 to 800 volts — more than enough to cause a fatal shock. We will cover high-voltage safety in detail in Requirement 1d.
Fire and Explosion Hazards
Gasoline vapors are extremely flammable and heavier than air, so they collect in low spots like pits and floor drains. A single spark — from a tool, a light switch, or static electricity — can ignite them.
- Never smoke in or near a garage.
- Keep a fire extinguisher rated for Class B (flammable liquids) and Class C (electrical) fires within reach.
- Store gasoline and other flammable liquids in approved containers, away from heat sources.
Exhaust Hazards
Running an engine in an enclosed space produces carbon monoxide (CO), a colorless, odorless gas that can kill within minutes. Always ensure adequate ventilation when an engine is running indoors. If the garage door must be closed, use a tailpipe exhaust hose vented to the outside.

Anticipate, Prevent, Mitigate
Your counselor will want to hear you use these three concepts:
- Anticipate: Before you start any job, look around the workspace. What could go wrong? Is the floor slippery? Is the car securely supported? Are flammable materials nearby?
- Prevent: Take action to stop hazards from becoming injuries. Wear protective gear, use the right tools, follow procedures, and keep your workspace clean and organized.
- Mitigate: If something does go wrong, know how to minimize the damage. Know where the fire extinguisher is. Know how to shut off the engine. Know basic first aid. Have a phone nearby to call for help.
🎬 Video: Automotive Repair Safety Observations — https://youtu.be/g52rQbJd43w?si=5YRRnfneJqWspPMb
Req 1b — Safety Equipment & Clothing
Before you touch a single bolt, you need the right gear. Just like a firefighter would never enter a burning building without protective equipment, you should never work on a vehicle without the proper safety gear, tools, and clothing. The right equipment protects you from the hazards we discussed in Requirement 1a and makes every job easier and safer.
Personal Protective Equipment (PPE)
PPE is gear you wear to protect your body from injury. In an automotive shop, the most important items are:
Essential PPE for Automotive Work
Wear these every time you work on a vehicle- Safety glasses or goggles: Protect your eyes from flying debris, chemical splashes, and brake dust. Regular eyeglasses are not a substitute — they do not have side shields.
- Nitrile or mechanic’s gloves: Shield your hands from chemicals like brake fluid, coolant, and used oil. Nitrile gloves are chemical-resistant and disposable. Heavier mechanic’s gloves add cut and abrasion protection.
- Closed-toe shoes or boots: Protect your feet from dropped tools and heavy parts. Steel-toe boots are ideal. Never wear sandals or sneakers in the shop.
- Hearing protection: Power tools like impact wrenches and grinders can damage your hearing over time. Foam earplugs or earmuffs are inexpensive insurance.
Clothing
What you wear matters more than you might think.
- Fitted clothing — Loose shirts, dangling sleeves, and untucked shirttails can get caught in belts, pulleys, and fans. Wear fitted clothes or roll up your sleeves.
- Long pants — Protect your legs from hot surfaces, sharp edges, and chemical splashes. Jeans or heavy work pants are ideal.
- No synthetic fabrics near sparks — If you are grinding or welding, polyester and nylon can melt onto your skin. Wear cotton or flame-resistant fabrics for those tasks.

Essential Hand Tools
A good set of hand tools is the foundation of automotive work. You do not need a professional-grade collection to get started — a basic set will cover most of the tasks in this merit badge.
Starter Tool Kit
The basics every Scout mechanic needs- Socket set (metric and SAE): The most-used tools in automotive work. Sockets fit over bolt heads and nuts for fast, secure turning.
- Combination wrenches (metric and SAE): Open-end and box-end wrenches for bolts in tight spaces where a socket cannot reach.
- Screwdriver set: Phillips and flat-head in multiple sizes.
- Pliers: Needle-nose for small items, slip-joint for general use, and locking pliers (like Vise-Grips) for stubborn fasteners.
- Torque wrench: Measures how tightly a bolt is tightened. Critical for lug nuts, drain plugs, and many engine components.
- Oil filter wrench: Designed to grip and remove oil filters without crushing them.
- Funnel set: For adding fluids without spilling. A small funnel for oil and a larger one for coolant.
- Drain pan: Catches used oil and other fluids during changes.
Shop Safety Equipment
Beyond personal gear, a properly equipped shop has safety features built into the workspace.
Shop Safety Essentials
Every workspace should have these- Fire extinguisher: ABC-rated (handles ordinary combustibles, flammable liquids, and electrical fires). Mount it near the exit so you can grab it on your way out — or on your way to the fire.
- First-aid kit: Stocked with bandages, antiseptic, burn cream, and eye wash.
- Jack stands: Heavy-duty stands rated for the vehicle’s weight. The jack lifts the car; jack stands hold it.
- Wheel chocks: Blocks placed against the tires that stay on the ground to prevent the vehicle from rolling.
- Adequate lighting: A drop light or LED work light lets you see what you are doing. Working in the dark leads to mistakes and injuries.
- Ventilation: An open garage door, exhaust fan, or tailpipe hose. Essential whenever the engine is running.

Keeping Your Workspace Clean
A clean shop is a safe shop. Oil on the floor is a slip hazard. Tools left on the ground are tripping hazards. Rags soaked with oil or solvents can spontaneously combust if left in a pile.
- Clean up spills immediately with absorbent material.
- Put tools back in their place when you are done using them.
- Dispose of oily rags in a sealed metal container — never toss them in a regular trash can.
- Keep walkways clear so you can move quickly in an emergency.
🎬 Video: Garage and Shop Safety Basics — https://youtu.be/lT_42grmnUk?si=9Ov1c-5CUwWuXg5m
Req 1c — Vehicle Power Types
Not every vehicle on the road runs on the same type of fuel or uses the same kind of engine. Understanding how different powertrains work is important because each type has its own maintenance needs, safety considerations, and environmental impact. Let’s explore the major ways vehicles are powered today.
Gasoline Engines
The gasoline internal combustion engine (ICE) is the most common powertrain on the road. It works by mixing gasoline with air, compressing that mixture in a cylinder, and igniting it with a spark plug. The explosion pushes a piston down, which turns the crankshaft, which ultimately spins the wheels.
- Fuel: Gasoline (regular, mid-grade, or premium depending on the engine)
- How it ignites: Spark plugs create a precisely timed spark
- Maintenance needs: Oil changes, spark plug replacement, air filter changes, coolant flushes, and belt/hose inspections
You will learn much more about how internal combustion engines work in Requirement 5a.
Diesel Engines
Diesel engines are also internal combustion engines, but they work differently than gasoline engines. Instead of using a spark plug, a diesel engine compresses air so tightly that it gets extremely hot — hot enough to ignite the diesel fuel when it is injected into the cylinder. This is called compression ignition.
- Fuel: Diesel fuel (higher energy density than gasoline)
- How it ignites: Compression alone — no spark plugs needed
- Advantages: More fuel-efficient, produce more torque (pulling power), and tend to last longer
- Common in: Pickup trucks, commercial vehicles, buses, and heavy equipment
Hybrid Electric Vehicles (HEVs)
A hybrid vehicle combines a gasoline engine with one or more electric motors and a battery pack. The vehicle’s computer decides when to use the gas engine, the electric motor, or both — depending on driving conditions. Most hybrids also use regenerative braking, which captures energy that would normally be lost as heat when you brake and stores it in the battery.
- Fuel: Gasoline + electricity generated on board
- Types:
- Parallel hybrid — Both the engine and electric motor can drive the wheels directly
- Series hybrid — The gas engine only generates electricity; the electric motor drives the wheels
- Maintenance needs: Similar to gasoline vehicles, plus battery system maintenance
Plug-In Hybrid Electric Vehicles (PHEVs)
A plug-in hybrid is like a standard hybrid, but with a larger battery that can be charged by plugging in to an external power source. This allows the vehicle to drive a significant distance on electricity alone — typically 20 to 50 miles — before the gasoline engine kicks in.
- Fuel: Electricity (from charging) + gasoline as backup
- Charging: Can be plugged in at home or at public charging stations
- Best for: Drivers with short daily commutes who want the flexibility of a gas engine for longer trips
Battery Electric Vehicles (BEVs)
Battery electric vehicles — commonly just called “EVs” — have no gasoline engine at all. They run entirely on electricity stored in a large battery pack and are powered by one or more electric motors. No tailpipe, no engine oil, no spark plugs.
- Fuel: Electricity only
- Charging: Level 1 (household outlet, slowest), Level 2 (240V home or public charger), or DC fast charging (fastest)
- Maintenance needs: Far fewer moving parts than a gas engine. No oil changes, no transmission fluid, no spark plugs. Focus shifts to tires, brakes, battery health, and cabin air filters
- Range: Typically 200 to 350 miles per charge, depending on the vehicle and conditions
Hydrogen Fuel Cell Vehicles (FCEVs)
Fuel cell electric vehicles generate their own electricity on board by combining hydrogen gas with oxygen from the air in a fuel cell. The only byproduct is water. They are essentially electric vehicles that make their own power instead of storing it in a large battery.
- Fuel: Compressed hydrogen gas
- How it works: Hydrogen and oxygen combine in a fuel cell to produce electricity, which powers an electric motor
- Refueling: Takes about 5 minutes at a hydrogen fueling station — similar to filling up with gasoline
- Limitations: Hydrogen fueling stations are currently very rare (mostly in California)

Requirement 1d — High-Voltage Safety
Hybrid, plug-in hybrid, and battery electric vehicles use high-voltage battery systems that operate between 200 and 800 volts. For comparison, a standard household outlet in the United States is 120 volts — and that is already dangerous enough to be fatal. The high-voltage systems in these vehicles demand serious respect and specific safety precautions.
Identifying High-Voltage Components
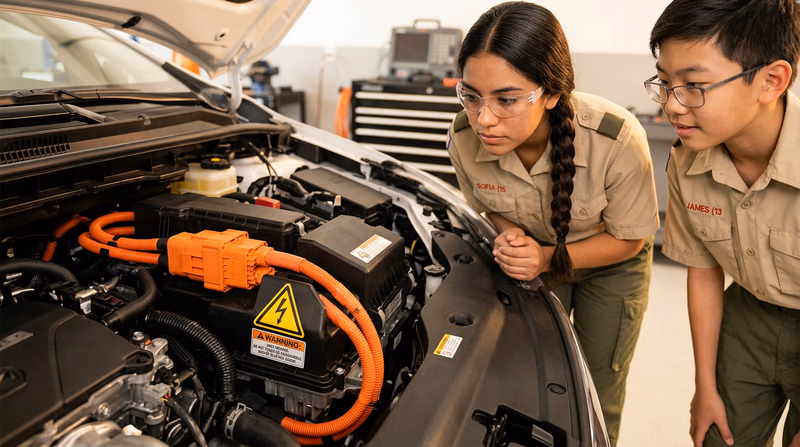
All high-voltage cables, connectors, and components in hybrid and electric vehicles are color-coded orange. This is an industry-wide safety standard. If you see orange wiring, orange connectors, or orange-labeled components under the hood or under the vehicle, do not touch them.
High-voltage components include:
- The main battery pack (usually located under the rear seats or floor)
- The electric motor(s)
- The inverter (converts DC battery power to AC for the motor)
- High-voltage wiring harnesses
- The onboard charger
- The DC-DC converter
Safety Rules for High-Voltage Vehicles
- Never cut, probe, or disconnect orange cables or connectors. Even with the vehicle turned off, the battery pack may still hold a lethal charge.
- Do not work on a high-voltage vehicle in wet conditions. Water conducts electricity and increases shock risk.
- Do not attempt to open or repair the battery pack. This requires specialized training, tools, and facilities.
- In an accident, if a high-voltage vehicle is damaged, stay away from any exposed battery cells or wiring and call emergency services. First responders are trained to handle these situations.
- Before any routine maintenance (like changing a tire or checking brake pads), verify that you are not near high-voltage components. Consult the owner’s manual for the location of high-voltage parts.
🎬 Video: Working on High Voltage Vehicles — https://youtu.be/t_jDdsC5UBc?si=X3i6HvfGoSnFMV05
🎬 Video: Difference Between Diesel and Gas Engines — https://youtu.be/rlK7JIAz9WY?si=zlHbl7TXVzW_9W0K
Req 1e — Maintenance Schedules
Every vehicle comes with an owner’s manual, and inside it is one of the most important sections you can read: the maintenance schedule. This chart tells you exactly what maintenance needs to be done and when — based on mileage, time, or both. Following this schedule is the single best thing you can do to keep a vehicle running reliably and hold its resale value.
Finding the Maintenance Schedule
The owner’s manual is usually stored in the glove compartment. Look for a section titled “Scheduled Maintenance,” “Maintenance Schedule,” or “Service Intervals.” If the physical manual is missing, most manufacturers make their owner’s manuals available for free on their websites — just search for the make, model, and year.
How to Read the Chart
A typical maintenance schedule is organized as a grid:
- Rows list the maintenance tasks (oil change, tire rotation, coolant flush, brake inspection, etc.)
- Columns list the intervals — either in miles (e.g., every 5,000 miles, 15,000 miles, 30,000 miles) or in months (every 6 months, 12 months, etc.)
- An “X” or checkmark in a cell means that task should be performed at that interval
Most schedules use the rule of “whichever comes first.” For example, if the manual says to change the oil every 5,000 miles or every 6 months, whichever milestone you hit first is when the oil should be changed — even if you have not driven many miles.
Normal vs. Severe Conditions
Many maintenance schedules have two columns: normal and severe (sometimes called “heavy-duty” or “special operating conditions”). Severe conditions call for more frequent maintenance. You might be surprised by what counts as “severe”:
- Frequent short trips (less than 10 miles)
- Stop-and-go city driving
- Driving in dusty or sandy conditions
- Towing a trailer or carrying heavy loads
- Driving in extreme heat or cold
- Driving on dirt or gravel roads
Common Maintenance Intervals
While every vehicle is different, here are some typical intervals you will see:
| Task | Typical Interval |
|---|---|
| Engine oil and filter | 5,000–10,000 miles or 6–12 months |
| Tire rotation | 5,000–7,500 miles |
| Air filter (engine) | 15,000–30,000 miles |
| Cabin air filter | 15,000–25,000 miles |
| Brake inspection | 15,000–30,000 miles |
| Coolant flush | 30,000–60,000 miles or 3–5 years |
| Transmission fluid | 30,000–60,000 miles |
| Spark plugs | 30,000–100,000 miles (varies widely) |
| Timing belt/chain | 60,000–100,000 miles (if applicable) |
Why Following the Schedule Matters
Skipping scheduled maintenance might save a little money in the short term, but it costs much more in the long run. A $50 oil change prevents a $5,000 engine replacement. A $20 coolant check prevents an overheated engine and a tow truck bill. Many vehicle warranties also require proof that scheduled maintenance was performed — skip it and you could void your warranty.

Requirement 1f — Safety Belts & Passive Restraints
Safety belts and passive restraints are your vehicle’s most important safety features. They are designed to keep you in your seat and slow your body’s forward motion during a crash, reducing the force of impact on your body.
Safety Belts (Seat Belts)
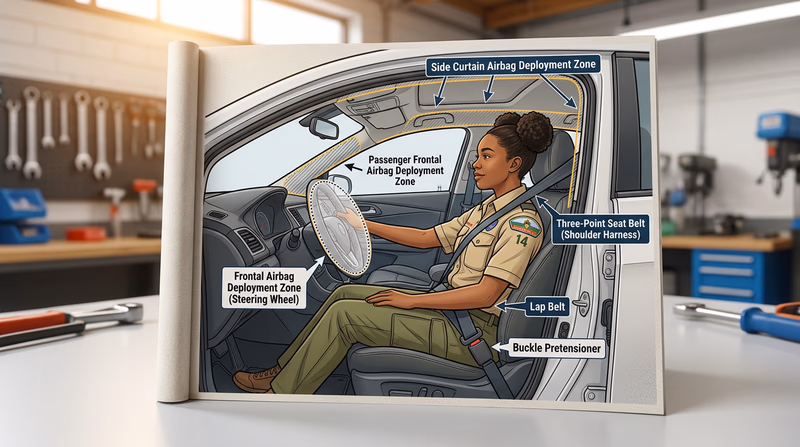
Modern seat belts are three-point harnesses — they go across your lap and over your shoulder. They work by distributing crash forces across the strongest parts of your body: your pelvis, chest, and shoulders.
How they work:
- During normal driving, the belt allows free movement so you can lean forward and turn.
- In a sudden stop or crash, a locking mechanism activates and holds the belt tight, preventing you from being thrown forward.
- Many modern seat belts also have pretensioners that instantly tighten the belt in a crash, removing any slack.
Limitations of seat belts:
- They only work if you wear them. An unbuckled seat belt protects no one.
- They must be positioned correctly — the lap portion across your hips (not your stomach) and the shoulder portion across your chest (not your neck).
- They are designed for one crash. After a collision, the belt and its mechanisms should be inspected and may need replacement.
Passive Restraints — Air Bags
Air bags are called “passive” because they work automatically — you do not need to do anything to activate them. They are designed to work with seat belts, not instead of them.
How air bags work:
- Crash sensors detect a sudden deceleration (rapid slowing) that indicates a collision.
- Within milliseconds, a chemical reaction inflates the air bag with nitrogen gas.
- The air bag cushions your head and upper body, then deflates almost immediately.
Types of air bags:
- Frontal air bags — Protect the driver (steering wheel) and front passenger (dashboard)
- Side air bags — Protect your torso in a side-impact crash
- Side curtain air bags — Drop from the ceiling to protect your head in a side impact or rollover
- Knee air bags — Protect your legs and help position your body correctly during a crash
Limitations of air bags:
- They deploy with tremendous force — fast enough to cause injury if you are too close. Keep at least 10 inches between your chest and the steering wheel.
- They are supplemental restraints — designed to work with seat belts, not replace them. Without a seat belt, you can slide forward into a deploying air bag, which can cause serious injury.
- They are single-use. After deployment, they must be replaced by a professional.
🎬 Video: Seatbelt — How Does it Work? — https://youtu.be/uRaU1HMJyCo?si=35wRwtjnIBBaBQk3
Req 1g — Inspections & Registration
Many states require vehicles to pass periodic inspections before they can be legally driven on public roads. These inspections are designed to keep unsafe and heavily polluting vehicles off the road, protecting both drivers and the environment.
Types of Inspections
Safety inspections check that critical vehicle components are working properly:
- Brakes (including parking brake)
- Tires (tread depth, condition, proper inflation)
- Lights (headlights, taillights, brake lights, turn signals)
- Windshield and wipers (no major cracks, wipers functional)
- Steering and suspension
- Mirrors
- Horn
- Seat belts
Emissions inspections (also called “smog checks”) measure the pollutants coming from your vehicle’s exhaust system. The test typically checks for:
- Carbon monoxide (CO)
- Hydrocarbons (HC)
- Nitrogen oxides (NOx)
- The proper functioning of the vehicle’s OBD-II system and catalytic converter
State-by-State Differences
Inspection requirements vary widely by state. Some important things to research for your state:
- Does your state require safety inspections? Not all do.
- Does your state require emissions inspections? These are more common in urban areas with air quality concerns.
- How often? Most states that require inspections do so annually, but some require them every two years or only when a vehicle changes ownership.
- Are there exemptions? Some states exempt new vehicles for the first few years, or exempt vehicles older than a certain age, or exempt electric vehicles from emissions testing.
- What happens if you fail? You typically have a set period to make repairs and return for a re-inspection.
Requirement 1h — Vehicle Registration
Why Registration Matters
Every vehicle driven on public roads must be registered with the state. Registration serves several important purposes:
- Identification: Registration links a vehicle to its owner through a unique license plate number and registration card. This helps law enforcement identify vehicles involved in accidents, thefts, or traffic violations.
- Safety accountability: Registration ensures the state knows who is responsible for each vehicle on the road.
- Revenue: Registration fees fund road construction, maintenance, bridges, and highway safety programs.
- Insurance verification: Many states tie registration to proof of insurance, ensuring drivers carry the minimum required coverage.
The Registration Process
When a vehicle is purchased (new or used), the owner must register it with their state’s DMV. This involves:
- Completing a registration application
- Providing proof of ownership (title)
- Showing proof of insurance
- Paying the registration fee
- Receiving license plates and a registration card
Registration must be renewed periodically — usually every one or two years. The renewal process is simpler (often done online or by mail) and typically requires only payment of the renewal fee and proof of insurance.
Finding Your Family’s Registration Fee
Research Steps
Find your family's annual registration cost- Ask a parent or guardian to show you the vehicle’s current registration card or renewal notice.
- Look up your state’s DMV website and find the registration fee schedule.
- Note that fees may vary based on the vehicle’s weight, age, value, or type (passenger car vs. truck).
- Some states charge additional fees for electric vehicles to offset the gas tax revenue they do not generate.
- Add up the base registration fee plus any additional fees to find the total annual cost.
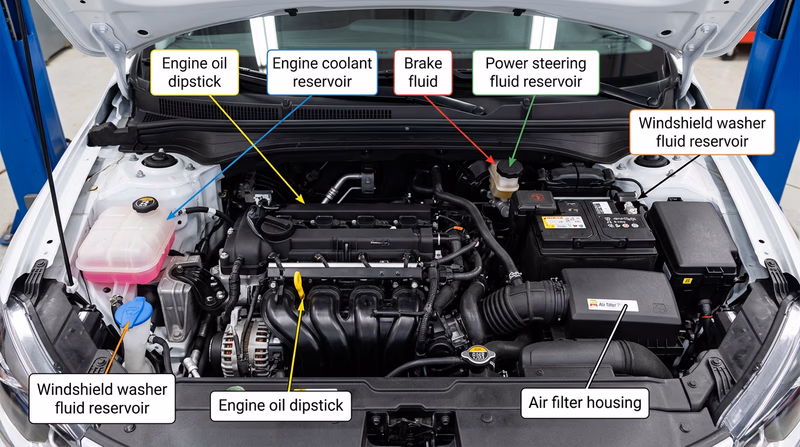
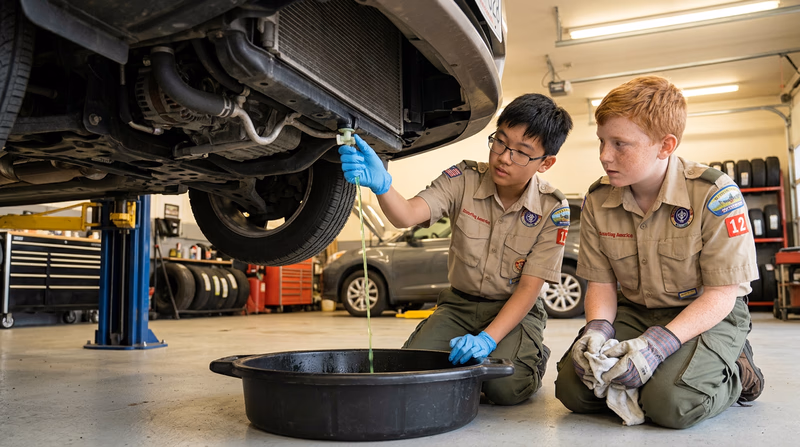
Req 2a — Checking Fluids
Demonstrate how to check the following:
- Brake fluid
- Engine oil
- Coolant
- Power steering fluid
- Windshield washer fluid
- Transmission fluid
- Battery fluid (if possible) and condition of the battery terminals.
A vehicle depends on several different fluids to operate safely and efficiently. Each fluid serves a specific purpose, and checking them regularly is one of the easiest and most important maintenance tasks you can learn. Think of it as a health checkup for your car — catching a low fluid level early can prevent expensive damage.
1. Brake Fluid
What it does: Brake fluid transmits the force from your foot on the brake pedal to the brake pads at each wheel. It operates under high pressure and must not compress — even a little air in the brake lines can make braking less effective.
How to check it:
- Locate the brake fluid reservoir — a small, translucent plastic container on top of the master cylinder, usually near the back of the engine compartment on the driver’s side.
- The fluid level should be between the “MIN” and “MAX” lines marked on the reservoir. You can usually see the level through the translucent plastic without opening the cap.
- The fluid should be clear to light amber. Dark or murky fluid needs to be replaced.
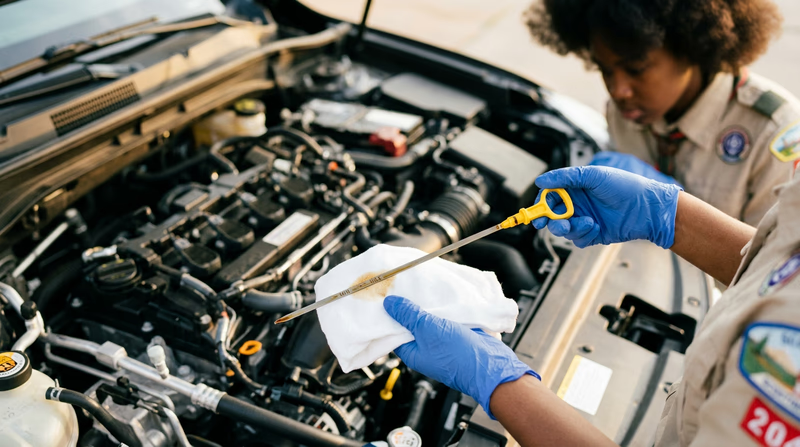
2. Engine Oil
What it does: Engine oil lubricates the moving parts inside the engine, reduces friction, carries away heat, and helps keep the engine clean by suspending tiny particles of dirt and metal.
How to check it:
- With the engine off and cooled for at least a few minutes, locate the dipstick — usually a brightly colored (yellow or orange) loop or handle sticking out of the engine.
- Pull the dipstick out, wipe it clean with a rag, reinsert it fully, and pull it out again.
- Check the oil level against the markings on the dipstick (usually two dots or lines indicating “LOW” and “FULL”).
- Check the oil’s color: fresh oil is amber/golden; worn oil turns dark brown or black.
3. Coolant (Antifreeze)
What it does: Coolant circulates through the engine and radiator to carry heat away from the engine. It also prevents the liquid from freezing in winter and raises its boiling point for summer.
How to check it:
- Never open the radiator cap when the engine is hot. The system is pressurized and can spray boiling coolant.
- Instead, check the coolant overflow reservoir (a translucent plastic tank connected to the radiator by a hose). The fluid level should be between the “MIN” and “MAX” lines.
- Coolant comes in different colors (green, orange, pink, blue) depending on the type. Never mix different types unless the owner’s manual says it is safe.
4. Power Steering Fluid
What it does: Power steering fluid provides the hydraulic pressure that makes it easy to turn the steering wheel. Without it, steering would require significant physical effort.
How to check it:
- Locate the power steering fluid reservoir — a small container usually near the front of the engine, often with a cap labeled with a steering wheel icon.
- Some reservoirs are translucent with level markings; others have a dipstick built into the cap.
- Check the level against the “HOT” or “COLD” markings (depending on engine temperature).
5. Windshield Washer Fluid
What it does: Washer fluid cleans your windshield when you activate the wiper spray. It contains mild detergents and often antifreeze compounds to work in cold weather.
How to check it:
- Locate the washer fluid reservoir — usually a large, translucent plastic container with a cap marked with a windshield/wiper icon.
- Check the level visually and top off with premixed washer fluid if low.
- Never substitute plain water in cold climates — it will freeze and crack the reservoir or damage the pump.
6. Transmission Fluid
What it does: Transmission fluid lubricates and cools the gears inside the transmission. In automatic transmissions, it also serves as a hydraulic fluid that enables gear shifts.
How to check it:
- Some vehicles have a transmission dipstick (similar to the oil dipstick but usually located farther back in the engine bay). Some vehicles require checking while the engine is running and warm.
- Many newer vehicles have sealed transmissions with no dipstick — these are designed to be checked only by a technician with a lift.
- If your vehicle has a dipstick, pull it, wipe it, reinsert it, and check the level. Transmission fluid should be pink or red and should not smell burned.
7. Battery Fluid & Terminal Condition
What it does: Inside a traditional lead-acid battery, a mixture of water and sulfuric acid (called electrolyte) creates the chemical reaction that produces electricity. The battery terminals connect the battery to the vehicle’s electrical system.
How to check it:
- Battery fluid: Some batteries are “maintenance-free” (sealed) and cannot be checked. If the battery has removable caps on top, you can open them to check that the electrolyte covers the lead plates inside. If the level is low, add distilled water only — never tap water or acid.
- Terminal condition: Look at the battery posts (the metal nubs on top) and the cable connectors attached to them. Look for:
- White, blue, or green corrosion buildup (a powdery or crusty substance)
- Loose connections (cables should be tight and not wiggle)
- Cracked or damaged cables
🎬 Video: A Guide to Your Car's Fluids — https://youtu.be/RaxZUGP1Zr0?si=_Z1CMmzpR5nAPJkp
Req 2b — Fuses, Belts & Hoses
Understanding Fuses
Fuses are small, inexpensive electrical components that protect your vehicle’s wiring and electronic systems from damage caused by electrical overloads or short circuits. When too much current flows through a circuit, the thin metal strip inside the fuse melts (“blows”), breaking the circuit and preventing damage to the wiring or the component it protects.
Think of a fuse as a sacrificial guard — it is designed to fail so that something more expensive does not.
Locating the Fuse Boxes
Most vehicles have at least two fuse boxes:
- Interior fuse box — Usually located under the dashboard on the driver’s side, behind a kick panel, or in the center console area. This box protects interior systems like the radio, power windows, interior lights, and instrument panel.
- Under-hood fuse box — Located in the engine compartment, usually near the battery. This box protects engine-related systems like the fuel pump, cooling fans, headlights, and horn. It also contains larger relays (electromagnetic switches) for high-draw systems.
The owner’s manual has a fuse box diagram that labels each fuse by circuit name and amperage rating.
Types and Sizes of Fuses
Modern vehicles use blade-type fuses that plug into slots. There are three common sizes:
| Type | Size | Common Use |
|---|---|---|
| Mini (APM/ATM) | Smallest | Newer vehicles, interior circuits |
| Standard (ATO/ATC) | Medium | Most common; interior and under-hood |
| Maxi (APX) | Largest | High-current circuits (cooling fans, fuel pump) |
Each fuse is color-coded by amperage (how much current it can handle before blowing):
- Orange = 5A
- Red = 10A
- Blue = 15A
- Yellow = 20A
- Clear/White = 25A
- Green = 30A
How to Replace a Blown Fuse
- Turn off the ignition and the circuit you suspect is affected.
- Locate the correct fuse using the diagram in the owner’s manual or on the fuse box cover.
- Use a fuse puller (a small plastic tool often stored in the fuse box) to remove the fuse. Never use pliers or metal tools — you could short a circuit.
- Inspect the fuse — hold it up to the light. If the thin metal strip inside is broken or blackened, the fuse is blown.
- Insert a new fuse of the same amperage rating into the slot.
- Turn the ignition on and test the circuit.
🎬 Video: How to Check Car Fuses — https://youtu.be/PF5G4llnvQs?si=TTLfI1ev6g2UtMw-

Requirement 2c — Belts and Hoses
Belts
Most modern engines use a single serpentine belt — a long, flat, ribbed belt that winds around multiple pulleys to drive the alternator, power steering pump, water pump, and air conditioning compressor all at once. Older vehicles may have multiple V-belts, each driving a single component.
How to inspect a belt:
- Visual check: Look for cracks, fraying, glazing (a shiny, smooth surface), missing chunks, or separation of the ribs. Any of these mean the belt should be replaced.
- Tension check: Press on the belt midway between two pulleys with moderate thumb pressure. The belt should deflect about 1/4 to 1/2 inch. Too loose and it will slip (causing a squealing noise); too tight and it puts excessive strain on bearings.
- Most modern vehicles have an automatic tensioner — a spring-loaded pulley that maintains proper belt tension. If the tensioner is worn, the belt may appear loose even though you cannot manually adjust it.
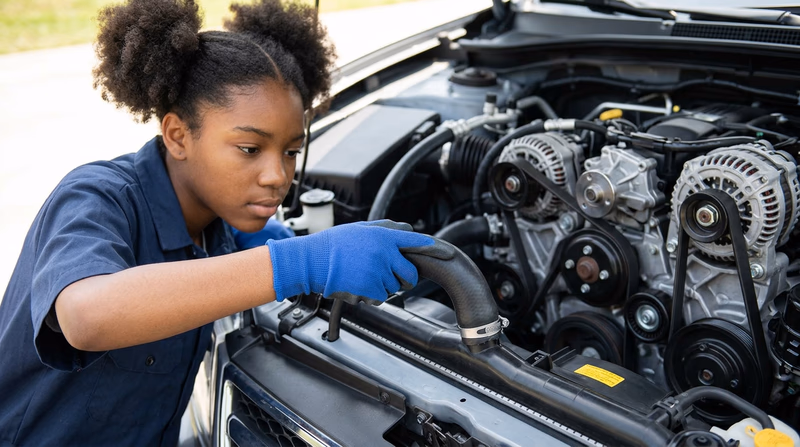
Hoses
Rubber hoses carry coolant between the engine, radiator, and heater core. Over time, heat and chemicals cause hoses to deteriorate from the inside out.
How to inspect hoses:
- Visual check: Look for cracks, bulges, soft spots, or leaks at the connection points (where the hose meets the engine or radiator). White or green residue around a connection usually means coolant is seeping out.
- Squeeze test: When the engine is cool, gently squeeze the hoses. They should feel firm but flexible — like a thick rubber band. A hose that feels mushy, spongy, or crunchy is deteriorating and should be replaced.
- Check the clamps: The metal clamps that hold hoses in place should be tight and free of rust. Loose clamps cause leaks.
The two most critical hoses are:
- Upper radiator hose — Carries hot coolant from the engine to the radiator
- Lower radiator hose — Returns cooled coolant from the radiator to the engine
🎬 Video: How to Inspect Belts — https://youtu.be/XlUK0XDpCSY?si=mPiotbFHaGk0grht&t=20
🎬 Video: How to Check Serpentine Belt — https://youtu.be/Clv2ZlS3hB0?feature=shared
Req 2d — Lights & Air Filters
Your vehicle’s lights are essential for safety — they let you see the road and let other drivers see you. A burned-out brake light or headlight can lead to an accident or a traffic citation. Checking your lights is quick and easy, and it is something you should do regularly.
How to Check Exterior Lights
The best way to check exterior lights is with a helper. One person sits in the vehicle and operates the controls while the other walks around outside and confirms each light works.
Exterior Light Check
Test each of these with a helper- Headlights (low beam): Turn on the headlight switch. Both front headlights should illuminate.
- Headlights (high beam): Activate high beams. Both headlights should get noticeably brighter.
- Parking/running lights: These are dimmer lights in the front and rear that turn on with the first click of the headlight switch.
- Turn signals (front and rear): Activate the left turn signal, then the right. Check that both front and both rear signal lights blink.
- Brake lights: Have your helper press the brake pedal while you check the rear. There should be three: one on each side plus a center high-mount brake light.
- Reverse/backup lights: Shift into reverse (with the parking brake set and your foot on the brake). White lights on the rear should illuminate.
- Hazard lights: Press the hazard button. All four turn signals should blink simultaneously.
- License plate light: Check that the small light above or below the rear license plate is working.
- Fog lights (if equipped): Check front and/or rear fog lights.
Checking Interior Lights
- Overhead (dome) lights: Open a door — the dome light should come on automatically. Also test the manual switch.
- Instrument panel lights: Turn on the headlights and check that the speedometer, tachometer, and other gauges are illuminated. Most vehicles let you adjust the brightness with a dimmer dial or button.
- Warning lights: Turn the key to the “ON” position without starting the engine. All warning lights (check engine, oil pressure, battery, ABS, etc.) should briefly illuminate as a self-test, then turn off. If a light does not come on during this test, the bulb may be burned out — which means it could not warn you of a real problem.
When a Light is Out
If you find a burned-out bulb:
- Check the owner’s manual for the correct replacement bulb number and type.
- Many exterior bulbs can be replaced at home with basic tools — some headlights and taillights are accessible from inside the engine bay or trunk without removing any panels.
- Modern vehicles increasingly use LED lights, which last much longer than traditional incandescent bulbs but may require replacing an entire light assembly if one fails.

🎬 Video: How to Check Car Lights — https://youtu.be/WLDE5-QVEi8?si=xxbnuJv2QtXKRNuf
Requirement 2e — Air Filters
Engine Air Filter
The engine air filter prevents dirt, dust, leaves, and insects from entering the engine. Clean air is essential for proper combustion — dirty air reduces performance and fuel efficiency and can cause long-term engine damage.
How to check it:
- Locate the air filter housing — a large plastic box in the engine compartment, usually connected to a large hose (the air intake duct) that leads to the engine. It is typically held closed by metal clips or screws.
- Open the housing and remove the filter.
- Hold the filter up to a light source. If you can see light passing through the filter material, it still has life left. If the filter is visibly clogged with dirt, dark gray or black, or you cannot see light through it, it should be replaced.
- Check for tears or holes in the filter material — a damaged filter should be replaced immediately.
Cabin Air Filter
Many vehicles also have a cabin air filter that cleans the air entering the passenger compartment through the heating, ventilation, and air conditioning (HVAC) system. This filter catches pollen, dust, and exhaust fumes to keep the air you breathe inside the car clean.
How to check it:
- The cabin air filter is usually located behind the glove box or under the dashboard. The owner’s manual will show you exactly where.
- Some are easy to access — you simply lower the glove box and slide the filter out. Others may require removing a small panel.
- Inspect it the same way as the engine air filter: hold it to the light and check for discoloration, debris, and odor.

🎬 Video: Check and Change Air Filter — https://youtu.be/noid4J2TbpU?si=skrUm5VlKpkcKADO
Req 3 — Dashboard & Driver Info
Your dashboard is your vehicle’s way of talking to you. Every gauge, light, and message tells you something important about what is happening under the hood and around the car. Learning to read your dashboard is like learning a new language — once you understand it, you can catch problems before they become emergencies.
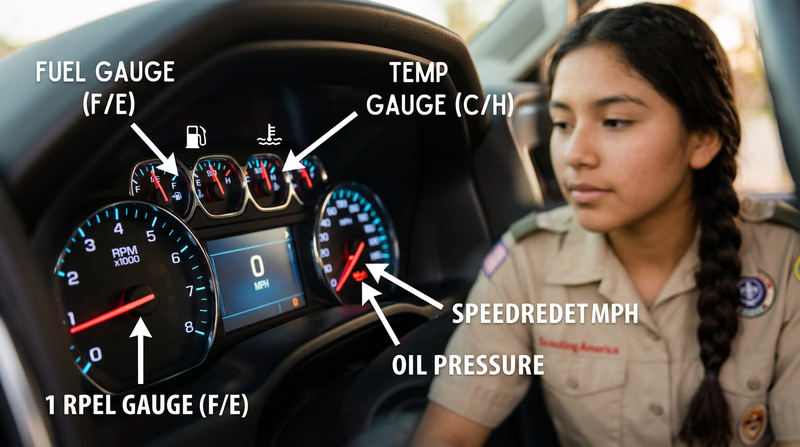
The Five Key Gauges
Fuel Gauge — Shows how much fuel is in the tank. The needle moves from “F” (full) to “E” (empty). Most vehicles also have a low-fuel warning light that turns on when you have roughly 2 to 3 gallons remaining. A small arrow next to the fuel pump icon on the gauge tells you which side of the car the gas cap is on.
Speedometer — Displays your current speed in miles per hour (MPH) and often kilometers per hour (km/h) on an inner scale. Modern vehicles may use a digital readout instead of a needle. This is the gauge you will use most — and it is your responsibility as a driver to keep it within the posted speed limit.
Tachometer — Measures engine speed in revolutions per minute (RPM). The numbers on the tachometer are usually multiplied by 1,000, so “3” means 3,000 RPM. Most tachometers have a redline zone — a red area at the high end. Running the engine in the redline can cause serious damage. The tachometer is especially useful for drivers of manual-transmission vehicles, who use it to know when to shift gears.
Oil Pressure Gauge — Indicates the pressure of the oil circulating through the engine. Normal readings vary by vehicle, but the needle should stay in the middle range during operation. Some vehicles replace this gauge with a simple warning light.
Engine Temperature Gauge — Shows the temperature of the engine coolant. The needle should settle in the middle of the gauge during normal driving. If it climbs toward the “H” (hot) zone, the engine is overheating — you need to pull over safely and turn off the engine immediately.
🎬 Video: Understanding the Car Gauges — https://youtu.be/EDZbQdvM-dI?feature=shared
Dashboard Warning Light Colors
Warning lights follow a universal color system, similar to traffic lights:
- Red lights mean STOP — something is seriously wrong. Pull over as soon as it is safe and address the issue before driving further. Red lights indicate conditions that can cause immediate damage or danger (overheating, low oil pressure, charging system failure, open door).
- Yellow/amber lights mean CAUTION — something needs attention but is not an immediate emergency. You can usually continue driving to your destination or a service shop, but do not ignore it. Examples include the check engine light, tire pressure warning, and traction control alerts.
- Green or blue lights are informational — they tell you a system is active. Turn signals, high beams, cruise control, and eco-driving mode indicators are all green or blue.
Common Dashboard Warning Symbols
Here are some of the most important warning lights to recognize:
| Symbol | Color | Meaning |
|---|---|---|
| Engine outline (check engine) | Yellow | Engine or emissions system needs diagnosis |
| Oil can | Red | Low oil pressure — stop driving immediately |
| Thermometer in water | Red | Engine is overheating — pull over immediately |
| Battery | Red | Charging system failure — the alternator may have stopped working |
| Exclamation mark in circle (brakes) | Red/Yellow | Brake system issue — red means critical, yellow means ABS issue |
| Tire with exclamation mark (TPMS) | Yellow | One or more tires have low pressure |
| Seat belt icon | Red | Seat belt not fastened |
| Air bag icon | Red/Yellow | Air bag system malfunction |
| ABS | Yellow | Antilock brake system issue |
🎬 Video: Dashboard Warning Lights Explained — https://youtu.be/DswOF-reMRo?si=N020Ga39csW2d_28
The Driver Information Center
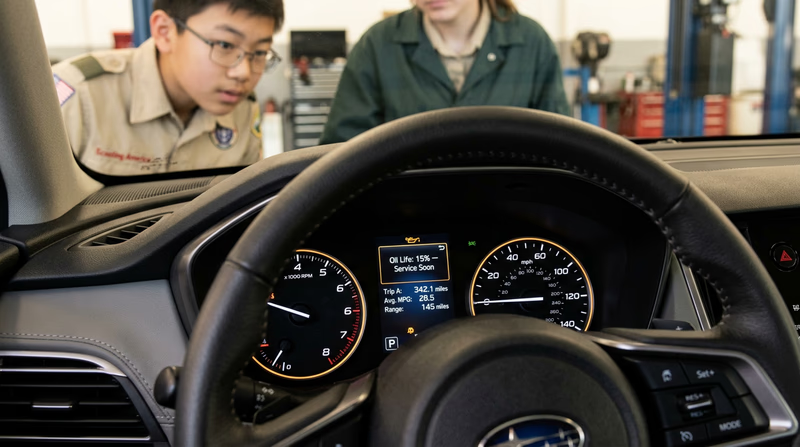
Modern vehicles have a driver information center (DIC) — usually a small screen in the instrument cluster that displays text messages and alerts. Unlike simple warning lights, the DIC can tell you specifically what is happening.
Types of messages you might see:
- Maintenance reminders: “Oil Life 15%” or “Service Due Soon” — the vehicle’s computer tracks driving conditions and estimates when maintenance is needed.
- Tire pressure alerts: “Low Tire Pressure — Right Rear” — the TPMS (Tire Pressure Monitoring System) can often identify which specific tire is low.
- Door/trunk ajar: “Trunk Open” or “Right Rear Door Ajar”
- Fuel reminders: “Low Fuel — Range 35 Miles”
- System status: “Traction Control Off” or “Lane Departure Warning Active”
- Trip information: Current fuel economy (MPG), distance to empty, trip distance, and average speed
Oil Life Monitors
Many vehicles use an oil life monitoring system that calculates when the engine oil needs to be changed based on driving conditions — not just mileage. It considers factors like engine temperature, RPM, trip length, and ambient temperature. When the oil life percentage drops to 15% or lower, the vehicle will display a maintenance reminder. After an oil change, the system must be reset following the procedure in the owner’s manual.
Req 4a — Tire Specs & Pressure
Tires are the only part of your vehicle that actually touches the road, which makes them one of the most critical components for safety and performance. Understanding tire specifications helps you choose the right tires and maintain them properly.
Two Different Sets of Specifications
There are two important sources of tire information, and they tell you different things:
Tire manufacturer’s specifications are printed on the sidewall of the tire itself. They describe what that specific tire is capable of — its size, load capacity, speed rating, and construction type. These specs are determined by the company that made the tire (Michelin, Goodyear, Bridgestone, etc.).
Vehicle manufacturer’s specifications are found on a sticker on the driver’s door jamb (the edge of the door frame) and in the owner’s manual. They tell you what tire size, inflation pressure, and load rating the vehicle was designed to use. These specs are determined by the company that made the car (Toyota, Ford, Chevrolet, etc.).
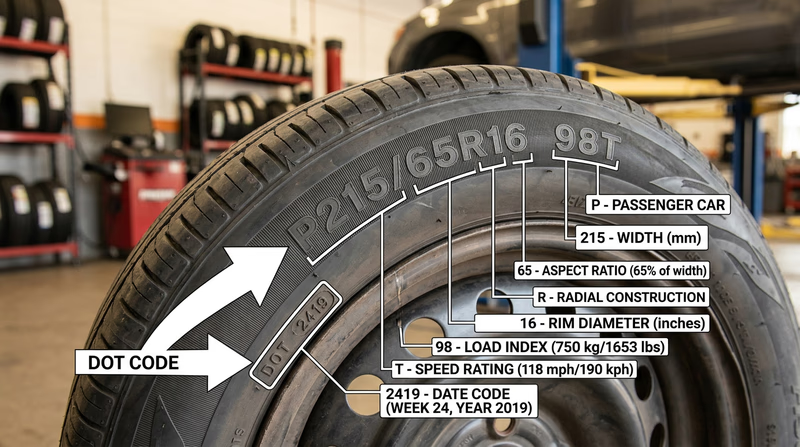
Reading the Tire Sidewall
The sidewall of every tire has a string of numbers and letters that tells you everything about that tire. Here is how to decode a common example: P215/65R16 98T
- P = Passenger vehicle tire (LT = Light Truck)
- 215 = Section width in millimeters (the width of the tire from sidewall to sidewall)
- 65 = Aspect ratio — the sidewall height is 65% of the section width
- R = Radial construction (how the internal plies are arranged)
- 16 = Rim diameter in inches (the wheel this tire fits)
- 98 = Load index (the maximum weight the tire can support — 98 = 1,653 lbs per tire)
- T = Speed rating (the maximum safe speed — T = 118 mph)
The Door Jamb Sticker
The vehicle manufacturer’s tire placard (sticker) on the driver’s door jamb shows:
- The recommended tire size for front, rear, and spare
- The recommended cold inflation pressure in PSI (pounds per square inch) for front and rear tires
- The vehicle’s maximum load capacity
🎬 Video: How to Read a Tire — https://youtu.be/bW5XKi8RvR0?si=bUxYodfbQYrUuRzq
Checking Tire Pressure
Tire pressure should be checked when the tires are cold — meaning the vehicle has been parked for at least three hours or driven less than a mile. Driving heats the air inside the tires and increases the pressure reading, giving you a false high reading.
Steps to check tire pressure:
- Find the recommended pressure on the door jamb sticker.
- Remove the valve cap from the tire’s valve stem.
- Press a tire pressure gauge firmly onto the valve stem. You will hear a brief hiss of air — that is normal.
- Read the pressure on the gauge.
- Compare the reading to the recommended pressure.
- Replace the valve cap (it keeps dirt and moisture out of the valve).
Inflating a Tire
If the pressure is low:
- Use an air compressor (at home or at a gas station) or a portable tire inflator.
- Press the air chuck firmly onto the valve stem.
- Add air in short bursts, checking the pressure frequently with your gauge.
- If you add too much air, press the small pin inside the valve stem with the back of the gauge or a small tool to release some air.
- Replace the valve cap when finished.
Don’t Forget the Spare
The spare tire is the one most people forget about — until they need it. Check it regularly:
- Verify the spare is properly inflated (it often requires a higher pressure than the regular tires — check the sticker or owner’s manual).
- Make sure the jack, lug wrench, and any other tire-changing tools are present and in good condition.
- If the spare is a “compact” or “donut” spare, note that it is designed for temporary use only — typically limited to 50 mph and 50 to 70 miles.

🎬 Video: How to Properly Check and Fill Tires — https://youtu.be/0Q-Eb7aUyt4?si=aIug5NNg5ISPI_RW
Req 4c — Alignment, Wear & Disposal
Wheel alignment refers to the precise angles at which your wheels are set relative to the vehicle and the road surface. When your wheels are properly aligned, your tires wear evenly, your vehicle handles predictably, and your fuel efficiency is maximized. When alignment is off, tires can wear out thousands of miles early, the vehicle may pull to one side, and steering can feel unstable.
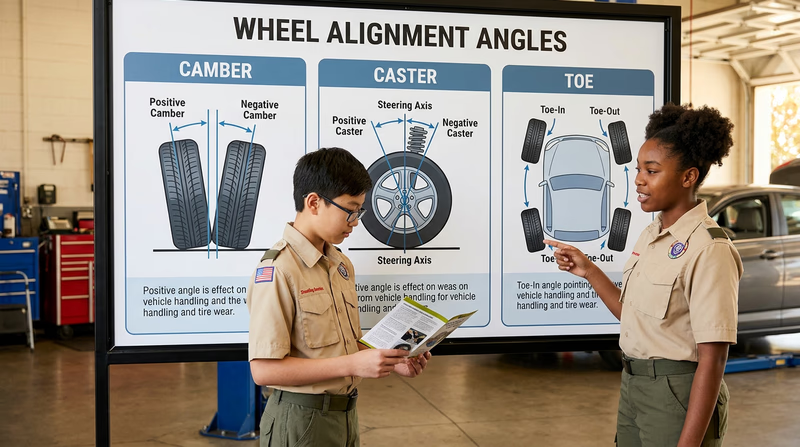
The Three Alignment Angles
Alignment technicians adjust three main angles. Think of each one as a different way the wheel can tilt or turn:
Camber — Tilt In or Out
Camber is the angle of the wheel when viewed from the front of the vehicle. Imagine looking at the front tires head-on:
- Zero camber means the tire is perfectly vertical.
- Negative camber means the top of the tire tilts inward (toward the engine). A small amount of negative camber improves cornering grip.
- Positive camber means the top of the tire tilts outward. This was common on older vehicles but is rare today.
If camber is off, you will see uneven wear on the inner or outer edge of the tire tread.
Caster — Forward or Backward Lean
Caster is the angle of the steering axis when viewed from the side of the vehicle. Think of a bicycle’s front fork — it angles backward so the wheel trails behind the steering axis, which helps the bike go straight.
- Positive caster means the steering axis tilts toward the driver. This provides straight-line stability and helps the steering wheel return to center after a turn.
- Negative caster means the steering axis tilts toward the front bumper. This would make the vehicle feel unstable and is not desirable.
If caster is unequal side-to-side, the vehicle will pull toward the side with less positive caster.
Toe — Pointing In or Out
Toe is the angle of the tires when viewed from above the vehicle (bird’s-eye view):
- Toe-in means the fronts of the tires point slightly toward each other (like pigeon-toed feet).
- Toe-out means the fronts of the tires point slightly away from each other.
- Most vehicles are set with a very slight toe-in for stability.
Incorrect toe is the most common alignment problem and causes rapid, feathered tire wear — you can feel it by running your hand across the tread in one direction and then the other. It will feel smooth one way and rough the other.
🎬 Video: Understanding Wheel Alignment — https://youtu.be/Zs2-mdUFnrs?si=k39aCmmH8CFBnW2f
Tread Wear Indicators
Every tire sold in the United States has built-in tread wear indicator bars (also called wear bars). These are small raised bars of rubber that sit in the grooves of the tire tread at a height of 2/32 of an inch — the legal minimum tread depth in most states.
When a tire is new, the wear bars are hidden deep in the grooves and are hard to see. As the tire wears down over thousands of miles, the tread surface gets closer and closer to the height of the wear bars. When the tread is flush (level) with the wear bars, the tire has reached the end of its usable life and must be replaced.
How to find them:
- Look for small raised rubber bridges running across the bottom of the tread grooves, perpendicular to the direction of travel.
- Small triangles or “TWI” (Tread Wear Indicator) markings on the sidewall point to the locations of the wear bars.
The Penny Test
A classic quick test: insert a penny into a tire groove with Lincoln’s head facing down. If you can see the top of Lincoln’s head, the tread is at or below 2/32 of an inch and the tire needs to be replaced. Many experts now recommend the quarter test instead — using a quarter with Washington’s head. If you can see the top of Washington’s head, the tread is at 4/32 of an inch, which is the point where wet-weather traction begins to degrade significantly.
🎬 Video: What is a Tire Wear Indicator Bar? — https://youtu.be/juwEdAk8fQU?si=tKT9gEm5OWE_sR_V
Tire Disposal
Old tires cannot simply be thrown in the trash. In most states, it is illegal to dispose of tires in regular landfills because they take up space, trap methane gas, and collect water that breeds mosquitoes. Proper disposal is important for public health and the environment.
Legal disposal options:
- Tire retailers: When you buy new tires, the shop will typically remove and dispose of your old tires for a small fee (usually $3 to $5 per tire). This is the most common method.
- Municipal collection events: Many cities and counties hold periodic tire recycling drives or accept tires at household hazardous waste collection facilities.
- Recycling facilities: Dedicated tire recyclers shred old tires for use in:
- Rubberized asphalt for road surfaces
- Playground surfaces and athletic tracks
- Landscaping mulch
- Tire-derived fuel for cement kilns and power plants
- New rubber products
Req 5a — How Engines Work
The engine is the heart of a vehicle. Understanding how it works gives you the foundation for everything else in automotive maintenance. Let’s break down the three major powertrain types you need to know.
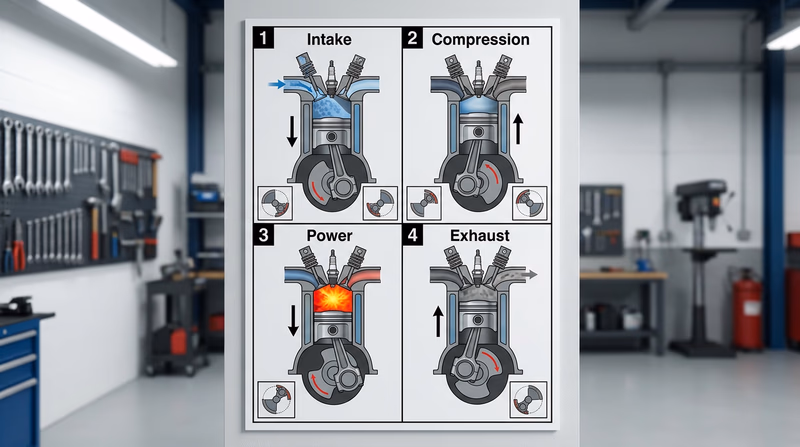
The Four-Stroke Cycle
Most gasoline and diesel engines use a four-stroke cycle to convert fuel into motion. Each stroke is one movement of a piston inside a cylinder — either up or down. The four strokes repeat thousands of times per minute to keep the engine running.
1. Intake Stroke — The piston moves down, creating a vacuum that pulls a mixture of air and fuel into the cylinder through an open intake valve. (In a diesel engine, only air is pulled in during this stroke.)
2. Compression Stroke — The intake valve closes and the piston moves back up, compressing the air-fuel mixture into a much smaller space. Compression makes the mixture easier to ignite and increases the power of the explosion.
3. Power Stroke — This is where the energy is created. In a gasoline engine, the spark plug fires and ignites the compressed air-fuel mixture. In a diesel engine, the compressed air is so hot that diesel fuel injected at this point ignites on contact — no spark plug needed. The explosion forces the piston down with tremendous force, turning the crankshaft.
4. Exhaust Stroke — The exhaust valve opens and the piston moves back up, pushing the burned gases out of the cylinder and through the exhaust system. Then the cycle starts again.
From Pistons to Wheels
The up-and-down motion of the pistons is converted to rotational motion by the crankshaft — a heavy metal shaft with offset sections that the pistons push on via connecting rods. The crankshaft spins, and that spinning motion is transmitted through the transmission, drive shaft, and differential to the wheels.
Most passenger car engines have four or six cylinders arranged in a line (inline) or a V-shape. More cylinders generally means more power but also more fuel consumption.
Gasoline vs. Diesel — Key Differences
| Feature | Gasoline Engine | Diesel Engine |
|---|---|---|
| Ignition method | Spark plug | Compression (no spark plug) |
| Compression ratio | 8:1 to 12:1 | 14:1 to 25:1 |
| Fuel | Gasoline | Diesel fuel |
| Power delivery | Higher RPM, quicker revving | More torque at lower RPM |
| Fuel efficiency | Lower | Higher (more energy per gallon) |
| Emissions equipment | Catalytic converter | Catalytic converter + Diesel Particulate Filter (DPF) |
| Sound | Smoother, quieter | Distinctive “clatter” at idle |
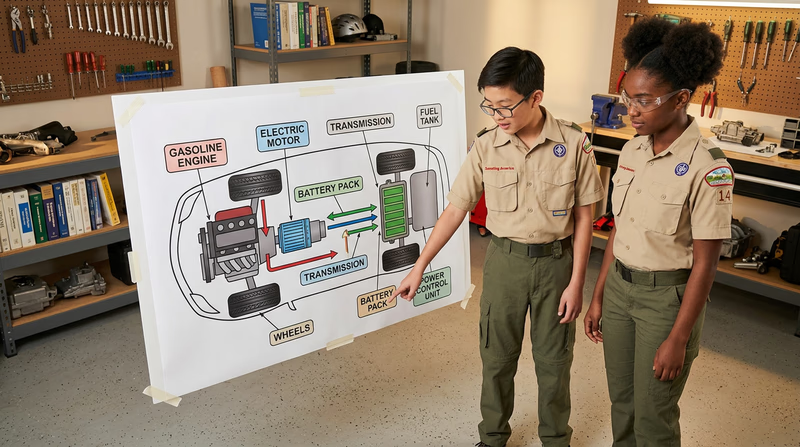
How Hybrid Vehicles Work
A gasoline-electric hybrid combines a gasoline engine with one or more electric motors and a battery pack. The vehicle’s computer constantly decides which power source — or combination of sources — is most efficient for the current driving conditions.
Key hybrid concepts:
- Low speeds and light acceleration: The electric motor drives the wheels alone, using battery power. The gas engine stays off, saving fuel.
- Highway cruising: The gas engine takes over because it is most efficient at steady speeds.
- Hard acceleration: Both the gas engine and electric motor work together to provide maximum power.
- Braking and coasting: The electric motor reverses its role and becomes a generator, capturing kinetic energy and converting it back to electricity to recharge the battery. This is called regenerative braking.
- Stopped in traffic: The gas engine shuts off completely. Accessories run on battery power. When you press the accelerator, the electric motor gets you moving silently before the gas engine restarts.
🎬 Video: Engines 101: Basics of How Engines Work — https://youtu.be/gqK3dCpwzxE?si=UPmmasiMdCvH9Z18
🎬 Video: Engines 101: How Does a Diesel Engine Work — https://youtu.be/PFKppLZNVuU?si=IXxylkf44UZj8UOt
🎬 Video: How Hybrid Cars Work — https://youtu.be/hRYWqdiUlbA?feature=shared
Req 5b — Engine Oil
Engine oil is one of the most important fluids in your vehicle. Without it, an engine would destroy itself in minutes. Understanding what oil does and how to read the labels on an oil bottle will help you make informed maintenance decisions.
What Engine Oil Does
Oil serves several critical functions inside the engine:
- Lubrication — Oil creates a thin film between moving metal surfaces (pistons, bearings, camshafts) to reduce friction and prevent metal-on-metal contact. Without lubrication, these parts would grind together, overheat, and seize.
- Cooling — Oil absorbs heat from hot engine components and carries it away, helping to regulate engine temperature alongside the cooling system.
- Cleaning — Oil contains detergent additives that pick up microscopic particles of dirt, metal shavings, and combustion byproducts, keeping them suspended in the oil so they can be removed during an oil change.
- Sealing — Oil helps fill the tiny gaps between piston rings and cylinder walls, maintaining compression and preventing combustion gases from escaping.
- Corrosion protection — Additives in the oil prevent moisture and acids from corroding internal engine surfaces.
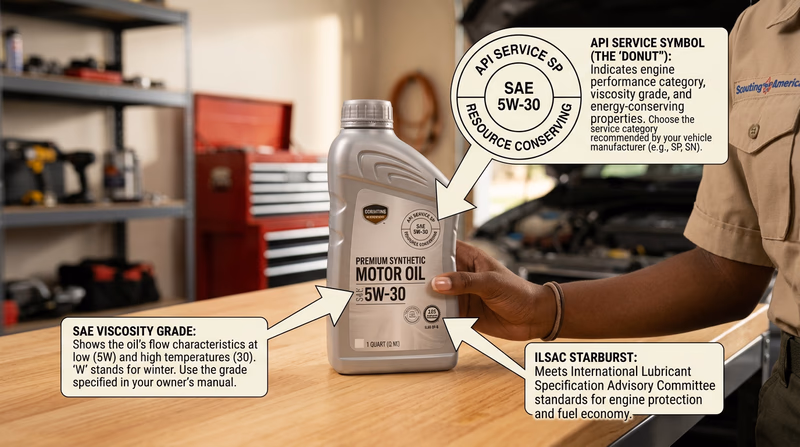
The API Service Code
The API (American Petroleum Institute) service code tells you what type of engine the oil is designed for and how well it performs. You will find the API certification mark — often called the “donut” — on the back of every oil bottle.
The API donut has three parts:
- Top half: The API service category (e.g., “API SP” for gasoline engines or “API CK-4” for diesel engines)
- Center: The SAE viscosity grade (e.g., “SAE 5W-30”)
- Bottom half: Whether the oil is “Resource Conserving” (designed to improve fuel economy)
For gasoline engines, categories are designated with “S” (for “Spark ignition”):
- The current standard is API SP (introduced in 2020). Each new category supersedes the previous ones.
- Using an oil that meets the latest API standard ensures compatibility with modern engine technology.
For diesel engines, categories use “C” (for “Compression ignition”):
- The current standard is API CK-4 (for modern low-emission diesel engines).
The SAE Number and Viscosity
Viscosity is a measure of how thick or thin the oil is — how easily it flows. Think of it like comparing honey (high viscosity) to water (low viscosity). The SAE (Society of Automotive Engineers) developed a numbering system to rate oil viscosity.
Most modern engine oils are multi-grade, meaning they work well across a range of temperatures. A multi-grade oil has a label like 5W-30:
- 5W = The “winter” rating. The lower this number, the better the oil flows in cold temperatures. A 5W oil flows more easily in cold weather than a 10W oil, making it easier to start the engine on a freezing morning.
- 30 = The operating-temperature viscosity. This is the oil’s thickness when the engine is at normal running temperature (around 212°F). A 30-weight oil is thinner at operating temperature than a 40-weight oil.
Common multi-grade oils:
| Oil Grade | Cold Flow | Operating Protection | Typical Use |
|---|---|---|---|
| 0W-20 | Excellent | Lighter protection | Many modern engines, hybrids |
| 5W-30 | Very good | Moderate protection | Most common; wide range of vehicles |
| 10W-40 | Good | Heavier protection | Older engines, warmer climates |
🎬 Video: API Motor Oil Ratings Explained — https://youtu.be/zOm_qlge9sE?si=Cmjw88X-dBXCAZC-
🎬 Video: What Do SAE Grades Mean — https://youtu.be/I09djHVZbaw?si=iAYgnRyx2mwjtNF2
Finding the Right Oil for Your Vehicle
Using the wrong oil — the wrong viscosity or the wrong API category — can cause poor lubrication, increased engine wear, and even void your warranty. Always use the oil specified by the vehicle manufacturer.
Where to find the recommended oil type and capacity:
- Owner’s manual — The specifications section lists the recommended oil viscosity grade (e.g., 5W-30), the API category, and the oil capacity in quarts.
- Oil filler cap — On many vehicles, the recommended viscosity is printed directly on the oil filler cap under the hood (e.g., “5W-20”).
- Door jamb or underhood sticker — Some manufacturers include oil specifications on informational stickers.
- Manufacturer’s website — Most automakers have an online owner’s manual or maintenance guide searchable by VIN (Vehicle Identification Number).
Oil capacity is listed in two ways:
- With filter change — The total amount needed when you also replace the oil filter (this is the number you use during a standard oil change).
- Without filter change — Slightly less, because the old filter still holds some oil.
A typical passenger car holds 4 to 6 quarts of oil. Larger trucks and SUVs may hold 7 to 8 quarts or more.
🎬 Video: Choosing the Correct Engine Oil — https://youtu.be/UdzbRMy0sYU?si=K1C5G09GxYyQ3Q-m
Req 6 — Coolant & Cooling
An internal combustion engine generates tremendous heat — combustion temperatures inside the cylinders can exceed 4,000°F. Without a cooling system to carry that heat away, the engine would warp, crack, and fail within minutes. The cooling system is what keeps the engine operating in its ideal temperature range of about 195°F to 220°F.
Why Plain Water Is Not Enough
Water is actually an excellent coolant — it absorbs heat very well. But water alone has two big problems:
- It freezes at 32°F. Frozen water expands and can crack the engine block, radiator, and hoses.
- It boils at 212°F. Engine operating temperatures can exceed this, especially under load.
Coolant (also called antifreeze) is a mixture of water and ethylene glycol (or sometimes propylene glycol). This mixture:
- Lowers the freezing point to as cold as -35°F or colder
- Raises the boiling point to about 265°F (even higher with the system under pressure)
- Contains corrosion inhibitors that protect the metal and rubber components inside the cooling system
The standard mix is 50/50 — equal parts coolant concentrate and distilled water. Some coolant is sold pre-mixed; others require you to mix it yourself.
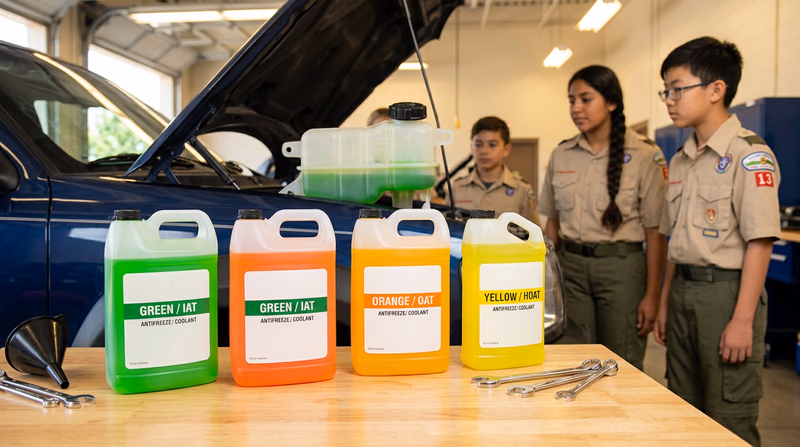
Choosing the Correct Coolant Type
Not all coolants are the same. Different vehicles require different formulations, and mixing the wrong types can cause damage.
| Coolant Type | Color | Typical Use |
|---|---|---|
| IAT (Inorganic Acid Technology) | Green | Older American vehicles |
| OAT (Organic Acid Technology) | Orange or dark green | GM, Saab, VW |
| HOAT (Hybrid OAT) | Yellow, turquoise, pink, blue | Chrysler, Ford, many European and Asian vehicles |
🎬 Video: Role of Antifreeze/Coolant — https://youtu.be/E6UieoMzvxM?si=5IYkQMMWHf8N-LIf
Why Coolant Needs to Be Changed
Over time, coolant breaks down. The corrosion inhibitors wear out, the pH level drops (becoming more acidic), and contaminants accumulate. Old coolant can:
- Allow corrosion of the radiator, heater core, and engine water passages
- Become less effective at preventing freezing and boiling
- Form deposits that restrict coolant flow
Most manufacturers recommend a coolant flush every 30,000 to 60,000 miles or every 3 to 5 years, depending on the coolant type.
How a Coolant Flush Works
A coolant flush is the process of draining the old coolant, cleaning the system, and refilling it with fresh coolant. Here is the general process:
Coolant Flush Steps
General procedure (always consult the vehicle's owner's manual)- Allow the engine to cool completely. Never open the cooling system when hot.
- Place a drain pan under the radiator drain valve (petcock), located at the bottom of the radiator.
- Open the petcock and allow the old coolant to drain completely into the pan.
- Close the petcock and fill the system with distilled water. Run the engine until it reaches operating temperature, then let it cool and drain again. This flushes out remaining old coolant and debris.
- Close the petcock and fill the system with the correct type of coolant at the proper mixture ratio (usually 50/50).
- Start the engine and check for leaks. Top off the coolant reservoir after the engine reaches operating temperature and the thermostat opens.
- Check the coolant level again after the vehicle has cooled down. Air bubbles may have escaped, lowering the level.
Disposing of Used Coolant
- Auto parts stores (AutoZone, O’Reilly, NAPA) — Many accept used coolant at no charge.
- Municipal hazardous waste facilities — Your local government likely has a drop-off site for automotive fluids.
- Service shops — If you have a coolant flush done professionally, the shop handles disposal.
Keep used coolant in a sealed, labeled container until you can dispose of it. Never mix used coolant with used oil — they must be recycled separately.
🎬 Video: Flushing and Filling Your Coolant System — https://youtu.be/XdyZDw7jOP0?si=erJ4Yd2RGSk2-DGB
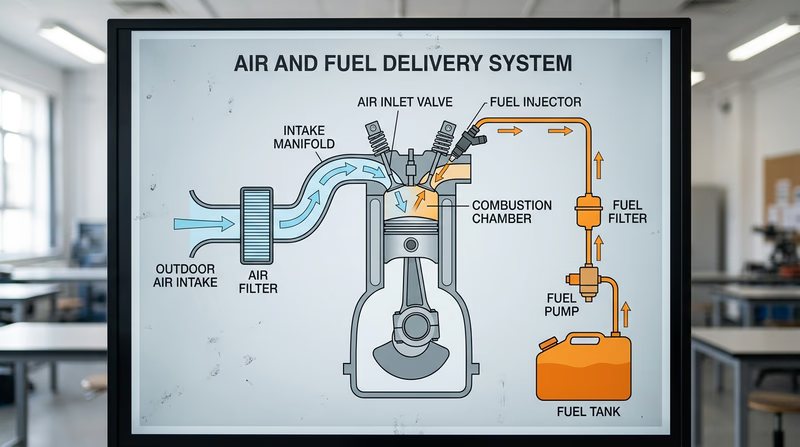
Req 7 — Air, Fuel & Injection
An engine needs three things to run: fuel, air, and a spark (or compression, in a diesel). The air system and fuel system work together to deliver exactly the right mixture of clean air and clean fuel to the engine’s cylinders at exactly the right time.
How Air and Fuel Work Together
The engine needs a precise air-fuel ratio to burn efficiently. For a gasoline engine, the ideal ratio is approximately 14.7 parts air to 1 part fuel by weight — this is called the stoichiometric ratio. Too much fuel (a “rich” mixture) wastes gas and increases emissions. Too little fuel (a “lean” mixture) can cause overheating, misfires, and engine damage.
The air path:
- Air enters through the air intake (usually a large opening at the front of the engine bay).
- It passes through the engine air filter, which removes dirt, dust, and debris.
- Clean air flows through the intake manifold to the cylinders.
The fuel path:
- Fuel is stored in the fuel tank (usually under the rear of the vehicle).
- The fuel pump pushes fuel through the fuel lines toward the engine.
- Fuel passes through the fuel filter, which removes dirt and contaminants.
- Clean fuel reaches the fuel injectors, which spray a precise amount of fuel into the air stream or directly into the cylinders.
Why the Air Filter Matters
The air filter is a barrier between dirty outdoor air and the engine’s precisely engineered internals. Without it:
- Dust and dirt particles would be sucked into the cylinders, acting like sandpaper on the piston walls and rings.
- Insects, leaves, and other debris could damage or clog engine components.
- Engine wear would increase dramatically, shortening the engine’s life.
A clean air filter ensures maximum airflow for efficient combustion. As discussed in Requirement 2e, a dirty air filter restricts airflow and reduces performance.
Why the Fuel Filter Matters
Even though gasoline and diesel fuel are refined products, they can pick up contaminants:
- Rust and sediment from the inside of fuel tanks and storage containers
- Moisture from condensation
- Dirt that enters during refueling
The fuel filter traps these particles before they reach the fuel injectors. Fuel injectors have extremely tiny openings — sometimes as small as a human hair — and even microscopic debris can clog them, causing misfires, reduced power, and poor fuel economy.
How Fuel Injection Works
Fuel injection replaced carburetors (which mechanically mixed air and fuel) in the 1980s and 1990s. It is far more precise, efficient, and responsive. There are two main types:
Port Fuel Injection (PFI):
- Fuel injectors are mounted in the intake manifold, one per cylinder.
- Each injector sprays fuel into the intake port just above the intake valve.
- The fuel mixes with air in the port and enters the cylinder as a pre-mixed charge.
Gasoline Direct Injection (GDI):
- Fuel injectors spray fuel directly into the combustion chamber at very high pressure.
- This allows more precise control of the air-fuel mixture and can improve fuel efficiency and power.
- GDI engines can even vary the injection timing and fuel volume within a single combustion cycle.
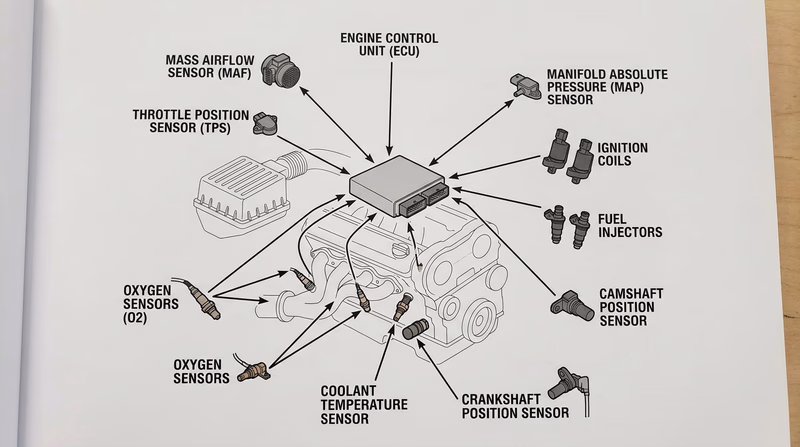
The Brain: The Engine Control Unit (ECU)
The ECU (Engine Control Unit), also called the PCM (Powertrain Control Module), is the onboard computer that controls the fuel injection system. It is the brain that makes sure the engine runs efficiently under all conditions.
The ECU receives real-time data from dozens of sensors placed throughout the engine and exhaust system:
- Mass airflow sensor (MAF) — Measures how much air is entering the engine
- Throttle position sensor (TPS) — Tells the ECU how far the accelerator pedal is pressed
- Oxygen sensors (O2) — Measure the oxygen content in the exhaust to determine if the air-fuel mixture is rich or lean
- Coolant temperature sensor — Adjusts the mixture based on engine temperature (cold engines need richer mixtures)
- Crankshaft position sensor — Tells the ECU the engine’s RPM and the position of each piston
- Manifold absolute pressure sensor (MAP) — Measures intake vacuum/pressure
Using all this data, the ECU calculates the exact amount of fuel each injector should spray and the exact timing of each spray — multiple times per second. It adjusts continuously as conditions change: accelerating, decelerating, idling, climbing a hill, or cruising on a flat highway.
The Feedback Loop
The ECU uses a closed-loop feedback system. The oxygen sensors in the exhaust tell the ECU whether the last combustion cycle was too rich or too lean. The ECU immediately adjusts the next injection pulse to correct it. This constant cycle of measure-adjust-measure-adjust keeps emissions low and fuel economy high.
When a sensor fails or detects a problem, the ECU stores a trouble code and turns on the check engine light. A technician (or you, with an OBD-II scanner) can read these codes to diagnose the problem.
🎬 Video: How a Car Fuel Injection System Works — https://youtu.be/DI4Oci7U2lA?si=gXVRcMg3qzrhN7g9
Req 8a — Electrical System Diagrams
Diagram and explain the parts of one of the following electrical systems:
- Starting/charging system
- Hybrid or electric vehicle inverter
- Lighting system.
For this requirement, you will choose one of the three electrical systems listed, diagram its components, and explain how they work together. Below is an overview of all three options to help you decide which one interests you most — and to prepare you for your counselor discussion.
Option 1: Starting/Charging System
The starting and charging system is responsible for starting the engine and keeping the battery charged while the vehicle is running.
Key components:
- Battery — Stores electrical energy as chemical energy. Provides the initial burst of power to start the engine and powers accessories when the engine is off.
- Starter motor — A powerful electric motor that spins the engine’s flywheel to start the combustion process. It only runs for a few seconds during starting.
- Ignition switch / Start button — Sends the signal to engage the starter motor.
- Solenoid — An electromagnetic switch mounted on the starter motor. When activated by the ignition switch, it pushes a small gear (the pinion) into contact with the flywheel and connects the battery’s power to the starter motor.
- Alternator — A generator driven by the serpentine belt. Once the engine is running, the alternator produces alternating current (AC) electricity, converts it to direct current (DC) through internal diodes, and sends it to the battery to recharge it and to the vehicle’s electrical systems.
- Voltage regulator — Controls the alternator’s output to maintain a consistent voltage (typically 13.5 to 14.5 volts). Prevents overcharging the battery.
How they work together: You turn the key → the solenoid engages → the starter motor spins the flywheel → the engine starts combustion → the alternator takes over, generating electricity to recharge the battery and power all electrical systems.
🎬 Video: Automotive Starting and Charging System — https://youtu.be/IixqxkWpT5M?si=iTXN07OTcbwFCpzB
Option 2: Hybrid or Electric Vehicle Inverter
The inverter is a critical component in hybrid and electric vehicles that converts electricity between two forms.
Key components:
- High-voltage battery pack — Stores energy as direct current (DC). Operates at 200 to 800 volts.
- Inverter — Converts DC from the battery into three-phase alternating current (AC) that the electric motor needs to operate. During regenerative braking, it reverses the process — converting AC from the motor (now acting as a generator) back to DC to recharge the battery.
- Electric motor — Uses AC electricity to produce rotational force (torque) that drives the wheels. Most EVs use permanent magnet or induction motors.
- DC-DC converter — Steps down the high-voltage DC to 12 volts to power the vehicle’s traditional electrical systems (lights, radio, windows).
- Motor controller — Works with the inverter to regulate speed and torque based on accelerator pedal input.
How they work together: You press the accelerator → the motor controller signals the inverter → the inverter converts DC battery power to AC → the electric motor spins → you lift off the accelerator or brake → the motor becomes a generator → the inverter converts AC back to DC → energy returns to the battery.
🎬 Video: The Role of Inverters for EV Propulsion Systems — https://youtu.be/wbfOoQgg7Tk?si=CK1dIlvuJJDSXKlC
Option 3: Lighting System
The lighting system provides visibility for the driver and makes the vehicle visible to others on the road.
Key components:
- Headlights — Provide forward illumination. Modern vehicles use halogen, HID (High-Intensity Discharge), or LED bulbs. Most have both low-beam and high-beam settings.
- Taillights / Brake lights — Red lights at the rear. Taillights illuminate when headlights are on; brake lights illuminate brighter when the brake pedal is pressed.
- Turn signals — Amber or yellow blinking lights on the front, rear, and sides that indicate the driver’s intention to turn or change lanes. Controlled by a flasher relay that creates the blinking pattern.
- Lighting switch — Dashboard control that turns headlights, parking lights, and instrument lights on and off. Many modern vehicles have automatic headlights that use a light sensor.
- Dimmer switch — Toggles between low and high beams (usually a stalk on the steering column).
- Fuses and relays — Protect and control the lighting circuits. Each lighting circuit has its own fuse.
- Wiring harness — The network of wires connecting the battery, switches, fuses, and light assemblies.
How they work together: You flip the headlight switch → current flows from the battery through the fuse box → through the headlight relay → through the wiring harness → to the headlight bulbs → current returns to the battery through the ground circuit, completing the loop.
🎬 Video: Automotive Lighting Circuits — https://youtu.be/ST5nz8M9Lcg?si=yIgLMjiU5VL_Gu1_
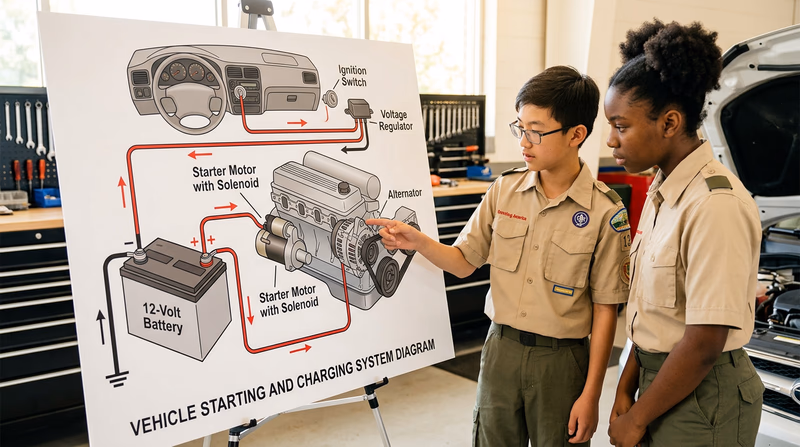
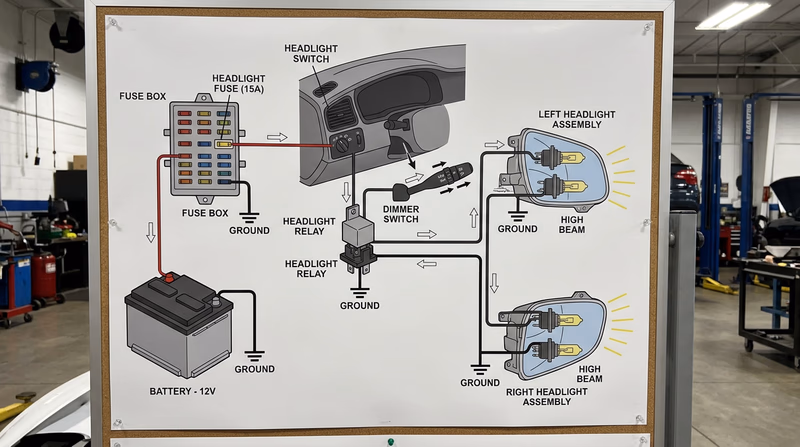
🎬 Video: Car Electrical System Explained — https://youtu.be/XO-3nCYHeFQ?si=eNmJgO9ya1a2jzJP
Req 8b — Firing Order & Spark Gap
What Is Firing Order?
In a multi-cylinder engine, the cylinders do not all fire at the same time. Instead, they fire in a specific sequence called the firing order. This sequence is carefully engineered by the manufacturer to achieve:
- Smooth power delivery — If all cylinders fired simultaneously, the engine would produce one massive pulse of power followed by nothing. By staggering the firing, the engine produces a steady, overlapping stream of power pulses.
- Reduced vibration — The firing order is designed so that adjacent cylinders do not fire consecutively. This distributes the forces more evenly across the crankshaft and reduces vibration.
- Even heat distribution — Alternating which cylinders fire helps spread heat more evenly across the engine block.
Common Firing Orders
Firing orders vary by engine design:
| Engine Type | Common Firing Order |
|---|---|
| Inline 4-cylinder | 1-3-4-2 |
| V6 | 1-2-3-4-5-6 (varies by manufacturer) |
| V8 (GM/Chevy) | 1-8-4-3-6-5-7-2 |
| V8 (Ford) | 1-3-7-2-6-5-4-8 |
The firing order is typically stamped on the intake manifold or printed in the owner’s manual and service manual.
🎬 Video: Explain Engine Firing Order — https://youtu.be/ss0GMKBYCks?si=jlPZT5HiIhDtQKQw
What Is the Spark Gap?
The spark gap (also called the electrode gap or simply the gap) is the distance between the center electrode and the ground electrode at the tip of a spark plug. This gap is where the spark actually jumps — creating the tiny bolt of electricity that ignites the air-fuel mixture in the cylinder.
Why the Gap Matters
The size of the gap directly affects how the engine runs:
- Correct gap — The spark is strong enough to reliably ignite the air-fuel mixture, resulting in complete combustion, smooth idle, good fuel economy, and clean emissions.
- Gap too small — The spark is weak and short. It may not ignite the mixture reliably, causing misfires, rough idle, and poor performance.
- Gap too large — The ignition coil may not produce enough voltage to bridge the wider gap, especially under high compression or heavy load. This can also cause misfires.
Setting the Gap
Every engine has a specified spark plug gap, measured in thousandths of an inch (e.g., 0.044 inches) or millimeters (e.g., 1.1 mm). You can find the correct gap in the owner’s manual, the service manual, or on a sticker under the hood.
To check and adjust the gap, you use a gap gauge (also called a feeler gauge or gap tool):
- Select the correct wire or blade on the gauge that matches the specified gap.
- Slide it between the two electrodes of the spark plug.
- If it fits snugly, the gap is correct.
- If the gap is too large, gently tap the ground electrode on a hard surface to close it slightly.
- If the gap is too small, carefully pry the ground electrode open with the gap tool.
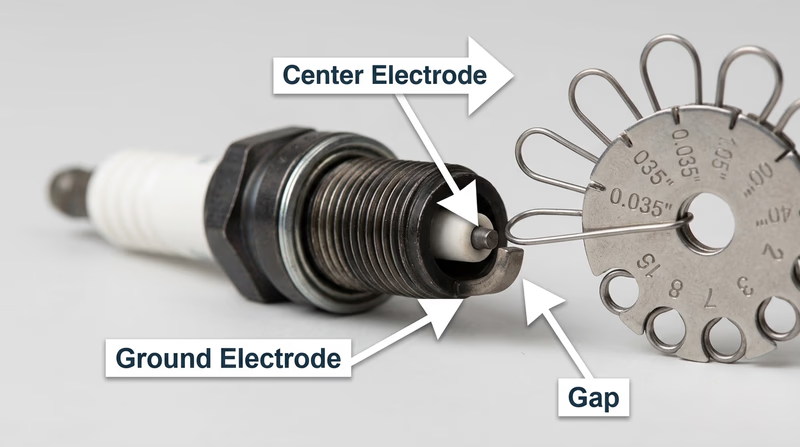
🎬 Video: What You Need to Know About Spark Plugs — https://youtu.be/iGiTXYWmSQs?si=ks9YTt40H9lwDuDR
Req 8d — Jump-Starting a Battery
A dead battery is one of the most common roadside problems. Knowing how to safely jump-start a vehicle is a practical skill that every driver — and every Scout — should have. The process is straightforward, but the order of the connections matters for safety.
What You Need
- A set of jumper cables (also called booster cables) — heavier gauge cables (4 to 6 gauge) are better because they carry more current.
- A donor vehicle with a charged battery of the same voltage (12V for most passenger vehicles).
- Both vehicles should be parked close enough for the cables to reach, but not touching each other.
Step-by-Step: Connecting Jumper Cables
Jump-Start Procedure
Follow this order exactly- Turn off both vehicles. Remove the keys from the ignition. Turn off all accessories (lights, radio, AC).
- Identify the positive (+) and negative (-) terminals on both batteries. Positive terminals are usually marked with a “+” sign and may have a red cover. Negative terminals are marked with a “-” sign and may have a black cover.
- Connect the RED (positive) cable to the POSITIVE (+) terminal of the DEAD battery.
- Connect the other end of the RED cable to the POSITIVE (+) terminal of the GOOD battery.
- Connect the BLACK (negative) cable to the NEGATIVE (-) terminal of the GOOD battery.
- Connect the other end of the BLACK cable to an UNPAINTED METAL SURFACE on the dead vehicle’s engine block — not to the dead battery’s negative terminal. A bolt or bracket on the engine works well. This is the ground connection.
- Start the donor vehicle and let it run for 2 to 3 minutes.
- Try to start the dead vehicle. If it does not start, wait a few more minutes and try again.
- Once the dead vehicle is running, disconnect the cables in REVERSE order: black from engine block, black from good battery, red from good battery, red from dead battery.
- Drive the jump-started vehicle for at least 15 to 20 minutes to allow the alternator to recharge the battery.
Why the Last Connection Goes to the Engine Block
The final connection (the black cable to the engine block of the dead vehicle) is made away from the battery on purpose. When you make this last connection, a small spark is likely. If that spark happened right next to the battery, it could ignite the hydrogen gas that dead batteries sometimes vent. By connecting to the engine block instead, the spark occurs safely away from the battery.
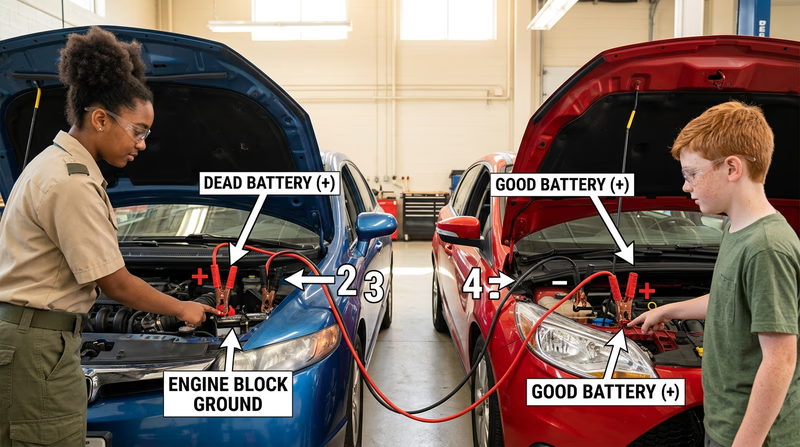
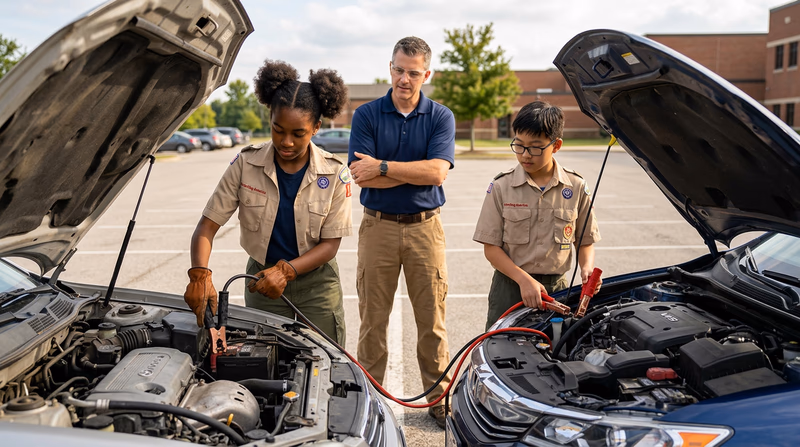
🎬 Video: How to Properly Jump Start a Car — https://youtu.be/iI1o2hNy2hE?si=t_Z0kfFFLqNt1lkQ
Req 8e — Electric Vehicles
If you drive a battery electric vehicle (BEV) or plug-in hybrid (PHEV), understanding what affects your range — and how to recharge efficiently — is just as important as knowing where the nearest gas station is for a conventional vehicle.
Factors That Affect EV Range
The range displayed on an EV’s dashboard is an estimate, not a guarantee. Many factors cause actual range to vary:
Temperature:
- Cold weather is the biggest range reducer. At 20°F, range can drop by 25% to 40% compared to ideal conditions. This happens because the battery’s chemical reactions slow down in the cold, and heating the cabin draws significant power.
- Extreme heat also reduces range, though less dramatically, because the battery cooling system works harder and air conditioning draws power.
Driving Speed:
- Aerodynamic drag increases with the square of speed. Driving at 75 mph uses significantly more energy per mile than driving at 55 mph. Highway driving at high speeds can reduce range by 15% to 25% compared to city driving.
Driving Style:
- Aggressive acceleration, hard braking, and frequent speed changes consume more energy. Smooth, gradual acceleration and coasting to decelerate (which activates regenerative braking) maximize range.
Climate Control:
- Heating and air conditioning are the largest non-driving power draws. Seat heaters and steering wheel heaters are more efficient than running the cabin heater because they warm you directly instead of heating all the air in the car.
Terrain and Load:
- Driving uphill uses more energy (though going downhill recovers some through regenerative braking). Carrying heavy loads or towing reduces range.
Tire Pressure:
- Under-inflated tires increase rolling resistance, reducing range. Keep tires at the recommended pressure.
Battery Age and Health:
- Over time, batteries gradually lose some maximum capacity. A new battery that once provided 300 miles of range might deliver 270 miles after several years.
How to Recharge an Electric Vehicle
There are three levels of EV charging, each progressively faster:
Level 1 — Standard Household Outlet (120V):
- Uses the portable charging cord that comes with most EVs — plugs into a regular wall outlet.
- Adds about 3 to 5 miles of range per hour of charging.
- Best for: Overnight charging at home when daily driving is short (under 40 miles).
- A full charge from empty can take 24 to 48+ hours.
Level 2 — Dedicated 240V Circuit:
- Uses a wall-mounted charging station (called an EVSE — Electric Vehicle Supply Equipment) connected to a 240-volt circuit, like the ones used for clothes dryers.
- Adds about 15 to 30 miles of range per hour of charging.
- Best for: Home charging (overnight gives a full charge), workplace charging, and public charging stations at shopping centers and parking garages.
- A full charge from empty typically takes 6 to 12 hours.
Level 3 — DC Fast Charging (DCFC):
- Uses high-powered commercial charging stations found along highways and in urban areas.
- Adds about 100 to 200+ miles of range in 30 minutes (varies widely by vehicle and charger).
- Best for: Long road trips when you need to charge quickly.
- Not recommended for daily use — frequent DC fast charging can accelerate battery degradation over time.
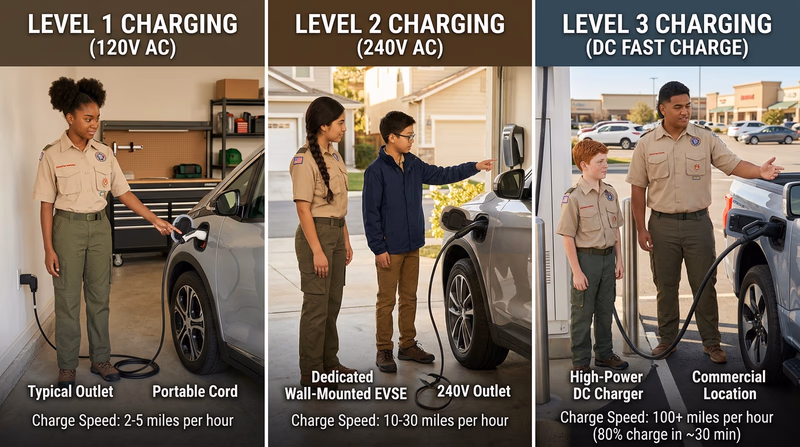
Systems That Depend on Electricity
In a modern vehicle, almost every system relies on the electrical system to function. If the battery dies or the alternator fails, the consequences go far beyond not being able to start the engine.
Engine management:
- The ECU/PCM, fuel injectors, ignition coils, and all engine sensors need power. Without electricity, the engine cannot run.
Safety systems:
- Antilock brakes (ABS), electronic stability control, traction control, and air bag deployment all depend on electrical power and electronic sensors.
Comfort and convenience:
- Power windows, power locks, power seats, climate control (heating and AC), and infotainment systems are all electrically powered.
Lighting:
- Headlights, taillights, interior lights, and instrument panel illumination all require electricity.
Communication and navigation:
- Bluetooth, GPS navigation, backup cameras, and hands-free phone systems are all electrical.
Advanced driver-assistance systems (ADAS):
- Lane-keeping assist, adaptive cruise control, automatic emergency braking, blind-spot monitoring, and parking sensors all rely on cameras, radar, and ultrasonic sensors powered by the electrical system.
🎬 Video: Factors Affecting Range — https://youtu.be/FlaskUlzdmU?si=CIjEtDAEGsjmaiP6
🎬 Video: Fundamentals of Automotive Electrical Systems — https://youtu.be/17DdpIJ6IsI?si=TsLAiKVhMLMmEeh_
Req 9a — Drive Train & Transmissions
The drive train (also called the drivetrain or powertrain) is the system that transfers power from the engine to the wheels. Understanding its components helps you appreciate how a vehicle actually moves — and why proper maintenance of these parts is essential.
Drive Train Components
Transmission — Connected directly to the engine, the transmission uses gears to multiply the engine’s torque and match engine speed to vehicle speed. At low speeds, the transmission uses lower gears (more torque, less speed). At highway speeds, it shifts to higher gears (less torque, more speed). Think of it like the gears on a bicycle — you use a low gear to start pedaling from a stop and shift to a higher gear once you are rolling.
Drive shaft (or propeller shaft) — A long, rotating metal tube that connects the transmission to the differential. Found primarily in rear-wheel-drive and four-wheel-drive vehicles. Front-wheel-drive vehicles use shorter half shafts (axle shafts) instead.
Universal joints (U-joints) — Flexible couplings at each end of the drive shaft that allow it to move up and down with the suspension while still spinning. They compensate for the angle between the transmission (which is fixed to the frame) and the differential (which moves with the axle).
Differential — A gearbox between the drive wheels that serves two purposes:
- It turns the rotational direction 90 degrees (from the lengthwise drive shaft to the sideways axles).
- It allows the two drive wheels to spin at different speeds when turning a corner. The outside wheel travels a longer distance than the inside wheel, so it must spin faster.
Axle shafts (half shafts) — Connect the differential to the drive wheels. They transmit the rotational force from the differential to the wheel hubs.
CV joints (Constant Velocity joints) — Found on front-wheel-drive vehicles and independent rear suspensions. They do the same job as U-joints but are designed to operate at sharper angles and maintain a constant speed, which is necessary because front wheels must both steer and be driven.
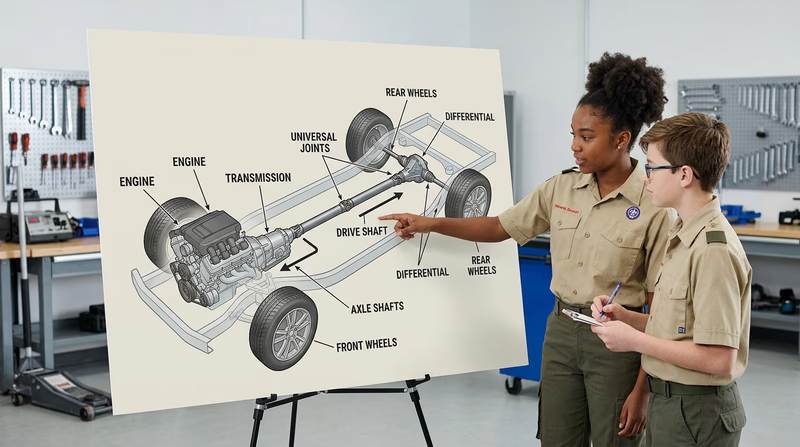
Manual (Standard) Transmission
A manual transmission requires the driver to select gears manually using a gear shift lever and a clutch pedal.
- Clutch pedal — Pressing the clutch disconnects the engine from the transmission momentarily, allowing the driver to change gears without grinding.
- Gear shift — The driver moves the lever into the desired gear position (1st, 2nd, 3rd, 4th, 5th, and sometimes 6th, plus reverse).
- How it works: The driver presses the clutch, moves the shifter to the next gear, and releases the clutch to re-engage power. The driver decides when to shift based on engine RPM, speed, and driving conditions.
Advantages: More driver control, often more fuel-efficient in older designs, lower maintenance costs (no automatic transmission fluid changes), and some drivers simply enjoy the engagement of shifting.
Disadvantages: Requires more skill, can be tiring in stop-and-go traffic, and is harder to learn.
Automatic Transmission
An automatic transmission shifts gears on its own — the driver just selects Drive (D), Reverse (R), Neutral (N), or Park (P).
- Torque converter — Replaces the clutch pedal. It uses fluid (automatic transmission fluid, or ATF) to transfer power from the engine to the transmission. The torque converter allows the engine to keep running while the vehicle is stopped.
- Planetary gear sets — Instead of the sliding gears in a manual, automatics use sets of interlocking gears controlled by clutch packs and bands inside the transmission. The vehicle’s computer decides when to shift.
Advantages: Easier to drive, better in traffic, and modern automatics are often more fuel-efficient than manuals.
Disadvantages: More complex, more expensive to repair, and requires periodic automatic transmission fluid changes.
CVT (Continuously Variable Transmission)
A CVT is a type of automatic transmission that uses a belt and two variable-diameter pulleys instead of fixed gears. It can smoothly adjust to any ratio between its minimum and maximum, giving the engine the most efficient speed at all times. You will notice that the engine RPM stays relatively constant while the vehicle accelerates — there are no distinct “shifts.”
🎬 Video: Manual vs Automatic Transmission — https://youtu.be/qAdJu3cwVME?si=iBSSp4Jwxk3jhgyr
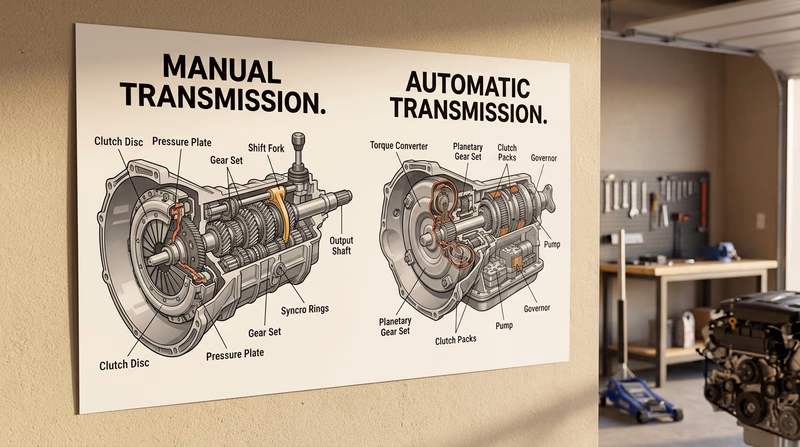
Req 9c — Fluids & Drive Configurations
Automatic Transmission Fluid (ATF)
ATF does far more than just lubricate — it is the hydraulic fluid that makes an automatic transmission work. It transmits power through the torque converter, activates the clutch packs and bands that change gears, cools the transmission, and cleans internal components.
Not all ATF is the same. Different transmissions require different fluid formulations, and using the wrong type can cause shifting problems, increased wear, or outright transmission failure.
Common ATF types:
| Type | Description |
|---|---|
| DEXRON (various versions) | Developed by GM. DEXRON VI is the current standard. Used in many GM, BMW, and Toyota vehicles. |
| MERCON (various versions) | Developed by Ford. MERCON V and MERCON LV are current standards. |
| ATF+4 | Developed by Chrysler/Stellantis. Required for most Dodge, Jeep, Ram, and Chrysler vehicles. |
| CVT Fluid | Specifically formulated for continuously variable transmissions. Never use conventional ATF in a CVT. |
| Multi-Vehicle ATF | Aftermarket formulations designed to work in multiple vehicle brands. Convenient but always verify compatibility. |
How to identify the correct ATF:
- Check the owner’s manual — it lists the exact specification required.
- The transmission dipstick handle (if equipped) sometimes lists the ATF type.
- The vehicle’s door jamb sticker may include fluid specifications.
🎬 Video: The Complexities of Automatic Transmission Fluid — https://youtu.be/0jnewEGKAp0?si=coMA15wWraII-t2m
Manual Transmission Fluid
Manual transmissions do not use ATF (with a few exceptions). Instead, they typically use one of these lubricants:
- Gear oil — A thick, high-viscosity oil rated by the API GL (Gear Lubricant) system. GL-4 is common for manual transmissions; GL-5 is for hypoid gears in differentials.
- Manual transmission fluid (MTF) — Some manufacturers specify a lighter, special-purpose fluid designed for smoother shifting.
- Engine oil — A few manual transmissions (like some Honda models) actually use regular engine oil.
Always use the exact type specified in the owner’s manual — the wrong lubricant can cause hard shifting, gear damage, or synchronizer wear.
Differential Fluid (Gear Oil)
The differential contains gears that operate under heavy loads and high pressures. They need thick, durable gear oil — typically rated 75W-90 or 80W-90.
- GL-5 rated gear oil is the standard for most differentials.
- Some limited-slip differentials (LSD) require a friction modifier additive mixed into the gear oil. If you hear a chattering or clunking noise from the rear end when turning (especially in parking lots), it often means the limited-slip additive is needed.
Transfer Case Fluid
The transfer case is found only in four-wheel-drive (4WD) and all-wheel-drive (AWD) vehicles. It splits power from the transmission between the front and rear axles.
Transfer cases may use:
- ATF (in some older designs)
- Gear oil
- A manufacturer-specific transfer case fluid
The owner’s manual specifies the correct fluid and the recommended change interval (often every 30,000 to 60,000 miles).
🎬 Video: Which Fluids to Use — https://youtu.be/3le9ZT5HUlk?si=WmA2BT2KcmgCqFqe
Drive Configurations
The drive configuration describes which wheels receive power from the engine. Each has advantages and trade-offs.
Front-Wheel Drive (FWD):
- The engine, transmission, and differential are all in the front of the vehicle, and power goes to the front wheels only.
- Advantages: Better traction in rain and light snow (the weight of the engine sits over the drive wheels), more interior space (no drive shaft tunnel), and generally better fuel economy.
- Disadvantages: The front wheels handle both steering and driving, which limits performance in hard cornering. Not ideal for towing heavy loads.
- Common in: Most sedans, hatchbacks, and compact SUVs.
Rear-Wheel Drive (RWD):
- The engine is in the front, and a drive shaft sends power to the rear wheels.
- Advantages: Better weight distribution (front wheels steer, rear wheels push), better handling and performance, and better for towing because acceleration shifts weight onto the rear drive wheels.
- Disadvantages: Less traction in slippery conditions because less weight sits over the drive wheels.
- Common in: Pickup trucks, sports cars, luxury sedans, and most large SUVs.
Four-Wheel Drive (4WD):
- Power is sent to all four wheels through a transfer case that splits power between the front and rear axles.
- Part-time 4WD: The driver selects 4WD mode when needed (off-road, snow, mud). The vehicle normally operates in 2WD. Should not be used on dry pavement — the locked transfer case can cause drivetrain binding.
- Full-time 4WD: The system operates in 4WD at all times, with a center differential that allows for use on dry pavement.
- Common in: Trucks and off-road SUVs.
All-Wheel Drive (AWD):
- Similar to 4WD, but operates automatically — no driver input needed. The vehicle’s computer continuously varies the power split between front and rear axles based on traction conditions.
- Common in: Crossover SUVs, performance sedans, and wagons.
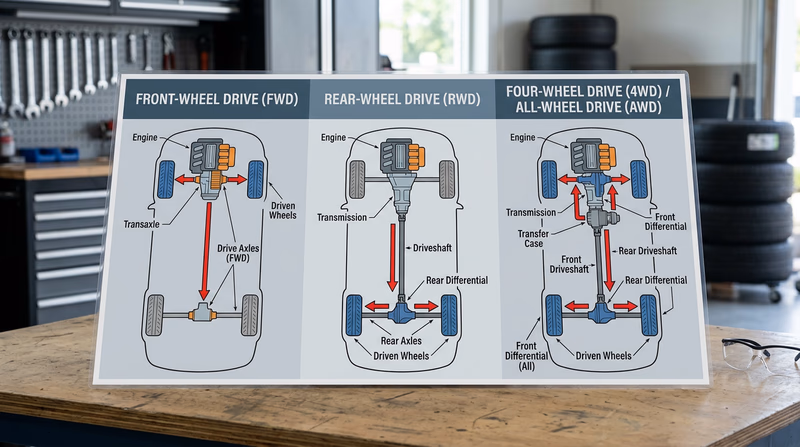
🎬 Video: Ultimate Drive Train Guide — https://youtu.be/-cTJqNWwmf0?si=qapozBPNfBih0PCY
Req 10 — Brakes
The brake system is arguably the most critical safety system on any vehicle. It converts your vehicle’s kinetic energy (the energy of motion) into heat energy through friction, slowing and stopping the car. Understanding how it works — and how to check its condition — is essential knowledge for every driver and Scout.
How the Brake System Works
When you press the brake pedal, here is what happens:
- Brake pedal — Your foot pushes on the pedal, which is connected to a lever that multiplies the force you apply.
- Brake booster — A vacuum-powered (or electric, in some newer vehicles) device that amplifies the force from your foot even further. Without the booster, you would need to push the pedal extremely hard.
- Master cylinder — Converts the mechanical force from the pedal into hydraulic pressure by pushing brake fluid through the brake lines.
- Brake lines — Steel and rubber tubes that carry pressurized brake fluid from the master cylinder to each wheel.
- Brake calipers (disc brakes) or wheel cylinders (drum brakes) — At each wheel, the hydraulic pressure pushes pistons outward, forcing the brake pads against the rotor (disc brakes) or the brake shoes against the drum (drum brakes).
- Friction — The pads or shoes press against the spinning rotor or drum, creating friction that slows the wheel. The kinetic energy is converted to heat, which is dissipated into the air.
Antilock Braking System (ABS)
ABS prevents the wheels from locking up during hard braking, which helps the driver maintain steering control. Without ABS, slamming the brakes on a slippery surface could lock the wheels, causing the vehicle to skid in a straight line — unable to steer around an obstacle.
How ABS works:
- Wheel speed sensors at each wheel continuously monitor how fast each wheel is rotating.
- If a sensor detects that one wheel is about to lock up (stop spinning while the car is still moving), the ABS control module rapidly pulses the brake pressure to that wheel — releasing and reapplying the brake many times per second.
- This pulsing action keeps the wheel rotating just enough to maintain traction and steering control.
- You may feel a pulsing or vibration in the brake pedal and hear a grinding or buzzing noise when ABS activates — this is normal.
🎬 Video: Understanding ABS — https://youtu.be/98DXe3uKwfc?si=G4NpfHoDLA1k-_qu
Disc Brakes
Disc brakes use a rotor (a flat, round metal disc) that spins with the wheel and a caliper that straddles the rotor. Inside the caliper, hydraulic pistons push brake pads against both sides of the rotor to create friction.
Advantages of disc brakes:
- Better heat dissipation — the rotor is exposed to air, so heat escapes quickly.
- Better performance in wet conditions — water is flung off the spinning rotor by centrifugal force.
- More consistent braking under repeated hard use (less “brake fade”).
- Easier to inspect — you can often see the brake pad thickness through the wheel spokes.
Drum Brakes
Drum brakes use a hollow drum that spins with the wheel. Inside the drum, brake shoes (curved pads) are pushed outward against the inside surface of the drum by a wheel cylinder.
Advantages of drum brakes:
- Less expensive to manufacture.
- Self-energizing — the rotation of the drum helps pull the shoe into tighter contact, requiring less hydraulic pressure.
- Better integration with the parking brake mechanism.
Modern Vehicles
Most vehicles today use disc brakes on the front wheels (which do 60–80% of the braking work) and either disc or drum brakes on the rear. Many newer vehicles use disc brakes on all four wheels.
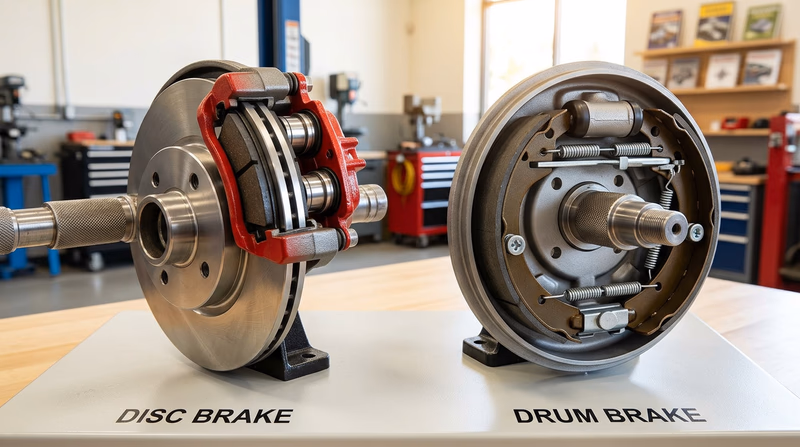
🎬 Video: Disc vs Drum Brakes — https://youtu.be/RAQcvP07RHE?si=ppH7voCgequLWmeo
How to Inspect Brakes
A basic brake inspection can be done visually and by paying attention to how the brakes feel and sound.
Visual inspection (disc brakes):
- Look through the wheel spokes at the brake caliper. You should be able to see the brake pad pressed against the rotor.
- Measure the pad thickness. New pads are typically 10 to 12 mm thick. They should be replaced when they reach 3 mm or less.
- Examine the rotor surface. It should be smooth and even. Deep grooves, scoring, or a lip at the outer edge indicate the rotor may need to be resurfaced or replaced.
- Look for brake fluid leaks around the caliper and along the brake lines.
Listen and feel:
- Squealing or squeaking — Many brake pads have a built-in metal wear indicator that makes a high-pitched squeal when the pad wears down to the replacement point. This is a designed warning.
- Grinding — A harsh grinding noise means the pads have worn completely through and metal is grinding on metal. This damages the rotor and requires immediate repair.
- Pulling — If the vehicle pulls to one side when braking, a caliper may be sticking or pads may be wearing unevenly.
- Soft pedal — If the brake pedal feels spongy or sinks to the floor, there may be air in the brake lines or a brake fluid leak.
- Vibration — Pulsing or vibration in the pedal during normal braking (not ABS activation) usually indicates a warped rotor.
Brake Inspection Checklist
What to check and what to look for- Brake pad thickness: Should be more than 3 mm. Replace if worn thin.
- Rotor condition: Should be smooth, no deep grooves or scoring.
- Brake fluid level: Check the reservoir (covered in Req 2a). Should be between MIN and MAX.
- Brake fluid condition: Should be clear to light amber, not dark or murky.
- Brake lines and hoses: No visible leaks, cracks, or bulging.
- Brake pedal feel: Should be firm, not spongy or sinking.
- Parking brake: Should hold the vehicle on a moderate slope.
- Warning lights: ABS and brake warning lights should not be illuminated during driving.
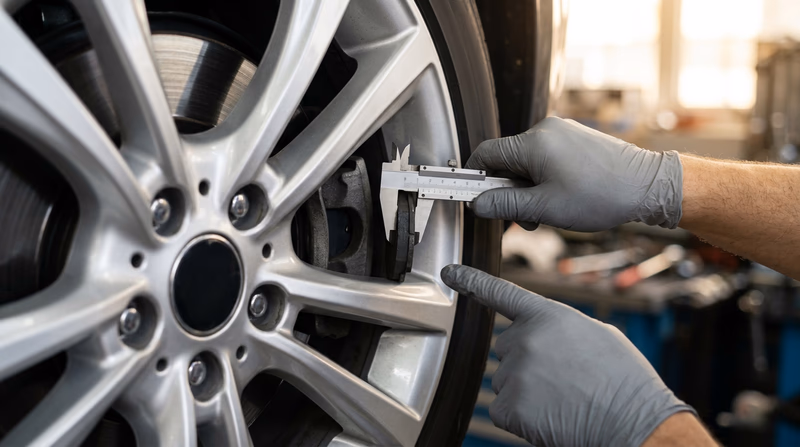
🎬 Video: How to Check Brake Pads and Rotors — https://youtu.be/WzXjTrMu3lg?si=WU6olZplgEwSJXrU
Req 11 — Choose Two Projects
This is where everything comes together — real, hands-on automotive work. You will choose two of the four options below and complete them with your counselor’s guidance. Read through all four options to decide which two interest you most.
Option A: Vehicle Value & Operating Costs
This option is about understanding the financial side of owning a vehicle. You will research three vehicles, compare their costs, and calculate how much each one costs to operate per mile.
Steps to complete this option:
Choose three vehicles — one must be new, one must be used, and the third can be either. Pick vehicles you would actually want to own. Use websites like Kelley Blue Book (kbb.com), Edmunds (edmunds.com), or Cars.com to find prices.
Research insurance costs for each vehicle. You can ask a parent or guardian to get quotes from their insurance company, or use online insurance estimators. Compare:
- Liability — Covers damage you cause to other people and their property (required by law in most states)
- Collision — Covers damage to your own vehicle from an accident
- Comprehensive — Covers non-collision damage (theft, hail, flood, vandalism)
- Towing and rental car — Optional coverage for roadside assistance and a rental while your car is being repaired
Calculate operating costs per mile using the pamphlet’s chart. Factor in:
- Fuel cost (annual miles ÷ MPG × price per gallon)
- Insurance (annual premium)
- Maintenance (oil changes, tires, brakes, etc.)
- Depreciation (how much value the vehicle loses each year)
- Registration and taxes
🎬 Video: How to Negotiate and Buy a Used Car — https://youtu.be/DW6CbYMz2uM?si=wHJGXS-PhtyOsCfK
Option B: Cleaning & Waxing
This option teaches you how to properly care for a vehicle’s exterior finish and interior surfaces.
What you need to know about clear-coat paint:
Most modern vehicles have a multi-layer paint system:
- Primer — Bonds to the metal body and provides a smooth base
- Base coat — The actual color you see
- Clear coat — A transparent protective layer on top that provides gloss and UV protection
The clear coat is delicate. Harsh chemicals, abrasive cleaners, automatic car washes with stiff brushes, and even wiping a dirty car with a dry cloth can scratch it. Once the clear coat is damaged, the base coat underneath is exposed to the elements and will fade and peel.
Precautions for clear-coat paint:
- Use only car-specific wash soap — never dish soap, which strips wax and can damage the clear coat
- Wash from top to bottom (the dirtiest areas are near the bottom)
- Use the two-bucket method: one bucket for soapy water, one for rinsing your wash mitt
- Dry with a clean microfiber towel or chamois, never a regular bath towel
Waxing adds a protective layer on top of the clear coat that shields it from UV rays, bird droppings, tree sap, and minor scratches. Wax also makes water bead up and roll off the surface.
Vinyl and rubber protectant is applied to non-painted surfaces like door seals, tire sidewalls, vinyl trim, and dashboard surfaces. It prevents cracking, fading, and drying caused by UV exposure and temperature extremes.
🎬 Video: How to Wax Your Car — https://youtu.be/9vYTXat5jZc?feature=shared
Option C: Changing a Tire
This is one of the most practical skills you can learn — and one you will likely need to use someday.
Tire Change Procedure
Step-by-step, in order- Park on a flat, firm surface. Engage the parking brake. Place wheel chocks behind the tires that will stay on the ground.
- Locate the spare tire, jack, and lug wrench (usually in the trunk or under the vehicle).
- Loosen the lug nuts on the flat tire about half a turn BEFORE jacking up the vehicle. The weight of the car keeps the wheel from spinning while you break them loose.
- Position the jack at the manufacturer’s designated jack point (shown in the owner’s manual). This is a reinforced spot on the frame designed to support the vehicle’s weight.
- Raise the vehicle until the flat tire is about 6 inches off the ground.
- Remove the lug nuts completely and pull the flat tire off.
- Mount the spare tire and hand-tighten the lug nuts in a star pattern (not in a circle) to seat the wheel evenly.
- Lower the vehicle until the tire just touches the ground but does not bear the full weight.
- Tighten the lug nuts firmly in a star pattern using the lug wrench. If you have a torque wrench, tighten to the specification in the owner’s manual (typically 80–100 ft-lbs).
- Lower the vehicle completely and remove the jack.
- Verify all lug nuts are tight. Stow the flat tire and tools.
- If using a compact spare, observe the speed and distance limitations (usually 50 mph max, 50–70 miles max).
🎬 Video: How to Change a Flat Tire — https://youtu.be/owHHcbrytvU?si=NvpQkfFmzJBbYzT9

Option D: Oil & Filter Change
Changing your own oil is one of the most satisfying and money-saving maintenance tasks you can do.
Oil Change Procedure
Step-by-step- Gather supplies: correct oil type and amount (check owner’s manual), new oil filter, drain pan, wrench for the drain plug, oil filter wrench, funnel, gloves, and rags.
- Run the engine for a few minutes to warm the oil, then turn it off.
- Raise the vehicle on jack stands (if needed for access).
- Place the drain pan under the oil drain plug (located on the bottom of the oil pan).
- Remove the drain plug with a wrench and let the oil drain completely (5–10 minutes).
- While the oil drains, remove the old oil filter using the oil filter wrench. Some oil will spill — keep the drain pan positioned.
- Apply a thin coat of new oil to the gasket (rubber ring) on the new filter. This ensures a proper seal.
- Install the new filter by hand — tighten until the gasket contacts the mounting surface, then turn an additional 3/4 turn. Do not over-tighten.
- Replace the drain plug and tighten snugly (check the torque spec if you have a torque wrench).
- Lower the vehicle.
- Add the correct amount of new oil through the oil filler cap using a funnel.
- Start the engine and let it run for 30 seconds. Check under the vehicle for leaks around the drain plug and filter.
- Turn off the engine, wait a few minutes, and check the oil level with the dipstick. Add more if needed.
- Reset the oil life monitor if your vehicle has one (see the owner’s manual for the procedure).
Disposing of used oil and filter:
- Pour the used oil from the drain pan into a sealed container (the empty oil bottles work well).
- Place the used oil filter in a sealed plastic bag.
- Take both to an auto parts store (AutoZone, O’Reilly, NAPA) or a municipal recycling center — most accept used oil and filters for free.
- Never pour used oil down a drain, into the trash, or onto the ground. One gallon of used oil can contaminate one million gallons of water.
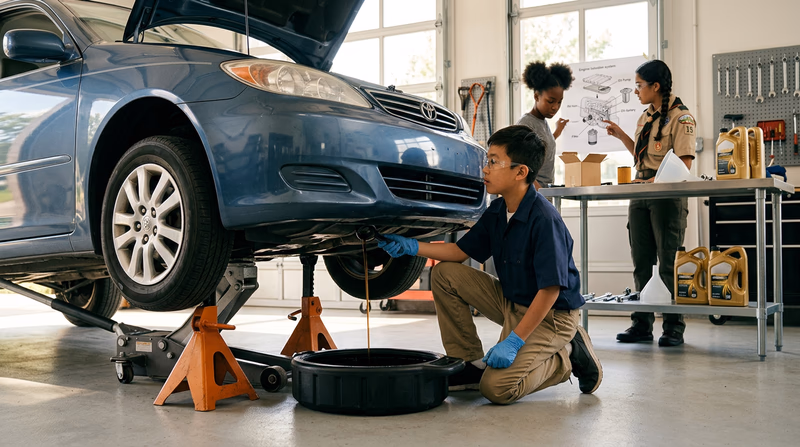
Req 12 — Career Exploration
The automotive industry is one of the largest employers in the United States, supporting millions of jobs — and it is not just about turning wrenches. From designing the next generation of electric vehicles to developing self-driving software, from running a repair shop to crash-testing new safety features, the automotive world offers career paths for almost every interest and skill set.
Career Categories
Here are some of the many career areas within the automotive industry. As you research, try to find three that interest you from different categories.
Hands-On / Technical Careers:
- Automotive technician / mechanic — Diagnoses and repairs vehicles. Modern technicians use computer diagnostics as much as hand tools. ASE (Automotive Service Excellence) certification is the industry standard.
- Diesel technician — Specializes in diesel engines found in commercial trucks, buses, and heavy equipment.
- Auto body / collision repair technician — Repairs vehicle bodies after accidents. Involves metalwork, painting, frame straightening, and working with advanced materials like carbon fiber and aluminum.
- EV/hybrid specialist — A rapidly growing field focused on high-voltage battery systems, electric motors, and the electronics in electrified vehicles. Requires specialized safety training.
Engineering and Design Careers:
- Automotive engineer — Designs vehicle systems including engines, transmissions, suspension, and safety features. Requires a bachelor’s degree in mechanical, electrical, or automotive engineering.
- Industrial designer — Creates the look and feel of vehicles, from exterior styling to interior layout.
- Software engineer — Develops the code that runs everything from infotainment systems to advanced driver-assistance systems (ADAS) and autonomous driving.
Business and Management Careers:
- Service advisor — The link between the customer and the technician. Explains needed repairs, provides cost estimates, and ensures customer satisfaction.
- Parts manager — Manages the inventory of replacement parts for a dealership or repair shop.
- Dealership general manager — Oversees all operations of a car dealership, from sales to service to finance.
Safety and Regulation Careers:
- Crash test engineer — Designs and conducts vehicle safety tests to meet federal standards.
- Emissions specialist — Works on technologies and regulations related to vehicle emissions and environmental compliance.
- Insurance claims adjuster — Evaluates vehicle damage after accidents and determines repair costs for insurance companies.
Researching Your Career
When you choose one career to explore in depth for your counselor, find out:
Career Research Questions
Prepare answers for your counselor discussion- What does a typical day look like in this job?
- What education is required? (High school diploma, trade school, associate degree, bachelor’s degree, or more?)
- What certifications or training are needed? (ASE certification, manufacturer training, engineering license?)
- How much experience is typically needed for entry-level positions?
- What is the salary range? (Entry-level, mid-career, and experienced)
- What is the job outlook — is demand growing, shrinking, or stable?
- Why does this career interest you personally?
Pathways into Automotive Careers
Vocational/Technical Schools: Many automotive careers — technician, body repair, diesel mechanic — begin with a program at a vocational or technical school. Programs typically take 6 months to 2 years and combine classroom learning with hands-on shop time.
Apprenticeships: Some employers offer paid apprenticeships where you learn on the job under an experienced mentor while earning a paycheck. Dealer-sponsored programs from manufacturers like Toyota (T-TEN), Ford (ASSET), and GM (ASEP) are well-respected pathways.
College Degrees: Engineering, design, and management careers typically require a bachelor’s degree. Some positions (like research engineering) may require a master’s degree or Ph.D.
ASE Certification: The National Institute for Automotive Service Excellence (ASE) offers certifications in specific areas like brakes, electrical systems, engine repair, and more. ASE certification is widely recognized and often required by employers. Technicians must pass a written exam and have relevant work experience.

🎬 Video: Automotive Jobs: The Highest Paying Ones — https://youtu.be/BgN-1cQzbRM?si=gYwIG5Ea6V3-bLRy
Extended Learning
A. Introduction
Congratulations — you have earned the Automotive Maintenance merit badge! You now understand how vehicles work from bumper to bumper: safety, fluids, tires, engines, electrical systems, brakes, and more. But the automotive world is always evolving, and there is so much more to explore. Let’s take your knowledge even further.
B. Deep Dive: Understanding Your OBD-II Scanner
You learned about the OBD-II system and trouble codes earlier in this guide. Now let’s go deeper into how you can use a scanner to diagnose real problems — a skill that can save you hundreds of dollars in shop diagnostic fees.
Every vehicle sold in the United States since 1996 has a standardized OBD-II port, usually located under the dashboard near the steering column. When you plug in a scanner, you gain access to a wealth of real-time data about the engine and emissions systems. Basic scanners cost as little as $20 and can read and clear trouble codes. More advanced models (and smartphone apps with Bluetooth adapters) can display live data like engine RPM, coolant temperature, fuel trim, oxygen sensor readings, and more.
Trouble codes follow a standardized format. The first character tells you the system:
- P = Powertrain (engine and transmission)
- B = Body (interior systems)
- C = Chassis (brakes, steering, suspension)
- U = Network/Communication (data bus between modules)
The second character tells you if the code is generic (0) or manufacturer-specific (1). For example, P0301 is a generic code meaning “Cylinder 1 Misfire Detected.” The beauty of generic codes is that P0301 means the same thing on a Toyota as it does on a Ford.
When the check engine light comes on, the first step is always to read the code. The code will not tell you exactly what part to replace, but it points you toward the right system. For instance, P0171 (“System Too Lean, Bank 1”) tells you the engine is getting too much air or not enough fuel — so you might check for vacuum leaks, a dirty mass airflow sensor, or a failing fuel pump. Knowing this before you visit a shop means you can have an informed conversation with the technician rather than simply accepting whatever they recommend.
Many public libraries lend OBD-II scanners, and some auto parts stores (like AutoZone and O’Reilly) will scan your codes for free. Learning to read and interpret these codes is one of the most empowering skills you can develop as a vehicle owner.
OBD-II Code Database Searchable database of all standard OBD-II trouble codes with explanations and common causes. Link: OBD-II Code Database — https://www.obd-codes.com/C. Deep Dive: The Future of Automotive Technology
The automotive industry is in the middle of its biggest transformation in over a century. Understanding where the technology is heading gives you a preview of the vehicles you will be driving and maintaining in the coming years.
Autonomous Driving is the most talked-about trend. Vehicles are being equipped with cameras, radar, lidar (laser-based distance sensors), and artificial intelligence to handle more and more driving tasks. The Society of Automotive Engineers defines six levels of autonomy, from Level 0 (no automation — the driver does everything) to Level 5 (full automation — no steering wheel needed). Most current vehicles are at Level 2, where the car can steer, accelerate, and brake on its own in certain situations but requires the driver to remain attentive. Reaching Level 4 and 5 will require not just better technology but also new laws, insurance frameworks, and public trust.
Solid-State Batteries promise to replace the current lithium-ion battery packs in electric vehicles. Solid-state batteries use a solid electrolyte instead of a liquid one, which makes them safer (less fire risk), lighter, faster to charge, and capable of storing more energy in the same space. Several major automakers are racing to bring solid-state batteries to production vehicles within the next decade.
Vehicle-to-Everything (V2X) Communication allows vehicles to wirelessly communicate with each other (V2V), with traffic signals and infrastructure (V2I), and with pedestrians’ smartphones (V2P). Imagine approaching an intersection and your car already knows the traffic signal is about to turn red, or receiving a warning that a vehicle two cars ahead has slammed on its brakes. V2X technology could prevent millions of accidents — but it requires widespread adoption to be effective.
Over-the-Air (OTA) Updates allow manufacturers to improve a vehicle’s software remotely — similar to how your phone receives updates. Tesla pioneered this approach, and most major automakers are now following suit. OTA updates can add new features, improve performance, fix bugs, and even update safety systems without the owner visiting a dealership.
These technologies mean that the automotive technician of the future will need strong skills in software, electronics, and networking alongside traditional mechanical knowledge.
D. Deep Dive: Building a Home Maintenance Kit
One of the best things you can do after earning this badge is set up your own vehicle maintenance station at home. You do not need a professional shop — a clean, organized garage corner is plenty.
Start with the tools and supplies from Requirement 1b. Store them in a tool chest or portable toolbox where they are organized and easy to find. A clean workspace with good lighting makes every job safer and more enjoyable.
Beyond the basics, consider building a vehicle emergency kit to keep in your car. This kit should include jumper cables (or a portable jump starter), a tire pressure gauge, a flashlight with extra batteries, reflective triangles or road flares, a first-aid kit, basic hand tools (screwdrivers, pliers, adjustable wrench), duct tape, zip ties, and a quart of engine oil. Add a warm blanket and bottled water if you drive in cold climates.
Keep a maintenance log — either a small notebook in the glove compartment or a spreadsheet on your computer. Record every maintenance task with the date, mileage, what was done, and what products were used. This log is invaluable for staying on schedule, diagnosing recurring problems, and proving maintenance history when selling the vehicle. There are also free apps like Drivvo, Fuelly, and Simply Auto that make tracking maintenance on your phone easy.
Finally, consider subscribing to a reliable automotive YouTube channel or website that covers DIY maintenance for your specific vehicle. Channels like ChrisFix, Engineering Explained, and Scotty Kilmer offer thousands of free tutorials that can walk you through nearly any maintenance or repair task step by step.

E. Real-World Experiences
Take your automotive knowledge beyond the garage with these hands-on experiences:
Visit a Professional Auto Shop
Attend a Local Car Show or Cars and Coffee
Tour an Auto Manufacturing Plant
Take a Vocational Auto Shop Class
Volunteer with Vehicles for Change or Similar Organizations
F. Organizations
These organizations support automotive education, safety, and career development:
Partners with high schools and colleges to accredit automotive technology programs, ensuring students get quality training that leads to ASE certification.
Organization: ASE Education Foundation — https://www.aseeducationfoundation.org/
Represents the automotive aftermarket industry. Their SEMA Show in Las Vegas is one of the largest automotive events in the world, and they offer scholarships for students pursuing automotive careers.
Organization: SEMA (Specialty Equipment Market Association) — https://www.sema.org/
A partnership of students, teachers, and industry working together to build a skilled workforce. Hosts regional and national automotive repair competitions for high school and college students.
Organization: SkillsUSA — https://www.skillsusa.org/
The gold standard for automotive technician certification. Offers exams in over 40 specialty areas and is recognized by employers nationwide.
Organization: National Institute for Automotive Service Excellence (ASE) — https://www.ase.com/
Dedicated to saving automotive culture through youth education, car preservation, and community events. Offers programs that teach young people to work on and appreciate cars.
Organization: Hagerty Drivers Foundation — https://www.hagerty.com/drivers-foundation