Req 11 — Choose Two Projects
This is where everything comes together — real, hands-on automotive work. You will choose two of the four options below and complete them with your counselor’s guidance. Read through all four options to decide which two interest you most.
Option A: Vehicle Value & Operating Costs
This option is about understanding the financial side of owning a vehicle. You will research three vehicles, compare their costs, and calculate how much each one costs to operate per mile.
Steps to complete this option:
Choose three vehicles — one must be new, one must be used, and the third can be either. Pick vehicles you would actually want to own. Use websites like Kelley Blue Book (kbb.com), Edmunds (edmunds.com), or Cars.com to find prices.
Research insurance costs for each vehicle. You can ask a parent or guardian to get quotes from their insurance company, or use online insurance estimators. Compare:
- Liability — Covers damage you cause to other people and their property (required by law in most states)
- Collision — Covers damage to your own vehicle from an accident
- Comprehensive — Covers non-collision damage (theft, hail, flood, vandalism)
- Towing and rental car — Optional coverage for roadside assistance and a rental while your car is being repaired
Calculate operating costs per mile using the pamphlet’s chart. Factor in:
- Fuel cost (annual miles ÷ MPG × price per gallon)
- Insurance (annual premium)
- Maintenance (oil changes, tires, brakes, etc.)
- Depreciation (how much value the vehicle loses each year)
- Registration and taxes
Option B: Cleaning & Waxing
This option teaches you how to properly care for a vehicle’s exterior finish and interior surfaces.
What you need to know about clear-coat paint:
Most modern vehicles have a multi-layer paint system:
- Primer — Bonds to the metal body and provides a smooth base
- Base coat — The actual color you see
- Clear coat — A transparent protective layer on top that provides gloss and UV protection
The clear coat is delicate. Harsh chemicals, abrasive cleaners, automatic car washes with stiff brushes, and even wiping a dirty car with a dry cloth can scratch it. Once the clear coat is damaged, the base coat underneath is exposed to the elements and will fade and peel.
Precautions for clear-coat paint:
- Use only car-specific wash soap — never dish soap, which strips wax and can damage the clear coat
- Wash from top to bottom (the dirtiest areas are near the bottom)
- Use the two-bucket method: one bucket for soapy water, one for rinsing your wash mitt
- Dry with a clean microfiber towel or chamois, never a regular bath towel
Waxing adds a protective layer on top of the clear coat that shields it from UV rays, bird droppings, tree sap, and minor scratches. Wax also makes water bead up and roll off the surface.
Vinyl and rubber protectant is applied to non-painted surfaces like door seals, tire sidewalls, vinyl trim, and dashboard surfaces. It prevents cracking, fading, and drying caused by UV exposure and temperature extremes.
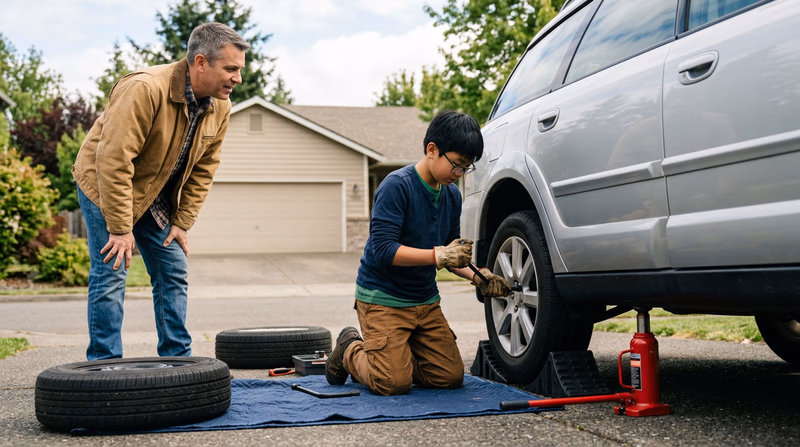
Option C: Changing a Tire
This is one of the most practical skills you can learn — and one you will likely need to use someday.
Tire Change Procedure
Step-by-step, in order
- Park on a flat, firm surface. Engage the parking brake. Place wheel chocks behind the tires that will stay on the ground.
- Locate the spare tire, jack, and lug wrench (usually in the trunk or under the vehicle).
- Loosen the lug nuts on the flat tire about half a turn BEFORE jacking up the vehicle. The weight of the car keeps the wheel from spinning while you break them loose.
- Position the jack at the manufacturer’s designated jack point (shown in the owner’s manual). This is a reinforced spot on the frame designed to support the vehicle’s weight.
- Raise the vehicle until the flat tire is about 6 inches off the ground.
- Remove the lug nuts completely and pull the flat tire off.
- Mount the spare tire and hand-tighten the lug nuts in a star pattern (not in a circle) to seat the wheel evenly.
- Lower the vehicle until the tire just touches the ground but does not bear the full weight.
- Tighten the lug nuts firmly in a star pattern using the lug wrench. If you have a torque wrench, tighten to the specification in the owner’s manual (typically 80–100 ft-lbs).
- Lower the vehicle completely and remove the jack.
- Verify all lug nuts are tight. Stow the flat tire and tools.
- If using a compact spare, observe the speed and distance limitations (usually 50 mph max, 50–70 miles max).
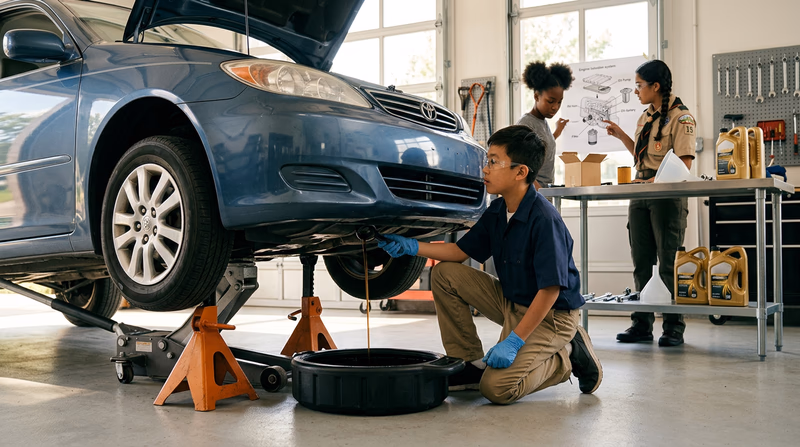
Option D: Oil & Filter Change
Changing your own oil is one of the most satisfying and money-saving maintenance tasks you can do.
Oil Change Procedure
Step-by-step
- Gather supplies: correct oil type and amount (check owner’s manual), new oil filter, drain pan, wrench for the drain plug, oil filter wrench, funnel, gloves, and rags.
- Run the engine for a few minutes to warm the oil, then turn it off.
- Raise the vehicle on jack stands (if needed for access).
- Place the drain pan under the oil drain plug (located on the bottom of the oil pan).
- Remove the drain plug with a wrench and let the oil drain completely (5–10 minutes).
- While the oil drains, remove the old oil filter using the oil filter wrench. Some oil will spill — keep the drain pan positioned.
- Apply a thin coat of new oil to the gasket (rubber ring) on the new filter. This ensures a proper seal.
- Install the new filter by hand — tighten until the gasket contacts the mounting surface, then turn an additional 3/4 turn. Do not over-tighten.
- Replace the drain plug and tighten snugly (check the torque spec if you have a torque wrench).
- Lower the vehicle.
- Add the correct amount of new oil through the oil filler cap using a funnel.
- Start the engine and let it run for 30 seconds. Check under the vehicle for leaks around the drain plug and filter.
- Turn off the engine, wait a few minutes, and check the oil level with the dipstick. Add more if needed.
- Reset the oil life monitor if your vehicle has one (see the owner’s manual for the procedure).
Disposing of used oil and filter:
- Pour the used oil from the drain pan into a sealed container (the empty oil bottles work well).
- Place the used oil filter in a sealed plastic bag.
- Take both to an auto parts store (AutoZone, O’Reilly, NAPA) or a municipal recycling center — most accept used oil and filters for free.
- Never pour used oil down a drain, into the trash, or onto the ground. One gallon of used oil can contaminate one million gallons of water.