Req 4a — Tire Specs & Pressure
Tires are the only part of your vehicle that actually touches the road, which makes them one of the most critical components for safety and performance. Understanding tire specifications helps you choose the right tires and maintain them properly.
Two Different Sets of Specifications
There are two important sources of tire information, and they tell you different things:
Tire manufacturer’s specifications are printed on the sidewall of the tire itself. They describe what that specific tire is capable of — its size, load capacity, speed rating, and construction type. These specs are determined by the company that made the tire (Michelin, Goodyear, Bridgestone, etc.).
Vehicle manufacturer’s specifications are found on a sticker on the driver’s door jamb (the edge of the door frame) and in the owner’s manual. They tell you what tire size, inflation pressure, and load rating the vehicle was designed to use. These specs are determined by the company that made the car (Toyota, Ford, Chevrolet, etc.).
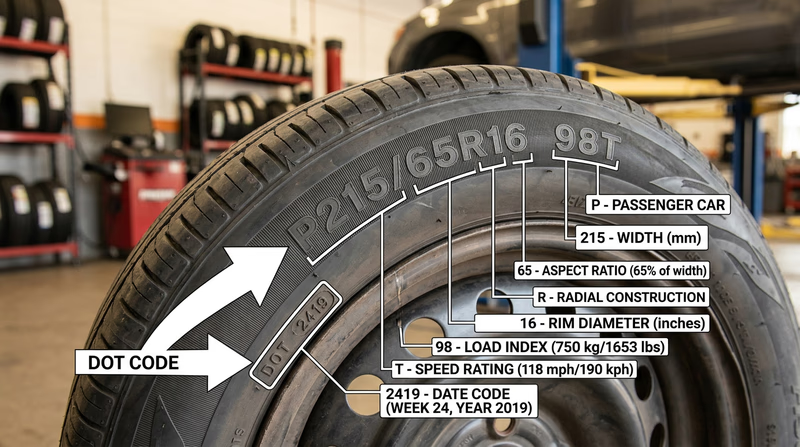
Reading the Tire Sidewall
The sidewall of every tire has a string of numbers and letters that tells you everything about that tire. Here is how to decode a common example: P215/65R16 98T
- P = Passenger vehicle tire (LT = Light Truck)
- 215 = Section width in millimeters (the width of the tire from sidewall to sidewall)
- 65 = Aspect ratio — the sidewall height is 65% of the section width
- R = Radial construction (how the internal plies are arranged)
- 16 = Rim diameter in inches (the wheel this tire fits)
- 98 = Load index (the maximum weight the tire can support — 98 = 1,653 lbs per tire)
- T = Speed rating (the maximum safe speed — T = 118 mph)
The Door Jamb Sticker
The vehicle manufacturer’s tire placard (sticker) on the driver’s door jamb shows:
- The recommended tire size for front, rear, and spare
- The recommended cold inflation pressure in PSI (pounds per square inch) for front and rear tires
- The vehicle’s maximum load capacity
Checking Tire Pressure
Tire pressure should be checked when the tires are cold — meaning the vehicle has been parked for at least three hours or driven less than a mile. Driving heats the air inside the tires and increases the pressure reading, giving you a false high reading.
Steps to check tire pressure:
- Find the recommended pressure on the door jamb sticker.
- Remove the valve cap from the tire’s valve stem.
- Press a tire pressure gauge firmly onto the valve stem. You will hear a brief hiss of air — that is normal.
- Read the pressure on the gauge.
- Compare the reading to the recommended pressure.
- Replace the valve cap (it keeps dirt and moisture out of the valve).
Inflating a Tire
If the pressure is low:
- Use an air compressor (at home or at a gas station) or a portable tire inflator.
- Press the air chuck firmly onto the valve stem.
- Add air in short bursts, checking the pressure frequently with your gauge.
- If you add too much air, press the small pin inside the valve stem with the back of the gauge or a small tool to release some air.
- Replace the valve cap when finished.
Don’t Forget the Spare
The spare tire is the one most people forget about — until they need it. Check it regularly:
- Verify the spare is properly inflated (it often requires a higher pressure than the regular tires — check the sticker or owner’s manual).
- Make sure the jack, lug wrench, and any other tire-changing tools are present and in good condition.
- If the spare is a “compact” or “donut” spare, note that it is designed for temporary use only — typically limited to 50 mph and 50 to 70 miles.