Req 8 — Stoves & Backcountry Cooking
This requirement covers everything about cooking in the backcountry:
- Stove types and fuels — advantages and disadvantages
- Safe stove operation — including liquid fuel handling
- Meal preparation — cooking three meals with your stove
- Cleanup and food storage — keeping things clean and critter-free
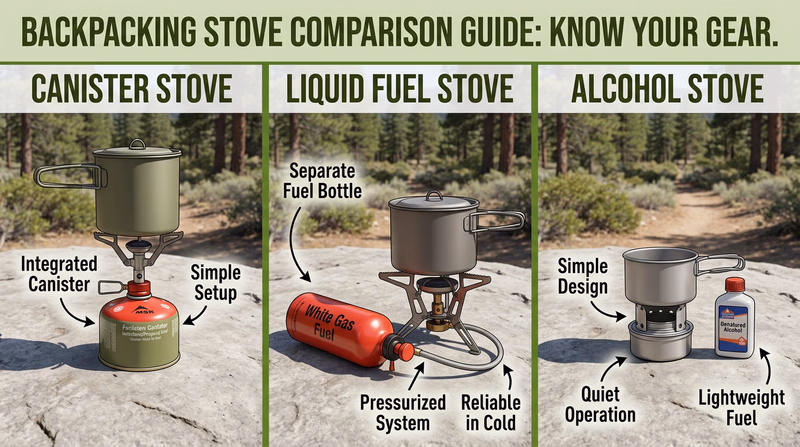
8a. Backpacking Stove Types
There are several types of backpacking stoves, each using a different fuel. Understanding the trade-offs helps you choose the right stove for your trek conditions and crew needs.
Canister Stoves (Isobutane/Propane Blend)
Canister stoves screw onto a pressurized metal fuel canister containing a blend of isobutane and propane. They are the most popular choice for backpackers.
- Advantages: Lightweight, easy to use (turn the valve and light), consistent flame, no priming needed, clean-burning with little odor
- Disadvantages: Performance drops in cold weather (below 20°F) as the gas pressure decreases, canisters are not refillable (pack-out the empty canister), difficult to tell how much fuel remains, canisters can be hard to find in remote areas
- Best for: Three-season backpacking, weekend trips, beginners
Liquid Fuel Stoves (White Gas/Naphtha)
Liquid fuel stoves use a refillable bottle of white gas (naphtha). They require priming — preheating the burner so the liquid fuel vaporizes before burning.
- Advantages: Excellent cold-weather performance, you can see exactly how much fuel you have, fuel bottles are refillable, white gas is widely available, high heat output for melting snow
- Disadvantages: Heavier than canister stoves, requires priming (a skill that takes practice), more maintenance (cleaning jets, replacing O-rings), can flare during priming if done incorrectly
- Best for: Winter backpacking, high-altitude treks, international travel
Alcohol Stoves (Denatured Alcohol)
Alcohol stoves are simple — often just a small metal cup that holds denatured alcohol or methanol. Many ultralight hikers make their own from aluminum cans.
- Advantages: Extremely lightweight and compact, no moving parts (nothing to break), fuel is cheap and available at hardware stores, silent operation
- Disadvantages: Low heat output (slow boil times), poor wind resistance, no flame control (once lit, it burns until the fuel is gone), not suitable for cooking complex meals, poor performance in cold weather
- Best for: Ultralight solo backpacking, boiling water for freeze-dried meals
Wood-Burning Stoves (Biomass)
Wood-burning backpacking stoves use twigs, pinecones, and small sticks found on the ground as fuel. They use a double-wall design to create a super-efficient burn.
- Advantages: No fuel to carry (weight savings on long treks), renewable fuel source, some models can charge USB devices using thermoelectric generators
- Disadvantages: Banned in many areas during fire season, requires dry wood (useless in rain), produces soot on cookware, slower than gas stoves, gathering wood may violate Leave No Trace principles in some environments
- Best for: Long-distance treks where resupply is infrequent, areas where fires are permitted
8b. Safe Stove Operation
General stove safety rules:
- Always set up your stove on a flat, stable, non-flammable surface (bare ground, rock, or a fire-resistant pad)
- Keep flammable materials (dry leaves, clothing, tent fabric) at least three feet away
- Never leave a burning stove unattended
- Let the stove cool completely before packing it
- Have water nearby to extinguish an accidental fire
Liquid fuel safety:
- Store fuel bottles upright and tightly sealed when not in use
- Refill fuel bottles away from any flame or heat source — spilled white gas is extremely flammable
- Wipe up any spilled fuel immediately and let the area air-dry before lighting the stove
- Familiarize yourself with the priming process before your trek — practice at home in a safe outdoor area
- Check all connections and O-rings for leaks before each use
8c. Trail Meals
Backcountry cooking is about efficiency: maximum calories, minimum weight, and fast preparation. Here are ideas for three classic backpacking meals:
Breakfast — Instant Oatmeal with Trail Mix Boil water, pour over instant oatmeal, stir in a handful of trail mix or dried fruit and a spoonful of peanut butter. Ready in under five minutes and packed with carbohydrates and healthy fats for the morning’s hike.
Lunch — No-Cook Trail Lunch Many backpackers skip cooking at lunch to save time and fuel. Tortillas with peanut butter and honey, hard cheese, summer sausage, crackers, and dried fruit make a satisfying meal with zero stove time. Save your fuel for dinner.
Dinner — Freeze-Dried Backpacking Meal Boil two cups of water, pour into the freeze-dried meal pouch, seal, and wait 10–15 minutes. Freeze-dried meals are lightweight, calorie-dense, and come in dozens of flavors. Add extra calories with a side of instant mashed potatoes or ramen.
8d. Cleanup and Food Storage
Cleaning cookware:
- Scrape all food residue from pots and bowls (eat every last bit — waste is weight you carried for nothing)
- Heat water and add a small amount of biodegradable soap
- Scrub with a small sponge or bandana
- Strain the gray water through a fine mesh or bandana
- Pack out the food particles (add them to your trash bag)
- Scatter the strained gray water over a wide area at least 200 feet from water sources
Food storage:
In bear country, you must protect your food from wildlife. Improperly stored food attracts bears, teaches them to associate humans with food, and often leads to the bear being relocated or destroyed.
Food Storage Methods
Keep your food safe from wildlife
- Bear canister: A hard-sided, screw-top container that bears cannot open. Required in many wilderness areas. Store at least 200 feet from your tent.
- Bear hang (PCT method): Hang your food bag from a tree branch at least 10 feet off the ground, 4 feet from the trunk, and 200 feet from your sleeping area.
- Bear pole or bear box: Some established backcountry campsites provide metal poles or boxes for food storage. Use them when available.
- Odor-proof bags: Reduce food smells but should be used inside a bear canister or hung — they are not bear-proof by themselves.