Req 9 — Planning & Packing
This requirement brings everything together — planning a real backpacking hike, inspecting gear, packing your pack, fitting it properly, and hitting the trail. It covers:
- Writing a hike plan with a schedule
- Pre-hike inspection of your patrol and equipment
- Packing your gear properly
- Fitting and adjusting your pack
- Completing a 2-mile hike with a full load
9a. Writing a Hike Plan
A good hike plan is your roadmap for the day. It keeps your crew organized, on schedule, and safe. Here is what to include:
Route information:
- Trailhead location and driving directions
- Total distance and elevation gain
- Trail name(s) and any junction descriptions
- Campsite location (if overnight)
- Water source locations along the route
Schedule:
- Meeting time and departure time
- Estimated time at each waypoint or rest stop
- Planned lunch/snack stops
- Expected arrival time at campsite or trailhead
- Turnaround time (the latest you will start heading back regardless of progress)
Crew information:
- Names of all participants
- Assigned roles (leader, navigator, sweep, first aider)
- Emergency contacts for each participant
Safety plan:
- Emergency contact numbers (ranger station, search and rescue)
- Nearest evacuation routes
- Vehicle location and keys arrangement
- Communication plan (cell coverage expected? satellite communicator?)

9b. Pre-Hike Inspection
Before anyone shoulders a pack, the crew leader should conduct a thorough inspection. This is your last chance to catch problems before you are on the trail.
Pre-Hike Inspection
Check every item before departure
- Every crew member has the Ten Essentials (see Requirement 2a).
- First-aid kit is fully stocked and accessible.
- Every crew member has adequate water and a treatment method.
- Food supply matches the planned menu and trip duration.
- Tent, sleeping bag, and pad are packed and functional (no broken poles, no torn fabric).
- Stove works — test-light it before packing.
- Rain gear is packed and accessible (top of pack or outside pocket, not buried at the bottom).
- Map and compass are present and the navigator knows the route.
- Footwear is broken in and appropriate for the terrain.
- All crew members know the emergency plan and have emergency contact information.
- Bear canister or food storage system is packed (if required).
- Trash bags are packed for leave-no-trace compliance.
9c. Packing Your Gear
How you pack your backpack affects your balance, comfort, and ability to access critical items. The general principle is simple: heavy items close to your back and centered between your shoulder blades and hips.
Pack Loading Zones
- Bottom zone (sleeping bag compartment): Sleeping bag, camp clothes, and items you will not need until camp. These are light and compressible.
- Core zone (main compartment, close to your back): Heavy items — food, stove, fuel, water, bear canister. Keeping weight here improves balance and stability.
- Top zone (top of main compartment and lid): Rain gear, first-aid kit, snacks, map — things you may need during the day without unpacking everything.
- Outer pockets and attachments: Water bottles, sunscreen, lip balm, trekking poles, tent (some hikers strap the tent to the outside).
Crew Gear Distribution
Shared crew gear (stove, fuel, cook pot, water filter, trowel, food) should be divided fairly among crew members based on body size and fitness. A smaller Scout should not carry the same crew-gear weight as the biggest member of the crew.
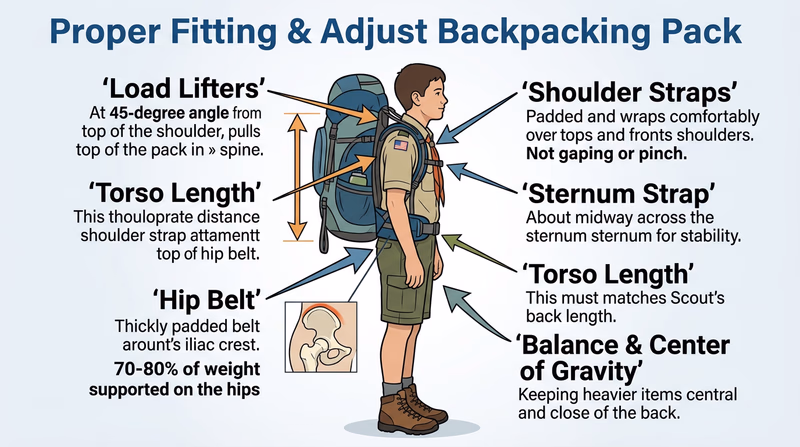
9d. Fitting Your Pack
A poorly adjusted pack causes sore shoulders, back pain, and blisters on your hips. A properly adjusted pack feels like it is part of your body.
How to put on a loaded pack:
- Set the pack on a rock, log, or bench at hip height. Trying to lift a 30-pound pack from the ground in one motion strains your back.
- Slide one arm through the shoulder strap, then the other.
- Lean forward slightly and buckle the hip belt.
How to adjust the fit:
- Hip belt first: The top of the hip belt should sit on your iliac crest (the top of your hip bones). Tighten it firmly — the hip belt should carry 70–80% of the pack’s weight.
- Shoulder straps: Tighten until the straps wrap over your shoulders with no gap, but do not over-tighten. Your shoulders should carry only 20–30% of the weight.
- Load lifters: These small straps connect the top of your shoulder straps to the top of the pack frame. Tighten them to about a 45-degree angle to pull the pack weight closer to your body and off your shoulders.
- Sternum strap: Buckle across your chest and adjust so it sits comfortably without restricting breathing.
9e. Your 2-Mile Hike
This is where the planning meets the trail. Use the plan you wrote in 9a, carry your fully loaded pack, and complete a hike of at least 2 miles. Treat this as a real trek — follow your schedule, use your navigation tools, take breaks at planned stops, and practice the skills you have learned.
After the hike, take time to debrief with your crew:
- What worked well in the plan?
- What would you change?
- Did your pack feel balanced and comfortable?
- Were there any gear issues?
This 2-mile hike is your dress rehearsal for the longer treks in Requirements 10 and 11.