Basketry Merit Badge — Complete Digital Resource Guide
https://merit-badge.university/merit-badges/basketry/guide/
Introduction & Overview
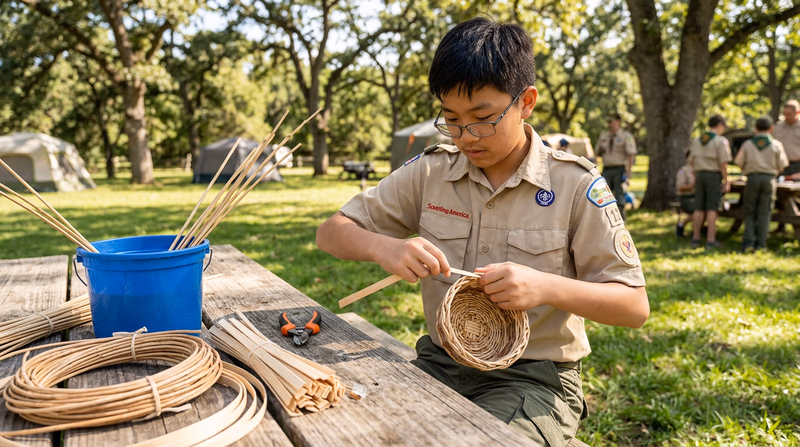
Basketry is one of the oldest crafts in human history — and one of the most satisfying to learn. With just a few simple materials, your hands, and a little patience, you can weave something useful and beautiful from scratch. Whether you are making a sturdy basket for carrying gear or a seat for a camp chair, you are practicing a skill that connects you to thousands of years of human ingenuity.
This guide will walk you through everything you need to know to earn the Basketry merit badge. You will learn about safety, explore different basket styles and weaving techniques, and then put your skills to work by weaving three real projects.
Then and Now
Then — Weaving for Survival
Long before people learned to make pottery, they were weaving baskets. Archaeologists have found basket fragments dating back more than 10,000 years — making basketry one of humanity’s earliest technologies. Ancient peoples wove baskets to carry food, store grain, trap fish, and even waterproof their shelters. Every culture on every continent developed its own basket-making traditions using whatever materials grew nearby: willow, palm, birch bark, sweetgrass, or bamboo.
- Purpose: Carrying, storing, trapping, building
- Materials: Whatever nature provided — grasses, bark, roots, reeds
- Method: Passed from generation to generation by hand
Now — A Living Art and Practical Skill
Today, basketry is both a respected art form and a hands-on craft. Contemporary basket makers create everything from functional household items to gallery-worthy sculptures. Traditional techniques are preserved by Indigenous communities and cultural organizations around the world. And for Scouts, basketry is a chance to slow down, work with your hands, and create something you can actually use.
- Purpose: Art, craft, cultural preservation, outdoor skill
- Materials: Natural reed, flat reed, round reed, raffia, and more
- Method: Taught in workshops, Scout programs, art schools, and online
Get Ready! You are about to learn a craft that connects you to makers across centuries and cultures. All you need is some reed, a little water, and the willingness to weave. Let’s get started!
Kinds of Basketry
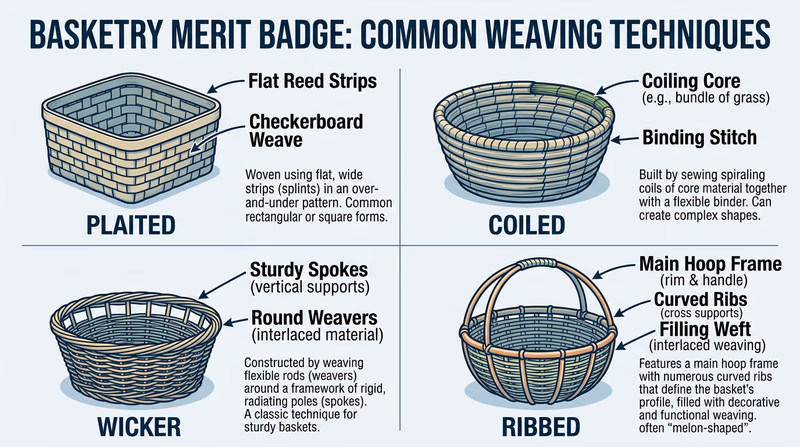
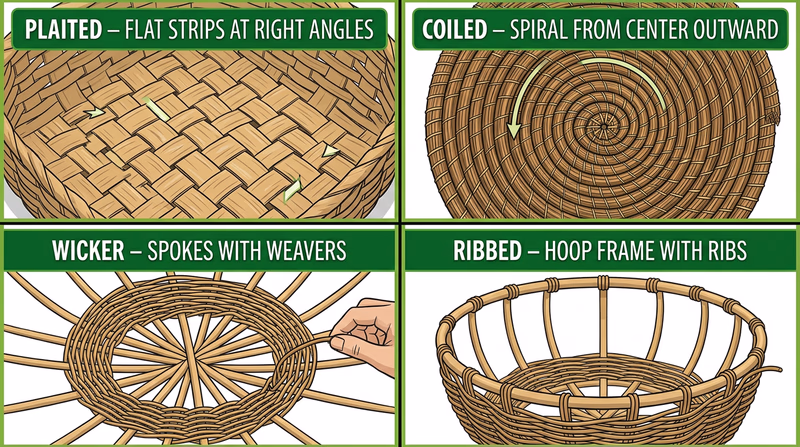
Before you start weaving, it helps to know that not all baskets are built the same way. There are four main types of baskets, each with a different structure and technique. You will need to identify all four for Requirement 2, so pay attention to how they differ.
Plaited Baskets
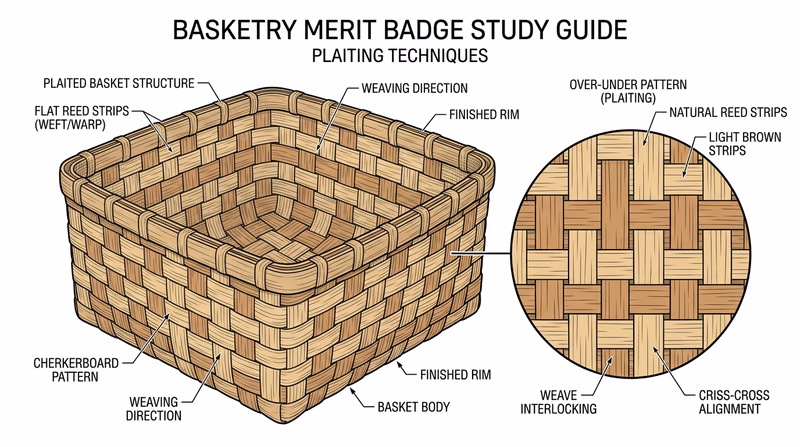
Plaited baskets are made by weaving flat strips over and under each other at right angles — like a checkerboard pattern. Think of how you might weave strips of paper together in a craft project. The materials are usually flat reed, splint, or palm leaves. Plaited baskets tend to have a clean, geometric look.
Coiled Baskets
Coiled baskets are built by wrapping a bundle of material (called the “core”) in a spiral and stitching each new row to the one below it. The stitching holds everything together. Coiled baskets are often associated with Native American and African traditions and can be incredibly detailed, with patterns woven right into the stitching.
Wicker Baskets
Wicker baskets use round, flexible materials — like willow branches or round reed — woven around a frame of rigid spokes. The spokes radiate out from the base, and the weaver works flexible “weavers” in and out of them. Wicker is probably the style most people picture when they hear the word “basket.”
Ribbed Baskets
Ribbed baskets (sometimes called “rib baskets” or “melon baskets”) start with a frame of intersecting hoops or ribs, and the weaver fills in the spaces between the ribs. They have a distinctive rounded, boat-like shape. The classic egg basket — wide on the sides and narrow at the top — is a well-known example.
Now that you know what kinds of baskets are out there, let’s talk about staying safe while you work.
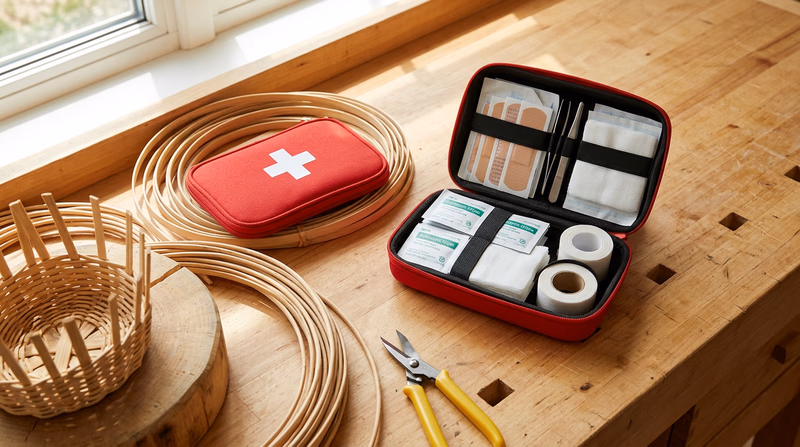
Req 1 — Safety & First Aid
This requirement covers two important safety topics you need to discuss with your counselor:
- Requirement 1a — Hazards you may encounter while using basketry tools and materials, and how to anticipate, prevent, mitigate, and respond to them.
- Requirement 1b — Prevention of and first-aid treatment for cuts, scratches, and scrapes that could occur while working with basketry tools and materials.
Requirement 1a — Basketry Hazards
Basketry might seem like a calm, low-risk activity — and compared to something like rock climbing, it is. But every craft has its hazards, and knowing about them ahead of time is what keeps a minor annoyance from becoming a real problem.
Tools of the Trade
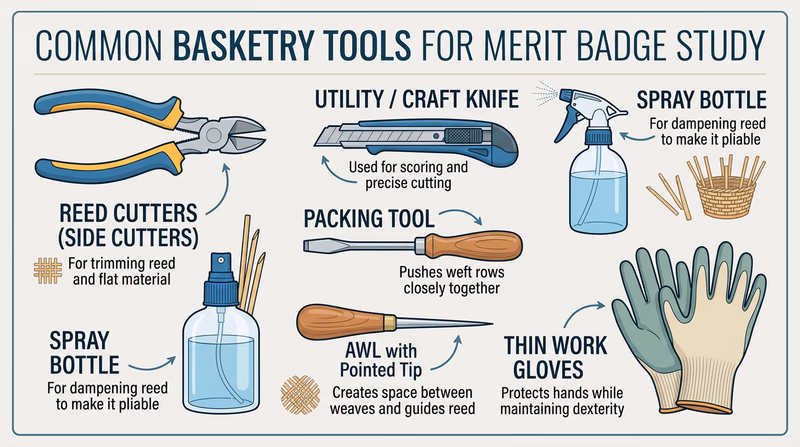
Before we talk about hazards, let’s meet the tools you will be working with:
- Reed cutters or side cutters — Used to trim reed to length. They have sharp blades that can cut skin just as easily as reed.
- Awl — A pointed tool used to open up spaces in a weave. The sharp tip can poke or puncture skin.
- Utility knife or craft knife — Used to trim and shape materials. These are the sharpest tools in your kit.
- Spray bottle or soaking tub — Used to keep reed damp and flexible. Wet floors or tables can be a slip hazard.
- Packing tool or flat screwdriver — Used to push weavers tightly into place. Usually blunt, but can slip and cause bruising.
Common Hazards
Here are the hazards you are most likely to encounter:
Cuts and punctures from sharp tools. Reed cutters, awls, and knives can all break the skin. The risk goes up when you rush, when your hands are wet and slippery, or when you reach across the table without looking.
Splinters and sharp reed ends. Natural reed can have rough edges, and freshly cut ends are surprisingly sharp. Splinters are the most common basketry injury, and they can embed deep enough to need tweezers to remove.
Repetitive strain. Weaving involves a lot of repetitive hand and wrist motions. Over long sessions, this can lead to soreness, cramping, or even tendon irritation. Take breaks, stretch your hands, and switch tasks periodically.
Allergic reactions. Some people react to certain natural materials, dyes, or the mold that can grow on improperly stored reed. If you notice itching, redness, or a rash, stop handling the material and wash your hands.
Wet and slippery surfaces. Soaking reed is a necessary part of basketry, but water on your table or floor creates a slip hazard. Wipe up spills promptly and keep your soaking tub in a stable location.
Anticipate, Prevent, Mitigate, Respond
Your counselor will want to hear you use these four words. Here is what they mean in a basketry context:
The Four Steps
How to handle basketry hazards- Anticipate: Before you start, look at your workspace and tools. Are there sharp edges? Is the floor wet? Is your reed properly soaked? Identify what could go wrong.
- Prevent: Set up your workspace safely. Use sharp tools correctly. Wear protective gloves when handling rough reed. Keep your work area clean and dry.
- Mitigate: If something does go wrong, minimize the damage. Have a first-aid kit within reach. Know where the nearest water source is for cleaning a wound.
- Respond: Treat injuries immediately. Clean cuts with soap and water, apply antibiotic ointment, and bandage them. Tell an adult if the injury is more than minor.
Requirement 1b — First Aid for Basketry Injuries
Most basketry injuries are minor — a small cut from a reed cutter, a scratch from a rough splint, or a splinter from an unfinished edge. But treating even minor injuries properly keeps them from becoming infected or slowing you down.
Prevention
The best injury is the one that never happens. Here are some practical ways to prevent common basketry injuries:
- Keep tools sharp. It sounds backward, but sharp tools are safer because they require less force. Less force means more control.
- Cut away from your body. When trimming reed, always direct the blade away from your fingers, hands, and body.
- Soak your reed properly. Dry reed is brittle and more likely to snap, sending sharp fragments toward your face or hands. Properly soaked reed is flexible and much easier to work with.
- Wear gloves for rough work. When pulling reed through tight weaves or handling rough materials, a pair of thin work gloves can save your hands a lot of grief.
- Take breaks. Tired hands are clumsy hands. Step away, stretch, and come back refreshed.
First-Aid Treatment
Req 2 — Basket Types & Weaves
This requirement covers two topics that build your basketry knowledge:
- Requirement 2a — Identify four types of baskets: plaited, coiled, ribbed, and wicker.
- Requirement 2b — Describe three different types of weaves.
Requirement 2a — Identifying Basket Types
You got a preview of these four basket types on the Introduction page. Now let’s go deeper so you can confidently identify each one when your counselor shows you examples.
Plaited Baskets
Plaited baskets are made by interlacing flat strips of material at right angles. The most basic version is a simple over-one, under-one pattern — exactly like weaving strips of paper in elementary school. More advanced plaiting uses twill patterns (over-two, under-two, or other variations) to create diagonal lines and geometric designs.
Key identification features:
- Flat, ribbon-like strips of material
- Grid-like structure with strips crossing at right angles
- Clean, geometric appearance
- Often made from flat reed, splint, birch bark, or palm leaves
Common uses: Market baskets, storage bins, mats, and trays.
Coiled Baskets
Coiled baskets are built by spiraling a bundle of material (the “core” or “foundation”) outward from a center point and stitching each new row to the previous one. The stitching material wraps around the core and attaches it to the row below, building up the walls of the basket one coil at a time.
Key identification features:
- Visible spiral pattern from center outward
- Stitching that wraps around and connects each coil
- Smooth, rounded forms
- Often made from sweetgrass, pine needles, raffia, or other flexible materials
Common uses: Decorative bowls, storage containers, and ceremonial objects.
Wicker Baskets
Wicker baskets use a framework of rigid spokes (also called “stakes” or “ribs”) with flexible weavers woven in and out around them. The spokes provide structure, while the weavers fill in the walls. Wicker is the most common basket style in Western traditions.
Key identification features:
- Rigid spokes radiating from the base
- Round, flexible weavers going over and under the spokes
- Three-dimensional, often cylindrical or rounded shape
- Typically made from willow, rattan, or round reed
Common uses: Laundry hampers, picnic baskets, furniture, garden planters.
Ribbed Baskets
Ribbed baskets start with a frame — usually two intersecting hoops that form the rim and handle. Flexible ribs (thin, curved sticks) are inserted along the frame, and then weavers are worked in and out of the ribs to fill in the basket’s walls. The result is a distinctive rounded, boat-like or melon-like shape.
Key identification features:
- Visible hoop frame at the rim and/or handle
- Curved ribs giving the basket its shape
- Weavers filling in between the ribs
- Rounded, three-dimensional form often wider in the middle
Common uses: Egg baskets, gathering baskets, wall decorations, and Appalachian-style baskets.
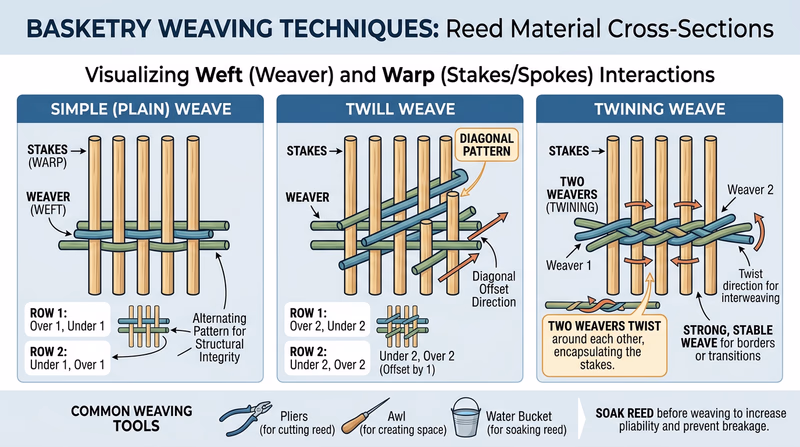
Requirement 2b — Types of Weaves
A “weave” is the specific pattern used to interlace the materials. Different weaves create different textures, strengths, and visual effects. Here are the most common weaves you should know:
Simple (Plain) Weave
The simplest and most fundamental weave pattern. The weaver goes over one spoke, under the next, over one, under one — alternating all the way around. On the next row, the pattern reverses so each spoke that was covered is now exposed.
- Look: Even, uniform surface
- Strength: Good for everyday baskets
- Best for: Beginners and most basic basket projects
- Requirement: Requires an odd number of spokes so the pattern alternates correctly on each row
Twill Weave
A variation of plain weave where the weaver passes over two (or more) spokes and under two (or more). By shifting the pattern one spoke over on each row, the weave creates a diagonal line across the surface. This is the same principle used in twill fabric like denim.
- Look: Diagonal lines or zigzag patterns across the surface
- Strength: Slightly stronger than plain weave because of the longer floats
- Best for: Plaited baskets and adding visual interest to flat-woven projects
Twining
Twining uses two weavers at the same time. The weavers twist around each other between each spoke — one goes in front of the spoke while the other goes behind, and then they switch. This creates a very secure, locked weave that holds spokes firmly in place.
- Look: Twisted rope-like rows with each pair of weavers wrapping around each other
- Strength: Very strong — excellent for securing the base of a basket or locking spokes into position
- Best for: Starting the base of round baskets and reinforcing structural areas
Other Weaves Worth Knowing
While you only need to describe three weaves, here are two more that you may encounter:
- Randing — A simple over-one, under-one weave using a single weaver, common in wicker baskets. Very similar to plain weave but specifically used with round reed on round forms.
- Coiling stitch — Used in coiled baskets. The stitching wraps around the core and attaches to the previous row. There are many named stitches (lazy squaw, figure-eight, Navajo), each producing a different look.
Req 3a — Square Basket
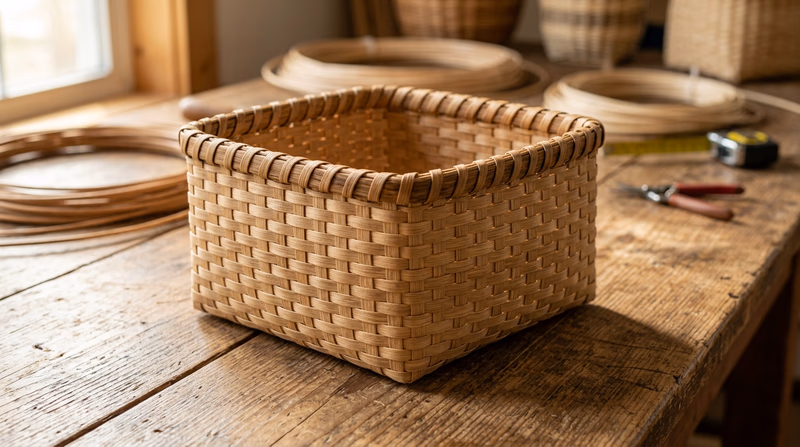
This is the first of three weaving projects for the Basketry merit badge. A square basket is an excellent starting point because the flat, straight sides teach you the fundamentals of planning, measuring, and weaving with flat reed.
Before You Begin — Planning Your Basket
The requirement says “plan and weave,” so take the planning part seriously. Before you cut a single piece of reed, answer these questions:
- What size will your basket be? A good starter size is about 6 inches square and 4 inches tall. Not too small (hard to weave), not too large (uses a lot of material).
- What materials will you use? Flat reed is standard for square baskets — typically 1/2-inch flat reed for the stakes and 3/8-inch or 1/4-inch flat reed for the weavers.
- What weave pattern will you use? A simple over-under (plain weave) is traditional for a first square basket.
Materials You Will Need
Square Basket Supply List
Gather these before you start- Flat reed (1/2 inch wide): For stakes — the vertical and horizontal strips that form the structure.
- Flat reed (3/8 inch or 1/4 inch wide): For weavers — the strips that weave in and out of the stakes.
- Reed cutters or sharp scissors: For cutting reed to length.
- Clothespins or spring clamps: For holding stakes in place while you weave.
- Spray bottle: For keeping reed damp during weaving.
- Bucket or tub of warm water: For soaking reed before use.
- Towel: For drying your hands and wiping up drips.
- Tape measure or ruler: For measuring and cutting consistently.
- Pencil: For marking center points and measurements.
Step-by-Step Overview
Here is how the process works from start to finish. Your merit badge counselor or a basketry instructor will guide you through the details, but understanding the big picture will help you follow along confidently.
1. Soak Your Reed
Cut your reed to length, then soak it in warm water for about 10–15 minutes. This makes the reed flexible and easy to bend without cracking. Keep a spray bottle handy — if the reed starts to dry out while you work, give it a spritz.
2. Lay Out the Base
Arrange your stakes in a grid pattern — half running in one direction and half in the other. For a 6-inch square base, you might use seven stakes in each direction. Weave them over-under to create a flat, square mat. This is your basket’s floor.
Center the grid carefully. A lopsided base means a lopsided basket. Use a ruler to make sure the stakes are evenly spaced and the base is truly square.
3. Upset the Stakes
“Upsetting” means bending the stakes upward to form the walls of the basket. Fold each stake crisply at the edge of the base so it points straight up. This is where your soaking pays off — well-soaked reed bends cleanly without cracking.
Use clothespins to hold the stakes upright while you prepare to weave the sides.
4. Weave the Sides
Start weaving your first row of weavers around the upright stakes. Go over one stake, under the next, all the way around. On the next row, reverse the pattern. Keep your rows snug and even — push each row down firmly against the one below it using a packing tool or your thumbs.
5. Finish the Rim
When your walls reach the desired height, you need a clean, strong finish at the top. The most common method is to fold the stakes over and tuck them down into the weave on the inside of the basket. Trim any excess with reed cutters. You can also add a rim made from a piece of half-round reed or a braided border for a more polished look.
6. Let It Dry
Set your finished basket aside to dry completely. As the reed dries, it will tighten and stiffen, making the basket firm and sturdy. Drying usually takes 24 hours or more depending on humidity.
Common Mistakes to Avoid
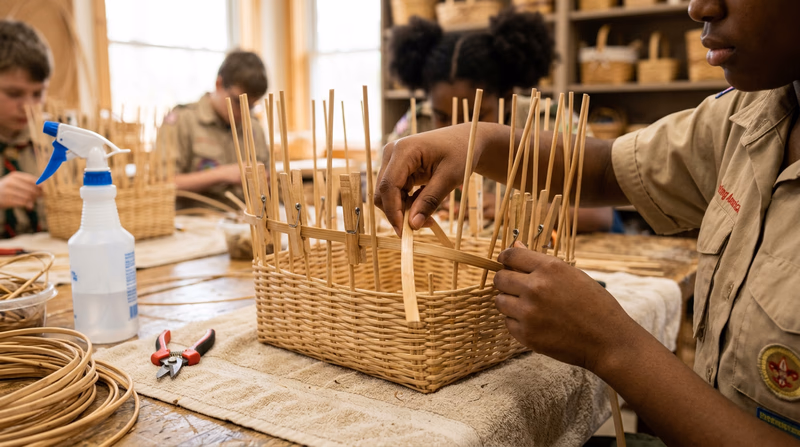
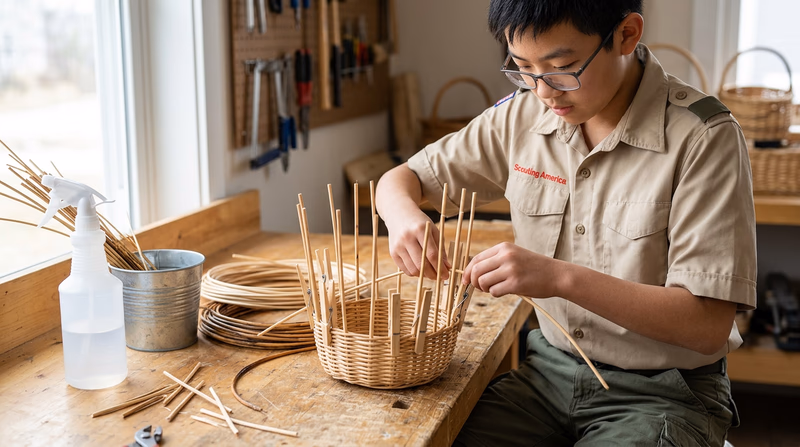
Req 3b — Round Basket
Your second project is a round basket. If the square basket taught you the basics of weaving flat reed in straight lines, the round basket introduces you to working with curves, round reed, and the spoke-and-weaver system. This is where basketry starts to feel like a real craft.
What Makes a Round Basket Different?
A square basket’s base is a flat grid of interlocking strips. A round basket’s base is a set of spokes radiating outward from a center point — like the spokes of a wheel. The weaver goes around and around the spokes in a spiral, building the base outward and then curving up to form the walls.
This change in structure means you will be working with round reed for the spokes and either round reed or flat reed for the weavers, depending on your design.
Planning Your Round Basket
Just like the square basket, planning comes first:
- Size: A 5- to 7-inch diameter base with 3- to 4-inch walls is a manageable first round basket.
- Materials: Round reed for spokes (sizes #3 to #6 are common) and round or flat reed for weavers (a size or two thinner than the spokes).
- Number of spokes: An odd number works best for simple weave — this ensures the over-under pattern alternates on each round. Start with 7 or 9 spokes.
Materials You Will Need
Round Basket Supply List
What to gather- Round reed (#5 or #6): For spokes.
- Round reed (#3) or flat reed (1/4 inch): For weavers.
- Reed cutters: For trimming.
- Awl: For opening spaces and adjusting spoke positions.
- Clothespins or spring clamps: For holding pieces in place.
- Bucket of warm water: For soaking.
- Spray bottle: For keeping reed damp.
- Towel: For drying hands.
Step-by-Step Overview
1. Prepare Your Spokes
Cut your spokes to length — the diameter of the base plus twice the wall height plus a few extra inches for tucking at the rim. Soak them in warm water until they are flexible (10–15 minutes for round reed).
2. Create the Base Cross
Group your spokes into two bundles. Lay one bundle horizontally and the other vertically, crossing them at the center. This cross is the foundation of your entire basket.
Some weavers split the center of one bundle and thread the other through it to lock them together. Others lash the cross with a short piece of weaving reed. Either method works — the goal is a stable center that will not shift as you start weaving.
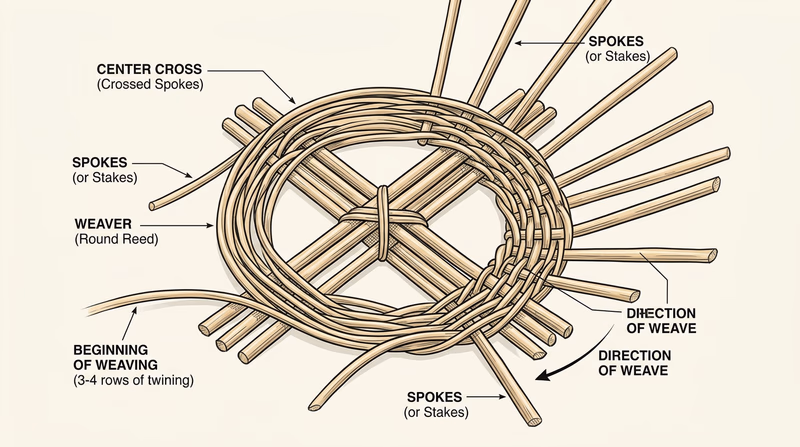
3. Weave the Base
Begin twining (or simple weaving) around the cross, treating each bundle of spokes as a single unit for the first few rows. After 2–3 rows, fan the spokes apart so each one is separate and evenly spaced. Continue weaving outward in a spiral until the base reaches your target diameter.
4. Upset the Spokes
Just like the square basket, you need to bend the spokes upward to create walls. Gently bend each spoke at the edge of the base so it points upward. Because round reed is already somewhat curved, this step usually feels more natural than with flat reed.
Soak the base in water again if the reed has dried out — cracking a spoke at this point means starting over.
5. Weave the Walls
Continue weaving around the upright spokes, building the walls row by row. Keep the spokes evenly spaced and maintain consistent tension. If you notice the basket pulling inward, ease your tension. If it is flaring outward, tighten slightly.
This is where the basket takes shape. You will feel the rhythm of the weave — over, under, over, under — and each row reinforces the structure.
6. Finish the Rim
Trim the spokes to about 2–3 inches above the last row of weaving. Soak the spoke ends, then bend each one over and tuck it down alongside its neighbor into the weave. This creates a clean, woven border.
For a sturdier rim, you can add a “lashing” — a piece of reed wrapped around the top edge to reinforce it.
7. Dry and Inspect
Set the basket on a flat surface to dry completely. Check that the base sits flat and the walls are even. Minor adjustments can be made while the basket is still slightly damp.
How Round Baskets Differ from Square
| Feature | Square Basket | Round Basket |
|---|---|---|
| Base construction | Flat grid of interlocking strips | Spokes radiating from a center cross |
| Primary material | Flat reed | Round reed (spokes) with round or flat weavers |
| Wall shape | Straight sides, sharp corners | Curved walls, no corners |
| Weave pattern | Usually plain weave | Often starts with twining, then plain weave |
| Difficulty | Beginner | Intermediate |
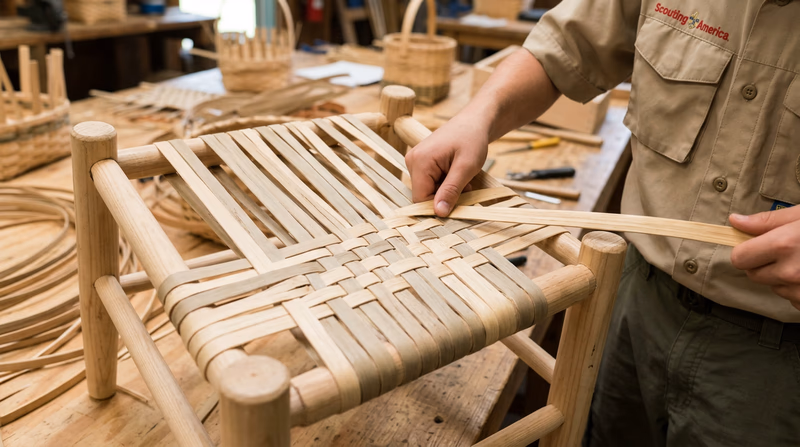
Req 3c — Campstool Seat
Your third and final project takes basketry beyond containers and into furniture. A campstool seat is a woven surface stretched across a wooden frame, and it must be strong enough to support the weight of a person sitting on it. This project brings together everything you have learned — planning, material selection, weaving technique, and attention to quality.
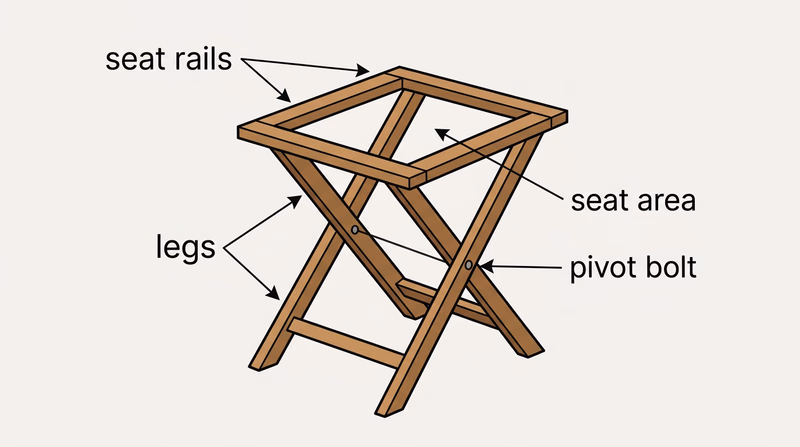
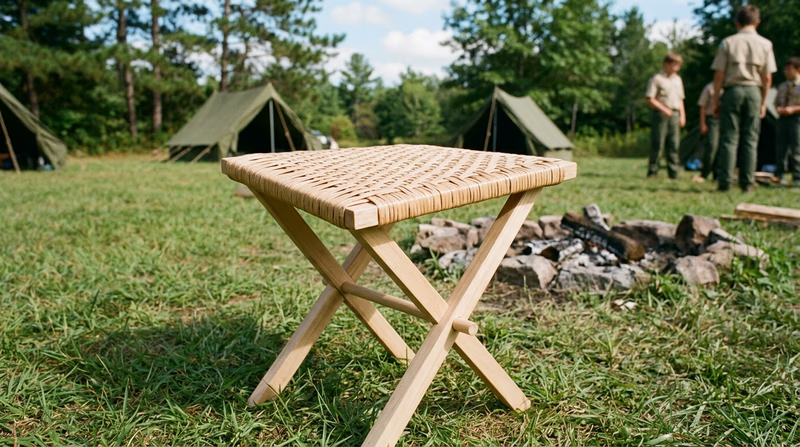
What Is a Campstool Seat?
A campstool (or camp stool) is a lightweight, portable seat used outdoors. The seat itself is a woven panel made from flat reed, cane, or similar material, attached to a simple wooden frame. The frame is usually made of hardwood dowels or milled lumber, either an X-frame (folding) or a fixed four-legged design.
For this merit badge requirement, you are weaving the seat — not building the frame from scratch. Your counselor may provide a pre-made frame, or you may work with a kit that includes both the frame and the weaving materials.
Planning Your Campstool Seat
This project requires more planning than the baskets because the seat has to carry weight. A floppy or loose weave will not hold up when someone sits on it.
Consider these factors:
- Frame dimensions: Measure the opening you need to fill. The seat area is typically 12–14 inches wide by 12–14 inches deep.
- Material: Flat reed (at least 1/2 inch wide) or flat oval reed works well. Some Scouts use flat reed for the warp (front-to-back strips) and a slightly narrower reed for the weft (side-to-side strips).
- Weave pattern: A tight plain weave or twill weave are both good choices. Twill creates a slightly more flexible seat, while plain weave is simpler and very strong.
- Tension: This is the most critical factor. Every strip must be pulled snug and consistent. Loose tension means a saggy seat that will not support weight.
Materials You Will Need
Campstool Seat Supply List
What to gather- Campstool frame: Either pre-made or from a kit.
- Flat reed (1/2 inch wide): For the warp and weft strips.
- Reed cutters or sharp scissors: For cutting reed to length.
- Bucket of warm water: For soaking reed.
- Spray bottle: For keeping reed damp during weaving.
- Spring clamps or clothespins: For holding strips in place.
- Packing tool: For pushing weft strips tight against each other.
- Towel: For drying hands and workspace.
Step-by-Step Overview
1. Prepare the Frame
Inspect your campstool frame. Make sure the joints are solid, the rails are smooth (sand any rough spots), and the frame sits level. If the frame wobbles now, the finished seat will be uneven.
2. Soak Your Reed
Cut enough reed strips to cover the seat area with a few extras. Soak them in warm water for 10–15 minutes until they are flexible. Soaked reed conforms to the frame better and will tighten as it dries.
3. Warp the Frame
The warp strips run front-to-back across the seat frame. Start at one side and attach the first strip by wrapping it around the seat rail (or threading it through a slot if the frame has one). Pull it across to the opposite rail, wrap around, and bring it back. Continue until the entire width is covered.
Key point: Keep every warp strip parallel and evenly spaced. Pull each one snug before moving to the next — but not so tight that it bows the frame.
4. Weave the Weft
The weft strips run side-to-side, weaving over and under the warp strips. Start at the front of the seat and work toward the back. Use a plain weave (over one, under one) or a twill weave (over two, under two, offset by one each row).
Push each weft strip firmly against the previous one using a packing tool. A loose weave will stretch under weight — you want the surface tight and even.
5. Secure the Edges
When you reach the back of the seat, secure the last weft strip by tucking it under several warp strips or wrapping it around the rail. Trim any excess reed. Some weavers add a final wrap of reed around the frame rails to lock everything in place and create a clean edge.
6. Dry Under Tension
Leave the finished seat stretched on the frame to dry completely. As the reed dries, it contracts slightly, which tightens the weave even further. This is one reason basketry seat weaving works so well — the natural drying process makes the seat firmer over time.
Testing Your Work
Once the seat is dry, it is time for the moment of truth. Set the campstool on a flat surface and sit down carefully. The seat should feel firm and supportive with no sagging in the center.
How the Campstool Seat Compares
| Feature | Square Basket | Round Basket | Campstool Seat |
|---|---|---|---|
| Shape | Square box | Round bowl | Flat panel |
| Load | Holds objects | Holds objects | Supports a person |
| Critical factor | Even spacing | Spoke symmetry | Tension |
| Frame | Self-supporting | Self-supporting | Requires wooden frame |
| Skill level | Beginner | Intermediate | Intermediate |
Extended Learning
A. Introduction
You have completed the requirements for the Basketry merit badge — congratulations! You have learned to identify basket types, describe weaving techniques, and weave three projects with your own hands. But basketry is a craft with endless depth, and there is so much more to explore beyond these basics.
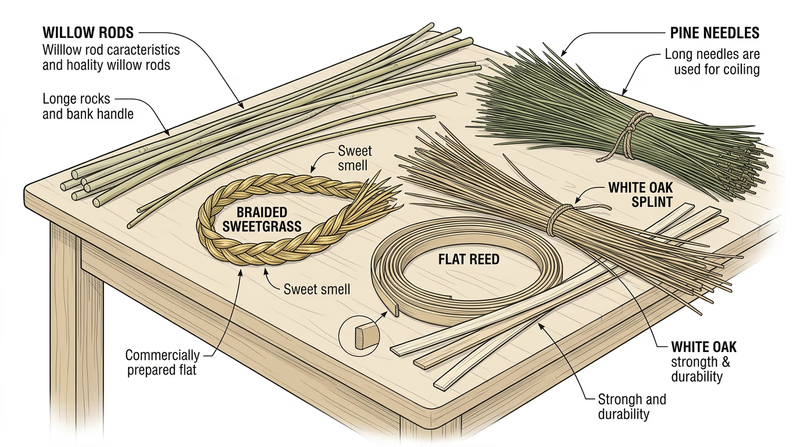
B. Deep Dive: Natural Materials and Foraging
The reed you used for your merit badge projects was commercially prepared — cut, dried, and ready to soak. But traditional basket makers around the world gather their own materials directly from the land. Learning to identify and harvest natural materials opens up an entirely new dimension of the craft.
Willow is the classic European basket-making material. Basket willows are grown specifically for weaving — they are coppiced (cut back to the base) each winter, and the long, straight shoots that grow the following year are harvested in fall. Fresh willow must be dried and then re-soaked before weaving, but it produces baskets with a beautiful, organic feel that commercial reed cannot match.
White oak splint is a traditional material in Appalachian basketry. A freshly felled white oak log is pounded with a mallet until the growth rings separate into thin, flexible strips. This process, called “riving,” requires considerable strength and skill, but the resulting splints are incredibly strong and durable.
Sweetgrass, pine needles, and raffia are commonly used in coiled baskets. Sweetgrass (Hierochloe odorata) is especially prized by Native American weavers — it has a pleasant vanilla-like fragrance that lasts for years. Pine needles are abundant, free, and surprisingly strong when bundled and stitched into coils.
Birch bark has been used for centuries by Indigenous peoples of the northern forests to create lightweight, waterproof containers. Bark is carefully peeled from living trees (without harming the tree), and then folded and stitched into baskets, canoes, and storage vessels.
C. Deep Dive: Basketry Traditions Around the World
Basketry is a universal craft — every culture on Earth has its own basket-making traditions. Understanding these traditions deepens your appreciation for what you are doing and connects your work to a global community of makers.
Gullah-Geechee sweetgrass baskets (Southeast United States) are coiled baskets made from sweetgrass, bulrush, and palmetto, sewn with strips of palm leaf. This tradition was brought to the Carolina Lowcountry by enslaved West Africans and has been passed down through families for over 300 years. Today, Gullah basket makers sell their work in the historic Charleston City Market and at roadside stands along Highway 17 in South Carolina. In 2023, Gullah sweetgrass basket making was recognized on the UNESCO Representative List of the Intangible Cultural Heritage of Humanity.
Japanese bamboo basketry (called take zaiku or chikugei) produces incredibly refined, sculptural works using thin bamboo strips. Japanese basket makers train for years to master the intricate plaiting and twisting techniques required. Some bamboo baskets are designated as Important Cultural Properties and are displayed in museums alongside paintings and ceramics.
Navajo wedding baskets are ceremonial coiled baskets with specific symbolic designs. The red-and-black pattern represents mountains, clouds, and the journey of life. These baskets are used in traditional Navajo ceremonies and are always woven with an intentional gap in the rim design called a “spirit line.”
English willow baskets have been woven in Somerset, England, for centuries. The Somerset Levels — flat, marshy lowlands — are ideal for growing basket willow, and the region remains the center of British willow basketry. Traditional forms include shopping baskets, lobster pots, and hampers.
D. Deep Dive: Advanced Techniques to Try
Once you have mastered the basics, here are some techniques that will push your skills further.
Twill patterns and color weaving. By using dyed reed in different colors and varying the over-under count, you can create intricate geometric patterns in your baskets — diamonds, arrows, spirals, and more. Start by planning your pattern on graph paper before you weave.
Continuous weave baskets. Instead of weaving row by row, some basket makers use a single continuous weaver that spirals up the basket without stopping. This creates a seamless, flowing surface and requires careful management of tension and material length.
Handles and lids. Adding a handle transforms a basket from a container into a carrying tool. Handles can be wrapped, braided, or carved from a single piece of wood. Lids add functionality — a lidded basket can store and protect its contents. Both require careful fitting and attachment.
Dyeing and finishing. Reed can be dyed with fabric dyes, natural plant dyes (walnut hulls, onion skins, berries), or commercial wood stains. Finished baskets can be sealed with a light coat of polyurethane or lacquer to increase durability and water resistance.
E. Real-World Experiences
Visit a Basketry Guild Workshop
Charleston Sweetgrass Basket Makers
Appalachian Craft Fairs
Smithsonian Folklife Festival
F. Organizations
A nonprofit dedicated to promoting and preserving the art and craft of basketry through education, exhibitions, and community.
Organization: National Basketry Organization (NBO) — https://nationalbasketry.org/
A statewide organization that hosts workshops, retreats, and an annual convention for basket weavers of all skill levels.
Organization: North Carolina Basketmakers Association — https://ncbasketmakers.com/
A British organization promoting traditional and contemporary basketry, offering workshops and connecting weavers worldwide.
Organization: The Basket Makers' Association (UK) — https://basketmakersassociation.org.uk/
One of the largest basketry guilds in the U.S., offering an annual convention with classes taught by nationally known basket makers.
Organization: Association of Michigan Basketmakers — https://michiganbasketmakers.com/
Documents and celebrates living cultural traditions including basketry through festivals, recordings, and educational programs.
Organization: Smithsonian Center for Folklife and Cultural Heritage — https://folklife.si.edu/