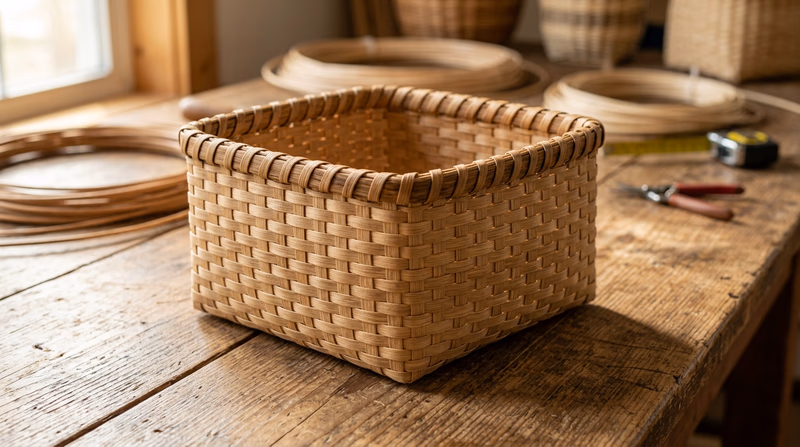
Req 3a — Square Basket
This is the first of three weaving projects for the Basketry merit badge. A square basket is an excellent starting point because the flat, straight sides teach you the fundamentals of planning, measuring, and weaving with flat reed.
Before You Begin — Planning Your Basket
The requirement says “plan and weave,” so take the planning part seriously. Before you cut a single piece of reed, answer these questions:
- What size will your basket be? A good starter size is about 6 inches square and 4 inches tall. Not too small (hard to weave), not too large (uses a lot of material).
- What materials will you use? Flat reed is standard for square baskets — typically 1/2-inch flat reed for the stakes and 3/8-inch or 1/4-inch flat reed for the weavers.
- What weave pattern will you use? A simple over-under (plain weave) is traditional for a first square basket.
Materials You Will Need
Square Basket Supply List
Gather these before you start
- Flat reed (1/2 inch wide): For stakes — the vertical and horizontal strips that form the structure.
- Flat reed (3/8 inch or 1/4 inch wide): For weavers — the strips that weave in and out of the stakes.
- Reed cutters or sharp scissors: For cutting reed to length.
- Clothespins or spring clamps: For holding stakes in place while you weave.
- Spray bottle: For keeping reed damp during weaving.
- Bucket or tub of warm water: For soaking reed before use.
- Towel: For drying your hands and wiping up drips.
- Tape measure or ruler: For measuring and cutting consistently.
- Pencil: For marking center points and measurements.
Step-by-Step Overview
Here is how the process works from start to finish. Your merit badge counselor or a basketry instructor will guide you through the details, but understanding the big picture will help you follow along confidently.
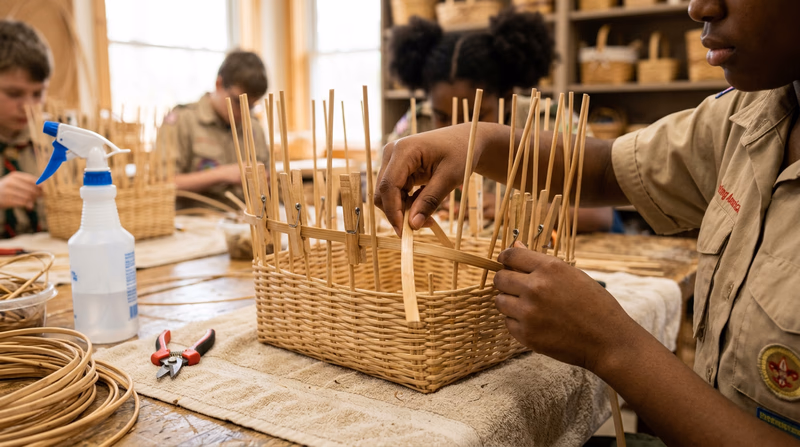
1. Soak Your Reed
Cut your reed to length, then soak it in warm water for about 10–15 minutes. This makes the reed flexible and easy to bend without cracking. Keep a spray bottle handy — if the reed starts to dry out while you work, give it a spritz.
2. Lay Out the Base
Arrange your stakes in a grid pattern — half running in one direction and half in the other. For a 6-inch square base, you might use seven stakes in each direction. Weave them over-under to create a flat, square mat. This is your basket’s floor.
Center the grid carefully. A lopsided base means a lopsided basket. Use a ruler to make sure the stakes are evenly spaced and the base is truly square.
3. Upset the Stakes
“Upsetting” means bending the stakes upward to form the walls of the basket. Fold each stake crisply at the edge of the base so it points straight up. This is where your soaking pays off — well-soaked reed bends cleanly without cracking.
Use clothespins to hold the stakes upright while you prepare to weave the sides.
4. Weave the Sides
Start weaving your first row of weavers around the upright stakes. Go over one stake, under the next, all the way around. On the next row, reverse the pattern. Keep your rows snug and even — push each row down firmly against the one below it using a packing tool or your thumbs.
5. Finish the Rim
When your walls reach the desired height, you need a clean, strong finish at the top. The most common method is to fold the stakes over and tuck them down into the weave on the inside of the basket. Trim any excess with reed cutters. You can also add a rim made from a piece of half-round reed or a braided border for a more polished look.
6. Let It Dry
Set your finished basket aside to dry completely. As the reed dries, it will tighten and stiffen, making the basket firm and sturdy. Drying usually takes 24 hours or more depending on humidity.
Common Mistakes to Avoid