Req 3c — Campstool Seat
Your third and final project takes basketry beyond containers and into furniture. A campstool seat is a woven surface stretched across a wooden frame, and it must be strong enough to support the weight of a person sitting on it. This project brings together everything you have learned — planning, material selection, weaving technique, and attention to quality.
What Is a Campstool Seat?
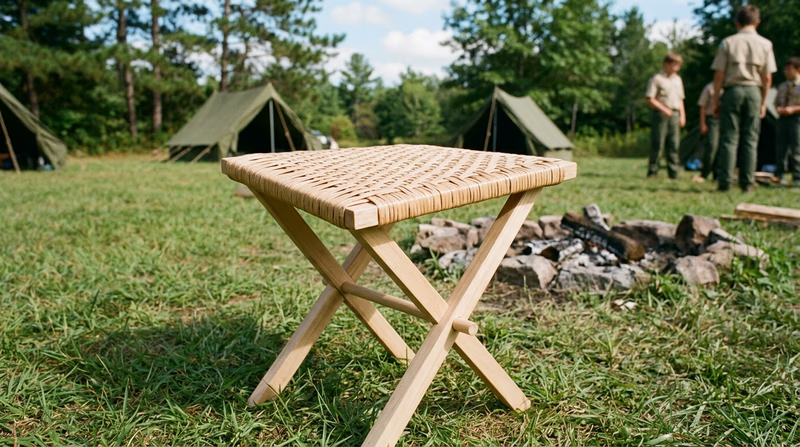
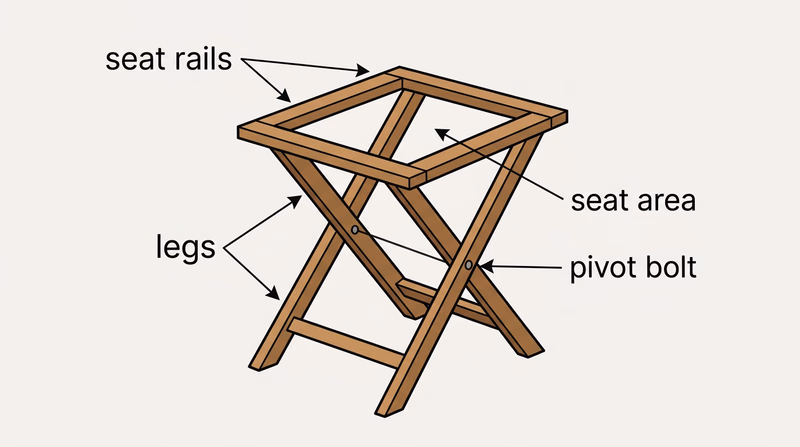
A campstool (or camp stool) is a lightweight, portable seat used outdoors. The seat itself is a woven panel made from flat reed, cane, or similar material, attached to a simple wooden frame. The frame is usually made of hardwood dowels or milled lumber, either an X-frame (folding) or a fixed four-legged design.
For this merit badge requirement, you are weaving the seat — not building the frame from scratch. Your counselor may provide a pre-made frame, or you may work with a kit that includes both the frame and the weaving materials.
Planning Your Campstool Seat
This project requires more planning than the baskets because the seat has to carry weight. A floppy or loose weave will not hold up when someone sits on it.
Consider these factors:
- Frame dimensions: Measure the opening you need to fill. The seat area is typically 12–14 inches wide by 12–14 inches deep.
- Material: Flat reed (at least 1/2 inch wide) or flat oval reed works well. Some Scouts use flat reed for the warp (front-to-back strips) and a slightly narrower reed for the weft (side-to-side strips).
- Weave pattern: A tight plain weave or twill weave are both good choices. Twill creates a slightly more flexible seat, while plain weave is simpler and very strong.
- Tension: This is the most critical factor. Every strip must be pulled snug and consistent. Loose tension means a saggy seat that will not support weight.
Materials You Will Need
Campstool Seat Supply List
What to gather
- Campstool frame: Either pre-made or from a kit.
- Flat reed (1/2 inch wide): For the warp and weft strips.
- Reed cutters or sharp scissors: For cutting reed to length.
- Bucket of warm water: For soaking reed.
- Spray bottle: For keeping reed damp during weaving.
- Spring clamps or clothespins: For holding strips in place.
- Packing tool: For pushing weft strips tight against each other.
- Towel: For drying hands and workspace.
Step-by-Step Overview
1. Prepare the Frame
Inspect your campstool frame. Make sure the joints are solid, the rails are smooth (sand any rough spots), and the frame sits level. If the frame wobbles now, the finished seat will be uneven.
2. Soak Your Reed
Cut enough reed strips to cover the seat area with a few extras. Soak them in warm water for 10–15 minutes until they are flexible. Soaked reed conforms to the frame better and will tighten as it dries.
3. Warp the Frame
The warp strips run front-to-back across the seat frame. Start at one side and attach the first strip by wrapping it around the seat rail (or threading it through a slot if the frame has one). Pull it across to the opposite rail, wrap around, and bring it back. Continue until the entire width is covered.
Key point: Keep every warp strip parallel and evenly spaced. Pull each one snug before moving to the next — but not so tight that it bows the frame.
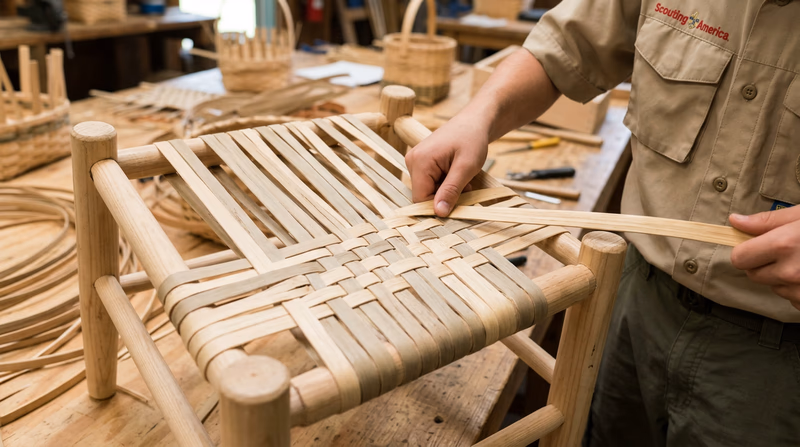
4. Weave the Weft
The weft strips run side-to-side, weaving over and under the warp strips. Start at the front of the seat and work toward the back. Use a plain weave (over one, under one) or a twill weave (over two, under two, offset by one each row).
Push each weft strip firmly against the previous one using a packing tool. A loose weave will stretch under weight — you want the surface tight and even.
5. Secure the Edges
When you reach the back of the seat, secure the last weft strip by tucking it under several warp strips or wrapping it around the rail. Trim any excess reed. Some weavers add a final wrap of reed around the frame rails to lock everything in place and create a clean edge.
6. Dry Under Tension
Leave the finished seat stretched on the frame to dry completely. As the reed dries, it contracts slightly, which tightens the weave even further. This is one reason basketry seat weaving works so well — the natural drying process makes the seat firmer over time.
Testing Your Work
Once the seat is dry, it is time for the moment of truth. Set the campstool on a flat surface and sit down carefully. The seat should feel firm and supportive with no sagging in the center.
How the Campstool Seat Compares
| Feature | Square Basket | Round Basket | Campstool Seat |
|---|---|---|---|
| Shape | Square box | Round bowl | Flat panel |
| Load | Holds objects | Holds objects | Supports a person |
| Critical factor | Even spacing | Spoke symmetry | Tension |
| Frame | Self-supporting | Self-supporting | Requires wooden frame |
| Skill level | Beginner | Intermediate | Intermediate |