Req 3 — Map & Navigation
Choose ONE of the following navigation tools to pair with your topographic map:
- (a) Compass
- (b) GPS receiver
- (c) Smartphone with a GPS app
Navigation is one of the most important skills you can develop as a camper. Being able to read a map and find your way — even when the trail disappears or the weather closes in — gives you confidence and keeps you safe. This requirement asks you to plan a real trip and demonstrate that you can get to your campsite using a topographic map and a navigation tool of your choice.
Understanding Topographic Maps
A topographic map (often called a “topo map”) is different from a regular road map. Instead of showing only streets and towns, a topo map shows the shape of the land using contour lines — curved lines that connect points of equal elevation.
Key features of a topo map:
- Contour lines — Each line represents a specific elevation. Lines close together mean steep terrain. Lines far apart mean gentle slopes.
- Contour interval — The elevation change between each contour line (printed in the map legend). Common intervals are 20 or 40 feet.
- Index contours — Every fifth contour line is darker and labeled with its elevation.
- Colors — Green represents vegetation (forests), white represents open areas, blue represents water, and brown represents contour lines.
- Scale — Tells you how much real-world distance is represented by a unit on the map. A common scale is 1:24,000, where 1 inch on the map equals 2,000 feet on the ground.
- Declination diagram — Shows the difference between true north (the North Pole) and magnetic north (where your compass points). This is critical for accurate navigation.
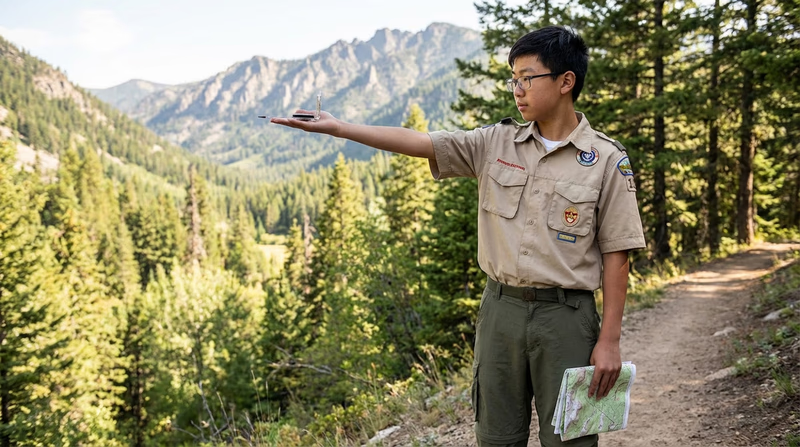
Option A: Compass Navigation
A compass is the classic navigation tool and the most reliable one in the outdoors. It has no batteries to die, no screen to crack, and no signal to lose. Every Scout should know the basics of compass use.
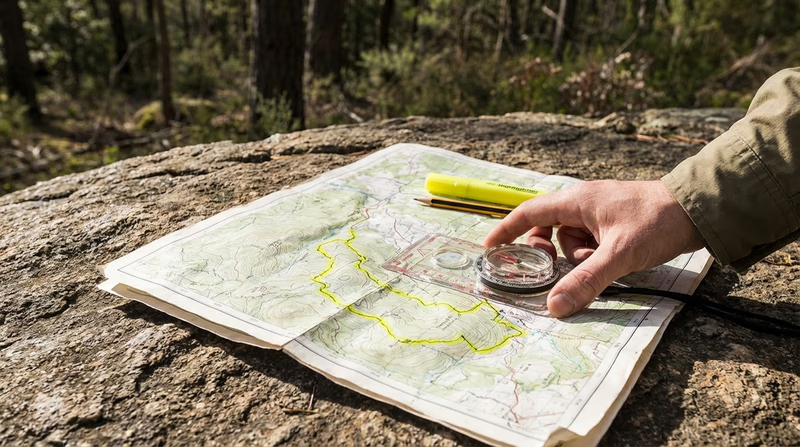
How to take a bearing:
- Place the compass on your map so the edge connects your current location to your destination.
- Rotate the compass housing (bezel) until the orienting lines inside align with the north-south grid lines on the map.
- Read the bearing (in degrees) at the direction-of-travel arrow.
- Adjust for magnetic declination (the difference between true north and magnetic north for your area).
- Hold the compass level in front of you, turn your body until the magnetic needle aligns with the orienting arrow, and walk in the direction the travel arrow points.
Option B: GPS Receiver
A handheld GPS receiver uses satellites to pinpoint your location with remarkable accuracy — usually within 10–30 feet. GPS receivers are popular with backcountry campers because they work in dense forest, in fog, and at night.
Key GPS skills:
- Mark waypoints for your trailhead, campsites, and water sources before you start
- Follow a track (breadcrumb trail) to retrace your steps
- Read coordinates (latitude and longitude) and match them to your topo map
- Carry extra batteries — GPS receivers drain batteries fast, especially in cold weather
Option C: Smartphone GPS App
Most modern smartphones have a built-in GPS chip that works even without cell service. Apps like Gaia GPS, AllTrails, and Avenza Maps let you download topographic maps for offline use, so you can navigate in areas with no signal.
Using your phone as a GPS:
- Download your map area at home while you have Wi-Fi — offline maps are essential
- Put your phone in airplane mode to save battery (GPS still works in airplane mode)
- Carry a portable battery pack for recharging
- Use a waterproof case or bag to protect your phone from rain and drops
- Mark waypoints for key locations before you leave
Your Written Trip Plan
This requirement asks you to create a written plan for an overnight trek. Here is what your plan should include:
Overnight Trek Plan
Essential elements for your written plan
- Trip destination and campsite location (with map coordinates or landmark description).
- Route description — trailhead to campsite, including distance and elevation gain.
- Key navigation checkpoints along the route (trail junctions, stream crossings, landmarks).
- Emergency exit routes — alternate ways out if conditions change.
- Estimated travel time based on distance and terrain.
- Group members and their experience levels.
- Emergency contact information and nearest medical facility.
- Equipment list, food plan, and water sources.