Canoeing Merit Badge — Complete Digital Resource Guide
https://merit-badge.university/merit-badges/canoeing/guide/
Introduction & Overview
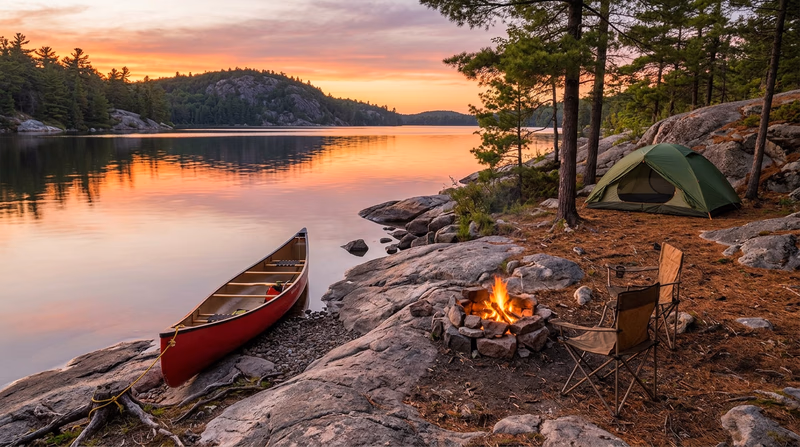
Few things beat the feeling of gliding across still water in a canoe — just you, your paddle, and the world stretching out ahead. The Canoeing merit badge teaches you how to handle a canoe safely and skillfully, from launching at a dock to rescuing a capsized paddler. Whether you dream of exploring a quiet lake, running a river, or paddling deep into the backcountry on a wilderness trip, this badge gives you the foundation to do it right.
Canoeing is one of the most versatile outdoor skills you can learn. It connects you to centuries of exploration, builds teamwork with your paddling partner, and opens up places you simply cannot reach on foot.
Then and Now
Then — The Canoe That Built a Continent
Long before roads and railroads, the canoe was North America’s highway. Indigenous peoples designed birchbark canoes that were light enough for one person to carry over a portage trail yet strong enough to haul hundreds of pounds of cargo across open water. The Algonquin, Ojibwe, and many other nations built canoes perfectly suited to their local waters — wide and stable for big lakes, narrow and nimble for rivers.
When European fur traders arrived, they adopted Indigenous canoe designs because nothing else worked as well. French-Canadian voyageurs paddled massive freight canoes — some over 36 feet long — across thousands of miles of lakes and rivers, carrying beaver pelts from the interior to trading posts on the coast. These paddlers covered up to 100 miles a day, singing songs to keep their stroke rhythm steady.
- Purpose: Transportation, trade, fishing, exploration, warfare
- Mindset: The canoe was essential — without it, the interior of North America was unreachable
Now — The Canoe That Takes You Anywhere
Today’s canoes are built from aluminum, fiberglass, Kevlar, polyethylene, and other modern materials. They are tougher, lighter, and more specialized than ever. Recreational paddlers enjoy calm lakes on weekend afternoons. Wilderness trippers load gear for week-long adventures through places like the Boundary Waters Canoe Area Wilderness in Minnesota or Algonquin Provincial Park in Ontario. Whitewater paddlers push through rapids. Racers compete in sprint and marathon events around the world.
The canoe has gone from survival tool to one of the most popular ways to enjoy the outdoors — but the basic skill of reading the water, choosing the right stroke, and working in harmony with your partner has not changed.
- Purpose: Recreation, fitness, wilderness travel, competition, conservation
- Mindset: Enjoy the journey, sharpen your skills, and respect the water
Get Ready! You are about to learn skills that people have relied on for thousands of years. By the time you finish this badge, you will know how to handle a canoe with confidence — launching, paddling, maneuvering, and even rescuing a capsized boat. Let’s get on the water.
Kinds of Canoeing
Canoeing is not just one activity — it is a whole family of adventures. Here are the main styles you might explore.
Flatwater & Recreational Canoeing
This is where most paddlers start. Flatwater canoeing takes place on calm lakes, ponds, and slow-moving rivers. The water is predictable, and you can focus on learning your strokes and building confidence. It is perfect for fishing, bird-watching, or just enjoying a quiet afternoon on the water.
Canoe Camping & Tripping
Canoe tripping combines paddling with backcountry camping. You load your tent, food, and gear into the canoe and travel from campsite to campsite — sometimes for days or even weeks. Classic canoe trip destinations include the Boundary Waters in Minnesota, Algonquin Park in Ontario, and the Everglades in Florida. Portaging — carrying your canoe and gear overland between waterways — is a big part of the experience.
Whitewater Canoeing
Whitewater canoeing takes you into moving water — rapids, eddies, and currents that demand quick decisions and precise strokes. Whitewater canoes are shorter, more maneuverable, and often have extra flotation built in. This style requires serious training and experience beyond what this merit badge covers, but the flat water skills you learn here are the foundation for everything in whitewater.
Racing & Sprint Canoeing
Competitive canoeing has been an Olympic sport since 1936. Sprint canoe races take place on flat water over distances from 200 to 1,000 meters. Marathon races cover much longer distances — sometimes 50 miles or more. Racing canoes are extremely narrow, lightweight, and tippy. Paddlers kneel on one knee and use a single-blade paddle, driving through the water with remarkable speed and efficiency.
Freestyle Canoeing
Sometimes called “canoe dancing,” freestyle canoeing is the art of maneuvering a canoe through intricate patterns on flat water — heeling the boat, carving turns, and linking strokes into fluid sequences, often set to music. It looks effortless, but it takes deep understanding of how the canoe responds to every shift in weight and every paddle angle. Freestyle demonstrates that a canoe is one of the most responsive watercraft ever designed.
Now let’s dive into the safety knowledge you need before you ever touch the water.
Req 1a — Hazards on the Water
Before you launch a canoe, you need to understand what can go wrong — and how to keep it from happening. Canoeing is a safe activity when you respect the water and prepare properly, but every paddler should be able to recognize hazards and respond calmly.
Weather Hazards
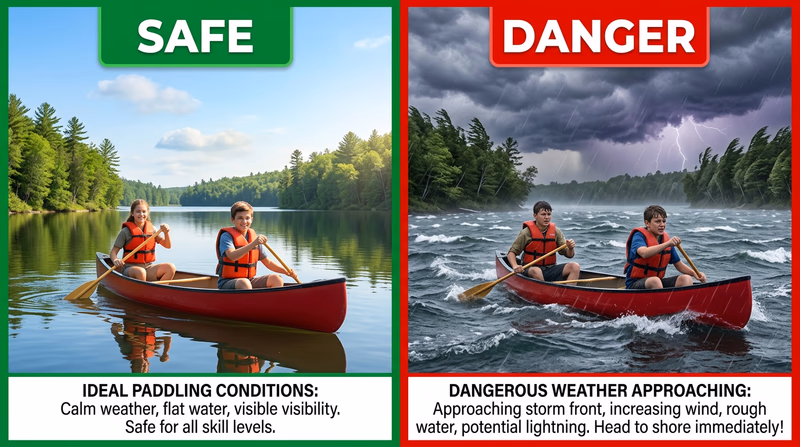
Weather is the single biggest variable on the water. Conditions can change fast, especially on large lakes and rivers.
Wind can turn a calm lake into a challenging and dangerous environment in minutes. Strong headwinds make forward progress exhausting. Crosswinds push you off course. Tailwinds feel easy until you try to turn around. On large lakes, sustained wind creates waves that can swamp an open canoe.
Lightning is an immediate, life-threatening danger on open water. A canoe on a lake is often the tallest object around. If you hear thunder or see lightning, get off the water immediately. The 30/30 rule is a good guide: if the time between a flash of lightning and the sound of thunder is 30 seconds or less, seek shelter. Stay sheltered until 30 minutes after the last thunder.
Fog reduces visibility and makes navigation difficult. On large bodies of water, you can lose sight of the shoreline entirely. Carry a compass and know how to use it.
Water Hazards
The water itself presents hazards that you need to recognize and respect.
Cold water is one of the most underestimated dangers in canoeing. Water does not need to be freezing to be dangerous — water below 70°F (21°C) drains body heat 25 times faster than air at the same temperature. Cold-water shock can cause gasping, hyperventilation, and loss of muscle control within seconds of immersion. This is why wearing a life jacket at all times is non-negotiable.
Currents and moving water can sweep you downstream faster than you expect. Even gentle river currents exert powerful force on a broadside canoe. Strainers — fallen trees or branches that let water through but trap boats and swimmers — are especially dangerous on rivers.
Submerged obstacles like rocks, logs, and stumps can damage your canoe or throw you off balance. In shallow water, look ahead and read the surface — ripples and changes in water color often signal something below.
Human Hazards
Sometimes the biggest hazard is the paddler — and that is the hazard you have the most control over.
Overconfidence leads paddlers to take on conditions beyond their skill level. Be honest about what you can handle. There is no shame in staying close to shore or choosing a calmer day.
Fatigue slows your reaction time and weakens your strokes. On longer paddles, take breaks, eat snacks, and drink water. A tired paddler makes poor decisions.
Lack of communication between paddling partners causes confusion, especially during maneuvers or in challenging conditions. Agree on basic commands before you launch — “draw left,” “stop,” “switch sides.”
Motorized boat traffic is common on many lakes and rivers. Powerboats create large wakes that can swamp a canoe. Paddle defensively — turn your bow into oncoming wakes and give motorized traffic plenty of room.
The Four-Step Hazard Approach
Your counselor will want to hear you think through hazards using four steps:
- Anticipate — What could go wrong? Check weather, scout the water, review your route.
- Prevent — What can you do ahead of time? Wear your life jacket, bring proper gear, paddle with a buddy.
- Mitigate — If something does go wrong, how do you reduce the damage? Stay with the canoe, signal for help, use rescue equipment.
- Respond — What is your emergency plan? Know how to perform a rescue, know how to get help, know basic first aid.
Understanding hazards is the first step to safe paddling. Next, you will learn about specific injuries and illnesses that can happen on the water — and how to treat them.
Req 1b — Injuries & First Aid
Canoeing puts you outdoors for hours at a time, often on or near water in varying weather conditions. Knowing how to prevent common injuries — and how to treat them if they happen — is a critical part of being a prepared paddler.
Blisters
Prevention: Blisters form when skin is rubbed repeatedly — and the paddle grip is the most common culprit. Paddling gloves or athletic tape on your hands can reduce friction. Make sure your grip is relaxed; squeezing the paddle too tightly causes more friction and fatigues your hands faster. Allow calluses to build up gradually over multiple paddling sessions.
Symptoms: Hot spot (redness and tenderness), then a raised, fluid-filled bubble on the skin — usually on the palm, thumb web, or fingers.
First aid: Do not pop small blisters — the skin underneath is not ready. Cover with a bandage or moleskin. If a blister pops on its own, clean the area, apply antibiotic ointment, and cover it. For large, painful blisters that interfere with paddling, a counselor or first aider can drain them using a sterilized needle at the blister’s edge.
Cold-Water Shock and Hypothermia
These are two related but different dangers, and both can be life-threatening.
Cold-water shock happens the instant you fall into cold water (below about 60°F / 15°C). Your body gasps involuntarily, your heart rate spikes, and your blood pressure jumps. This reflex can cause you to inhale water. The shock phase lasts 1–3 minutes.
Hypothermia develops more slowly as your core body temperature drops below 95°F (35°C). It can happen in water that feels only mildly cool if you are in it long enough.
Prevention: Always wear a properly fitted life jacket — if cold-water shock makes you gasp, the life jacket keeps your head above water. Dress for the water temperature, not the air temperature. In spring and fall, consider a wetsuit or dry top even if the air feels warm. Check water temperature before paddling.
Symptoms of hypothermia: Shivering, confusion, slurred speech, clumsiness, drowsiness. As it progresses, shivering stops — that is a danger sign.
First aid: Get the person out of the water and out of wet clothes. Wrap them in dry blankets or sleeping bags. Give warm (not hot) drinks if they are conscious and alert. Do not rub their skin or apply direct heat. Call for emergency help if shivering stops, the person is confused, or they lose consciousness.
Dehydration
Prevention: Paddling is hard work, and you lose water through sweat even when you are surrounded by it. Bring plenty of drinking water — at least one liter per hour in warm conditions. Take regular water breaks. Do not wait until you feel thirsty; by then, you are already mildly dehydrated.
Symptoms: Thirst, dry mouth, dark yellow urine, headache, dizziness, fatigue. Severe dehydration causes confusion, rapid heartbeat, and fainting.
First aid: Move to shade if possible. Drink water in small, steady sips. Sports drinks with electrolytes help if the person has been sweating heavily. If symptoms are severe (confusion, inability to keep fluids down), seek medical help immediately.
Heat-Related Illnesses
Paddling in direct sun with limited shade exposure puts you at risk for heat exhaustion and heat stroke.
Prevention: Wear a wide-brimmed hat and lightweight, light-colored clothing. Take breaks in the shade. Drink water consistently. Avoid paddling during the hottest part of the day (noon to 3 PM) when possible. Splash water on your hat and neck to cool down.
Symptoms of heat exhaustion: Heavy sweating, weakness, nausea, dizziness, cool and clammy skin, fast but weak pulse.
Symptoms of heat stroke: High body temperature (above 103°F / 39°C), hot and dry skin (sweating may stop), confusion, rapid and strong pulse, possible unconsciousness. Heat stroke is a medical emergency.
First aid for heat exhaustion: Move to shade, loosen clothing, apply cool wet cloths, and sip water slowly. Rest until symptoms pass.
First aid for heat stroke: Call 911 immediately. Move the person to shade, cool them as rapidly as possible with water, wet towels, or fanning. Do not give fluids if they are confused or unconscious.
Sunburn
Prevention: Apply broad-spectrum sunscreen (SPF 30 or higher) to all exposed skin 15–20 minutes before launching. Reapply every two hours and after swimming. Water reflects UV rays, increasing your exposure. Wear sun-protective clothing, sunglasses with UV protection, and a hat.
Symptoms: Red, warm, tender skin. Severe sunburn causes blisters, swelling, and in extreme cases fever and chills.
First aid: Get out of the sun. Apply cool compresses and aloe vera gel. Take over-the-counter pain relief if needed. Drink extra water. Do not pop blisters. Severe sunburn with blistering or fever requires medical attention.
Sprains and Strains
Prevention: Sprains (ligament injuries) and strains (muscle or tendon injuries) in canoeing most often occur during portaging, loading/unloading gear, and launching from uneven terrain. Use proper lifting technique — bend your knees, keep the load close to your body, and lift with your legs. Warm up before paddling. Stretch your shoulders, back, and wrists.
Symptoms: Pain, swelling, bruising, limited range of motion. A sprain often has a “popping” sensation at the time of injury.
First aid: Use the RICE method:
- Rest — Stop the activity
- Ice — Apply cold (a cold wet towel or water bottle from the lake works in a pinch) for 20 minutes at a time
- Compression — Wrap with an elastic bandage to reduce swelling
- Elevation — Raise the injured area above heart level
Seek medical attention if the person cannot bear weight, the joint looks deformed, or pain is severe.
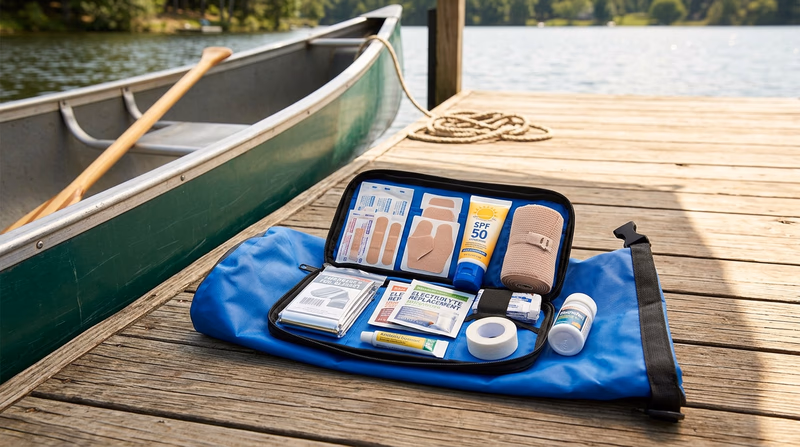
Paddler's First Aid Kit Essentials
Items to pack for every canoeing outing- Adhesive bandages and moleskin: For blisters and small cuts.
- Elastic bandage: For sprains and strains (ACE wrap).
- Sunscreen (SPF 30+): Broad-spectrum, water-resistant.
- Insect repellent: For shoreline breaks and portages.
- Emergency blanket: Compact and critical for hypothermia treatment.
- Electrolyte packets: Mix with water for dehydration.
- Antibiotic ointment: For open blisters and minor wounds.
- Medical tape: Multipurpose — securing bandages, preventing blisters.
- Pain reliever: Ibuprofen or acetaminophen.
Now that you know how to prevent and treat common canoeing injuries, let’s look at the safety policy that governs all Scouting watercraft activities.
Req 1c — Safety Afloat
Safety Afloat is the Scouting America policy that governs every activity involving watercraft — from canoes and kayaks to sailboats and motorboats. It is not a suggestion. It is a requirement for every Scout water activity, and your counselor will expect you to know it and explain how each point applies to canoeing.
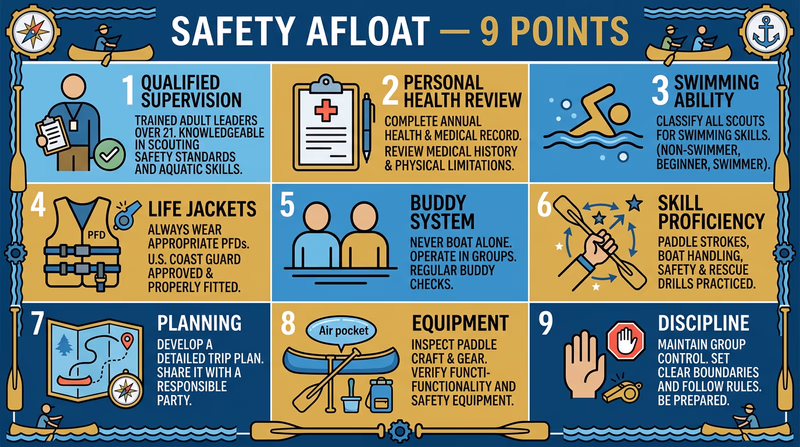
The Nine Points of Safety Afloat
1. Qualified Supervision
Every canoeing activity must have a qualified adult supervisor who is at least 21 years old. This person must have completed Safety Afloat training (valid for two years). For canoeing, the supervisor should understand canoe handling, rescue techniques, and the specific conditions of the waterway being used.
Canoeing application: Your counselor or the adult leading the outing must have current Safety Afloat certification. They must be present at the waterfront at all times during the activity.
2. Personal Health Review
Every participant must have a current health history on file. Parents or guardians review medical conditions that could create problems on the water — things like seizure disorders, heart conditions, or medications that cause drowsiness.
Canoeing application: Before your first paddle, make sure your health form is up to date. Tell your counselor about any conditions that could affect you on the water.
3. Swimming Ability
Participants are classified by swimming ability: swimmer, beginner, or nonswimmer. For canoeing, participants must meet the requirements for “swimmer” — which is why Requirement 2 of this merit badge requires you to pass the BSA swimmer test.
Canoeing application: Everyone in a canoe must be a classified swimmer. No exceptions.
4. Life Jackets
Properly fitted, US Coast Guard-approved life jackets must be worn by all participants whenever they are on the water. Life jackets must be the correct type and size for the user and the activity.
Canoeing application: Your life jacket must be on and fastened from the moment you step into the canoe until you are back on the dock or shore. You will learn more about selecting and fitting life jackets in Requirement 5.
5. Buddy System
Every paddler has a buddy. Buddies stay together and monitor each other. Buddy checks are conducted at regular intervals by the supervisor.
Canoeing application: In tandem canoeing, your paddling partner is your buddy. If paddling solo canoes, pair up with another canoe that stays within communication distance. Regular buddy checks mean counting heads and confirming everyone is accounted for.
6. Skill Proficiency
All participants must demonstrate that they have the skills needed for the activity before heading out. No one is thrown into conditions beyond their training.
Canoeing application: Before paddling on open water, you need to demonstrate basic strokes, launching, landing, and capsize recovery in a controlled setting. This merit badge builds those skills step by step.
7. Planning
A written plan covers the route, timeline, emergency procedures, and communication methods. The plan is shared with someone who is not on the trip.
Canoeing application: Know your route, check the weather, identify access points and potential shelter, and file a float plan. A float plan tells someone on shore where you are going, when you expect to return, and what to do if you do not check in on time.
8. Equipment
All equipment must be in good condition and appropriate for the activity and conditions. This includes the canoe, paddles, life jackets, rescue equipment, and communication devices.
Canoeing application: Before every paddle, inspect your canoe for damage, check that you have an extra paddle, verify that your life jacket is in good condition, and make sure you have the required safety gear (sound signal, bailer, throw bag). You will cover equipment in detail in Requirements 5 and 6.
9. Discipline
Everyone follows the rules. The supervisor has authority to stop the activity if conditions become unsafe or if participants are not following safety protocols.
Canoeing application: When the supervisor says “get off the water,” you get off the water — no debate. Horseplay in canoes is dangerous. Standing up, rocking the canoe, or paddling away from the group puts everyone at risk.
How Safety Afloat Connects to This Badge
Almost every requirement in the Canoeing merit badge ties back to Safety Afloat. The swimmer test (Requirement 2) covers Point 3. Life jacket selection (Requirement 5) covers Point 4. Equipment care (Requirement 6) covers Point 8. Rescue skills (Requirement 8) support Points 1 and 6. When your counselor asks you to discuss Safety Afloat, show that you understand not just the rules, but why each rule matters.
Scouting America Safety Afloat The full text of the Safety Afloat policy directly from Scouting America. Link: Scouting America Safety Afloat — https://www.scouting.org/health-and-safety/safety-afloat/With safety covered, it is time to make sure you are water-ready. Next up: the swimming prerequisite.
Req 2 — Swimmer Test
This requirement is a gate — you must pass the BSA swimmer test before you can work on any of the remaining requirements. The test ensures that if you end up in the water (and at some point during this badge, you will), you can handle yourself.
What the Swimmer Test Involves
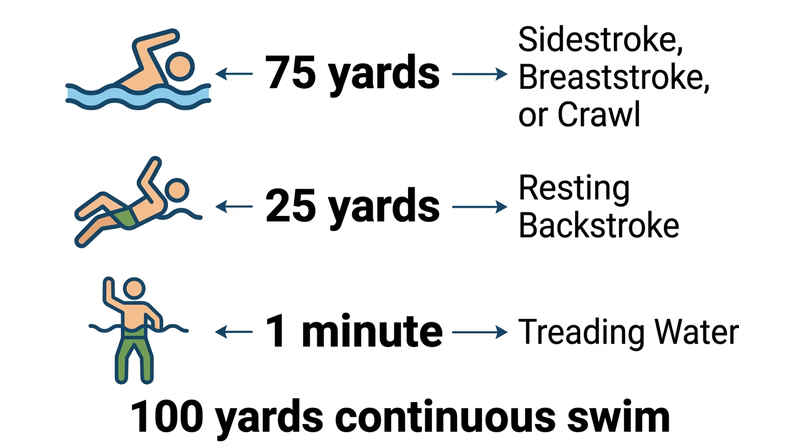
The BSA swimmer test has two parts, performed without a life jacket:
Jump into deep water (over your head), swim 75 yards using at least one of these strokes: sidestroke, breaststroke, or crawl (freestyle). Then swim 25 yards using a resting backstroke. The total distance is 100 yards of continuous swimming without stopping or touching the bottom.
Float or tread water for one minute after completing the swim.
You must complete both parts without resting or using the side of the pool. The test is administered by a certified lifeguard, aquatics instructor, or BSA swim test counselor.
Why Swimming Ability Matters for Canoeing
Canoeing puts you on the water — and sometimes in it. Capsizing, swamping, and falling out of a canoe are all normal parts of learning. In Requirement 8, you will deliberately capsize your canoe and practice rescue techniques. You need to be a confident swimmer to handle these situations safely.
Swimming ability also connects directly to Safety Afloat Point 3: every person in a canoe must be a classified swimmer. There are no shortcuts on this one.
Getting Ready for the Test
If you are not a strong swimmer yet, here are some ways to build up:
- Practice consistently. Swimming two or three times a week builds endurance faster than one long session.
- Work on your strokes. The sidestroke and breaststroke are efficient resting strokes — learn them well and they will save your energy.
- Build your treading endurance. Practice treading water for increasing intervals — start with 30 seconds and work up to two minutes.
- Stay relaxed. Tension wastes energy. Breathe rhythmically, keep your body streamlined, and let the water support you.
Once you have passed the swimmer test, you are cleared to get into a canoe. Let’s start by learning about the boat itself.
Req 3 — Canoe Anatomy & Design
This requirement covers two topics about your canoe:
- Req 3a — Name and point out the major parts of a canoe
- Req 3b — Describe how the length and shape of a canoe affect its performance
Knowing your canoe inside and out is the foundation of good paddling. When your counselor says “grab the thwart” or “check the gunwale,” you need to know exactly what they mean — and when you are choosing a canoe for a trip, understanding how shape affects performance will help you pick the right boat.
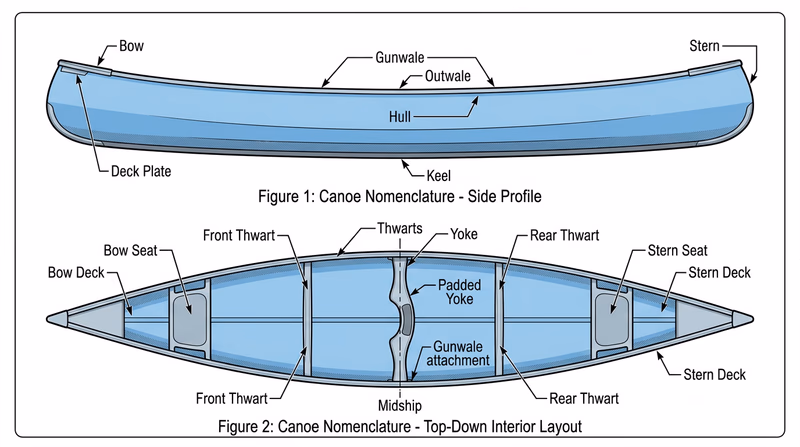
Parts of a Canoe
A canoe has a deceptively simple design, but every part serves a purpose.
Hull and Structure
- Hull — The body of the canoe. Everything else is attached to or built into the hull. The hull’s shape determines how the canoe moves through water.
- Bow — The front end of the canoe. The bow paddler sits here.
- Stern — The back end of the canoe. The stern paddler sits here and is responsible for steering.
- Keel — A ridge or strip running along the bottom center of the hull from bow to stern. Not all canoes have a visible keel, but the keel line (the hull’s bottom centerline) is always there. A pronounced keel helps the canoe track straight; a flat or shallow keel makes it easier to turn.
- Gunwales (pronounced “gunnels”) — The top edges of the canoe running along both sides from bow to stern. Gunwales provide structural rigidity and give you a place to grip when carrying the canoe.
- Thwarts — Cross-pieces that span the canoe from gunwale to gunwale. Thwarts hold the canoe’s shape and provide structural support. The center thwart is often used as a yoke for portaging.
- Yoke — A specially shaped thwart (often with shoulder pads) at the center of the canoe, designed for carrying the canoe inverted on your shoulders during portages.
- Seats — Mounted between the gunwales near the bow and stern. Canoe seats are typically positioned so you face forward. The bow seat is wider and set farther from the end; the stern seat is narrower and closer to the end.
- Decks (or deck plates) — Small triangular pieces at the bow and stern that cap the gunwales where they come together. Decks add strength and provide a grab point.
- Ribs — Curved internal supports running across the bottom of the hull. Found mainly in traditional wood-and-canvas canoes, ribs give the hull its shape and strength.
- Planking — Thin strips of wood running lengthwise inside a wood-and-canvas canoe, layered over the ribs. In modern canoes, the hull material itself replaces traditional planking.
How Length and Shape Affect Performance
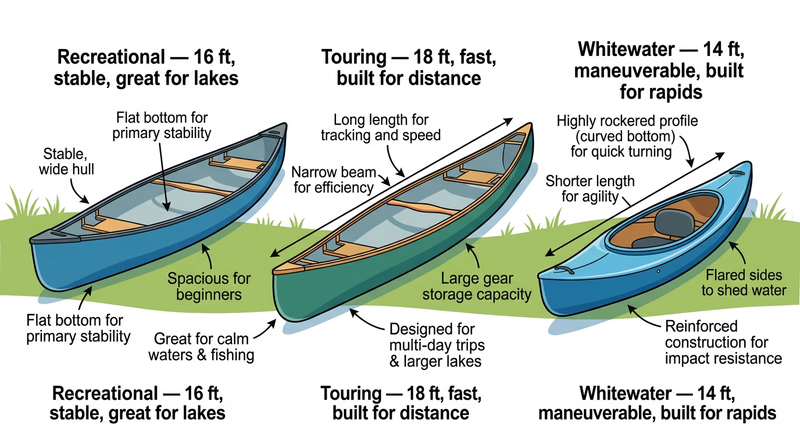
Two canoes can look similar at a glance but behave completely differently on the water. Length, width, hull shape, and rocker all affect how a canoe tracks, turns, and handles waves.
Length
- Longer canoes (17–18.5 feet) are faster, track straighter, and carry more gear. They are ideal for lake touring, tripping, and tandem paddling. The tradeoff: they are harder to turn and heavier to portage.
- Shorter canoes (14–16 feet) are more maneuverable and lighter. They turn quickly, making them better for rivers and tight spaces. The tradeoff: they are slower on open water and carry less.
Width (Beam)
- Wider canoes feel more stable when you first sit in them (called initial stability). They are forgiving for beginners. But they are slower because they push more water aside.
- Narrower canoes feel tippy at first but are actually more stable in rough water (called secondary stability or final stability). They slice through the water efficiently.
Hull Shape
The cross-section of the hull — what you see if you could slice the canoe in half and look at the cut edge — determines stability and speed.
- Flat bottom — High initial stability (feels steady). Good for calm water. Can feel unstable in waves.
- Rounded bottom — Lower initial stability (feels tippy). Excellent secondary stability and speed. Preferred for experienced paddlers and rough water.
- Shallow-V bottom — A compromise between flat and round. Good tracking with reasonable stability.
- Shallow arch — Similar to rounded but with a gentler curve. Efficient and stable. Common in modern touring canoes.
Rocker
Rocker is the upward curve of the hull from the center toward the bow and stern. Imagine setting a canoe on flat ground and looking at it from the side — a canoe with more rocker looks like a banana, while one with less rocker sits flat.
- More rocker — The canoe pivots easily and turns quickly. Great for rivers and maneuvering. Poor for tracking straight on a lake.
- Less rocker — The canoe tracks straight with less effort. Good for lakes and long-distance paddling. Harder to turn.
Canoe Materials
Modern canoes are made from a variety of materials, each with tradeoffs:
| Material | Weight | Durability | Cost | Best For |
|---|---|---|---|---|
| Aluminum | Medium | Very high | Low–Medium | Camp programs, rental fleets |
| Polyethylene | Heavy | Very high | Low | Beginner-friendly, rocky rivers |
| Fiberglass | Medium | Medium | Medium | Touring, recreational use |
| Kevlar | Very light | Medium | High | Portaging, long-distance tripping |
| Royalex/T-Formex | Medium | High | Medium–High | Whitewater, all-around |
| Wood/Canvas | Medium–Heavy | Low–Medium | High | Traditional craft, beauty |
Now that you know your canoe, let’s get to know your paddle — the tool that makes it all work.
Req 4 — Paddle Anatomy & Sizing
This requirement covers two topics about your paddle:
- Req 4a — Name and point out the parts of a paddle
- Req 4b — Demonstrate how to correctly size a paddle for sitting and kneeling positions
Your paddle is your engine, your rudder, and your brake — all in one tool. Understanding its parts and choosing the right size makes every stroke more efficient and every hour on the water more comfortable.
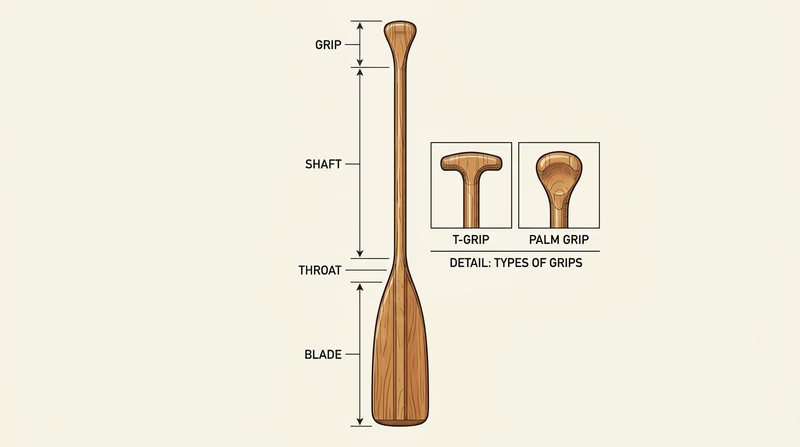
Parts of a Paddle
A canoe paddle has four main parts, each designed for a specific function.
Grip
The top of the paddle where your upper hand (the control hand) holds on. Grips come in two common shapes:
- T-grip — A horizontal bar that gives you a firm, precise hold. Preferred for whitewater and maneuvering because you can feel exactly what angle the blade is at.
- Palm grip (or pear grip) — A rounded, egg-shaped grip that fits comfortably in your palm. Preferred for long-distance paddling because it reduces hand fatigue.
Shaft
The long, straight section between the grip and the blade. Your lower hand (the power hand) grips the shaft. Shafts can be round, oval, or slightly flattened. An oval shaft helps you feel the blade angle without looking down. Some paddles have a bent shaft (angled about 12–14°) designed for flatwater efficiency.
Throat
The point where the shaft flares into the blade. The throat transfers your stroke force from the shaft into the blade. It is the transition zone — not a grip point.
Blade
The wide, flat section at the bottom of the paddle that moves through the water. The blade does the actual work of pushing water to propel and steer the canoe. Blades vary in width, length, and shape:
- Wider blades catch more water per stroke but require more effort.
- Narrower blades are easier on your body for long paddles but move less water per stroke.
- The power face is the side of the blade that pushes against the water during a forward stroke. The back face is the opposite side.
- The tip is the bottom edge of the blade.
Sizing a Paddle
Using a paddle that is too long or too short makes paddling harder and less efficient. The correct length depends on your body size and whether you paddle from a sitting or kneeling position.
Sizing for a Sitting Position
- Sit in the canoe seat (or on a chair that is the same height).
- Hold the paddle upside down so the grip rests on the seat between your legs.
- Reach out with one hand and grip the shaft at the throat (where it meets the blade).
- Your upper arm should be roughly parallel to the ground — bent at about a 90° angle at the elbow.
- If you have to reach up, the paddle is too long. If your arm angles downward, it is too short.
Quick rule of thumb: When sitting, the paddle should reach from the seat to your chin or nose.
Sizing for a Kneeling Position
Kneeling lowers your body closer to the water, so you need a shorter paddle.
- Kneel on the ground (or in the canoe) as you would when paddling.
- Use the same upside-down method: grip rests on the ground between your knees, reach for the throat.
- Your arm should again be at roughly a 90° angle.
Quick rule of thumb: When kneeling, the paddle should reach from the floor to your chin or just below.
Why Sizing Matters
A properly sized paddle means:
- Efficient strokes — The blade enters and exits the water at the right angle, maximizing power transfer.
- Less fatigue — You are not reaching too far or lifting too high with each stroke.
- Better control — A properly sized paddle responds predictably to steering strokes.
- Fewer injuries — Oversized paddles strain your shoulders and back over time.
Paddle Materials
Like canoes, paddles come in different materials:
| Material | Weight | Durability | Cost | Best For |
|---|---|---|---|---|
| Wood | Medium | Medium | Medium | Traditional feel, all-around use |
| Aluminum shaft / plastic blade | Medium | High | Low | Camp programs, rentals |
| Fiberglass | Light | Medium–High | Medium–High | Touring, recreational |
| Carbon fiber | Very light | Medium | High | Racing, long-distance touring |
You know your canoe and your paddle. Now let’s gear up with the most important piece of safety equipment — your life jacket.
Req 5a — Life Jacket Selection
A life jacket — officially called a personal flotation device (PFD) — is the single most important piece of safety equipment in canoeing. It is not optional. It is not something you put on “when things get rough.” You wear it from the moment you step into the canoe until you are back on solid ground.
Why You Must Always Wear a Life Jacket
The reason is simple: you cannot predict when you will end up in the water. Capsizing happens without warning — a sudden gust of wind, an unexpected wake from a motorboat, a shift in weight, or a submerged rock. When it happens, you do not have time to reach for a life jacket stowed under the seat.
Cold-water shock (discussed in Requirement 1b) can cause involuntary gasping within seconds of immersion. A life jacket keeps your head above water during those critical moments. Even strong swimmers can be incapacitated by cold water, exhaustion, or a blow to the head during a capsize.
US Coast Guard PFD Types
Life jackets are classified by the US Coast Guard into types based on the conditions they are designed for:
Type I — Offshore Life Jacket
Designed for open, rough water far from shore. Provides the most buoyancy and is designed to turn an unconscious person face-up. Bulky and uncomfortable for paddling — not ideal for canoeing.
Type II — Near-Shore Buoyant Vest
Designed for calm, inland water where rescue is expected quickly. Less bulky than Type I but still somewhat restrictive. May turn some unconscious wearers face-up. Common in rental fleets and camp programs.
Type III — Flotation Aid
Designed for calm water where quick rescue is likely. Comfortable and allows good freedom of movement. This is the most common type for canoeing. It does not turn you face-up automatically, so you need to be conscious and able to position yourself — which is another reason to be a strong swimmer.
Type V — Special Use
Designed for specific activities. Some Type V PFDs are approved for paddlesports and combine comfort with good flotation. They must be worn to count as a legal PFD (unlike other types, which technically just need to be aboard — though in Scouting, all PFDs must be worn).
Key Characteristics for Canoeing PFDs
When selecting a life jacket for canoeing, look for these features:
- Freedom of movement — You need full range of motion in your arms and shoulders for paddling. Test the PFD by mimicking paddle strokes before getting on the water.
- Proper buoyancy — Adults need at least 15.5 pounds of buoyancy. Youth PFDs are sized by weight range and provide appropriate buoyancy for smaller bodies.
- Snug fit — The PFD should not ride up past your chin when you are in the water. Buckles, straps, and zippers should be secure.
- High visibility color — Bright yellow, orange, or red makes you easier to spot in the water. Avoid dark colors that blend into waves.
- US Coast Guard approval — Look for the USCG approval label inside. Non-approved flotation vests (pool toys, water ski vests without approval) are not acceptable.
- Pockets — A nice bonus for carrying a whistle, sunscreen, or snack bar within easy reach.

Now that you know what to look for in a life jacket, let’s make sure it fits properly.
Req 5b — Fitting a Life Jacket
A life jacket that does not fit properly is almost as dangerous as not wearing one at all. If it is too loose, it can ride up over your face in the water. If it is too tight, it restricts your breathing and movement. Getting the right fit takes less than a minute and could save your life.
Selecting the Right Size
Life jackets are sized by chest measurement for adults and by weight for youth.
Youth Sizing
| Weight Range | Label |
|---|---|
| 30–50 lbs | Youth Small |
| 50–90 lbs | Youth Medium/Large |
| Over 90 lbs | Adult or Youth XL |
Adult Sizing
| Chest Measurement | Size |
|---|---|
| 30–36 inches | Small |
| 36–40 inches | Medium |
| 40–44 inches | Large |
| 44–48+ inches | XL/XXL |
Check the label inside the PFD — it will list the size range. If you are between sizes, try both and go with the one that fits snugly without restricting your breathing.
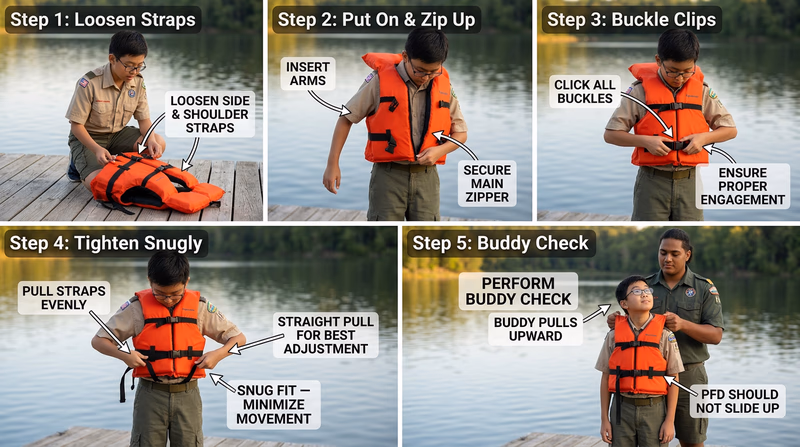
How to Fit a Life Jacket — Step by Step
- Loosen all straps and buckles before putting it on.
- Put the PFD on like a vest. Make sure the front is facing forward (the label is usually on the inside back).
- Zip it up completely.
- Buckle all clips starting from the bottom and working up.
- Tighten the adjustment straps until the PFD fits snugly. It should feel secure but not constricting — you should be able to breathe deeply and comfortably.
- Do the lift test: Have a buddy grab the PFD by the shoulders and pull up firmly. If the PFD rides up past your chin or ears, it is too loose. Tighten the straps and retest. If it still rides up, you need a smaller size.
The Lift Test
The lift test is the most important check. Here is why: when you are in the water, the buoyancy of the PFD pushes upward. If the PFD is too loose, it pushes up while you stay down — and the PFD ends up around your face, blocking your vision and airway.
A properly fitted PFD should:
- Stay in place when pulled upward from the shoulders
- Not ride up past your chin
- Allow you to move your arms freely in a paddling motion
- Feel snug around your chest and waist
- Allow normal breathing
Common Fitting Mistakes
- Too loose — The most common mistake. Paddlers leave straps loose for comfort, but the PFD becomes useless in the water.
- Wrong size — Using an adult PFD on a youth (or vice versa) because “close enough.” It is not close enough. Size matters.
- Worn over bulky clothing — A PFD fitted over a winter coat may not fit properly when you remove the coat. Fit the PFD over what you will actually wear on the water.
- Damaged or worn PFD — Check for torn fabric, broken buckles, compressed foam, and faded USCG approval labels. If any of these are present, replace the PFD.
PFD Fit Check
Run through this before every paddle- Correct size for your weight/chest measurement: Check the label.
- All zippers fully closed: No gaps or partial zips.
- All buckles fastened: Starting from bottom up.
- Straps snug but comfortable: You can breathe deeply.
- Lift test passed: PFD does not ride past your chin.
- Full arm mobility: Mimic paddling strokes freely.
- No visible damage: Fabric intact, foam not compressed, buckles working.
Your life jacket is on and fitted. Now let’s look at the other safety and rescue equipment that should be in your canoe every time you paddle.
Req 5c — Safety & Rescue Equipment
A life jacket keeps you afloat, but it is not the only safety equipment your canoe needs. Each piece of gear listed in this requirement solves a specific problem — and when that problem arises on the water, you will be very glad you brought it.
Sound Signal Device
A whistle is the simplest, most reliable sound signal. It works when your voice cannot carry over wind, waves, or distance. Three sharp blasts on a whistle is the universal distress signal on the water. Unlike your voice, a whistle does not get hoarse or drowned out by wind.
Clip a whistle to your life jacket where you can reach it without looking. Pealess whistles (like the Fox 40) work even when wet and have no moving parts to fail.
Extra Paddle
If your primary paddle breaks, slips out of your hands, or floats away during a capsize, you need a backup. An extra paddle keeps you from being stranded on the water with no way to move or steer. Carry at least one spare per canoe — stowed along the bottom or secured under the thwarts so it does not shift around.
Sponge
Water gets into canoes — from rain, splashing, wet gear, and paddle drip. A large sponge lets you soak up small amounts of water that collect in the bilge (the bottom of the hull). Keeping the canoe dry improves stability and prevents gear from getting soaked. A regular kitchen sponge or a boat sponge both work.
Bailer
A bailer handles larger amounts of water than a sponge can manage. The simplest bailer is a cut-open plastic jug — slice a gallon milk jug diagonally, keep the handle, and you have a lightweight scoop that moves a lot of water fast. A bailer is essential after a capsize recovery when the canoe is partially swamped.
Bilge Pump
A hand-operated bilge pump is a step up from a bailer. It moves water out of the canoe quickly and efficiently — useful for larger canoes or situations where a lot of water has come in. Not every canoe needs a bilge pump, but for open-water paddling or trips where swamping is more likely, it is worth carrying.
Rescue Sling
A rescue sling (also called a stirrup) is a loop of webbing or rope that hangs over the side of a canoe. A swimmer in the water can step into the sling and use it as a foothold to climb back into the canoe. Without a sling, reboarding a canoe from deep water is much harder — especially for tired or cold swimmers.
Ropes
Short lengths of rope (called painters) are typically attached to the bow and stern of the canoe. Painters are used for:
- Tying up the canoe at a dock or shore
- Towing a swamped canoe to shallow water
- Lining the canoe through shallow rapids (walking along the bank while guiding the canoe with ropes)
- Rescue — throwing a line to a swimmer or securing the canoe during an emergency
Painters should be 10–15 feet long, made of floating rope (polypropylene), and neatly coiled or stowed so they do not become a tangling hazard.
Throw Bag
A throw bag is a nylon bag filled with coiled rope, designed to be thrown to a person in the water. You grip the free end of the rope, toss the bag underhand toward the swimmer, and the rope pays out as the bag flies. Throw bags are standard rescue equipment for any paddlesport.
You will practice using a throw bag in Requirement 8f — where you need to land the rope within 3 feet of a swimmer 30 feet away.

Canoe Safety Equipment
Required gear for every outing- Sound signal device (whistle): Clipped to your PFD.
- Extra paddle: Stowed securely in the canoe.
- Sponge: For minor water removal.
- Bailer: Cut-jug or similar scoop for swamped canoe.
- Rescue sling: Loop of webbing for deep-water reboarding.
- Painters (bow and stern): 10–15 ft floating rope, neatly coiled.
- Throw bag: For reaching swimmers from shore or canoe.
You know the gear. Now let’s learn how to take care of it — along with your canoe and paddles.
Req 6 — Equipment Care
Taking care of your equipment is not just about making it last — it is about making it safe. A cracked paddle, a leaking hull, or a frayed throw bag rope can turn a routine paddle into a dangerous situation. Caring for your gear is part of being a responsible paddler.
Canoe Care
Before Each Use
- Inspect the hull for cracks, dents, punctures, and soft spots. Run your hand along the bottom and sides. Small cracks in fiberglass or plastic can grow into serious leaks if not repaired.
- Check the gunwales for damage or looseness. Gunwales that are separating from the hull compromise the canoe’s structural integrity.
- Inspect seats and thwarts for loose bolts, cracked wood, or broken cane. A seat that fails while you are paddling can dump you in the water.
- Make sure hardware is tight — seat bolts, thwart bolts, and any deck fittings. Hand-tighten anything that has worked loose.
After Each Use
- Rinse the canoe with fresh water, especially after paddling in salt water, muddy rivers, or lakes with invasive species concerns. Let it dry before storage.
- Turn the canoe over or tilt it on its side to drain completely. Standing water left inside promotes mildew and can freeze and crack the hull in cold weather.
- Remove all gear — sponges, bailers, and throw bags left inside a stored canoe can trap moisture and develop mold.
Storage
- Store the canoe upside down on a rack or sawhorses, supported at the gunwales — never resting on the hull bottom, which can cause the hull to deform over time (called “oil-canning”).
- Keep it out of direct sunlight when possible. UV rays degrade plastics, fiberglass, and wood finishes over extended exposure.
- Indoors is best. If outdoor storage is unavoidable, use a fitted cover or tarp.
- Off the ground. Storing a canoe on the ground invites moisture, insects, and critters.
Repairs
Minor damage can often be repaired in the field or at home:
- Aluminum canoes — Small dents can often be left alone. Rivets that work loose can be replaced. Major dents or cracks need professional repair.
- Fiberglass canoes — Small cracks and chips can be repaired with fiberglass repair kits (resin and cloth). Sand, patch, and seal.
- Polyethylene/plastic canoes — Scratches are normal and rarely a problem. Deep gouges or cracks can sometimes be welded with a plastic welding tool.
- Wood/canvas canoes — These require the most maintenance. Canvas needs periodic re-coating with filler and paint. Wood needs protection from moisture and UV.
Paddle Care
Before Each Use
- Check the shaft for cracks or splinters. A cracked shaft can break mid-stroke.
- Inspect the blade for chips, cracks, or delamination (layers separating). A damaged blade is less effective and can deteriorate further in the water.
- Check the grip for looseness. A grip that rotates on the shaft is a control problem.
After Each Use
- Rinse with fresh water and dry before storage.
- Store paddles upright or hung on a wall rack — never leaning on the blade tip, which can warp or damage the edge over time.
Maintenance
- Wooden paddles benefit from periodic sanding and a fresh coat of marine varnish or oil. This protects the wood from water absorption, which causes swelling, warping, and cracking.
- Aluminum/plastic paddles need minimal maintenance but should be checked for loose blade-to-shaft connections.
Life Jacket Care
- Rinse with fresh water after each use and hang to dry completely before storing.
- Never machine wash or dry a life jacket. The agitation and heat can break down the flotation foam.
- Store hanging or flat — never compressed under heavy objects, which crushes the foam and reduces buoyancy.
- Inspect regularly for torn fabric, broken buckles, compressed foam, and faded USCG labels. Replace any PFD that fails inspection.
- Do not use as a seat cushion or kneeling pad. This compresses the flotation foam.
Other Equipment
- Throw bags — Inspect the rope for fraying, cuts, and UV damage. Practice repacking after each use so the rope deploys cleanly. Replace rope that shows wear.
- Sponges and bailers — Clean after each use. Replace when worn.
- Painters and ropes — Check for fraying and stiffness. Polypropylene rope degrades in UV light — replace when it becomes stiff or brittle.
Your gear is inspected and ready to go. Time to get on the water and learn how to carry, launch, and handle your canoe.
Req 7 — On the Water Basics
This requirement covers four essential on-the-water skills:
- Req 7a — Safely carry and launch the canoe from a dock or shore
- Req 7b — Safely land the canoe and return it to storage
- Req 7c — Demonstrate kneeling and sitting positions and their proper use
- Req 7d — Change places while afloat
These are the fundamentals — the skills you use every single time you go canoeing. Get them right, and everything else in this badge builds on a solid foundation.
Carrying the Canoe
Two-Person Carry
The most common carry for getting a canoe from the rack to the water:
- Position yourselves — One person at the bow, one at the stern, both facing the same direction (toward the water).
- Lift together on a count of three. Grab the gunwales or the end decks.
- Carry at your sides with the canoe right-side up, or carry inverted (upside down) resting on your shoulders at the thwarts.
- Communicate constantly — “Step up,” “turning right,” “set it down.” The person in front cannot see behind them.
- Watch your footing. Uneven ground, slippery rocks, and muddy banks are hazards during the carry.
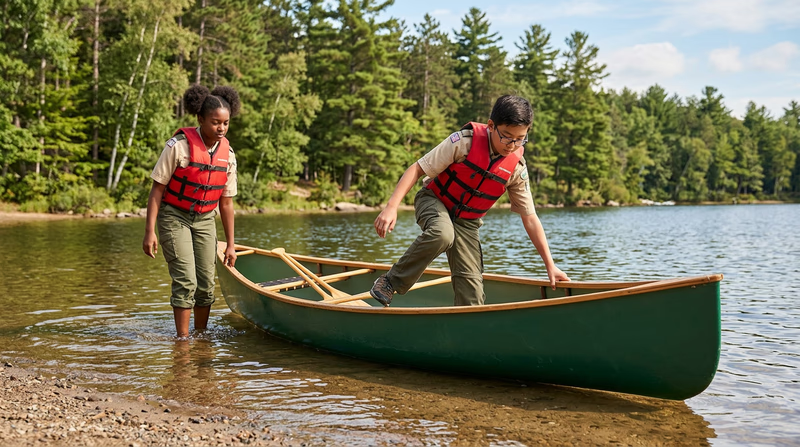
Launching from Shore
- Set the canoe at the water’s edge parallel to the shoreline, with the bow pointing in the direction you want to go.
- Slide the canoe into the water so it is floating freely with the stern still touching shore.
- The stern paddler holds the canoe steady by gripping the gunwales and bracing from shore.
- The bow paddler boards first — stepping into the center of the canoe (on the keel line), keeping their weight low, and moving forward to the bow seat.
- Once the bow paddler is seated, the stern paddler pushes off gently, steps into the center, and moves to the stern seat.
Launching from a Dock
- Position the canoe alongside the dock with bow and stern lines loosely secured.
- Hold the canoe steady by gripping the near gunwale and the dock edge. The canoe should be pulled in tight to the dock.
- The bow paddler boards first — facing the bow, they step down into the center of the canoe, keeping their weight low and hands on both gunwales.
- The stern paddler boards after the bow paddler is settled.
- Push off gently from the dock.
Landing on Shore
- Approach the shore at a gentle angle — not straight on (which can damage the bow) and not broadside (which makes it hard to exit).
- The bow paddler stops paddling and prepares to step out as the canoe touches bottom or the bow reaches shore.
- The bow paddler exits first — stepping out onto stable ground while holding the gunwale, then pulling the canoe in.
- The stern paddler exits once the canoe is stabilized.
- Pull the canoe up far enough that it will not float away. In tidal areas, pull it well above the high-water line.
Landing at a Dock
- Approach parallel to the dock at slow speed.
- The bow paddler grabs the dock and holds the canoe alongside.
- The stern paddler exits first (they are closer to the dock edge), stepping up onto the dock while keeping weight low.
- The bow paddler exits once the stern paddler is holding the canoe from the dock.
- Secure the canoe with painters if you are leaving it at the dock.
Kneeling vs. Sitting Positions
Your position in the canoe affects stability, power, and control.
Sitting Position
You sit on the canoe seat with your feet flat on the hull bottom in front of you. This is the most comfortable position for long paddles and is fine for calm conditions.
- Pros: Comfortable for extended paddling, easier on the knees
- Cons: Higher center of gravity, less stable in rough water or during maneuvers
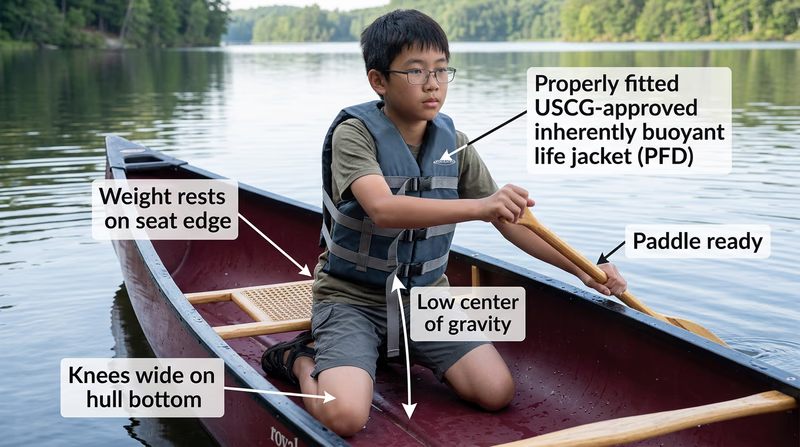
Kneeling Position
You kneel on the hull bottom with your knees spread for stability, resting your backside against the front edge of the seat. This lowers your center of gravity significantly.
- Pros: Much more stable, better control during maneuvers and rough water, more powerful strokes
- Cons: Harder on the knees over long distances
When to kneel:
- Whenever conditions get rough (wind, waves, wakes)
- During technical maneuvers (pivots, draws, rescue operations)
- When you need maximum stability (loading gear, switching places)
- In moving water
Changing Places While Afloat
Switching positions with your partner while the canoe is on the water is a skill you will need to demonstrate. It feels awkward at first, but it is manageable if you follow the right steps:
- Move to calm, sheltered water — do not attempt this in current or waves.
- Both paddlers kneel to lower the center of gravity.
- Stow paddles along the bottom of the canoe or across the gunwales so they do not get in the way.
- One paddler moves at a time while the other stays still and stabilizes the canoe.
- The moving paddler stays low — hands on the gunwales, moving along the centerline of the canoe. Do not stand up.
- Move past each other at the center of the canoe, keeping weight as low and centered as possible.
- Settle into the new position before the other paddler begins moving.
- Retrieve paddles and resume paddling.
You can now carry, launch, paddle, land, and switch positions in your canoe. Next comes a critical set of skills — what to do when things go sideways (literally).
Req 8a — Deep Water Exit & Reentry
There are situations where you may need to get out of a canoe in deep water — to help another paddler, to retrieve something, or during a rescue operation. The key is doing it without flipping the boat and without losing contact with the canoe.
Exiting the Canoe in Deep Water
- Communicate with your partner. Tell them what you are doing and make sure they are ready to stabilize the canoe.
- Move to the center of the canoe and lower yourself to a kneeling position if you are not already kneeling.
- Your partner shifts to the opposite side of the canoe to counterbalance your exit.
- Grip the gunwale on the side you are exiting from. Roll your body over the gunwale feet-first, lowering yourself into the water slowly.
- Keep one hand on the gunwale at all times. Never let go of the canoe. In deep water, the canoe is your flotation platform, your reference point, and your ride home.
- Once in the water, hold the gunwale and position yourself along the side of the canoe. Let your life jacket support you — do not try to pull yourself up immediately.
Reentering the Canoe from Deep Water
Getting back in is harder than getting out. The main challenge is climbing over the gunwale without capsizing the canoe on top of yourself and your partner.
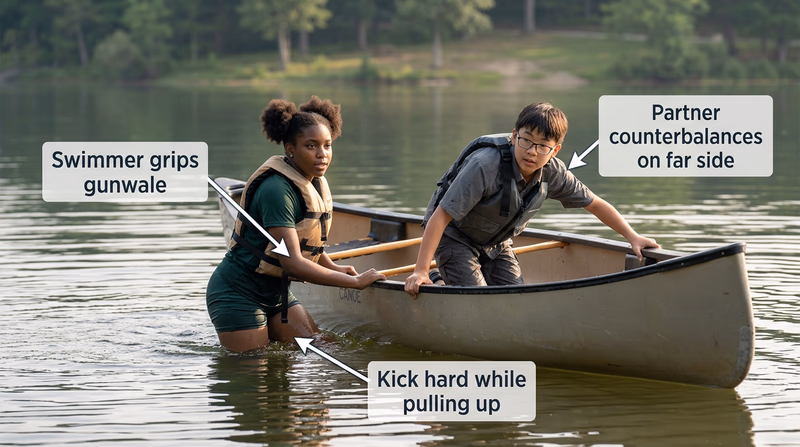
With Assistance from Your Partner
- Your partner moves to the opposite side of the canoe and leans their weight out over that gunwale, acting as a counterbalance. They may grip the far gunwale with both hands and lean over it.
- Position yourself alongside the canoe near the center (not at the ends), facing the canoe.
- Kick hard with your legs while pulling yourself up and over the near gunwale. Think of it like getting out of a swimming pool — a strong kick combined with an arm pull.
- Roll into the canoe belly-first, keeping your weight low. Do not try to swing a leg over — this raises your center of gravity and invites a capsize.
- Once your torso is over the gunwale, rotate and lower yourself to a kneeling or sitting position as quickly as possible.
- Stabilize the canoe before your partner shifts back to their normal position.
Using a Rescue Sling
If the canoe is equipped with a rescue sling (a loop of webbing hung over the side), the swimmer can step into it and use it as a foothold to boost themselves up and over the gunwale. This is especially helpful for smaller paddlers or when fatigue is a factor.
Practice Makes Perfect
This is a skill that feels awkward and difficult the first few times. Practice in calm, warm water with your counselor present. The more times you do it, the smoother and more confident it becomes. When you need this skill in a real situation, muscle memory will take over.
You can get out of and back into a canoe in deep water. Next, you will learn what happens when the canoe tips over completely — and why that is not as scary as it sounds.
Req 8b — Controlled Capsize
Capsizing — intentionally tipping your canoe over — is one of the most valuable exercises in this merit badge. It teaches you that a capsize is not a disaster. When you know what to expect, you can stay calm, stay with the boat, and take care of yourself and your partner.
Why Practice Capsizing?
Because it will happen eventually. Wind, waves, a clumsy move, or an unexpected obstacle can flip a canoe. Paddlers who have never capsized tend to panic. Paddlers who have practiced it stay calm — because they have been there before and they know what to do.
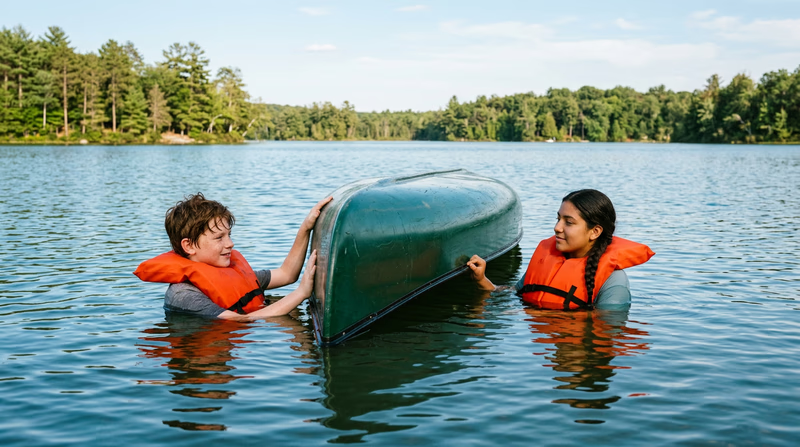
A capsized canoe still floats. Even swamped and upside down, a canoe provides significant flotation. Two paddlers can hold onto a capsized canoe and float indefinitely with their life jackets. It is almost always safer to stay with the boat than to try to swim to shore.
How to Perform a Controlled Capsize
- Choose calm, deep water — deep enough that you will not hit the bottom, calm enough that you can focus on technique.
- Secure or remove any loose gear so it does not become a hazard in the water.
- Both paddlers confirm they are ready. Life jackets must be properly fitted and secured.
- On a count of three, both paddlers lean to the same side. Shift your weight toward one gunwale until the canoe rolls over.
- As the canoe tips, tuck your chin and roll with it. Do not fight it — go with the motion.
- Surface and grab the canoe. Reach for the hull, gunwale, or any part of the canoe you can hold.
- Account for your partner immediately. Make eye contact and confirm they are okay.
Staying with the Capsized Canoe
Once both paddlers are in the water with the canoe, the priority is simple: do not leave the boat.
Why Stay with the Canoe?
- Flotation — A capsized canoe supports the weight of two paddlers easily. Even swamped, canoes made of aluminum, plastic, or fiberglass have enough buoyancy to keep you floating.
- Visibility — A canoe is much easier for rescuers to spot than a swimmer’s head in the water. Bright-colored hulls are visible from a distance.
- Rest — Holding the canoe and letting your life jacket support you conserves energy. Swimming to shore — especially in cold water, current, or waves — burns energy fast and can lead to exhaustion.
- Decision-making — Staying with the canoe gives you time to think, assess the situation, and wait for help or plan your next move.
How to Float with a Capsized Canoe
- Position yourselves on opposite ends of the overturned canoe — one at the bow, one at the stern.
- Hold the canoe by the gunwale, keel, or end grab. Relax your body and let the life jacket do the work.
- Kick gently if you need to move the canoe toward shore, but do not exhaust yourself.
- Communicate with your partner. Stay positive and talk through your plan.
You have capsized and stayed with your canoe. Next, you will learn how to get a swamped canoe to shore and empty it out.
Req 8c — Swamped Canoe Recovery
A swamped canoe — one that is full of water but still floating — is heavy and awkward, but it is not hopeless. You can move it to shallow water, drain it, and get back to paddling. This is a fundamental self-rescue skill that every canoeist needs.
Moving a Swamped Canoe
A canoe full of water weighs hundreds of pounds more than an empty one, but it still floats because the hull material itself is buoyant. Moving it requires patience and teamwork — brute force will just exhaust you.
Swimming and Pushing
- Position yourself at the stern of the swamped canoe.
- Hold the stern deck or gunwale with one or both hands.
- Kick with your legs using a flutter kick or scissor kick to propel yourself and the canoe forward.
- Your partner can help by pushing from the side or pulling from the bow using a painter.
- Aim for the nearest shallow area — a gently sloping beach or sandbar is ideal.
Towing
If you have a painter (bow line), your partner can swim ahead with the rope and tow while you push from behind. This distributes the effort and keeps the canoe moving in a straight line.
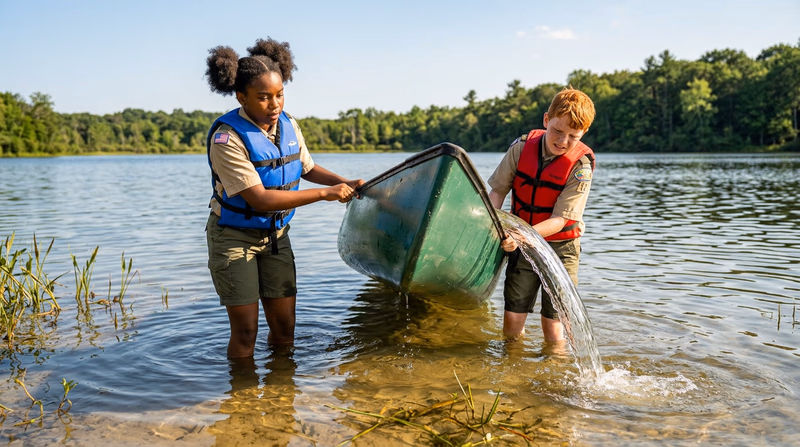
Emptying a Swamped Canoe in Shallow Water
Once you reach water that is about knee- to waist-deep, you can drain the canoe.
The Roll-Out Method
- Position the canoe broadside to you in shallow water (perpendicular to the shore is fine).
- Roll the canoe onto its side by lifting the near gunwale up and pushing the far gunwale down. Most of the water will pour out over the far side.
- Continue rolling the canoe completely upside down to drain the rest.
- Flip the canoe back upright. It should now be mostly empty — use a bailer or sponge to remove any remaining water.
The Lift-and-Drain Method
For lighter canoes, two people can lift one end high while the other end stays in the water. Water flows to the low end and pours out over the gunwale. Then set it down and repeat from the other end if needed.
Reentering in Shallow Water
Once the canoe is emptied and floating in shallow water, reentry is straightforward:
- Stabilize the canoe — one person holds the gunwale while the other boards.
- Step in at the center of the canoe, keeping your weight low over the keel line.
- Move to your seat while maintaining three points of contact (two hands on gunwales, feet on hull).
- Once the first paddler is settled, the second paddler boards.
- Use the bailer or sponge to remove any last water before paddling out.
You can recover your own swamped canoe. But what if another canoe capsizes near you? Next, you will learn the canoe-over-canoe rescue — how to help others from your own boat.
Req 8d — Deep Water Canoe Rescue
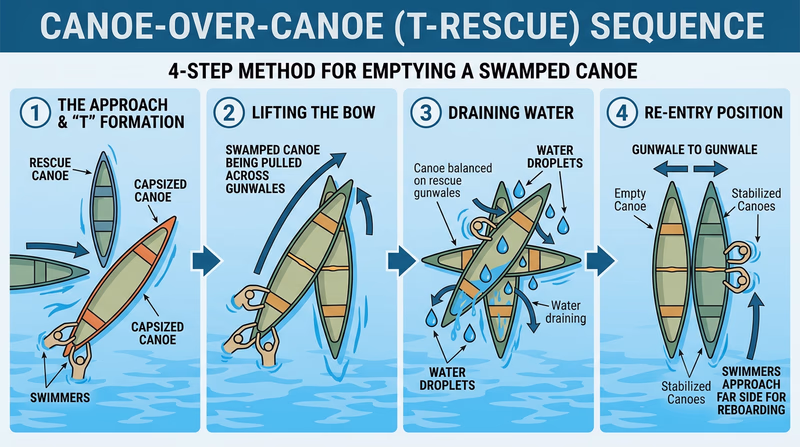
The canoe-over-canoe rescue (also called the T-rescue) is the classic deep-water technique for emptying a capsized or swamped canoe without going to shore. You perform it from your own canoe while the other paddlers float in the water. It is a team effort that requires communication, coordination, and practice.
Step 1: Approach and Assess
When you see a capsized canoe with paddlers in the water:
- Paddle to the scene quickly but calmly. Approach perpendicular (at a right angle) to the capsized canoe.
- Check on the swimmers first. Before touching the swamped canoe, make sure both paddlers are conscious, breathing, and not injured. Ask: “Are you okay? Is anyone hurt?”
- If anyone needs immediate help (unconscious, panicking, or injured), prioritize the swimmer rescue (see Requirement 8e) before dealing with the canoe.
- Direct the swimmers to hold onto the far end of their capsized canoe. This keeps them supported and out of the way during the rescue.
Step 2: Position for the T-Rescue
- Approach the capsized canoe broadside so the two canoes form a T shape — your canoe is the crossbar, their canoe is the stem.
- If the swamped canoe is upside down, the swimmers can flip it right-side up first. Or you can roll it during the next step. Either approach works.
- Your partner stabilizes your canoe by leaning to the opposite side as a counterbalance while you do the lifting.
Step 3: Lift and Drain
This is the physically demanding part:
- Grab the bow (or stern) of the swamped canoe and begin pulling it up and across your gunwales.
- Pull it across your canoe perpendicular to your gunwales — the swamped canoe slides across your canoe like a seesaw, with the center of the swamped canoe resting on your gunwales.
- As the canoe comes out of the water, it drains. Rock it gently back and forth to get the last of the water out.
- Slide the now-empty canoe back into the water right-side up, parallel to your canoe. The two canoes should be side by side, gunwale to gunwale.
Step 4: Stabilize for Reentry
- Hold the two canoes together gunwale to gunwale. Both you and your partner grip the gunwales of both canoes. This creates a very stable platform.
- Direct the swimmers to approach the far side of their now-empty canoe.
- One swimmer at a time reenters their canoe by pulling themselves over the far gunwale (the side away from your canoe). They enter near the center of the canoe, keeping weight low.
- The counterbalance from your canoe prevents the empty canoe from tipping as the swimmers climb in.
- Once both paddlers are aboard and settled, release the canoes and separate.
Communication During the Rescue
Clear communication makes this rescue work smoothly:
- Rescue canoe: “Are you both okay? Hold the far end of your canoe.”
- Rescue canoe: “I am going to pull your canoe across ours. Stay clear.”
- Rescue canoe: “Your canoe is drained. Come around to the far side.”
- Rescue canoe: “One at a time — climb in at the center, stay low.”
- Rescue canoe: “You are in. We are going to let go now.”
You can rescue a swamped canoe and its crew from deep water. Next, you will learn how to rescue a swimmer from your canoe.
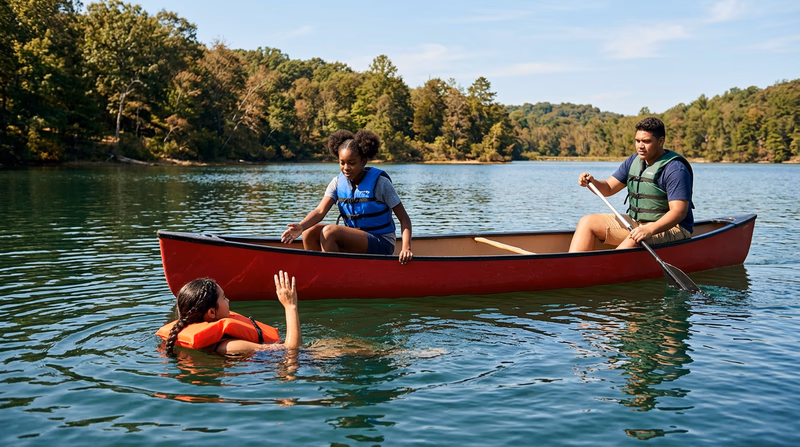
Req 8e — Swimmer Rescue from Canoe
A swimmer in the water — whether they fell out of their own boat, jumped in to cool off and got into trouble, or capsized a watercraft — needs to be rescued efficiently without capsizing your canoe in the process. This skill bridges canoe handling with water rescue.
Approach the Swimmer
- Assess the situation before you paddle over. Is the swimmer calm or panicking? Are they injured? Are there hazards (current, other boats, obstacles) between you and them?
- Approach from downwind or downstream if possible. This gives you more control as you get close — you can slow down naturally rather than fighting to hold position.
- Approach the swimmer from the side, not head-on. You do not want to hit them with the bow.
- Communicate clearly. Call out: “We are coming to get you. Stay calm. We are going to bring you alongside.”
Position the Canoe
- Bring the canoe alongside the swimmer so the swimmer is at the center of the canoe (near the widest, most stable point).
- Both paddlers shift their weight to the far side of the canoe to counterbalance the swimmer’s weight as they come aboard.
- If using a rescue sling, lower it over the near side so the swimmer can step into it.
Get the Swimmer Aboard
Method 1: Stern Pickup
This is the most stable approach:
- Position the swimmer at the stern of the canoe, facing the transom.
- The swimmer grabs the stern gunwales with both hands.
- On a count, the swimmer kicks hard and pulls themselves up and over the stern, belly-first.
- The bow paddler leans forward to counterbalance the weight at the stern.
- The swimmer rolls into the canoe and moves to a stable position.
Method 2: Side Pickup
Use when the swimmer is alongside the canoe:
- The counterbalancing paddler leans hard to the far side, lowering that gunwale toward the water and raising the near gunwale slightly.
- The swimmer grabs the near gunwale at the center of the canoe.
- On a count, the swimmer kicks and pulls over the near gunwale while the paddler counterbalances.
- The swimmer rolls in belly-first, keeping low, and immediately moves to the center of the canoe.
Method 3: Paddle Bridge
If the swimmer cannot pull themselves in:
- Extend a paddle across the canoe with the blade resting on the far gunwale and the grip extending over the near gunwale toward the swimmer.
- The swimmer grabs the paddle shaft and uses it as a rail to pull themselves up and over the gunwale.
- Counterbalance from the opposite side throughout.
After the Rescue
- Check the swimmer for signs of cold-water shock, hypothermia, or injury. Wrap them in a dry layer if available.
- Position the rescued swimmer low in the center of the canoe for maximum stability.
- Paddle to shore as directly as possible. A three-person canoe is less stable and harder to maneuver.
- If the swimmer’s canoe is still in the water, decide whether to tow it or return for it after reaching shore.
You can rescue a swimmer from the water using your canoe. For the final rescue skill, you will learn how to use a throw bag from shore — one of the most effective tools in water rescue.
Req 8f — Throw Bag Rescue
A throw bag is one of the simplest and most effective rescue tools in paddlesports. It is a nylon bag filled with coiled rope. You hold the free end, throw the bag to a swimmer, and the rope pays out in flight. When it works — and with practice, it works reliably — you can get a line to a swimmer 30 feet or more away in seconds.
How to Throw a Throw Bag
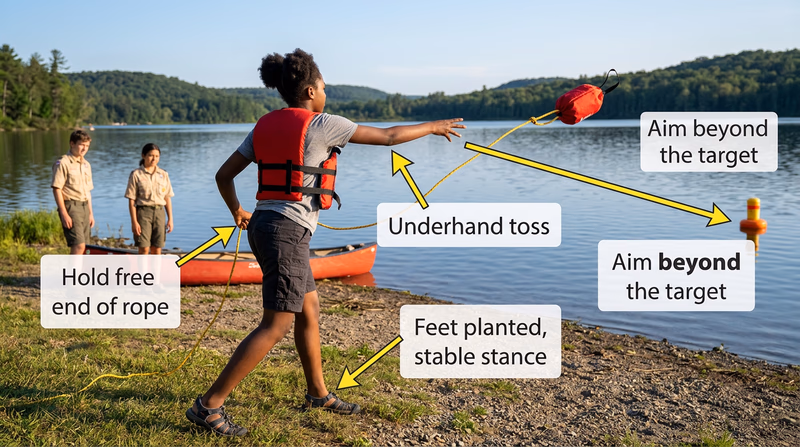
Setup
- Open the bag and grab a firm grip on the free end of the rope (the end that is not stuffed inside the bag). Some throw bags have a loop on the free end — put your wrist through the loop or tie it off to something solid on shore.
- Hold the bag in your throwing hand by the top, with the opening facing the swimmer.
- Plant your feet in a stable stance — one foot forward, shoulder-width apart, facing the swimmer.
The Throw
- Make eye contact with the swimmer and shout: “ROPE!” This alerts them to look for the incoming line.
- Throw underhand — swing the bag from behind your hip, forward and upward, releasing it toward the swimmer in a smooth arc.
- Aim slightly beyond and to the side of the swimmer. It is easier for a swimmer to grab a rope that lands across them than one that falls short.
- Follow through with your arm pointing toward the target, like bowling.
- Brace yourself for the pull. When the swimmer grabs the rope, the current (if any) and the swimmer’s weight will pull on you. Bend your knees and lean back.
For the Swimmer
The swimmer should:
- Grab the rope (not the bag — the bag is hard to grip when wet).
- Roll onto their back facing upstream (if in current) and hold the rope to their chest.
- Let the rescuer pendulum them to shore. The current swings them in an arc toward the bank.
- On calm water, the rescuer simply pulls them in hand-over-hand.
If You Miss
Throw bags are designed for a second throw:
- Do not try to stuff the rope back in the bag. There is no time.
- Coil the rope quickly in large loops in your throwing hand.
- Throw the coiled rope directly at the swimmer using the same underhand motion. The loose coils will spread out, giving the swimmer more rope to grab.
This is why practice matters. Your first throw should be accurate — but knowing the backup technique gives you confidence.
How to Repack a Throw Bag
After use, the rope must be repacked correctly so it deploys cleanly next time. A tangled throw bag is useless in an emergency.
- Open the bag wide and hold it upright with the opening facing you.
- Feed the rope in one arm-length at a time, stuffing it loosely into the bag. Do not coil it — just stuff. Coiling creates twists that cause tangles during the throw.
- Let the rope fall naturally into the bag in random folds. The bag’s shape will organize it well enough.
- Leave about 3 feet of rope outside the bag — this is the free end you hold when throwing.
- Close the bag or cinch the drawstring.
- Test it. If you can pull the rope out smoothly, it is packed correctly.
Meeting the Requirement
You need to land the rope within 3 feet of a conscious swimmer at 30 feet. That is a 6-foot target zone — achievable with practice. Here is how to prepare:
- Practice 10–15 throws per session from 30 feet. Track your accuracy.
- Practice from different stances — flat ground, a slope, a dock edge.
- Practice with wet rope — wet rope is heavier and flies differently.
- Practice the backup coil throw at least a few times. If your first throw misses during the test, you need the backup to be ready.
Throw Bag Practice Drill
Run through these before your counselor evaluation- Set a target at 30 feet: Use a buoy, a floating cushion, or a friend treading water.
- Throw 10 times from a stable stance: Count how many land within 3 feet.
- Practice the backup coil throw: At least 3 times after a missed first throw.
- Repack the bag after every throw: Build the habit.
- Practice with wet rope: It handles differently — get used to it.
You now have the full suite of rescue skills — from deep-water exit to canoe-over-canoe rescue to throw bag technique. Time to put your paddle skills to the test with tandem maneuvers.
Req 9 — Tandem Maneuvers
This requirement covers eight tandem maneuvers that put everything you have learned together. You and your partner will demonstrate these while paddling on opposite sides without switching, from both bow and stern positions. These are the strokes that make a canoe do exactly what you want it to do.
Before diving into each maneuver, you need to understand the individual strokes that make them work.
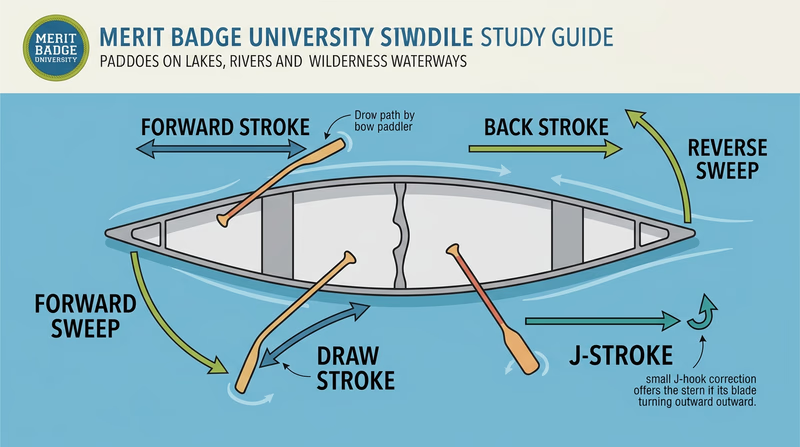
The Core Strokes
Forward Stroke
The foundation of paddling. Plant the blade fully in the water near the bow, pull straight back along the gunwale, and exit the blade at your hip. Keep the shaft vertical for maximum power. Your upper hand pushes forward while your lower hand pulls back.
Back Stroke (Reverse Stroke)
The forward stroke in reverse. Plant the blade at your hip and push forward toward the bow. Used for stopping and moving backward.
Draw Stroke
Pulls the canoe sideways toward your paddle. Reach out to the side (away from the canoe), plant the blade parallel to the keel line, and pull it straight toward you. Slice the blade back out through the water (or lift it out) and repeat.
Pushaway Stroke (Pry)
The opposite of the draw. Start with the blade alongside the canoe, near the hull, and push it away from the canoe. This moves the canoe away from your paddle side.
Forward Sweep
A wide, arcing stroke that starts at the bow and sweeps outward in a half-circle to the stern. Used to turn the canoe. In the bow, a forward sweep turns the canoe away from your paddle side. In the stern, a forward sweep turns the canoe toward your paddle side.
Reverse Sweep
The forward sweep in reverse — a wide arc from stern to bow. In the bow, a reverse sweep turns the canoe toward your paddle side.
J-Stroke
The essential stern steering stroke. Begin with a normal forward stroke, but at the end, rotate the blade outward and push away from the hull in a small “J” shape. This corrects the canoe’s natural tendency to turn away from the stern paddler’s stroke side. Keeps the canoe tracking straight without switching sides.
Thumb-Down Rudder Stroke
An alternative steering stroke for the stern. After a forward stroke, rotate your thumb down on the grip and trail the blade behind you at an angle, using it as a rudder. A slight push outward (stern pry) adds additional correction. Some paddlers find this more natural than the J-stroke.
The Eight Maneuvers
9a — Pivot (Spin) 180°
What you do: From a standstill, spin the canoe 180° to the right, stop, then spin 180° back to the left — staying within 2 boat lengths of your starting position.
How it works:
- To pivot right: The bow paddler (paddling on the left) does a forward sweep while the stern paddler (paddling on the right) does a reverse sweep. Or, the bow paddler draws while the stern paddler does a pushaway. Both actions rotate the canoe clockwise.
- To pivot left: Reverse the strokes. The bow paddler does a reverse sweep (or pushaway) and the stern paddler does a forward sweep (or draw).
- Stay in place: Keep the strokes balanced so the canoe spins around its center without drifting forward or backward.
9b — Move Sideways (Abeam)
What you do: Move the canoe sideways 10 feet in one direction, then return to the starting position. The canoe stays parallel to its original orientation — no turning.
How it works:
- Both paddlers use draw strokes on the same side to pull the canoe that direction. Or, one draws while the other pushes away — both moving the canoe the same way.
- To return: Switch — the paddler who was drawing now does a pushaway, and the other draws.
- Keep the canoe straight. If the bow or stern starts to lead, one paddler adjusts their stroke power or angle.
9c — Emergency Stop
What you do: While paddling forward, stop the canoe within two boat lengths using the backstroke.
How it works:
- Both paddlers simultaneously switch to backstrokes — planting the blade in front and pushing water forward.
- Lean forward slightly as the canoe decelerates to maintain balance.
- Keep strokes in unison so the canoe stops straight rather than spinning.
9d — Straight Line (Stern Only)
What you do: From the stern position, paddle in a straight line for 15–20 boat lengths without help from the bow paddler. Use the J-stroke or thumb-down rudder with or without a stern pry.
How it works:
- This tests your ability to steer from the stern while providing your own power.
- After each forward stroke, apply a J-stroke correction (or a thumb-down rudder) to keep the canoe from veering.
- The correction should be subtle — large corrections waste energy and slow you down.
9e — Straight Line (Tandem)
What you do: Paddle in a straight line for 15–20 boat lengths with the bow paddler using forward strokes, draws, or forward sweeps, and the stern paddler steering with a J-stroke or thumb-down rudder.
How it works:
- The bow provides power with forward strokes. If the canoe drifts off course, the bow can add a slight draw or forward sweep to pull the bow back in line.
- The stern provides power and steering using the J-stroke or rudder stroke.
- This is how you actually paddle a canoe across a lake — it is the everyday tandem technique.
9f — 90° Turn in an Arc
What you do: While paddling forward, turn the canoe 90° to the right in an arc covering 5–10 boat lengths. The bow uses a draw or forward sweep; the stern uses only the forward stroke. Then repeat turning 90° to the left.
How it works:
- Turning right (when the bow paddles left): The bow paddler applies a draw stroke or forward sweep that pulls the bow to the right. The stern paddler keeps paddling forward — their strokes on the right side naturally help the turn.
- Turning left: The bow paddler switches technique to push the bow left (forward sweep on the right, or draw if paddling on the right side).
- The key is a smooth, gradual turn — not a sharp pivot. Think of tracing a wide curve on the water.
9g — Paddle Backward
What you do: Move the canoe backward in a straight line for 3–4 boat lengths using backstrokes, reverse sweeps, or draws.
How it works:
- Both paddlers use backstrokes — pushing water forward from the hip to the bow.
- Reverse sweeps help keep the canoe straight while backing up.
- The bow paddler (now effectively the “stern” since you are moving backward) is responsible for steering during reverse.
- Moving backward is awkward because you cannot see where you are going. Turn your head and look over your shoulder.
9h — Figure Eight
What you do: Complete a figure-eight course around two markers set 3–4 boat lengths apart.
How it works:
- This combines everything — forward strokes for speed, draw strokes and sweeps for turning, and J-strokes for tracking between turns.
- Plan your arcs. Approach each marker with enough room to make a smooth turn. Cutting it too close forces a tight spin that kills your momentum.
- Communicate. The bow and stern need to coordinate their strokes — especially when transitioning from a right turn into a left turn (or vice versa).
- This maneuver demonstrates your overall canoe control — it is the final exam of tandem skills.
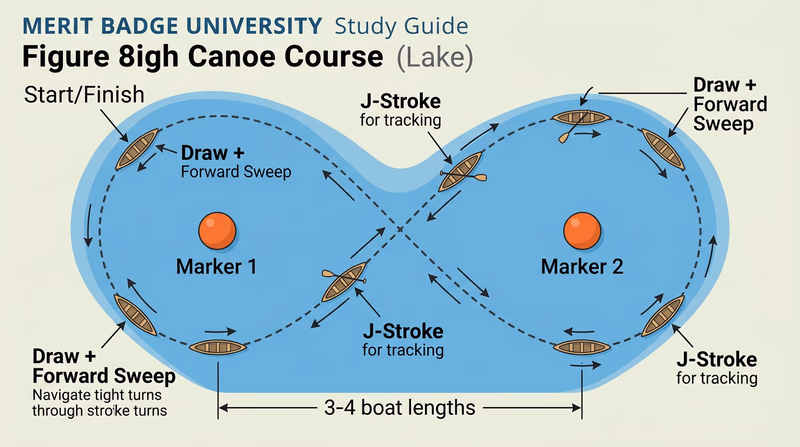
Tips for All Maneuvers
Tandem Maneuver Keys
Keep these in mind for every skill- Paddle in unison: Match your partner’s stroke rate and timing.
- Communicate: Call out strokes and transitions. “Draw.” “Sweep.” “Stop.”
- Stay on opposite sides: Do not switch paddle sides during a maneuver.
- Demonstrate from both positions: Bow and stern, both sides of the canoe.
- Keep the canoe trimmed: Your weight should keep the canoe level bow to stern.
- Stay low: Kneeling gives you more stability during technical maneuvers.
You have mastered the strokes, the maneuvers, and the rescues. You are a canoeist. But there is always more to explore — read on for ways to take your paddling further.
Extended Learning
A. Congratulations, Paddler
You have earned the Canoeing merit badge — and with it, a set of skills that people have relied on for thousands of years. You can launch and land a canoe, handle it with precision, rescue a capsized crew, and navigate open water with your partner. That is no small thing. But there is a whole world of paddling beyond the requirements, and it is waiting for you.
B. Planning Your First Canoe Trip
The Canoeing merit badge teaches you how to handle a canoe. A canoe trip teaches you how to live from one. Multi-day canoe trips combine paddling with backcountry camping, and they are one of the most rewarding outdoor experiences available to Scouts.
Choosing Your Route
Start with an established canoe route that has designated campsites. State and national parks with canoe trails publish maps showing distances, portages, and campsite locations. Look for routes with:
- Short daily distances for your first trip — 6 to 10 miles per day is plenty when you are also setting up camp, cooking, and portaging.
- Minimal portages until you are comfortable carrying a canoe and gear overland. Each portage requires multiple trips between water and trail.
- Known water conditions — calm lakes and slow rivers. Save moving water for after you have more experience.
Packing a Canoe for a Trip
Everything must fit in the canoe and stay dry. Use dry bags or waterproof containers for clothing, sleeping gear, and electronics. Pack heavy items low and centered in the canoe to keep the center of gravity stable. Secure all gear so nothing shifts during paddling or falls out during a capsize.
A typical packing order from bottom to top:
- Heavy items (food barrel, water jugs, cook kit) — centered on the hull bottom
- Sleeping gear (tent, sleeping bag in dry bags) — on top of heavy items
- Clothing and personal items — in dry bags, tucked along the sides
- Day-access items (snacks, water bottles, rain gear, map, sunscreen) — on top, within arm’s reach
Portaging
Portaging — carrying your canoe and gear overland between waterways — is the reality of wilderness canoeing. Most canoeists use the center thwart or yoke to carry the canoe inverted on their shoulders. Gear goes in packs (backpacks or specially designed portage packs called Duluth packs).
The standard approach: carry the canoe on one trip, come back for the packs, then carry the packs on a second trip. If your portage trail is short, you may be able to do everything in one trip by wearing a pack while carrying the canoe.
C. Reading Water and River Canoeing
Flatwater skills are the foundation, but rivers add a whole new dimension. Moving water has its own logic — understanding it is the key to safe and enjoyable river paddling.
Current and Eddies
A river’s current is fastest in the center and slower along the edges. Eddies are pockets of calm water that form behind obstacles like rocks and bridge pilings. The current actually reverses in an eddy, flowing upstream. Eddies are your rest stops, your parking spots, and your staging areas for scouting the next stretch of river.
Learning to “eddy turn” — paddling out of the main current into an eddy — is one of the first skills river canoeists develop. You cross the eddy line (the boundary between downstream current and upstream eddy flow) at an angle with forward momentum, and the eddy’s reverse current spins your canoe to face upstream.
Reading the Surface
Moving water communicates through its surface:
- Smooth, dark water — Usually deep. Safe passage.
- V-shapes pointing downstream — The V points to a clear channel between obstacles. Paddle through the point of the V.
- V-shapes pointing upstream — An obstacle (rock, log) just below the surface. The V’s point shows you where the hazard is.
- White, turbulent water — The river is flowing over or around shallow obstacles. May be navigable or may require portaging, depending on depth and severity.
- Horizon line — The water appears to disappear. This means a drop-off, ledge, or dam ahead. Pull over and scout from shore before proceeding.
River Classification
Rivers are classified on a scale from Class I (easy) to Class VI (extreme):
| Class | Description | Canoeing Suitability |
|---|---|---|
| I | Easy — small waves, few obstructions | Good for beginners with basic skills |
| II | Novice — straightforward rapids, wide channels | Intermediate canoeists with rescue skills |
| III | Intermediate — irregular waves, strong eddies | Experienced canoeists with whitewater training |
| IV–VI | Advanced to Expert | Beyond open canoe capability for most paddlers |
D. Canoe-Based Citizen Science
Your canoe gives you access to places most people never see — and that makes you a valuable contributor to environmental monitoring. Several citizen science programs welcome data from paddlers.
Water quality monitoring programs let you test pH, dissolved oxygen, turbidity, and temperature at locations along your route. Organizations like the Izaak Walton League run volunteer water monitoring networks across the country. Your data helps scientists track the health of rivers and lakes over time.
Invasive species reporting is another way paddlers contribute. You are often the first to notice invasive plants (like Eurasian watermilfoil) or animals (like zebra mussels) in waterways. Many states have apps and hotlines for reporting sightings.
Bird and wildlife surveys are a natural fit for canoe trips. Canoeing is quiet — you can get closer to wildlife than hikers or motorboaters can. Programs like eBird (from the Cornell Lab of Ornithology) accept sightings from anywhere, and your observations from remote waterways are especially valuable because few other observers reach those areas.
E. Real-World Experiences
Boundary Waters Canoe Area Wilderness Over one million acres and 1,100 lakes in northeastern Minnesota — the premier canoe trip destination in the United States. Permits are required. Plan well in advance. Link: Boundary Waters Canoe Area Wilderness — https://www.fs.usda.gov/recarea/superior/recarea/?recid=84168 Everglades National Park — Wilderness Waterway A 99-mile canoe trail through Florida's Everglades, winding through mangrove tunnels, open bays, and coastal waterways. A completely different canoeing environment than northern lakes. Link: Everglades National Park — Wilderness Waterway — https://www.nps.gov/ever/planyourvisit/canoeing-and-kayaking.htm National Park Service — Paddling Trails NPS guide to paddling opportunities across national parks and waterways throughout the United States. Link: National Park Service — Paddling Trails — https://www.nps.gov/subjects/rivers/paddling.htm Attend a Canoe Skills Clinic The American Canoe Association offers paddlesport instruction programs ranging from beginner to advanced. Find a course near you to take your skills to the next level. Link: Attend a Canoe Skills Clinic — https://americancanoe.org/education/F. Organizations
American Canoe Association (ACA) The national governing body for paddlesports in the United States. Offers certification courses, safety programs, and a network of local clubs. The ACA is the best resource for continuing your paddling education. Link: American Canoe Association (ACA) — https://americancanoe.org/ Leave No Trace Center for Outdoor Ethics The seven principles of Leave No Trace apply directly to canoe camping — from campsite selection to waste disposal to minimizing your impact on waterways. Link: Leave No Trace Center for Outdoor Ethics — https://lnt.org/ Izaak Walton League of America A conservation organization focused on clean water, healthy habitats, and outdoor recreation. Their Save Our Streams program is a great way to combine paddling with environmental stewardship. Link: Izaak Walton League of America — https://www.iwla.org/ National Oceanic and Atmospheric Administration (NOAA) — Water Safety NOAA provides weather forecasts, water condition reports, and safety information critical for planning paddling trips on lakes and coastal waterways. Link: National Oceanic and Atmospheric Administration (NOAA) — Water Safety — https://www.weather.gov/safety/ripcurrent US Fish and Wildlife Service — National Wildlife Refuges Many national wildlife refuges have canoe trails and paddling opportunities. Combine your canoeing skills with wildlife observation in protected habitats. Link: US Fish and Wildlife Service — National Wildlife Refuges — https://www.fws.gov/refuges/