Req 8f — Throw Bag Rescue
A throw bag is one of the simplest and most effective rescue tools in paddlesports. It is a nylon bag filled with coiled rope. You hold the free end, throw the bag to a swimmer, and the rope pays out in flight. When it works — and with practice, it works reliably — you can get a line to a swimmer 30 feet or more away in seconds.
How to Throw a Throw Bag
Setup
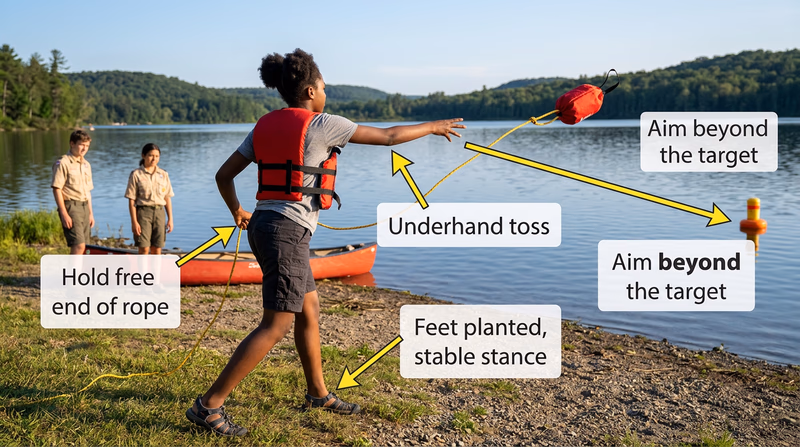
- Open the bag and grab a firm grip on the free end of the rope (the end that is not stuffed inside the bag). Some throw bags have a loop on the free end — put your wrist through the loop or tie it off to something solid on shore.
- Hold the bag in your throwing hand by the top, with the opening facing the swimmer.
- Plant your feet in a stable stance — one foot forward, shoulder-width apart, facing the swimmer.
The Throw
- Make eye contact with the swimmer and shout: “ROPE!” This alerts them to look for the incoming line.
- Throw underhand — swing the bag from behind your hip, forward and upward, releasing it toward the swimmer in a smooth arc.
- Aim slightly beyond and to the side of the swimmer. It is easier for a swimmer to grab a rope that lands across them than one that falls short.
- Follow through with your arm pointing toward the target, like bowling.
- Brace yourself for the pull. When the swimmer grabs the rope, the current (if any) and the swimmer’s weight will pull on you. Bend your knees and lean back.
For the Swimmer
The swimmer should:
- Grab the rope (not the bag — the bag is hard to grip when wet).
- Roll onto their back facing upstream (if in current) and hold the rope to their chest.
- Let the rescuer pendulum them to shore. The current swings them in an arc toward the bank.
- On calm water, the rescuer simply pulls them in hand-over-hand.
If You Miss
Throw bags are designed for a second throw:
- Do not try to stuff the rope back in the bag. There is no time.
- Coil the rope quickly in large loops in your throwing hand.
- Throw the coiled rope directly at the swimmer using the same underhand motion. The loose coils will spread out, giving the swimmer more rope to grab.
This is why practice matters. Your first throw should be accurate — but knowing the backup technique gives you confidence.
How to Repack a Throw Bag
After use, the rope must be repacked correctly so it deploys cleanly next time. A tangled throw bag is useless in an emergency.
- Open the bag wide and hold it upright with the opening facing you.
- Feed the rope in one arm-length at a time, stuffing it loosely into the bag. Do not coil it — just stuff. Coiling creates twists that cause tangles during the throw.
- Let the rope fall naturally into the bag in random folds. The bag’s shape will organize it well enough.
- Leave about 3 feet of rope outside the bag — this is the free end you hold when throwing.
- Close the bag or cinch the drawstring.
- Test it. If you can pull the rope out smoothly, it is packed correctly.
Meeting the Requirement
You need to land the rope within 3 feet of a conscious swimmer at 30 feet. That is a 6-foot target zone — achievable with practice. Here is how to prepare:
- Practice 10–15 throws per session from 30 feet. Track your accuracy.
- Practice from different stances — flat ground, a slope, a dock edge.
- Practice with wet rope — wet rope is heavier and flies differently.
- Practice the backup coil throw at least a few times. If your first throw misses during the test, you need the backup to be ready.
Throw Bag Practice Drill
Run through these before your counselor evaluation
- Set a target at 30 feet: Use a buoy, a floating cushion, or a friend treading water.
- Throw 10 times from a stable stance: Count how many land within 3 feet.
- Practice the backup coil throw: At least 3 times after a missed first throw.
- Repack the bag after every throw: Build the habit.
- Practice with wet rope: It handles differently — get used to it.
You now have the full suite of rescue skills — from deep-water exit to canoe-over-canoe rescue to throw bag technique. Time to put your paddle skills to the test with tandem maneuvers.