Chemistry Merit Badge — Complete Digital Resource Guide
https://merit-badge.university/merit-badges/chemistry/guide/
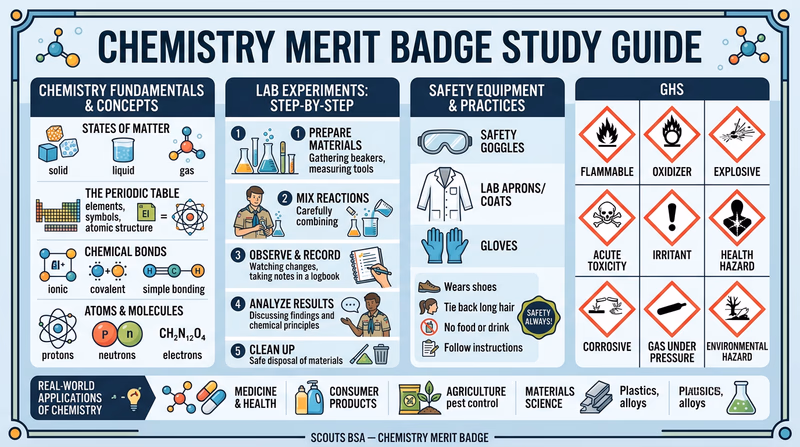
Introduction & Overview
Everything around you is chemistry. The water you drink, the food you eat, the clothes you wear, the phone in your pocket — all of it exists because of chemical reactions and the properties of matter. The Chemistry merit badge pulls back the curtain on how the world works at the molecular level, and once you start seeing chemistry in everyday life, you will never look at things the same way again.
This guide will walk you through each requirement, giving you the background knowledge, hands-on experiment tips, and real-world connections you need to earn this badge with confidence.
Then and Now
Then — The Age of Alchemy
Long before chemistry was a science, it was a mystery. Ancient alchemists in Egypt, China, and the Middle East spent centuries mixing substances in search of the “philosopher’s stone” — a legendary material they believed could turn lead into gold and grant eternal life. They never found it, but along the way they discovered real things: how to distill liquids, extract metals from ore, and create dyes, inks, and medicines.
- Key figure: Antoine Lavoisier (1743–1794), often called the “Father of Modern Chemistry,” proved that burning was a chemical reaction with oxygen — not a magical substance called “phlogiston.” He also established the law of conservation of mass: matter is never created or destroyed, only rearranged.
- Mindset: Trial and error, secrecy, a blend of science and superstition
Now — Chemistry Everywhere
Today, chemistry is one of the most important sciences on the planet. Chemists develop life-saving medicines, create stronger and lighter materials, design cleaner energy sources, and figure out how to clean up pollution. The COVID-19 vaccines were developed using chemistry and biochemistry. Biodegradable plastics, water purification systems, and even the flavor of your favorite snack — all chemistry.
- Key breakthroughs: mRNA vaccines, biodegradable polymers, lithium-ion batteries, water desalination membranes
- Mindset: Solve real-world problems, from human health to climate change
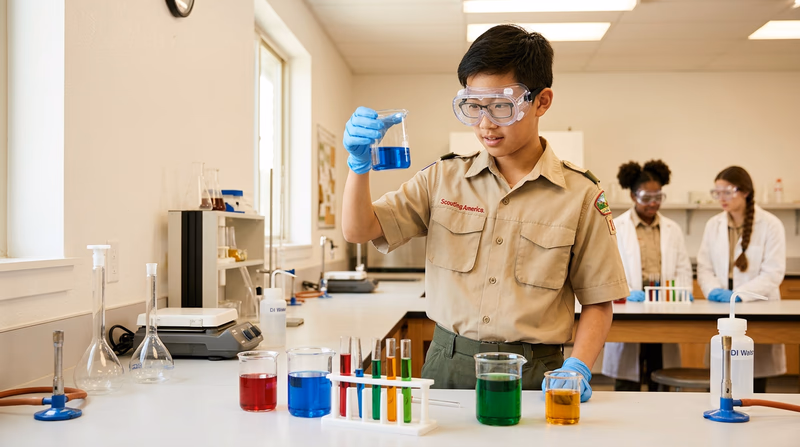
Get Ready! Chemistry is not just beakers and lab coats — it is the science of everything. By the time you finish this badge, you will have conducted real experiments, learned to read safety documents like a pro, and discovered how chemistry connects to cooking, camping, first aid, and the environment.
Kinds of Chemistry
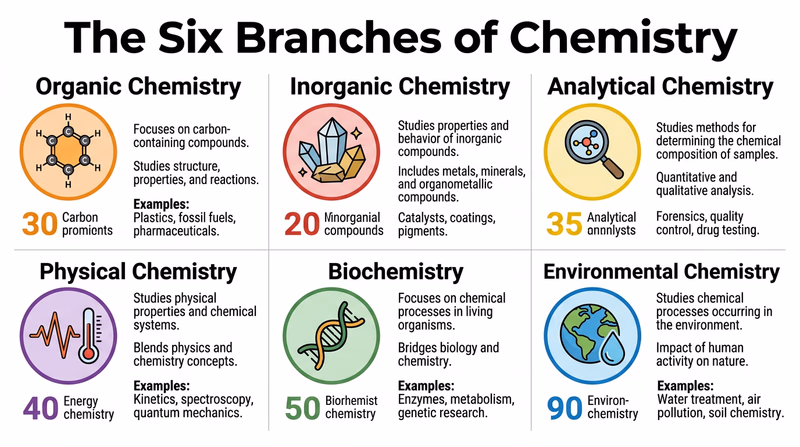
Chemistry is a big field, and scientists have divided it into several branches. Here is a look at the major areas you will encounter as you work through this merit badge.
Organic Chemistry
Organic chemistry studies molecules built around carbon atoms. Carbon is special because it can form long chains and rings, creating an enormous variety of compounds. Everything from the sugar in your cereal to the plastic in your water bottle to the DNA in your cells is organic chemistry.
Inorganic Chemistry
Inorganic chemistry covers everything that is not carbon-based — metals, minerals, salts, and ceramics. The iron in a bridge, the silicon in a computer chip, and the calcium in your bones all fall under inorganic chemistry.
Analytical Chemistry
Analytical chemists are detectives. They figure out what substances are made of and how much of each ingredient is present. When a water treatment plant tests for lead, or a forensic lab analyzes evidence from a crime scene, that is analytical chemistry in action.
Physical Chemistry
Physical chemistry explores why reactions happen and how energy flows during them. Why does ice melt? Why do some reactions release heat while others absorb it? Physical chemists use math and physics to answer these questions.
Biochemistry
Biochemistry is where chemistry meets biology. It studies the chemical processes inside living things — how your body breaks down food for energy, how plants convert sunlight into sugar, and how medicines interact with your cells.
Environmental Chemistry
Environmental chemistry looks at how chemicals move through air, water, and soil — and what happens when pollutants enter those systems. Environmental chemists work on cleaning up contaminated sites, developing greener products, and understanding climate change.
Now that you know what chemistry is all about, it is time to start with the foundation of every safe experiment — understanding chemical hazards and how to protect yourself.
Req 1a — Safety Data Sheets
Before you pick up a single beaker or light a single burner, you need to know how to handle chemicals safely. That starts with one of the most important documents in all of chemistry: the Safety Data Sheet, or SDS.
What Is a Safety Data Sheet?
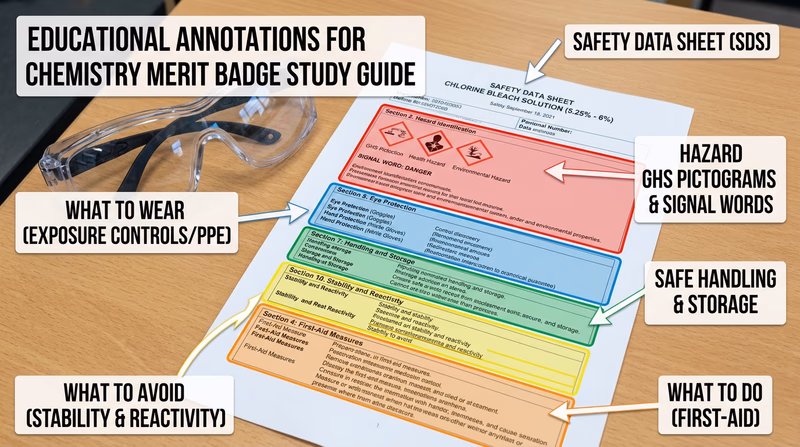
An SDS is a detailed document that tells you everything you need to know about a chemical substance — what it is, what dangers it poses, how to handle it safely, and what to do if something goes wrong. Every chemical sold for commercial or industrial use is required to have one. You can usually find an SDS by searching the product name plus “SDS” online.
The 16 Sections of an SDS
Every SDS is organized into exactly 16 sections. You do not need to memorize all of them, but knowing the key ones will help you work with any chemical confidently:
- Identification — Product name and manufacturer
- Hazard(s) identification — Danger level, pictograms, and signal words
- Composition/ingredients — What the chemical is made of
- First-aid measures — What to do if someone is exposed
- Fire-fighting measures — How to handle fires involving this chemical
- Accidental release measures — How to clean up spills
- Handling and storage — Safe practices for use and storage
- Exposure controls/PPE — What protective equipment to wear
- Physical and chemical properties — Appearance, odor, boiling point, etc.
- Stability and reactivity — What conditions could make it dangerous
- Toxicological information — Health effects of exposure
- Ecological information — Environmental impact
- Disposal considerations — How to dispose of it safely
- Transport information — Shipping rules
- Regulatory information — Laws and regulations
- Other information — Anything else you should know
Comparing Three Common Chemicals
For this requirement, you need to obtain and compare the SDS for three substances: sucrose (table sugar), isopropyl alcohol (rubbing alcohol), and a waterproofing spray. Here is what to look for as you compare them:
Sucrose (Table Sugar)
Sugar is about as safe as chemicals get. Its SDS will show:
- Hazards: Very low. Sugar is not toxic, not flammable under normal conditions, and not corrosive. The main hazard is dust — fine sugar dust in the air can irritate eyes and lungs.
- Handling: No special precautions beyond basic hygiene (wash hands after handling).
- Disposal: Can be disposed of as regular waste or dissolved in water.
Isopropyl Alcohol (Rubbing Alcohol)
Rubbing alcohol is much more hazardous than sugar:
- Hazards: Flammable liquid and vapor. Can cause eye irritation and drowsiness if inhaled in large amounts. Harmful if swallowed.
- Handling: Keep away from heat, sparks, and open flames. Use in well-ventilated areas.
- Disposal: Cannot be poured down the drain in large quantities. Follow local hazardous waste guidelines.
Waterproofing Spray
Waterproofing sprays are typically the most hazardous of the three:
- Hazards: Often extremely flammable (pressurized aerosol). May contain chemicals harmful to lungs if inhaled. Some contain compounds toxic to aquatic life.
- Handling: Use only outdoors or in very well-ventilated areas. Keep away from heat and flames. Do not breathe spray mist.
- Disposal: Do not puncture or incinerate the can. Follow local hazardous waste collection guidelines.
How to Find an SDS
Finding an SDS is easy:
- Search online for the product name followed by “SDS” (for example, “Kiwi Camp Dry waterproofing spray SDS”).
- The manufacturer’s website usually has SDS documents available for download.
- Your school’s chemistry teacher or your merit badge counselor may have printed copies.
🎬 Video: Safety Data Sheets Training — https://www.youtube.com/watch?v=_yWF-w3CwmU
Req 1b — Personal Protective Equipment
Now that you know how to read a Safety Data Sheet, let’s talk about the gear that stands between you and chemical hazards: personal protective equipment, or PPE. This is the clothing and equipment designed to protect your body from chemical splashes, fumes, dust, and heat.
The Big Four: Types of PPE
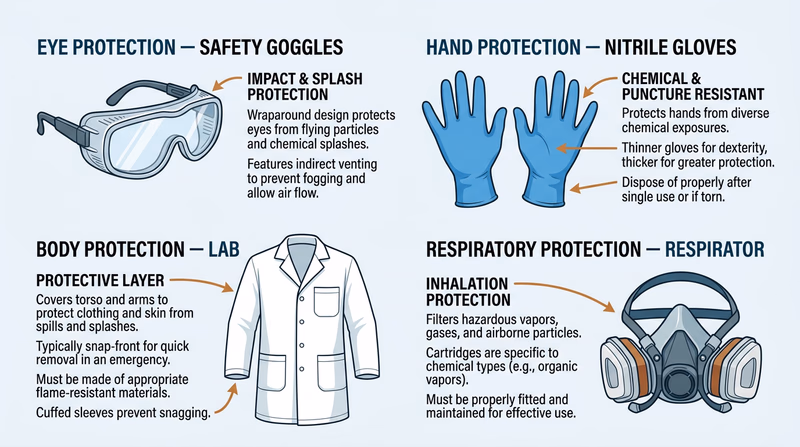
There are four main categories of PPE used in chemistry, each protecting a different part of your body:
1. Eye Protection
Your eyes are one of the most vulnerable parts of your body. Chemical splashes, flying particles, or fumes can cause serious and sometimes permanent damage.
- Safety goggles — Seal around your eyes to protect against splashes, fumes, and dust. These are the standard for most chemistry work.
- Safety glasses — Protect against flying particles but do not seal around your eyes. Good for low-hazard work but not enough for chemical splashes.
- Face shields — Cover your entire face. Used when working with highly corrosive chemicals that could splash.
2. Hand Protection
Your hands touch chemicals more than any other body part. Gloves are your first line of defense.
- Nitrile gloves — Resist many chemicals and are the most common lab glove. Good for rubbing alcohol, dilute acids, and most general chemistry work.
- Latex gloves — Similar to nitrile but some people are allergic to latex. Not as chemically resistant.
- Butyl rubber gloves — Thick gloves for handling highly toxic or corrosive chemicals. Used in industrial settings.
3. Respiratory Protection
Breathing in chemical fumes, dust, or mist can damage your lungs. The type of respiratory protection depends on what is in the air.
- Dust mask — Filters large particles like sugar dust. Not effective against chemical vapors.
- Half-face respirator with cartridges — Filters specific chemical vapors. The cartridge type must match the chemical (organic vapor, acid gas, etc.).
- Fume hood — Not worn, but used in labs to pull chemical vapors away from you while you work.
4. Body Protection
Protecting your skin and clothing from splashes and spills.
- Lab coat — Shields your clothes and skin from small splashes. Standard in any chemistry lab.
- Chemical-resistant apron — Heavier protection for working with larger volumes of chemicals.
- Closed-toe shoes — Always required in a lab to protect your feet from spills and dropped glassware.
PPE Changes with Toxicity and Exposure Route
Here is the key concept for this requirement: the more dangerous the chemical, the more PPE you need. And the type of PPE depends on how the chemical can enter your body.
There are four routes of exposure:
| Route | How It Happens | PPE Protection |
|---|---|---|
| Inhalation | Breathing in fumes, dust, or mist | Respirator, fume hood, ventilation |
| Skin contact | Chemical touches your skin | Gloves, lab coat, apron |
| Eye contact | Splash or vapor reaches your eyes | Safety goggles, face shield |
| Ingestion | Accidentally swallowing a chemical | Good hygiene — never eat or drink in a lab |
Comparing PPE for Your Three Chemicals
Let’s revisit sucrose, isopropyl alcohol, and waterproofing spray from Requirement 1a:
| Chemical | Eye | Hands | Respiratory | Body |
|---|---|---|---|---|
| Sucrose | Safety glasses (dust) | Optional gloves | Dust mask if grinding | Lab coat optional |
| Isopropyl alcohol | Safety goggles | Nitrile gloves | Ventilation or fume hood | Lab coat |
| Waterproofing spray | Safety goggles | Chemical-resistant gloves | Respirator with organic vapor cartridge | Use outdoors; full coverage clothing |
Notice how the PPE requirements escalate as the hazard level increases. Sugar barely needs any protection. Rubbing alcohol needs goggles and gloves. Waterproofing spray — the most hazardous of the three — needs respiratory protection and should only be used outdoors.
🎬 Video: How to Dress in the Lab and the Use of PPE — https://youtu.be/i1D6zpSw_6Q
Req 1c — Safety Pictograms
You have probably seen those small diamond-shaped symbols with red borders on cleaning products, paint cans, or laboratory chemicals. Those are GHS pictograms — a universal visual language that tells you about a chemical’s hazards at a glance, even if you cannot read the label’s language.
The Nine GHS Pictograms
The Globally Harmonized System uses nine standard pictograms. Each one warns about a specific type of hazard:
| Pictogram | Name | What It Means |
|---|---|---|
| Flame | Flammable | Can catch fire easily. Includes flammable liquids, gases, and solids. |
| Flame over circle | Oxidizer | Can cause or intensify a fire by providing oxygen. |
| Exploding bomb | Explosive | Can explode under certain conditions (heat, shock, friction). |
| Skull and crossbones | Acute toxicity (severe) | Can cause death or serious harm with a single exposure. |
| Exclamation mark | Irritant / Harmful | Can cause less serious health effects like skin or eye irritation. |
| Health hazard | Serious health hazard | Can cause long-term health problems like cancer, organ damage, or respiratory sensitization. |
| Corrosion | Corrosive | Destroys skin tissue or corrodes metals on contact. |
| Gas cylinder | Gas under pressure | Contains gas stored under pressure. May explode if heated. |
| Environment | Environmental hazard | Toxic to aquatic life or the environment. |
What Pictograms Do Your Three Chemicals Have?
When you look at Section 2 of each SDS, here is what you will typically find:
Sucrose (sugar): Usually no GHS pictograms at all. Sugar is not classified as hazardous under the GHS system. Some SDS documents may note minor dust irritation, but it does not warrant a pictogram.
Isopropyl alcohol: You will likely see two pictograms:
- Flame — It is a flammable liquid (flash point around 12°C / 53°F)
- Exclamation mark — It can cause eye irritation and drowsiness if inhaled
Waterproofing spray: Typically shows three or more pictograms:
- Flame — Extremely flammable aerosol
- Exclamation mark — Irritant to eyes and skin
- Health hazard — May cause respiratory damage if inhaled
- Environment — Some formulas are toxic to aquatic life
Pictograms in Your Community
Once you know what to look for, you will start noticing GHS pictograms everywhere:
- At home — Oven cleaner, drain cleaner, bleach, spray paint, nail polish remover, and lighter fluid all carry pictograms.
- At school — Chemistry labs, art rooms (solvents, glazes), and custodial supply closets all have chemicals with pictograms on the labels.
- In your community — Gas stations (fuel pumps), hardware stores (paints and adhesives), swimming pool supply shops (chlorine), and farms (pesticides and fertilizers) all use GHS-labeled products.
- On the road — Delivery trucks carrying hazardous materials display placards that are closely related to GHS pictograms.
Signal Words
In addition to pictograms, Section 2 of the SDS includes a signal word that tells you how severe the hazard is:
- Danger — Used for more severe hazards. If you see this word, take extra precautions.
- Warning — Used for less severe hazards. Still take it seriously, but the risk is lower.
- No signal word — The chemical is not classified as hazardous (like sucrose).
🎬 Video: Safety Pictograms in SDS — https://youtube.com/shorts/x_TebXJET0Y
Req 1d — Chemical Storage
Storing chemicals safely is not just a lab rule — it is something that affects every home, school, and community. When chemicals are stored incorrectly, the consequences can range from minor spills to fires, poisonings, and environmental contamination.
The Golden Rules of Chemical Storage
These principles apply whether you are organizing a school chemistry lab or the cabinet under your kitchen sink:
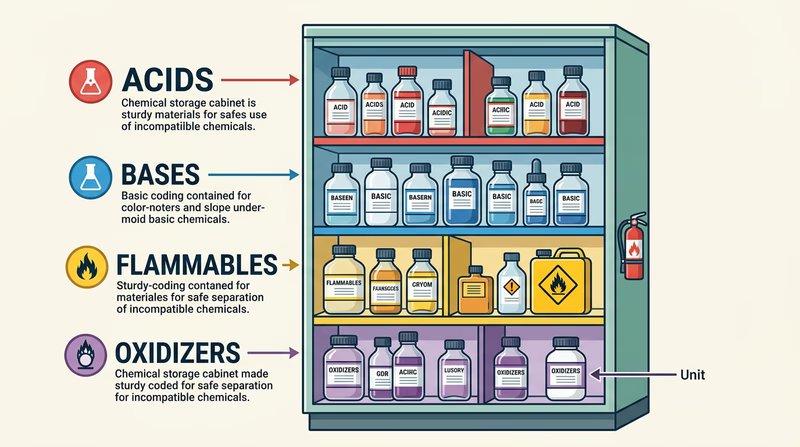
1. Keep incompatible chemicals apart. Some chemicals react dangerously when they come into contact with each other. Bleach and ammonia, for example, produce toxic chloramine gas when mixed. Acids and bases should be stored separately. Flammables should be far from oxidizers.
2. Store chemicals in their original containers. The label tells you what is inside and how to handle it. Pouring chemicals into unlabeled containers — especially food or drink containers — is one of the most common causes of accidental poisoning.
3. Keep chemicals in a cool, dry, well-ventilated area. Heat can cause chemicals to decompose, evaporate, or even ignite. Moisture can cause reactions in some chemicals. Ventilation prevents fumes from building up.
4. Store chemicals out of reach of children and pets. Use locked cabinets or high shelves. Childproof caps are helpful but not foolproof.
5. Store flammable chemicals away from heat sources and ignition points. This includes pilot lights, water heaters, furnaces, and electrical panels.
Chemical Storage at Home
Your home contains more chemicals than you might think. Here is where to find them and how to store them safely:
Home Chemical Storage
Room-by-room guide- Kitchen: Dish soap, oven cleaner, drain cleaner — store under the sink in a locked cabinet away from food. Never mix cleaning products.
- Bathroom: Rubbing alcohol, hydrogen peroxide, nail polish remover — keep in original containers with caps tightly closed. Store away from heat sources.
- Garage: Gasoline, motor oil, paint, paint thinner, pesticides — store in a cool, ventilated area. Keep flammable liquids in approved containers away from the water heater or furnace.
- Laundry room: Bleach, detergent, fabric softener — store on a high shelf or in a locked cabinet. Never mix bleach with other cleaners.
Chemical Storage at School
School chemistry labs follow strict storage protocols required by law. Chemicals are typically organized by hazard class, not alphabetically:
- Flammable cabinet (yellow) — Contains alcohols, acetone, and other flammable liquids
- Corrosive cabinet — Acids on one side, bases on the other, with physical separation
- Oxidizer storage — Kept far from flammables
- General chemicals — Non-hazardous substances stored separately
Chemical Storage in the Community
Communities manage chemical storage on a much larger scale:
- Gas stations store thousands of gallons of flammable fuel in underground tanks with leak detection systems.
- Water treatment plants store chlorine and other disinfection chemicals in controlled environments with ventilation and containment systems.
- Hospitals and pharmacies store medications and hazardous drugs under strict temperature and security controls.
- Farms store pesticides, herbicides, and fertilizers in dedicated buildings away from water sources and livestock.
Protecting the Environment
Improper chemical storage and disposal can have devastating environmental effects:
- Groundwater contamination — Chemicals stored on bare ground or in leaking containers can seep into the water table, contaminating drinking water.
- Aquatic damage — Pesticides and fertilizers that wash into streams and rivers can kill fish and create algal blooms that choke off oxygen.
- Soil pollution — Spilled chemicals can make soil toxic for decades, preventing plant growth and harming wildlife.
🎬 Video: Chemical Storage Safety — https://youtu.be/4GUSQj-xOBY
Req 2a — Soap & Alcohol
When you get a cut or scrape, one of the first things someone tells you is “wash it with soap and water” or “put some rubbing alcohol on it.” But have you ever stopped to think about why those two substances are used? The answer comes down to chemistry.
Why Soap?
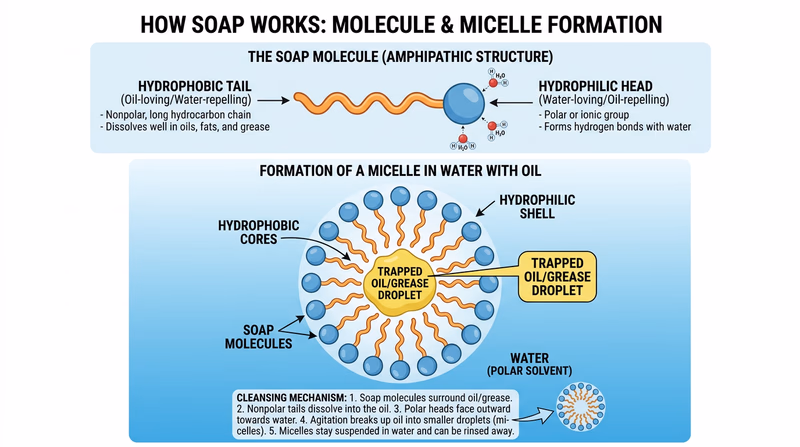
Soap is a surfactant — a molecule that has two ends with very different properties. One end is hydrophilic (water-loving) and the other is hydrophobic (water-fearing, but oil-loving). This dual nature is what makes soap so effective.
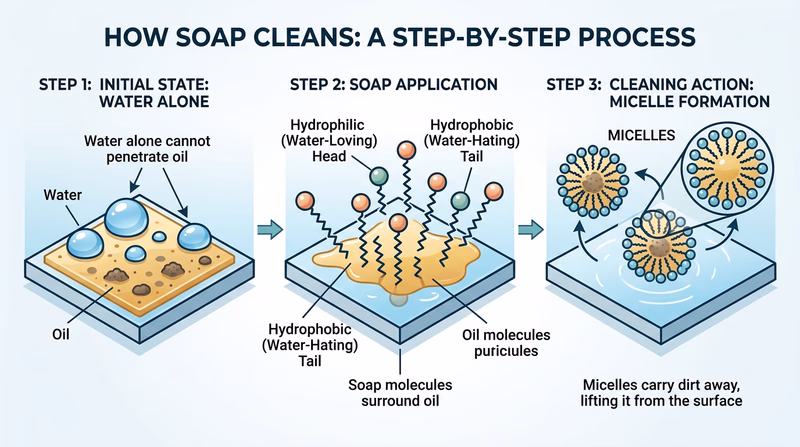
When you wash a wound with soap and water:
- The hydrophobic tails of soap molecules attach to dirt, oil, and bacteria on your skin.
- The hydrophilic heads stay dissolved in the water.
- As the water rinses away, the soap molecules carry the dirt and bacteria with them.
Soap does not technically “kill” most bacteria — it removes them from your skin mechanically. Think of it like using a mop instead of a flamethrower. The bacteria get lifted off your skin and washed down the drain.
Why Rubbing Alcohol?
Isopropyl alcohol (rubbing alcohol) works differently from soap. Instead of removing bacteria, it kills them by destroying their cell membranes. When alcohol contacts a bacterial cell, it dissolves the fatty outer membrane, causing the cell to fall apart and die.
Alcohol is also effective against many viruses for the same reason — it breaks apart the lipid (fat) envelope that surrounds many viral particles.
However, alcohol has some limitations:
- It can sting and irritate damaged skin tissue
- It evaporates quickly, so its germ-killing action is brief
- It is less effective against certain types of bacteria that have tough, protective outer coats (called spores)
Forming a Hypothesis
This requirement asks you to think about why soap and alcohol are used and then discuss how you might test your ideas. In science, a testable idea is called a hypothesis. Here is how to think about it:
- Observe — Soap and alcohol are both used to clean wounds, but they work differently.
- Ask a question — “Does soap remove more germs than alcohol kills?”
- Form a hypothesis — “I think soap removes more bacteria because it physically lifts them away, while alcohol only kills bacteria it directly contacts.”
- Design a test — You could swab a surface, apply soap to one area and alcohol to another, and then culture the swabs to see which has fewer bacteria remaining.
The Scientific Method in Action
This requirement is really about using the scientific method, which is the foundation of all chemistry:
- Observation — Notice something interesting
- Question — Ask why or how
- Hypothesis — Propose an explanation
- Experiment — Test your hypothesis
- Analysis — Look at the results
- Conclusion — Did the data support your hypothesis?
You will get to actually run experiments in the next two requirements, but forming the hypothesis first is where real science begins.
🎬 Video: Soap and Hand Sanitizers vs Viruses and Bacteria — https://www.youtube.com/watch?v=x7KKkElpyKQ
Req 2b — How Soap Works
This is one of the most satisfying experiments in the Chemistry merit badge. You are going to see — right on your own hands — why soap is so much better at cleaning than water alone. The answer lies in the chemistry of polarity.
Why Water Alone Falls Short
Water is sometimes called the “universal solvent,” but it has a major weakness: it cannot dissolve oil. Water molecules are polar, meaning they have a positive end and a negative end. Oil molecules are nonpolar — they have no charged ends. Polar and nonpolar molecules do not mix. That is why oil and water separate in a glass, and it is why water alone slides right off your oily hands.
When you coat your hands with cooking oil and powder, then rinse with just water, you will notice:
- The water beads up and rolls off the oily surface
- The powder stays stuck in the oil layer
- Your hands still feel greasy after rinsing
How Soap Bridges the Gap
Soap molecules are special because each one has both a polar end and a nonpolar end. This structure lets soap act as a bridge between oil and water:
- The nonpolar tail of the soap molecule digs into the oil on your skin.
- Many soap molecules surround a tiny droplet of oil, with their tails pointing inward and their polar heads pointing outward toward the water.
- This creates a tiny sphere called a micelle — a ball of soap molecules with oil trapped inside.
- Because the outside of the micelle is polar (water-friendly), the whole thing dissolves in water and rinses away, taking the oil and dirt with it.
When you coat your hands again and wash with soap and water, you will notice:
- The soap lathers up and mixes with the oil
- The powder lifts off your skin with the oil
- Your hands feel completely clean after rinsing
Running the Experiment
Experiment Materials
What you will need- Cooking oil: Vegetable oil, olive oil, or coconut oil all work well.
- Nontoxic powder: Cocoa powder, cinnamon, sand, or cornstarch. Cocoa powder is easiest to see.
- Liquid hand soap: Regular hand soap or dish soap.
- Paper towels: For cleanup.
- A sink: With warm running water.
What to Observe and Discuss
When you talk with your counselor, be ready to describe:
- What happened with water only — Did the oil come off? Did the powder stick? How did your hands feel?
- What happened with soap and water — How quickly did the oil come off? Was the powder removed? How did your hands feel afterward?
- Why the difference? — Explain the concept of polarity and micelles in your own words.
- Real-world connection — How does this relate to cleaning a wound? Oil, dirt, and bacteria on your skin behave just like the cooking oil and powder in this experiment.
🎬 Video: How Does Soap Work? — https://www.youtube.com/shorts/Jx5BgbIkXEs
Req 2c — Alcohol & Microbes
In Requirement 2a, you formed a hypothesis about how alcohol kills germs. Now it is time to put that hypothesis to the test with a real experiment. You will use baker’s yeast as a stand-in for harmful microbes because yeast is safe to handle, easy to grow, and responds to alcohol in a visible way.
Why Baker’s Yeast?
Baker’s yeast (Saccharomyces cerevisiae) is a single-celled fungus — a type of microorganism. Like bacteria, yeast has a cell membrane made of lipids (fats) that is vulnerable to alcohol. Yeast is also easy to observe because when it is alive and active, it produces carbon dioxide gas (the same gas that makes bread rise and soda fizzy). If the yeast is alive, you will see bubbles. If the alcohol kills it, the bubbling stops.
Designing Your Experiment
A good experiment needs a control — a sample that does not receive the treatment — so you have something to compare against. Here is a simple setup:
Experiment Materials
What you will need- Active dry yeast: One packet (about 7 grams) from the grocery store.
- Warm water: About 110°F (43°C) — warm to the touch but not hot.
- Sugar: One tablespoon to feed the yeast.
- Rubbing alcohol (70% isopropyl): Available at any pharmacy.
- Clear cups or jars: At least three identical containers.
- Measuring spoons: For consistent amounts.
- Labels or tape: To mark your cups.
- Timer or clock: To track observations over time.
Step-by-Step Procedure
Step 1: Activate the yeast. Mix one packet of yeast with one cup of warm water and one tablespoon of sugar. Stir gently and wait 5–10 minutes until the mixture becomes foamy and bubbly. This tells you the yeast is alive and actively fermenting.
Step 2: Divide into cups. Pour equal amounts of the active yeast mixture into three labeled cups:
- Cup A (Control): Yeast mixture only — do not add anything else.
- Cup B (Low dose): Add one teaspoon of rubbing alcohol.
- Cup C (High dose): Add one tablespoon of rubbing alcohol.
Step 3: Observe. Watch all three cups over the next 15–30 minutes. Record your observations every 5 minutes.
Step 4: Compare. After 30 minutes, compare the amount of bubbling, foam, and activity in each cup.
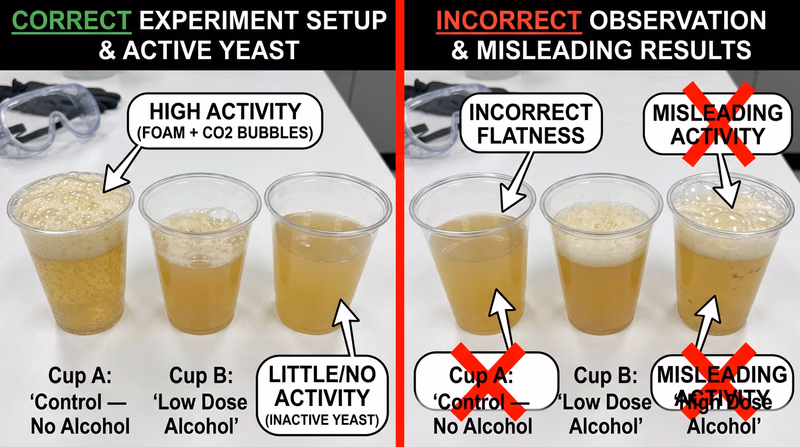
What You Should See
- Cup A (Control) should continue bubbling throughout the experiment. The yeast is alive and happily eating sugar.
- Cup B (Low dose) will likely show reduced bubbling. Some yeast cells are being killed or damaged by the alcohol, but others survive.
- Cup C (High dose) should show significantly less — or no — bubbling. The higher concentration of alcohol is killing most or all of the yeast cells.
Understanding Your Results
The results demonstrate the same principle that makes rubbing alcohol effective for cleaning wounds:
- Alcohol disrupts cell membranes. Yeast (and bacteria) have membranes made of lipids. Alcohol dissolves these lipids, causing the cells to leak and die.
- Concentration matters. A small amount of alcohol may only slow down microbial growth, while a larger amount kills the organisms outright.
- 70% alcohol is the sweet spot. Pure (100%) alcohol actually evaporates too quickly to be as effective. The 70% concentration used in rubbing alcohol gives the best balance — it stays in contact with the microbes long enough to destroy them.
Discussing Results with Your Counselor
When you meet with your counselor, be prepared to explain:
- What your hypothesis was before the experiment
- What you observed in each cup
- Why concentration of alcohol affected the results
- How this relates to using rubbing alcohol on cuts and scrapes
- Whether your hypothesis was confirmed or disproven
Req 3a — The Maillard Reaction
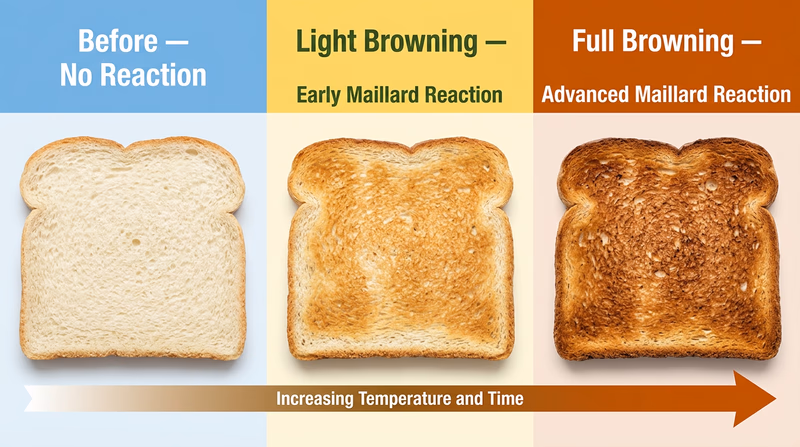
Every time you toast bread, sear a steak, or bake cookies, you are performing one of the most important chemical reactions in cooking: the Maillard reaction. Named after French chemist Louis-Camille Maillard, who described it in 1912, this reaction is responsible for the golden-brown color and incredible flavors you associate with perfectly cooked food.
What Is the Maillard Reaction?
The Maillard reaction occurs when amino acids (building blocks of proteins) react with reducing sugars (like glucose or fructose) at high temperatures — typically above 280°F (140°C). This reaction produces hundreds of new compounds that give browned food its distinctive color, aroma, and flavor.
It is not just one reaction — it is a cascade of many reactions happening simultaneously, creating an enormous variety of flavor molecules. That is why a grilled burger tastes completely different from raw ground beef, even though it is made of the same ingredients.
Physical Change vs. Chemical Change
This is the core chemistry concept for this requirement. Understanding the difference between physical and chemical changes is fundamental to all of chemistry.
Physical change: The substance changes its appearance or form, but its molecular structure stays the same. You can usually reverse a physical change. Examples: melting ice (water is still H₂O), dissolving sugar in water, cutting paper.
Chemical change: The substance’s molecular structure is permanently altered, creating entirely new substances. Chemical changes are usually irreversible. Signs of a chemical change include color change, new odor, gas production, heat release, and formation of a precipitate.
The Maillard reaction is a chemical change because:
- New molecules are created (flavor compounds, pigments)
- The color changes permanently (you cannot un-toast bread)
- New aromas are produced
- The nutritional composition changes
- Heat energy drives the transformation
Performing the Reaction
The simplest way to perform a Maillard reaction is to toast a piece of bread. But you can also try any of these:
- Pan-sear a piece of meat or mushroom — Watch the surface transform from pale to deep brown.
- Caramelize onions — Slowly cook sliced onions in a pan until they turn golden-brown and sweet.
- Bake cookies — Notice how the dough changes from pale to golden-brown at the edges.
- Roast marshmallows — A camping favorite that perfectly demonstrates browning.
What Happens at the Molecular Level
Here is what is happening inside your food during the Maillard reaction:
- Heat breaks bonds — The thermal energy breaks apart amino acids and sugars into reactive fragments.
- New bonds form — These fragments recombine in new ways, creating molecules that did not exist before: melanoidins (brown pigments), pyrazines (nutty, roasted flavors), furanones (caramel flavors), and many more.
- The reaction cascades — Each new compound can react further, creating even more compounds. This is why longer cooking produces deeper, more complex flavors.
- Carbon dioxide and water are released — These gases escape as steam, which is why bread loses weight when toasted.
Maillard Reaction vs. Caramelization
These two browning reactions are often confused, but they are chemically different:
| Feature | Maillard Reaction | Caramelization |
|---|---|---|
| Requires | Amino acids + sugars | Sugars only (no protein needed) |
| Temperature | Above 280°F (140°C) | Above 320°F (160°C) |
| Examples | Seared steak, toasted bread, roasted coffee | Crème brûlée, caramel sauce, cotton candy |
| Flavors | Savory, nutty, roasted, meaty | Sweet, buttery, toffee-like |
Both are chemical changes, but the Maillard reaction requires protein (amino acids), while caramelization only involves sugar.
🎬 Video: Why the Maillard Reaction Makes Everything Delicious — https://youtu.be/rs1JLYXROVU
Req 3b — pH & Indicators
Red cabbage might not look like a chemistry tool, but it contains a natural pigment that changes color depending on whether a solution is acidic, neutral, or basic. In this experiment, you will make your own pH indicator and use it to test common household liquids.
What Is pH?
pH is a scale that measures how acidic or basic (alkaline) a solution is. The scale runs from 0 to 14:
- 0–6: Acidic (the lower the number, the stronger the acid)
- 7: Neutral (pure water)
- 8–14: Basic/alkaline (the higher the number, the stronger the base)
The “p” in pH stands for the German word Potenz (power), and “H” stands for hydrogen. pH actually measures the concentration of hydrogen ions (H⁺) in a solution. More hydrogen ions = more acidic.
Why Red Cabbage Works
Red cabbage gets its purple color from a class of pigments called anthocyanins. These molecules change their chemical structure — and therefore their color — depending on the pH of their environment:
| pH Range | Color | Type |
|---|---|---|
| 1–3 | Red/Pink | Strong acid |
| 4–6 | Purple/Violet | Weak acid |
| 7 | Blue/Violet | Neutral |
| 8–10 | Blue/Green | Weak base |
| 11–14 | Green/Yellow | Strong base |
This range of color changes makes red cabbage one of the best natural pH indicators available.
Making Your Indicator
Indicator Materials
What you will need- Red cabbage: About one quarter of a head, chopped into small pieces.
- Boiling water: About 2 cups.
- Pot and stove: To boil the cabbage.
- Strainer or cheesecloth: To separate the liquid from the cabbage.
- Clear cups or glasses: At least six (one for each liquid you test, plus extras).
- Household liquids to test: At least five, including water.
- White paper: Place behind the cups to see colors more clearly.
- Labels or tape: To mark each cup.
Step 1: Chop the red cabbage into small pieces and place them in a pot.
Step 2: Pour boiling water over the cabbage and let it steep for 15–20 minutes. The water should turn a deep purple-blue color.
Step 3: Strain out the cabbage pieces. The purple liquid is your pH indicator. Let it cool to room temperature.
Step 4: Pour equal amounts of indicator into each clear cup (about 2–3 tablespoons).
Step 5: Add a small amount of each test liquid to a separate cup and observe the color change.
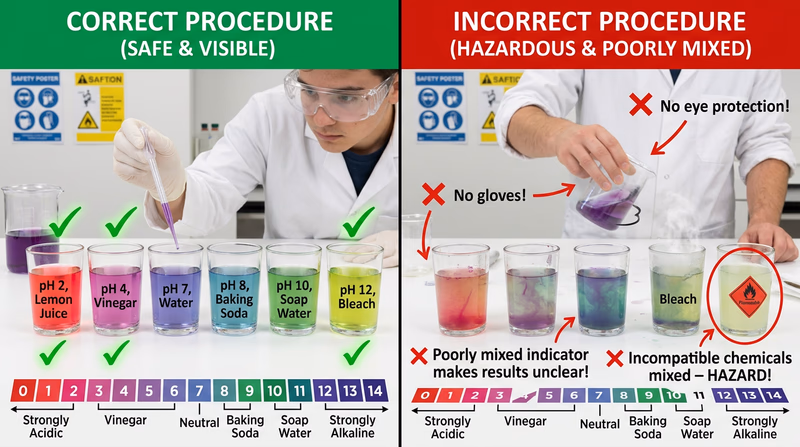
Suggested Liquids to Test
Here are some common household liquids that give a good range of results:
- Water (pH ~7) — Should stay purple/blue (neutral)
- Lemon juice or white vinegar (pH ~2–3) — Should turn pink/red (acidic)
- Baking soda dissolved in water (pH ~8–9) — Should turn blue/green (basic)
- Milk (pH ~6.5) — Should stay purple with a slight pink tint (slightly acidic)
- Laundry detergent dissolved in water (pH ~10–11) — Should turn green (basic)
Other options: orange juice, soda, soapy water, antacid tablets dissolved in water, or apple juice.
What to Discuss with Your Counselor
When you meet with your counselor, be ready to explain:
- What pH is and how the scale works
- Why red cabbage changes color (anthocyanins change structure with pH)
- Your results — Which liquids were acidic? Basic? Neutral?
- Any surprises — Did any liquid test differently than you expected?
- Real-world applications — Where is pH important? (Swimming pools, aquariums, soil for gardening, human blood, food preservation)
pH in Everyday Life
pH is not just a lab concept — it matters in the real world:
- Swimming pools must maintain a pH of 7.2–7.8 for safety and comfort
- Your blood is kept at a very precise pH of 7.35–7.45; even small changes can be life-threatening
- Soil pH determines which plants can grow; blueberries need acidic soil, while most vegetables prefer slightly acidic to neutral
- Acid rain (pH below 5.6) damages buildings, kills fish, and harms forests
- Your stomach has a pH of 1.5–3.5 — acidic enough to dissolve metal
🎬 Video: Why Is Red Cabbage a pH Indicator? — https://youtu.be/4AElaDIhMyA
Req 4 — Camping Chemistry
Chemistry and camping go hand-in-hand in ways you might not expect. From keeping your gear dry to understanding how fires work, chemistry is at the heart of outdoor skills. For this requirement, you will choose two of the four options below.
- Option a: Compare waterproofing methods
- Option b: Fire classes and extinguishers
- Option c: Flame tests of elements
- Option d: Synthesize nylon
Read through all four options to decide which two interest you most, then dive deep into those.
Option A: Waterproofing Experiment
Waterproofing is chemistry in action. There are several approaches, and each works through a different chemical mechanism:
Silicone-based sprays coat fibers with a thin layer of silicone, a polymer that repels water. They are lightweight and breathable but may need reapplication.
Wax-based treatments fill the gaps between fabric fibers with wax, creating a physical barrier. They are durable but can reduce breathability and add weight.
Fluoropolymer treatments (DWR) use fluorine-based compounds to lower the surface energy of the fabric so water beads up and rolls off. Most factory waterproofing on jackets and tents uses this technology.
Oil-based treatments (like linseed oil) saturate the fabric, making it water-resistant. Traditional but heavy and can change the fabric’s feel.
For your counselor discussion: Tents need breathability so moisture from your breath does not condense inside — silicone sprays are a great choice. Boots need durability and full water blockage — wax treatments hold up better under heavy use and mud.
🎬 Video: Waterproofing Fabrics — https://youtu.be/y83uXupu5tY
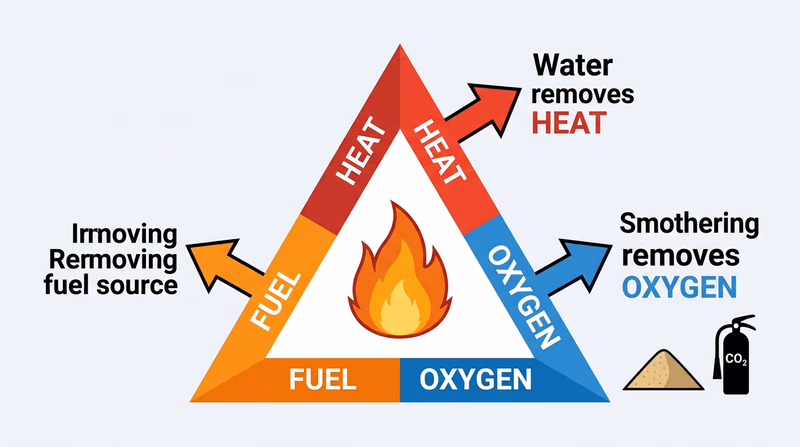
Option B: Fire Classes and Extinguishers
Fire needs three things to burn — heat, fuel, and oxygen. This is called the fire triangle. Fire extinguishers work by removing one or more of these elements.
The Four Classes of Fire
| Class | Fuel Type | Examples | Icon |
|---|---|---|---|
| A | Ordinary combustibles | Wood, paper, cloth, trash | Green triangle |
| B | Flammable liquids | Gasoline, oil, grease, paint | Red square |
| C | Electrical equipment | Wiring, outlets, appliances | Blue circle |
| D | Combustible metals | Magnesium, titanium, sodium | Yellow star |
How Extinguishers Work
| Extinguisher Type | Works On | Mechanism |
|---|---|---|
| Water | Class A | Cools the fuel below ignition temperature (removes heat) |
| CO₂ (carbon dioxide) | Class B, C | Displaces oxygen around the fire (removes oxygen) |
| Dry chemical (ABC) | Class A, B, C | Coats the fuel with a powder that interrupts the chemical reaction |
| Class D powder | Class D | Smothers the metal fire with a special powder that does not react with the burning metal |
Sand works by smothering — it covers the fuel and cuts off the oxygen supply. Baking soda (sodium bicarbonate) works in two ways: it smothers the fire like sand, and when heated, it releases CO₂ gas, which further displaces oxygen.
🎬 Video: How to Distinguish Between the Different Classes of Fire — https://www.youtube.com/watch?v=B8PrA_AOa6w
Option C: Flame Tests
Flame tests are one of the most visually stunning experiments in chemistry. When certain elements are heated in a flame, they emit light at specific wavelengths — producing distinctive, beautiful colors. This is the same principle behind fireworks.
Why Elements Produce Colors
When an atom absorbs heat energy, its electrons jump to a higher energy level (an “excited state”). When those electrons fall back to their normal energy level, they release the extra energy as light. The color of that light depends on the element, because each element has a unique arrangement of electron energy levels.
Common Flame Test Colors
| Element | Compound to Use | Flame Color |
|---|---|---|
| Lithium | Lithium chloride | Crimson red |
| Sodium | Table salt (NaCl) | Bright yellow/orange |
| Potassium | Salt substitute (KCl) | Light violet/lilac |
| Copper | Copper sulfate | Blue-green |
| Calcium | Calcium chloride (ice melt) | Orange-red |
| Strontium | Strontium chloride | Bright red |
| Barium | Barium chloride | Yellow-green |
🎬 Video: The Flame Test Experiment — https://www.youtube.com/watch?v=7hC-KyFraCQ
Option D: Synthesize Nylon
Nylon was the first commercially successful synthetic polymer, invented by Wallace Carothers at DuPont in 1935. Making nylon from its raw chemicals is called the nylon rope trick because you literally pull a continuous strand of nylon from a beaker — it looks like magic, but it is pure chemistry.
How Nylon Synthesis Works
Nylon is formed through a condensation reaction between two chemicals:
- Hexamethylenediamine (a diamine — a molecule with two amine groups)
- Adipoyl chloride or sebacoyl chloride (a diacid chloride)
When these two liquids meet, they react at the interface (the boundary between the two layers) to form a thin film of nylon polymer. You can grab the film with tweezers or a glass rod and slowly pull it upward, drawing out a continuous strand of nylon fiber.
Nylon in Camping
Nylon is everywhere in outdoor gear:
- Tents — Nylon fabric is lightweight, strong, and water-resistant
- Backpack straps — Nylon webbing is tough and does not stretch
- Rope and cord — Paracord and climbing rope are made from nylon
- Sleeping bag shells — Nylon is packable and durable
By synthesizing nylon yourself, you are creating the same type of material used in the gear that keeps you safe and comfortable in the backcountry.
🎬 Video: Nylon Synthesis Chemistry Demo — https://www.youtube.com/watch?v=NQpTQFGKRN8
NFPA — Fire Extinguisher Types National Fire Protection Association guide to fire extinguisher types and proper use. Link: NFPA — Fire Extinguisher Types — https://www.nfpa.org/education-and-research/home/safety-tips/fire-safety-equipment/fire-extinguishers
Req 5 — Reducing Environmental Impact
Every year, humans produce over 400 million tons of plastic — and most of it is designed to be used once and thrown away. Single-use water bottles, shopping bags, straws, and disposable batteries create enormous environmental problems when they end up in landfills, oceans, and waterways. The good news? Chemistry is at the center of the solutions.
The Problem with Single-Use Items
Most single-use plastics are made from polymers derived from petroleum (crude oil). These polymers are incredibly durable — which is great when you need a strong water bottle, but terrible when that bottle sits in a landfill for 450 years without breaking down.
Traditional batteries contain heavy metals like cadmium, mercury, and lead that can leach into soil and groundwater when improperly disposed of, contaminating ecosystems and posing health risks.
How Chemistry Is Solving the Problem
Chemists are tackling single-use waste from multiple angles:
1. Biodegradable Plastics
Chemists have developed bioplastics — polymers made from renewable biological sources instead of petroleum. These materials can break down naturally in the environment.
- PLA (polylactic acid) is made from fermented corn starch or sugarcane. It is used in compostable cups, food containers, and 3D printing filament. Under the right composting conditions, PLA breaks down in 60–90 days.
- PHA (polyhydroxyalkanoate) is produced by bacteria that feed on plant oils or sugars. It biodegrades in soil and ocean water, making it one of the most promising replacements for conventional plastic.
2. Chemical Recycling
Traditional recycling (mechanical recycling) melts and reshapes plastic, but each cycle degrades the material. Chemical recycling breaks plastics back down into their original molecular building blocks, which can then be rebuilt into brand-new, high-quality plastic. This process is called depolymerization.
- Pyrolysis heats plastic waste in the absence of oxygen, breaking it down into oils and gases that can be used as fuel or raw materials for new plastics.
- Enzymatic recycling uses specially engineered enzymes (biological catalysts) to break down PET plastic (the type used in water bottles) into its original monomers in just hours.
3. Better Batteries
Chemistry is also transforming the battery industry:
- Rechargeable lithium-ion batteries reduce the need for disposable batteries. Your phone, laptop, and many power tools use them.
- Solid-state batteries replace the liquid electrolyte with a solid material, making batteries safer, longer-lasting, and more recyclable.
- Sodium-ion batteries use abundant, inexpensive sodium instead of rare lithium, potentially making rechargeable batteries accessible to everyone.
- Researchers are even upcycling plastic bags into battery components — turning waste into energy storage.
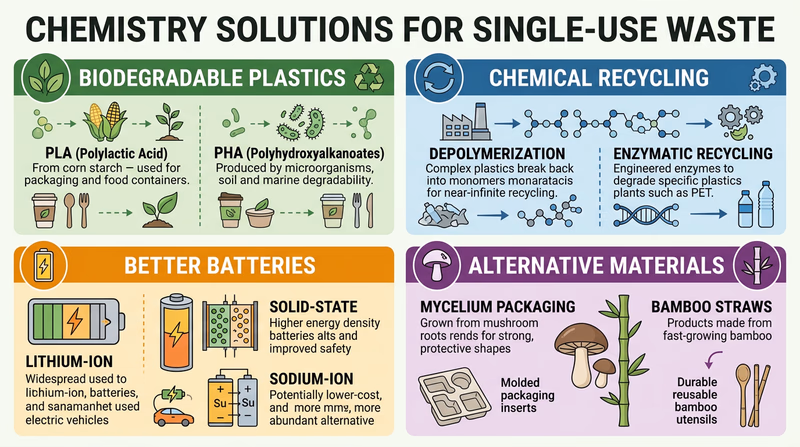
4. Alternative Materials
Chemists are also developing entirely new materials to replace single-use items:
- Bamboo and paper straws use natural cellulose fibers instead of plastic polymers
- Mushroom-based packaging (mycelium) grows into custom shapes and composts in weeks
- Water-soluble detergent pods eliminate the need for plastic bottles entirely
- Silicone food storage bags replace single-use plastic bags with a durable, reusable polymer
Green Chemistry: The Bigger Picture
Green chemistry is an entire field dedicated to designing chemical products and processes that reduce or eliminate hazardous substances. The 12 Principles of Green Chemistry guide scientists to:
- Prevent waste rather than clean it up
- Use renewable feedstocks instead of petroleum
- Design products that break down safely after use
- Minimize energy use in chemical processes
🎬 Video: Edible, Biodegradable Food Packaging — https://youtu.be/wt32GgQGTcI
Req 6 — Five Fields of Chemistry
In the Introduction, we touched on the major branches of chemistry. Now it is time to go deeper. For this requirement, you need to identify five fields, describe what each one does, explain how it connects to your daily life, and discuss how the fields work together.
The Major Fields of Chemistry
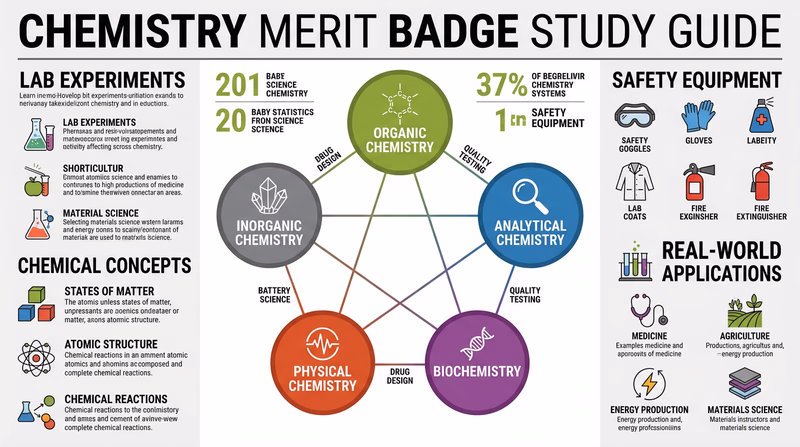
1. Organic Chemistry
What it studies: Molecules containing carbon, including the complex molecules that make up living things, fuels, plastics, and medicines.
How it applies to your life: The clothes you wear (polyester, nylon, cotton fibers), the food you eat (carbohydrates, fats, proteins), the medicines you take (aspirin, antibiotics), and the fuel in your family’s car are all products of organic chemistry. Even the soap you used in Requirement 2b is an organic compound.
2. Inorganic Chemistry
What it studies: Compounds that are not carbon-based — metals, minerals, salts, ceramics, and semiconductors.
How it applies to your life: The aluminum in a soda can, the silicon chips in your phone, the iron in a steel bridge, and the titanium dioxide in sunscreen are all inorganic materials. The flame test colors you may have seen in Requirement 4c come from inorganic metal salts.
3. Analytical Chemistry
What it studies: Methods for identifying what substances are made of and measuring how much of each component is present.
How it applies to your life: When your city tests the water supply for lead or bacteria, that is analytical chemistry. When a doctor orders a blood test to check your cholesterol, analytical chemistry is at work. The nutrition labels on food — listing exact amounts of vitamins, minerals, and macronutrients — are the result of analytical chemistry techniques.
4. Physical Chemistry
What it studies: The energy changes that drive chemical reactions, including thermodynamics (heat flow), kinetics (reaction speed), and quantum mechanics (behavior of atoms and electrons).
How it applies to your life: Physical chemistry explains why your hand warmer gets hot (exothermic reaction), why ice melts at 32°F (phase transition energy), and why batteries store energy (electrochemistry). The Maillard reaction you performed in Requirement 3a involves physical chemistry — heat energy drove the chemical change.
5. Biochemistry
What it studies: The chemical processes that occur inside living organisms — how enzymes work, how DNA stores information, how cells produce energy.
How it applies to your life: Biochemistry is behind everything your body does: digesting food, building muscle, fighting infections, and even thinking. The yeast experiment you performed in Requirement 2c demonstrated biochemistry — yeast cells use biochemical pathways to ferment sugar into CO₂ and alcohol.
More Fields Worth Knowing
While you only need five, here are additional fields that show just how broad chemistry is:
- Environmental Chemistry — Studies how chemicals interact with the environment. You explored this in Requirement 5 when you learned about biodegradable plastics and green chemistry.
- Nuclear Chemistry — Studies radioactive elements and nuclear reactions. Powers nuclear energy plants and medical imaging (PET scans, radiation therapy).
- Polymer Chemistry — Studies large molecules made of repeating units. Every plastic item you own is a polymer. Nylon synthesis (Requirement 4d) is polymer chemistry.
- Food Chemistry — Studies the chemical composition and properties of food. The red cabbage indicator (Requirement 3b) is food chemistry in action.
- Forensic Chemistry — Applies chemical analysis to criminal investigations. Drug testing, DNA analysis, and trace evidence analysis all rely on forensic chemistry.
How the Fields Interact
Chemistry fields do not exist in isolation — they constantly overlap and depend on each other:
- Making a new medicine requires organic chemistry (designing the molecule), analytical chemistry (testing its purity), biochemistry (understanding how it interacts with the body), and physical chemistry (determining the best conditions for the reaction).
- Building a better battery combines inorganic chemistry (electrode materials), physical chemistry (energy storage and transfer), and analytical chemistry (measuring performance).
- Developing biodegradable plastic involves organic chemistry (designing the polymer), environmental chemistry (ensuring it breaks down safely), and biochemistry (using bacteria or enzymes in production).
Req 7 — Government Agencies
Chemicals are everywhere — in your food, medicine, cleaning products, and the air you breathe. Without oversight, companies and individuals could use chemicals in ways that harm people and the environment. That is why the United States has several government agencies dedicated to chemical safety. Here are the three most important ones.
1. Environmental Protection Agency (EPA)
Founded: 1970, by President Richard Nixon
History: In the 1960s, Americans began noticing that pollution was devastating the environment. Rivers were catching fire (the Cuyahoga River in Cleveland literally burned), smog choked cities, and pesticides like DDT were killing wildlife. Rachel Carson’s 1962 book Silent Spring helped spark a national environmental movement. In response, President Nixon created the EPA to consolidate all federal pollution-control activities under one agency.
Responsibilities:
- Regulates the manufacture, use, and disposal of chemicals under laws like the Toxic Substances Control Act (TSCA)
- Sets and enforces limits on pollutants in air and water
- Manages the cleanup of contaminated sites (Superfund program)
- Registers and regulates pesticides
- Oversees hazardous waste management
How it affects you: The EPA ensures your drinking water is safe, the air in your community meets quality standards, and hazardous chemicals are properly disposed of. When you learned about chemical storage and disposal in Requirement 1d, those guidelines exist because of EPA regulations.
2. Food and Drug Administration (FDA)
Founded: 1906 (as the Bureau of Chemistry), reorganized as the FDA in 1930
History: In the early 1900s, there were no rules about what could go into food or medicine. Companies sold “patent medicines” containing alcohol, cocaine, and heroin — marketed as cures for everything from headaches to cancer. Upton Sinclair’s novel The Jungle (1906) exposed horrific conditions in the meatpacking industry. Public outrage led to the Pure Food and Drug Act of 1906, which created the agency that would become the FDA.
Responsibilities:
- Ensures the safety of food, drugs, medical devices, cosmetics, and dietary supplements
- Reviews and approves new medications before they can be sold
- Monitors food additives and packaging materials for safety
- Regulates the labeling of food and pharmaceutical products
- Oversees blood supply safety and vaccine development
How it affects you: Every medicine you have ever taken was reviewed by the FDA for safety and effectiveness. The ingredient list and nutrition facts on food labels exist because of FDA requirements. When you read about PPE and SDS documents in Requirements 1a–1b, you saw how chemicals are classified — the FDA does similar classification work for drugs and food additives.
3. Occupational Safety and Health Administration (OSHA)
Founded: 1971, under the Occupational Safety and Health Act signed by President Nixon
History: Before OSHA, workplace safety was largely left to individual companies. Workers in factories, mines, and chemical plants were routinely exposed to toxic substances, dangerous machinery, and hazardous conditions with little legal protection. An estimated 14,000 workers died on the job each year in the late 1960s. OSHA was created to ensure every worker has a safe and healthy workplace.
Responsibilities:
- Sets and enforces workplace safety standards, including chemical exposure limits
- Requires employers to provide Safety Data Sheets (SDS) for all hazardous chemicals in the workplace
- Mandates proper PPE for workers handling chemicals
- Conducts workplace inspections and investigates accidents
- Provides training and education on chemical safety
How it affects you: The Safety Data Sheets you studied in Requirement 1a exist because OSHA’s Hazard Communication Standard requires them. The GHS pictograms you learned about in Requirement 1c are part of OSHA’s labeling requirements. Every time you see a “hard hat area” sign or a chemical warning label at a job site, that is OSHA’s work.
Other Agencies Worth Mentioning
While you only need three, here are additional agencies involved in chemical regulation:
- Department of Transportation (DOT) — Regulates the safe transport of hazardous materials on roads, rails, and waterways. Those diamond-shaped placards on tanker trucks? DOT requires them.
- Consumer Product Safety Commission (CPSC) — Protects the public from unreasonable risks of injury from consumer products, including those containing chemicals.
- Drug Enforcement Administration (DEA) — Controls the manufacture, distribution, and dispensing of legally produced controlled substances.
- National Institute for Occupational Safety and Health (NIOSH) — Conducts research on workplace safety (part of the CDC, not a regulatory agency).
How These Agencies Work Together
These agencies often collaborate:
- When a new pesticide is developed, the EPA evaluates its environmental impact, the FDA may assess residues on food, and OSHA sets rules for workers who manufacture or apply it.
- When a chemical spill occurs during transport, the DOT investigates the shipping violation, the EPA manages the environmental cleanup, and OSHA ensures the cleanup workers are protected.
🎬 Video: Why Does the FDA Exist? — https://youtu.be/DmYX23j5rnQ
Req 8 — Career Exploration
This is your chance to see chemistry in action beyond the classroom. You will choose one of three options: visiting a research laboratory, touring a chemical plant, or researching a chemistry career. Each option gives you a real-world connection to the science you have been studying.
- Option a: Visit a research laboratory
- Option b: Visit a company or plant that uses chemistry
- Option c: Research chemistry careers
Read through all three options and choose the one that works best for you.
Option A: Visit a Research Laboratory
A research laboratory is where new chemistry happens — where scientists ask questions nobody has answered yet and design experiments to find out. Research labs exist at universities, government agencies, hospitals, and private companies.
Where to find a lab to visit:
- Universities — Most college chemistry departments welcome visitors, especially Scouts working on merit badges. Contact the department office and ask if a professor or graduate student would be willing to give you a tour.
- Government labs — Agencies like the EPA, USDA, and Department of Energy operate research facilities. Some offer public tours or educational programs.
- Hospital labs — Clinical laboratories analyze blood, tissue, and other samples. Ask your family doctor or a local hospital about shadowing opportunities.
Questions to ask the chemist:
- What research are you currently working on?
- What does a typical day look like for you?
- What degree(s) do you have, and where did you study?
- What got you interested in chemistry?
- What is the most surprising discovery you have made?
- What skills beyond chemistry are important in your work?
Option B: Visit a Chemical Company or Plant
Chemistry is the backbone of many industries. Companies that manufacture paints, medicines, plastics, food products, cosmetics, fertilizers, and cleaning supplies all rely on chemical processes every day.
Types of facilities to visit:
- Water treatment plants — Your local municipality treats drinking water and wastewater using chemical processes. Most plants offer free public tours.
- Food manufacturing — Companies that produce beverages, baked goods, or dairy products use chemistry for preservation, flavoring, and quality control.
- Pharmaceutical companies — Drug manufacturers use chemistry at every stage, from drug discovery to quality testing.
- Paint or coatings manufacturers — These companies formulate products using pigments, solvents, resins, and additives.
- Breweries or distilleries — Fermentation is biochemistry in action, and quality control relies on analytical chemistry.
Questions to ask employees:
- What chemical processes does this facility use?
- What safety protocols do you follow? (Connect this to Requirements 1a–1d)
- What products do you make, and who uses them?
- What education or training did you need for your job?
- What is the most interesting part of working here?

Option C: Research Chemistry Careers
Chemistry opens doors to a wide range of careers. Here are several to consider — but remember, you need to identify at least three and research one in depth.
Career Options in Chemistry
| Career | What They Do | Typical Education |
|---|---|---|
| Chemist | Conducts research, develops new materials, tests substances | Bachelor’s or Master’s in Chemistry |
| Chemical Engineer | Designs large-scale chemical manufacturing processes | Bachelor’s in Chemical Engineering |
| Pharmacist | Dispenses medications, advises patients on drug interactions | Doctor of Pharmacy (PharmD) — 6–8 years |
| Environmental Scientist | Studies pollution, develops cleanup strategies | Bachelor’s in Environmental Science or Chemistry |
| Forensic Scientist | Analyzes crime scene evidence using chemistry | Bachelor’s in Forensic Science or Chemistry |
| Food Scientist | Develops and tests food products for safety and quality | Bachelor’s in Food Science |
| Quality Control Analyst | Tests products to ensure they meet safety and quality standards | Bachelor’s in Chemistry or related field |
| Patent Attorney (Chemistry) | Protects chemical inventions with legal expertise | Chemistry degree + Law degree |
| Science Teacher | Teaches chemistry at middle school, high school, or college | Bachelor’s + teaching certification |
How to Research a Career
For the career you choose, investigate:
- Education requirements — What degrees or certifications are needed? How long does it take?
- Training — Are there internships, residencies, or apprenticeships?
- Costs — What is the cost of the required education? Are scholarships available?
- Employment outlook — Is the field growing? The Bureau of Labor Statistics (BLS) publishes this data.
- Starting salary — What can you expect to earn in your first job?
- Advancement — What does the career ladder look like? Can you move into management, research, or academia?
- Day-to-day work — What does a typical workday look like?
🎬 Video: What Does a Chemical Engineer Do? — https://youtu.be/k-7B_YfHWXQ
Extended Learning
A. Introduction
Congratulations — you have earned the Chemistry merit badge! You have read Safety Data Sheets, performed experiments with soap and yeast, explored the Maillard reaction, tested pH with homemade indicators, and learned about the chemistry behind camping, the environment, and careers. But chemistry is a science that never stops revealing new wonders. Here are some paths to continue your exploration.
B. Deep Dive: Kitchen Chemistry Experiments
Your kitchen is one of the best chemistry labs you will ever have access to — and it is open 24 hours a day. Beyond the Maillard reaction and pH indicators, there are dozens of experiments you can do with ingredients already in your pantry.
Making butter is a fascinating demonstration of an emulsion breaking down. Heavy cream is an emulsion — tiny fat droplets suspended in water. When you shake cream vigorously in a jar for 10–15 minutes, the fat globules collide and stick together, separating from the liquid (buttermilk). You have just performed a physical change that reverses the emulsification process used in dairy production.
Rock candy demonstrates crystallization — the process by which dissolved molecules arrange themselves into a solid, repeating lattice structure. Dissolve as much sugar as possible in boiling water to create a supersaturated solution, then suspend a string in the liquid and wait several days. Sugar crystals will slowly grow on the string as the water evaporates and the solution can no longer hold all the dissolved sugar. The crystal shape you see is a direct result of the molecular geometry of sucrose.
Elephant toothpaste is a dramatic demonstration of catalysis — the use of a substance (catalyst) to speed up a chemical reaction. By mixing hydrogen peroxide with yeast (which contains the enzyme catalase), you trigger the rapid decomposition of hydrogen peroxide into water and oxygen gas. The oxygen gets trapped in dish soap, creating a massive, foamy eruption. The yeast itself is not consumed in the reaction — it simply lowers the activation energy needed for the reaction to occur.
Homemade slime teaches polymer chemistry. When you mix white glue (polyvinyl acetate) with borax solution, the borax ions create cross-links between the long polymer chains in the glue, turning a liquid into a stretchy, semi-solid material. Adjusting the ratio of glue to borax changes the slime’s properties — more borax makes it stiffer, less makes it runnier — demonstrating how molecular structure determines material properties.
C. Deep Dive: The Chemistry of Color
Color is one of the most visible ways chemistry manifests in the world around you. Every color you see — in a sunset, a painting, a flower, or a flame — has a chemical explanation.
Why things have color comes down to how molecules interact with light. White light contains all wavelengths (colors) of visible light. When light hits an object, the object’s molecules absorb some wavelengths and reflect or transmit others. The wavelengths that reach your eyes determine the color you perceive. A red apple absorbs blue and green light and reflects red light back to you.
Pigments vs. dyes represent two different chemical approaches to adding color. Pigments are insoluble particles that sit on top of or within a material (like paint on a wall). Dyes are soluble molecules that chemically bond to the material they color (like fabric dye bonding to cotton fibers). Both involve carefully engineered molecules whose electron structures absorb specific wavelengths of light.
Chromatography is a technique that separates mixtures based on how different molecules travel through a medium. You can try this at home: draw a line with a black marker on a coffee filter, dip the edge in water, and watch as the water carries different pigments up the filter at different speeds. You will see that “black” ink is actually a mixture of several colors — blue, purple, red, and sometimes yellow — each with a different molecular size and polarity.
Fluorescence and phosphorescence occur when certain molecules absorb light at one wavelength and re-emit it at another. Fluorescent materials glow under UV (“black”) light because they absorb invisible ultraviolet light and emit visible light. Phosphorescent materials (like glow-in-the-dark stickers) absorb light and release it slowly over time, continuing to glow after the light source is removed.
D. Deep Dive: Chemistry in Forensic Science
Every crime scene tells a chemical story. Forensic chemists use the same principles you have been learning — analytical techniques, chemical reactions, and molecular properties — to solve crimes.
Fingerprint detection relies on chemistry. Latent fingerprints (invisible to the eye) contain sweat residue rich in amino acids, salts, and oils. Forensic scientists use chemical reagents like ninhydrin (which reacts with amino acids to produce a purple color) or cyanoacrylate fuming (superglue vapors that adhere to fingerprint residue) to make invisible prints visible.
Toxicology testing uses analytical chemistry techniques to detect drugs, poisons, and alcohol in blood and tissue samples. Mass spectrometry — one of the most powerful analytical tools in chemistry — can identify specific molecules even in trace quantities of a few parts per billion.
Arson investigation relies on gas chromatography to detect accelerants (like gasoline or lighter fluid) at fire scenes. Even after a building has burned, trace chemical residues can survive and be identified by their unique molecular signatures.
DNA analysis, while technically biochemistry, uses chemical reactions (polymerase chain reaction, or PCR) to amplify tiny amounts of DNA into quantities large enough to analyze and compare.
E. Real-World Experiences
Science Olympiad
ACS Chemistry Festivals
University Open Houses
Museum of Science and Industry (Chicago)
Household Hazardous Waste Collection Day
F. Organizations
The world’s largest scientific society, with over 155,000 members. Offers student memberships, Chemistry Olympiad competitions, and extensive career resources.
Organization: American Chemical Society (ACS) — https://www.acs.org/
National STEM competition that includes multiple chemistry events. A great way to apply your chemistry knowledge in a team-based, competitive setting.
Organization: Science Olympiad — https://www.scioly.org/
Professional organization for chemical engineers. Offers student chapters, competitions, and career development resources.
Organization: American Institute of Chemical Engineers (AIChE) — https://www.aiche.org/
International chemistry organization based in the UK with excellent free educational resources, experiments, and videos for students worldwide.
Organization: Royal Society of Chemistry — https://www.rsc.org/
A website and social media project that creates beautiful infographics explaining the chemistry of everyday life — from food and drink to medicines and materials.
Organization: Compound Interest — https://www.compoundchem.com/