Req 2c — Alcohol & Microbes
In Requirement 2a, you formed a hypothesis about how alcohol kills germs. Now it is time to put that hypothesis to the test with a real experiment. You will use baker’s yeast as a stand-in for harmful microbes because yeast is safe to handle, easy to grow, and responds to alcohol in a visible way.
Why Baker’s Yeast?
Baker’s yeast (Saccharomyces cerevisiae) is a single-celled fungus — a type of microorganism. Like bacteria, yeast has a cell membrane made of lipids (fats) that is vulnerable to alcohol. Yeast is also easy to observe because when it is alive and active, it produces carbon dioxide gas (the same gas that makes bread rise and soda fizzy). If the yeast is alive, you will see bubbles. If the alcohol kills it, the bubbling stops.
Designing Your Experiment
A good experiment needs a control — a sample that does not receive the treatment — so you have something to compare against. Here is a simple setup:
Experiment Materials
What you will need
- Active dry yeast: One packet (about 7 grams) from the grocery store.
- Warm water: About 110°F (43°C) — warm to the touch but not hot.
- Sugar: One tablespoon to feed the yeast.
- Rubbing alcohol (70% isopropyl): Available at any pharmacy.
- Clear cups or jars: At least three identical containers.
- Measuring spoons: For consistent amounts.
- Labels or tape: To mark your cups.
- Timer or clock: To track observations over time.
Step-by-Step Procedure
Step 1: Activate the yeast. Mix one packet of yeast with one cup of warm water and one tablespoon of sugar. Stir gently and wait 5–10 minutes until the mixture becomes foamy and bubbly. This tells you the yeast is alive and actively fermenting.
Step 2: Divide into cups. Pour equal amounts of the active yeast mixture into three labeled cups:
- Cup A (Control): Yeast mixture only — do not add anything else.
- Cup B (Low dose): Add one teaspoon of rubbing alcohol.
- Cup C (High dose): Add one tablespoon of rubbing alcohol.
Step 3: Observe. Watch all three cups over the next 15–30 minutes. Record your observations every 5 minutes.
Step 4: Compare. After 30 minutes, compare the amount of bubbling, foam, and activity in each cup.
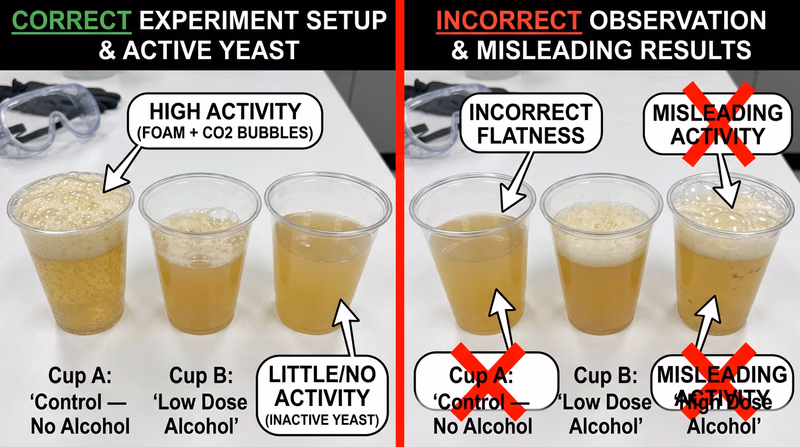
What You Should See
- Cup A (Control) should continue bubbling throughout the experiment. The yeast is alive and happily eating sugar.
- Cup B (Low dose) will likely show reduced bubbling. Some yeast cells are being killed or damaged by the alcohol, but others survive.
- Cup C (High dose) should show significantly less — or no — bubbling. The higher concentration of alcohol is killing most or all of the yeast cells.
Understanding Your Results
The results demonstrate the same principle that makes rubbing alcohol effective for cleaning wounds:
- Alcohol disrupts cell membranes. Yeast (and bacteria) have membranes made of lipids. Alcohol dissolves these lipids, causing the cells to leak and die.
- Concentration matters. A small amount of alcohol may only slow down microbial growth, while a larger amount kills the organisms outright.
- 70% alcohol is the sweet spot. Pure (100%) alcohol actually evaporates too quickly to be as effective. The 70% concentration used in rubbing alcohol gives the best balance — it stays in contact with the microbes long enough to destroy them.
Discussing Results with Your Counselor
When you meet with your counselor, be prepared to explain:
- What your hypothesis was before the experiment
- What you observed in each cup
- Why concentration of alcohol affected the results
- How this relates to using rubbing alcohol on cuts and scrapes
- Whether your hypothesis was confirmed or disproven