Req 4 — Camping Chemistry
Chemistry and camping go hand-in-hand in ways you might not expect. From keeping your gear dry to understanding how fires work, chemistry is at the heart of outdoor skills. For this requirement, you will choose two of the four options below.
- Option a: Compare waterproofing methods
- Option b: Fire classes and extinguishers
- Option c: Flame tests of elements
- Option d: Synthesize nylon
Read through all four options to decide which two interest you most, then dive deep into those.
Option A: Waterproofing Experiment
Waterproofing is chemistry in action. There are several approaches, and each works through a different chemical mechanism:
Silicone-based sprays coat fibers with a thin layer of silicone, a polymer that repels water. They are lightweight and breathable but may need reapplication.
Wax-based treatments fill the gaps between fabric fibers with wax, creating a physical barrier. They are durable but can reduce breathability and add weight.
Fluoropolymer treatments (DWR) use fluorine-based compounds to lower the surface energy of the fabric so water beads up and rolls off. Most factory waterproofing on jackets and tents uses this technology.
Oil-based treatments (like linseed oil) saturate the fabric, making it water-resistant. Traditional but heavy and can change the fabric’s feel.
For your counselor discussion: Tents need breathability so moisture from your breath does not condense inside — silicone sprays are a great choice. Boots need durability and full water blockage — wax treatments hold up better under heavy use and mud.
Option B: Fire Classes and Extinguishers
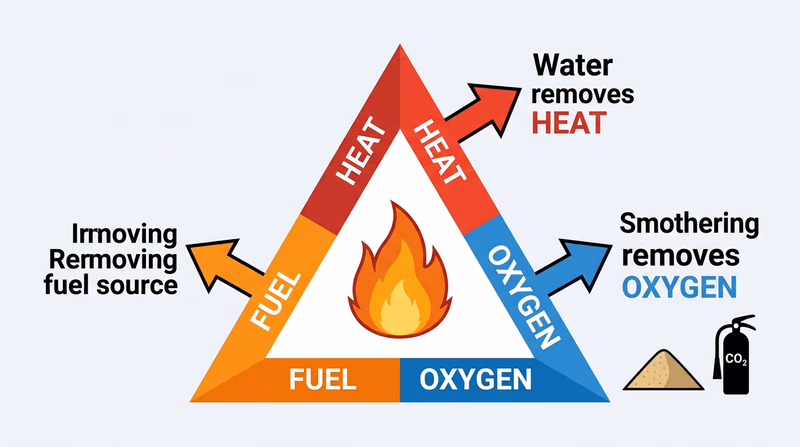
Fire needs three things to burn — heat, fuel, and oxygen. This is called the fire triangle. Fire extinguishers work by removing one or more of these elements.
The Four Classes of Fire
| Class | Fuel Type | Examples | Icon |
|---|---|---|---|
| A | Ordinary combustibles | Wood, paper, cloth, trash | Green triangle |
| B | Flammable liquids | Gasoline, oil, grease, paint | Red square |
| C | Electrical equipment | Wiring, outlets, appliances | Blue circle |
| D | Combustible metals | Magnesium, titanium, sodium | Yellow star |
How Extinguishers Work
| Extinguisher Type | Works On | Mechanism |
|---|---|---|
| Water | Class A | Cools the fuel below ignition temperature (removes heat) |
| CO₂ (carbon dioxide) | Class B, C | Displaces oxygen around the fire (removes oxygen) |
| Dry chemical (ABC) | Class A, B, C | Coats the fuel with a powder that interrupts the chemical reaction |
| Class D powder | Class D | Smothers the metal fire with a special powder that does not react with the burning metal |
Sand works by smothering — it covers the fuel and cuts off the oxygen supply. Baking soda (sodium bicarbonate) works in two ways: it smothers the fire like sand, and when heated, it releases CO₂ gas, which further displaces oxygen.
Option C: Flame Tests
Flame tests are one of the most visually stunning experiments in chemistry. When certain elements are heated in a flame, they emit light at specific wavelengths — producing distinctive, beautiful colors. This is the same principle behind fireworks.
Why Elements Produce Colors
When an atom absorbs heat energy, its electrons jump to a higher energy level (an “excited state”). When those electrons fall back to their normal energy level, they release the extra energy as light. The color of that light depends on the element, because each element has a unique arrangement of electron energy levels.
Common Flame Test Colors
| Element | Compound to Use | Flame Color |
|---|---|---|
| Lithium | Lithium chloride | Crimson red |
| Sodium | Table salt (NaCl) | Bright yellow/orange |
| Potassium | Salt substitute (KCl) | Light violet/lilac |
| Copper | Copper sulfate | Blue-green |
| Calcium | Calcium chloride (ice melt) | Orange-red |
| Strontium | Strontium chloride | Bright red |
| Barium | Barium chloride | Yellow-green |
Option D: Synthesize Nylon
Nylon was the first commercially successful synthetic polymer, invented by Wallace Carothers at DuPont in 1935. Making nylon from its raw chemicals is called the nylon rope trick because you literally pull a continuous strand of nylon from a beaker — it looks like magic, but it is pure chemistry.
How Nylon Synthesis Works
Nylon is formed through a condensation reaction between two chemicals:
- Hexamethylenediamine (a diamine — a molecule with two amine groups)
- Adipoyl chloride or sebacoyl chloride (a diacid chloride)
When these two liquids meet, they react at the interface (the boundary between the two layers) to form a thin film of nylon polymer. You can grab the film with tweezers or a glass rod and slowly pull it upward, drawing out a continuous strand of nylon fiber.
Nylon in Camping
Nylon is everywhere in outdoor gear:
- Tents — Nylon fabric is lightweight, strong, and water-resistant
- Backpack straps — Nylon webbing is tough and does not stretch
- Rope and cord — Paracord and climbing rope are made from nylon
- Sleeping bag shells — Nylon is packable and durable
By synthesizing nylon yourself, you are creating the same type of material used in the gear that keeps you safe and comfortable in the backcountry.
NFPA — Fire Extinguisher Types National Fire Protection Association guide to fire extinguisher types and proper use.