Climbing Merit Badge — Complete Digital Resource Guide
https://merit-badge.university/merit-badges/climbing/guide/
Introduction & Overview
Thirty feet off the ground, your fingertips curl over a ledge you cannot see. Your legs push against tiny footholds. Your belayer watches every inch of rope. In that moment, climbing is not just exercise — it is a conversation between your body, the rock, and the person holding your lifeline. Few merit badges demand this kind of trust, focus, and physical problem-solving all at once.
Climbing teaches you to read terrain, manage risk, and rely on a partner whose attention could save your life. Whether you scramble up a granite face in the backcountry or clip into a colorful route at your local gym, the skills you build here transfer to every outdoor adventure you will ever take.
Then and Now
Then
People have climbed mountains for centuries — to hunt, to explore, and to prove it could be done. Modern rock climbing traces its roots to the European Alps in the mid-1800s, when mountaineers like Edward Whymper made the first ascent of the Matterhorn in 1865. Back then, climbers wore hobnail boots, tied hemp ropes around their waists, and hammered iron pitons into cracks for protection. Falls were often fatal.
In the 1950s and 1960s, a group of climbers in Yosemite Valley pushed the sport forward. Royal Robbins, Yvon Chouinard, and Warren Harding developed techniques for scaling massive granite walls like El Capitan. They invented new gear — hexagonal chocks, spring-loaded camming devices — and debated the ethics of leaving permanent anchors in the rock. Their innovations shaped the sport we know today.
Now
Climbing exploded in popularity when sport climbing debuted at the 2020 Tokyo Olympics. Today, over 45 million people climb worldwide. Indoor climbing gyms have made the sport accessible to anyone — no mountain required. Modern dynamic ropes stretch to absorb falls. Lightweight harnesses, sticky-rubber shoes, and precision-engineered carabiners make climbing safer and more comfortable than ever before. Route-setting has become an art form, and competitions draw millions of viewers.
Yet the core challenge remains the same: you, the wall, and the next hold.
Get Ready!
Kinds of Climbing
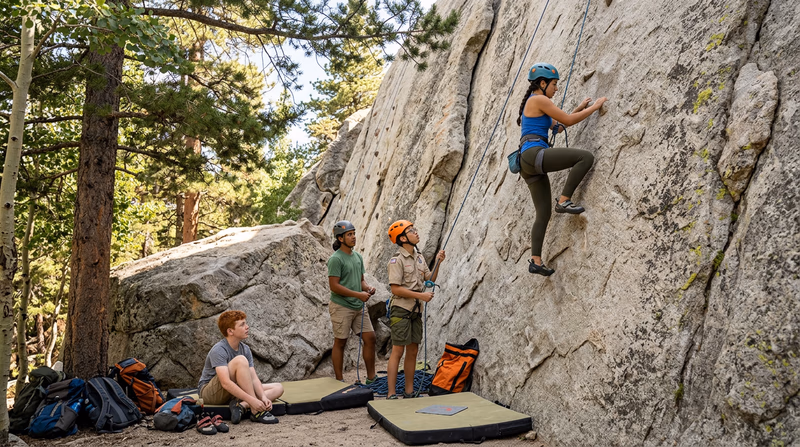
Top-Rope Climbing
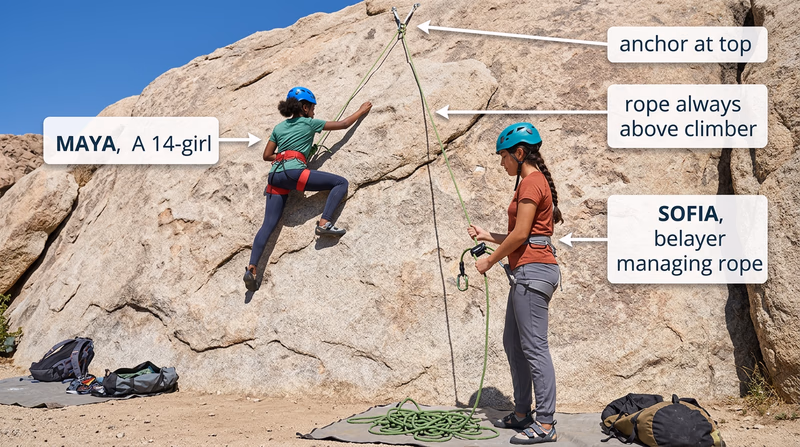
In top-rope climbing, the rope runs from the climber up to an anchor at the top of the route and back down to the belayer on the ground. Because the rope is always above you, a fall is short — usually just a few inches. This is how most Scouts will learn to climb and how you will complete several requirements for this badge. Top-roping is the safest form of roped climbing and the best way to build confidence on the wall.
Lead Climbing
Lead climbing raises the stakes. The climber carries the rope up and clips it into protection points (called quickdraws) along the route. If you fall, you drop to below your last clip — potentially a much longer distance than in top-roping. Lead climbing demands more experience, better technique, and stronger nerves. Your counselor will explain this style, though the merit badge focuses on top-rope skills.
Bouldering
Bouldering strips climbing down to its essentials: no rope, no harness, just you and a short wall (usually under 20 feet). Climbers use thick crash pads on the ground and rely on spotters — people standing below ready to guide a falling climber onto the pad. Bouldering builds strength, balance, and creative problem-solving because routes (called “problems”) often require unusual body positions.
Sport Climbing
Sport climbing uses pre-placed bolts drilled into the rock for protection. Climbers clip quickdraws into these bolts as they ascend. Because the protection is already in place, sport climbers can focus on movement and difficulty rather than gear placement. Most indoor climbing routes mimic sport climbing.
Traditional (Trad) Climbing
Traditional climbers place their own removable protection — cams, nuts, and hexes — into natural cracks as they ascend, then remove the gear on the way down. Trad climbing requires deep knowledge of gear placement and rock features. It is the style closest to climbing’s historical roots and remains popular in areas like Yosemite, the Gunks in New York, and Red River Gorge in Kentucky.
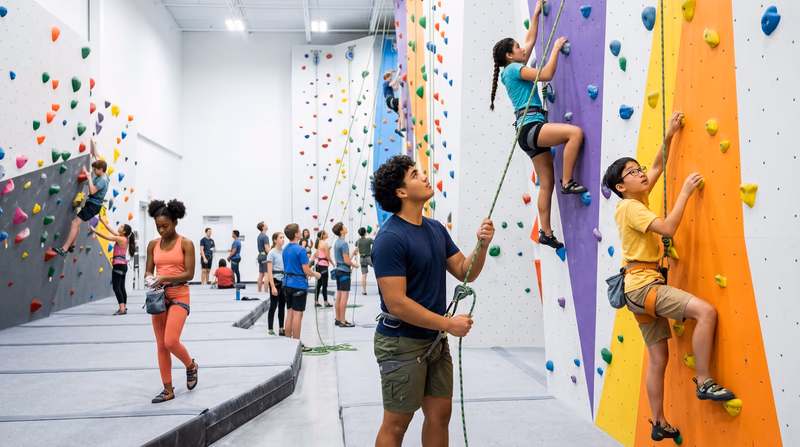
Indoor Climbing
Indoor climbing gyms offer manufactured walls with artificial holds bolted to plywood panels. Routes are color-coded by difficulty and regularly reset by route-setters. Gyms provide a controlled environment for learning — consistent temperatures, no weather worries, and trained staff nearby. Many Scouts will complete their climbing requirements at an indoor facility.
Start Your Ascent
This guide walks you through every requirement of the Climbing merit badge, from safety fundamentals and rope skills to the hands-on climbing and rappelling you will do with your counselor. Each section teaches the knowledge you need so you arrive prepared and confident.
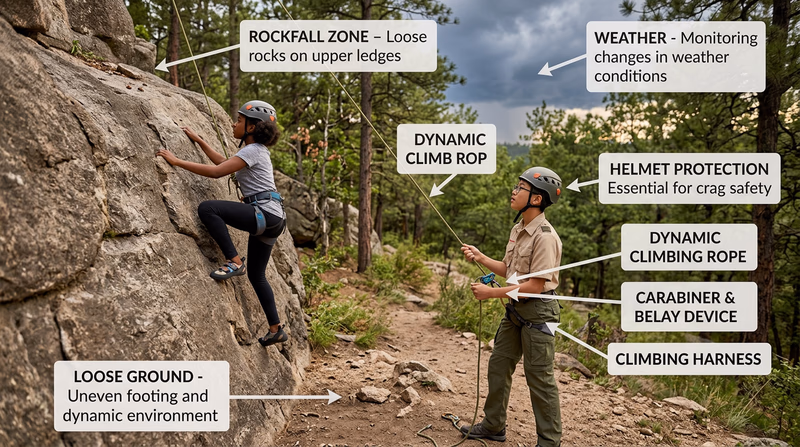
Req 1a — Climbing Hazards
A loose rock the size of a baseball breaks free forty feet above you. You hear someone shout “ROCK!” and press yourself flat against the wall. The stone bounces off the cliff and lands where you were standing three seconds ago. That is not a movie scene — it happens on real climbs. Understanding the hazards before you leave the ground is the first step toward keeping yourself and your climbing partners safe.
Falling
Falls are the most obvious hazard in climbing. A top-rope fall is usually just a short drop — the rope catches you quickly. But even a short fall can cause injury if you swing into the wall or land on a ledge. Longer falls happen in lead climbing when you are above your last piece of protection.
How to anticipate and prevent: Climb within your ability level. Check your knots and harness before every climb. Always have a trained belayer paying attention.
How to respond: If you fall, keep your legs slightly bent and ready to absorb impact against the wall. Do not grab the rope — let the belay system do its job. After a fall, pause, breathe, and check yourself for injuries before continuing.
Rockfall
Loose rock is a constant danger on outdoor climbs. Rocks can be dislodged by climbers above you, by weather, or by animals. Helmets exist specifically for this reason.
How to anticipate and prevent: Always wear a helmet outdoors. Test handholds before committing your weight. Avoid climbing directly below other parties. Choose routes known for solid rock when possible.
How to respond: If you hear “ROCK!” — do not look up. Press close to the wall, tuck your head, and let your helmet protect you. If you accidentally knock a rock loose, immediately shout “ROCK!” to warn everyone below.
Equipment Failure
Gear failures are rare in modern climbing because equipment is rigorously tested, but they do happen — usually because gear was damaged, improperly used, or worn beyond its service life.
How to anticipate and prevent: Inspect all equipment before every climb (you will learn the CHECK system in Req 9). Retire gear that shows signs of wear or damage. Never use equipment you did not inspect yourself.
Weather Hazards
Weather can change fast, especially in the mountains. Rain makes rock dangerously slippery. Lightning is a serious threat on exposed rock faces. Extreme heat causes dehydration and heat exhaustion. Cold temperatures reduce grip strength and decision-making ability.
How to anticipate and prevent: Check the weather forecast before every climbing day. Know the signs of approaching storms — darkening skies, sudden temperature drops, distant thunder. Have a plan to retreat if conditions deteriorate.
How to respond: If lightning threatens, descend immediately. Get off ridges and exposed rock. Avoid being the tallest object. If you cannot descend, crouch on an insulating pad (your rope) away from the cliff edge.
Environmental Hazards
The climbing environment itself presents dangers: sharp rock edges that cut ropes and skin, loose soil at the base of cliffs, uneven ground that causes ankle injuries during the approach hike, poison ivy or poison oak near the crag, and wildlife including snakes and stinging insects.
How to anticipate and prevent: Scout the area before you set up. Watch where you place your hands — both on the rock and on the ground. Wear appropriate footwear for the approach. Learn to identify local hazardous plants and animals.
Human Error
Mistakes by climbers and belayers cause more accidents than gear failure. Forgetting to tie a stopper knot, threading the rope through the belay device wrong, or losing focus while belaying — these errors are preventable.
How to anticipate and prevent: Use the buddy system. Before every climb, have your partner check your harness, knot, and belay device while you check theirs. Follow established communication protocols (covered in Req 5). Never rush.
Putting It Together
Anticipating hazards means thinking ahead. Before every climb, ask yourself: What could go wrong? What is the weather doing? Is the gear in good condition? Is my partner focused? This mindset — constant, calm awareness — is what separates safe climbers from lucky ones.
American Alpine Club — Accidents in North American Climbing Annual reports analyzing real climbing accidents and the lessons they teach. Link: American Alpine Club — Accidents in North American Climbing — https://americanalpineclub.org/annual-reportReq 1b — Injury Prevention & First Aid
A climber reaches the top of a route on a 95-degree afternoon, unclips, and sits down at the anchor. Her hands are shaking, she feels dizzy, and she has stopped sweating. Those are warning signs of heat stroke — and at the top of a cliff, getting her down safely requires quick thinking and calm action. Knowing first aid for climbing-specific injuries is not optional. It is part of the job.
Heat Reactions
Climbing in warm weather puts you at risk for heat-related illness. The progression goes: heat cramps → heat exhaustion → heat stroke. Each stage is more dangerous.
Prevention: Drink water before you feel thirsty. Take breaks in the shade. Climb during cooler parts of the day — early morning or late afternoon. Wear light-colored, breathable clothing.
First aid for heat exhaustion: Move the person to shade. Have them lie down with feet elevated. Cool them with wet cloths on the neck, armpits, and forehead. Give small sips of water. If they do not improve in 15 minutes, this is a medical emergency.
First aid for heat stroke: This is life-threatening. The person may be confused, have hot and dry skin, or lose consciousness. Call 911 immediately. Cool them aggressively — pour water over them, fan them, pack ice around the neck and armpits.
Cold Reactions
Climbing in cold weather — or at high altitudes where temperatures drop unexpectedly — can cause hypothermia and frostbite.
Prevention: Dress in layers. Avoid cotton (it holds moisture and loses insulation when wet). Bring extra warm layers even on mild days — temperatures drop as you gain elevation. Eat and drink regularly to fuel your body’s heat production.
First aid for hypothermia: Get the person out of the wind and cold. Remove wet clothing and replace with dry layers. Wrap them in an emergency blanket or sleeping bag. Give warm (not hot) drinks if they are alert. Handle them gently — rough movement can cause dangerous heart rhythms in severe hypothermia.
First aid for frostbite: Do not rub the affected area. Warm it gradually with body heat (tuck frostbitten fingers into armpits). Do not rewarm if there is a risk of refreezing — that causes worse damage. Seek medical attention.
Dehydration
Climbing is hard work, and you lose water through sweat and breathing — especially at altitude. Dehydration impairs your judgment, coordination, and grip strength before you realize it.
Prevention: Drink at least 16 ounces of water per hour during active climbing. Start hydrated — drink water throughout the day before you climb. Monitor your urine color: pale yellow means well-hydrated; dark yellow means drink more.
First aid: Rest in shade. Drink water or an electrolyte solution in small, frequent sips. If the person is vomiting or cannot keep fluids down, seek medical help.
Sprains
Ankle and wrist sprains are common in climbing, especially during bouldering falls and approaches over rough terrain.
Prevention: Wear supportive footwear for the approach hike. When bouldering, use crash pads and land on both feet with knees slightly bent. Warm up before climbing.
First aid (RICE method):
- Rest — Stop using the injured joint
- Ice — Apply cold for 20 minutes on, 20 minutes off
- Compression — Wrap with an elastic bandage (snug, not tight)
- Elevation — Raise the injured limb above heart level
Abrasions
Scraping skin against rough rock is almost unavoidable. Most abrasions are minor, but they need proper care to prevent infection.
Prevention: Wear climbing gloves for rappelling. Avoid dragging your arms and legs against the rock. Long sleeves and pants protect skin on rough routes.
First aid: Clean the wound thoroughly with clean water. Remove any debris. Apply antibiotic ointment and cover with a sterile bandage. Watch for signs of infection (redness, swelling, warmth, pus) over the following days.
Fractures
A broken bone from a fall or impact with the wall requires immediate attention. Signs include severe pain, swelling, deformity, and inability to move the limb.
Prevention: Climb within your skill level. Use proper belay technique to minimize fall distance. Wear a helmet to prevent skull fractures from rockfall.
First aid: Immobilize the fracture by splinting the injured limb — pad it and secure it to a rigid object so it cannot move. Do not try to straighten a deformed limb. Control any bleeding. Treat for shock (lay them down, elevate feet, keep warm). Call for help — a climber with a fracture will likely need a rescue team to get off the wall.
Rope Burns
Rope running quickly through bare hands generates enough friction heat to burn skin. This usually happens to belayers who grab a running rope during a fall.
Prevention: Always belay with a proper device — never hand-over-hand without one. Wear belay gloves, especially for rappelling. Keep loose clothing and hair away from belay devices.
First aid: Treat like a thermal burn. Cool the area with clean, cool water. Cover with a sterile, non-stick bandage. Do not pop blisters. Severe rope burns may need medical attention.
Blisters
Tight climbing shoes, new hiking boots, and repeated friction from rope handling all cause blisters.
Prevention: Break in new footwear before a climbing trip. Wear moisture-wicking socks. Apply moleskin or athletic tape to hot spots before blisters form.
First aid: If a blister is small and intact, cover it with moleskin or a bandage and leave it alone. If a large blister is painful and likely to rupture on its own, sterilize a needle, drain from the edge, and cover with antibiotic ointment and a bandage.
Snakebite
Snakes sun themselves on rocks — the same rocks climbers approach and grab. Rattlesnakes, copperheads, and cottonmouths are the venomous species most commonly encountered at climbing areas in the United States.
Prevention: Watch where you put your hands and feet, especially at the base of cliffs and on ledges. Step on top of rocks and logs, not over them blindly. Make noise on the approach trail.
First aid: Keep the person calm and still — movement speeds venom circulation. Remove rings, watches, or tight clothing near the bite (swelling will follow). Keep the bite below heart level if possible. Do not cut the wound, suck the venom, apply a tourniquet, or apply ice. Get to a hospital immediately — antivenom is the only effective treatment.
Concussions
A blow to the head from rockfall, a fall, or swinging into the wall can cause a concussion — a brain injury that requires careful monitoring.
Prevention: Wear a climbing helmet on every outdoor climb and rappel. Helmets protect against both falling objects and impacts during falls.
First aid: If someone takes a hit to the head, check for confusion, dizziness, headache, nausea, or vision problems. Do not let them continue climbing. Monitor them closely — symptoms can develop over hours. If they lose consciousness, vomit, or become increasingly confused, call 911.
Insect Bites and Stings
Bees, wasps, hornets, and spiders inhabit rocky areas. Some climbers discover nests mid-route — an alarming situation when you are thirty feet off the ground.
Prevention: Inspect the route from the ground before climbing. Avoid wearing heavily scented sunscreen or deodorant. Know whether anyone in your group has a severe allergy and carry an epinephrine auto-injector (EpiPen) if prescribed.
First aid: For mild stings, remove the stinger (scrape it off — do not squeeze), clean the area, and apply a cold pack. For allergic reactions — swelling of the face or throat, difficulty breathing, hives spreading across the body — use the EpiPen and call 911 immediately. This is anaphylaxis, and it can be fatal without treatment.
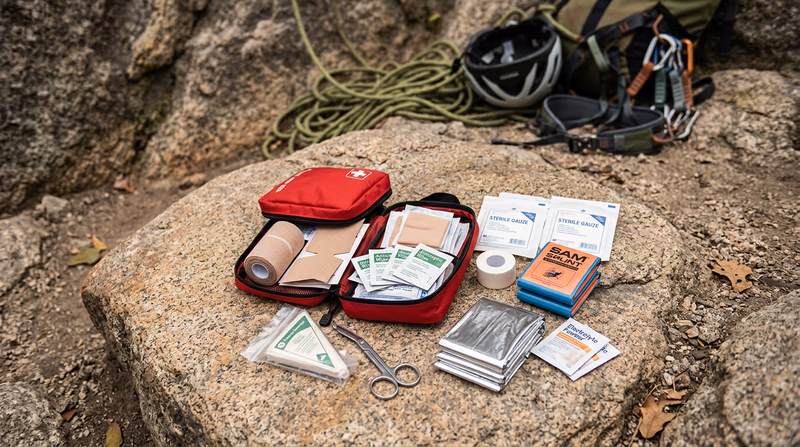
Build Your Climbing First Aid Kit
Your standard troop first aid kit covers most situations, but climbing adds a few extras worth carrying:
Climbing First Aid Additions
Items to add to your standard kit- Athletic tape: Protects fingers and covers hot spots before blisters form.
- Moleskin: Immediate blister relief.
- Elastic bandage: For wrapping sprains.
- SAM splint: Lightweight, moldable splint for fractures.
- Emergency blanket: Prevents hypothermia in an injured climber.
- Electrolyte packets: Mix with water to treat dehydration.
Req 1c — CPR Readiness
A climbing partner takes a long fall, swings hard into the wall, and hangs motionless on the rope. Your belayer lowers them to the ground. They are not moving. You shout their name — no response. In that moment, you need to know exactly when CPR is appropriate and when it is not. Starting CPR on someone who does not need it can cause harm. Not starting it on someone who does can cost their life.
What Is CPR?
CPR stands for cardiopulmonary resuscitation. It is a combination of chest compressions and rescue breaths designed to keep blood and oxygen flowing through the body when the heart has stopped beating or a person has stopped breathing. CPR does not restart the heart on its own — it buys time until advanced medical help arrives or a defibrillator (AED) can be used.
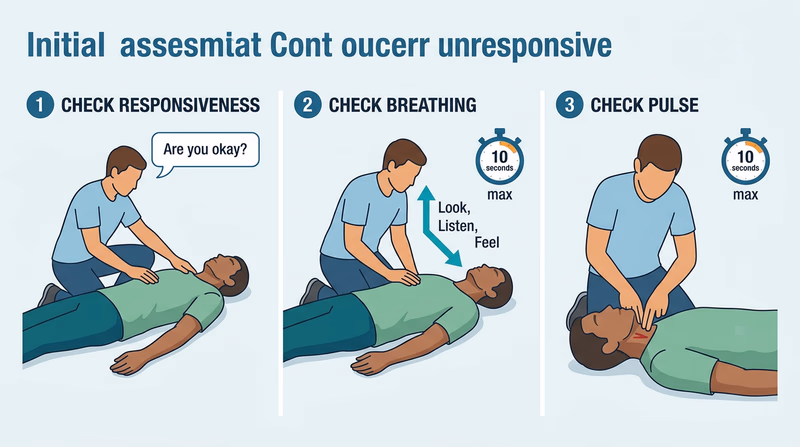
The Three Conditions for CPR
All three of these conditions must be present before you begin CPR:
1. The Person Is Unresponsive
Tap their shoulders firmly and shout, “Are you okay?” If they do not respond — no movement, no sound, no eye opening — they are unresponsive. A person who moans, pulls away from pain, or opens their eyes does not need CPR, even if they are confused or injured.
2. The Person Is Not Breathing Normally
Once you determine unresponsiveness, check for breathing. Look for chest rise and fall. Listen for breath sounds. Feel for air on your cheek. Take no more than 10 seconds to check.
Gasping is not normal breathing. Occasional gasping breaths (called agonal breathing) can occur when the heart stops. These look like irregular, labored gulps of air. If you see gasping but no steady, regular breathing, treat it as “not breathing” and begin CPR.
3. There Is No Pulse (or You Cannot Find One)
Check for a pulse at the carotid artery — the side of the neck, between the windpipe and the large muscle. Use two fingers (not your thumb, which has its own pulse). Check for no more than 10 seconds.
If you cannot find a pulse within 10 seconds, begin CPR. In a high-stress situation, finding a pulse can be difficult even on a living person. Current guidelines from the American Heart Association say that if a person is unresponsive and not breathing normally, you should begin CPR even if you are unsure about the pulse.
When NOT to Perform CPR
CPR is only for people who are unresponsive, not breathing normally, and have no pulse. Do not perform CPR if:
- The person is conscious and talking
- The person is breathing normally, even if unconscious (place them in the recovery position instead)
- The person has a clear pulse
- The scene is unsafe for you (active rockfall, unstable terrain, electrical hazard) — you cannot help anyone if you become a second victim
CPR in a Climbing Context
Climbing adds complications that make CPR scenarios more challenging:
- Vertical terrain: You cannot perform CPR on someone hanging from a rope. The person must be lowered to flat ground first. This is why belaying skill and rescue knowledge are so critical.
- Remote locations: Outdoor climbing areas may be far from emergency services. Cell phone reception is unreliable in canyons and mountain areas. In Req 4d, you will plan how to summon help.
- Limited help: You may be the only trained person at the crag. This makes CPR and first aid training even more important for everyone in your climbing group.
Get Trained
Reading about CPR is not the same as practicing it. To be truly prepared, take a hands-on CPR course where you practice on a training mannequin with a certified instructor. Many Scout councils offer CPR training, and the First Aid merit badge covers CPR in detail.
American Heart Association — CPR Training Find CPR courses and certification near you through the American Heart Association. Link: American Heart Association — CPR Training — https://cpr.heart.org/en/cpr-courses-and-kitsReq 2 — Leave No Trace & Outdoor Code
A popular climbing crag gets trashed over a single weekend — chalk graffiti on the rock, granola bar wrappers stuffed in cracks, and a fire ring built on fragile soil at the base. The landowner closes the area to climbers permanently. This has happened at real climbing areas across the country. Leave No Trace is not just an ideal — it is how climbers keep their access to outdoor spaces.
The Leave No Trace Seven Principles
These seven principles were developed by the Leave No Trace Center for Outdoor Ethics. They apply to every outdoor activity, but several have specific meaning for climbers.
1. Plan Ahead and Prepare
Research the climbing area before you go. Know the regulations — some crags have seasonal closures for nesting raptors like peregrine falcons. Check if permits are required. Bring everything you need so you do not have to improvise solutions that damage the environment.
2. Travel on Durable Surfaces
Stick to established trails on the approach to the crag. The soil at the base of cliffs is often fragile and slow to recover from trampling. Avoid creating new social trails. At popular bouldering areas, approach mats and crash pads should be placed on bare rock or established ground, not on vegetation.
3. Dispose of Waste Properly
Pack out everything you bring in — tape, water bottles, food wrappers, and even used athletic tape from your fingers. Climbers also need to think about human waste at remote crags. If there are no restrooms, follow the “cathole” method: dig a hole 6–8 inches deep, at least 200 feet from water, trails, and the climbing area.
4. Leave What You Find
Do not remove rocks, plants, or historical artifacts from climbing areas. Do not carve your initials into rock. Avoid “cleaning” natural holds by chipping or altering the rock — this permanently changes the route and is considered unethical in the climbing community.
5. Minimize Campfire Impacts
If you camp near a climbing area, use an established fire ring or a camp stove. Do not build fires at the base of cliffs — heat from fire can weaken rock structure and leave permanent scars. In many climbing areas, fires are prohibited altogether.
6. Respect Wildlife
Climbing areas are home to birds of prey, snakes, bats, and other wildlife. Peregrine falcons nest on cliff faces and are protected by federal law. If a route is closed for nesting season, respect the closure — even if the route looks open. Keep food stored properly to avoid attracting bears, raccoons, and rodents.
7. Be Considerate of Other Visitors
Share the crag. Do not monopolize popular routes by hanging on them for hours. Keep noise levels reasonable. Yield to other parties on the approach trail. If you are playing music, use headphones — not everyone wants to hear your playlist echoing off the canyon walls.
The Outdoor Code
The Outdoor Code is Scouting America’s pledge for responsible outdoor behavior:
As an American, I will do my best to be clean in my outdoor manners, be careful with fire, be considerate in the outdoors, and be conservation-minded.
Each line has direct relevance to climbing:
- Clean in my outdoor manners — Pack out all waste, clean chalk marks from holds if excessive, leave the crag better than you found it.
- Careful with fire — No campfires at the base of cliffs. Use stoves for cooking.
- Considerate in the outdoors — Share routes, communicate with other parties, keep the area welcoming for everyone.
- Conservation-minded — Support climbing area conservation through organizations like the Access Fund. Respect closures. Educate newer climbers about stewardship.
Chalk and Leave No Trace
Climbing chalk (magnesium carbonate) leaves white marks on rock that can last for years. While chalk is a necessary tool, excessive chalk buildup is an eyesore and a common complaint from land managers and non-climbing visitors.
Chalk Etiquette
Reduce your chalk impact- Use a chalk ball inside your chalk bag to reduce airborne chalk dust.
- Brush excess chalk off holds when you finish a route (carry a soft brush).
- Consider using colored chalk that matches the rock at sensitive areas.
- Do not draw on the rock with chalk — no arrows, tick marks, or messages.
Req 3 — Dressing for the Climb
Your clothing is gear. A loose hoodie string that catches in your belay device. Baggy shorts that snag on a quickdraw. Jeans so stiff you cannot high-step to the next foothold. What you wear directly affects how safely and comfortably you climb. Your counselor will ask you to present yourself dressed and ready — and to explain every choice.
Easy Movement
Climbing demands a huge range of motion. You will high-step, reach overhead, twist sideways, and squat deep against the wall. Your clothing needs to move with you, not against you.
Pants or shorts: Choose stretchy, lightweight pants or shorts that allow you to lift your knee to your chest. Many climbers prefer pants with a gusseted crotch — an extra panel of fabric that adds freedom of movement. Athletic shorts or stretchy hiking pants work well. Avoid jeans, cargo pants, or anything stiff.
Shirt: A fitted, moisture-wicking T-shirt or long-sleeve shirt works best. It should be snug enough that it does not catch on gear but loose enough for full arm extension. Synthetic fabrics or merino wool dry faster than cotton.
Entanglement Free
Anything dangling from your body can get caught in a belay device, carabiner, or crack in the rock. Entanglement while belaying or rappelling can jam your system and create a dangerous situation.
Specific entanglement risks:
- Drawstrings on hoodies and jackets — tuck them in or tie them short
- Jewelry — remove necklaces, bracelets, and dangling earrings
- Long hair — tie it back in a bun or braid and tuck it under your helmet
- Loose straps on backpacks or chalk bags — secure all dangling webbing
- Watch bands and fitness trackers — remove or cover them
Weather Protection and Comfort
Outdoor climbing means dealing with sun, wind, rain, and temperature swings — sometimes all in one day.
Sun Protection
At the crag, you may be exposed to direct sun for hours. Apply sunscreen before you start climbing (it is hard to reapply when your hands are chalked). A lightweight, brimmed hat works during belaying. Some climbers wear a thin sun hoodie for UV protection.
Wind and Cold
Wind accelerates heat loss, especially when you are standing at a belay station waiting your turn. Bring a lightweight wind shell that packs into your harness or a small bag. A thin insulating layer (fleece or puffy jacket) should be accessible at the base.
Rain
If rain is possible, carry a waterproof shell. Rain makes rock extremely slippery and increases the risk of hypothermia. As you learned in Req 1a, wet conditions are a serious hazard — you should stop climbing in rain.
Layering System
The classic layering system works perfectly for climbing:
| Layer | Purpose | Examples |
|---|---|---|
| Base layer | Wicks sweat away from skin | Synthetic or merino wool T-shirt |
| Mid layer | Insulates and retains heat | Fleece pullover, thin puffy jacket |
| Outer layer | Blocks wind and rain | Lightweight wind shell or rain jacket |
Remove and add layers as your activity level changes. You will be warm while climbing and cool while belaying — plan for both.
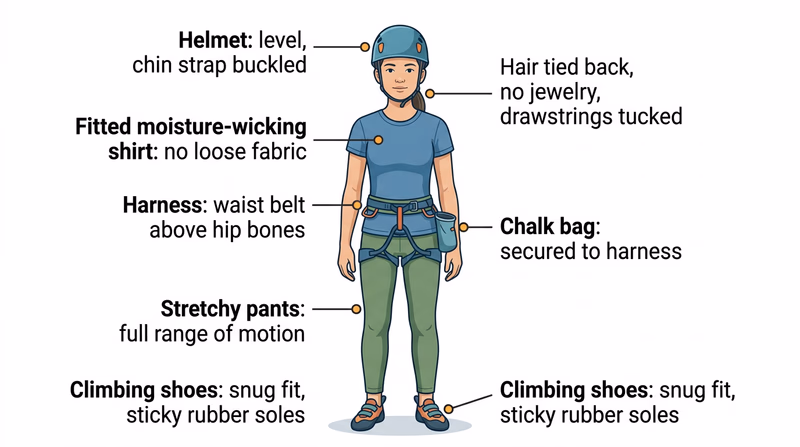
Footwear
Climbing shoes are specialized footwear with sticky rubber soles that grip rock. They fit tightly — much tighter than street shoes — to give you precise control over your foot placement. Your counselor or gym will help you find the right size. Climb in the shoes, but walk around in approach shoes or hiking shoes.
Approach shoes or hiking shoes get you to the crag. They should have good ankle support and grippy soles for rough terrain.
Putting It All Together
When your counselor asks you to present yourself dressed for climbing, think through these three principles: Can I move freely? Is anything dangling that could snag? Am I prepared for the weather? If you can say yes, yes, and yes — you are ready.
Pre-Climb Clothing Check
Run through this before every climb- Stretchy pants or shorts that allow full range of motion.
- Fitted, moisture-wicking shirt (no loose fabric).
- All drawstrings tucked in or removed.
- Jewelry removed; long hair secured.
- Climbing shoes fitted and comfortable.
- Weather layers accessible (not worn while climbing if not needed).
- Sunscreen applied.
Req 4a — Climb Difficulty Ratings
You arrive at a crag and see routes labeled 5.6, 5.10a, and 5.12c. Without understanding the rating system, those numbers are meaningless. With it, you can instantly gauge whether a route is within your ability — or whether you should build more skill before attempting it.
The Yosemite Decimal System (YDS)
The most widely used climbing rating system in North America is the Yosemite Decimal System. It was developed in the 1950s at Tahquitz Rock in Southern California and refined over decades by Yosemite climbers.
The system classifies terrain into five classes:
| Class | Description | Example |
|---|---|---|
| Class 1 | Walking on a trail | A maintained hiking path |
| Class 2 | Simple scrambling, may use hands for balance | Boulder hopping on a rocky trail |
| Class 3 | Scrambling on steep terrain, exposure to falls | Ascending a rocky ridge with some exposure |
| Class 4 | Simple climbing, rope recommended | Easy rock with serious fall consequences |
| Class 5 | Technical rock climbing, rope and protection required | What you do for this merit badge |
Class 5 Breakdown
Class 5 is where real climbing begins, and it has its own detailed sub-ratings:
| Rating | Description |
|---|---|
| 5.0–5.4 | Very easy climbing. Large, obvious holds. Like climbing a steep ladder. |
| 5.5–5.6 | Easy. Good holds, moderate angle. Most beginners start here. |
| 5.7–5.8 | Moderate. Smaller holds, steeper angles. Requires some technique. |
| 5.9 | Difficult. Holds get smaller, moves become more precise. |
| 5.10a–5.10d | Hard. Requires specific techniques and good fitness. |
| 5.11a–5.11d | Very hard. Sustained difficult moves, strength and endurance required. |
| 5.12+ | Expert. At the edge of human ability for most recreational climbers. |
Notice that starting at 5.10, ratings add a letter suffix (a, b, c, d) to create finer distinctions. A 5.10a is significantly easier than a 5.10d.
Bouldering Grades: The V-Scale
Bouldering uses a separate rating system called the V-scale (also called the Hueco scale, after Hueco Tanks in Texas where it was developed).
| Grade | Description |
|---|---|
| VB | Beginner. Easy moves on large holds. |
| V0–V1 | Introductory. Requires basic technique. |
| V2–V3 | Moderate. More demanding moves and body positions. |
| V4–V5 | Difficult. Requires strength and specific technique. |
| V6+ | Advanced and beyond. |
There is no direct conversion between the V-scale and YDS, but very roughly, V0 corresponds to the difficulty of moves on a 5.10 route.
Indoor Gym Ratings
Indoor climbing gyms use the same YDS and V-scale numbers, but they also add color-coded routes. Each color represents a difficulty level, and the gym’s route-setters assign ratings based on the intended difficulty. Gym ratings tend to be slightly easier than outdoor ratings of the same number because indoor holds are manufactured and predictable.
Other Rating Systems
If you climb internationally or read older guidebooks, you may encounter other systems:
- French system — Used worldwide for sport climbing (e.g., 6a, 7b+). Common in European gyms.
- UIAA scale — Used in Central Europe (e.g., VI, VII+).
- British system — Combines an adjectival grade (e.g., “Hard Very Severe”) with a technical grade.
For this merit badge, focus on the YDS and V-scale — they are the standard in North America.

Req 4b — Climbing Styles
These three styles of climbing look similar from a distance — someone going up a wall — but the rope systems, risk profiles, and skills involved are fundamentally different. Understanding these distinctions helps you choose the right style for your experience level and communicate knowledgeably with your counselor.
Top-Rope Climbing
In top-rope climbing, the rope is anchored at the top of the route before the climber begins. The rope runs from the belayer on the ground, up through the anchor, and back down to the climber’s harness. As the climber ascends, the belayer takes in slack so the rope stays taut above.
What makes it safer: If the climber falls, they only drop a few inches — the distance of whatever slack was in the rope. There is no long fall. This makes top-roping the standard style for beginners and the method you will use for most of your merit badge climbing.
Setup: Someone must first get the rope to the top. This can be done by hiking to the top of the cliff and building an anchor, or by a lead climber ascending first and setting the anchor for everyone else.
Limitations: You can only top-rope routes where you can safely access the top or where an experienced climber can lead the route first. The rope creates friction through the top anchor, which means the belayer has to pull harder as the climber gets higher.
Lead Climbing
In lead climbing, the climber starts from the ground with the rope trailing below, clipping it into protection points (quickdraws on bolts, or removable gear in cracks) as they ascend. The belayer feeds rope out as the climber moves up.
The key difference: If a lead climber falls, they drop twice the distance to their last clip, plus rope stretch. For example, if you are 5 feet above your last quickdraw, you will fall 10 feet (5 feet down to the quickdraw, plus 5 feet below it) before the rope catches you.
Why it matters: Lead falls are longer, more dynamic, and demand more from both the climber and the belayer. The belayer must feed rope smoothly and catch falls without being pulled off balance. Lead climbing requires advanced skills and more experience than top-roping.
Gear: Sport lead climbing uses pre-placed bolts and quickdraws. Traditional (trad) lead climbing requires the climber to place removable protection in cracks — a skill that takes significant training.
Bouldering
Bouldering is climbing without ropes on short walls or boulders, typically under 20 feet. Instead of a belay system, boulderers use thick foam crash pads on the ground and rely on spotters.
The appeal: Bouldering strips climbing down to pure movement. Routes (called “problems”) are short but intensely difficult. Each problem is a puzzle — figuring out the sequence of moves is half the challenge. Bouldering builds strength, flexibility, and creative problem-solving faster than any other climbing style.
Spotting: A spotter does not catch the falling climber. Instead, the spotter guides the climber’s upper body so they land feet-first on the crash pad. Spotting is a skill that requires attention and positioning — you will practice it in Req 5d.
Risks: Even at low heights, awkward falls cause injuries. Ankle sprains and wrist fractures are the most common. Always use crash pads, keep the landing zone clear of rocks and gear, and have at least one attentive spotter.
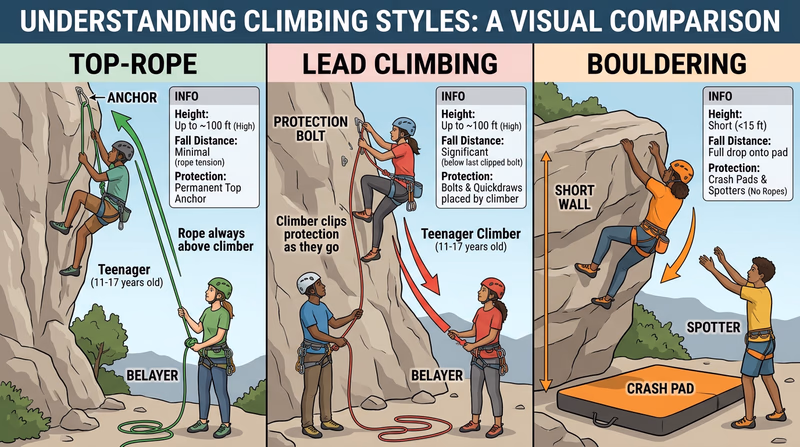
Comparing the Three Styles
| Feature | Top-Rope | Lead | Bouldering |
|---|---|---|---|
| Rope | Anchored at top | Climber clips as they go | No rope |
| Fall distance | Inches | Feet to tens of feet | Full height to ground |
| Protection | Top anchor | Bolts or removable gear | Crash pads + spotter |
| Best for | Beginners, skill building | Experienced climbers | Strength, problem-solving |
| Height | Full wall height | Full wall height | Under 20 feet |
Req 4c — Site Safety Evaluation
Two climbing areas rated the same difficulty can have wildly different risk profiles. One crag has solid granite, good bolts, and a flat approach. Another has crumbly sandstone, rusty anchors, and a loose scree slope at the base. The rating tells you how hard the climbing moves are. The site evaluation tells you whether it is safe to climb there today.
Weather Assessment
Weather is the most dynamic safety factor. It can change within hours and turn a safe crag into a dangerous one.
Before you leave home:
- Check the forecast for the climbing area — not just your town. Mountain weather can differ dramatically from the valley.
- Look for precipitation chances, wind speed, and temperature highs and lows.
- Check for thunderstorm warnings. Lightning and exposed rock are a lethal combination.
At the crag:
- Scan the sky for building cumulus clouds (the tall, puffy ones that signal thunderstorms).
- Feel for sudden temperature drops or wind shifts — both signal incoming weather.
- If rain has fallen recently, rock may still be wet and slippery even under clear skies. Sandstone is particularly dangerous when wet because it weakens structurally.
Visibility
Good visibility keeps everyone safe. You need to see your climber, your climber needs to see holds, and everyone needs to spot rockfall.
Factors that reduce visibility:
- Fog or low clouds at the crag
- Fading daylight (never climb in the dark)
- Sun glare — early morning or late afternoon sun can blind belayers looking up
- Dust kicked up by wind or nearby activity
What to do: If visibility is poor, move to routes where the belayer can see the climber clearly. Adjust your position to avoid sun glare. Plan to finish climbing well before sunset — packing up in the dark on uneven terrain invites ankle injuries.
Climbing Surface Condition
The rock itself can be the biggest hazard. Evaluate it before trusting it with your life.
What to look for:
| Condition | Risk | What to Do |
|---|---|---|
| Loose or flaky rock | Holds break off, rockfall danger | Avoid the route or test holds carefully |
| Wet rock | Slippery holds and reduced friction | Wait for it to dry; sandstone may need 24–48 hours |
| Lichen or moss | Extremely slippery, hides hold quality | Avoid covered areas |
| Fractured or cracked rock | Entire sections can shift | Assess whether cracks are stable or active |
| Sandy or dirty holds | Reduced grip, especially on slabs | Brush holds before climbing |
Environmental Hazards
Look beyond the rock face itself. The entire area around the climbing site affects safety.
Ground hazards: Uneven or sloping ground at the base makes belaying difficult and landing from bouldering falls dangerous. Look for tripping hazards — roots, loose rocks, gear scattered on the ground.
Overhead hazards: Are there climbers above you who might knock down rocks? Are there dead trees or loose boulders above the crag that could come down in wind? Is there an active trail above the cliff edge where hikers might kick rocks over?
Biological hazards: Check for poison ivy, poison oak, or stinging nettle near the base and on approach trails. Look for wasp nests in cracks and on ledges. In snake country, watch where you put your hands at ground level.
Access and terrain: Evaluate the approach trail. A dangerous approach hike increases overall risk even if the climbing itself is safe. Steep scree slopes, river crossings, and scrambling sections all add hazard.
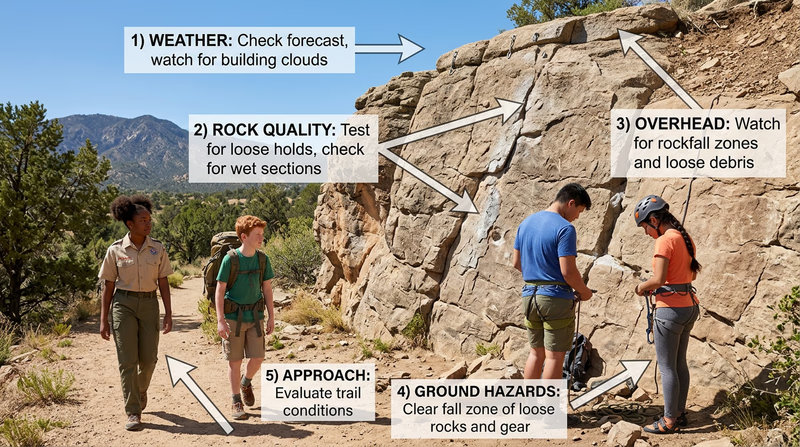
Making the Call
Site evaluation is not just an exercise for your counselor — it is a decision-making process. After assessing all factors, you should be able to answer: Is it safe to climb here, right now?
Sometimes the answer is “not today.” Maybe the rock is wet. Maybe weather is moving in. Maybe the only available routes are above your skill level. A good climber knows when to walk away. That takes more judgment than any move on the wall.
American Alpine Club — Know Before You Go Safety resources for climbers, including accident reports that highlight real-world consequences of poor site evaluation. Link: American Alpine Club — Know Before You Go — https://americanalpineclub.org/safety-resourcesReq 4d — Emergency Planning
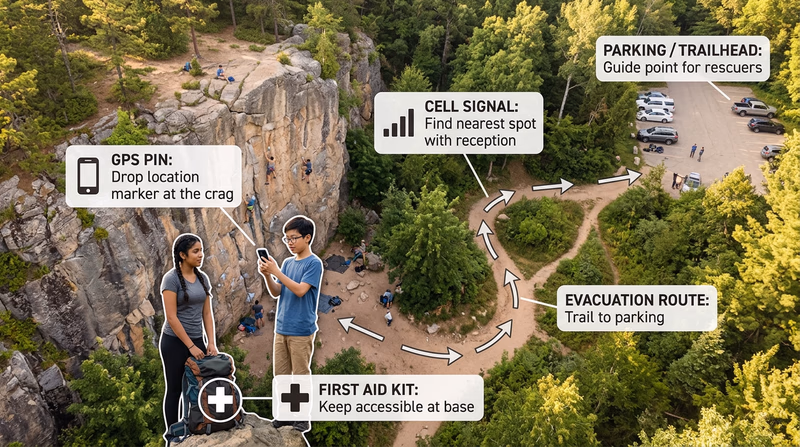
A climber breaks an ankle on a ledge forty feet up. The nearest road is a twenty-minute hike through the woods. Cell service is spotty. Who calls for help? What do you tell them? How does the rescue team find you? These questions need answers before anyone ties into the rope — not while someone is screaming in pain on the wall.
Building an Emergency Plan
Every climbing outing needs a simple, written emergency plan. It does not have to be complicated, but it must cover four questions:
1. How Do We Call for Help?
- Cell phone coverage: Test your phone at the climbing area before you start climbing. Many crags have dead zones. If you cannot get a signal at the base, walk the area and find the closest spot where you can. Note that location.
- Designated caller: Assign one person in the group who carries a fully charged phone and knows they are the emergency caller.
- Alternative communication: If cell service is unreliable, consider carrying a personal locator beacon (PLB) or satellite messenger. These devices send emergency signals via satellite from anywhere.
2. What Do We Tell Them?
When calling 911 or emergency services, provide:
Emergency Call Information
Have this ready before you need it- Your name and the number of people in your group.
- Exact location: GPS coordinates, trail name, and landmark descriptions.
- Nature of the injury: what happened, what hurts, level of consciousness.
- Current conditions: weather, time of day, terrain description.
- Access information: how rescue teams can reach you (trail name, parking area, approach directions).
3. How Does the Rescue Team Find Us?
Remote climbing areas can be hard to locate from the air or the trail. Help the rescue team by:
- Providing GPS coordinates (latitude/longitude, not just an address)
- Describing landmarks: “The cliff face is 200 yards north of the creek crossing on the Blue Trail”
- Sending someone to the trailhead or parking area to guide rescuers in
- Using a whistle, mirror, or bright-colored gear to signal if a helicopter is searching
4. What Do We Do While Waiting?
- Keep the injured person calm, warm, and still
- Treat injuries with your first aid knowledge from Req 1b
- Do not move someone with a suspected spinal injury unless they are in immediate danger
- Monitor their condition and note any changes to report to responders
- Clear the landing zone if helicopter evacuation is possible
Medical Training for Your Group
The remoteness of the climbing area determines how much medical training your group needs. More remote means more self-reliance.
| Setting | Minimum Training | Why |
|---|---|---|
| Indoor gym | Basic first aid | Staff and EMS are minutes away |
| Roadside crag (near parking) | First aid + CPR | EMS can reach you in 15–30 minutes |
| Backcountry crag (1+ hour from road) | Wilderness First Aid (WFA) | You may need to stabilize injuries for hours before help arrives |
| Remote alpine (multi-day approach) | Wilderness First Responder (WFR) | Days from medical care; advanced skills essential |
For most Scout climbing activities, at least one adult leader should hold current first aid and CPR certification. For remote locations, Wilderness First Aid (WFA) is strongly recommended — it is a 16-hour course that teaches you how to assess and manage injuries when a hospital is hours away.
Indoor Climbing Emergencies
If you are completing your merit badge at an indoor climbing gym, the emergency plan is simpler but still necessary. Know where the first aid kit is. Know where the AED (automated external defibrillator) is located. Know the gym’s emergency procedures — most gyms have posted protocols and trained staff. Your counselor should orient you to these before climbing begins.
NOLS Wilderness Medicine — Course Finder Find Wilderness First Aid and Wilderness First Responder courses near you. Link: NOLS Wilderness Medicine — Course Finder — https://www.nols.edu/en/coursefinder/wilderness-medicine/Req 5 — Communication on the Wall
This requirement covers the verbal signals used by four roles:
- Climbers (5a)
- Rappellers (5b)
- Belayers (5c)
- Boulderers and their spotters (5d)
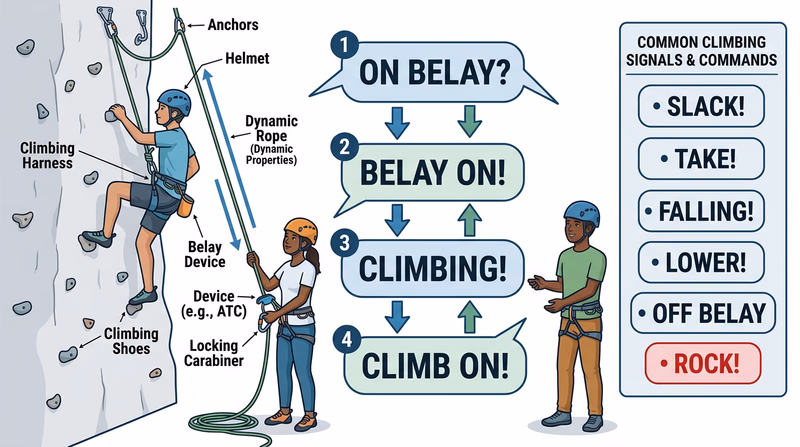
“Slack!” You hear the shout from forty feet up, but wind garbles the next word. Was it “Slack” or “Take”? Those two commands do opposite things — one feeds rope out, the other pulls it tight. If the belayer guesses wrong, the climber could fall or get pulled off balance. Verbal signals are not suggestions. They are the communication system that keeps everyone alive.
Why Signals Matter
Climbing is a team activity where two people — climber and belayer — cannot always see each other. The climber may be around a corner, above an overhang, or simply too far away for casual conversation. Wind, echoes, and other climbers add noise. Standardized verbal signals cut through all of this because:
- They are short and distinct — each command sounds different from the others
- They are universal — climbers everywhere use the same words
- They create a confirmation loop — every command gets a response
Climbing Signals (5a)
These signals form a call-and-response sequence between the climber and belayer:
| Who Says It | Signal | Meaning |
|---|---|---|
| Climber | “On belay?” | “Am I connected to the belay system? Are you ready?” |
| Belayer | “Belay on.” | “Yes, I have you. The system is active.” |
| Climber | “Climbing.” | “I am about to start moving up.” |
| Belayer | “Climb on.” | “Go ahead, I am managing the rope.” |
| Climber | “Slack!” | “Give me more rope — it is too tight.” |
| Climber | “Up rope!” or “Take!” | “Pull the rope tighter — too much slack.” |
| Climber | “Falling!” | “I am falling — catch me!” |
| Climber | “Lower!” or “Take!” | “I am done — lower me to the ground.” |
| Climber | “Off belay.” | “I am safe and no longer need the belay.” |
| Belayer | “Belay off.” | “The belay system is deactivated.” |
Rappelling Signals (5b)
Rappelling uses a similar system. The rappeller controls their own descent, but a belayer (or backup belayer) manages a safety line below.
| Who Says It | Signal | Meaning |
|---|---|---|
| Rappeller | “On rappel?” | “Is the belay ready for my descent?” |
| Belayer | “Rappel on.” | “The fireman’s belay is ready. Descend when ready.” |
| Rappeller | “Rappelling!” | “I am beginning my descent.” |
| Rappeller | “Off rappel.” | “I am down and disconnected from the rope.” |
| Belayer | “Belay off.” | “The safety line is released.” |
If the rappeller needs the belayer to lock the rope (stop their descent), the belayer can pull the rope taut from below — this is called a fireman’s belay. The rappeller shouts “Stop!” if they need to pause.
Belayer Signals (5c)
The belayer is the silent partner through most of the climb, responding to the climber’s commands. But belayers also initiate signals when needed:
| Who Says It | Signal | Meaning |
|---|---|---|
| Belayer | “Belay on.” | Response confirming the belay is active |
| Belayer | “Climb on.” | Response confirming the climber can begin |
| Belayer | “Belay off.” | The belay is no longer active |
| Belayer | “Watch me!” | “I see something — pay attention” (used for rockfall, etc.) |
| Anyone | “ROCK!” | “Something is falling — protect yourself!” |
The “ROCK!” signal deserves special emphasis. It is the one signal that everyone at the crag must know and respond to instantly. When you hear “ROCK!” — do not look up. Press against the wall, tuck your head, and let your helmet do its job.
Bouldering and Spotter Signals (5d)
Bouldering has no rope system, so signals are simpler — but spotting communication is critical.
| Who Says It | Signal | Meaning |
|---|---|---|
| Boulderer | “Spot me.” | “I am about to start. Be ready.” |
| Spotter | “Spotting.” | “I am in position and paying attention.” |
| Boulderer | “Falling!” | “I am coming off — guide me to the pad.” |
| Spotter | “Watch your left/right.” | “Move your pad — the fall line is shifting.” |
| Anyone | “Clear!” | “Move crash pads, I am jumping down.” |
The Spotter’s Role
A spotter does not catch a falling boulderer — that would injure both people. Instead, the spotter:
- Stands with arms up, hands open, ready to redirect the climber’s upper body
- Guides the climber’s hips and shoulders so they land feet-first on the crash pad
- Keeps the landing zone clear of gear, water bottles, and other tripping hazards
- Moves the crash pad if the climber traverses laterally
Practice Makes Automatic
You will demonstrate these signals with your counselor or another Scout. Practice them until they are automatic — in a real situation, you will not have time to think. The signals should come out as instinct, not as something you have to remember.
Petzl — Climbing Communication Visual guide to climbing communication signals from a leading climbing equipment manufacturer. Link: Petzl — Climbing Communication — https://www.petzl.com/US/en/Sport/Signals-and-communication-while-climbingReq 6 — Rope Care & Management
This requirement covers five topics about climbing rope:
- 6a — Kinds of rope acceptable for climbing and rappelling
- 6b — How to examine a rope for wear or damage
- 6c — Ways to prevent rope damage
- 6d — When and how to retire a rope
- 6e — How to properly coil a rope
Your climbing rope is the single most important piece of safety equipment you own. A 60-meter dynamic rope, thinner than your thumb, can catch a 200-pound climber falling 20 feet without breaking. But that same rope, if damaged, can fail without warning. Understanding rope types, inspection, care, and retirement is not optional knowledge — it is survival knowledge.
6a: Kinds of Climbing Rope
Dynamic Ropes
Dynamic ropes are designed to stretch under the force of a fall, absorbing energy gradually rather than stopping the climber with a sudden jerk. This stretch is critical — a rope that does not stretch transfers all the force of a fall directly to the climber’s body, the anchor, and the belayer.
Dynamic ropes are the only ropes acceptable for climbing where falls are possible. They are what you will use for top-rope climbing, lead climbing, and rappelling with a belay.
Dynamic ropes come in three categories:
| Type | Diameter | Use |
|---|---|---|
| Single rope | 9.0–10.2mm | Standard for top-roping and single-line lead climbing |
| Half rope | 8.0–9.0mm | Used in pairs for trad climbing; each strand clips different protection |
| Twin rope | 7.0–8.0mm | Used in pairs, both strands clipped together; ultralight alpine use |
For this merit badge, you will most likely use a single dynamic rope.
Static Ropes
Static ropes do not stretch significantly. They are used for:
- Fixed lines (hauling gear, ascending with mechanical ascenders)
- Rescue operations
- Rappelling on fixed installations (when no falls are possible)
Rope Construction
Modern climbing ropes use a kernmantle construction: a core (kern) of parallel and braided nylon fibers provides strength, wrapped by a woven outer sheath (mantle) that protects against abrasion. The sheath takes the wear; the core carries the load.
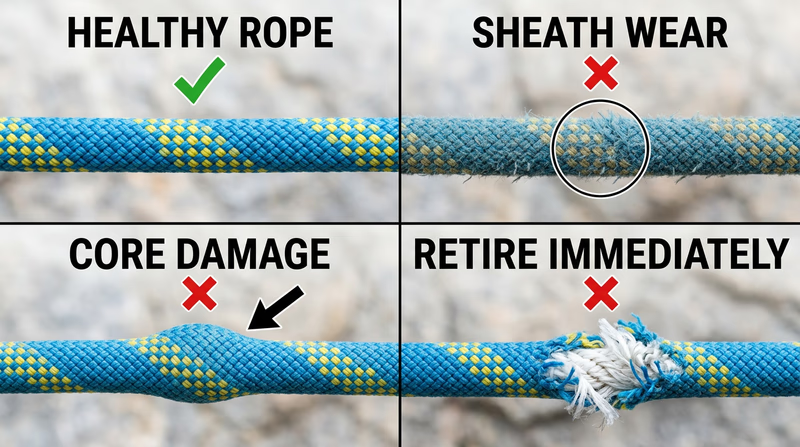
6b: Inspecting a Rope
Inspect your rope before every climbing session and after any significant fall, rockfall contact, or exposure to chemicals.
Visual Inspection
Run the entire rope through your hands, looking for:
- Sheath damage: Cuts, fuzzy spots, flat sections, or areas where the core is visible through the sheath
- Discoloration: Stains from chemicals, solvents, or battery acid (these weaken nylon invisibly)
- Stiffness: Sections that feel hard or crunchy compared to the rest of the rope
Tactile Inspection
Feel for:
- Lumps or thin spots: These indicate core damage. A healthy rope feels uniform in diameter throughout its length. A lump means the core fibers are bunched; a thin spot means some have broken.
- Soft spots: Areas that feel mushy or collapse easily under finger pressure, suggesting the core is compromised.
6c: Preventing Rope Damage
Prevention is always easier than replacement. Climbing ropes are expensive and your life depends on them.
Rope Protection Habits
Follow these every time you climb- Keep the rope away from sharp edges. Use edge protectors or padding over sharp rock.
- Never step on a climbing rope. Boot soles grind dirt and tiny rock particles into the sheath, cutting core fibers invisibly.
- Avoid dragging the rope across rough ground. Carry it to the base of the route.
- Keep rope away from chemicals: sunscreen, insect repellent, battery acid, gasoline.
- Do not leave rope in direct sunlight for extended periods. UV light degrades nylon over time.
- Prevent the rope from running over other ropes under load — friction between two loaded ropes generates enough heat to melt through the sheath in seconds.
Cleaning Your Rope
Dirt is a rope’s slow enemy. Grit works its way into the sheath and gradually abrades core fibers. Wash your rope periodically:
- Fill a bathtub with cool water and a mild soap (rope-specific wash or gentle dish soap)
- Loosely coil the rope and submerge it
- Gently work the soap through the rope by hand
- Drain and refill with clean water to rinse — repeat until water runs clear
- Air dry in shade, draped loosely — never in a dryer or direct sunlight
6d: Retiring a Rope
Even a well-maintained rope does not last forever. Retire a rope when any of these conditions apply:
| Condition | Action |
|---|---|
| Core visible through the sheath | Retire immediately |
| Core damage (lumps, thin spots) | Retire immediately |
| Severe fall (high fall factor) | Retire or have it professionally inspected |
| Chemical exposure | Retire immediately — damage is invisible |
| Excessive fuzziness on the sheath | Approaching end of life |
| Age — unused rope stored properly | Retire after 10 years regardless of condition |
| Age — regular weekend use | Retire after 3–5 years |
| Age — daily or heavy use | Retire after 1–2 years |
When you retire a rope, cut it into short lengths so no one accidentally uses it for climbing. Retired ropes make great practice knots, camp guy-lines, or dog leashes.
6e: Coiling a Rope
A properly coiled rope stores neatly, deploys without tangles, and is easy to carry. There are several coiling methods — your counselor will show you the technique they prefer. Here is the general approach for the mountaineer’s coil (also called the butterfly coil):
- Find the middle of the rope
- Drape the midpoint over the back of your neck, with equal lengths hanging on each side
- Alternately take an arm’s-length loop from each side, laying them into your hand
- When a few feet remain, wrap the tails around the top of the coil several times
- Pass a loop through the top of the coil and pull the tails through it to secure
- The tails become shoulder straps for carrying
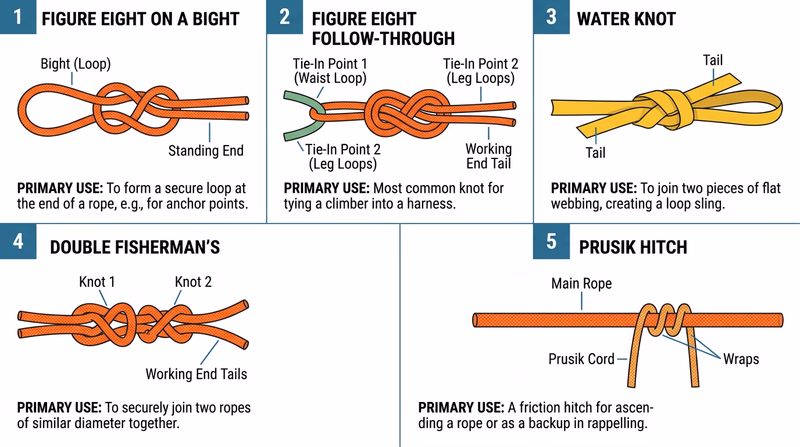
Req 7 — Essential Climbing Knots
This requirement covers five knots:
- Figure eight on a bight (7a)
- Figure eight follow-through (7b)
- Water knot (7c)
- Double fisherman’s knot (7d)
- Prusik hitch (7e)
Every climber’s life depends on a handful of knots. Not dozens — just a few, tied perfectly every time. A figure eight follow-through connects you to the rope. A double fisherman’s joins two ropes for a long rappel. A Prusik can get you out of a jam mid-route. You do not need to know fifty knots. You need to know these five cold — in the dark, with gloves on, when you are tired.
Figure Eight on a Bight (7a)
The figure eight on a bight creates a fixed loop in the middle of a rope without needing access to either end. “Bight” means a U-shaped bend in the rope.
How it is used: This knot creates a clip-in point on the rope. It is commonly used to attach the rope to an anchor using a carabiner. If you are building a top-rope anchor with the climbing rope, you will likely tie a figure eight on a bight at the anchor end.
Key features:
- Easy to inspect visually — the knot should look like the number 8 with a loop coming out of it
- Does not slip or roll under load
- Relatively easy to untie after being loaded (compared to an overhand on a bight)
Figure Eight Follow-Through (7b)
The figure eight follow-through (also called a rewoven or retraced figure eight) ties the rope directly to your harness. This is the most important knot you will learn — it is the knot that holds you to the rope every time you climb.
How it is used: The climber threads the rope through both tie-in points on the harness, then retraces a figure eight knot. This creates a secure, non-slipping connection between the climber and the rope.
Key features:
- Extremely strong — retains approximately 75–80% of the rope’s rated strength
- Easy to visually inspect: the two strands should run perfectly parallel through the entire knot
- Must have a tail of at least 6 inches after the knot (some guides require a backup stopper knot on the tail)
Water Knot (7c)
The water knot (also called a ring bend or overhand retrace) joins the two ends of flat webbing to make a sling or runner. It is the standard knot for tying nylon webbing into a loop.
How it is used: Climbers use webbing slings for building anchors, extending placements, and creating equalized anchor systems. The water knot connects the ends of a length of webbing into a closed loop.
Key features:
- Specifically designed for flat webbing — do not use it to join ropes
- Must be tied tightly with tails of at least 3 inches on each side
- Critical: The water knot can slowly work itself loose over time. Check it before every use and retighten if the tails have shortened.
Double Fisherman’s Knot (7d)
The double fisherman’s knot (also called a grapevine knot) joins two rope ends together. It is incredibly secure — once loaded, it can be nearly impossible to untie.
How it is used: This knot joins two ropes together for long rappels when a single rope is too short to reach the ground. It is also used to tie accessory cord into loops for Prusik hitches (see 7e below) and to make cordelettes for anchor building.
Key features:
- Each side is a double overhand knot wrapped around the other rope
- When complete, the two knots should slide together snugly with no gap between them
- The “X” pattern on each knot should be clearly visible — if it looks messy, retie it
- Tails should be at least 3 inches long
Prusik Hitch (7e)
The Prusik hitch is a friction knot tied with a thin loop of accessory cord around a thicker climbing rope. It grips the rope when loaded but can be slid along the rope when unloaded.
How it is used: The Prusik is a self-rescue knot. If a climber is stranded on a rope mid-route — hanging in space after a fall, for example — they can attach Prusik hitches to the rope and inch their way up or down. Prusiks are also used as backup friction knots during rappelling.
Key features:
- The accessory cord must be significantly thinner than the climbing rope (typically 5–7mm cord on a 9–10mm rope)
- Usually wrapped three times around the climbing rope for sufficient friction
- Grips when pulled downward but slides when the load is released and the knot is pushed
- The Prusik loop is typically made by tying a piece of accessory cord into a loop with a double fisherman’s knot (7d)
Practice Until Automatic
Your counselor will ask you to demonstrate each knot and explain its use. Practice at home with a piece of rope or cord until you can tie each one without looking at instructions. A knot you have to think about on the wall is a knot you might tie wrong when it matters most.
Animated Knots — Climbing Knots Step-by-step animated instructions for every climbing knot, including all five required for this badge. Link: Animated Knots — Climbing Knots — https://www.animatedknots.com/climbing-knotsReq 8 — Personal Protective Equipment
This requirement covers three pieces of personal protective equipment:
- Commercially made climbing harness (8a)
- Climbing helmet (8b)
- Climbing or rappelling gloves (8c)
These three items protect you from the three most common categories of climbing injury: falls (harness), head impact (helmet), and rope friction (gloves). None of them help if they are fitted wrong or worn incorrectly.
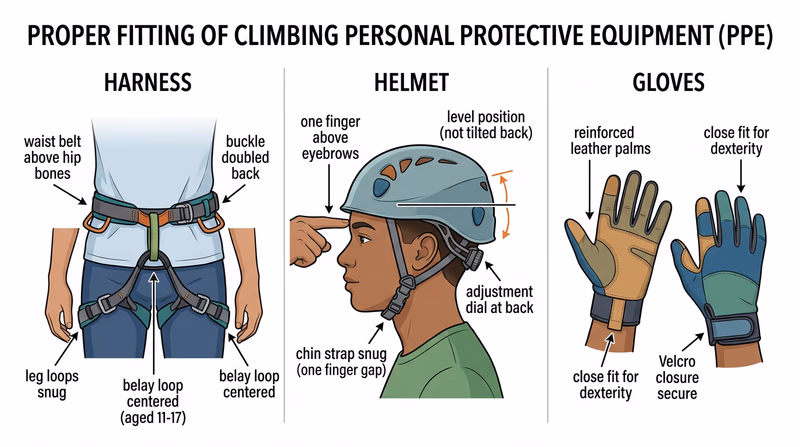
Climbing Harness (8a)
A climbing harness distributes the force of a fall across your hips and thighs — the strongest parts of your body. Without a harness, a fall onto a rope tied around your waist could break ribs, damage internal organs, or cut off circulation in minutes.
Parts of a Harness
| Part | Purpose |
|---|---|
| Waist belt | Wraps around the waist above the hip bones; carries most of the load |
| Leg loops | Encircle each upper thigh; distribute force and prevent you from flipping upside down |
| Belay loop | The reinforced loop on the front where you attach your belay device and clip into anchors |
| Tie-in points | Two hard points (above and below the belay loop) where you thread the rope for the figure eight follow-through |
| Gear loops | Loops on the sides for carrying quickdraws, carabiners, and other hardware |
| Buckles | Secure the waist belt and leg loops; must be doubled back on older designs |
Putting It On
- Hold the harness in front of you with the belay loop facing forward and the waist belt at the top
- Step into the leg loops — left leg in the left loop, right leg in the right
- Pull the harness up so the waist belt sits above your hip bones, not on your hips
- Tighten the waist belt snugly — you should be able to fit a flat hand between the belt and your body, but not a fist
- Tighten the leg loops comfortably — snug but not restrictive
- If your harness has buckles that require doubling back, thread the webbing through the buckle and back through again. Many modern harnesses have auto-locking buckles that eliminate this step.
Climbing Helmet (8b)
A climbing helmet protects against two threats: objects falling from above (rockfall, dropped gear) and impacts during falls (swinging into the wall, hitting a ledge).
Types of Helmets
| Type | Construction | Characteristics |
|---|---|---|
| Hardshell | ABS plastic outer shell with foam suspension | Durable, affordable, heavier |
| In-mold | EPS foam with thin polycarbonate shell | Lighter, better ventilation, less durable to multiple impacts |
| Hybrid | Combination of both | Balances weight, protection, and durability |
Putting It On
- Adjust the sizing system (dial or strap at the back) to fit your head snugly
- The helmet should sit level on your head — not tilted back like a baseball cap
- The front edge should be about one finger-width above your eyebrows
- Buckle the chin strap and tighten it so you can fit one finger between the strap and your chin
- Shake your head side to side and up and down — the helmet should not shift or wobble
When to Wear It
Wear a helmet for all outdoor climbing, rappelling, and belaying. Indoor climbing gyms generally do not require helmets because there is no rockfall risk, but some programs and counselors may require them. When in doubt, wear the helmet.
Climbing or Rappelling Gloves (8c)
Gloves protect your hands from rope friction, especially during rappelling where the rope slides through your braking hand under load. Without gloves, a fast rappel or a sudden stop can cause painful rope burns.
When to Wear Gloves
- Rappelling: Always. The rope generates significant friction and heat through your braking hand.
- Belaying: Optional but recommended, especially for long belaying sessions or when lowering heavy climbers.
- Climbing: Generally not worn while climbing — gloves reduce the sensitivity you need to grip holds. Remove them before you start climbing.
Choosing the Right Gloves
Climbing and rappelling gloves are not regular work gloves. Look for:
- Leather or reinforced palms for heat and abrasion resistance
- Close fit that allows you to operate belay devices and carabiners
- Secure closure (usually Velcro) so they do not slip off
- Reinforced fingers if you plan to belay for extended sessions
A Note on Equipment Standards
All climbing harnesses, helmets, and carabiners sold by reputable manufacturers meet certification standards set by the UIAA (International Climbing and Mountaineering Federation) or CE (European conformity). Look for these markings on your gear. Never use homemade harnesses, improvised helmets, or uncertified equipment for climbing.
UIAA — Safety Standards Learn about the international safety standards that climbing equipment must meet to be certified for use. Link: UIAA — Safety Standards — https://www.theuiaa.org/safety-standards/Req 9 — Pre-Climb Safety Check
A climber ties in, the belayer loads the rope into the device, and someone calls “Climbing!” Everything looks fine — but the belayer’s carabiner gate is not locked. One wrong move and the rope unclips from the belay device. This near-miss happens more often than anyone wants to admit, and it is exactly what the CHECK system prevents.
The CHECK system is a pre-climb safety inspection that both the climber and belayer perform before anyone leaves the ground. It takes thirty seconds and catches the mistakes that cause accidents.
C — Carabiners
Check every carabiner in the system. Is each one:
- Locked? Screw-gate carabiners should be screwed shut. Auto-locking carabiners should click into the locked position. An unlocked carabiner can open under load and release the rope.
- Properly oriented? The carabiner gate should face away from the rock and away from the direction of loading. A gate pressed against rock can be forced open.
- Loaded on the spine? Carabiners are strongest when the load runs along the spine (the solid side opposite the gate). Cross-loading — where the force pulls across the gate — reduces strength by up to 70%.
H — Harness
Check both the climber’s and belayer’s harnesses:
- Waist belt above the hip bones? A low belt can allow the climber to slip out during an inverted fall.
- Buckles doubled back? (If the harness requires it.) Modern auto-locking buckles do not need doubling back, but many rental and older harnesses do.
- Leg loops snug? Loose leg loops let the climber slide down in the harness during a fall.
- Belay loop intact? No fraying, cuts, or visible wear.
- Gear loops clear? Nothing is clipped to a gear loop that should be on the belay loop.
E — Environment
Look around you. Assess the immediate climbing environment:
- Is the ground clear? Remove loose rocks, gear, water bottles, and anything else from the fall zone and the belayer’s stance.
- Is the weather stable? Any signs of incoming rain or lightning?
- Are other climbing parties nearby? Could their activities (rappelling, knocking rocks) create hazards?
- Is there enough light? Can you see the route clearly?
C — Connections
Check every point where the system connects:
- Climber’s knot: Is the figure eight follow-through tied correctly with a sufficient tail? Are the strands parallel through the knot?
- Rope through the harness: Is the rope threaded through both tie-in points (not just the belay loop)?
- Belay device threaded correctly? Is the rope loaded properly into the ATC, GriGri, or other device?
- Anchor connections (if applicable): Is the top-rope anchor built correctly and equalized?
K — Knots
The final check focuses specifically on knots:
- Figure eight follow-through: Parallel strands, dressed neatly, tail at least 6 inches
- Stopper knot on the rope end: If the rope is shorter than twice the route height, tie a stopper knot in the free end so the belayer cannot accidentally feed all the rope through the device during a lower
- Any knots in the anchor system: Properly tied, dressed, and loaded correctly
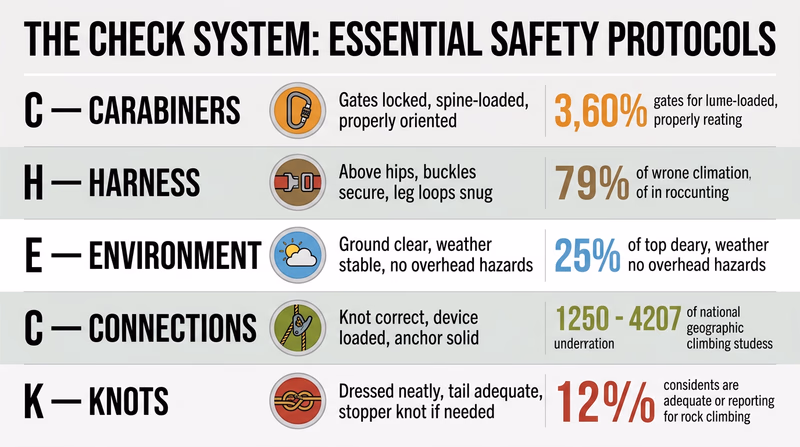
Make It a Habit
The CHECK system is not a formality. It is a structured way to catch the mistakes that experience alone does not prevent. Even professional climbing guides run through a safety check before every pitch. Make it a habit from your very first climb, and it will protect you for the rest of your climbing life.
CHECK Quick Reference
Run through before every climb- Carabiners: Locked, properly oriented, loaded on the spine.
- Harness: Waist belt above hips, buckles secure, leg loops snug.
- Environment: Ground clear, weather stable, no overhead hazards.
- Connections: Knot to harness correct, belay device loaded properly, anchor solid.
- Knots: Figure eight dressed, stopper knot on rope end if needed.
Req 10 — Belaying Skills
This requirement covers five belaying tasks:
- 10a — Explain the importance of belaying and when it is necessary
- 10b — Belay three climbers on three different routes
- 10c — Serve as a backup belayer on three different climbs
- 10d — Belay three rappellers on three different routes
- 10e — Serve as a backup belayer on three different rappels
When you belay, another person’s life is literally in your hands. The belayer manages the rope that catches falls, controls descents, and keeps the climber connected to safety. A distracted belayer is more dangerous than a loose rock, a frayed rope, or a poor knot — because the belayer is the last line of defense when everything else goes wrong.
Why Belaying Matters (10a)
Belaying serves three critical functions:
- Catching falls — When a climber slips, the belayer locks the rope to stop the fall. Without a belayer, a fall on a roped climb would be uncontrolled.
- Controlling descent — The belayer smoothly lowers the climber to the ground after completing a route. A jerky or too-fast lower can cause injury.
- Managing slack — The belayer feeds rope out as the climber moves up and takes in slack to minimize fall distance. Too much slack means a longer fall; too little means the climber gets pulled off the wall.
When is belaying necessary? Any time someone is roped climbing or rappelling. The only climbing situation without a belayer is bouldering, which uses spotters and crash pads instead. For this merit badge, you will belay during both climbing (10b–c) and rappelling (10d–e).
Belay Devices
A belay device creates friction on the rope, making it possible for a belayer to hold a falling climber with one hand. There are two main categories:
Tubular Devices (ATC)
The ATC (Air Traffic Controller) and similar tubular devices are simple, lightweight, and versatile. The rope passes through a slot in the device and over a carabiner. To brake, the belayer pulls the rope down and back, creating a sharp bend that generates friction.
Pros: Works for climbing and rappelling, inexpensive, lightweight Cons: Requires active braking — the belayer must hold the rope in the brake position
Assisted-Braking Devices (GriGri)
The Petzl GriGri and similar devices use a camming mechanism that pinches the rope when loaded suddenly, providing assisted braking. If the climber falls, the cam rotates and locks the rope automatically.
Pros: Adds a mechanical backup to the belayer’s grip Cons: Heavier, more expensive, and can give false confidence — the belayer must still actively manage the rope
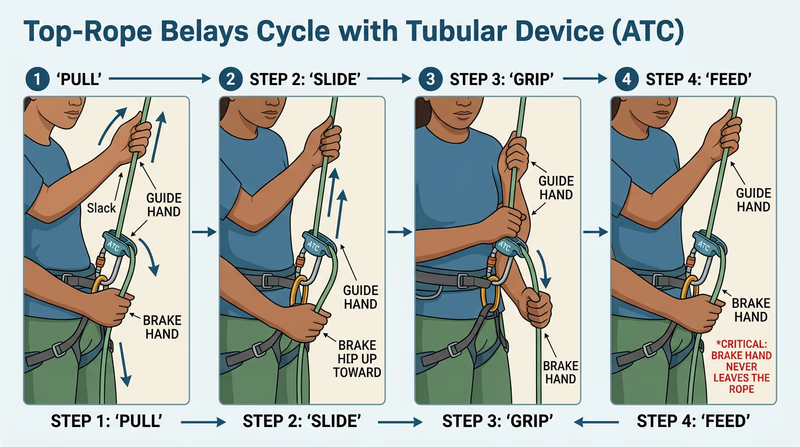
Belaying a Climber (10b)
When belaying a top-rope climber, the belayer’s job is to take in slack as the climber ascends. The basic cycle:
- Pull rope through the device with the guide hand
- Brake hand slides up to meet the guide hand (brake hand stays on the rope the entire time)
- Grip the rope below the device with the brake hand in the new position
- Repeat — slide the guide hand back up the rope and pull more slack through
When catching a fall, pull the brake strand sharply downward and step back slightly. The friction in the device does most of the work — your job is to maintain the brake position.
For lowering, smoothly feed rope through the device while maintaining steady friction. Lower at a controlled speed — not too fast, not jerky. Communicate with the climber: “Lowering!”
Backup Belaying (10c)
A backup belayer stands behind the primary belayer and holds the brake strand of the rope below the primary belayer’s brake hand. If the primary belayer loses control — from being pulled off balance, getting distracted, or any other reason — the backup belayer clamps down on the rope to stop it.
The backup belayer’s rules:
- Stand directly behind the primary belayer
- Hold the rope loosely below the primary belayer’s hands — do not interfere with the primary belayer’s technique
- Watch the climber and the primary belayer simultaneously
- Be ready to lock the rope at any moment
- Let go of the rope immediately when the primary belayer signals “off belay”
Belaying a Rappeller (10d)
Belaying a rappeller uses a technique called a fireman’s belay. The belayer stands at the bottom of the rappel, holding the rope ends that hang below the rappeller. If the rappeller loses control, the belayer pulls the ropes taut — this locks the rappeller’s device and stops the descent.
Key differences from climb belaying:
- The belayer is below, not at the base of the climb
- The belayer pulls down on the rope to brake (not up through a device)
- The rappeller controls their own speed; the belayer is the emergency backup
Backup Belaying a Rappel (10e)
The backup belayer for a rappel assists the fireman’s belayer in the same way as for climbing — standing behind and holding the rope below the primary belayer’s hands. This adds a second layer of safety for the rappeller.
Weight Difference Considerations
If you are significantly lighter than the climber you are belaying, you may be pulled off the ground or slammed into the wall during a fall. This is a real concern for younger or smaller Scouts belaying adults.
Solutions:
- The belayer can anchor themselves to a ground anchor
- Use a heavier backup belayer
- Stand close to the wall to reduce the pull distance
- Communicate with the climber about fall potential
Req 11 — Climbing Technique
This requirement has two parts:
- 11a — Show the correct way to directly tie a belay rope to your harness
- 11b — Climb at least three different routes, demonstrating good technique and using verbal signals with a belayer
Everything you have learned so far — hazards, first aid, signals, rope, knots, gear, the CHECK system, and belaying — comes together the moment you step off the ground. Climbing is where all that preparation becomes real.
Tying In (11a)
“Tying in” means connecting the climbing rope directly to your harness using a figure eight follow-through knot. You practiced this knot in Req 7b. Now you apply it to your harness before every climb.
Step-by-Step
- Pull enough rope through to tie the knot — about 3 feet from the end
- Tie a figure eight knot in the rope, leaving a long tail
- Thread the tail through both tie-in points on your harness (the hard points above and below the belay loop — never just through the belay loop alone)
- Retrace the figure eight knot, following the original path in reverse
- Dress the knot — ensure all strands are parallel and neat
- Tighten each strand individually
- Verify the tail is at least 6 inches long
After tying in, have your partner check your knot as part of the CHECK system from Req 9. They should verify the strands are parallel, the knot is dressed, and the tail is adequate.
Climbing Technique (11b)
Good climbing technique is efficient — it lets you climb longer, harder routes without exhausting yourself. Poor technique relies on brute strength and burns out fast. Here are the fundamentals your counselor will look for.
Footwork First
Your legs are far stronger than your arms. Good climbers move primarily with their legs and use their arms for balance and positioning.
- Use the front of your shoe. Place the ball of your foot (the area behind your toes) precisely on the hold. Do not stand flat-footed.
- Quiet feet. Good footwork is smooth and deliberate. If your feet are scraping and sliding on the wall, slow down and place each foot carefully before weighting it.
- Trust your feet. Climbing shoe rubber grips far better than it feels. Stand on small footholds with confidence — hesitation actually makes you more likely to slip.
Body Position
- Keep your hips close to the wall. When your hips drift away from the rock, your weight shifts to your arms and they tire quickly. Press your hips toward the wall to keep weight on your feet.
- Straight arms. When resting or assessing the next move, hang on straight arms. Bent arms engage your biceps constantly and lead to “pumped” forearms (that burning, swollen feeling).
- Three points of contact. Always have at least three limbs on the wall — two feet and one hand, or two hands and one foot — while moving the fourth.
Efficient Movement
- Plan before you move. Look at the next three or four holds before you reach for one. Read the route from the ground before you start.
- Move deliberately. Smooth, controlled movements use less energy than lunging and grabbing. Climb like you are solving a puzzle, not fighting the wall.
- Rest on the wall. When you find a good stance, shake out one arm at a time to recover. Alternate arms to let each one recover.
Common Beginner Mistakes
| Mistake | Why It Happens | Fix |
|---|---|---|
| Over-gripping | Fear of falling | Trust the rope; relax your hands |
| Pulling with arms | Instinct to reach up | Push with legs first, then reach |
| Hugging the wall | Feels safer | Push hips in but lean back slightly to see holds |
| Looking down | Checking feet placement | Glance down to place feet, then look up at your path |
| Rushing | Adrenaline | Breathe. Slow down. Plan each move. |
Using Verbal Signals
Throughout every climb, use the verbal signals you learned in Req 5. The exchange before climbing begins:
- You: “On belay?”
- Belayer: “Belay on.”
- You: “Climbing.”
- Belayer: “Climb on.”
During the climb, call for “Slack!” or “Take!” as needed. If you fall, shout “Falling!” When you reach the top and are ready to descend: “Take!” followed by “Lower!”
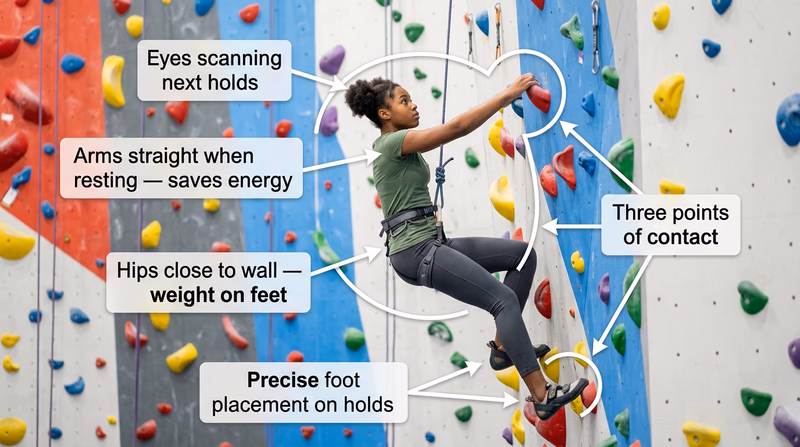
Three Routes, Three Opportunities
Your counselor will have you climb at least three different routes. Each route is a chance to practice different skills:
- Route 1 — Focus on footwork and body position. Keep it simple.
- Route 2 — Focus on reading the route and planning moves. Try to pause less.
- Route 3 — Put it all together. Climb smoothly, use signals confidently, and trust your technique.
Req 12 — Rappelling Technique
This requirement has three parts:
- 12a — Show the correct way to directly tie a belay rope to your harness
- 12b — Using a carabiner and a rappel device, attach a rappel rope to your harness
- 12c — Rappel down three different rock faces or rappel routes, using verbal signals and demonstrating good technique
Walking to the edge of a cliff with nothing but a rope and a small metal device between you and the ground below — rappelling feels intimidating at first. Your brain is telling you not to lean backward over a drop. But once you trust the system, rappelling becomes one of the most exhilarating skills in climbing. The rope, the device, the belayer below, and your braking hand all work together to give you complete control of your descent.
Tying In for Rappelling (12a)
The tie-in process for rappelling is identical to climbing. Use a figure eight follow-through knot threaded through both tie-in points on your harness. This belay rope — managed by someone at the bottom using a fireman’s belay — is your safety backup during the rappel.
Review the tie-in steps in Req 11a if you need a refresher. The same knot, the same harness points, the same partner check.
Setting Up the Rappel Device (12b)
The rappel device creates friction on the rope so you can control your descent speed. You will most likely use an ATC (tubular device) or a similar device.
Setup Steps
- Thread the rappel rope through the slot in the device (for a single-rope rappel, one strand goes through one slot)
- Clip a locking carabiner through the device’s cable or loop and through your harness’s belay loop
- Lock the carabiner — check that the gate is fully closed and the lock is engaged
- Check the braking direction — the rope should feed so that pulling your brake hand down and back creates maximum friction
- Run through the CHECK system — have your partner verify the setup
The Belay Rope
In addition to the rappel rope running through your device, your belayer manages a separate belay rope (or the other end of the same rope) using a fireman’s belay from below. This is your backup — if you lose control, the belayer pulls the rope taut and stops your descent.
Rappelling Technique (12c)
Good rappelling technique is smooth, controlled, and deliberate. Jerky movements and excessive speed are the signs of a nervous or untrained rappeller.
Getting Started
The hardest part of rappelling is the first move — leaning back over the edge. Here is how to do it:
- Face the anchor with the rope running through your device
- Feet at the edge, shoulder-width apart
- Hold the rope with your brake hand below the device (this is your speed control)
- Hold the rope above the device lightly with your guide hand (for balance only — never use it for braking)
- Slowly lean back, walking your feet to the edge until your body forms an L-shape — feet flat on the wall, torso perpendicular to the rock face
- Begin feeding rope through the device with your brake hand
Descending
- Feet flat on the wall, shoulder-width apart, legs slightly bent
- Body perpendicular to the rock face — sit back into the harness
- Feed rope smoothly with your brake hand — small, controlled movements
- Walk down the wall in steady steps, matching your footwork to your rope feed
- Do not bounce or jump — this shocks the system and can damage the rope or anchor
- Look down periodically to check your path and landing zone
Speed Control
Your brake hand is your throttle. The tighter you grip and the more you bend the rope, the slower you go. To stop completely, pull the rope behind your hip — this maximizes friction and locks you in place.
Communication
Use the rappelling signals from Req 5:
- You: “On rappel?”
- Belayer: “Rappel on.”
- You: “Rappelling!”
- (Descend the route)
- You: “Off rappel.”
- Belayer: “Belay off.”

Three Rappels, Three Routes
Like climbing, your counselor will have you rappel three different routes. Use each one to improve:
- Rappel 1 — Focus on getting comfortable leaning back and controlling speed. It is okay to go slowly.
- Rappel 2 — Work on smooth, steady footwork. Walk down the wall in even steps.
- Rappel 3 — Put it together. Smooth descent, confident signals, controlled speed, clean landing.
Req 13 — Storing Your Gear
The climbing day is done. Everyone is safe on the ground, shoes are off, and it is tempting to toss everything into the trunk and head home. But how you store your gear determines how long it lasts and whether it remains safe to use. A rope coiled wet in a hot trunk can develop hidden mildew damage. A carabiner thrown into a bucket with other metal hardware can develop gate-weakening micro-cracks. Gear storage is the final act of every climbing day — and it matters.
Storing Rope
Rope is your most expensive and most critical piece of equipment. Proper storage extends its lifespan and keeps it trustworthy.
After Every Use
- Inspect the rope while coiling it — run it through your hands and check for damage (review the inspection process from Req 6b)
- Clean if dirty — wash in cool water with mild soap, rinse thoroughly
- Dry completely before storage — hang loosely in shade, away from direct sunlight. A damp rope stored in a bag grows mildew and weakens
Storage Environment
| Do | Do Not |
|---|---|
| Store in a cool, dry, dark place | Leave in a hot car trunk |
| Use a rope bag or hang loosely on a wide peg | Store in direct sunlight (UV degrades nylon) |
| Keep away from the floor (avoid chemicals, oil stains) | Store near batteries, gasoline, or cleaning chemicals |
| Coil loosely — do not cinch tightly | Store wet or damp |
Storing Hardware
Hardware includes carabiners, quickdraws, belay devices, rappel devices, and any metal climbing equipment.
Carabiners and Metal Gear
- Dry thoroughly if wet — wipe with a clean cloth and air dry with gates open. Moisture trapped inside a carabiner gate mechanism causes corrosion.
- Store individually or in organized sets — do not pile loose carabiners in a bucket where they can bang against each other. Gate mechanisms are precision parts.
- Rack on a gear sling or gear organizer — this keeps everything sorted and prevents damage from metal-on-metal contact.
- Inspect gates before storing — each carabiner gate should spring open and closed smoothly. If a gate sticks or feels gritty, clean the hinge with a dry brush and a tiny drop of dry lubricant (never oil, which attracts dirt).
Belay and Rappel Devices
- Rinse if exposed to sand or grit — debris in the rope channels increases rope wear
- Dry completely before storage
- Store with your harness or on a gear rack — not loose in a box with heavy hardware
Storing Soft Goods
Soft goods include harnesses, slings, webbing, helmets, and climbing shoes.
Harnesses and Slings
- Inspect all webbing for fraying, cuts, or UV fading before storing
- Hang or lay flat — do not stuff a harness into a tight ball
- Keep dry and out of direct sunlight
- Store separately from metal hardware to prevent abrasion on webbing
Helmets
- Wipe clean with a damp cloth
- Do not store anything inside the helmet that could press on the foam — this compresses the protective material over time
- Keep out of extreme heat — car dashboards and trunks in summer can soften or deform the plastic and foam
- Store right-side up on a shelf or hang from the chin strap
Climbing Shoes
- Air them out after every use — climbing shoes get sweaty and the rubber breaks down faster in damp conditions
- Do not leave in a hot car — heat degrades the adhesive that bonds rubber to the shoe
- Store at room temperature in a ventilated area
- Stuff with newspaper if they are particularly damp to absorb moisture
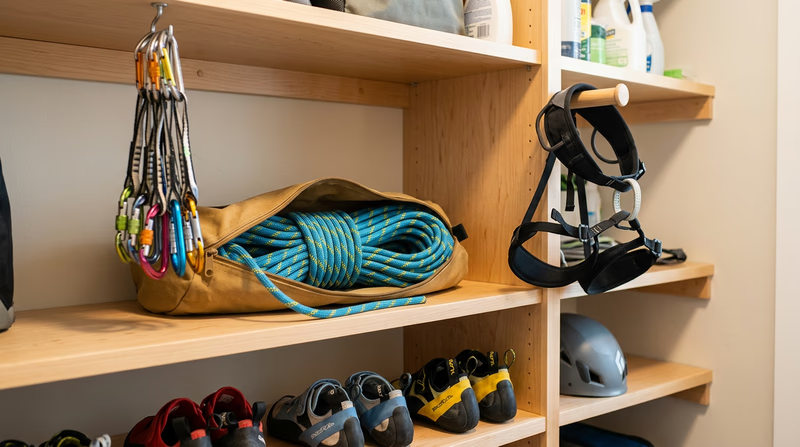
Gear Lifespan
Even with perfect storage, climbing gear does not last forever. Here are general guidelines:
| Gear | Typical Lifespan | Retire When |
|---|---|---|
| Dynamic rope | 2–10 years depending on use | See retirement criteria in Req 6d |
| Harness | 3–7 years | Frayed tie-in points, faded webbing, stiff buckles |
| Carabiners | 10+ years if undamaged | Deep grooves from rope wear, sticky gate, visible cracks |
| Helmet | 5–10 years | After any significant impact, cracked shell, degraded foam |
| Slings/webbing | 5–10 years | Fraying, stiffness, fading, chemical exposure |
| Belay device | 10+ years if undamaged | Deep rope grooves, worn cam mechanism |
Demonstrate to Your Counselor
Your counselor will ask you to show how you would store each major piece of gear after a day of climbing. Walk through the process: inspect, clean if needed, dry, and store properly. Explain why each step matters. This is not just a merit badge requirement — it is the habit that keeps your gear (and you) safe for years of climbing ahead.
Black Diamond — Gear Care and Maintenance Detailed care instructions from one of the world's leading climbing gear manufacturers. Link: Black Diamond — Gear Care and Maintenance — https://www.blackdiamondequipment.com/en_US/experience-story?cid=qc-lab-702Extended Learning
A. Congratulations
You have earned the Climbing merit badge. You can identify hazards, tie five essential knots, belay a partner, climb routes, rappel safely, and care for your gear. Those skills put you in a small group of Scouts who have mastered one of the most demanding and rewarding outdoor activities Scouting offers. What follows are ways to take your climbing further — deeper skills, real experiences, and communities that will support you for years.
B. Building a Self-Rescue Toolkit
The Prusik hitch you learned in Req 7e is just the beginning of self-rescue. When something goes wrong on the wall — a stuck rope, an incapacitated partner, or a locked belay device — knowing how to solve the problem without outside help can be the difference between a minor inconvenience and a genuine emergency.
Ascending a rope with Prusik hitches is a core self-rescue skill. Two Prusik loops — one attached to your harness, one used as a foot loop — let you inch up a fixed rope. The technique is simple but physically demanding. Practice on a low rope first: slide the upper Prusik up, stand in the lower one, slide the lower Prusik up, sit back into the upper one. Repeat. Ascending 30 feet of rope this way takes several minutes and burns your legs, but it gets you to safety.
Escaping the belay is an advanced skill for when the belayer needs to free themselves while keeping the climber’s weight held. This involves tying off the belay device, transferring the load to an anchor using a Prusik or Klemheist knot, and then disconnecting from the system. This technique requires hands-on instruction — read about it, but do not attempt it without qualified training.
Lowering an injured climber from above requires the belayer to convert the system from a static hold to a controlled lower. If the climber cannot descend under their own power, the belayer must know how to rig a lowering system. This is typically taught in rescue courses, not in a merit badge setting, but understanding that the technique exists prepares you for advanced training.
The American Alpine Club and organizations like AMGA (American Mountain Guides Association) offer self-rescue workshops and courses. Even a single weekend course dramatically increases your ability to handle unexpected situations on the wall.
C. Training for Harder Climbing
The merit badge requirements top out at relatively easy climbing, but the discipline extends far beyond 5.6 routes. If the physical challenge of climbing excited you, here is how to keep improving.
Fingerboard training builds the finger and forearm strength that limits most intermediate climbers. A fingerboard (also called a hangboard) mounts above a doorframe and provides edges and pockets of various sizes to hang from. Start with large holds and short hangs — 7 seconds on, 3 seconds off — and gradually progress to smaller edges. Fingerboard training should begin slowly, as tendons strengthen much more slowly than muscles, and overtraining causes finger pulley injuries that can take months to heal.
Movement drills develop the coordination and body awareness that separate strong climbers from skilled climbers. Try these at your gym: climb a route using only your feet and open palms (no gripping). Climb a route silently — zero sound from your feet touching holds. Climb a route using the minimum number of hand moves. Each drill forces you to solve movement problems differently and builds proprioception — your body’s sense of its own position in space.
Route reading improves with structured practice. Before each climb, study the route from the ground for 30 seconds. Identify the crux (hardest section), plan your hand sequence, and locate rest positions. After climbing, compare what actually happened to your plan. Over time, your ability to visualize complex sequences improves dramatically — and you will spend less energy on the wall.
Outdoor climbing adds dimensions that gym climbing cannot replicate: variable hold texture, weather management, route-finding on natural features, and multi-pitch climbing where routes exceed a single rope length. If you have been climbing primarily indoors, seek out a guide service or experienced mentor for your first outdoor sessions. The transition from plastic to rock is humbling but deeply rewarding.
D. Understanding Climbing Ethics
Climbing has a strong culture of self-governance and environmental ethics that goes beyond Leave No Trace. Understanding these unwritten rules makes you a respected member of the climbing community.
Fixed hardware ethics are hotly debated. In some areas, placing permanent bolts is encouraged (sport climbing areas like the Red River Gorge). In others, it is prohibited or controversial (traditionally protected areas like the Gunks in New York or Indian Creek in Utah). Before drilling or placing fixed gear, research the local ethic. The Access Fund and local climbing coalitions publish guidelines for each area.
Crag etiquette includes yielding routes to parties who were there first, not monopolizing popular climbs, keeping noise levels reasonable, and cleaning up chalk and tape. At popular areas on busy days, efficiency matters — set up quickly, climb, and move on so others get a turn.
First ascent ethics apply if you are ever the first to climb a new route or boulder problem. The first ascensionist traditionally names the route and proposes a grade, but the community refines both over time. Chipping holds (altering natural rock to create new holds) is universally condemned in the modern climbing community. The rock sets the challenge — the climber adapts, not the other way around.