Req 11 — Climbing Technique
This requirement has two parts:
- 11a — Show the correct way to directly tie a belay rope to your harness
- 11b — Climb at least three different routes, demonstrating good technique and using verbal signals with a belayer
Everything you have learned so far — hazards, first aid, signals, rope, knots, gear, the CHECK system, and belaying — comes together the moment you step off the ground. Climbing is where all that preparation becomes real.
Tying In (11a)
“Tying in” means connecting the climbing rope directly to your harness using a figure eight follow-through knot. You practiced this knot in Req 7b. Now you apply it to your harness before every climb.
Step-by-Step
- Pull enough rope through to tie the knot — about 3 feet from the end
- Tie a figure eight knot in the rope, leaving a long tail
- Thread the tail through both tie-in points on your harness (the hard points above and below the belay loop — never just through the belay loop alone)
- Retrace the figure eight knot, following the original path in reverse
- Dress the knot — ensure all strands are parallel and neat
- Tighten each strand individually
- Verify the tail is at least 6 inches long
After tying in, have your partner check your knot as part of the CHECK system from Req 9. They should verify the strands are parallel, the knot is dressed, and the tail is adequate.
Climbing Technique (11b)
Good climbing technique is efficient — it lets you climb longer, harder routes without exhausting yourself. Poor technique relies on brute strength and burns out fast. Here are the fundamentals your counselor will look for.
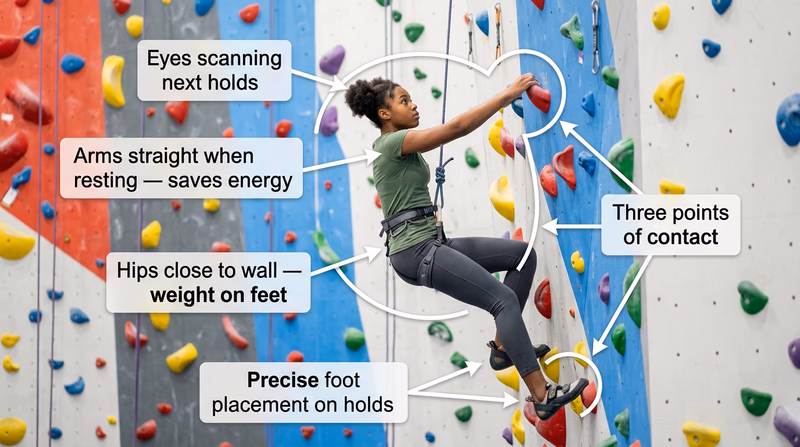
Footwork First
Your legs are far stronger than your arms. Good climbers move primarily with their legs and use their arms for balance and positioning.
- Use the front of your shoe. Place the ball of your foot (the area behind your toes) precisely on the hold. Do not stand flat-footed.
- Quiet feet. Good footwork is smooth and deliberate. If your feet are scraping and sliding on the wall, slow down and place each foot carefully before weighting it.
- Trust your feet. Climbing shoe rubber grips far better than it feels. Stand on small footholds with confidence — hesitation actually makes you more likely to slip.
Body Position
- Keep your hips close to the wall. When your hips drift away from the rock, your weight shifts to your arms and they tire quickly. Press your hips toward the wall to keep weight on your feet.
- Straight arms. When resting or assessing the next move, hang on straight arms. Bent arms engage your biceps constantly and lead to “pumped” forearms (that burning, swollen feeling).
- Three points of contact. Always have at least three limbs on the wall — two feet and one hand, or two hands and one foot — while moving the fourth.
Efficient Movement
- Plan before you move. Look at the next three or four holds before you reach for one. Read the route from the ground before you start.
- Move deliberately. Smooth, controlled movements use less energy than lunging and grabbing. Climb like you are solving a puzzle, not fighting the wall.
- Rest on the wall. When you find a good stance, shake out one arm at a time to recover. Alternate arms to let each one recover.
Common Beginner Mistakes
| Mistake | Why It Happens | Fix |
|---|---|---|
| Over-gripping | Fear of falling | Trust the rope; relax your hands |
| Pulling with arms | Instinct to reach up | Push with legs first, then reach |
| Hugging the wall | Feels safer | Push hips in but lean back slightly to see holds |
| Looking down | Checking feet placement | Glance down to place feet, then look up at your path |
| Rushing | Adrenaline | Breathe. Slow down. Plan each move. |
Using Verbal Signals
Throughout every climb, use the verbal signals you learned in Req 5. The exchange before climbing begins:
- You: “On belay?”
- Belayer: “Belay on.”
- You: “Climbing.”
- Belayer: “Climb on.”
During the climb, call for “Slack!” or “Take!” as needed. If you fall, shout “Falling!” When you reach the top and are ready to descend: “Take!” followed by “Lower!”
Three Routes, Three Opportunities
Your counselor will have you climb at least three different routes. Each route is a chance to practice different skills:
- Route 1 — Focus on footwork and body position. Keep it simple.
- Route 2 — Focus on reading the route and planning moves. Try to pause less.
- Route 3 — Put it all together. Climb smoothly, use signals confidently, and trust your technique.