Coin Collecting Merit Badge — Complete Digital Resource Guide
https://merit-badge.university/merit-badges/coin-collecting/guide/
Introduction & Overview
Every coin tells a story. The Lincoln cent in your pocket has traveled through thousands of hands since it left the Mint. The quarter in your change jar might feature a national park you have visited — or one you dream of seeing. And somewhere in a forgotten drawer, a coin from 1943 made of steel instead of copper is waiting for a collector sharp enough to spot it.
Coin collecting — called numismatics when you get serious about it — is one of the oldest hobbies in the world. Kings, presidents, and ordinary people have all been drawn to the art, history, and mystery packed into these small metal discs. This merit badge will teach you how coins are made, how to read their designs, and how to start building a collection of your own.
Then and Now
Then
Coin collecting has been called the “Hobby of Kings” — and that is not just a saying. Roman Emperor Augustus collected ancient Greek coins in the first century AD. During the Renaissance, Italian nobles competed to assemble the finest “cabinets of curiosities,” with rare coins as the crown jewels. When the United States was young, collectors saved early American copper cents and silver dollars, recognizing that these coins captured the spirit of a brand-new nation.
For most of history, collecting meant examining coins by eye, trusting your own judgment about condition, and storing them in wooden cabinets or velvet-lined trays. There were no standardized grades, no certification services, and no internet — just collectors trading knowledge and coins at local shops and through the mail.
Now
Modern numismatics is a blend of tradition and technology. Third-party grading services like PCGS and NGC use expert teams and precise scales (from 1 to 70) to authenticate and grade coins in tamper-evident holders. Online marketplaces let you buy a Roman denarius from a seller in London while sitting at your kitchen table. Digital cataloging apps help you track every coin in your collection with photos, grades, and estimated values.
The U.S. Mint itself has become a collector’s best friend, releasing special programs like the 50 State Quarters, America the Beautiful series, and American Women Quarters that turn pocket change into a nationwide treasure hunt. More people collect coins today than at any point in history — and many of them started exactly where you are right now.
Get Ready!
You are about to dive into a hobby that connects you to history, art, geography, and economics — all through objects small enough to fit in your palm. By the time you finish this badge, you will know how to read a coin like a book, spot the details most people walk right past, and build a collection that is uniquely yours.
Kinds of Coin Collecting
There is no single “right way” to collect coins. Most collectors start with one approach and branch out as their interests grow. Here are the main styles you will encounter.
Date and Series Collecting
This is the classic approach: pick a coin series and try to collect one from every year and mint mark. A Lincoln cent collection from 1959 to the present, for example, means tracking down coins from Philadelphia, Denver, and San Francisco across more than sixty years. The thrill is in the hunt — checking your change, visiting coin shops, and slowly filling every slot in your album.
Type Collecting
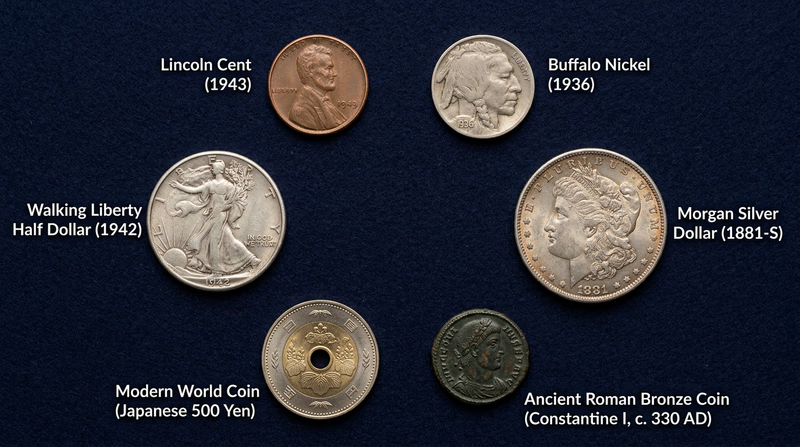
Instead of chasing every date, type collectors aim for one example of each major design. A U.S. type set might include a Buffalo nickel, a Mercury dime, a Walking Liberty half dollar, and a Morgan silver dollar — one coin representing each era and style. Type collecting gives you a broad survey of American coinage without needing hundreds of coins.
Commemorative Collecting
The U.S. Mint issues special coins to honor people, places, and events. These include the Bicentennial quarters of 1976, the 50 State Quarters program, and modern gold and silver commemoratives. Commemorative collectors focus on these special releases, often buying directly from the Mint.
Error Coin Collecting
Minting is a high-speed industrial process, and mistakes happen. A die might strike a blank off-center. Two images might overlap, creating a “doubled die.” A wrong metal blank might slip into the press. Error collectors hunt for these oddities, and rare errors can be worth far more than their perfect counterparts.
World Coin Collecting
Every country that has ever existed has produced coins, and many of them are beautiful, strange, or historically significant. Some world coin collectors focus on a single country. Others collect by theme — animals, ships, famous buildings. A handful of ancient Roman or Greek coins can be surprisingly affordable and put two thousand years of history in your hands.
Ancient Coin Collecting
Speaking of ancient coins — yes, you can actually own them. Bronze coins from the Roman Empire regularly sell for under $20, and holding a coin that was last used to buy bread in a Roman market town is an experience no photograph can match. Ancient coin collecting requires learning about different civilizations, their leaders, and the symbols they chose to put on their money.
Your Collecting Journey Starts Here
Whether you are drawn to the history of the Lincoln cent, the artistry of the Walking Liberty, or the mystery of a coin with no country you recognize, this badge gives you the foundation to explore it all. The first step is understanding where coins come from — and that starts at the United States Mint.
Req 1 — How Coins Are Made
A quarter does not just appear in your pocket. It begins as a sheet of raw metal, gets punched, pressed, and inspected at incredible speed, and travels through one of the most precise manufacturing operations in the country before it ever reaches your hand. Understanding this process will change the way you look at every coin you touch.
From Metal to Money
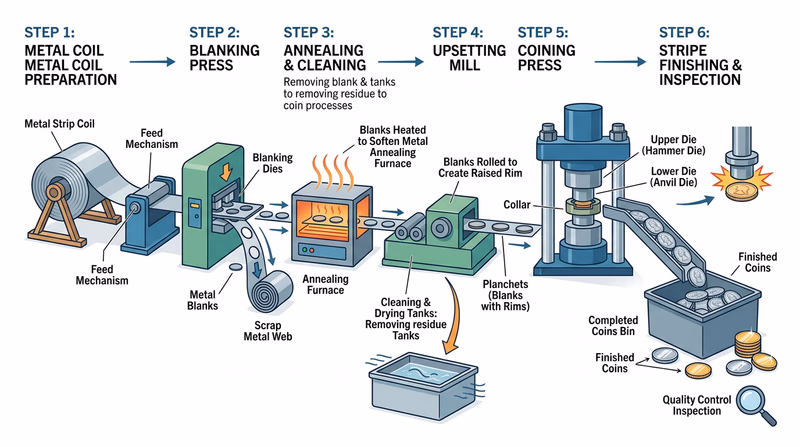
The journey of a coin starts long before it enters a press. Here is how it works, step by step.
Step 1: Designing the Coin
Every new coin design begins with artists. The U.S. Mint employs a team of sculptor-engravers and also accepts designs from the public through its Artistic Infusion Program. Proposed designs go through review by the Citizens Coinage Advisory Committee and the Commission of Fine Arts before the Secretary of the Treasury makes the final selection.
Once a design is approved, a sculptor-engraver creates a large clay or digital model — typically 8 to 12 inches across. This oversized model captures fine details that will be shrunk down to coin size.
Step 2: Making the Dies
The large model is transferred to a steel hub using a pantograph-like device called a reducing lathe (or, increasingly, digital engraving technology). The hub creates a master die, and the master die stamps out working dies — the hardened steel cylinders that will actually strike the coins. A single working die can produce hundreds of thousands of coins before it wears out and is replaced.
Step 3: Preparing the Blanks
Coins start as large coils of metal strip. For most circulating coins, the Mint buys pre-made strip from outside suppliers. A blanking press punches out round discs called blanks (also called planchets once they are prepared). The blanks are heated in an annealing furnace to soften them, then washed and dried.
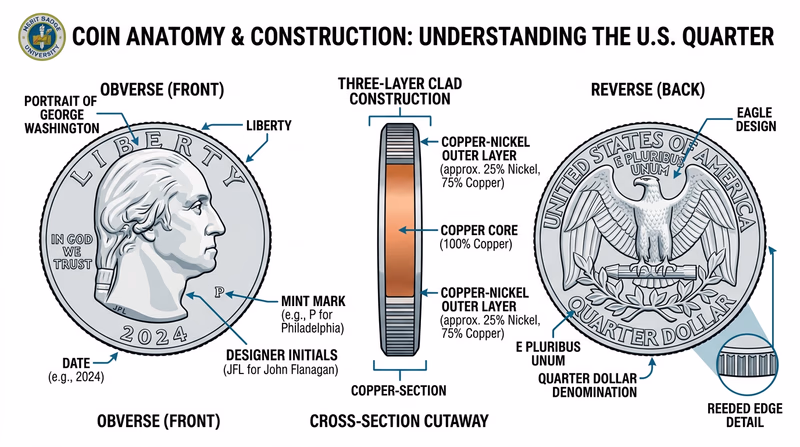
For clad coins like dimes and quarters, the strip is a sandwich — a copper core bonded between layers of a copper-nickel alloy. If you look at the edge of a quarter, you can see the copper core peeking through as a thin reddish-brown line.
Step 4: The Upsetting Mill
Before striking, blanks pass through an upsetting mill that raises a slight rim around the edge. This rim protects the coin’s design from wear and helps coins stack neatly. At this point, the blank is officially called a planchet.
Step 5: Striking
The planchet enters a coining press, where it sits in a collar (a ring that constrains the coin’s diameter and can impress edge designs like reeding). Two dies — one for the obverse (front) and one for the reverse (back) — slam together with 35 to 100 tons of force, impressing the design in a fraction of a second. Modern presses can strike over 800 coins per minute.
Step 6: Inspection and Bagging
After striking, coins pass through automated inspection systems that check for defects. Rejected coins are recycled. Accepted coins are counted by machine, poured into large bags, and shipped to Federal Reserve Banks, which distribute them to commercial banks — and eventually to your pocket.
Active U.S. Mint Facilities
The United States Mint operates several facilities, each with a specific role. The ones that produce coins for circulation mark their products with a small letter called a mint mark.
Philadelphia Mint (P)
Located in Philadelphia, Pennsylvania — where the Mint has operated since 1792. This is the largest Mint facility and produces coins for circulation (marked with a “P” or, historically, no mint mark at all). It also manufactures the dies used by all other facilities.
Denver Mint (D)
Located in Denver, Colorado, and in operation since 1906. The Denver Mint produces coins for circulation marked with a “D” and is the second-largest production facility.
San Francisco Mint (S)
Located in San Francisco, California. Once a major producer of circulating coins, the San Francisco Mint now focuses primarily on proof coins and special collector editions marked with an “S.” Proof coins are struck with specially polished dies that produce mirror-like surfaces and sharp details.
West Point Mint (W)
Located at the United States Military Academy in West Point, New York. This facility produces gold, silver, and platinum bullion coins, as well as commemorative coins marked with a “W.” It also serves as a secure storage site for gold and silver bullion.
Headquarters — Washington, D.C.
The Mint’s administrative headquarters is in Washington, D.C. No coins are struck here, but it oversees all Mint operations, policy, and the design selection process.
Fort Knox Bullion Depository
Located at Fort Knox, Kentucky. This is not a coin production facility — it is a fortified vault that stores a large portion of the United States’ gold reserves. While it is part of the Mint’s operations, it does not produce any coins.
How Coins Are Made — U.S. Mint The official U.S. Mint page walks through the entire coin production process with photos and diagrams. Link: How Coins Are Made — U.S. Mint — https://www.usmint.gov/learn/coin-and-medal-programs/how-coins-are-made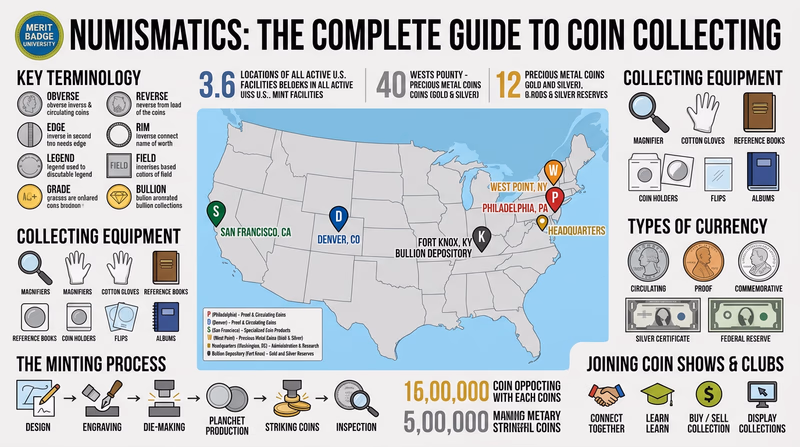
Why This Matters to Collectors
Understanding the minting process helps you appreciate what you are holding. When you know that a proof coin was struck twice on polished dies, you understand why it looks so different from a coin pulled from circulation. When you spot a coin struck slightly off-center, you recognize it as a manufacturing error — potentially valuable. And when you see a mint mark, you can trace that coin back to the exact building where it was born.
Req 2 — Coin Terminology
Every hobby has its own vocabulary, and coin collecting is no exception. These six terms are the building blocks of numismatic language. Once you know them, you will be able to talk with any collector — from a casual hobbyist to a professional dealer — and understand exactly what they mean.
The Anatomy of a Coin
Obverse
The obverse is the front of the coin — the side most people think of as “heads.” On U.S. coins, the obverse typically features a portrait or symbolic figure. Lincoln appears on the cent, Jefferson on the nickel, Roosevelt on the dime, Washington on the quarter, Kennedy on the half dollar, and various figures on the dollar coin.
The obverse usually carries the date, the mint mark, and the motto “IN GOD WE TRUST.” Think of it as the coin’s face — the side that introduces itself to the world.
Reverse
The reverse is the back of the coin — the “tails” side. This is where designers often get the most creative freedom. The reverse of the Lincoln cent has changed from the Lincoln Memorial (1959–2008) to the Union Shield (2010–present). The quarter’s reverse has transformed dramatically through the 50 State Quarters, America the Beautiful, and American Women programs.
The reverse typically displays the denomination (how much the coin is worth), “UNITED STATES OF AMERICA,” and the motto “E PLURIBUS UNUM” — Latin for “Out of Many, One.”
Reeding
Reeding refers to the ridged edge found on dimes, quarters, half dollars, and some dollar coins. Run your fingernail along the edge of a quarter and you will feel the tiny parallel grooves — that is reeding.
Reeding was originally an anti-counterfeiting and anti-clipping measure. In the days when coins were made of precious metals, dishonest people would shave or “clip” tiny amounts of silver or gold from the edges and melt the shavings down. Reeded edges made this kind of tampering immediately obvious. Today, reeding serves mainly as a tactile identifier — it helps visually impaired people distinguish between coins of similar size by touch.
Not all coins have reeding. The cent and nickel have smooth (plain) edges. The Presidential dollar coins feature edge lettering instead of traditional reeding.
Clad
Clad describes a coin made from layers of different metals bonded together. Before 1965, dimes, quarters, and half dollars were made of 90% silver. When the price of silver rose above the face value of these coins, Congress passed the Coinage Act of 1965, replacing silver with clad construction.
A clad coin is a sandwich: a core of pure copper between outer layers of copper-nickel alloy (75% copper, 25% nickel). This combination gives the coin a silvery appearance while keeping production costs low. Look at the edge of any modern quarter or dime — the reddish-brown stripe you see is the copper core peeking through.
Ways to Organize a Collection
Type Set
A type set is a collection that includes one example of each major design type within a category. Instead of trying to collect every date and mint mark of the Lincoln cent (which would be hundreds of coins), a type set collector would want just one representative Lincoln cent — and then move on to a Buffalo nickel, a Mercury dime, a Standing Liberty quarter, and so on.
Type sets give you a broad overview of American coinage history without requiring a huge budget or decades of searching. They are an excellent way to start collecting because each coin you add looks dramatically different from the last.
A common approach is to build a “20th Century Type Set” that includes one example of every major coin design used from 1900 to 1999. This might include 15 to 20 coins and could be assembled for a few hundred dollars.
Date Set
A date set is a collection organized by year. The goal is to acquire one coin from every year a particular series was produced. A Lincoln cent date set from 1959 to the present, for example, means finding a cent for each year — and possibly each mint mark — in that range.
Date sets can range from simple (a complete set of America the Beautiful quarters from 2010 to 2021) to extremely challenging (a complete set of Morgan silver dollars from 1878 to 1921, which includes some very rare dates). The difficulty and cost depend entirely on which series you choose.
Putting It All Together
These six terms form the foundation of everything you will learn in this badge. When your counselor asks you to explain the design features of a coin, you will use “obverse” and “reverse.” When you discuss why modern coins look different from older ones, you will talk about “clad” construction. And when you describe how your collection is organized, you will use “type set” or “date set” — or both.
Coin Terminology Glossary — American Numismatic Association A comprehensive glossary of coin collecting terms from the ANA, covering hundreds of terms beyond the six covered here. Link: Coin Terminology Glossary — American Numismatic Association — https://www.money.org/numismatic-glossaryReq 3 — Storing Your Collection
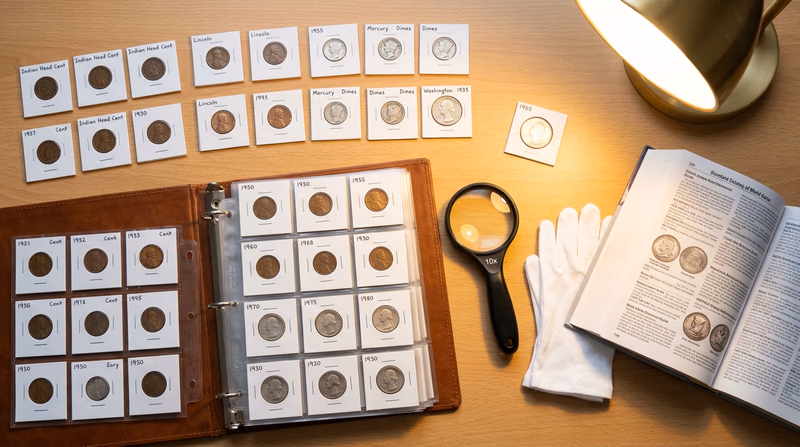
A coin that survived 100 years in a bank vault can be ruined in a week by improper storage. The oils on your fingers, the chemicals in cheap plastic holders, and even the humidity in your bedroom can damage a coin’s surface permanently. Before you start building your collection, you need to know how to protect it.
Three Common Storage Methods
1. Coin Albums (Folders)
Coin albums are the most popular storage method for beginners. A standard coin folder — like the classic blue Whitman folders — has labeled slots for each date and mint mark in a series. You press each coin into its slot, where it sits in a die-cut cardboard opening. More advanced albums (like Dansco albums) use clear plastic slides that cover both sides of the coin, letting you view the obverse and reverse without removing it.
Benefits:
- Organized by date and mint mark — you can see your progress at a glance
- Relatively compact and easy to display
- Albums with slides protect both sides of the coin
- Fun and satisfying to fill, which keeps you motivated to collect
Drawbacks:
- Basic folders expose one side of the coin to air and contact
- Inserting and removing coins can cause scratches if you are not careful
- Not airtight — humidity and pollutants can still reach the coin
- Folders work best for circulated coins; they are not ideal for high-grade uncirculated coins
Cost: Basic folders run $5–$10 each. Higher-end albums with clear slides cost $25–$50.
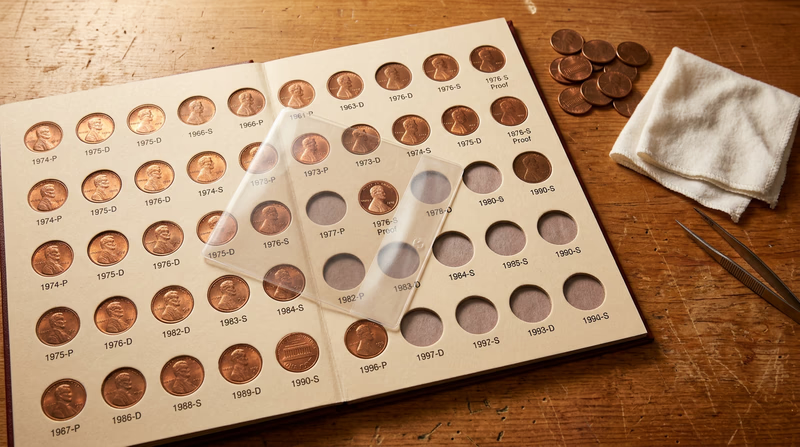
2. Individual Holders (Flips and Capsules)
For coins that deserve individual attention, collectors use two main types of holders:
- 2×2 cardboard flips are small cardboard squares with a clear window. You place the coin in the window and staple or fold the cardboard shut. They are the standard way dealers and collectors store and trade individual coins.
- Plastic capsules (also called coin holders or “AirTites”) are rigid, airtight containers sized to fit specific denominations. The coin sits inside a clear plastic shell that snaps or screws shut.
Benefits:
- Each coin is individually protected from contact with other coins
- Capsules provide excellent protection against air, moisture, and handling
- Easy to label and organize in boxes
- You can examine both sides of the coin without touching it
- Great for valuable or high-grade coins
Drawbacks:
- More time-consuming to organize than an album
- Capsules take up more space
- Cardboard flips can contain PVC (a type of plastic that breaks down over time and damages coins) — you must buy “Mylar” or “archival” flips to avoid this
- Buying individual holders for a large collection adds up
Cost: Cardboard flips cost about $5–$10 per 100. Hard plastic capsules cost $0.50–$1.50 each depending on size.
3. Slabbed (Third-Party Grading Service) Holders
For valuable coins, many collectors send their coins to a third-party grading service like PCGS (Professional Coin Grading Service) or NGC (Numismatic Guaranty Company). The service authenticates the coin, assigns a grade on the 1–70 Sheldon scale, and encapsulates it in a tamper-evident hard plastic holder called a “slab.” The slab includes a label with the coin’s grade, description, and a unique certification number.
Benefits:
- Professional authentication — you know the coin is genuine
- Standardized grade accepted by the entire hobby
- Excellent physical protection in a sonically sealed holder
- Certification number lets you verify the coin’s grade online
- Enhances resale value and buyer confidence
Drawbacks:
- Expensive — grading fees typically start at $20–$40 per coin and go up
- Turnaround time can be weeks or months
- Not practical for low-value coins (the grading fee may exceed the coin’s worth)
- You cannot touch or examine the coin’s edge once it is slabbed
- Bulkier than other storage methods
Cost: Grading fees range from $20 to $150+ per coin depending on service level and coin value. You also pay for shipping and insurance both ways.
General Storage Tips
No matter which method you choose, a few universal rules apply:
Coin Storage Essentials
- Hold coins by the edges: Never touch the obverse or reverse with bare fingers. The oils on your skin can leave permanent marks.
- Store in a cool, dry place: Heat and humidity accelerate toning and corrosion. Avoid attics, basements, and bathrooms.
- Never clean your coins: Cleaning removes the natural surface (called “luster”) and almost always reduces a coin’s value. Collectors and dealers can spot a cleaned coin instantly.
- Keep coins away from rubber bands, cardboard, and paper: These materials contain sulfur and acids that cause toning and corrosion over time.
- Use PVC-free materials only: Check labels before buying storage supplies.
Req 4a — The One-Cent Coin
The Lincoln cent is the longest-running coin design in U.S. history — Abraham Lincoln has appeared on the obverse since 1909. But the reverse has changed dramatically, and 2009 was a year unlike any other. Finding these coins is straightforward, but understanding their story is what sets you apart as a collector.
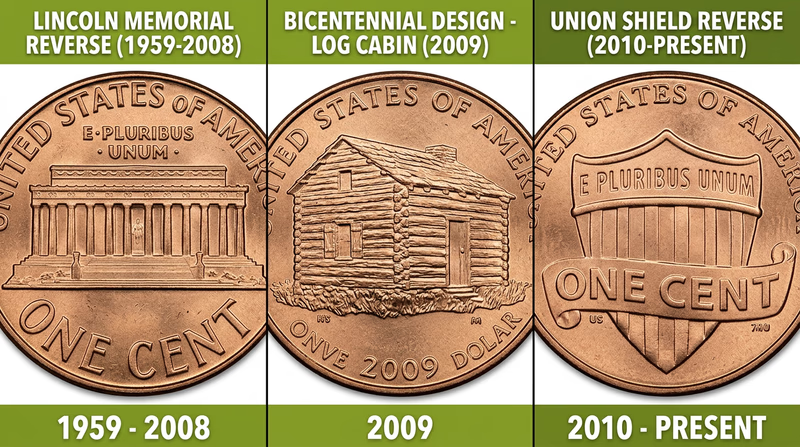
The Lincoln Memorial Reverse (1959–2008)
In 1959 — the 150th anniversary of Lincoln’s birth — the Mint replaced the “Wheat Ears” reverse with a new design showing the Lincoln Memorial in Washington, D.C. This design, created by Frank Gasparro, ran for nearly fifty years, making it one of the most familiar images in American coinage.
Design features to know:
- Obverse: Lincoln’s portrait facing right, designed by Victor David Brenner in 1909. Look for the designer’s initials “VDB” on the truncation of Lincoln’s shoulder (they are tiny — a magnifying glass helps). The date and mint mark appear below and to the right of the portrait.
- Reverse: The Lincoln Memorial building with the words “UNITED STATES OF AMERICA” above and “ONE CENT” below. The designer’s initials “FG” (Frank Gasparro) appear to the right of the Memorial near the base.
The Union Shield Reverse (2010–Present)
In 2010, the Mint introduced the Union Shield reverse, designed by Lyndall Bass and sculpted by Joseph Menna. The shield represents Lincoln’s preservation of the United States as a single, united country during the Civil War.
Design features:
- Obverse: Same Lincoln portrait by Brenner, updated slightly over the years but essentially unchanged since 1909.
- Reverse: A heraldic shield with a horizontal bar across the top inscribed “ONE CENT,” a vertical stripe pattern below, and a scroll banner across the middle reading “E PLURIBUS UNUM.” The designer’s initials “LB” (Lyndall Bass) appear below the shield.
The Special Year: 2009
The year 2009 marked the 200th anniversary of Lincoln’s birth and the 100th anniversary of the Lincoln cent. To celebrate, the Mint issued four different reverse designs, each representing a chapter of Lincoln’s life:
Birth and Early Childhood (Kentucky) — A log cabin in the woods, designed by Richard Masters (initials “RM”). This represents Lincoln’s humble beginnings in Hodgenville, Kentucky.
Formative Years (Indiana) — A young Lincoln reading a book while sitting on a log, designed by Charles Vickers (initials “CV”). Lincoln was a voracious reader despite having very little formal schooling.
Professional Life (Illinois) — Lincoln standing before the Old State Capitol in Springfield, Illinois, designed by Joel Iskowitz (initials “JI”). This represents his career as a lawyer and politician.
Presidency (Washington, D.C.) — A half-completed U.S. Capitol dome, designed by Susan Gamble (initials “SG”). The dome was under construction during Lincoln’s presidency, and he insisted work continue as a symbol that the Union would endure.
Finding the Designer Initials
Part of this requirement asks you to locate the designer’s name and initials on each coin. Here is a quick reference:
| Coin | Designer | Initials | Location |
|---|---|---|---|
| Obverse (all years) | Victor David Brenner | VDB | Truncation of Lincoln’s shoulder |
| Reverse (1959–2008) | Frank Gasparro | FG | Right of the Lincoln Memorial, near the base |
| Reverse (2010–present) | Lyndall Bass | LB | Below the shield |
| 2009 reverses | Various (RM, CV, JI, SG) | Varies | Near the bottom of each design |
What to Collect
For this requirement, you need:
- One cent dated 1959–2008 (Lincoln Memorial reverse)
- One cent dated 2010 or later (Union Shield reverse)
Check your pockets, your family’s coin jars, or ask at the bank for rolls of pennies. The Lincoln Memorial cent is becoming less common in circulation as older coins get worn out and replaced, but they are still out there. The Union Shield cent is in your change right now.
Be ready to explain to your counselor what makes each design different, who designed it, and where to find the initials. And do not forget the 2009 story — your counselor will want to hear why that year was special.
Req 4b — The Five-Cent Coin
The nickel has one of the most interesting stories in modern American coinage. For decades, Jefferson’s Monticello sat quietly on the reverse. Then, in 2004 and 2005, the Mint turned the nickel into a history lesson — and even gave Jefferson himself a brand-new look.
The Classic Jefferson Nickel (1959–2003)
The Jefferson nickel was introduced in 1938, replacing the beloved Buffalo nickel. The original design was created by Felix Schlag, who won a public design competition. His portrait of Jefferson faces left on the obverse, and his rendering of Monticello — Jefferson’s Virginia home — appears on the reverse.
Design features to know:
- Obverse: Jefferson facing left. “IN GOD WE TRUST” appears along the left rim. The date and mint mark are to the right of Jefferson’s portrait.
- Reverse: Monticello, Jefferson’s home near Charlottesville, Virginia. “MONTICELLO” appears below the building, “E PLURIBUS UNUM” above, and “FIVE CENTS” at the bottom. The designer’s initials “FS” appear below the right side of Monticello (they were added in 1966 after originally being omitted).
The Westward Journey Nickels (2004–2005)
In 2004 and 2005, the U.S. Mint issued four special nickels commemorating the Westward Journey — the Lewis and Clark Expedition of 1804–1806 and the Louisiana Purchase that made it possible.
2004 Designs
Both 2004 nickels kept the classic Schlag portrait of Jefferson on the obverse but introduced two new reverse designs:
Peace Medal (first half of 2004) — Shows the reverse of the peace medals that Lewis and Clark presented to Native American leaders. The design features two clasped hands beneath a crossed pipe and hatchet, with “UNITED STATES OF AMERICA” on a ribbon. Designed by Norman E. Nemeth (initials “NEN”).
Keelboat (second half of 2004) — Shows the 55-foot keelboat that carried the Corps of Discovery up the Missouri River. Designed by Al Maletsky (initials “AM”).
2005 Designs
The 2005 nickels changed both sides of the coin — something rarely done:
American Bison (first half of 2005) — The reverse features a bison (buffalo), an animal central to the Great Plains that Lewis and Clark documented extensively. Designed by Jamie Franki (initials “JF”). The obverse features a new, more lifelike portrait of Jefferson by Joe Fitzgerald (initials “JF”), based on a marble bust by Jean-Antoine Houdon.
Ocean in View (second half of 2005) — The reverse shows the Pacific Ocean as seen from the expedition’s campsite, inspired by William Clark’s journal entry: “Ocian in view! O! the joy!” Designed by Joe Fitzgerald (initials “JF”). The obverse uses the same new Fitzgerald portrait of Jefferson.
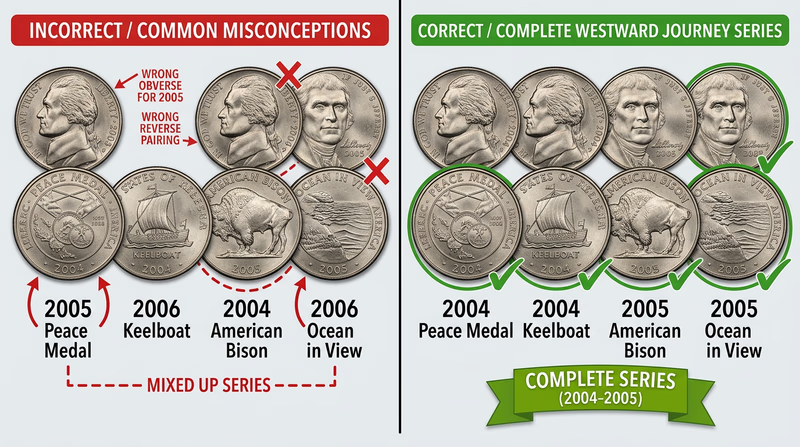
The Return to Monticello (2006–Present)
In 2006, Monticello returned to the reverse, but the obverse got a permanent update. The new forward-facing portrait of Jefferson, designed by Jamie Franki based on the Rembrandt Peale painting of 1800, replaced the classic left-facing profile. This was the first time a regular U.S. circulating coin depicted a president facing forward instead of in profile.
Design features:
- Obverse: Jefferson facing forward. “IN GOD WE TRUST” appears in Jefferson’s own handwriting along the left side. Designer’s initials “JNF” (Jamie N. Franki) appear below the portrait.
- Reverse: Monticello, redesigned by Felix Schlag (original) and re-engraved by John Reich and Mint staff. “FS” initials appear below Monticello.
Finding the Designer Initials
| Coin | Designer | Initials | Location |
|---|---|---|---|
| Obverse (1959–2004) | Felix Schlag | FS | Below the date |
| Obverse (2005–present) | Jamie Franki | JNF | Below the portrait |
| Reverse (1959–2003, 2006–present) | Felix Schlag | FS | Below Monticello (right side) |
| 2004 Peace Medal | Norman E. Nemeth | NEN | Lower right |
| 2004 Keelboat | Al Maletsky | AM | Lower right |
| 2005 Bison | Jamie Franki | JF | Lower right |
| 2005 Ocean in View | Joe Fitzgerald | JF | Lower right |
What to Collect
For this requirement, you need:
- One nickel dated 1959–2003 (classic Jefferson/Monticello)
- One nickel dated 2006 or later (forward-facing Jefferson/Monticello)
Both are common in circulation. Check your change or ask at the bank for a roll of nickels. Be prepared to explain the Westward Journey nickels of 2004–2005 and why the Mint chose to honor the Lewis and Clark Expedition.
Westward Journey Nickel Series — U.S. Mint The official story behind the 2004–2005 Westward Journey nickels, including design inspiration and the artists involved. Link: Westward Journey Nickel Series — U.S. Mint — https://www.usmint.gov/learn/coin-and-medal-programs/westward-journey-nickel-seriesReq 4c — The Ten-Cent Coin
The Roosevelt dime is a coin with a straightforward requirement — but its story is richer than its small size suggests. This tiny coin honors a president who transformed America and helped defeat polio, and its design has barely changed in nearly eighty years.
The Roosevelt Dime (1946–Present)
The Roosevelt dime was introduced in 1946, one year after President Franklin D. Roosevelt’s death. Roosevelt was closely associated with the dime because of his role in founding the March of Dimes — originally called the National Foundation for Infantile Paralysis — which raised money to fight polio by asking Americans to contribute their dimes.
The coin was designed by John R. Sinnock, the Mint’s Chief Engraver.
Design features to know:
- Obverse: Roosevelt’s portrait facing left, with “LIBERTY” along the left rim and “IN GOD WE TRUST” along the lower left. The date appears at the bottom right, and the mint mark is just above the date. Sinnock’s initials “JS” appear at the base of Roosevelt’s neck.
- Reverse: A torch flanked by an olive branch (on the left, symbolizing peace) and an oak branch (on the right, symbolizing strength and independence). “UNITED STATES OF AMERICA” arcs across the top, “E PLURIBUS UNUM” runs along the bottom left, and “ONE DIME” appears at the base. Sinnock’s initials “JS” also appear at the base of the torch.
The 1965 Transition
The most significant change to the Roosevelt dime happened in 1965, when the Mint switched from 90% silver to clad construction (copper-nickel over copper). As you learned in Req 2, this change was driven by the rising price of silver. The 1964 dime was the last silver dime produced for circulation, and collectors immediately began hoarding them.
If you compare a pre-1965 and post-1965 dime edge-on, the difference is obvious. The older coin has a uniform silvery edge, while the clad coin shows a thin copper stripe sandwiched between the outer layers.

A Design That Endures
Unlike the cent, nickel, and quarter — which have all received new reverse designs in recent decades — the Roosevelt dime has kept essentially the same design since 1946. Minor adjustments have been made (the mint mark moved from the reverse to the obverse in 1968, and the lettering has been slightly refined), but the overall design remains John Sinnock’s original vision.
This consistency makes the Roosevelt dime one of the simplest coins to collect but also one of the most understated. It does not get the attention of flashy quarter programs or bicentennial specials, but it has quietly honored Roosevelt’s legacy for nearly eight decades.
What to Collect
For this requirement, you need:
- One dime dated 1965 or later (clad Roosevelt dime)
This is the easiest coin to find for this badge — any dime in your pocket almost certainly qualifies. Focus your preparation on knowing the design features, the designer (John R. Sinnock), where to find “JS” on both sides, and the story of why Roosevelt appears on this coin.
The Roosevelt Dime — CoinWeek A detailed profile of the Roosevelt dime covering its history, design evolution, and key dates for collectors. Link: The Roosevelt Dime — CoinWeek — https://coinweek.com/education/coin-profiles/coin-profiles-united-states/the-roosevelt-dime/Req 4d — The Quarter
No U.S. coin has gone through more design changes in the past thirty years than the quarter. What was once a single, unchanging design has become a rotating canvas for states, parks, and pioneering women. For this requirement, you will collect seven quarters that span this entire transformation.
The Washington Quarter (1965–1998)
The Washington quarter was introduced in 1932 to mark the 200th anniversary of George Washington’s birth. The obverse portrait was designed by John Flanagan, based on a bust of Washington by sculptor Jean-Antoine Houdon. The original reverse featured a heraldic eagle.
Design features:
- Obverse: Washington facing left. “LIBERTY” above, “IN GOD WE TRUST” below and to the left, date at the bottom. Flanagan’s initials “JF” (later “JFL”) appear at the base of Washington’s neck.
- Reverse: A heraldic eagle with outstretched wings, clutching arrows and an olive branch. “UNITED STATES OF AMERICA” and “E PLURIBUS UNUM” above, “QUARTER DOLLAR” below.
This design ran without major changes from 1965 through 1998 (the 1975–1976 Bicentennial coins were a temporary exception — you will learn about those in Req 5).
The 50 State Quarters Program (1999–2009)
In 1999, the Mint launched the most popular coin program in American history. Every ten weeks for ten years, a new quarter appeared with a unique reverse design honoring one of the 50 states (in the order they ratified the Constitution or were admitted to the Union). Six additional designs for U.S. territories and the District of Columbia followed in 2009.
Purpose: The 50 State Quarters Program was designed to encourage a new generation of coin collectors and to honor each state’s unique history, landmarks, and culture. Congress estimated that millions of Americans would pull quarters out of circulation to save them — and they were right. The program generated enormous public interest and an estimated $3 billion in profit for the government from coins that were saved rather than spent.
Each state selected its own design through a state-level process, making every quarter a tiny portrait of local identity. Georgia featured a peach. Massachusetts honored the Minuteman. Colorado displayed its Rocky Mountain peaks.
The America the Beautiful Program (2010–2021)
Building on the success of the State Quarters, this program featured 56 designs honoring national parks, forests, monuments, and other national sites — one from each state, territory, and the District of Columbia.
Purpose: The America the Beautiful Quarters celebrated the natural and historic treasures of the National Park System and other federal lands. Each quarter showcased a different site, from the Grand Canyon to Yellowstone to the Tuskegee Airmen National Historic Site. The program encouraged Americans to explore and appreciate the country’s public lands.
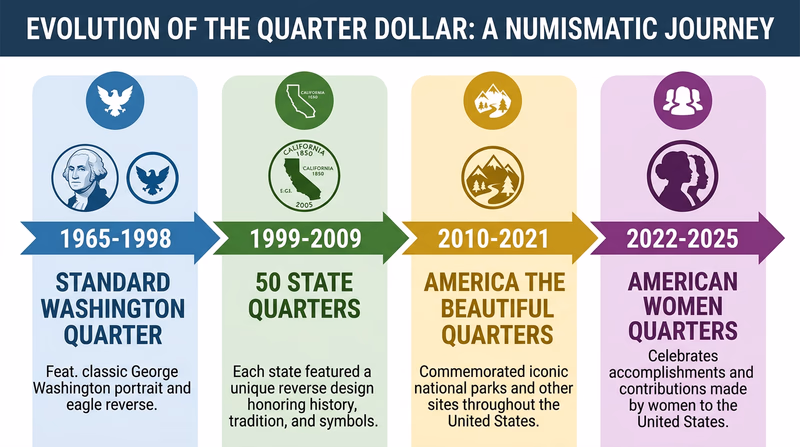
The American Women Quarters Program (2022–2025)
The most recent program features notable American women on the reverse — women who have made significant contributions to the country in a wide range of fields. The program runs from 2022 through 2025, with up to five new designs released each year. The obverse features an updated portrait of Washington by Laura Gardin Fraser — a design originally submitted for the 1932 quarter but passed over at that time.
Purpose: The American Women Quarters Program honors the achievements of women who have shaped American history, including Maya Angelou (poet and civil rights activist), Sally Ride (astronaut), Wilma Mankiller (Cherokee Nation chief), and many others. The program aims to ensure that American currency reflects the diversity of the people who built the nation.
What to Collect
For this requirement, you need seven quarters total:
Quarter Collection Checklist
- One Washington quarter dated 1965–1998: The classic eagle reverse design.
- Two 50 State/Territories quarters (1999–2009): Pick any two different state or territory designs.
- Two America the Beautiful quarters (2010–2021): Pick any two different national site designs.
- Two American Women quarters (2022–2024): Pick any two different honoree designs.
The 1965–1998 quarter is getting harder to find in circulation but still turns up regularly. All the program quarters are common and affordable — your change jar is the best starting point.
Be prepared to explain the purpose of each program to your counselor: why the Mint started it, what it celebrates, and how the designs were chosen.
Quarter Programs — U.S. Mint The Mint's hub page for all quarter programs, with design galleries and background on each series. Link: Quarter Programs — U.S. Mint — https://www.usmint.gov/learn/coin-and-medal-programs/quarter-programsReq 4e — The Half Dollar
The Kennedy half dollar is a coin most people have heard of but few have in their pockets. Although the Mint still produces it, the half dollar rarely circulates — most are saved by collectors or sit in bank vaults. Finding one is part of the adventure.
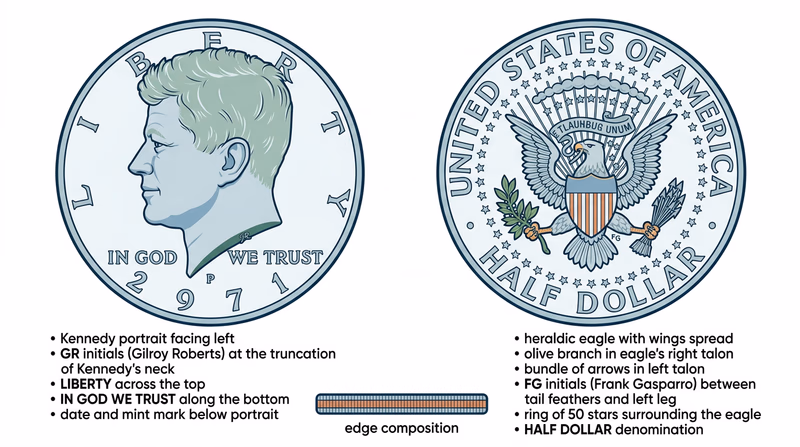
The Kennedy Half Dollar (1964–Present)
The Kennedy half dollar was created with extraordinary speed. President John F. Kennedy was assassinated on November 22, 1963. Within weeks, Congress authorized a new half dollar bearing his likeness, and the first coins were struck in January 1964. The public response was overwhelming — people lined up at banks and hoarded the coins as keepsakes, which is one reason the half dollar gradually disappeared from everyday commerce.
Design features to know:
- Obverse: Kennedy’s portrait facing left, designed by Gilroy Roberts, the Mint’s Chief Engraver. Roberts’ initials “GR” appear in a stylized form at the truncation of Kennedy’s neck, just above the neckline. “LIBERTY” arcs across the top, “IN GOD WE TRUST” runs along the bottom, and the date and mint mark appear below the portrait.
- Reverse: A heraldic eagle based on the Presidential Seal, designed by Frank Gasparro. The eagle holds an olive branch and a bundle of arrows, surrounded by a ring of 50 stars (one for each state). Gasparro’s initials “FG” appear between the eagle’s tail feathers and the left leg. “UNITED STATES OF AMERICA” and “HALF DOLLAR” frame the design.
Why You Do Not See Them in Change
The Kennedy half dollar is still legal tender and still produced, but it does not circulate the way quarters and dimes do. There are a few reasons:
- Sentimental value: From the very beginning, people saved Kennedy halves rather than spending them.
- Vending machines: Most vending machines and parking meters do not accept half dollars, reducing demand.
- Size and weight: At 30.6mm in diameter, the half dollar is significantly larger and heavier than a quarter, making it impractical for everyday pocket change.
- Low production: The Mint now produces Kennedy halves primarily for collector rolls and bags rather than for general circulation.
How to Find One
Since the half dollar does not circulate widely, you may need to be a bit resourceful:
Where to Find a Kennedy Half Dollar
- Ask your bank: Most banks can order half dollar rolls for you. A roll contains 20 coins ($10 face value).
- Check with older relatives: Many families have Kennedy halves tucked away in drawers or coin collections started in the 1960s.
- Visit a coin shop: Dealers typically have common-date Kennedy halves available for close to face value.
- Look online: Reputable dealers sell circulated Kennedy halves for around $1–$2 each.
What to Know for Your Counselor
Be ready to explain:
- Who designed the obverse (Gilroy Roberts) and reverse (Frank Gasparro)
- Where to find each designer’s initials
- The key design elements: Kennedy’s portrait, the heraldic eagle, the 50 stars
- Why the half dollar does not circulate widely
- The composition change from silver to clad
Req 4f — The Dollar Coin
The dollar coin has had a rocky history with the American public. Despite repeated attempts to get people to use dollar coins instead of dollar bills, most Americans have stubbornly preferred paper. But for collectors, each attempt at a new dollar coin created a fascinating design — and for this requirement, you need one from each of the three modern series.
Susan B. Anthony Dollar (1979–1981, 1999)
The Susan B. Anthony dollar was the first U.S. circulating coin to honor a real woman (as opposed to symbolic figures like Liberty). It was designed by Frank Gasparro, who also designed the Kennedy half dollar reverse.
Design features:
- Obverse: Susan B. Anthony — the pioneering women’s suffrage leader — facing right, with her likeness shown in front of a small representation of the Moon. “LIBERTY” appears above, the date below, and “IN GOD WE TRUST” to the left. Gasparro’s initials “FG” appear near the portrait.
- Reverse: An eagle landing on the Moon, adapted from the Apollo 11 mission patch. “UNITED STATES OF AMERICA” and “ONE DOLLAR” frame the design. Designer’s initials “FG” appear near the eagle’s tail.
The problem: The Susan B. Anthony dollar was nearly the same size and color as a quarter, causing endless confusion. Vending machine operators loved it (it eliminated paper dollar jams), but the public rejected it. Production stopped after just three years. A final batch was struck in 1999 to fill a gap before the Sacagawea dollar was ready.
Sacagawea Dollar (2000–2008)
Learning from the SBA dollar’s failure, the Mint made the Sacagawea dollar visually and tactilely distinct: a smooth (plain) edge, a golden color, and a wider diameter.
Design features:
- Obverse: Sacagawea — the Lemhi Shoshone woman who served as guide and interpreter for the Lewis and Clark Expedition — carrying her infant son, Jean Baptiste. Designed by Glenna Goodacre, with her initials “GG” appearing on the front. The model for Sacagawea was Randy’L He-dow Teton, a Shoshone student at the University of New Mexico.
- Reverse: A soaring eagle surrounded by 17 stars (representing the number of states at the time of the Lewis and Clark Expedition). Designed by Thomas D. Rogers with initials “TDR” near the eagle.
The Sacagawea dollar solved the confusion problem but never caught on for everyday use. The dollar bill remained far more popular, and most Sacagawea dollars ended up in vending machines, transit systems, or collector albums.
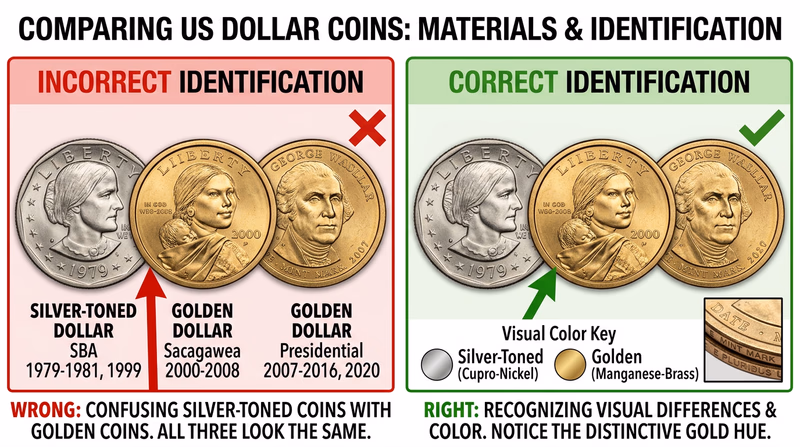
Presidential Dollar Coins (2007–2016, 2020)
Modeled on the success of the 50 State Quarters, the Presidential Dollar program issued four coins per year honoring U.S. presidents in the order they served. The series ran from 2007 (George Washington) through 2016 (Ronald Reagan), with a final coin in 2020 for George H.W. Bush.
Design features:
- Obverse: A portrait of the president being honored, with the president’s name and order number (e.g., “1st President”). Each portrait was designed by a different artist.
- Reverse: The Statue of Liberty, designed by Don Everhart (initials “DE”). This design remained constant throughout the series.
- Edge lettering: The date, mint mark, “E PLURIBUS UNUM,” and “IN GOD WE TRUST” were incused (pressed into) the edge of the coin rather than appearing on the obverse or reverse. This was a first for U.S. circulating coins.
A living-president rule: By law, a president could only be honored on a coin at least two years after death. This is why the series skipped several living presidents and issued the George H.W. Bush coin in 2020, two years after his death in 2018.
How to Find Dollar Coins
Like the half dollar, dollar coins do not circulate widely. Here is where to look:
Finding Dollar Coins
- Bank rolls: Ask your bank for dollar coin rolls ($25 face value per roll). You may get a mix of Sacagawea and Presidential dollars.
- Post office vending machines: USPS stamp machines often give dollar coins as change.
- Transit systems: Many transit fare machines accept and dispense dollar coins.
- Coin dealers: Common-date dollar coins from all three series are available at or near face value.
- Online: The U.S. Mint sells uncirculated rolls and bags directly at usmint.gov.
The Susan B. Anthony dollar is the hardest to find in circulation since it has not been produced since 1999, but they still turn up occasionally. Coin shops and online sellers carry them for $1.50–$3 in circulated condition.
What to Know for Your Counselor
For each of your three dollar coins, be ready to discuss:
- The designer and their initials
- The key design features on both obverse and reverse
- Where the mint mark appears (edge on Presidential dollars, obverse on the others)
- Why the coin was created and what it honored
The dollar coin story is also a story about design and public acceptance. Your counselor may enjoy hearing why each new dollar was created and why none of them replaced the paper dollar.
Dollar Coin Programs — U.S. Mint The Mint's hub page covering all modern dollar coin programs, from the Susan B. Anthony through the current Native American series. Link: Dollar Coin Programs — U.S. Mint — https://www.usmint.gov/learn/coin-and-medal-programs/dollarReq 5 — Bicentennial Coins
In 1976, the United States celebrated its 200th birthday. The Mint marked the occasion by doing something it had never done before and has never done since: temporarily replacing the reverse designs on three circulating denominations at the same time. These Bicentennial coins are among the most distinctive in American numismatic history.
A National Celebration
Congress authorized the Bicentennial coinage program in 1973, giving the Mint time to select designs and prepare for production. A national design competition drew over 800 entries from professional and amateur artists. Three winning designs were chosen — one each for the quarter, half dollar, and dollar.
All three coins carry a special dual date — 1776–1976 — instead of a single year. This means no coins bear the date 1975 for these denominations. Every quarter, half dollar, and dollar struck in both 1975 and 1976 carries the 1776–1976 dual date.
The Three Bicentennial Designs
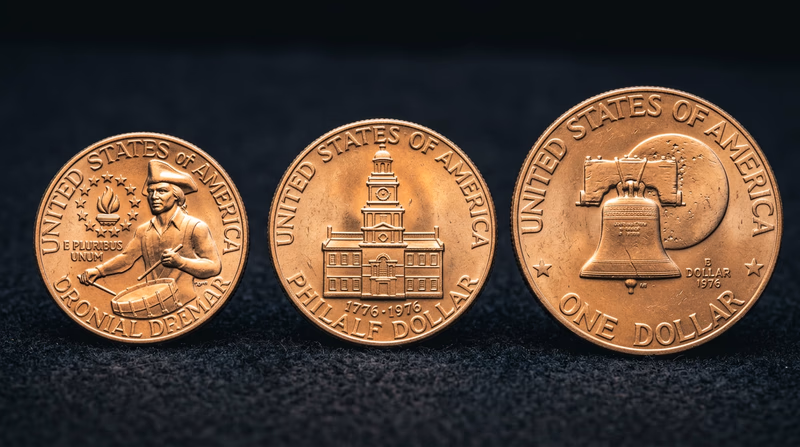
Bicentennial Quarter — Colonial Drummer
The reverse features a Colonial drummer — a young soldier marching with a drum, accompanied by a victory torch surrounded by 13 stars (representing the original colonies). Designed by Jack L. Ahr, whose initials “JLA” appear near the drummer’s boot.
The obverse retains John Flanagan’s familiar Washington portrait but replaces the single date with “1776–1976.”
This is probably the most commonly encountered Bicentennial coin. Hundreds of millions were struck, and they still turn up in circulation regularly. The Colonial Drummer became an iconic symbol of America’s bicentennial celebration.
Bicentennial Half Dollar — Independence Hall
The reverse depicts Independence Hall in Philadelphia — the building where the Declaration of Independence was signed and the Constitution was drafted. The view shows the south facade of the building, with “200 YEARS OF FREEDOM” inscribed below. Designed by Seth G. Huntington, with initials “SGH” to the right of the building.
The obverse retains Gilroy Roberts’ Kennedy portrait with the dual date. As you learned in Req 4e, the half dollar was already becoming scarce in circulation by this time, so many Bicentennial halves were saved by collectors rather than spent.
Bicentennial Dollar — Liberty Bell and Moon
The reverse shows the Liberty Bell superimposed on the Moon — a striking combination of two American symbols, connecting the nation’s founding to the Space Age. Designed by Dennis R. Williams, with initials “DRW” below the bell.
The obverse retains Frank Gasparro’s Eisenhower portrait with the dual date. The Eisenhower dollar was the last large-format dollar coin (38.1mm diameter), making the Bicentennial dollar a substantial and impressive coin to hold.
Special Collector Editions
In addition to the regular copper-nickel clad versions struck for circulation, the Mint also produced special 40% silver versions of all three Bicentennial coins. These were sold in collector sets and are distinguished by their “S” mint mark (San Francisco). The silver versions have a slightly different luster and feel compared to the clad versions.
The Mint offered three-coin sets containing all three silver Bicentennial coins in both uncirculated and proof finishes. These sets remain popular with collectors today and can be found at coin shops and online for $15–$30.
Why the Bicentennial Coins Matter
The Bicentennial coinage program was more than a celebration — it was a demonstration of how coins can serve as cultural artifacts. These coins captured a national moment: the pride of a 200th birthday, the connection between past and future (Liberty Bell meets Moon), and the grassroots patriotism of a nation marking its origins.
For collectors, the Bicentennial coins are also a case study in how temporary designs create collecting opportunities. Because they were struck in enormous quantities, they remain affordable. But because they look so different from standard coinage, they catch people’s attention and spark curiosity — which is exactly what the Mint intended.
Bicentennial Coinage — U.S. Mint The official Mint page on the Bicentennial quarter, with links to the half dollar and dollar designs. Link: Bicentennial Coinage — U.S. Mint — https://www.usmint.gov/learn/coin-and-medal-programs/bicentennial-quarterReq 6 — U.S. Currency
Coins are minted. Paper money is printed — and the distinction matters. While the U.S. Mint handles coins, paper currency comes from a completely separate government agency with its own fascinating history.
The Faces on U.S. Currency
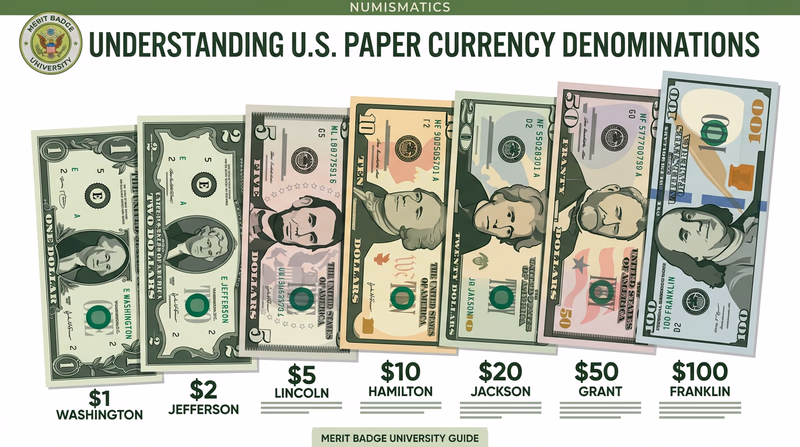
Every denomination of U.S. paper money features a prominent American leader. Here are the current portraits:
| Denomination | Portrait | Notable Role |
|---|---|---|
| $1 | George Washington | 1st President, Commander of the Continental Army |
| $2 | Thomas Jefferson | 3rd President, author of the Declaration of Independence |
| $5 | Abraham Lincoln | 16th President, preserved the Union during the Civil War |
| $10 | Alexander Hamilton | 1st Secretary of the Treasury, architect of the U.S. financial system |
| $20 | Andrew Jackson | 7th President, controversial populist and military hero |
| $50 | Ulysses S. Grant | 18th President, commanding general of the Union Army |
| $100 | Benjamin Franklin | Founding Father, diplomat, inventor, and scientist |
The $2 Bill — Rarer Than You Think
The $2 bill featuring Thomas Jefferson is still in production, but it is printed in much smaller quantities than other denominations. Many people believe the $2 bill has been discontinued, but that is a myth. The Bureau of Engraving and Printing produces new $2 bills periodically when the Federal Reserve orders them. Their relative scarcity makes them a fun conversation piece — and some people collect $2 bills by serial number or series year.
The Reverse Designs
The backs of U.S. bills are just as interesting as the fronts:
- $1 — The Great Seal of the United States (both sides: the eagle and the unfinished pyramid with the Eye of Providence)
- $2 — John Trumbull’s painting Declaration of Independence, showing the presentation of the document to Congress
- $5 — The Lincoln Memorial
- $10 — The U.S. Treasury Building
- $20 — The White House
- $50 — The U.S. Capitol Building
- $100 — Independence Hall
Where U.S. Currency Is Printed
U.S. paper money is produced by the Bureau of Engraving and Printing (BEP), a division of the U.S. Department of the Treasury. The BEP operates two production facilities:
Washington, D.C. Facility
The original and primary facility, located at 14th and C Streets SW in Washington, D.C. This facility has been printing currency since 1914. It is open to the public for tours, where visitors can watch billions of dollars being printed on massive high-speed presses.
Fort Worth, Texas Facility
The Western Currency Facility in Fort Worth, Texas, opened in 1991 to supplement production. Notes printed here carry a small “FW” designation near the Federal Reserve seal — a detail most people never notice.
How Paper Money Is Made
The BEP uses a combination of intaglio printing (where ink is applied to engraved plates and wiped from the surface, leaving ink only in the recessed lines) and offset printing (for background colors and patterns). This multi-step process creates the distinctive raised feel of genuine U.S. currency — run your finger across the portrait on a bill and you can feel the texture of the ink.
Modern U.S. bills also include advanced security features:
Security Features on Modern U.S. Bills
- Watermark: Hold the bill up to light and you will see a faint portrait matching the one on the front.
- Security thread: A thin embedded strip that glows a specific color under ultraviolet light (different for each denomination).
- Color-shifting ink: The denomination number in the lower right corner changes color when you tilt the bill.
- Microprinting: Tiny text visible only with magnification, printed around the portrait and in other locations.
- 3-D security ribbon ($100 only): A blue ribbon woven into the paper that shows moving images when tilted.
Coins vs. Currency: Key Differences
Since this badge focuses on coin collecting, it is worth noting the key distinctions between coins and paper money:
- Coins are made by the U.S. Mint (Department of the Treasury). Paper money is printed by the Bureau of Engraving and Printing (also Department of the Treasury, but a separate bureau).
- Coins are “minted” (struck from metal). Paper money is “printed” (on special cotton-linen blend paper — not wood-pulp paper like books or newspapers).
- Coins last 25–30+ years in circulation. Paper bills last only 5–15 years depending on denomination (the $1 bill lasts about 6 years on average).
- Both coins and paper money are distributed to the public through the Federal Reserve System.
Req 7 — Expanding Your Horizons
This final requirement gives you a choice: explore the world through coins, paper money, or tokens — or experience the collecting community firsthand. Read through all four options below, then pick the one that excites you most.
- Option a: Collect 20 world coins from at least 7 countries
- Option b: Collect 20 pieces of world paper money from at least 7 countries
- Option c: Collect 20 tokens and/or medals
- Option d: Attend a coin show, club meeting, Mint tour, or approved virtual exhibit
Option A: World Coins
World coins open a window to other cultures, histories, and artistic traditions. A coin from Japan looks nothing like a coin from South Africa, and both look nothing like a coin from Brazil. The variety is staggering.
Where to Find World Coins
- Friends and family who have traveled often have leftover foreign change sitting in drawers.
- Coin shops usually have bins of unsorted world coins at low prices (often $0.25–$1.00 each).
- Online dealers sell assorted world coin lots — a bag of 50 mixed coins from multiple countries typically costs $10–$20.
- Currency exchange leftovers at airports or banks.
What to Look For
For each coin, you need to identify:
- Country of origin — Often written on the coin, though sometimes in the local language or script.
- Denomination — The face value and currency name (e.g., “5 Pence” from the United Kingdom, “10 Yen” from Japan).
- Major design elements — What is depicted on each side? A monarch? A national symbol? An animal? A landmark?
Option B: World Paper Money
World paper money (called banknotes) showcases some of the most elaborate artwork and security features of any printed material in the world. Many countries use polymer (plastic) banknotes with transparent windows, holographic strips, and color-shifting elements that make U.S. bills look plain by comparison.
Where to Find World Banknotes
- Travelers in your family or troop may have leftover bills from trips.
- Coin and currency dealers sell world banknotes, often at modest markups above face value.
- Online marketplaces offer assorted lots of world banknotes for collectors.
- Banks occasionally have foreign currency available, though usually only major currencies.
What to Look For
Just like coins, identify the country, denomination, and major design elements. Pay special attention to:
- Who or what is depicted (leaders, animals, landmarks, cultural symbols)
- Security features (watermarks, holograms, color-shifting ink, transparent windows)
- The material — is it traditional cotton/linen paper or modern polymer?
Option C: Tokens and Medals
Tokens and medals look like coins but serve different purposes. A token substitutes for money in a specific context (arcade tokens, transit tokens, trade tokens). A medal commemorates a person, event, or achievement but has no monetary value.
Where to Find Tokens and Medals
- Antique shops and flea markets are excellent sources for old trade tokens and commemorative medals.
- Amusement parks, arcades, and car washes still use tokens in some locations.
- Military surplus stores sometimes carry challenge coins and campaign medals.
- Souvenir shops at national parks, historical sites, and tourist attractions often sell commemorative medals.
- Elongated pennies — those flattened souvenir pennies from tourist attractions — count as a type of token.
What to Look For
For each item, identify:
- The issuer — Who created or distributed it? A business? A government? An organization?
- The use — What was it for? Payment in a specific system? A commemorative keepsake? An award?
Option D: Experience the Hobby
This option asks you to step outside your own collection and experience the coin collecting community. Complete one of these:
1. Attend a Coin Show
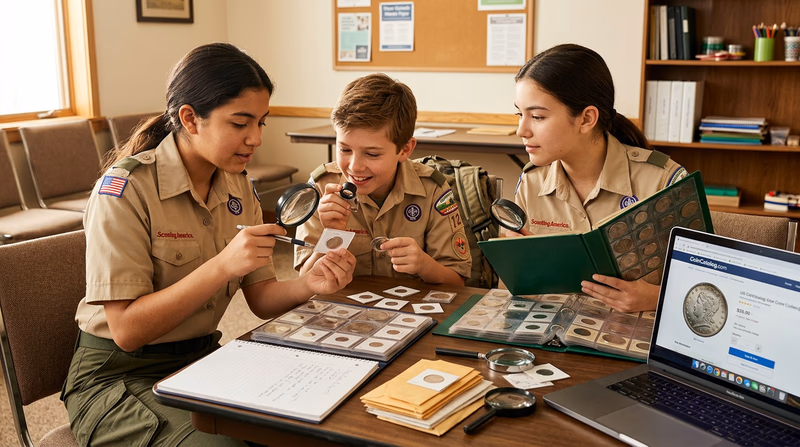
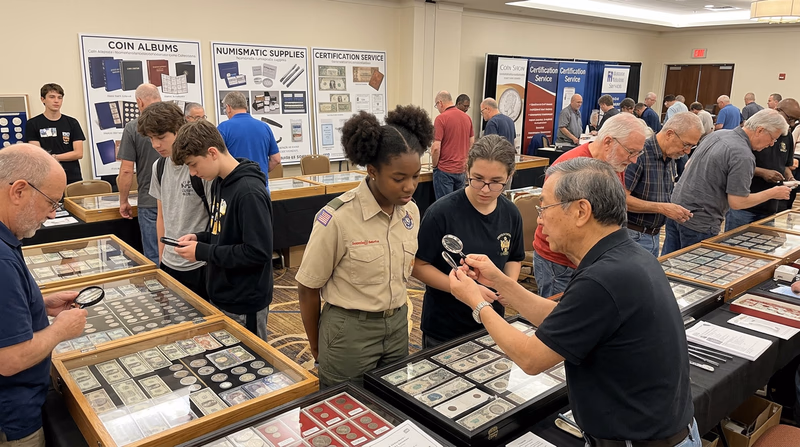
Coin shows (also called coin bourses) are events where dealers set up tables to buy, sell, and trade coins. Shows range from small local gatherings to massive national conventions. Walking a coin show floor is like visiting a museum where everything is for sale — you will see coins you have only read about, and dealers are usually happy to answer questions and show off their best pieces.
2. Attend a Coin Club Meeting
Local coin clubs meet regularly (usually monthly) and welcome visitors, including Scouts working on this badge. Meetings often feature guest speakers, show-and-tell presentations, and educational programs. The American Numismatic Association maintains a list of local clubs on their website.
3. Tour a U.S. Mint Facility or Museum
The Philadelphia and Denver Mints offer public tours where you can watch coins being struck in real time. The tour includes exhibits on coin history and the minting process. As you learned in Req 1, these are working production facilities — you will see the same machines that produce the coins in your pocket.
4. Tour a Virtual Exhibit
With your parent or guardian’s permission, visit an online numismatic exhibit approved by your counselor. The Smithsonian’s National Numismatic Collection and the American Numismatic Association’s Money Museum both offer virtual exhibits.
Preparing for Your Experience (Option d)
- Contact the venue in advance: Confirm dates, hours, and any admission fees.
- Bring a magnifying glass: You will want to examine coins up close.
- Bring a notebook: Write down what you see, what surprises you, and questions that come up.
- Set a budget: If you plan to buy anything, decide how much you can spend before you go.
- Ask questions: Dealers, club members, and museum staff are almost always eager to share their knowledge with young collectors.
Extended Learning
A. Congratulations, Collector
You have learned how coins are made, mastered the vocabulary of numismatics, built a collection across six denominations, explored commemorative coinage, identified the faces on U.S. currency, and stepped into the wider world of collecting. That is a serious foundation — and the hobby only gets deeper from here.
B. The Art of Coin Grading
Every coin you handle has a story written in its surface. The sharpness of the design, the luster of the metal, and the presence (or absence) of wear marks all tell you how that coin has been treated since it left the Mint. Coin grading is the skill of reading those clues and assigning a standardized condition rating.
The industry standard is the Sheldon scale, which runs from 1 (barely identifiable) to 70 (absolutely perfect — exactly as it left the dies). Here is a simplified overview of the key grade ranges:
| Grade Range | Abbreviation | What It Means |
|---|---|---|
| 1–3 | PO to AG | Heavily worn, major details visible but barely |
| 4–6 | G | Worn smooth in high spots, major design clear |
| 8–15 | VG to F | Moderate wear, all major and most minor details visible |
| 20–35 | VF to XF | Light wear on high points, sharp details remain |
| 40–45 | AU | Slight wear on the very highest points only, most luster intact |
| 50–58 | AU | Trace of wear, nearly full luster |
| 60–70 | MS (Mint State) | No wear at all — uncirculated |
The difference between an MS-63 and an MS-67 coin might be invisible to the untrained eye, but to a professional grader it involves the number and severity of contact marks, the quality of the strike, the fullness of the luster, and the overall eye appeal. A coin graded MS-67 can be worth 10 or even 100 times more than the same date and mint mark graded MS-63.
Learning to grade takes practice. Start by comparing coins of the same type in different conditions. A worn Lincoln cent from 1960 next to a fresh one from 2024 makes the concept of wear immediately visible. The American Numismatic Association offers a correspondence course in coin grading and hosts grading seminars at their conventions.
C. Error Coins and Varieties
The U.S. Mint produces billions of coins per year at tremendous speed. Despite rigorous quality control, mistakes happen — and collectors love them. Error coins are unintentional manufacturing defects, while varieties are minor design differences caused by variations in the dies.
Common error types:
- Off-center strikes: The planchet was not properly seated in the collar, so the design is shifted to one side. A coin struck 50% off-center with the date still visible can be worth hundreds of dollars.
- Doubled dies: The die was impressed with the hub at slightly different angles, creating a doubled image on the finished coin. The 1955 and 1972 Lincoln cent doubled dies are famous examples.
- Wrong planchet errors: A planchet meant for one denomination enters the press for another. A cent struck on a dime planchet, for example, creates a wildly wrong-sized coin.
- Broadstrikes: The collar failed to constrain the coin, so the metal spread outward under pressure, creating an oversized, rimless coin.
- Die cracks and cuds: Cracks in the die create raised lines on the coin. A large crack at the rim can produce a blob of raised metal called a “cud.”
Error collecting adds a detective element to the hobby. Every coin you handle could be an error — you just have to look closely enough. A basic loupe (5x to 10x magnification) and good lighting are your essential tools.
D. Ancient and Medieval Coins
One of the most rewarding extensions of coin collecting is stepping backward in time. Ancient coins — from Greek, Roman, Celtic, Byzantine, and other civilizations — connect you to people who lived thousands of years ago in a way that photographs and museum displays cannot.
Getting started with ancient coins is more accessible than most people think. Common bronze coins from the late Roman Empire (4th–5th century AD) can be purchased for $5–$20 from reputable dealers. These are not reproductions — they are genuine artifacts, more than 1,500 years old, that once changed hands in marketplaces across Europe, North Africa, and the Middle East.
When you hold a Roman coin showing Emperor Constantine, you are holding something that might have been used to buy bread in a town that is now an archaeological site. That physical connection to history is what draws many collectors into ancient numismatics.
Key differences from modern collecting:
- Ancient coins were struck by hand between two dies, so no two are exactly alike (unlike modern machine-struck coins, which are nearly identical).
- Grading ancient coins focuses more on centering, sharpness, and surface quality than on the 1–70 Sheldon scale.
- Authentication matters — fakes exist, especially for expensive rarities. Buy from established dealers who guarantee authenticity.
- Ancient coins are legal to own in the United States, though import laws and cultural heritage regulations vary by country of origin.
E. Real-World Experiences
Visit the Smithsonian’s National Numismatic Collection
The National Museum of American History in Washington, D.C. houses one of the world’s largest coin collections — over 450,000 objects. The collection includes the legendary 1933 Double Eagle, colonial coins, and currency from around the world. If you are ever in D.C., this is a must-see.
Attend an ANA Convention
The American Numismatic Association holds two major conventions each year — the World’s Fair of Money (summer) and the National Money Show (spring). These events feature hundreds of dealers, educational programs, a young numismatists program, and exhibits of some of the rarest coins in existence. ANA conventions are open to the public, and admission is usually free for young collectors.
Start a Coin Roll Hunting Habit
One of the most popular and affordable ways to find interesting coins is coin roll hunting (CRH). Buy rolls of coins from your bank, search through them for valuable dates, errors, silver coins, or unusual varieties, and return the common coins. Many collectors have found silver dimes, rare mint marks, and error coins this way — all at face value.
Compete in Numismatic Exhibits
The ANA and many regional shows host competitive exhibits where collectors display their collections with written descriptions, historical context, and thematic organization. Young numismatists (YN) categories exist specifically for collectors under 18. Competing teaches you research skills, presentation skills, and a deeper understanding of the coins you collect.
Explore a Mint Gift Shop or Museum
Even if you cannot take a full tour of a Mint facility, the gift shops at the Philadelphia and Denver Mints sell uncirculated coin sets, proof sets, and special products at retail prices. The gift shops also feature small museum exhibits about coin history and production.