Composite Materials Merit Badge — Complete Digital Resource Guide
https://merit-badge.university/merit-badges/composite-materials/guide/
Introduction & Overview
A kayak that weighs less than a mountain bike. A wind turbine blade longer than a football field. A race car body that can survive a 200-mph crash and protect the driver inside. None of these would exist without composite materials — engineered combinations of two or more substances that, working together, outperform anything either material could do alone.
Composite materials are everywhere, from the fishing rod in your hand to the helmet on your head. In this badge, you will learn how these materials are designed, why they behave the way they do, and how to build with them yourself.
Then and Now
Then
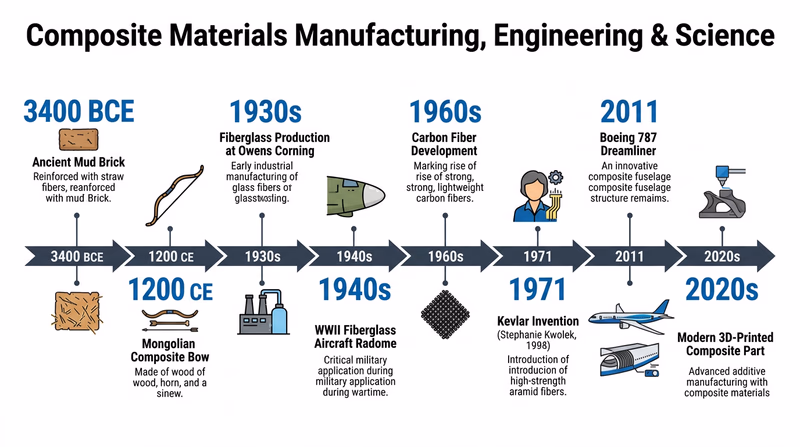
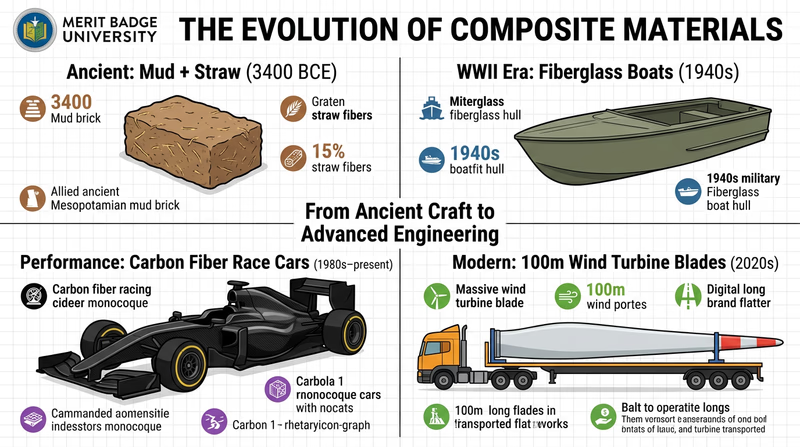
People have been making composites for thousands of years — they just did not call them that. Around 3400 BCE, ancient Mesopotamians pressed straw into mud bricks to keep them from cracking, creating one of the first engineered composites. Egyptian craftsmen laminated wood strips in alternating grain directions to build stronger furniture and chariots. Mongolian warriors built devastating composite bows from layers of horn, wood, and animal sinew — a combination that stored more energy than any single material could, giving their arrows lethal range.
The modern composites era began in the 1930s when Owens-Illinois (later Owens Corning) developed a process to spin molten glass into fine fibers. Paired with newly invented polyester resin, fiberglass was born. During World War II, fiberglass-reinforced plastics replaced scarce metals in aircraft radomes, boat hulls, and equipment housings. By the 1960s, boron and carbon fibers appeared, and aerospace engineers saw a future where aircraft could be strong and feather-light at the same time.
Now
Today, composites are a multi-billion-dollar industry reshaping transportation, energy, sports, and construction. The Boeing 787 Dreamliner is over 50% composite by weight — a first for a commercial airliner — making it lighter, more fuel-efficient, and resistant to corrosion. Formula 1 cars use carbon fiber monocoques that weigh about 35 kilograms yet can withstand crashes that would destroy a steel frame. Wind turbine blades made from fiberglass and carbon fiber now exceed 100 meters in length, capturing more energy from every gust.
New frontiers include 3D-printed composites, bio-based resins derived from plant oils, and recyclable thermoplastic composites that can be melted and reformed instead of ending up in a landfill. Researchers are even developing self-healing composites — materials embedded with microcapsules of resin that automatically repair small cracks before they spread.
Get Ready!
This badge puts real tools and real chemistry in your hands. You will learn how fibers and resins work together to create materials stronger than steel, lighter than aluminum, and more versatile than either. Then you will actually build something with them. Along the way, you will pick up safety skills, materials science knowledge, and hands-on fabrication experience that engineers and technicians use every day.
Kinds of Composite Materials
Fiber-Reinforced Polymers (FRP)
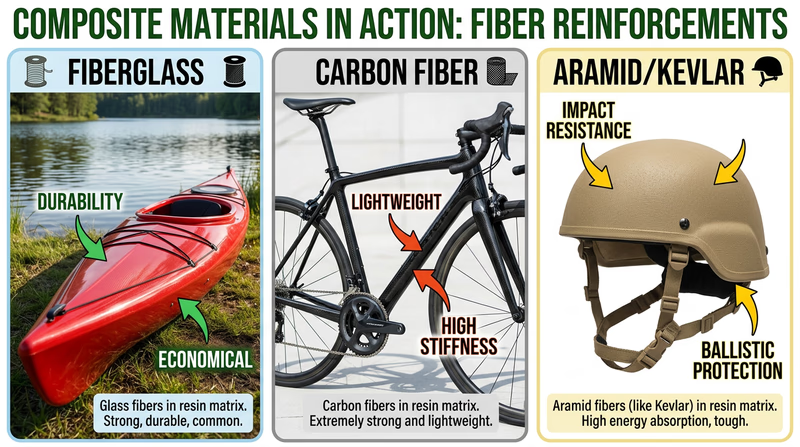
These are the composites most people picture: strong fibers embedded in a plastic resin that holds everything together. The fibers carry the load; the resin transfers stress between fibers and protects them from the environment. Fiberglass (glass fibers in polyester or epoxy resin) is the most common type — you will find it in boat hulls, shower stalls, and surfboards. Carbon fiber reinforced polymer (CFRP) uses carbon fibers instead, offering exceptional stiffness and low weight for aerospace, racing, and high-end sports equipment. Aramid fiber composites (like Kevlar) absorb impact energy, making them ideal for body armor and motorcycle helmets.
Particle-Reinforced Composites
Instead of long fibers, these composites use small particles or chunks of one material scattered through another. Concrete is the classic example: gravel and sand (the reinforcement) bonded by cement paste (the matrix). Particleboard uses wood chips bonded with adhesive. These composites are usually cheaper and easier to manufacture than fiber-reinforced types, but they are not as strong for their weight.
Laminated Composites
Laminated composites stack thin layers of different materials and bond them together. Plywood alternates wood veneer layers with their grain rotated 90 degrees, making the panel strong in every direction. Safety glass sandwiches a plastic interlayer between two sheets of glass — on impact, the glass cracks but the plastic holds the shards in place. Printed circuit boards laminate copper foil onto fiberglass-reinforced epoxy to create the backbone of every electronic device you own.
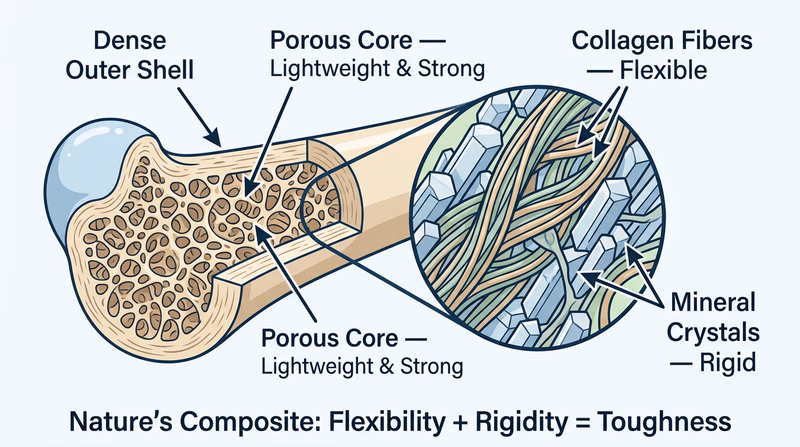
Natural Composites
Nature invented composites long before humans did. Bone is a composite of collagen (a flexible protein) and hydroxyapatite (a hard mineral), giving it both toughness and rigidity. Wood combines cellulose fibers in a lignin matrix. Bamboo arranges its fibers in a gradient — denser near the outer wall, more porous inside — giving it an outstanding strength-to-weight ratio. Engineers study these natural designs to inspire new synthetic materials.
Metal Matrix Composites (MMC)
When polymers cannot handle the heat, metal matrix composites step in. These embed ceramic fibers or particles in a metal matrix — often aluminum or titanium. The metal carries loads and conducts heat while the ceramic reinforcement adds stiffness and wear resistance. MMCs show up in aircraft engine parts, automotive brake rotors, and spacecraft structures where temperatures would melt ordinary plastics.
Ready to get started? The first step is learning how to work with composite materials safely — because the resins and fibers you will use demand respect.
Req 1a — Safety Hazards & Protective Gear
A single drop of uncured epoxy resin on bare skin might not look like a big deal — but repeated exposure can trigger a lifelong allergic reaction that means you can never work with epoxy again. Composite materials produce real chemical and physical hazards, and understanding them before you start is not optional. It is the foundation everything else in this badge builds on.
The Major Hazards
Chemical Exposure
Resins (epoxy, polyester, vinyl ester) contain chemicals that irritate skin, eyes, and the respiratory system. Some components — like the hardeners in epoxy systems — are sensitizers, meaning they can cause your immune system to overreact. Once you become sensitized, even tiny amounts of exposure can trigger severe allergic dermatitis (a painful, itchy rash) or breathing difficulties. This sensitization is permanent.
Solvents used to clean tools and thin resins (acetone, methyl ethyl ketone) evaporate quickly and produce vapors that can cause headaches, dizziness, and nausea. In a poorly ventilated space, these vapors build up fast.
Airborne Fibers and Dust
Cutting, sanding, or grinding fiberglass, carbon fiber, or aramid produces tiny fiber fragments and dust. Glass fibers cause itching and skin irritation on contact. Carbon fiber dust irritates the lungs. Aramid fibers can cause respiratory problems with prolonged exposure. Sanding cured composites is particularly hazardous because it generates fine particles that stay airborne for a long time.
Heat and Exothermic Reactions
When resin and hardener are mixed, they undergo a chemical reaction that generates heat. If too much resin is mixed at once or the mixture is left in a container rather than spread thin, the temperature can climb high enough to melt the mixing cup, produce toxic fumes, or even start a fire. This is called an exothermic reaction — “exo” means outside, “thermic” means heat.
Sharp Edges and Splinters
Cured composite materials can produce razor-sharp edges when cut or broken. Fiberglass splinters are especially irritating because the tiny glass fragments embed in skin and are nearly invisible.
Your Protective Gear
The right safety equipment creates a barrier between you and every hazard listed above. Here is what you need and why.
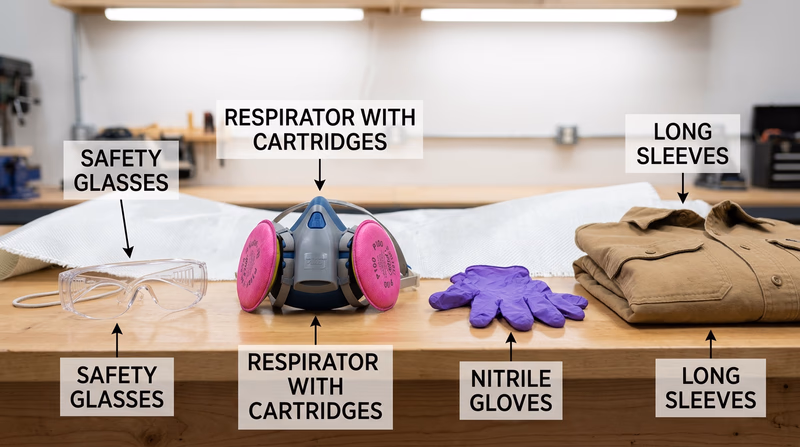
Eye Protection
Wear safety glasses with side shields at all times when cutting, sanding, or mixing. If you are working with liquid resins or solvents, switch to chemical splash goggles that seal against your face. Standard glasses leave gaps where splashes can reach your eyes.
Respiratory Protection
Use a NIOSH-approved respirator with organic vapor cartridges when mixing or applying resin. For sanding and cutting cured composites, a P100 particulate filter respirator traps fine dust and fiber fragments. A simple dust mask is not enough — the particles from composite work are too small for basic masks to catch.
Skin Protection
Wear nitrile gloves (not latex, which some resins dissolve). Use disposable coveralls or a long-sleeve work shirt to keep fibers and resin off your arms. Tuck sleeves into gloves. If you are sanding, wear a long-sleeve shirt with a snug collar to keep fibers from reaching your neck and chest.
Hand and Body Protection
Wear closed-toe shoes — never sandals. If you are doing extended sanding, a disposable Tyvek suit keeps fiber dust off your clothes and skin. Barrier creams applied to exposed skin before work make cleanup easier and add another layer of protection.
Personal Protective Equipment (PPE) Checklist
Have all of these ready before you start any composite work- Safety glasses with side shields (or chemical splash goggles for resin work)
- NIOSH-approved respirator with organic vapor and P100 cartridges
- Nitrile gloves (have extras — change them when torn or contaminated)
- Long-sleeve shirt or disposable coveralls
- Closed-toe shoes
- Barrier cream for exposed skin areas
Anticipate, Mitigate, Prevent, Respond
Your counselor will want to hear you use these four words — and understand what each one means in the context of composites work.
- Anticipate: Before you start, identify what could go wrong. Is the ventilation adequate? Do you have the right gloves? Is the fire extinguisher accessible? Think through the job before you pick up a single tool.
- Mitigate: Reduce the severity of hazards you cannot eliminate. You cannot make resin non-toxic, but you can work in a ventilated area, wear a respirator, and mix only small batches at a time.
- Prevent: Take actions that stop hazards from occurring. Keep resin containers sealed when not in use. Wet-sand instead of dry-sand to keep dust out of the air. Never eat or drink in the work area.
- Respond: Know what to do when something goes wrong. If resin contacts your skin, wash immediately with soap and water (not solvent, which drives chemicals deeper). If someone inhales excessive fumes, move them to fresh air. Know where the eyewash station and first aid kit are before you need them.
🎬 Video: Fibreglass Safety 101 — https://youtu.be/tXmTLRSMZSM
Now that you know the hazards and the gear that protects you, the next step is understanding how to handle, store, and dispose of the chemicals you will be working with.
Req 1b — Handling, Storage & Disposal
Knowing how to wear the right PPE is only half the safety picture. The other half is knowing how to handle, store, and get rid of composite materials so they do not hurt you, other people, or the environment. A sealed can of polyester resin is harmless on a shelf — but store it wrong, and it can overheat, leak fumes, or contaminate soil and groundwater.
Handling Precautions
Resins and Hardeners
Always wear the PPE you learned about in Req 1a before opening any container. Beyond personal protection, follow these handling rules:
- Mix in small batches. Large volumes of mixed resin generate more heat, speeding up the reaction and increasing the risk of an exothermic runaway. Mix only what you can use in the resin’s working time (called pot life).
- Use dedicated tools. Keep mixing cups, stir sticks, and brushes separate from household items. Never use food containers for resin.
- Work on a protected surface. Cover your work area with plastic sheeting or wax paper. Resin that soaks into a wooden bench is nearly impossible to remove.
- Keep containers closed. Resins and solvents release volatile organic compounds (VOCs) whenever the lid is off. Open containers only when you are actively pouring or mixing.
Reinforcement Fibers
- Cut fibers with sharp scissors or a rotary cutter on a dedicated cutting mat. Dull tools crush the fibers and generate more dust.
- Handle dry fiberglass fabric with gloves. Even before resin is applied, loose glass fibers can embed in your skin.
- Never shake or snap dry carbon or glass fabric. This launches invisible fiber fragments into the air.
Solvents
Acetone and other cleanup solvents are highly flammable. Keep them away from heat sources, pilot lights, and electrical sparks. Use the minimum amount needed, and keep the container sealed between uses.
Storage Rules
Proper storage keeps materials usable, prevents accidents, and protects the environment.
| Material | Storage Requirements |
|---|---|
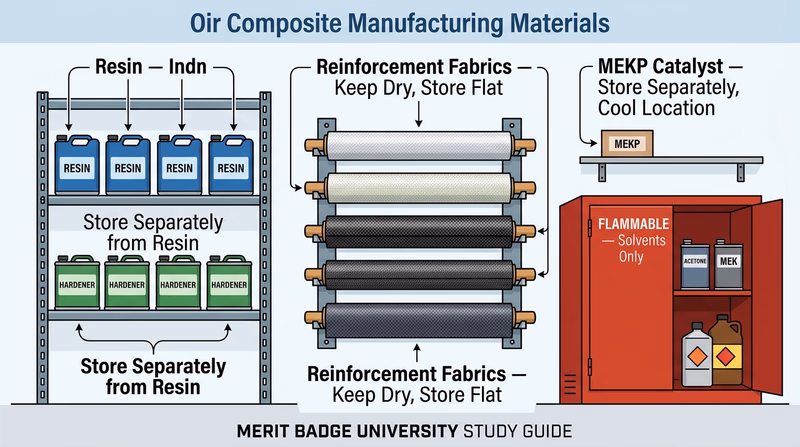
| Epoxy resin & hardener | Room temperature (60–90°F), out of direct sunlight. Store resin and hardener in separate locations to prevent accidental mixing from a leak. |
| Polyester / vinyl ester resin | Cool location (below 77°F ideal). These resins have a limited shelf life — check the expiration date. Contains flammable solvents; keep away from ignition sources. |
| Catalyst (MEKP) | Store separately from resin in a cool, dark place. MEKP is an organic peroxide — a strong oxidizer that can cause fires if it contacts resin without proper mixing. Never store it above resin containers. |
| Fiberglass / carbon / aramid fabric | Dry location. Moisture weakens the bond between fibers and resin. Store rolls horizontally to prevent kinks. |
| Solvents (acetone, MEK) | Flammable liquids cabinet if available. Away from heat, sparks, and direct sun. Keep containers tightly sealed. |
Disposal: Environmental Responsibility
Composite materials cannot be poured down a drain, tossed in a regular trash can, or dumped outside. Many components are classified as hazardous waste under federal and state environmental regulations.
Liquid Resin and Hardener
- Never pour liquid resin down a drain. It will contaminate water systems and can harden inside pipes.
- Fully cure leftover resin before disposal. Mix small leftover amounts of resin and hardener together, spread thin on cardboard, and let it cure completely. Once fully hardened, most cured resins can go in regular trash (check your local regulations).
- Large quantities of uncured resin must be taken to a hazardous waste collection facility.
Solvents
- Used solvents (contaminated with resin residue) are hazardous waste. Collect them in a sealed metal container and bring them to a household hazardous waste drop-off.
- Never evaporate solvents into the air as a disposal method — this releases VOCs that contribute to smog and ground-level ozone.
Fiber Scraps and Dust
- Cured composite scraps (trimmed edges, sanded dust) can usually go in regular trash, but bag them in sealed plastic first to prevent fiber release.
- Uncured fiber scraps contaminated with wet resin should be treated like uncured resin — let them cure fully before disposal.
Containers and PPE
- Empty resin containers with dried residue can usually go in regular trash. Containers with liquid residue need hazardous waste disposal.
- Used gloves, mixing cups, and brushes with cured resin can go in regular trash. With uncured resin, let them cure first.
Health, Safety, and Environmental Awareness
Your counselor wants to hear you connect these practices to a bigger picture. Here is what matters:
- Health: Acute exposure (one-time, high-dose) can cause burns, nausea, or respiratory distress. Chronic exposure (repeated, low-dose over time) leads to sensitization, organ damage, or cancer risk from certain chemicals. Following handling procedures protects against both.
- Safety: Fire risk from flammable solvents and exothermic reactions. Explosion risk from improperly stored peroxide catalysts. Slip-and-fall risk from resin spills. All preventable with proper procedure.
- Environment: VOC emissions contribute to air pollution. Improper disposal contaminates soil and water. Responsible composites work means minimizing waste, containing chemicals, and using proper disposal channels.
🎬 Video: How to Dispose of Epoxy Resin Leftovers and Used Materials — https://youtu.be/tVwFisroxrg
You now know how to handle, store, and dispose of composite materials responsibly. But how do you find the specific safety details for a particular product? That is where Safety Data Sheets come in.
Req 1c — Safety Data Sheets
You just learned general rules for handling and disposing of composite materials in Req 1b. But every resin, hardener, solvent, and fiber product has its own specific hazards, exposure limits, and emergency procedures. A Safety Data Sheet is where all of that information lives.
What Is a Safety Data Sheet?
A Safety Data Sheet (SDS) is a standardized document that provides detailed information about a chemical product’s hazards, safe handling procedures, storage requirements, and emergency response measures. In the United States, OSHA (the Occupational Safety and Health Administration) requires manufacturers to create an SDS for every hazardous chemical they produce, and employers must keep those sheets accessible to anyone who works with the product.
The SDS follows a globally standardized format called GHS (Globally Harmonized System of Classification and Labelling of Chemicals). Every SDS has exactly 16 sections, always in the same order. This consistency means that once you know how to read one SDS, you can read any of them — whether it is for an epoxy resin, a can of acetone, or an industrial cleaner.
The 16 Sections of an SDS
You do not need to memorize every section, but you should understand the ones most relevant to your composites work.
| Section | Title | What It Tells You |
|---|---|---|
| 1 | Identification | Product name, manufacturer, intended use, emergency phone number |
| 2 | Hazard(s) Identification | Signal word (Danger/Warning), hazard statements, pictograms |
| 3 | Composition/Ingredients | Chemical names and concentrations of hazardous ingredients |
| 4 | First-Aid Measures | What to do if swallowed, inhaled, or contacts skin/eyes |
| 5 | Fire-Fighting Measures | Extinguishing media, special hazards, firefighter precautions |
| 6 | Accidental Release Measures | Spill cleanup procedures |
| 7 | Handling and Storage | Safe handling practices, storage conditions, incompatible materials |
| 8 | Exposure Controls/PPE | Exposure limits, recommended gloves, respirator type, eye protection |
| 9 | Physical/Chemical Properties | Appearance, odor, flash point, boiling point, vapor pressure |
| 10 | Stability and Reactivity | Conditions to avoid, incompatible materials, hazardous decomposition |
| 11 | Toxicological Information | Health effects from short-term and long-term exposure |
| 12 | Ecological Information | Environmental impact, aquatic toxicity |
| 13 | Disposal Considerations | Proper disposal methods, waste treatment |
| 14 | Transport Information | Shipping classification, UN number, packing group |
| 15 | Regulatory Information | Laws and regulations that apply to the product |
| 16 | Other Information | Revision date, changes from previous version |
The bolded sections (2, 4, 7, 8, 13) are the ones you will refer to most often in composites work.
Why Are Safety Data Sheets Used?
Worker Protection
An SDS translates chemical formulas into practical safety instructions. Without it, you would have no way of knowing that a particular hardener requires butyl rubber gloves instead of nitrile, or that a resin produces toxic hydrogen chloride gas if it catches fire.
Emergency Response
If someone is exposed to a chemical and needs medical treatment, the SDS provides the exact information a doctor or poison control center needs. Section 4 (First-Aid Measures) and Section 11 (Toxicological Information) guide medical professionals on how to treat specific exposures.
Legal Requirement
Federal law (OSHA’s Hazard Communication Standard, 29 CFR 1910.1200) requires that SDSs be available to every worker who handles hazardous chemicals. Manufacturers must provide them. Employers must keep them accessible. If someone asks for an SDS, it must be provided — no exceptions.
Environmental Protection
Sections 12 and 13 tell you what happens if the chemical reaches waterways or soil, and how to dispose of it without causing environmental damage.
How to Find an SDS
Most manufacturers post their SDSs on their websites. You can also:
- Search the product name plus “SDS” in any search engine
- Ask your merit badge counselor or the supplier who provided your materials
- Check databases that collect SDSs from multiple manufacturers
For Req 3a and Req 3b, you will need to obtain and read the actual SDSs for the reinforcement materials and resins you choose. Start practicing now — find the SDS for a common product like acetone or a household epoxy and read through Sections 2, 4, 7, and 8.

🎬 Video: Safety Data Sheets Training — https://youtu.be/_yWF-w3CwmU
With the safety foundation complete — hazards, PPE, handling procedures, and SDS knowledge — you are ready to dig into the science. What exactly are composite materials, and where did they come from?
Req 2a — What Are Composites?
Pick up a piece of plywood and try to snap it. Now try the same with a single thin sheet of wood veneer. The veneer breaks easily; the plywood resists. That is a composite in action — two or more materials combined to create something better than either one alone.
Defining Composite Materials
A composite material is an engineered material made from two or more constituent materials with significantly different physical or chemical properties. When combined, they produce a material with characteristics different from — and usually superior to — the individual components. The key distinction from alloys or solutions is that the constituent materials remain separate and distinct within the finished product. You can often see or identify the individual components if you look closely enough.
Every composite has two essential parts:
- Matrix — the material that surrounds, binds, and protects the reinforcement. In most modern composites, this is a polymer resin (like epoxy or polyester), but it can also be a metal or ceramic.
- Reinforcement — the material that provides strength and stiffness. This is usually a fiber (glass, carbon, aramid) but can also be particles, flakes, or whiskers.
Think of it like reinforced concrete: the concrete (matrix) handles compression and protects the steel rebar (reinforcement) from corrosion, while the rebar handles tension forces that would crack plain concrete. Neither material alone could do what the combination does.
A Brief History of Composites
Ancient Composites (3400 BCE – 1800s)
The oldest known engineered composite is mud brick reinforced with straw, used in Mesopotamia around 3400 BCE. The dried mud handles compression (squeezing forces), while the straw fibers resist tension (pulling forces) and prevent cracking. This same principle — a matrix reinforced with fibers — is still the foundation of modern composites.
Ancient Egyptians laminated wood by gluing thin strips with their grain directions alternated, creating panels stronger than solid wood. They also mixed animal glue with papyrus to create a crude form of fiber-reinforced material for furniture and burial artifacts.
Mongolian composite bows (around 1200 CE) layered animal horn (compression-resistant), wood (flexible core), and sinew (tension-resistant) into a weapon that stored more energy per unit of draw weight than any simple wooden bow. These bows gave mounted warriors a decisive advantage at range.
The Fiberglass Revolution (1930s – 1960s)
In 1932, researcher Dale Kleist accidentally discovered glass fibers when a jet of compressed air hit a stream of molten glass. By 1936, Owens Corning was producing fiberglass commercially. When combined with newly developed polyester resin in the late 1930s, fiberglass-reinforced plastic (FRP) was born.
World War II accelerated composites development. The military needed lightweight materials to replace metals that were in short supply. Fiberglass found its way into aircraft radomes (the domes that protect radar equipment), boat hulls, and structural panels. After the war, fiberglass spread into civilian life — Corvette bodies, bathtubs, and fishing rods.
Advanced Composites (1960s – 2000s)
The space race and military aviation drove the development of higher-performance fibers:
- Boron fibers (1960s) — extremely stiff, used in military aircraft like the F-14 Tomcat
- Carbon fibers (1960s–70s) — lighter and stiffer than fiberglass, developed in both the UK and Japan
- Aramid fibers (1971) — DuPont introduced Kevlar, a fiber five times stronger than steel by weight, ideal for ballistic protection
By the 1980s, carbon fiber composites were standard in fighter jets, tennis rackets, and Formula 1 cars.
Modern Era (2000s – Present)
Composites have moved from specialty applications to mainstream manufacturing:
- Boeing 787 Dreamliner (2011) — first commercial airliner with a composite fuselage (over 50% composite by weight)
- Wind energy — turbine blades over 100 meters long rely entirely on fiberglass and carbon fiber composites
- Automotive — BMW’s i3 electric car used a carbon fiber passenger cell, proving composites could work in mass production
- 3D-printed composites — continuous fiber 3D printers now lay carbon fiber directly into parts, eliminating the need for molds
- Recyclable thermoplastics — new resin systems that can be melted and reformed, addressing the long-standing problem of composite waste
🎬 Video: Intro to Composites — https://youtu.be/WYqCnEvTRUQ
🎬 Video: What is a Composite? — https://youtu.be/8tEf_X9Rzts
Now that you understand what composites are and where they came from, let’s compare them head-to-head with the traditional materials they often replace.
Req 2b — Composites vs. Traditional Materials
Engineers choose materials the way a chef chooses ingredients — each one has strengths, weaknesses, and a price tag. Understanding how composites compare to wood, aluminum, copper, and steel will help you see why composites replace traditional materials in some applications and why they do not in others.
Property Comparison
The table below compares key properties across all five material types. Keep in mind that “composites” is a broad category — a fiberglass boat hull and a carbon fiber aircraft wing have very different properties. The values here represent typical fiber-reinforced polymer composites.
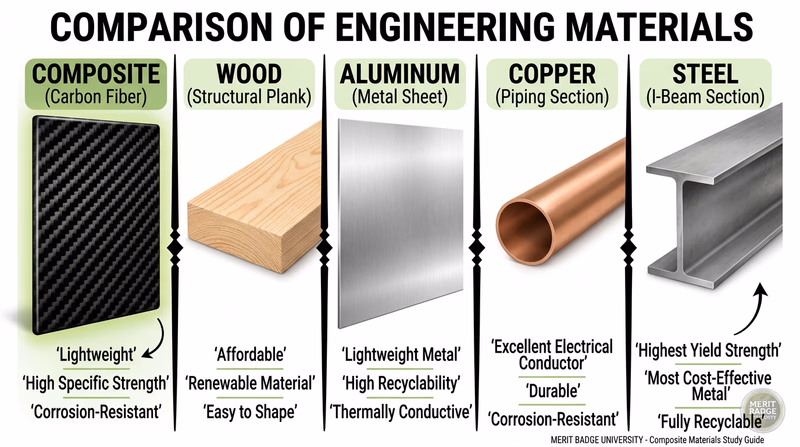
| Property | Composites (FRP) | Wood | Aluminum | Copper | Steel |
|---|---|---|---|---|---|
| Density (weight) | Low | Low | Medium | High | High |
| Tensile strength | High (directional) | Low–Medium | Medium | Low–Medium | High |
| Stiffness | Medium–High (directional) | Low–Medium | Medium | Low | High |
| Electrical conductivity | Very low (insulator) | Very low | High | Very high | Medium |
| Thermal conductivity | Low | Low | High | Very high | Medium |
| Corrosion resistance | Excellent | Poor (rots, fungus) | Good (oxide layer) | Good (patina) | Poor (rusts) |
| Flammability | Burns, toxic fumes | Burns readily | Non-flammable | Non-flammable | Non-flammable |
| Cost | Medium–High | Low | Medium | Medium–High | Low–Medium |
| Repairability | Moderate (patch/bond) | Easy (cut, glue, nail) | Moderate (weld, rivet) | Moderate (solder, weld) | Moderate (weld) |
| Recyclability | Difficult (thermosets) | Easy | Excellent | Excellent | Excellent |
Material Deep Dives
Wood
Wood is one of humanity’s oldest building materials and is itself a natural composite (cellulose fibers in a lignin matrix). It is lightweight, easy to shape with simple tools, and renewable. A carpenter can cut, sand, join, and finish wood with hand tools — no special chemistry or curing required.
Key properties: Low density, moderate strength along the grain (but weak across it), poor weather resistance without treatment, flammable, excellent machinability, very low cost.
Shaping example: A wooden canoe is built by steam bending — thin planks of cedar or ash are heated with steam until they become flexible, then bent over a form and held in place until they cool and hold their shape. The result is a lightweight, graceful hull shaped from a material that would crack if bent cold.
Where composites win: Composites do not rot, are not eaten by insects, and do not absorb water. A fiberglass canoe will outlast a wooden one in wet conditions by decades. Where wood wins: renewable, biodegradable, requires no chemical processing, and far easier to repair.
Aluminum
Aluminum is the most abundant metal in Earth’s crust and the go-to lightweight metal for aerospace, transportation, and packaging. It naturally forms a thin oxide layer that protects it from corrosion — unlike steel, it does not rust.
Key properties: Medium density (about one-third the weight of steel), good strength, excellent corrosion resistance, high electrical and thermal conductivity, non-flammable, fully recyclable.
Shaping example: Aluminum beverage cans are made by deep drawing — a flat disc of aluminum is punched into a die cavity, stretching it into a seamless cup shape. A single sheet of aluminum becomes a thin-walled, pressure-resistant container in a fraction of a second.
Where composites win: Composites can be even lighter than aluminum with equal or greater strength, and they do not fatigue the same way (aluminum develops micro-cracks over repeated stress cycles). Where aluminum wins: fully recyclable, easier to join (riveting and welding are well-understood), and conducts electricity and heat — properties composites lack.
Copper
Copper has been used for over 10,000 years, making it one of the first metals humans worked with. Its defining feature is exceptional electrical and thermal conductivity — which is why the wiring in your walls and the heat exchanger in your refrigerator are made from it.
Key properties: High density, moderate strength, outstanding electrical conductivity (second only to silver), excellent thermal conductivity, good corrosion resistance (forms a green patina over time), non-flammable, very recyclable.
Shaping example: Copper pipes for plumbing are made by extrusion — a heated billet of copper is forced through a die with a mandrel in the center, creating a hollow tube in a continuous process. The result is seamless, corrosion-resistant pipe that carries water through buildings worldwide.
Where composites win: Composites are dramatically lighter and do not conduct electricity (which is an advantage in some applications, like non-magnetic MRI rooms or electrical insulation). Where copper wins: nothing matches copper’s electrical conductivity, making it irreplaceable for wiring, motors, and electronics.
Steel
Steel is an alloy of iron and carbon — and it has been the backbone of construction, transportation, and manufacturing for over 150 years. It is the strongest common metal, relatively cheap, and can be recycled indefinitely without losing quality.
Key properties: High density (heavy), very high tensile strength, high stiffness, moderate corrosion resistance (stainless steel versions are excellent), non-flammable, low cost, excellent recyclability.
Shaping example: Steel I-beams for building construction are made by hot rolling — a red-hot slab of steel is passed through a series of rollers that progressively squeeze it into the distinctive I-shaped cross section. This shape maximizes strength while minimizing the amount of material used.
Where composites win: Weight. A carbon fiber composite part can be 70% lighter than its steel equivalent while matching or exceeding its strength. Composites also do not rust. Where steel wins: cost (steel is far cheaper), stiffness in all directions, weldability, and recyclability. Steel structures can be repaired with standard tools and techniques that every fabricator knows.
The Composites Trade-Off
No material is perfect for every application. Here is a quick way to think about when composites make sense and when they do not:
Choose composites when:
- Weight savings justify the cost (aerospace, racing, portable equipment)
- Corrosion resistance matters (marine, chemical processing)
- Complex shapes are needed in a single piece (reducing joints and fasteners)
- Electrical insulation is required
Choose traditional materials when:
- Cost is the top priority (structural steel in buildings)
- Electrical or thermal conductivity is needed (copper wiring, aluminum heat sinks)
- Recyclability is critical
- Repairability with standard tools is essential
- The part must withstand extreme heat beyond polymer limits
🎬 Video: Properties of Materials — https://youtu.be/XbX4xY1sqQo
You now understand what makes composites different from traditional materials. Next, you will zoom into the reinforcement side of the equation — the fibers that give composites their strength.
Req 3a — Reinforcement Materials
If the matrix is the body of a composite, the reinforcement is its skeleton. Reinforcement fibers carry the loads, resist the forces, and give composites their remarkable strength-to-weight ratio. In this requirement, you will choose three reinforcement materials, understand what each does best (and worst), and read their Safety Data Sheets — putting the SDS knowledge from Req 1c to real use.
The Big Three Reinforcement Fibers
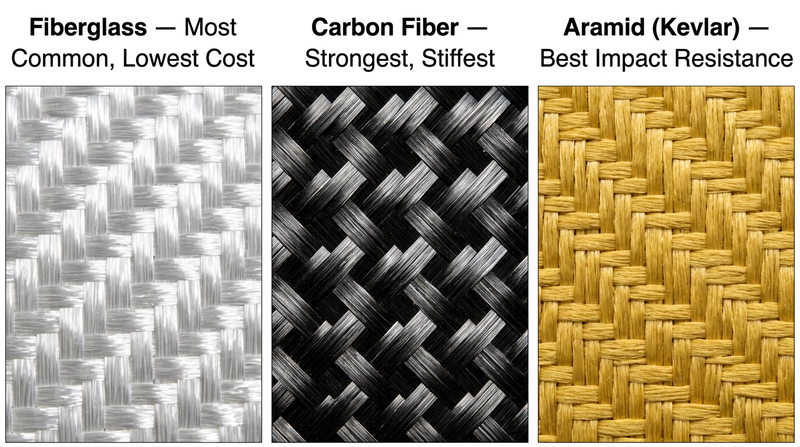
The three most common reinforcement fibers in modern composites are fiberglass, carbon fiber, and aramid (Kevlar). These are excellent choices for your discussion with your counselor, though other options exist (basalt fiber, natural fibers like flax, ultra-high-molecular-weight polyethylene).
Fiberglass (Glass Fiber)
Fiberglass is the workhorse of the composites industry — the most widely used reinforcement by volume and the most affordable.
How it is made: Molten glass is pulled through tiny holes in a heated platinum bushing, forming continuous filaments thinner than a human hair. These filaments are gathered into bundles called rovings and woven into fabrics or chopped into short strands.
Positive characteristics:
- Low cost compared to other fiber types
- Good tensile strength
- Excellent corrosion resistance (does not rust or rot)
- Electrically non-conductive (useful for electrical insulation)
- Good impact resistance — bends before breaking
- Transparent to radio waves (used in radomes and antenna housings)
Negative characteristics:
- Heavier than carbon or aramid fibers
- Lower stiffness than carbon fiber
- Itchy — loose glass fibers irritate skin and can cause respiratory issues if inhaled
- Fatigue performance is lower than carbon fiber over many stress cycles
Common uses: Boat hulls, shower stalls, automotive body panels, wind turbine blades, insulation batts, printed circuit boards, storage tanks, swimming pools.
Carbon Fiber
Carbon fiber is the high-performance option — lighter, stiffer, and stronger than fiberglass, but at a much higher price.
How it is made: A precursor material (usually polyacrylonitrile, or PAN) is heated to extremely high temperatures (2,000–3,000°C) in an inert atmosphere. This burns away everything except the carbon atoms, which align into tightly packed crystalline structures. The result is a fiber that is 90–95% pure carbon.
Positive characteristics:
- Exceptional strength-to-weight ratio (strongest common fiber per unit of weight)
- Very high stiffness — resists bending and stretching
- Low thermal expansion (does not change size much with temperature changes)
- Excellent fatigue resistance — handles millions of stress cycles without weakening
- Chemical resistance to most acids and solvents
Negative characteristics:
- Expensive — 5 to 15 times the cost of fiberglass
- Brittle — fails suddenly without warning (no gradual bending like fiberglass)
- Electrically conductive — can cause short circuits and galvanic corrosion when touching aluminum
- Dust is conductive and can damage electronics in the work area
- Difficult to detect damage visually (internal delamination is often invisible)
Common uses: Aircraft structures (Boeing 787, Airbus A350), Formula 1 cars, high-end bicycles, tennis rackets, golf clubs, drone frames, wind turbine blade spars, spacecraft components.
Aramid Fiber (Kevlar)
Aramid fibers are best known by DuPont’s brand name Kevlar. Their defining property is extraordinary impact resistance — they absorb and distribute energy from a blow rather than shattering.
How it is made: An aramid polymer solution is extruded through a spinneret (similar to making nylon), then the fibers are drawn and heat-treated to align the molecular chains. The resulting fiber has a unique combination of strength and flexibility.
Positive characteristics:
- Outstanding impact and abrasion resistance
- Excellent energy absorption — ideal for ballistic protection
- Lightweight (lower density than glass or carbon)
- Good resistance to heat and flame (does not melt; chars at high temperatures)
- Resistant to most chemicals and solvents
Negative characteristics:
- Low compressive strength — strong in tension but buckles under compression
- Degrades under prolonged UV exposure (yellows and weakens in sunlight)
- Difficult to cut and machine (fibers fuzz and pill instead of cutting cleanly)
- Absorbs moisture, which can weaken the composite over time
- Expensive (comparable to carbon fiber)
Common uses: Body armor and ballistic helmets, cut-resistant gloves, motorcycle protective gear, sailboat rigging, aircraft fuselage impact zones, tire reinforcement (belts), canoe and kayak hulls where impact resistance matters.
Quick Comparison
| Property | Fiberglass | Carbon Fiber | Aramid (Kevlar) |
|---|---|---|---|
| Tensile strength | Good | Excellent | Excellent |
| Stiffness | Moderate | Very High | Moderate |
| Impact resistance | Good | Poor (brittle) | Excellent |
| Weight | Medium | Low | Low |
| Cost | Low | High | High |
| Electrical conductivity | None | Conductive | None |
| UV resistance | Good | Good | Poor |
Reading the SDS for Reinforcement Materials
For each reinforcement material you choose, your counselor will expect you to obtain and discuss the actual Safety Data Sheet. Here is what to focus on:
Toxicity (SDS Sections 2, 3, 11)
- Fiberglass: Classified as a mechanical irritant, not a chemical toxin. Causes itching on skin contact and can irritate eyes and respiratory tract. Not classified as a carcinogen by IARC for most glass fiber types.
- Carbon fiber: Skin and respiratory irritant from dust. The fibers themselves are chemically inert but physically irritating. Main concern is dust inhalation during cutting/sanding.
- Aramid: Low toxicity. Fibers are too large to reach deep lung tissue in most handling. Dust from cutting can irritate eyes and respiratory tract.
Disposal (SDS Section 13)
- All three fiber types can usually be disposed of as non-hazardous solid waste once they are dry and uncontaminated by resins or solvents. Bag fiber scraps to prevent airborne release. Check local regulations — some jurisdictions have specific requirements for fibrous materials.
Safe Handling (SDS Sections 7, 8)
- Wear gloves, safety glasses, and a dust mask or respirator when cutting any reinforcement material. Work in a ventilated area. Avoid rubbing eyes or touching your face during handling. Wash exposed skin with soap and water after handling — do not use compressed air to blow dust off clothing (it just redistributes the fibers into the air).
SDS Discussion Prep
Make sure you can answer these questions for each of your three materials- What is the primary health hazard listed in Section 2?
- What first-aid measures does Section 4 recommend for skin and eye contact?
- What PPE does Section 8 specify for handling?
- How should waste material be disposed of according to Section 13?
- Are there any incompatible materials listed in Section 10?
🎬 Video: Introduction to Fibres — https://youtu.be/jsAJIMKEoZQ
You have the reinforcement side of the equation covered. Now you need to understand the other half — the resins that bind everything together.
Req 3b — Resins
In Req 3a, you learned about the fibers that carry loads in a composite. Now you meet the matrix — the resin that binds those fibers together, transfers stress between them, and protects them from moisture and chemicals. The resin you choose determines how the composite is manufactured, how it performs, and how it can (or cannot) be recycled.
Thermoset vs. Thermoplastic: The Fundamental Split
Before diving into specific resins, you need to understand the two broad categories.
Thermoset resins start as liquid. When mixed with a hardener or catalyst, they undergo a chemical reaction (called curing or cross-linking) that turns them into a rigid solid. This reaction is permanent — once cured, a thermoset cannot be melted or reshaped. Think of it like cooking an egg: once it is done, you cannot un-cook it.
Thermoplastic resins start as solid pellets or sheets. When heated above their glass transition temperature, they soften and can be molded into shape. When they cool, they harden. This process is reversible — you can reheat and reshape a thermoplastic as many times as you want. Think of it like ice: melt it, refreeze it, melt it again.
| Feature | Thermoset | Thermoplastic |
|---|---|---|
| Processing | Liquid → cured solid (permanent) | Heated → shaped → cooled (reversible) |
| Recyclability | Very difficult | Can be remelted and reformed |
| Chemical resistance | Excellent | Good (varies by type) |
| Typical stiffness | High | Moderate–High |
| Storage | Limited shelf life (resin + hardener) | Indefinite (solid pellets) |
| Common examples | Epoxy, polyester, vinyl ester | Nylon (PA), PEEK, polypropylene |
This requirement asks you to discuss three resins, and you must include at least one thermoset and one thermoplastic. Here are three strong choices.
Three Key Resins
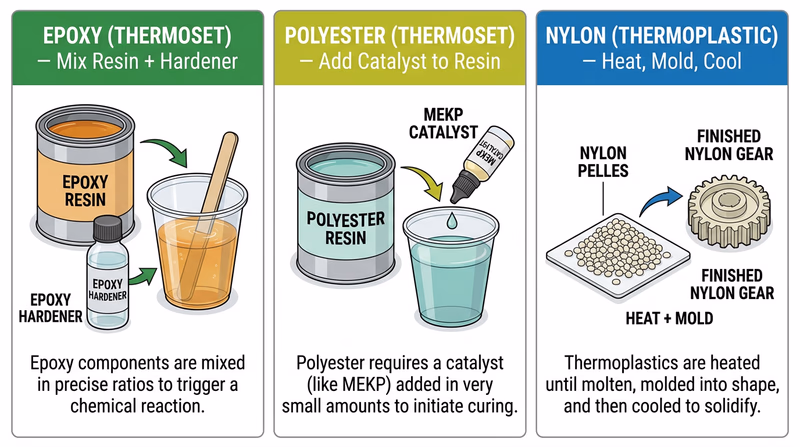
Epoxy Resin (Thermoset)
Epoxy is the premium thermoset resin — the one aerospace engineers reach for when performance matters more than cost.
How it works: Epoxy comes as a two-part system: the resin and the hardener. When mixed in the correct ratio, they react chemically to form a rigid, cross-linked polymer. Curing times range from minutes (fast hardeners) to hours (slow hardeners used in aerospace lay-ups). Some epoxies require heat to fully cure (called post-curing).
Positive characteristics:
- Excellent adhesion to fibers and other surfaces
- High mechanical strength and stiffness
- Outstanding chemical and moisture resistance
- Low shrinkage during curing (parts hold their shape accurately)
- Good fatigue resistance
- Can be formulated for many different working times and properties
Negative characteristics:
- Expensive (2–5 times the cost of polyester resin)
- Slow cure time compared to polyester
- Sensitizer — repeated skin contact can cause permanent allergic reactions
- Requires precise mixing ratios (incorrect ratios mean the part will not cure properly)
- Not recyclable once cured
Common uses: Aircraft structures, high-performance sporting goods, marine coatings, wind turbine blades, printed circuit boards, structural adhesives.
Polyester Resin (Thermoset)
Polyester resin is the workhorse of the composites industry — affordable, easy to use, and suitable for a wide range of applications.
How it works: Polyester resin cures when a small amount of catalyst (typically MEKP — methyl ethyl ketone peroxide) is added. The catalyst triggers a free-radical chain reaction that cross-links the resin. Cure time can be adjusted by varying the amount of catalyst and the temperature.
Positive characteristics:
- Low cost — the most affordable thermoset resin
- Fast cure time (can gel in 15–30 minutes at room temperature)
- Easy to use — tolerant of imprecise mixing
- Good corrosion resistance
- Wide availability — hardware stores carry it
Negative characteristics:
- Strong, unpleasant styrene odor during curing (a VOC that requires ventilation)
- Higher shrinkage during cure than epoxy (can cause warping)
- Lower adhesion to fibers compared to epoxy
- Weaker mechanical properties than epoxy
- Brittle — less impact-resistant than epoxy or vinyl ester
- Styrene emissions are a health and environmental concern
Common uses: Boat hulls, bathtubs, shower stalls, automotive body filler (Bondo), fiberglass panels, swimming pools, decorative castings.
Nylon (Polyamide) (Thermoplastic)
Nylon represents the thermoplastic side of composite resins. When reinforced with short or continuous fibers, nylon composites are increasingly common in automotive and industrial applications.
How it works: Nylon pellets are heated above their melting point (around 220–260°C depending on type), mixed with chopped fibers, and injected into molds at high pressure. The material cools and solidifies in the mold shape. For continuous fiber composites, nylon films are layered with fiber fabric and heated in a press.
Positive characteristics:
- Recyclable — can be remelted and reformed multiple times
- Excellent toughness and impact resistance
- Good abrasion and wear resistance
- No chemical curing reaction — no pot life concerns, no exothermic risk
- Fast processing (injection molding cycles measured in seconds)
- No VOC emissions during processing (just heat, no solvents)
Negative characteristics:
- Absorbs moisture from the air, which weakens the material and changes dimensions
- Requires high processing temperatures (energy-intensive)
- Lower chemical resistance than epoxy — attacked by strong acids
- Lower stiffness than thermoset composites (unless reinforced with continuous fibers)
- Equipment for thermoplastic composite processing is expensive
Common uses: Automotive engine covers, intake manifolds, structural brackets, cable ties (zip ties are nylon), sports equipment, industrial gears and bearings, 3D-printed parts.
Reading the SDS for Resins
Just like with reinforcement materials, you need to obtain and read the SDS for each resin you choose. Here is what to focus on:
Toxicity (Sections 2, 11)
- Epoxy: Resin is an irritant; hardener is a sensitizer and corrosive. Both are toxic if swallowed. Long-term exposure to uncured epoxy components can affect the liver and kidneys.
- Polyester: Styrene monomer is the primary concern — classified as a possible carcinogen by IARC (Group 2B). MEKP catalyst is an oxidizer and corrosive — contact with eyes can cause permanent damage.
- Nylon: Low toxicity in solid form. Processing fumes at high temperatures can be irritating but are generally low-risk with basic ventilation.
Disposal (Section 13)
- Epoxy and Polyester: Cure all liquid resin before disposal. Never pour liquid resin down a drain. Fully cured resin is generally non-hazardous solid waste. Containers with liquid residue are hazardous waste.
- Nylon: Recyclable as industrial scrap. Solid waste is non-hazardous. No special disposal requirements for formed parts.
Safe Handling (Sections 7, 8)
- Epoxy: Nitrile gloves, safety glasses, organic vapor respirator. Avoid skin contact completely. Work in ventilated area.
- Polyester: Nitrile gloves, safety glasses, organic vapor respirator (mandatory — styrene fumes). Store MEKP separately from resin. Never mix MEKP with acetone (explosive combination).
- Nylon: Heat-resistant gloves when handling at processing temperature. Eye protection. Standard industrial ventilation for thermal processing.
🎬 Video: Introduction to Matrix Materials — https://youtu.be/yQo4ucV3jfA
You now understand both halves of the composite equation — reinforcements and resins. For the next requirement, you get to think like an inventor.
Req 3c — New Resin Applications
This requirement turns you from a student into an innovator. You already know what epoxy, polyester, and nylon (or whichever resins you chose) do well and where they fall short. Now your job is to match those properties to a problem that has not been solved — or to an existing product that could be made better with composites.
How to Think Like a Materials Innovator
Coming up with a genuinely useful application is not about wild science fiction ideas. It is about matching a material’s strengths to a real need. Here is a framework to guide your thinking:
Step 1: Identify the Strength
For each resin, ask: “What does this material do better than anything else?”
- Epoxy → superior adhesion, precision, durability
- Polyester → low cost, fast cure, good enough for many jobs
- Nylon → recyclable, tough, fast to manufacture
Step 2: Find the Problem
Look for situations where existing materials fail, are too heavy, too expensive, or too wasteful. Good places to look:
- Products that corrode, rot, or wear out too fast
- Products that are heavier than they need to be
- Industries with high material waste
- Applications where recyclability is becoming a regulatory requirement
Step 3: Check the Fit
Ask: “Do the resin’s weaknesses matter in this application?” If epoxy’s high cost is a deal-breaker for a disposable product, it is not the right match. If nylon’s moisture absorption does not matter because the product stays indoors, it could be perfect.
Example Applications to Spark Your Thinking
These are examples of the kind of reasoning your counselor is looking for — do not copy them directly, but use them as a model for how to connect properties to applications.
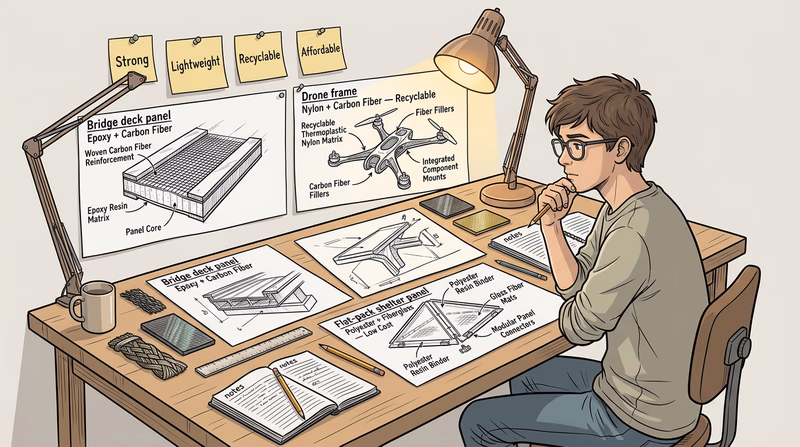
Epoxy Example: Emergency Bridge Repair Panels
The problem: Rural bridges in developing countries deteriorate from weather and overloading. Steel and concrete repairs require heavy equipment and skilled welders.
The idea: Pre-fabricated epoxy–carbon fiber panels that bolt onto damaged bridge decks. Epoxy’s excellent adhesion and structural strength mean the panels could reinforce a weakened bridge without replacing the entire deck. Lightweight panels could be carried in a truck and installed with hand tools — no welding, no crane.
Why epoxy fits: High strength, weather resistance, bonds well to concrete, handles heavy cyclic loads (traffic).
Polyester Example: Disaster Relief Shelters
The problem: After natural disasters, temporary shelters are often tarps or tents that deteriorate in weeks and cannot insulate against heat or cold.
The idea: Flat-pack fiberglass panels using polyester resin that snap together to form rigid shelters. Low resin cost makes them affordable for humanitarian organizations, and the fast cure time means panels could be mass-produced quickly after a disaster.
Why polyester fits: Lowest cost, fast manufacturing, weather-resistant, the slightly lower mechanical properties are acceptable for a one-story, temporary structure.
Nylon Example: Recyclable Drone Frames
The problem: Consumer drones break regularly (crashes, crashes, and more crashes). Broken carbon fiber–epoxy frames end up in landfills because thermoset composites cannot be recycled.
The idea: Drone frames made from nylon reinforced with continuous carbon fiber, produced by 3D printing or injection molding. When a frame breaks, the owner sends it back to the manufacturer, who grinds it up and molds new frames from the same material.
Why nylon fits: Fully recyclable (thermoplastic can be remelted), good impact resistance for crash landings, fast manufacturing via injection molding, and the slightly lower stiffness compared to epoxy is acceptable for small recreational drones.
Building Your Proposal
When you discuss your ideas with your counselor, organize your thinking like this:
- Name the resin and its key properties
- Describe the problem you are trying to solve
- Explain your proposed application — what would the product be?
- Connect the properties — why is this resin a good fit?
- Acknowledge the trade-offs — what limitations might need to be overcome?
🎬 Video: How Do Composites Work? — https://youtu.be/gYTjC8GIwcU
Now that you have explored composites from the inside — fibers, resins, and creative applications — it is time to see how the real industry works.
Req 4 — Explore the Industry
This requirement gives you two paths to explore the composites industry beyond your workbench. You only need to complete one — choose the option that works best for your location and interests.
- Option A: Visit a company that manufactures or repairs composites
- Option B: Find and explore three composites-related websites
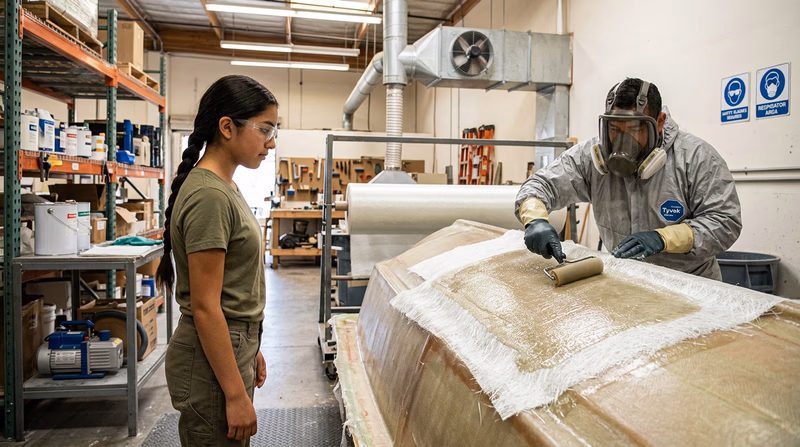
Option A: Visit a Composites Company
A facility visit lets you see industrial-scale composites work — the equipment, the processes, and the people who make it happen every day.
Finding a Company to Visit
Composites companies are more common than you might think. Look for:
- Boat builders — fiberglass boat manufacturing is one of the largest composites sectors
- Auto body repair shops — many repair fiberglass and carbon fiber body panels
- Aerospace manufacturers — if you live near a Boeing, Lockheed Martin, or Northrop Grumman facility, some offer tours or educational programs
- Wind turbine blade manufacturers — companies like TPI Composites and LM Wind Power operate plants across the country
- Custom fabrication shops — small businesses that make composite parts for racing, marine, or industrial clients
- Composite repair facilities — aviation repair stations that fix composite aircraft structures
What to Look For During Your Visit
Go in with questions ready. Here are topics that will impress your counselor and help you learn:
- What materials do they use? Which fibers, resins, and core materials?
- What manufacturing processes do they use? Hand lay-up? Vacuum bagging? Infusion? Autoclave? Compression molding?
- What PPE do workers wear? Does it match what you learned in Req 1a?
- How do they handle waste? Where do cutoffs, expired resin, and contaminated PPE go?
- What quality checks do they perform? How do they verify that a part is free of defects?
- What is the most challenging part of their work?
Visit Preparation
Get these ready before your visit- Parent/guardian permission obtained
- Counselor has approved the specific company
- Notebook and pen for taking notes (phones may not be allowed in the facility)
- Closed-toe shoes and long pants (most shops require them)
- A list of at least five questions to ask
Option B: Explore Three Composites Websites
If a facility visit is not practical, you can learn about the industry through focused online research. The key word is focused — you are not just browsing. You are identifying three websites, studying them, and preparing to discuss what you learned with your counselor.
Choosing Good Websites
Look for websites from these categories:
- Industry organizations — ACMA (American Composites Manufacturers Association), SAMPE, JEC Group
- Technical publishers — CompositesWorld, Composites Manufacturing Magazine
- Manufacturer sites — Toray, Hexcel, Owens Corning, Solvay
- Research institutions — university composites research centers (Delaware, Stanford, Georgia Tech)
- Government agencies — NASA Composites Materials, FAA composites guidelines
Avoid generic encyclopedia articles. Your counselor wants to see that you engaged with sources written by and for the composites industry.
What to Document from Each Website
For each of the three websites, be ready to discuss:
- What is the website’s purpose? Who runs it and who is it for?
- What did you learn that you did not know before? Specific new information, not general impressions.
- How does the content connect to what you have already learned? Link it back to fibers, resins, safety, or applications you studied in earlier requirements.
With your industry exploration complete, it is time for the most hands-on part of the badge — building actual composite projects.
Req 5a — Hands-On Projects
This is where everything you have learned comes together — safety gear, material properties, resin chemistry, and reinforcement behavior — all applied to building something real with your own hands. You will complete two projects, and the process of making them will teach you more than any reading ever could.
Understanding the Requirement
Two projects are required:
- Project 1 — must come from the merit badge pamphlet
- Project 2 — can come from the pamphlet OR be your own idea (approved by your counselor first)
If you do not have the pamphlet yet, talk to your counselor. The pamphlet describes several beginner-friendly projects that are specifically designed to teach fundamental composite fabrication techniques.
Common Composites Project Techniques
Regardless of which projects you choose, most beginner composites work uses one or more of these techniques:
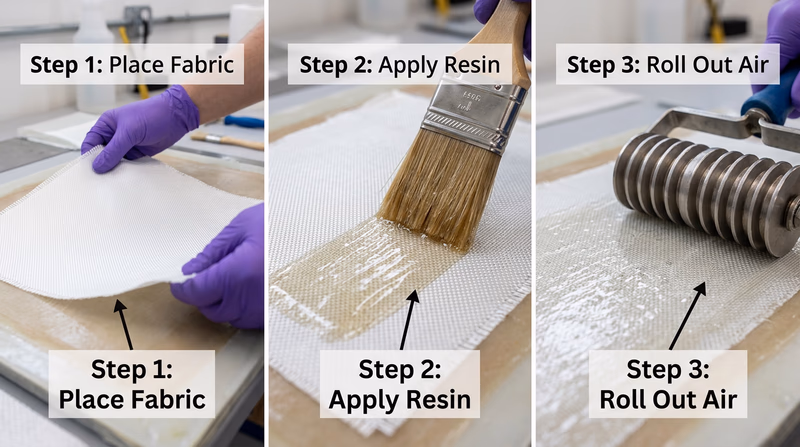
Hand Lay-Up
The most basic method. You cut reinforcement fabric (usually fiberglass) to shape, wet it with mixed resin using a brush or roller, and press it into or over a mold. Multiple layers build up thickness and strength. This is how most boat hulls, surfboards, and small composite parts are made in low-volume production.
What you learn: How resin wets out fiber, how fiber orientation affects strength, how air bubbles weaken the finished part.
Vacuum Bagging
After laying up wet fabric on a mold, you cover the part with a release film and breather cloth, seal it inside a plastic bag, and connect a vacuum pump. The atmospheric pressure (about 14.7 psi) presses the layers together, squeezing out excess resin and trapped air. The result is a lighter, stronger, more consistent part than hand lay-up alone.
What you learn: How consolidation pressure improves quality, how to work systematically under time pressure (the resin is curing while you bag).
Casting
Resin is poured into a mold without any reinforcement fiber. This produces solid resin objects — useful for decorative items, embedments (like coins or objects suspended in clear resin), or testing resin properties. While technically not a fiber composite, casting teaches you a lot about resin mixing, pot life, and curing behavior.
What you learn: Mixing ratios, exothermic reactions, bubbles and how to remove them, demolding techniques.
Planning Your Projects
Choosing Wisely
If you are new to composites, start with a simpler project from the pamphlet for Project 1, then try something more ambitious for Project 2. Consider these factors:
- Available materials: What fibers and resins can your counselor provide or help you source?
- Available workspace: Some projects need more room, ventilation, and mess tolerance than others (see Req 5b)
- Time: Resin curing takes hours or overnight. Plan for at least two work sessions per project — one for lay-up and one for trimming/finishing.
- Skill level: Be realistic. A carbon fiber skateboard deck is impressive but requires significant technique. A fiberglass phone case or small tray is achievable on your first try.
For Your Custom Project (Project 2)
If you design your own second project, get counselor approval before buying materials. Present your idea with:
- What you want to build and why
- What materials you need (fiber type, resin type, mold material)
- How you plan to fabricate it (hand lay-up, vacuum bag, cast)
- What safety precautions you will take
- How long you expect it to take
Project Ideas (Beyond the Pamphlet)
If you want to propose your own Project 2, here are ideas to get your thinking started. Always confirm with your counselor before committing.
- Fiberglass over foam — Shape a block of rigid foam into a shape (a fin, a small boat hull, a phone stand), then lay fiberglass over it to create a strong, lightweight shell
- Composite picture frame — Lay up fiberglass or carbon fiber fabric on a flat mold, cure, cut to shape, and finish the edges
- Tensile test samples — Make several small composite strips using different fiber orientations, then test their strength with your counselor (great for demonstrating how fiber direction affects properties)
- Repair project — If you have a cracked fiberglass item (canoe, kayak, bumper), repair it using proper composite repair techniques
🎬 Video: STEM Flix — Fun with Composite Materials with Science Bob — https://youtu.be/Ry7_Yuo-FYM
🎬 Video: How to Hand Lay Up a Carbon Fibre Skateboard — https://youtu.be/scvXKij1hQ0
You know what you want to build. Now you need to figure out where to build it.
Req 5b — Finding a Workspace
You would not spray-paint in a closet or weld in a living room. Composites work has similar space requirements — the chemicals, fibers, and tools demand a workspace that is safe, ventilated, and set up for the job.
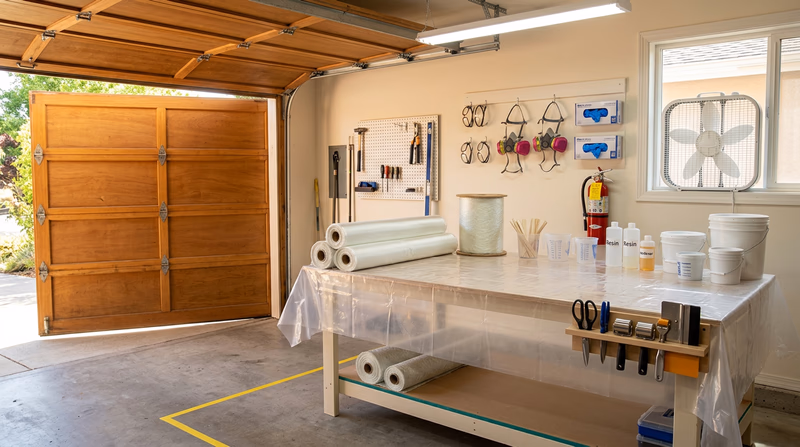
What Makes a Good Composites Workspace?
Ventilation — The Non-Negotiable
Resin fumes (especially styrene from polyester and amine vapor from epoxy hardeners) must be carried away from your breathing zone. A good workspace has:
- Cross-ventilation — at minimum, open windows or doors on two sides so air flows through the space rather than stagnating
- Exhaust fan — a box fan in a window blowing outward pulls fumes away from you. Position yourself between the fresh air source and the exhaust so clean air passes over your work.
- Ideally, a dedicated fume extraction system — professional shops use ducted ventilation hoods. If your counselor works in a professional shop, this is likely already in place.
Working outdoors solves the ventilation problem but introduces dust, bugs (which stick to wet resin), and weather variables. A covered patio or carport is a good compromise if indoor ventilation is limited.
Work Surfaces
Cover your work surface with disposable material — plastic sheeting, wax paper, or Tyvek. Resin will soak into and permanently bond to unprotected wood, concrete, or fabric surfaces. A flat table at a comfortable standing height is ideal. Working on the ground makes it hard to maintain good technique and puts your face closer to fumes.
Cleanup and Waste
Your workspace needs:
- A trash container for contaminated gloves, mixing cups, and cured scraps
- Paper towels and a solvent container (sealed metal can) for tool cleanup
- A sealed container for used solvent — do not dump it down a drain
- Access to soap and water for skin decontamination (not solvent — remember Req 1a)
Temperature
Most resins cure best between 65°F and 85°F (18–29°C). Below 60°F, epoxy and polyester cure very slowly or incompletely. Above 90°F, pot life shortens dramatically — you may not have enough working time to finish your lay-up before the resin starts to gel.
Where to Look for a Workspace
| Location | Pros | Cons |
|---|---|---|
| Counselor’s shop | Purpose-built, equipped, ventilated | Schedule coordination |
| School shop/maker space | Equipment available, supervised environment | May need special permission for chemical work |
| Garage (door open) | Convenient, tolerates mess | May lack ventilation without open door; temperature varies |
| Covered patio/carport | Excellent ventilation | Weather dependent, dust/insects |
| Community maker space | Tools and ventilation available | May have rules about chemicals |
Setting Up Your Space
Before your first project session, set up the workspace completely. Mixing resin with sticky gloves while searching for scissors is a recipe for a messy, unsafe, and frustrating experience.
Workspace Setup
Prepare all of this before opening any resin- Work surface covered with disposable plastic or wax paper
- All PPE laid out and accessible (gloves, glasses, respirator)
- Resin, hardener, and mixing supplies within arm’s reach
- Fiber reinforcement pre-cut to size
- Scissors, rollers, and squeegees ready
- Trash container lined with a bag
- Paper towels in quantity
- Soap and water accessible for skin washing
- Fire extinguisher visible and reachable
- SDS sheets for all chemicals posted or available nearby
- Ventilation running (fan on, windows open)
Your workspace is ready and your projects are underway. When they are finished, you and your counselor will evaluate the results together.
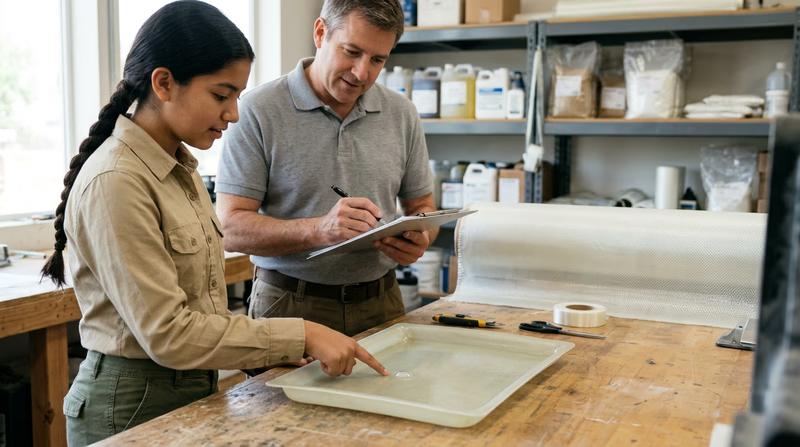
Req 5c — Evaluating Your Work
Building something is only half the job. Knowing whether you built it well — and being honest about what went right and wrong — is what separates a craftsperson from someone who just got lucky.
Setting Evaluation Criteria Before You Start
This requirement says to determine evaluation guidelines with your counselor, meaning you agree on what “good” looks like before you start building. This is how professional composites manufacturing works too — quality standards are defined before a single ounce of resin is mixed.
Work with your counselor to set criteria in these categories:
Visual Quality
- Surface finish: Is the surface smooth, or are there rough spots, pinholes, or dry areas where resin did not fully wet the fibers?
- Fiber visibility: In a translucent fiberglass lay-up, are the fibers evenly distributed, or do you see bunching, wrinkling, or gaps?
- Color and clarity: Is the cured resin uniform in color? Milky patches indicate trapped moisture. Yellow or brown spots may indicate localized overheating.
- Edge quality: Are trimmed edges clean and smooth, or rough and splintered?
Structural Integrity
- Rigidity: Does the part feel solid, or does it flex more than expected? Excessive flex could mean too few layers, incomplete cure, or poor fiber orientation.
- Delamination: Tap the surface with a coin or your knuckle. A sharp, clear sound means good consolidation. A dull, hollow sound may indicate delamination — layers that have separated internally.
- Voids and bubbles: Hold translucent fiberglass parts up to a light. Air bubbles show up as bright spots. Large voids weaken the part significantly.
Dimensional Accuracy
- Shape: Does the part match the mold or intended shape? Warping during cure is common with thin parts and indicates uneven fiber placement or thermal issues.
- Thickness: Is the wall thickness consistent? Thick spots mean excess resin (adding weight without strength). Thin spots mean insufficient resin coverage.
Process Quality
Your counselor may also evaluate your process, not just the result:
- Did you follow safety procedures consistently?
- Were your mixing ratios accurate?
- Did you work methodically or rush?
- How did you handle problems during the lay-up?
Common Defects and What Caused Them
Understanding why a defect occurred is more valuable than achieving a flawless result. Here are the most common issues in beginner composites work:
| Defect | What It Looks Like | Likely Cause |
|---|---|---|
| Dry spots | White, opaque areas where fibers are visible and rough | Not enough resin applied, or resin did not wet all fibers |
| Air bubbles/voids | Circular or irregular voids visible in or under the surface | Incomplete rolling/consolidation, trapped air during lay-up |
| Delamination | Layers separate when tapped or flexed | Poor surface prep between layers, contamination, insufficient resin |
| Wrinkling | Visible creases in the fiber fabric | Fabric not smoothed before resin application, too much fabric for the contour |
| Warping | Part curves or twists after demolding | Unbalanced lay-up (fibers not symmetric), uneven cure temperature |
| Tacky surface | Surface stays sticky and does not fully harden | Incorrect resin-to-hardener ratio, curing temperature too low |
| Exotherm damage | Discolored, cracked, or melted areas | Too much resin mixed at once, left in a thick pool instead of spread thin |
The Evaluation Conversation
When you sit down with your counselor to evaluate your projects, treat it as a learning conversation, not a pass/fail test. For each project:
- Describe what you planned — materials, technique, and expected outcome
- Show the finished part — point out both successes and defects
- Explain what caused the defects — connect them to specific steps in your process
- Describe what you would do differently — this shows growth and genuine understanding
A Scout who builds an imperfect part but can explain exactly why each defect occurred and how to prevent it next time has learned far more than someone who followed instructions perfectly without understanding the process.
🎬 Video: A Simple Composite Material to Make at Home — https://youtu.be/vxKlbik4QjM
You have built, inspected, and evaluated your composite projects. The final requirement looks ahead — toward careers and hobbies where your new composites knowledge could take you.
Req 6 — Careers & Hobbies
This final requirement asks you to look beyond the badge and imagine where composites knowledge could take you — either as a career or as a lifelong hobby. Choose one of the two options below.
- Option A: Research a composites-related career
- Option B: Explore a composites-related hobby or interest
Option A: Careers in Composites
The composites industry needs people at every level — from technicians who build parts with their hands to engineers who design the next generation of materials. Here are career paths worth researching.
Materials Engineer / Materials Scientist
What they do: Design, test, and develop new composite materials and manufacturing processes. They determine which combination of fibers, resins, and processing methods will meet a product’s performance requirements.
Education: Bachelor’s degree in materials science, mechanical engineering, or chemical engineering. Graduate degrees open research and leadership roles.
Salary range: $75,000–$130,000+ depending on industry and experience.
Where they work: Aerospace (Boeing, Lockheed Martin, SpaceX), automotive (Ford, BMW, Tesla), sporting goods, defense, wind energy.
Composites Technician / Fabricator
What they do: Build composite parts by hand lay-up, vacuum bagging, resin infusion, or autoclave curing. They read engineering drawings, cut and place fiber reinforcement, mix and apply resins, and inspect finished parts for defects.
Education: High school diploma plus on-the-job training or a composites technician certificate program (community colleges and trade schools offer these).
Salary range: $40,000–$70,000, with experienced technicians in aerospace earning more.
Where they work: Aerospace manufacturing, boat building, wind turbine blade factories, automotive repair, custom fabrication shops.
Composite Repair Technician (Aviation)
What they do: Inspect, assess, and repair damage to composite aircraft structures. This is highly specialized work — a single repair on a commercial aircraft wing can involve removing damaged material, scarfing (beveling) the repair area, laying up new composite plies, vacuum bagging, and curing under precise temperature control.
Education: FAA Airframe & Powerplant (A&P) certificate, plus specialized composite repair training. Some programs are offered through community colleges and aviation maintenance schools.
Salary range: $55,000–$90,000+, with airline and MRO (Maintenance, Repair, and Overhaul) facilities at the higher end.
Other Composites Careers
- Quality inspector — uses ultrasonic, X-ray, and visual methods to verify part integrity
- Process engineer — optimizes manufacturing methods for speed, cost, and quality
- Sales engineer — sells composite products and materials to manufacturers (requires both technical knowledge and people skills)
- Research scientist — develops next-generation materials at universities or national labs
🎬 Video: Materials Engineer — Careers in Science and Engineering — https://youtu.be/DtosXFgP7C4
🎬 Video: My Job in F1: Rachel, Materials Science Engineer — https://youtu.be/j_xotv7npsQ
Researching Your Chosen Career
When discussing your findings with your counselor, cover these points:
- Training and education: What degree, certificate, or training is required? How long does it take?
- Costs: What does the education cost? Are there scholarships, apprenticeships, or employer-sponsored training?
- Job prospects: Is the field growing? The Bureau of Labor Statistics (BLS) Occupational Outlook Handbook has data on job growth projections.
- Salary: What is the typical starting salary? What can experienced professionals earn?
- Day-to-day duties: What does a typical workday look like?
- Career advancement: Where can this career lead over 10–20 years?
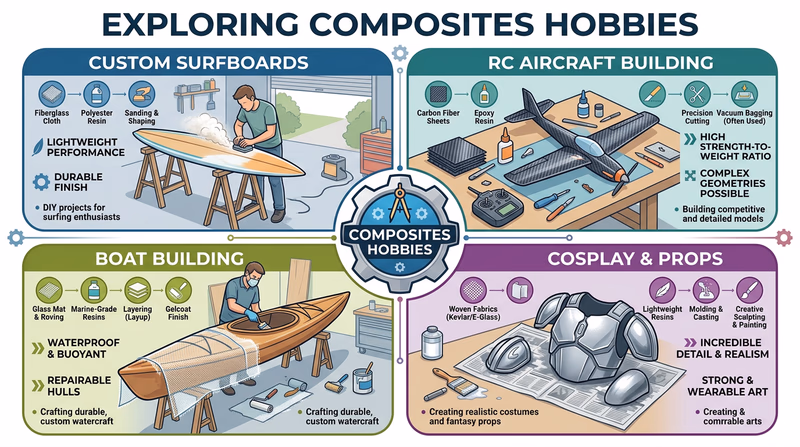
Option B: Composites as a Hobby
Composites skills open up a world of making, building, and customizing. Many people who learn composites through their profession — or through Scouting — turn it into a lifelong hobby.
Custom Sporting Equipment
Build your own surfboard, skateboard, longboard, or snowboard using composite lay-up techniques. The maker community has extensive tutorials for shaping a foam blank and glassing it with fiberglass or carbon fiber. Custom boards let you dial in the flex, weight, and shape that factory boards cannot match.
Model Building and RC Vehicles
Radio-controlled aircraft, boats, and cars use composite fuselages, wings, and hulls extensively. Building and repairing RC composite parts teaches you precision lay-up in miniature — skills that transfer directly to full-scale work.
Boat Building and Repair
From small sailboats to kayaks, composite construction is the standard. Learning to build or repair a fiberglass boat is a practical skill that can save thousands of dollars and give you a craft you built with your own hands.
Cosplay and Prop Making
Carbon fiber and fiberglass are popular in the cosplay community for building armor, helmets, and props that are lightweight and durable. Composite techniques create smooth, professional-looking pieces that hold up to convention wear.
🎬 Video: Surfboard Shaping and Glassing — https://youtu.be/rYYuDt8Z2cY
🎬 Video: Resin Infused Skateboard Using Carbon Fibre, Flax and Bio Resin — https://youtu.be/s2aS1G6yp-4
Exploring Your Chosen Hobby
When discussing your findings with your counselor, cover:
- What training is needed? Can you learn from online tutorials, or do you need a class?
- What expenses are involved? Materials, tools, workspace — what does it cost to get started?
- What organizations support it? Local clubs, online communities, maker spaces?
- Short-term goals: What is the first project you would tackle?
- Long-term goals: Where could this hobby take you in a year? Five years?
🎬 Video: Materials Science — A Building Block for the Future of Aerospace Technologies — https://youtu.be/c0EXAuWkMqA
You have completed all six requirements. Head to Extended Learning for deeper dives into advanced topics and resources that go beyond the badge.
Extended Learning
A. Congratulations
You have earned your Composite Materials merit badge. You now understand the science behind some of the most advanced materials on the planet — from the fibers that carry the loads to the resins that bind them together. More importantly, you have built composite parts with your own hands, evaluated your work honestly, and seen how this technology shapes the world around you. The knowledge and skills you have gained put you ahead of most adults when it comes to understanding what composites are and how they work.
B. Advanced Manufacturing Techniques
The hand lay-up method you used for your projects is just the starting point. Industrial composites manufacturing uses processes that produce faster, more consistent, and higher-performance parts.
Resin Transfer Molding (RTM)
In RTM, dry reinforcement fabric is placed into a closed mold, the mold is sealed, and liquid resin is injected under pressure. The resin flows through the fibers, filling the mold completely. Because the mold is closed, there are virtually no styrene emissions (a huge environmental advantage over open-mold polyester work), and the parts have smooth surfaces on both sides.
RTM is used for medium-volume production — automotive body panels, marine hardware, and structural components where consistent quality matters but full aerospace-level performance is not required. A variation called Vacuum-Assisted Resin Transfer Molding (VARTM) uses vacuum pressure instead of injection pressure, making it suitable for very large parts like wind turbine blades and boat hulls.
Autoclave Curing
The gold standard for aerospace composites. Pre-impregnated fiber sheets (prepreg — fiber already infused with precisely measured resin) are laid into a mold, vacuum-bagged, and placed inside a pressurized oven called an autoclave. The autoclave applies both heat (typically 250–350°F) and pressure (up to 100 psi) simultaneously, producing parts with the lowest void content and highest fiber-to-resin ratio achievable.
The downside is cost. Industrial autoclaves can be 20 feet in diameter and cost millions of dollars. Prepreg material has a limited shelf life and must be stored frozen. But for applications where every gram matters — aircraft wings, satellite structures, Formula 1 monocoques — autoclave curing is worth every dollar.
Automated Fiber Placement (AFP)
A robotic arm lays narrow strips of prepreg tape onto a mold surface with computer-controlled precision. The robot places each strip at the exact angle, speed, and tension specified by the engineering design. AFP can build up complex curved structures — like aircraft fuselage sections — that would be nearly impossible to lay by hand with the same accuracy.
Boeing uses AFP machines to build the barrel sections of the 787 Dreamliner fuselage. Each section is a single, seamless composite cylinder — no rivets, no joints, no metal fatigue points where leaks could develop.
3D-Printed Composites
The newest frontier. Specialized 3D printers feed continuous carbon fiber, fiberglass, or Kevlar strands into a nylon or other thermoplastic matrix as they print. The result is a part reinforced exactly where it needs strength, with no wasted material. Companies like Markforged and Anisoprint make desktop-scale continuous fiber printers that produce parts strong enough for tooling, fixtures, and end-use components.
The limitation today is speed — 3D printing is slow compared to molding or AFP. But for one-off parts, prototypes, and custom tooling, it eliminates the need to build a mold entirely.
C. Sustainability and the Recycling Challenge
One of the biggest criticisms of composite materials is that thermoset composites — the majority of what is produced today — cannot be recycled through conventional means. Once epoxy or polyester resin is cured, it cannot be melted or reformed. This creates a growing waste problem as composite structures reach the end of their useful life.
The Wind Turbine Blade Problem
Wind turbine blades are among the largest composite structures ever built — some exceed 100 meters in length. First-generation blades installed in the 1990s and 2000s are now reaching the end of their 20–25 year service life. Thousands of decommissioned blades are being cut into sections and buried in landfills because there is no economical way to recycle them.
Emerging Solutions
Researchers and companies are attacking the recycling problem from multiple directions:
- Pyrolysis breaks down thermoset composites by heating them in the absence of oxygen. The resin decomposes into gases and oils (which can be used as fuel), and the fibers are recovered for reuse. Recovered carbon fibers retain about 90% of their original strength.
- Solvolysis uses solvents at high temperature and pressure to dissolve thermoset resins, recovering both fibers and resin components for reuse.
- Thermoplastic composites sidestep the problem entirely — they can be remelted and reformed at end of life. The automotive industry is moving aggressively toward thermoplastic composites partly for this reason.
- Bio-based resins derived from plant oils (flax, soy, pine) reduce dependence on petroleum-based chemicals and can be designed for easier decomposition.
- Reclaimable thermosets — a new class of resins with chemical bonds that can be selectively broken under specific conditions, allowing the cross-linked network to be dissolved and reformed.
The composites industry knows that sustainability is not optional. The solutions exist in laboratories today — the challenge is scaling them to industrial production at a cost that competes with landfilling.
D. Composites in Extreme Environments
Composites do not just replace metals in everyday applications — they enable structures that could not exist otherwise.
Space
Spacecraft structures must survive extreme temperature swings (from -250°F in shadow to +250°F in sunlight), radiation bombardment, and micrometeorite impacts — all while weighing as little as possible because every kilogram costs thousands of dollars to launch. Carbon fiber composites with cyanate ester resins provide the dimensional stability, thermal performance, and weight savings that space demands. The James Webb Space Telescope’s primary mirror support structure is carbon fiber composite — it holds 18 gold-coated beryllium mirrors in alignment to within nanometers across a 21-foot span.
Deep Sea
Pressure vessels for deep-ocean submersibles face crushing hydrostatic pressure — over 15,000 psi at the bottom of the Mariana Trench. Carbon fiber composite pressure hulls offer the strength-to-weight advantage needed for neutral buoyancy while resisting compressive forces that would crush most metals at equivalent wall thickness.
Extreme Heat
Ceramic matrix composites (CMCs) replace the nickel superalloys in jet engine turbine shrouds and combustor liners. CMCs are one-third the weight of the metal parts they replace and can operate at temperatures above 2,400°F. GE Aviation’s LEAP engine uses CMC shrouds in commercial service, improving fuel efficiency by allowing higher operating temperatures.
E. Real-World Experiences
Places and Events to Explore
Seek out these experiences to deepen your composites knowledge- Tour a boat builder — Companies like Boston Whaler, Grady-White, or a local fiberglass shop will show you industrial-scale composite fabrication.
- Visit a wind farm — Many wind energy companies offer site tours where you can see turbine blade construction and maintenance up close.
- Attend a SAMPE conference or student competition — SAMPE’s annual Bridge Building Competition challenges student teams to design and build composite bridges tested to failure.
- Explore a maker space — Many community maker spaces have composite fabrication capabilities. Take a class or start a project.
- Visit an aerospace museum — The Smithsonian Air and Space Museum, Museum of Flight (Seattle), and Pima Air & Space Museum display composite aircraft structures with cross-sections and explanations.