Req 5b — Finding a Workspace
You would not spray-paint in a closet or weld in a living room. Composites work has similar space requirements — the chemicals, fibers, and tools demand a workspace that is safe, ventilated, and set up for the job.
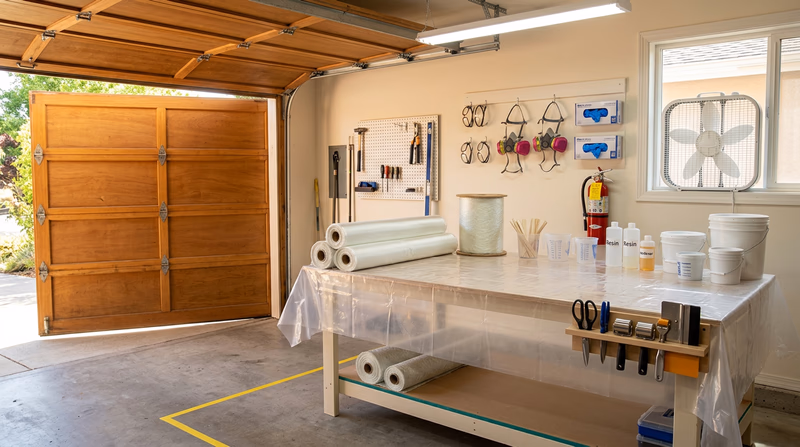
What Makes a Good Composites Workspace?
Ventilation — The Non-Negotiable
Resin fumes (especially styrene from polyester and amine vapor from epoxy hardeners) must be carried away from your breathing zone. A good workspace has:
- Cross-ventilation — at minimum, open windows or doors on two sides so air flows through the space rather than stagnating
- Exhaust fan — a box fan in a window blowing outward pulls fumes away from you. Position yourself between the fresh air source and the exhaust so clean air passes over your work.
- Ideally, a dedicated fume extraction system — professional shops use ducted ventilation hoods. If your counselor works in a professional shop, this is likely already in place.
Working outdoors solves the ventilation problem but introduces dust, bugs (which stick to wet resin), and weather variables. A covered patio or carport is a good compromise if indoor ventilation is limited.
Work Surfaces
Cover your work surface with disposable material — plastic sheeting, wax paper, or Tyvek. Resin will soak into and permanently bond to unprotected wood, concrete, or fabric surfaces. A flat table at a comfortable standing height is ideal. Working on the ground makes it hard to maintain good technique and puts your face closer to fumes.
Cleanup and Waste
Your workspace needs:
- A trash container for contaminated gloves, mixing cups, and cured scraps
- Paper towels and a solvent container (sealed metal can) for tool cleanup
- A sealed container for used solvent — do not dump it down a drain
- Access to soap and water for skin decontamination (not solvent — remember Req 1a)
Temperature
Most resins cure best between 65°F and 85°F (18–29°C). Below 60°F, epoxy and polyester cure very slowly or incompletely. Above 90°F, pot life shortens dramatically — you may not have enough working time to finish your lay-up before the resin starts to gel.
Where to Look for a Workspace
| Location | Pros | Cons |
|---|---|---|
| Counselor’s shop | Purpose-built, equipped, ventilated | Schedule coordination |
| School shop/maker space | Equipment available, supervised environment | May need special permission for chemical work |
| Garage (door open) | Convenient, tolerates mess | May lack ventilation without open door; temperature varies |
| Covered patio/carport | Excellent ventilation | Weather dependent, dust/insects |
| Community maker space | Tools and ventilation available | May have rules about chemicals |
Setting Up Your Space
Before your first project session, set up the workspace completely. Mixing resin with sticky gloves while searching for scissors is a recipe for a messy, unsafe, and frustrating experience.
Workspace Setup
Prepare all of this before opening any resin
- Work surface covered with disposable plastic or wax paper
- All PPE laid out and accessible (gloves, glasses, respirator)
- Resin, hardener, and mixing supplies within arm’s reach
- Fiber reinforcement pre-cut to size
- Scissors, rollers, and squeegees ready
- Trash container lined with a bag
- Paper towels in quantity
- Soap and water accessible for skin washing
- Fire extinguisher visible and reachable
- SDS sheets for all chemicals posted or available nearby
- Ventilation running (fan on, windows open)
Your workspace is ready and your projects are underway. When they are finished, you and your counselor will evaluate the results together.