Cooking Merit Badge — Complete Digital Resource Guide
https://merit-badge.university/merit-badges/cooking/guide/
Introduction & Overview
Every great meal starts with a spark of curiosity — and the Cooking merit badge is your invitation to step into the kitchen (and the campsite) with confidence. Whether you are scrambling eggs for your family on a Saturday morning, grilling burgers at a troop cookout, or preparing a one-pot trail dinner under the stars, cooking is one of the most practical and rewarding skills you will ever learn.
Cooking is also one of the Eagle-required merit badges, and for good reason. It teaches you planning, nutrition, safety, teamwork, and self-reliance — skills that will serve you long after you earn the badge. This guide will walk you through every requirement, giving you the knowledge and tools to become a capable cook at home, at camp, and on the trail.
Then and Now
Then — Cooking for Survival
For thousands of years, cooking was the difference between life and death. Early humans discovered that fire could transform raw meat and tough roots into something safe, digestible, and delicious. Ancient civilizations preserved food with salt, smoke, and fermentation — techniques developed long before refrigerators existed. Sailors packed hardtack and salted pork for voyages that lasted months. Pioneers crossing the American frontier cooked over open flames using cast-iron Dutch ovens that weighed as much as a small child.
- Purpose: Survival, preservation, nourishment
- Mindset: Make food safe to eat and make it last as long as possible
Now — Cooking as a Life Skill and Art Form
Today, cooking has evolved into something far bigger than survival. Professional chefs are celebrities. Food science has unlocked the chemistry behind why bread rises and why onions caramelize. You can watch a cooking tutorial from a chef in Tokyo, order ingredients from across the globe, and prepare a meal your great-grandparents never could have imagined. Yet the fundamentals remain the same — heat, timing, fresh ingredients, and care.
- Purpose: Health, creativity, connection, career, adventure
- Mindset: Feed yourself and others well — at home, at camp, and anywhere the trail takes you
Get Ready! You are about to learn skills that will feed you for the rest of your life — literally. From your first scrambled egg to a full trail dinner for your patrol, every meal you cook builds confidence. Let’s fire it up!

Kinds of Cooking
Cooking takes many forms, and this merit badge will introduce you to several of them. Here is a look at the styles you will explore.
Home Cooking
Home cooking is where most people start. You have access to a full kitchen — stove, oven, microwave, refrigerator, running water, and all the tools you need. Home cooking is about learning the basics: how to follow a recipe, how to use a knife safely, and how to time a meal so everything comes out hot at the same time.
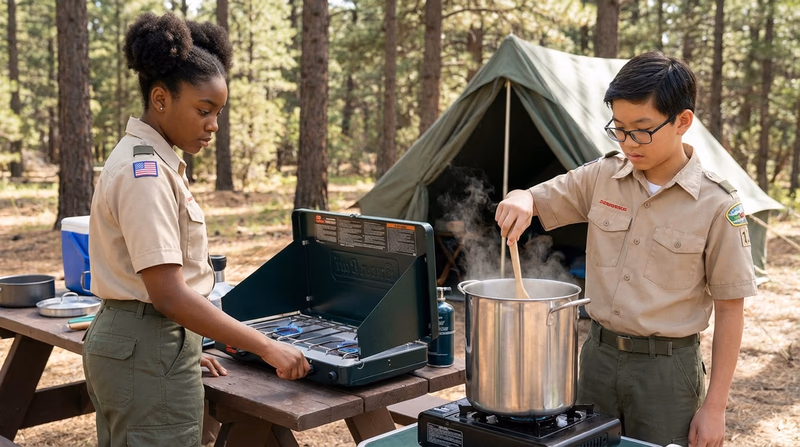
Camp Cooking
Camp cooking strips away the convenience of a kitchen and challenges you to prepare meals outdoors with limited equipment. You might use a camp stove, a charcoal fire, or a Dutch oven nestled in hot coals. Camp cooking is where Scouts really shine — feeding your patrol a hot meal after a long day of hiking is one of the most satisfying things you can do.
Trail & Backpacking Cooking
When you are miles from the nearest road, every ounce in your pack matters. Trail cooking means lightweight, compact, no-refrigeration meals that still give you the energy to keep moving. You will learn to think about food differently — weight, packaging, and calorie density become just as important as taste.
Baking & Pastry
Baking is the science side of cooking. Unlike stovetop cooking, where you can adjust on the fly, baking demands precision — exact measurements, correct temperatures, and careful timing. From biscuits to brownies, baking teaches patience and attention to detail.
Grilling & BBQ
Grilling means cooking food quickly over direct, high heat — think burgers, steaks, and vegetables on a grate. Barbecue (BBQ) is a slower process that uses indirect heat and smoke to transform tougher cuts of meat into tender, flavorful meals over hours. Both are essential outdoor cooking skills.
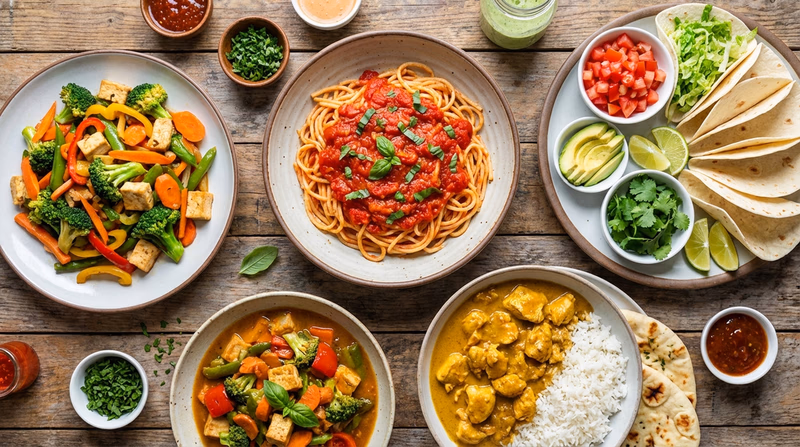
Global & Cultural Cuisine
Every culture on Earth has its own cooking traditions, ingredients, and techniques. Learning about global cuisine opens your eyes to new flavors and new ways of thinking about food. You might discover that the spices used in Indian curries, the fermentation behind Korean kimchi, or the simplicity of Italian pasta inspire your own cooking adventures.
Now let’s dive into the requirements — starting with the most important topic of all: keeping yourself and others safe in the kitchen.
Req 1a — Kitchen Hazards
Before you pick up a knife or turn on a burner, you need to understand the risks that come with cooking — and how to handle them. The kitchen (and the campsite) can be one of the safest places in the world if you know what to watch for. The key is thinking ahead.
The Four-Step Safety Framework
Your counselor will want to hear you use four specific words: anticipate, prevent, mitigate, and respond. Here is what each one means in the kitchen:
- Anticipate — Think about what could go wrong before you start. Is the stove near something flammable? Are there young children nearby? Is the floor slippery?
- Prevent — Take action to stop hazards before they happen. Wipe up spills immediately. Turn pot handles inward so they cannot be bumped. Keep knives in a block, not loose in a drawer.
- Mitigate — If something does go wrong, limit the damage. Know where the fire extinguisher is. Have a first-aid kit within reach. Turn off the heat source immediately if a problem occurs.
- Respond — Take the right action after an incident. Cool a burn under running water. Apply pressure to a cut. Call for help when you need it.
Common Kitchen Hazards
Here are the hazards you are most likely to encounter. For each one, think through the four-step framework above.
Burns and Scalds
Burns from hot surfaces, open flames, and boiling liquids are the most common kitchen injury. Steam burns are especially sneaky — lifting a lid off a pot can release a blast of steam that scalds your hand or face before you even feel the heat.
- Anticipate: Any surface near heat can burn you — pots, pans, oven racks, even plates that just came out of the microwave.
- Prevent: Use oven mitts or pot holders every time. Lift lids away from your face so steam escapes in the opposite direction. Never reach across a hot burner.
Cuts and Lacerations
Knives are essential tools, but they demand respect. Dull knives are actually more dangerous than sharp ones because they require more force and are more likely to slip.
- Anticipate: Any time you pick up a knife, a grater, or a can with a sharp lid, you are handling a potential hazard.
- Prevent: Keep knives sharp. Always cut on a stable cutting board. Curl your fingers into a “claw” to hold food — this keeps your fingertips out of the blade’s path.
Fires
Grease fires, unattended stoves, and flammable materials near heat sources are serious hazards. A grease fire can erupt in seconds and spread quickly if handled wrong.
- Anticipate: Cooking with oil or fat at high temperatures always carries fire risk.
- Prevent: Never leave cooking food unattended. Keep towels, paper, and plastic away from burners. Do not overfill pans with oil.
- Respond: Never throw water on a grease fire. Water causes the burning oil to splatter and spread. Instead, smother the fire by sliding a lid over the pan and turning off the heat. If the fire is in the oven, close the oven door. If it is out of control, evacuate and call 911.

Slips and Falls
Water, oil, and food scraps on the floor create slippery surfaces. In a busy kitchen, spills happen fast.
- Anticipate: Anytime liquids are being poured, stirred, or drained, there is a chance something hits the floor.
- Prevent: Clean spills immediately. Wear closed-toe shoes with non-slip soles. Keep walkways clear of cords, bags, and clutter.
Cross-Contamination
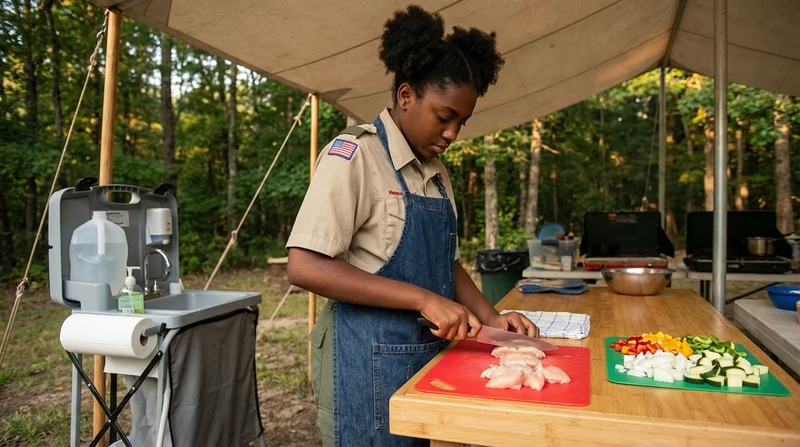
This is an invisible hazard — you cannot see the bacteria that transfer from raw meat to a cutting board to a salad. Cross-contamination is one of the leading causes of foodborne illness.
- Anticipate: Anytime you handle raw meat, poultry, fish, or eggs, harmful bacteria may be present.
- Prevent: Use separate cutting boards for raw meat and ready-to-eat foods. Wash your hands with soap and hot water for at least 20 seconds after handling raw proteins. Never place cooked food on a plate that held raw meat.
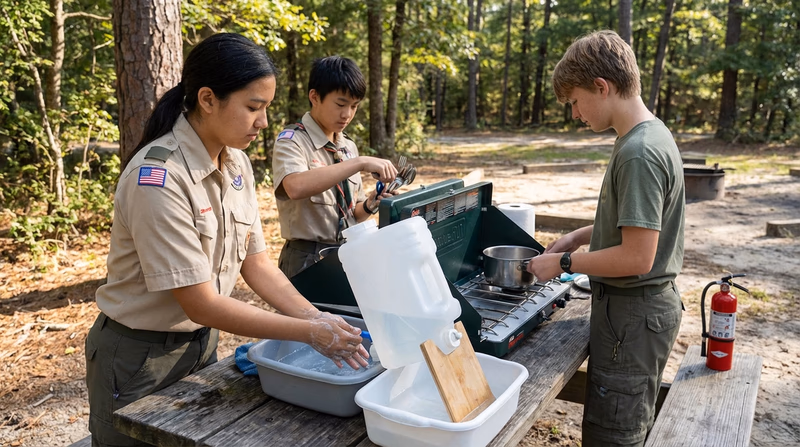
Outdoor Cooking Hazards
When you move from the kitchen to the campsite, you add a new set of hazards: uneven ground, wind, rain, wildlife, and limited access to water. Everything you have learned about indoor safety still applies, plus:
- Wind can blow flames and sparks. Position your cooking area downwind from tents and gear.
- Wildlife is attracted to food smells. Store food properly and cook at least 200 feet from sleeping areas.
- Limited water means you need to plan ahead for handwashing and cleanup.
Putting It All Together
When your counselor asks you about cooking hazards, organize your answer around the four steps: anticipate, prevent, mitigate, respond. Pick three or four specific hazards and walk through each step for each one. Showing that you can think systematically about safety is exactly what this requirement is looking for.
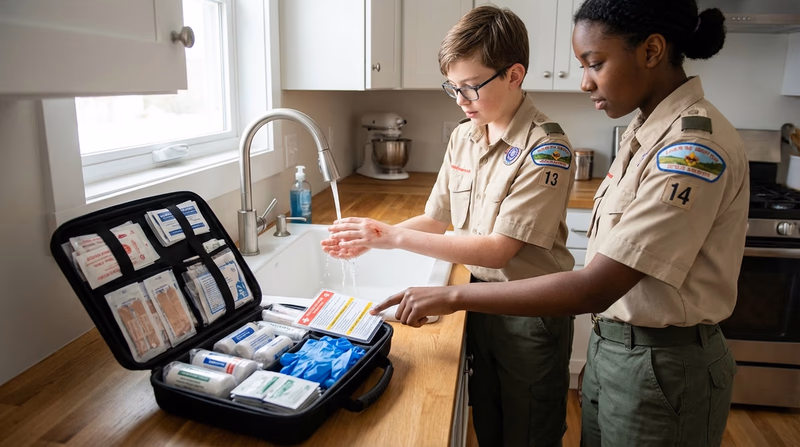
Req 1b — First Aid for the Kitchen
Knowing how to prevent kitchen injuries is half the battle. The other half is knowing what to do when something goes wrong. This requirement focuses on the four most common kitchen emergencies — and the first aid that goes with each one.
Burns and Scalds
Burns are classified by severity:
- First-degree burns affect only the outer layer of skin. The area turns red and hurts, but there are no blisters. Most minor kitchen burns fall into this category.
- Second-degree burns go deeper. You will see blisters, swelling, and more intense pain.
- Third-degree burns destroy multiple layers of skin. The area may look white, brown, or charred. These require emergency medical care immediately.
First Aid for Burns:
- Remove the source of the burn. Move away from the hot surface, flame, or liquid.
- Cool the burn under cool (not ice-cold) running water for at least 10 minutes. This is the single most effective treatment for minor burns.
- Do NOT apply butter, oil, toothpaste, or ice — these old remedies can actually make the injury worse.
- Cover the burn loosely with a sterile, non-stick bandage.
- Take an over-the-counter pain reliever if needed.
- Seek medical attention for any burn larger than 3 inches, any burn on the face, hands, feet, or joints, or any second- or third-degree burn.
Prevention:
- Use oven mitts or pot holders every single time you handle hot items.
- Turn pot handles toward the back of the stove so they cannot be bumped.
- Keep children and pets away from the cooking area.
- Let hot oil cool before moving a pan.
Cuts and Lacerations
Most kitchen cuts come from knives, but graters, can lids, broken glass, and even the edge of aluminum foil can slice skin quickly.
First Aid for Cuts:
- Apply firm, direct pressure with a clean cloth or gauze pad.
- Keep pressure on the wound for at least 5 minutes without peeking — lifting the cloth too soon can restart bleeding.
- Once bleeding stops, clean the wound gently with soap and water.
- Apply antibiotic ointment and cover with a bandage.
- Seek medical attention if the cut is deep, will not stop bleeding after 10 minutes of direct pressure, was caused by a rusty or dirty object, or shows signs of infection (redness, swelling, warmth, or pus).
Prevention:
- Always cut away from your body on a stable cutting board.
- Use the claw grip (from Req 1a) to protect your fingers.
- Keep knives sharp — a dull blade requires more force and is more likely to slip.
- Never try to catch a falling knife. Step back and let it drop.
Choking
Choking happens when food or another object blocks the airway. It can happen to anyone, at any age, and it can turn deadly in minutes if not addressed.
Signs of choking:
- The person grabs their throat (the universal choking sign).
- They cannot speak, cough, or breathe.
- Their skin may turn blue or gray.
First Aid for Choking (Conscious Person):
- Ask, “Are you choking? Can I help?” If they nod yes but cannot speak, act immediately.
- Stand behind the person and wrap your arms around their waist.
- Make a fist with one hand and place it just above their belly button, below the ribcage.
- Grasp your fist with your other hand.
- Deliver quick, upward thrusts (abdominal thrusts / Heimlich maneuver) until the object is dislodged or the person can breathe.
- If the person becomes unconscious, lower them to the ground and call 911. Begin CPR if you are trained.
Prevention:
- Cut food into small, manageable pieces — especially for younger Scouts.
- Chew thoroughly before swallowing.
- Do not talk, laugh, or run with food in your mouth.
- Avoid eating too quickly.
Allergic Reactions
Food allergies are a serious and potentially life-threatening concern. An allergic reaction happens when the immune system overreacts to a protein in food. Reactions can range from mild (hives, itching) to severe (anaphylaxis — a whole-body emergency).
Signs of a mild allergic reaction:
- Hives, itching, or a rash
- Tingling or swelling of the lips, tongue, or throat
- Stomach cramps, nausea, or vomiting
Signs of anaphylaxis (severe reaction):
- Difficulty breathing or wheezing
- Swelling of the throat that makes it hard to swallow or speak
- Rapid or weak pulse
- Dizziness or fainting
- A feeling of “something is very wrong”
First Aid for Allergic Reactions:
- If the person has a prescribed epinephrine auto-injector (like an EpiPen), help them use it immediately. Do not wait to see if the reaction gets worse.
- Call 911 right away for any signs of anaphylaxis.
- Help the person sit up to make breathing easier (unless they feel faint, then help them lie down with legs elevated).
- Stay with them until emergency help arrives.
- For mild reactions with only skin symptoms, an antihistamine (like Benadryl) may help, but always follow up with a medical professional.
Prevention:
- Always ask guests and fellow Scouts about food allergies before planning a menu.
- Read every ingredient label carefully (you will learn more about this in Req 1e).
- Keep allergen-free foods completely separate from other foods during preparation.
- When in doubt, leave it out.
🎬 Video: Treating Burns and Cuts — https://www.youtube.com/watch?v=tm0mRPy2VH4
Req 1c — Safe Food Storage
Food safety is invisible. You cannot see, smell, or taste the bacteria that cause foodborne illness — but they are there, multiplying fast if you give them the chance. This requirement teaches you how to handle the most common food groups safely from the moment you buy them to the moment they hit the plate.
The Temperature Danger Zone
The single most important concept in food storage is the temperature danger zone: 40°F to 140°F (4°C to 60°C). Bacteria thrive in this range and can double every 20 minutes. Your job as a cook is to keep cold foods cold and hot foods hot — and spend as little time as possible in the danger zone.
Storage Guidelines by Food Type
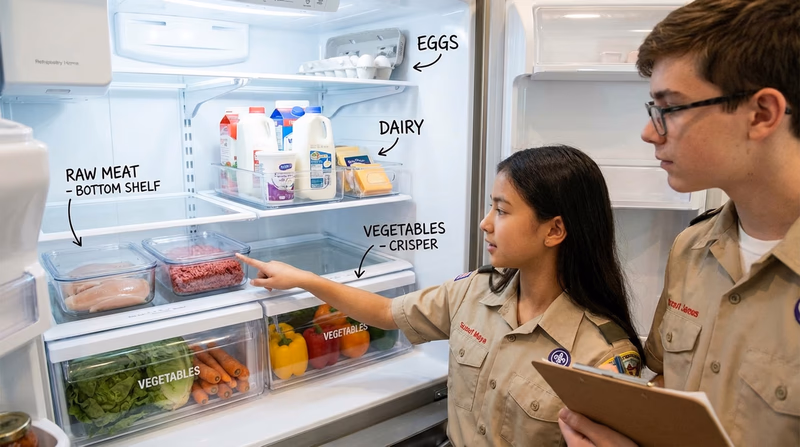
Meat (Beef, Pork, Lamb)
- Store: In the coldest part of the refrigerator (usually the bottom shelf), at 40°F or below. Place on a plate or in a sealed container to prevent juices from dripping onto other foods.
- Transport: Use a cooler with ice packs. Raw meat should be double-bagged and placed at the bottom of the cooler.
- Prepare: Thaw in the refrigerator (never on the counter). Cook to safe internal temperatures: ground meat to 160°F, steaks and roasts to 145°F with a 3-minute rest.
Fish and Shellfish
- Store: In the refrigerator at 40°F or below. Use within 1–2 days of purchase. Fresh fish should smell like the ocean, not “fishy.”
- Transport: Keep on ice. Fish spoils faster than any other protein.
- Prepare: Cook to an internal temperature of 145°F. Fish is done when it flakes easily with a fork and is opaque throughout.
Chicken and Poultry
- Store: Bottom shelf of the refrigerator in a sealed container. Poultry is one of the highest-risk foods for salmonella contamination.
- Transport: Double-bag and keep cold. Never let raw chicken juices come in contact with other foods.
- Prepare: Always cook to an internal temperature of 165°F — no exceptions. Never wash raw chicken in the sink; this splashes bacteria onto surrounding surfaces.
Eggs
- Store: In the refrigerator in their original carton (not the door — the door is the warmest part of the fridge). Use by the date on the carton.
- Transport: Handle gently. Cracked eggs should be discarded because bacteria can enter through breaks in the shell.
- Prepare: Cook until both the white and yolk are firm. Avoid recipes that call for raw or undercooked eggs unless using pasteurized eggs.
Dairy Products (Milk, Cheese, Yogurt)
- Store: Refrigerate at 40°F or below. Keep containers sealed. Hard cheeses last longer than soft cheeses.
- Transport: Use a cooler. Dairy products spoil quickly at room temperature.
- Prepare: Check expiration dates. Smell and inspect dairy products before using — sour milk and moldy cheese (other than intentionally moldy varieties like blue cheese) should be discarded.
Fresh Vegetables
- Store: Most vegetables go in the refrigerator’s crisper drawer. Potatoes, onions, and tomatoes do better at room temperature in a cool, dark place.
- Transport: Keep separate from raw meats. Leafy greens are especially vulnerable to contamination.
- Prepare: Wash all vegetables under running water before cutting or cooking — even if you plan to peel them. Bacteria on the skin can transfer to the flesh when you cut through it.
Cross-Contamination: The Invisible Threat
Cross-contamination is the transfer of harmful bacteria from one food, surface, or utensil to another. It is the cause of many foodborne illnesses and is almost entirely preventable.
The Three Pathways of Cross-Contamination:
- Food to food: Raw chicken juice drips onto salad greens in the refrigerator. Raw meat is stored above ready-to-eat foods.
- Surface to food: You cut raw chicken on a cutting board, then slice tomatoes on the same board without washing it.
- Hands to food: You handle raw meat, then grab a piece of bread without washing your hands.
Preventing Cross-Contamination
Follow these rules every time you cook- Use separate cutting boards for raw meat and ready-to-eat foods (many cooks use color-coded boards).
- Wash hands with soap and warm water for at least 20 seconds after touching raw meat, poultry, fish, or eggs.
- Sanitize countertops, cutting boards, and utensils with hot soapy water after they contact raw proteins.
- Store raw meats on the lowest shelf in the refrigerator, never above other foods.
- Use separate utensils for raw and cooked foods — never put cooked meat back on the plate that held it raw.
- Wash all produce under running water before eating or cooking, even if you plan to peel it.
Cooking Temperatures: Your Final Safety Net
Even if cross-contamination occurs, cooking food to the right internal temperature kills harmful bacteria. Use a food thermometer — do not rely on color or texture alone.
USDA Safe Minimum Internal Temperatures The official USDA chart showing the minimum safe cooking temperatures for all types of meat, poultry, seafood, and eggs. Link: USDA Safe Minimum Internal Temperatures — https://www.fsis.usda.gov/food-safety/safe-food-handling-and-preparation/food-safety-basics/safe-minimum-internal-temperature-chart🎬 Video: Basic Food Safety: Avoiding Cross Contamination — https://youtu.be/yiNTqUU-h6w?si=vlMbmOnZnVFqYRTW
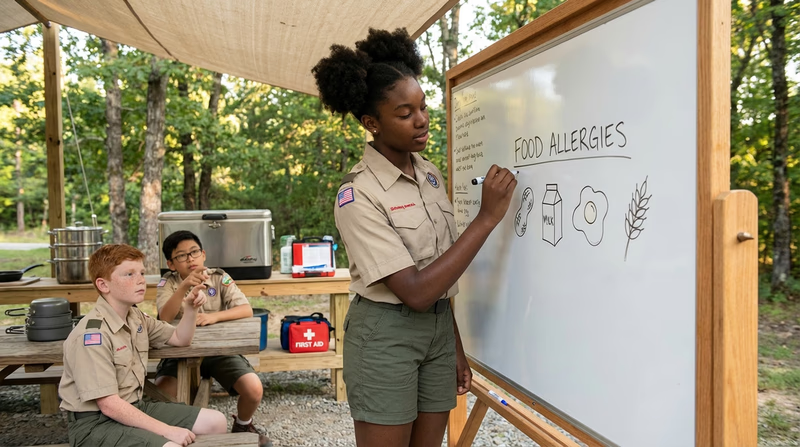
Req 1d — Allergies & Food Illness
As a cook, you are not just making food taste good — you are responsible for the health and safety of everyone who eats what you prepare. Understanding the difference between food allergies, food intolerance, and foodborne illness is essential knowledge for anyone who handles food.
Food Allergies
A food allergy is an immune system reaction. When someone with a food allergy eats even a tiny amount of the triggering food, their body treats it as an invader and launches an attack. Reactions can range from uncomfortable (hives, stomach cramps) to life-threatening (anaphylaxis).
The Big Nine Allergens account for about 90% of all food allergy reactions in the United States:
- Milk — one of the most common allergies in young children
- Eggs — both the white and the yolk can trigger reactions
- Peanuts — a legume, not a tree nut, and one of the most severe allergens
- Tree nuts — almonds, walnuts, cashews, pecans, and others
- Fish — salmon, tuna, halibut, and other fin fish
- Shellfish — shrimp, crab, lobster, and other crustaceans
- Wheat — found in bread, pasta, cereal, and many processed foods
- Soy — found in many processed foods, sauces, and oils
- Sesame — added to the list in 2023 and found in breads, hummus, and many sauces
Key facts about food allergies:
- There is no cure. The only way to prevent a reaction is to completely avoid the allergen.
- Even trace amounts can trigger severe reactions in some people. A peanut allergy can be triggered by a knife that was used to spread peanut butter, even after it was wiped off.
- Allergies can develop at any age — even if someone has eaten a food safely for years.
- Anaphylaxis requires immediate treatment with epinephrine and a call to 911.
Food Intolerance
Food intolerance is different from a food allergy. It does not involve the immune system. Instead, the digestive system has trouble breaking down a particular food or ingredient. Intolerance is uncomfortable but rarely dangerous.
Common food intolerances:
- Lactose intolerance — the body does not produce enough lactase enzyme to digest the sugar (lactose) in milk. Symptoms include bloating, gas, cramps, and diarrhea.
- Gluten sensitivity — some people experience digestive issues when eating gluten (a protein found in wheat, barley, and rye) even without having celiac disease.
- Histamine intolerance — some fermented, aged, or processed foods (like aged cheese, wine, or cured meats) can cause headaches, flushing, or digestive problems in sensitive individuals.
How intolerance differs from allergy:
| Food Allergy | Food Intolerance | |
|---|---|---|
| System involved | Immune system | Digestive system |
| Severity | Can be life-threatening | Uncomfortable but not life-threatening |
| Amount needed | Even trace amounts can trigger | Small amounts may be tolerated |
| Timing | Usually within minutes | May take hours to appear |
| Treatment | Epinephrine for severe reactions | Avoiding or limiting the food |
Food-Related Illnesses and Diseases
Beyond allergies and intolerance, several illnesses and diseases are directly related to food.
Foodborne Illness (“Food Poisoning”)
Caused by eating food contaminated with bacteria, viruses, or parasites. The most common culprits include:
- Salmonella — often linked to raw or undercooked poultry, eggs, and unpasteurized milk. Symptoms: diarrhea, fever, cramps (6–72 hours after eating).
- E. coli — found in undercooked ground beef, raw milk, and contaminated produce. Some strains can cause serious kidney damage.
- Norovirus — the most common cause of foodborne illness in the U.S. Spread through contaminated food, water, or surfaces. Extremely contagious.
- Listeria — found in deli meats, soft cheeses, and unpasteurized products. Especially dangerous for pregnant women and people with weakened immune systems.
Celiac Disease
An autoimmune disease (not an allergy or intolerance) where eating gluten causes the immune system to damage the lining of the small intestine. People with celiac disease must completely avoid gluten for life.
Diabetes
While not caused by a single food, diabetes affects how the body processes sugar. People with diabetes need to carefully monitor their carbohydrate and sugar intake. As a cook, knowing that a guest has diabetes means you should be able to describe the ingredients in your dishes and offer options that are lower in sugar and refined carbohydrates.
Why This Matters for You as a Cook
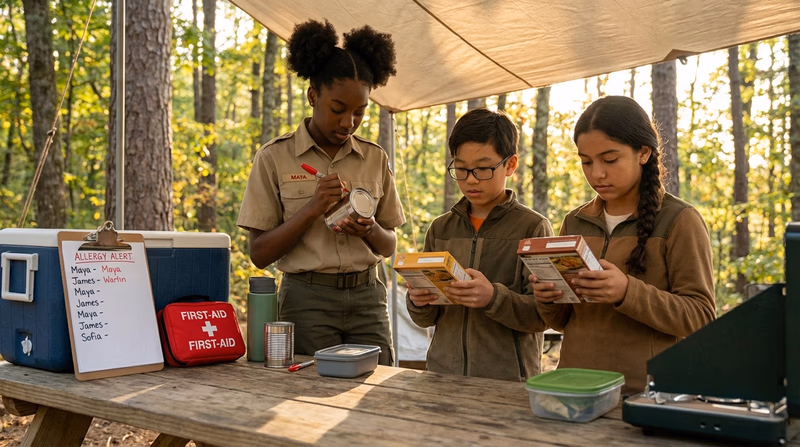
When you prepare food for others — whether it is your family, your patrol, or guests at a community event — you hold their health in your hands. Here is why awareness matters:
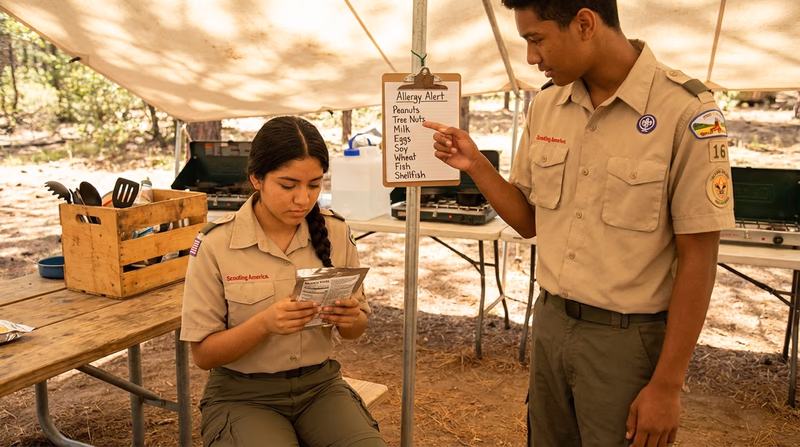
- Communication is key. Before planning any menu, ask everyone about allergies, intolerances, and dietary restrictions. Write them down and keep the list visible while you cook.
- Labels are your friend. Learn to read ingredient labels and watch for hidden allergens (you will practice this in Req 1e).
- Separate preparation. If you are cooking for someone with a food allergy, prepare their food first using clean equipment, or use completely separate tools and surfaces.
- Know the symptoms. If someone shows signs of an allergic reaction after eating, act fast. Review the first aid steps from Req 1b.
Req 1e — Reading Food Labels
Food labels are your most powerful tool for protecting yourself and others from allergens, hidden ingredients, and unhealthy choices. Every packaged food sold in the United States is required by law to carry a label — and knowing how to read one is a skill every cook needs.
Why Food Labels Matter
Labels tell you exactly what is in your food. Without them, you would have no way to know whether a granola bar contains tree nuts, whether a soup has dairy, or how much sugar is hiding in your breakfast cereal. For someone with a food allergy, that information is not just useful — it is life-saving.
Labels also help you:
- Make healthier choices by comparing products
- Plan balanced meals by checking serving sizes and nutrient content
- Budget wisely by understanding what you are actually paying for
- Follow dietary guidelines like the MyPlate recommendations you will learn in Req 2
Anatomy of a Food Label
Every food label has two key sections you need to understand:
1. The Nutrition Facts Panel
This panel lists calories, fat, sodium, carbohydrates, protein, and other nutrients per serving. You will dive deeper into these terms in Req 2e. For now, the most important thing to note is the serving size at the top — everything else on the panel is based on that amount.
2. The Ingredients List
Ingredients are listed in order from most to least by weight. The first ingredient is what the product contains the most of, and the last ingredient is what it contains the least of. This is where you find allergens and hidden ingredients.
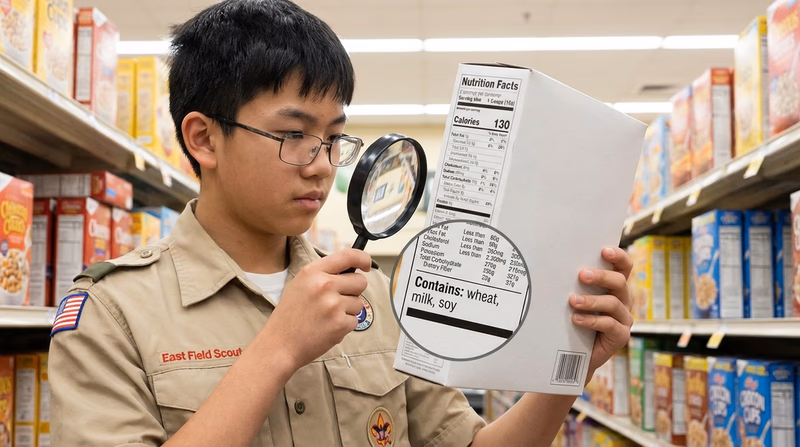
Spotting Allergens on Labels
U.S. law requires that the Big Nine allergens be clearly identified on food labels. Manufacturers must do this in one of two ways:
Method 1 — “Contains” statement: A bold line near the ingredients list that says something like: Contains: milk, wheat, soy.
Method 2 — Parenthetical in the ingredients list: The allergen is called out in parentheses after the ingredient name. For example: “casein (milk)” or “lecithin (soy).”
Hidden Allergen Names
Allergens do not always go by their common names. Here are some tricky ones to watch for:
| Allergen | Also listed as… |
|---|---|
| Milk | Casein, whey, lactalbumin, lactose, ghee, curds |
| Eggs | Albumin, globulin, lysozyme, mayonnaise, meringue |
| Wheat | Durum, semolina, spelt, kamut, farina, couscous |
| Soy | Edamame, miso, tempeh, tofu, textured vegetable protein (TVP) |
| Peanuts | Groundnuts, arachis oil, monkey nuts |
| Tree nuts | Marzipan, nougat, praline, gianduja, nut butters |
| Shellfish | Surimi (imitation crab), glucosamine |
Putting Label Reading Into Practice
When you are shopping for a meal — whether it is for your family at home or for your patrol at camp — get into the habit of checking labels before you put anything in the cart.
Label-Reading Routine
Do this for every packaged ingredient- Check the “Contains” statement for any of the Big Nine allergens.
- Scan the ingredients list for hidden allergen names (see the table above).
- Note the serving size — you will need this for nutrition planning.
- Check for “may contain” or “processed in a facility” warnings if cooking for someone with severe allergies.
- Compare brands — different manufacturers may use different ingredients for similar products.
Label Reading at Camp
At camp, label reading becomes even more important because you are cooking for a larger group and may not know everyone’s dietary needs as well as you know your family’s. Bring a permanent marker to circle allergens on packages so every member of the cooking crew can spot them at a glance.
FDA — How to Read Food Labels The FDA's official guide to understanding the Nutrition Facts label, including serving sizes, daily values, and nutrient information. Link: FDA — How to Read Food Labels — https://www.fda.gov/food/nutrition-facts-label/how-understand-and-use-nutrition-facts-label🎬 Video: 10 Rules for Reading a Food Label — https://youtu.be/R-o-83k8dP0?si=67Y3d8V1j407TPAn
Req 2a — MyPlate Food Groups
Nutrition is the foundation of everything you cook. If you are going to prepare meals for yourself, your family, and your patrol, you need to understand what a balanced plate looks like. The USDA’s MyPlate model makes this straightforward.
What Is MyPlate?
MyPlate replaced the old Food Pyramid in 2011. Instead of stacking food groups on top of each other, MyPlate shows a simple dinner plate divided into four sections — Fruits, Vegetables, Grains, and Proteins — with a small circle on the side for Dairy. The visual message is clear: fill half your plate with fruits and vegetables, and split the other half between grains and protein.
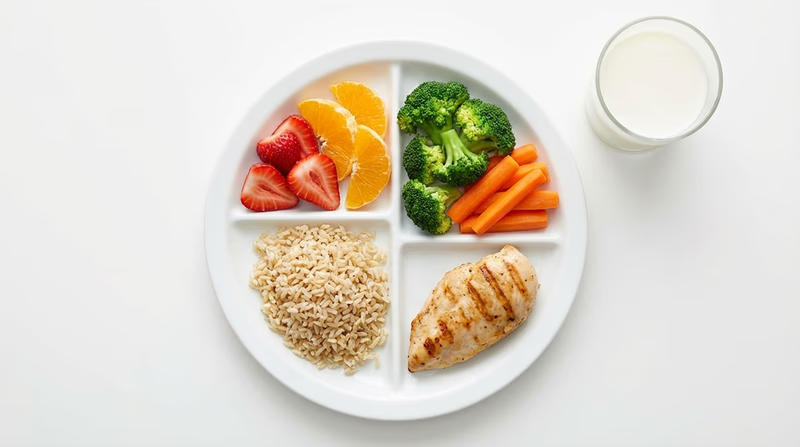
The Five Food Groups
For this requirement, you need to provide five examples from each group, know the recommended daily servings, and understand serving sizes. Here is a guide to get you started — but remember, the requirement asks you to come up with your own examples when you meet with your counselor.
1. Fruits
Fruits provide vitamins (especially vitamin C), fiber, and natural sugars for energy. Eating a variety of colorful fruits gives you a wider range of nutrients.
- Daily recommendation: 1½ to 2 cups per day (for most teens)
- What counts as 1 cup? 1 medium apple, 1 large banana, 1 cup of berries, ½ cup of dried fruit, or 1 cup of 100% fruit juice
Think about fruits you already enjoy — apples, oranges, bananas, grapes, strawberries, blueberries, watermelon, peaches, mangoes, and more. Try to include whole fruits more often than juice, because whole fruits contain fiber that juice does not.
2. Vegetables
Vegetables are nutritional powerhouses. They provide fiber, vitamins A and C, potassium, and folate. The USDA recommends eating vegetables from all five subgroups throughout the week: dark green, red/orange, beans and peas, starchy, and other.
- Daily recommendation: 2½ to 3 cups per day (for most teens)
- What counts as 1 cup? 1 cup of raw or cooked vegetables, 2 cups of raw leafy greens, or 1 cup of 100% vegetable juice
Think broadly — broccoli, carrots, spinach, sweet potatoes, corn, green beans, bell peppers, tomatoes, celery, and many more.
3. Grains
Grains provide energy in the form of carbohydrates, along with B vitamins, iron, and fiber (especially whole grains). The USDA recommends that at least half of your grains be whole grains.
- Daily recommendation: 6 to 8 ounce-equivalents per day (for most teens)
- What counts as 1 ounce-equivalent? 1 slice of bread, 1 cup of ready-to-eat cereal, or ½ cup of cooked rice, pasta, or oatmeal
Whole grains include whole wheat bread, brown rice, oatmeal, quinoa, and whole corn tortillas. Refined grains include white bread, white rice, and regular pasta.
4. Proteins
Proteins build and repair your muscles, bones, skin, and blood. This group includes much more than just meat — beans, nuts, seeds, eggs, and soy products are all excellent protein sources.
- Daily recommendation: 5 to 6½ ounce-equivalents per day (for most teens)
- What counts as 1 ounce-equivalent? 1 ounce of meat, poultry, or fish; 1 egg; ¼ cup of cooked beans; 1 tablespoon of peanut butter; or ½ ounce of nuts or seeds
Vary your protein sources. Seafood, lean poultry, beans, and nuts offer different nutrients. Aim for at least 8 ounces of seafood per week.
5. Dairy
Dairy provides calcium, vitamin D, and protein — all essential for building strong bones during your teen years. If you are lactose intolerant, calcium-fortified soy beverages and lactose-free dairy products are good alternatives.
- Daily recommendation: 3 cups per day (for most teens)
- What counts as 1 cup? 1 cup of milk or yogurt, 1½ ounces of natural cheese, or 2 ounces of processed cheese
Think about milk, yogurt, cheese, cottage cheese, and calcium-fortified alternatives like soy milk.
Preparing for Your Counselor Discussion
When you meet with your counselor, be ready to list five specific examples from each food group, state the daily serving recommendation, and describe what a single serving looks like. Do not just memorize a list — think about foods you actually eat and how they fit into the MyPlate model.
MyPlate — What Is MyPlate? The official USDA MyPlate website with detailed information about each food group, serving sizes, and daily recommendations by age. Link: MyPlate — What Is MyPlate? — https://www.myplate.gov/eat-healthy/what-is-myplateReq 2b — Oils & Sugars
You may have noticed that MyPlate does not have a section for oils and sugars. That is intentional — they are not a food group. Small amounts of healthy oils are necessary, but added sugars and excess oils provide calories without the nutrients your body needs.
Why Limit Oils?
Not all fats are bad. Your body actually needs fats to absorb vitamins (A, D, E, and K), protect your organs, and maintain healthy skin and hair. The key is choosing the right kinds and keeping the total amount in check.
Healthy oils come from plants and fish:
- Olive oil, canola oil, avocado oil
- Oils naturally present in nuts, seeds, avocados, and fatty fish like salmon
Unhealthy fats to limit or avoid:
- Saturated fats — found in butter, cheese, fatty meats, and coconut oil. Eating too much raises LDL (“bad”) cholesterol, which increases your risk of heart disease.
- Trans fats — artificially created fats found in some processed foods, fried foods, and baked goods. Trans fats are the worst kind for your heart. The FDA has banned the most common source of artificial trans fats, but small amounts may still appear in some products.
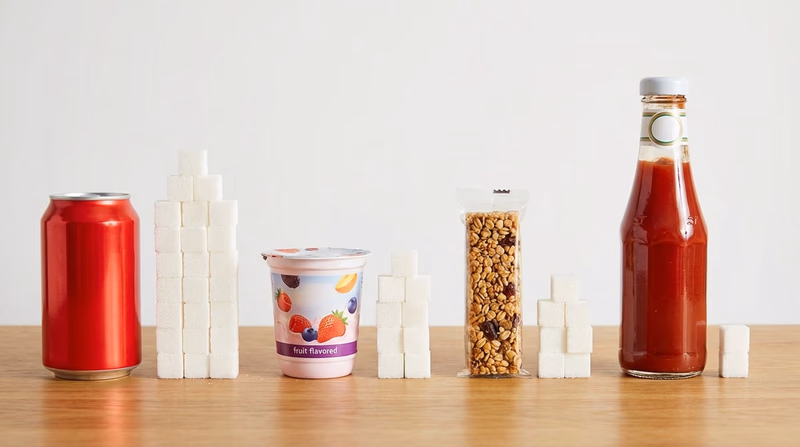
Why Limit Sugars?
There is a difference between natural sugars and added sugars:
- Natural sugars are found in fruits (fructose) and dairy (lactose). These come packaged with fiber, vitamins, and minerals, so they are part of a healthy diet.
- Added sugars are sugars and syrups put into foods during processing or preparation. They add calories but zero nutrients — these are sometimes called “empty calories.”
What happens when you eat too much added sugar?
- Weight gain — excess sugar calories are stored as fat
- Tooth decay — sugar feeds the bacteria that cause cavities
- Energy crashes — a sugar spike gives you quick energy, then a crash that leaves you tired and foggy
- Increased risk of type 2 diabetes, heart disease, and other chronic conditions over time
Where Is Sugar Hiding?
Added sugar is not just in candy and soda. It hides in foods you might not expect:
- Ketchup and BBQ sauce
- Flavored yogurt
- Granola bars and breakfast cereal
- Sports drinks and fruit juice
- Bread and pasta sauce
Remember the label-reading skills from Req 1e — check the ingredients list for sugar’s many names (high fructose corn syrup, dextrose, sucrose, maltose, honey, agave, and more).
The Balance
The goal is not to eliminate all fats and sugars from your diet. The goal is to choose wisely:
- Cook with healthy oils in moderate amounts.
- Satisfy your sweet tooth with whole fruits instead of candy and soda.
- Read labels and be aware of how much added sugar you are actually eating.
- When you plan meals for this merit badge, think about where oils and sugars fit — and where you can make healthier choices.
Req 2c — Activity & Calories
This requirement connects what you eat to how you move. The food you eat is fuel — and the amount of fuel you need depends on how active you are. Tracking your activity and matching it to your calorie needs is one of the most practical nutrition skills you can develop.
What Are Calories?
A calorie is simply a unit of energy. Every food you eat provides a certain number of calories, and every activity you do burns a certain number. Your body uses calories for everything — breathing, thinking, walking, playing sports, and even sleeping.
- If you eat roughly the same number of calories your body uses, your weight stays stable.
- If you consistently eat more than you use, your body stores the excess as fat.
- If you consistently eat less than you use, your body draws on stored energy.
For most teens, the goal is not to count every calorie obsessively, but to understand the relationship between activity and nutrition so you can make smart choices.
Estimating Your Daily Caloric Needs
Your caloric needs depend on your age, sex, and activity level. Here are general guidelines for teens:
| Activity Level | Description | Estimated Daily Calories (Ages 14–18) |
|---|---|---|
| Sedentary | Little physical activity beyond daily living | 1,800–2,200 |
| Moderately active | 30–60 minutes of moderate exercise daily | 2,000–2,600 |
| Active | 60+ minutes of vigorous exercise daily | 2,400–3,200 |
These are estimates. The MyPlate Plan tool can give you a more personalized recommendation based on your specific age, height, weight, and activity level.
MyPlate Plan Enter your age, sex, height, weight, and activity level to get a personalized daily food plan with recommended amounts from each food group. Link: MyPlate Plan — https://www.myplate.gov/myplate-planHow to Track Your Activity
For five days, keep a simple log of what you do and for how long. You do not need a fitness tracker — a notebook works fine. Focus on physical activities beyond your normal daily routine.
Activity Tracking Tips
What to record each day- Type of activity (walking, biking, sports practice, Scout outing, chores, etc.)
- Duration (how many minutes)
- Intensity level: light (walking, stretching), moderate (brisk walking, casual biking), or vigorous (running, competitive sports, hiking with a heavy pack)
- Any periods of extended sitting (screen time, homework, car rides)
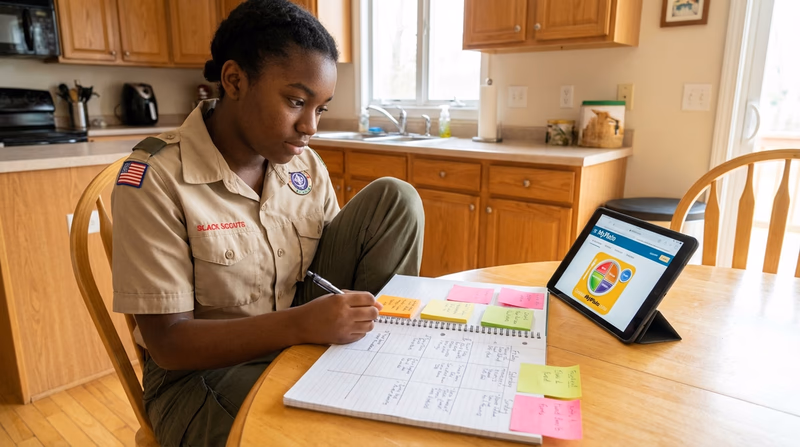
Planning a One-Day Meal Plan
After you have tracked your activity for five days, use the MyPlate Plan tool to determine your recommended daily caloric intake. Then plan one full day of meals (breakfast, lunch, dinner, and snacks) that meets your needs.
A good meal plan includes:
- Foods from all five food groups
- The right number of servings for your calorie level
- Meals that are realistic — foods you would actually eat and could actually prepare
- A balance of nutrients throughout the day (do not save all your vegetables for dinner)
Preparing for Your Counselor Discussion
When you meet with your counselor, bring your five-day activity log and your one-day meal plan. Be prepared to explain:
- How active you were on each of the five days
- What your estimated daily caloric need is, based on your activity level
- How your meal plan addresses each food group
- What adjustments you might make on a more active day (like a camping trip) versus a sedentary day
Req 2d — Healthy Eating Habits
This requirement is personal. It asks you to honestly look at what you eat and think about where you can improve. Nobody has a perfect diet — the goal is progress, not perfection.
Taking an Honest Look
Before meeting with your counselor, spend a day or two paying attention to what you actually eat — not what you think you should eat. Most people are surprised when they notice patterns they had not thought about before.
Ask yourself:
- Fruits and vegetables: Do you eat them at every meal, or are they missing from most of your plate?
- Whole grains vs. refined grains: Is most of your bread and pasta white, or do you choose whole grain options?
- Protein variety: Do you eat the same protein source every day, or do you mix it up with poultry, fish, beans, and nuts?
- Dairy: Are you getting three cups a day, including options like yogurt and cheese?
- Sugary drinks: How many sodas, sports drinks, or sweet teas do you drink in a day?
- Snacking: Are your snacks nutrient-rich (fruit, nuts, yogurt) or mostly empty calories (chips, candy, cookies)?
Common Eating Habits to Improve
Here are patterns that many teens (and adults) recognize in themselves:
Skipping breakfast. Your body has been fasting all night. Eating a balanced breakfast kickstarts your metabolism and improves focus and energy for the day. Even something simple — a banana with peanut butter on whole wheat toast — makes a difference.
Drinking your calories. Sodas, energy drinks, and specialty coffees can contain as much sugar as a dessert. Switching to water, milk, or unsweetened drinks is one of the easiest health improvements you can make.
Eating too fast. It takes about 20 minutes for your brain to register that your stomach is full. If you eat your entire meal in 5 minutes, you are likely to overeat. Slow down, chew thoroughly, and enjoy the food you prepared.
Relying on processed and fast food. Convenience foods tend to be high in sodium, added sugars, and unhealthy fats. Cooking your own meals — which is exactly what this merit badge teaches — gives you control over what goes into your body.
Not enough variety. Eating the same foods every day means you miss out on nutrients found in other foods. Challenge yourself to try one new fruit, vegetable, or whole grain each week.
Setting Realistic Goals
Your counselor does not expect you to overhaul your entire diet overnight. What they want to see is that you can identify one or two specific, realistic changes and explain why they matter.
Good examples of realistic goals:
- “I am going to add a fruit or vegetable to every lunch this week.”
- “I am going to replace soda with water at dinner.”
- “I am going to try one new vegetable each week for a month.”
- “I am going to eat breakfast every day, even if it is just yogurt and a piece of fruit.”
Making It Stick
Changing eating habits is hard. Here are strategies that work:
- Start small. One change at a time is more sustainable than five.
- Do not ban foods. Telling yourself you can never eat pizza again is a recipe for failure. Instead, think about balance — pizza with a side salad is better than pizza alone.
- Cook more. The more you cook, the more control you have over what you eat. This entire merit badge is building that skill.
- Involve your family. Healthy eating is easier when the people you eat with are on board.
Req 2e — Food Label Terms
In Req 1e, you learned how to read food labels to spot allergens. Now you are going deeper — understanding what each nutrition term means and how to use those numbers to make smart food choices.
The Nutrition Facts Panel — Term by Term
Here is what each term on the label means and why it matters:
Calorie — A unit of energy. The number on the label tells you how much energy one serving of that food provides. Your body uses calories for every function, from breathing to running. Too many calories leads to weight gain; too few leaves you without energy.
Fat — The total amount of fat in one serving, measured in grams. Fat is essential for absorbing vitamins and protecting organs, but the type of fat matters more than the total amount.
Saturated Fat — A type of fat found mainly in animal products (meat, butter, cheese) and some plant oils (coconut, palm). Eating too much saturated fat raises LDL cholesterol, which increases heart disease risk. The general guideline is to keep saturated fat below 10% of your daily calories.
Trans Fat — An artificially created fat that is worse for your heart than saturated fat. It raises bad cholesterol AND lowers good cholesterol. Look for 0 grams on the label. Even foods that say “0g trans fat” may contain small amounts if the ingredient list includes “partially hydrogenated oils.”
Cholesterol — A waxy substance your body needs in small amounts to build cells. Your liver makes all the cholesterol you need, so the cholesterol in food is extra. High cholesterol in the blood can lead to heart disease. Keep dietary cholesterol moderate.
Sodium — Salt. Your body needs some sodium to function, but most people eat far too much. High sodium intake raises blood pressure and increases the risk of heart disease and stroke. Processed foods, canned soups, and fast food tend to be loaded with sodium.
Carbohydrate — Your body’s primary source of energy. Carbohydrates are broken down into glucose (sugar), which fuels your muscles and brain. This number includes all types of carbohydrates: fiber, sugar, and starches.
Dietary Fiber — A type of carbohydrate your body cannot digest. Fiber helps your digestive system work properly, keeps you feeling full, and helps control blood sugar levels. Most teens should aim for about 25–30 grams of fiber per day. Whole grains, fruits, vegetables, and beans are excellent sources.
Sugar — Listed as “Total Sugars” and “Added Sugars” on modern labels. Total sugars include both natural sugars (from fruit, milk) and added sugars. Added sugars are the ones to limit — they provide calories with no nutritional benefit.
Protein — Essential for building and repairing muscles, bones, skin, and blood. The label tells you how many grams of protein are in one serving. Active teens need protein from a variety of sources throughout the day.
Understanding % Daily Value
The % Daily Value (%DV) column on the right side of the label tells you how much of a nutrient one serving contributes to a 2,000-calorie daily diet. Use this as a quick guide:
- 5% DV or less = Low in that nutrient
- 20% DV or more = High in that nutrient
For nutrients you want more of (fiber, vitamins, minerals), look for higher %DV. For nutrients you want to limit (saturated fat, sodium, added sugars), look for lower %DV.
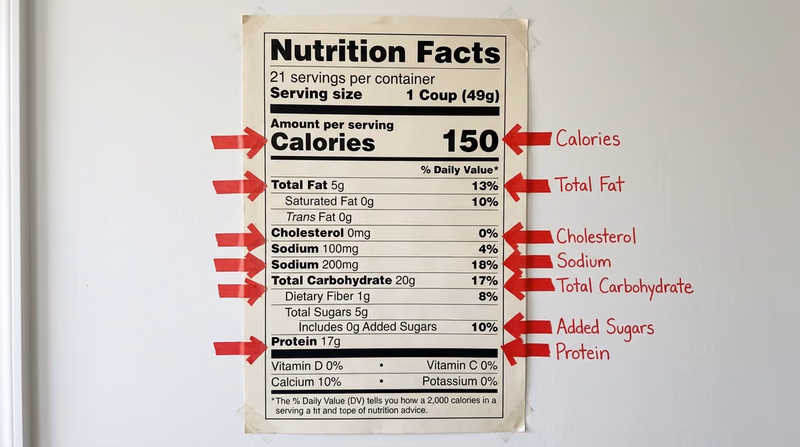
Calculating for Multiple Servings
Here is where math meets nutrition. The values on a food label are for one serving. If you eat two servings, you need to multiply every value by two.
Example: A bag of chips lists the following per serving:
| Nutrient | Per Serving | Per 2 Servings |
|---|---|---|
| Serving size | 15 chips | 30 chips |
| Calories | 150 | 300 |
| Total fat | 10g | 20g |
| Sodium | 170mg | 340mg |
| Total carbohydrate | 15g | 30g |
| Dietary fiber | 1g | 2g |
| Total sugars | 1g | 2g |
| Protein | 2g | 4g |
The math is simple — multiply each value by the number of servings. But many people do not realize they are eating more than one serving. A bottle of soda that looks like a single drink might actually be listed as 2 or 2.5 servings. That means the calories, sugar, and sodium are 2 to 2.5 times what you see on the label.
Practice Makes Perfect
Pick up three packaged foods from your kitchen right now and practice:
- Find the serving size.
- Identify the calories, fat, sodium, carbohydrates, fiber, sugar, and protein per serving.
- Calculate the values for two servings.
- Check the %DV — is the food high or low in sodium? Fiber? Added sugars?
Bring your calculations to your counselor discussion. Showing that you can read a real label and do the math is exactly what this requirement is looking for.
FDA — How to Understand and Use the Nutrition Facts Label The FDA's detailed guide to every section of the Nutrition Facts label, with interactive examples. Link: FDA — How to Understand and Use the Nutrition Facts Label — https://www.fda.gov/food/nutrition-facts-label/how-understand-and-use-nutrition-facts-label🎬 Video: How to Read Food Labels — https://youtu.be/76g2wabvA-w?si=gUuXZXKcrK7HY4vZ
Req 3a — Cooking Methods
This is one of the most important requirements in the entire merit badge. These ten cooking methods are the foundation of everything you will cook — at home, at camp, and on the trail. You will use at least five of them when you prepare your home meals in Req 4, and several more when you cook outdoors in Req 5.
The Ten Cooking Methods
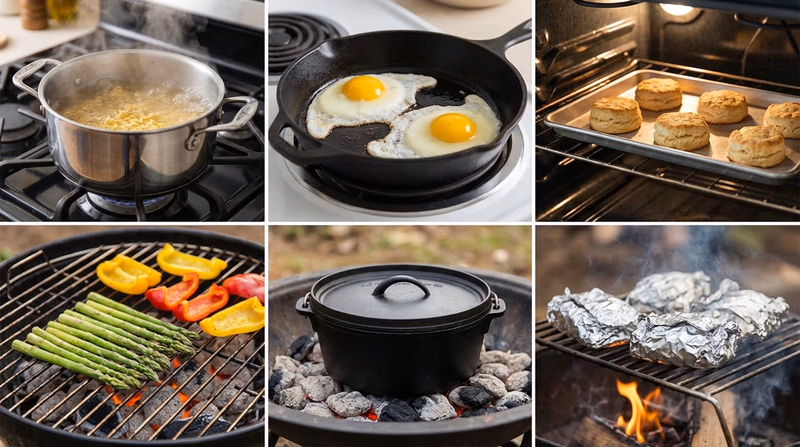
1. Baking
Baking uses dry heat in an enclosed space — typically an oven — to cook food evenly from all sides. It is the go-to method for breads, cakes, casseroles, and many other dishes.
- Equipment: Oven, baking pans or sheets, oven mitts, measuring cups and spoons
- Temperature control: Set the oven to a specific temperature (usually 300°F–450°F). An oven thermometer helps verify accuracy since many ovens run slightly hot or cold.
- Example foods: Biscuits, muffins, casseroles, roasted chicken, cookies
2. Boiling
Boiling means cooking food in water or liquid heated to 212°F (100°F at sea level) — the point where the liquid bubbles rapidly.
- Equipment: Pot, lid, stove or camp stove, colander for draining
- Temperature control: Once water reaches a rolling boil, you can lower the heat slightly to maintain it. Adding a lid helps water boil faster and maintains temperature.
- Example foods: Pasta, rice, eggs, corn on the cob, potatoes
3. Broiling
Broiling is the opposite of baking — heat comes from above the food instead of surrounding it. It is like an upside-down grill. Broiling uses very high, direct heat and cooks food quickly.
- Equipment: Oven with a broiler setting, broiler-safe pan or baking sheet, oven mitts, tongs
- Temperature control: Most broilers have only high and low settings. Control doneness by adjusting the rack height — closer to the heating element means more intense heat and faster cooking.
- Example foods: Steaks, fish fillets, cheese-topped dishes, garlic bread
4. Pan Frying
Pan frying uses a moderate amount of oil or fat in a skillet over medium to medium-high heat. The food sits in the oil but is not fully submerged (that would be deep frying).
- Equipment: Skillet or frying pan, cooking oil, spatula, tongs, stove
- Temperature control: Adjust the burner heat. Oil should shimmer but not smoke. If it smokes, it is too hot — remove the pan from heat and let it cool slightly.
- Example foods: Pancakes, eggs, grilled cheese, chicken cutlets, hamburgers
5. Simmering
Simmering is gentler than boiling. The liquid is heated to just below boiling — around 185°F–205°F — so you see small bubbles rising slowly rather than a full rolling boil. Simmering is used for foods that need longer, slower cooking.
- Equipment: Pot with lid, stove or camp stove, wooden spoon or ladle
- Temperature control: Bring liquid to a boil, then reduce heat until you see gentle bubbles. A lid keeps the temperature stable.
- Example foods: Soups, stews, chili, sauces, oatmeal
6. Microwaving
Microwaving uses electromagnetic waves to vibrate water molecules inside food, generating heat from the inside out. It is fast and convenient for reheating and cooking certain foods.
- Equipment: Microwave oven, microwave-safe containers (no metal!), microwave-safe cover or paper towel
- Temperature control: Adjust power level (most microwaves have settings from 1–10) and cooking time. Stirring or rotating food halfway through helps ensure even heating.
- Example foods: Popcorn, steamed vegetables, reheated leftovers, baked potatoes, scrambled eggs
7. Air Frying
Air frying circulates very hot air around food at high speed, creating a crispy outer layer similar to deep frying but with much less oil. Despite the name, it is actually a form of convection baking.
- Equipment: Air fryer appliance, air fryer basket, tongs
- Temperature control: Set the temperature (typically 300°F–400°F) and time using the controls. Shake or flip food halfway through for even cooking.
- Example foods: French fries, chicken tenders, roasted vegetables, fish sticks
8. Grilling
Grilling cooks food over direct heat from below — usually from charcoal, propane gas, or wood. The high heat creates a seared, slightly charred exterior while keeping the inside juicy.
- Equipment: Grill (charcoal, gas, or wood), grill grate, tongs, spatula, instant-read thermometer
- Temperature control: On a gas grill, adjust the burner knobs. On a charcoal grill, control heat by adjusting the vents (more air = hotter fire) and by creating heat zones (pile coals on one side for direct heat, leave the other side for indirect heat).
- Example foods: Burgers, hot dogs, steaks, chicken, vegetables, kebabs
9. Foil Cooking
Foil cooking wraps food in aluminum foil packets and cooks them over campfire coals, on a grill, or in an oven. The foil traps steam inside, essentially steaming the food in its own juices.
- Equipment: Heavy-duty aluminum foil, campfire coals or grill, tongs, heat-resistant gloves
- Temperature control: Control heat by the thickness of your coal bed and how far the packet sits from the heat source. Rotate packets every 5–10 minutes for even cooking.
- Example foods: Hobo dinners (meat and vegetables), banana boats, foil-wrapped corn, baked apples
10. Dutch Oven
A Dutch oven is a heavy, lidded cast-iron pot used for baking, roasting, stewing, and frying — all over campfire coals. It is one of the most versatile tools in outdoor cooking.
- Equipment: Cast-iron Dutch oven with legs and a flanged lid, charcoal briquettes or campfire coals, lid lifter, heat-resistant gloves, charcoal chimney starter
- Temperature control: Place charcoal briquettes on top of and underneath the Dutch oven. The number and placement of briquettes determines the temperature. A common rule of thumb: for a 12-inch Dutch oven, use twice the diameter in total briquettes (about 24), with roughly two-thirds on top and one-third on the bottom for baking.
- Example foods: Cobbler, cornbread, stew, chili, roasted chicken, biscuits
Putting It All Together
You will use at least five of these ten methods when you cook your home meals in Requirement 4, and you will use camp stoves, Dutch ovens, foil packs, and skewers when you cook outdoors in Requirement 5. Start thinking now about which methods you want to try and which foods you might prepare with each one.
🎬 Video: Types of Cooking Techniques — https://youtu.be/GE7FJU_9JsA?si=pahlJikaqGxsi8yK
🎬 Video: Dutch Oven Basics for Beginners — https://youtu.be/9uP1mauAtuI?si=tD0sbJHF2nxcapP8
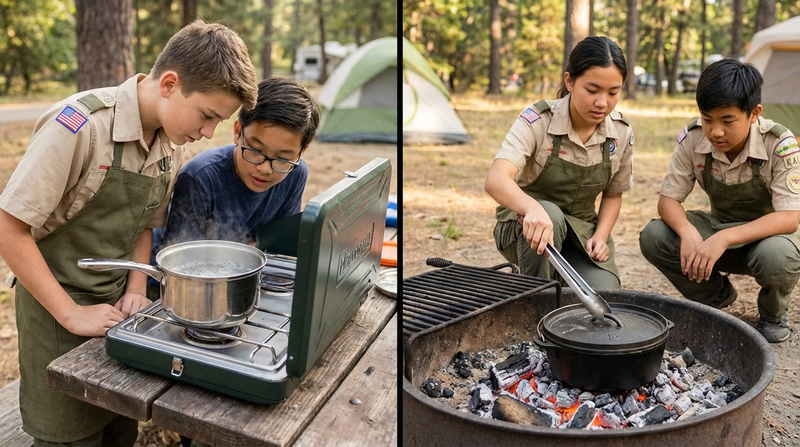
Req 3b — Stoves vs. Fires
When you cook outdoors, you have a choice: use a camp stove or build a fire. Both work, but they have very different advantages and tradeoffs. Understanding when to use each one makes you a more capable and responsible outdoor cook.
Camp Stove Advantages
A camp stove is a portable device that burns propane, butane, or liquid fuel (like white gas) to produce a controlled flame. Here is why many experienced outdoor cooks prefer them:
Convenience and Speed
- A camp stove lights in seconds — no need to gather wood, build a fire lay, or wait for coals.
- You can start cooking immediately and be done in minutes.
- Cleanup is minimal compared to managing fire ash and coals.
Precise Temperature Control
- Camp stoves have adjustable valves that let you dial the heat up or down instantly — just like a kitchen stove.
- This matters when you are simmering a sauce, boiling water for pasta, or pan-frying eggs without burning them.
Environmental Responsibility
- Camp stoves leave no trace — no fire ring, no char marks, no ash to dispose of.
- In areas where fire bans are in effect (which is increasingly common during dry seasons), a camp stove may be your only legal cooking option.
- Stoves do not consume firewood, which helps preserve the natural environment.
Safety
- The flame is contained and controllable.
- There is less risk of wildfire compared to an open campfire.
- Stoves work in wind and rain when starting a fire would be difficult or impossible.
Charcoal and Wood Fire Advantages
Despite the convenience of stoves, cooking over a fire has its own benefits:
Flavor
- Wood smoke adds a distinctive flavor to food that a camp stove cannot replicate.
- Charcoal grilling creates a seared, smoky taste that is hard to beat for burgers, steaks, and chicken.
Versatility with Dutch Ovens and Foil Cooking
- Dutch oven cooking requires hot coals — either from charcoal briquettes or a wood fire. A camp stove cannot provide the even, sustained heat that coals deliver from the top and bottom.
- Foil packet cooking is designed for campfire coals.
Self-Sufficiency
- In an emergency or a remote backcountry situation, you do not need to carry fuel — wood is often available on the ground.
- Knowing how to build and manage a fire is a fundamental outdoor skill.
Atmosphere
- Let’s be honest — a campfire is part of the camping experience. Gathering around the fire to cook, eat, and tell stories is a tradition that camp stoves cannot replace.
When to Use Which
| Situation | Best Choice | Why |
|---|---|---|
| Quick breakfast before a hike | Camp stove | Fast, easy, no cleanup delay |
| Dutch oven cobbler for dessert | Charcoal/wood fire | Need coals above and below |
| Fire ban in effect | Camp stove | Only legal option |
| Rainy or very windy conditions | Camp stove | More reliable ignition and flame control |
| Cooking for a large group | Both | Use the stove for boiling water and side dishes, the fire for the main course |
| Backpacking (weight matters) | Backpacking stove | Lightest option; fires may not be permitted |
| Patrol cookout at base camp | Wood fire | Full campfire experience with time to manage coals |
Req 3c — Meal Timing
One of the hardest things about cooking is not the cooking itself — it is getting everything done at the same time. Cold mashed potatoes next to a perfectly cooked steak is not a great meal. Timing is what separates a good cook from a great one.
The Backward Planning Method
Professional chefs use backward planning — they start with the time they want to serve the meal and work backward to figure out when to start each dish.
Here is how it works:
- Set your serving time. “Dinner is at 6:00 PM.”
- List every dish you are preparing and how long each one takes to cook (plus any prep time like chopping, marinating, or preheating).
- Identify the longest item. This is the dish you start first.
- Work backward from 6:00 PM, scheduling when to start each dish so they all finish around the same time.
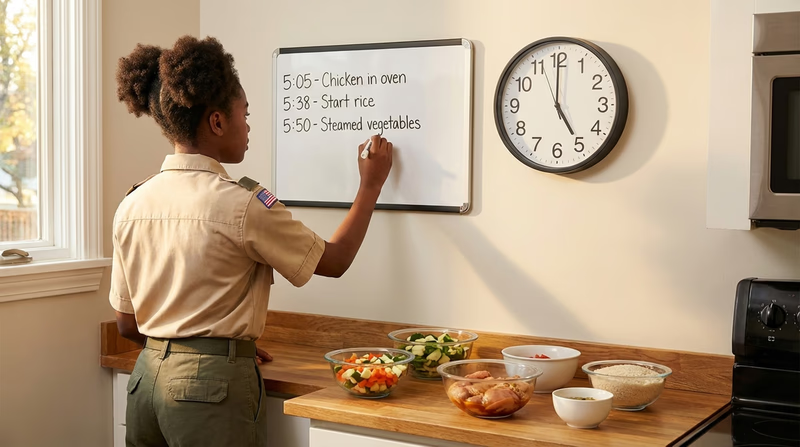
Example: A Simple Dinner
| Dish | Prep Time | Cook Time | Total | Start By |
|---|---|---|---|---|
| Baked chicken | 10 min | 45 min | 55 min | 5:05 PM |
| Steamed broccoli | 5 min | 8 min | 13 min | 5:47 PM |
| Rice | 2 min | 20 min | 22 min | 5:38 PM |
| Salad | 10 min | 0 min | 10 min | 5:50 PM |
By mapping it out, you can see that the chicken goes in the oven first, the rice starts about 20 minutes later, the broccoli starts toward the end, and the salad is assembled last. Everything hits the table at 6:00.
Tips for Managing Meal Timing
Start with prep work (mise en place). “Mise en place” is a French term that means “everything in its place.” Before you turn on a single burner, chop all your vegetables, measure your spices, open your cans, and lay out your tools. This eliminates last-minute scrambling and lets you focus on cooking.
Know your equipment. If you only have one oven and two burners, you cannot bake chicken, boil pasta, and pan-fry vegetables all at the same time unless you plan the sequence carefully. At camp, you might have one stove and one fire — plan your cooking order around what is available.
Use resting time wisely. Many meats need to “rest” for 5–10 minutes after cooking (this lets the juices redistribute). Use that resting time to finish side dishes, set the table, or plate the food.
Account for preheating. Ovens take 10–15 minutes to reach temperature. Grills take 15–20 minutes. Charcoal needs 20–30 minutes to become hot coals. Build these times into your plan.
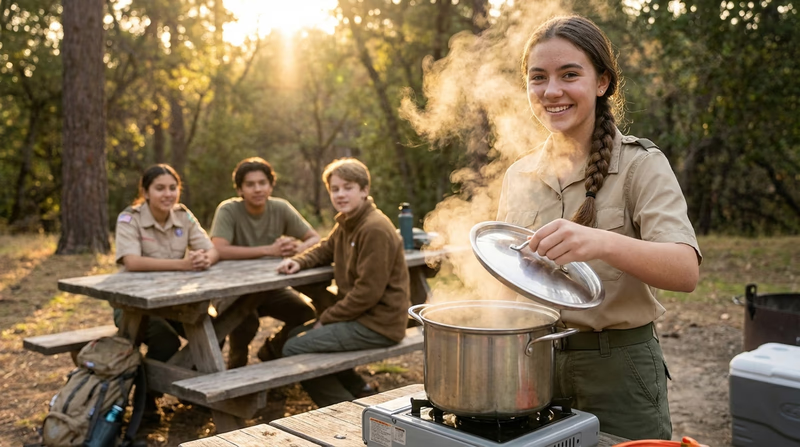
Timing at Camp
Meal timing at camp is even more challenging because you have less control. Fire takes time to build. Wind can cool things down. You may be sharing cooking equipment with other patrol members. Planning ahead — and building in extra time — is critical.
You will put these timing skills into practice in Req 4e when you time your home cooking, and again in Req 5 when you cook for your patrol outdoors.
🎬 Video: Timing Your Meals — https://youtu.be/ED4Cm-xz-_k?si=sk-7jnMuLwLqFJyp
Req 3d — Taste, Texture & Smell
Eating is a full-sensory experience. The way food tastes, feels in your mouth, and smells all work together to create what scientists call flavor. Understanding these three elements makes you a better cook — because great cooking is not just about following recipes, it is about creating an experience.
Taste: The Five Flavors
Your tongue can detect five basic tastes:
- Sweet — sugar, honey, ripe fruits, maple syrup. Sweetness signals energy-rich foods.
- Salty — table salt, soy sauce, cured meats, cheese. Salt enhances other flavors and is essential in almost every savory dish.
- Sour — lemon juice, vinegar, yogurt, pickles. Sourness adds brightness and can balance sweetness.
- Bitter — dark chocolate, coffee, kale, grapefruit. Bitterness is often an acquired taste but adds complexity to food.
- Umami — a savory, meaty depth found in mushrooms, aged cheese, soy sauce, tomatoes, and grilled meats. Umami was officially recognized as the fifth taste in 2002.
Great meals balance these flavors. A bowl of chili might have sweetness (from tomatoes), saltiness (from seasoning), sourness (from a squeeze of lime), bitterness (from chili peppers), and umami (from the beef and tomato paste). That balance is what makes it satisfying.
Texture: How Food Feels
Texture is how food feels in your mouth — crunchy, smooth, chewy, creamy, crispy, tender, or tough. Texture affects your enjoyment of food just as much as flavor.
Think about why these combinations work:
- A crispy taco shell with soft, seasoned meat inside — the contrast between crunch and tenderness makes every bite interesting.
- Creamy soup with crunchy croutons — the croutons add a textural surprise that makes the soup more enjoyable.
- A perfectly toasted marshmallow — crispy and slightly charred on the outside, gooey and melted on the inside.
Now think about why these do not work:
- Soggy cereal — cereal is meant to be crunchy. Once it loses that texture, most people lose interest.
- Overcooked pasta — mushy pasta has lost the “al dente” texture (slightly firm to the bite) that makes it appealing.
- Rubbery scrambled eggs — eggs cooked too long become tough and unpleasant to chew.
As a cook, you control texture through your cooking method, your timing, and your technique. A pan-fried chicken breast has a crispy exterior that a boiled one does not. A stir-fry keeps vegetables crunchy, while a long simmer turns them soft.
Smell: The Hidden Superpower
Here is a fact that surprises most people: up to 80% of what you experience as “flavor” is actually coming from your sense of smell, not your taste buds. Your nose detects thousands of different molecules in food, and your brain combines that information with what your tongue tastes to create the full flavor experience.
This is why food tastes bland when you have a stuffy nose. Your taste buds still work, but without smell, you lose most of the complexity.
How smell impacts cooking:
- Aroma draws people in. Think about walking into a kitchen where cookies are baking or bacon is sizzling. The smell creates anticipation and appetite before you take a single bite.
- Smell warns you of problems. Spoiled food, burned food, and rancid oil all have distinct smells that tell you something is wrong. Your nose is your first food safety tool.
- Spices and herbs are mostly about smell. When you add basil, cinnamon, garlic, or rosemary to a dish, you are adding aroma compounds that your nose detects while you eat. That is why fresh herbs and freshly ground spices taste “stronger” than dried or pre-ground ones — they release more aromatic compounds.
How Cooks Use All Three
Professional chefs think about taste, texture, and smell as a system. Here are practical ways you can apply this knowledge:
- Season in layers. Add salt and spices at different stages of cooking — not just at the end. This builds depth of flavor.
- Toast your spices. Heating spices briefly in a dry pan before adding them to a dish releases aromatic oils and intensifies their flavor.
- Finish with fresh elements. A squeeze of lemon, a handful of fresh herbs, or a drizzle of good olive oil added just before serving can transform a dish — these finishing touches add brightness, aroma, and contrast.
- Think about presentation. How food looks affects how you expect it to taste. A colorful plate with varied textures looks (and usually tastes) better than a plate of all-brown food.
Req 4a — Menu Planning
This is where everything comes together. You have learned about food groups, nutrition labels, cooking methods, and food safety. Now you are going to plan real meals for real people — starting with three full days of home cooking.
Building Your Menu Plan
Planning a menu is like solving a puzzle. You need every piece to fit: nutrition, safety, variety, skill level, available equipment, and the preferences of the people you are feeding.
Step 1: Know Your Audience
Before you plan a single meal, talk to the adult (or adults) you will be serving. Find out:
- Do they have any food allergies or intolerances? (Review Req 1d)
- Are there foods they strongly dislike?
- Are there dietary restrictions (vegetarian, low-sodium, diabetic)?
Write these down and keep them visible while you plan.
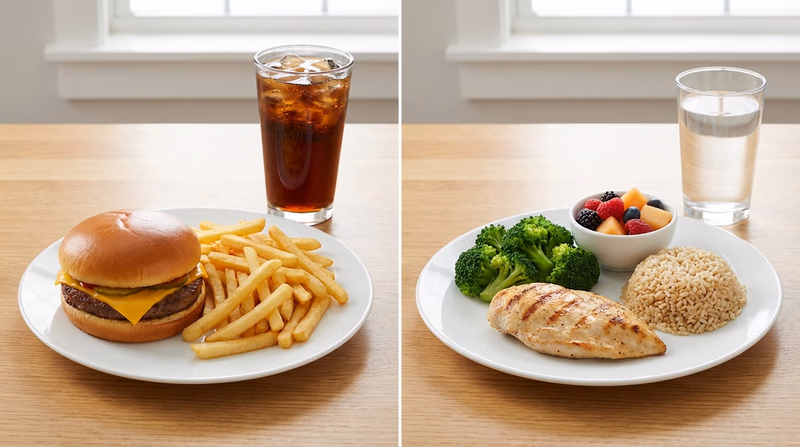
Step 2: Use MyPlate as Your Framework
For each meal, make sure your plate includes:
- A serving of protein (meat, fish, eggs, beans, or nuts)
- A serving of grains (preferably whole grains)
- A serving of fruits and/or vegetables (aim for half your plate)
- A serving of dairy (milk, yogurt, cheese, or a fortified alternative)
Not every single meal needs to be perfectly balanced, but your overall daily intake should cover all five food groups in the recommended amounts you learned in Req 2a.
Step 3: Plan for Variety
Three days of meals means nine meals plus a dessert. Avoid repeating the same protein, grain, or cooking method across meals. This is also your chance to use at least five of the ten cooking methods from Req 3a — plan your menus around the methods you want to practice.
Meal Planning Template
Here is a framework to organize your thinking. You will fill in your own choices:
| Day 1 | Day 2 | Day 3 | |
|---|---|---|---|
| Breakfast | |||
| Lunch | |||
| Dinner | |||
| Dessert | (plan 1 dessert for any day) |
For each meal, write down:
- The dish name
- Which food groups it covers
- Which cooking method(s) you will use
- Any food safety considerations (especially for raw meats, eggs, and dairy)
Equipment and Utensils List
The requirement asks you to list the equipment and utensils needed. Think through each meal and write down everything you will need to prepare, cook, and serve it.
Common Kitchen Equipment
Check which items you need for your planned meals- Cutting board and knife
- Measuring cups and spoons
- Mixing bowls
- Pots (small, medium, large)
- Skillets/frying pans
- Baking sheets and baking pans
- Oven mitts and pot holders
- Spatula, tongs, wooden spoon, ladle
- Colander/strainer
- Food thermometer
- Can opener
- Grater
- Whisk
Do not forget serving equipment — plates, bowls, cups, napkins, and utensils for the table.
Food Safety in Your Plan
Your menu plan should show your counselor that you are thinking about safety at every step. For each meal, note:
- How you will store perishable ingredients before cooking (refrigeration)
- How you will prevent cross-contamination (separate cutting boards for raw meat, handwashing)
- The safe internal cooking temperatures for any meats, poultry, or eggs
- How you will handle leftovers (refrigerate within 2 hours)
Req 4b — Recipes & Shopping
With your menu planned, it is time to find the recipes, figure out exactly what you need to buy, and calculate what it will cost. This is where cooking meets real-world planning — budgeting, math, and organization all come into play.
Finding Good Recipes
Not all recipes are created equal. As a beginning cook, look for recipes that are:
- Clear and detailed — step-by-step instructions with specific measurements
- Appropriate for your skill level — start with recipes labeled “easy” or “beginner”
- Tested and reviewed — recipes from reputable sources (USDA MyPlate Kitchen, cooking magazines, established food websites) are more reliable than random social media posts
- Complete — a good recipe lists prep time, cook time, serving size, and all ingredients
Adjusting Recipes for Serving Size
Most recipes are written for a specific number of servings — often 4 to 6. If you are cooking for just yourself and one adult, you may need to cut the recipe in half. If you are cooking for a larger group, you may need to double it.
How to scale a recipe:
- Note the original yield (e.g., “Serves 4”).
- Determine how many servings you need (e.g., 2).
- Calculate the ratio: 2 ÷ 4 = 0.5 (half).
- Multiply every ingredient by that ratio.
Example: A recipe calls for 2 cups of rice to serve 4 people. You need to serve 2 people: 2 cups × 0.5 = 1 cup of rice.
Be careful with spices and seasonings — they do not always scale linearly. If a recipe calls for 1 teaspoon of salt for 4 servings, halving it to ½ teaspoon is usually fine. But for baking, where precision matters, scale everything exactly.
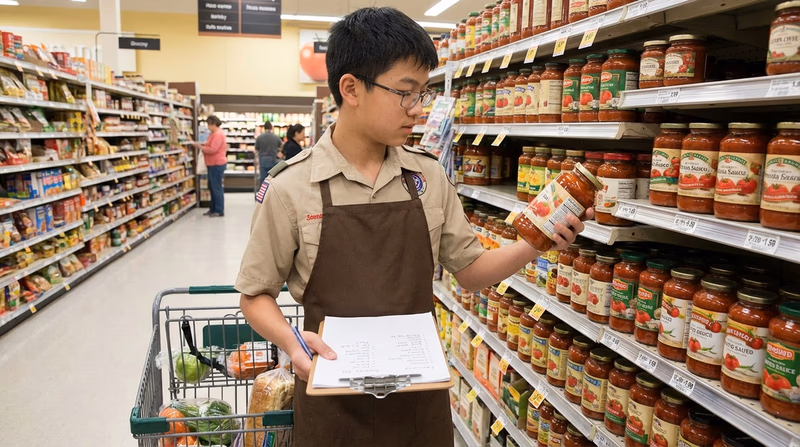
Creating Your Shopping List
Once you have all your recipes, combine the ingredient lists into one master shopping list. Organize it by store section to make shopping efficient:
Shopping List Organization
Group ingredients by where you find them in the store- Produce (fruits, vegetables, fresh herbs)
- Meat and seafood
- Dairy and eggs
- Bread and bakery
- Canned and dry goods (pasta, rice, beans, sauces)
- Spices and seasonings
- Frozen foods
- Beverages
Tips for an accurate list:
- Check what you already have at home before shopping. You may already have staples like oil, salt, pepper, and flour.
- Write the exact amount needed for each item (e.g., “1 lb ground beef” not just “ground beef”).
- If the same ingredient appears in multiple recipes, add the amounts together.
- Note the brand or type if the recipe specifies (e.g., “whole wheat bread” vs. “white bread”).
Determining the Cost
For each meal, add up the cost of the ingredients. This teaches you to think about food budgeting — a skill you will use for the rest of your life.
How to calculate cost:
- When you shop, write down the price of each item next to it on your list.
- If you only use part of an item (half a bottle of olive oil, for example), calculate the proportional cost: if the bottle costs $6 and you used half, that is $3.
- Add up all ingredient costs for each meal.
- Divide by the number of people served to get a per-person cost.
Budget-Friendly Tips
- Buy in season. Fruits and vegetables cost less and taste better when they are in season.
- Compare unit prices. The price per ounce or per pound (usually shown on the shelf tag) is more useful than the total price when comparing products.
- Use store brands. Generic or store-brand products are often the same quality as name brands at a lower cost.
- Minimize waste. Plan meals that use overlapping ingredients. If you buy a bunch of celery for one recipe, find another recipe that uses celery too.
Req 4c — Share Your Plan
Before you start cooking, you need to walk your counselor through your entire plan. This is not just a formality — it is your chance to get feedback, catch any gaps, and make sure your plan is solid before you spend money and time executing it.
What to Bring to Your Discussion
Gather all of your planning materials and organize them so you can present them clearly:
Counselor Meeting Prep
Have these ready before your meeting- Your three-day menu plan showing every meal (3 breakfasts, 3 lunches, 3 dinners, 1 dessert)
- The food groups covered by each meal (mapped to MyPlate)
- The cooking methods you plan to use (at least five different methods from Req 3a)
- Complete recipes for each meal
- Your shopping list organized by store section with quantities
- Cost breakdown per meal
- Equipment and utensils list
- Notes on any food allergies or special needs of the people you are serving
- Your food safety plan (how you will prevent cross-contamination, safe cooking temperatures)
What Your Counselor Is Looking For
Your counselor will review your plan with several questions in mind:
- Is it nutritionally balanced? Does each day cover all five food groups in reasonable proportions?
- Is it realistic? Can you actually prepare these meals with your current skill level and available equipment?
- Is it safe? Have you thought through food storage, cross-contamination prevention, and cooking temperatures?
- Does it show variety? Are you using at least five different cooking methods across your meals? Are you varying your proteins, grains, and vegetables?
- Is the budget reasonable? Did you calculate costs accurately?
Be Open to Feedback
Your counselor may suggest changes — a different cooking method, a food safety step you missed, or a nutritional gap. This is exactly what the discussion is for. Take notes on their feedback and adjust your plan before you start cooking.
Remember: this requirement is about planning, not perfection. Your counselor knows you are learning, and they want to help you succeed. The more preparation you do now, the smoother your cooking will go in Req 4d.

Req 4d — Cook & Serve
This is it — time to cook. You have planned your menus, found your recipes, bought your ingredients, and discussed your plan with your counselor. Now you put it all into action.
Before You Start
Set up your workspace. A clean, organized kitchen is a safe kitchen. Before you begin any meal:
- Clear countertops of clutter
- Gather all ingredients and equipment
- Set up your mise en place — prep everything (chop, measure, open cans) before turning on the heat
- Make sure you have pot holders, a fire extinguisher, and a first-aid kit accessible
Pre-Cooking Checklist
Run through this before every meal- Hands washed with soap and warm water
- Clean apron on
- Hair tied back (if long)
- Recipe printed or visible (not on a device that might get splashed)
- All ingredients measured and prepped
- Cutting boards ready (separate ones for raw meat and produce)
- Food thermometer available
- Trash can and compost accessible for scraps
- Timer set or phone ready for timing
Cooking Method Reminders
You need to use at least five of the ten methods from Req 3a. As you cook each meal, note which method you used. Here is a quick reference:
| Method | Key Reminder |
|---|---|
| Baking | Preheat oven fully before putting food in |
| Boiling | Use a lid to speed things up; watch for boil-overs |
| Broiling | Watch constantly — food burns fast under a broiler |
| Pan frying | Oil should shimmer, not smoke |
| Simmering | Gentle bubbles, not a rolling boil |
| Microwaving | Stir or rotate halfway through for even heating |
| Air frying | Shake or flip food halfway through |
| Grilling | Create heat zones; use a thermometer for doneness |
| Foil cooking | Seal packets tightly; rotate for even cooking |
| Dutch oven | Count briquettes carefully for temperature control |
Tips for Success
Read the recipe one more time right before you start. Even if you have read it three times already, a quick refresher prevents mistakes.
Taste as you go. The best cooks taste their food at every stage and adjust seasoning. Add a little salt, taste, add more if needed. You can always add — you cannot take away.
Do not panic if something goes wrong. Burned the garlic? Start that step over. Underseasoned the soup? Add more. Overcooked the pasta? Serve it with extra sauce. Cooking is forgiving, and small mistakes rarely ruin an entire meal.
Clean as you go. Wash a pot as soon as you are done with it. Wipe down cutting boards between uses. This keeps your workspace manageable and is a critical food safety practice.
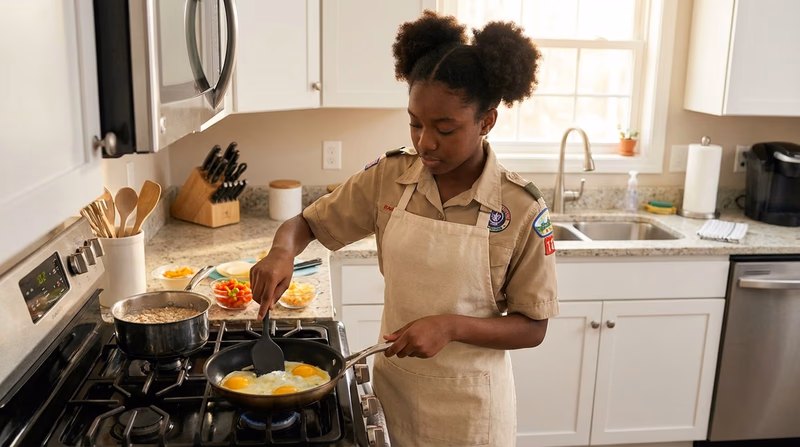
Serving the Meal
Presentation matters. You do not need restaurant-level plating, but taking a moment to arrange food neatly on the plate shows respect for the people you are serving and for the effort you put into cooking.
- Wipe the rim of the plate clean before serving
- Add a pop of color (a sprig of parsley, a slice of lemon, a handful of fresh berries)
- Serve food at the right temperature — hot food hot, cold food cold
- Set the table before the food is ready so you can serve immediately
Important Reminders
- The meals do not need to be prepared on consecutive days — take your time and do each one well.
- The same adult does not need to be served for every meal — you can serve different family members.
- Have the adult you serve verify the meal preparation so they can confirm it to your counselor.
Req 4e — Meal Timing
You learned the theory of meal timing in Req 3c. Now you are putting it into practice. This requirement asks you to demonstrate that you can manage your time in the kitchen — getting every component of a meal ready to serve together, at the time you planned.
Building Your Timing Plan
For each meal you cook, create a simple timeline using the backward planning method:
- Pick your serving time. Write it at the bottom of your plan.
- List every component of the meal with its total time (prep + cook).
- Work backward from the serving time to determine when each component needs to start.
- Include preheating time for ovens and grills.
- Build in 5–10 minutes of buffer — things almost always take a little longer than expected.
During the Meal
As you cook, stay aware of the clock. Here are practical strategies:
- Start the longest-cooking item first. Everything else works around that anchor dish.
- Use downtime wisely. While the oven does its job, prep your next dish, set the table, or clean up.
- Adjust on the fly. If one dish finishes early, cover it and keep it warm. If something is running late, push back the faster items.
- Communicate. Let the people you are serving know when dinner will be ready. If it is going to be late, tell them.
Adult Verification
An adult who is present during your cooking needs to verify your work to your counselor. They are watching for:
- Did you follow safe food handling practices?
- Did you use the cooking methods you planned?
- Did the components of the meal come out at roughly the same time?
- Was the food cooked properly (safe temperatures)?
Ask the adult to sign or write a brief note confirming what they observed. Your counselor will appreciate this documentation.

Reflecting on Your Timing
After each meal, take a minute to note:
- Did everything come out on time?
- What finished first? What finished last?
- What would you change in your timing plan next time?
These notes will feed directly into your evaluation discussion in Req 4f.
🎬 Video: Timing Your Meals — https://youtu.be/ED4Cm-xz-_k?si=sk-7jnMuLwLqFJyp
Req 4f — Evaluate & Reflect
Cooking does not end when you set the plate on the table. The best cooks reflect on every meal — what worked, what did not, and what they would change next time. This habit is what turns a beginner into a confident cook.
Getting Honest Feedback
After each meal, ask the person you served two simple questions:
- How was the presentation? Did the food look appealing? Was it arranged neatly on the plate? Were the portions right?
- How was the taste? Was it seasoned well? Was anything over- or under-cooked? Was there anything they would change?
Listen without defending yourself. The goal is not to get a compliment — it is to learn. Even a simple “the chicken was a little dry” gives you specific, useful information for next time.
Evaluating Your Own Meal
Now turn the lens on yourself. Be honest about what you think, separate from what the person you served said:
- Presentation: Did the plate look the way you imagined? Was the food a good temperature when served?
- Taste: Does the food taste the way the recipe described? Would you change the seasoning?
- Texture: Was everything cooked to the right doneness? Were there any texture problems (rubbery eggs, soggy vegetables, tough meat)?
- Timing: Did all the components come out together, or was something sitting too long while you finished another dish?
- Process: Was your workspace organized? Did you feel rushed or in control?
Common Adjustments
Here are adjustments that many Scouts discover through this process:
- “I needed more salt.” Underseasoning is the most common beginner mistake. Season in layers — a little while cooking, then taste and adjust at the end.
- “The meat was overcooked.” Use a food thermometer instead of guessing. Pull meat off the heat a few degrees before the target temperature — it will continue cooking from residual heat (called “carryover cooking”).
- “Everything was ready at different times.” Revisit your timing plan from Req 3c. Add buffer time for dishes that took longer than expected.
- “I ran out of a key ingredient.” Double-check your shopping list against your recipes before you start cooking.
- “The kitchen was a mess.” Clean as you go. Wash dishes, wipe surfaces, and put away ingredients between steps.

The Role of Planning and Preparation
When you meet with your counselor, be ready to explain how planning and preparation contributed to your success (or how a lack of planning caused problems). Think about:
- Menu planning ensured nutritional balance and variety across your meals.
- Recipes gave you step-by-step instructions so you were not guessing.
- Shopping lists meant you had every ingredient you needed before you started.
- Mise en place (prepping ingredients before cooking) let you focus on technique instead of scrambling.
- Timing plans helped you serve all components together.
- Food safety awareness kept everyone healthy.
The pattern is clear: the more you plan, the better the outcome. This lesson applies not just to cooking, but to almost everything you do in Scouting and in life.
Req 5a — Camp Menu Planning
Welcome to camp cooking — where everything gets more challenging and more rewarding. You are no longer cooking in a comfortable kitchen with running water and a full-size refrigerator. You are cooking outdoors, for a group, with limited equipment. The planning you do now is even more important than it was for home cooking.
Key Differences from Home Cooking
Before you start planning, understand what changes when you move outdoors:
- Larger group. You are feeding up to 8 people instead of 2. Quantities increase significantly.
- Limited equipment. You will have camp stoves, a fire, basic cookware, and maybe a Dutch oven — no oven, no microwave, no air fryer.
- Limited refrigeration. Coolers with ice replace refrigerators. Plan perishable foods for early meals and shelf-stable foods for later ones.
- No running water. You need to plan for handwashing, dishwashing, and drinking water.
- Weather and environment. Wind, rain, heat, cold, and wildlife all affect outdoor cooking.
Planning Your Camp Menu
Your menu must include:
- 2 breakfasts
- 1 lunch
- 1 dinner
- 1 snack
- 1 dessert
Breakfast ideas for camp:
- Scrambled eggs with cheese and toast (use fresh eggs early in the trip)
- Pancakes or French toast with fruit
- Oatmeal with brown sugar, nuts, and dried fruit (no refrigeration needed)
- Breakfast burritos with pre-cooked sausage
Lunch ideas for camp:
- Sandwiches with deli meat, cheese, and fresh vegetables
- Quesadillas on a camp stove
- Hot dogs or bratwurst grilled over coals
- Foil-packet meals prepared over coals
Dinner ideas for camp:
- Dutch oven chili with cornbread
- Grilled chicken with foil-packet vegetables
- Pasta with meat sauce on a camp stove
- Stew or soup simmered over the fire
Snack and dessert ideas:
- Trail mix, granola bars, fresh fruit
- Dutch oven cobbler, banana boats in foil, s’mores, campfire popcorn
Cooking Methods at Camp
Remember — Req 5d requires specific cooking methods:
- Two meals cooked on a camp stove OR backpacking stove
- One meal cooked in a skillet OR Dutch oven over campfire coals
- One meal cooked in a foil pack OR on a skewer
Build your menu around these requirements. Map each meal to its required cooking method before finalizing your plan.
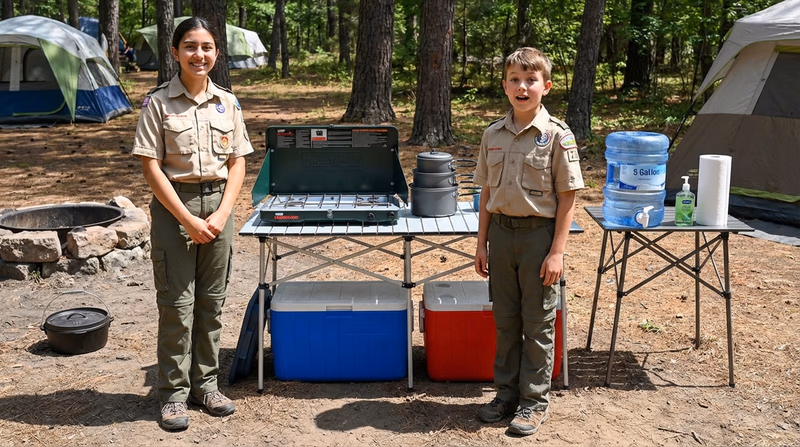
Food Safety at Camp
Camp food safety requires extra attention because you do not have the convenience of a kitchen.
Camp Food Safety Plan
Address these in your menu plan- How will you keep perishable foods cold (cooler strategy, ice replenishment)?
- How will you prevent cross-contamination (separate cutting boards, handwashing)?
- Where will you store food overnight (bear canister, bear box, or vehicle)?
- How will you wash hands before handling food (sanitizer, portable wash station)?
- How will you check meat temperatures (bring a food thermometer)?
- How will you dispose of gray water, food scraps, and garbage?
Equipment for Camp Cooking
Your equipment list will look different from your home cooking list. Think about what you need and what you can share with your patrol.
Camp Cooking Equipment
Common items for patrol-size camp cooking- Camp stove with fuel
- Matches or lighter (in a waterproof container)
- Cast-iron skillet and/or Dutch oven
- Pots (at least one large enough for the group)
- Heavy-duty aluminum foil
- Cooking utensils (spatula, tongs, ladle, wooden spoon, can opener)
- Cutting board and knife
- Food thermometer
- Pot holders or heat-resistant gloves
- Plates, cups, and utensils for each person
- Biodegradable soap, sponge, and wash basins (3-basin system)
- Trash bags and recycling bags
- Water jugs or containers
- Hand sanitizer or portable hand-washing station
- Coolers with ice
- Fire-starting supplies (if using a campfire)
Req 5b — Camp Recipes & Budget
Cooking for a patrol is a different math problem than cooking for two. You need to scale recipes, buy in bulk where it makes sense, and figure out what each person owes. Good budgeting is a leadership skill — it builds trust and keeps things fair.
Scaling Recipes for a Group
Most recipes serve 4–6 people. If you are cooking for 8, you will need to scale up. The math is the same as what you learned in Req 4b, but with larger numbers:
- Note the original serving size.
- Divide your group size by the recipe’s serving size to get the multiplier.
- Multiply every ingredient by that number.
Example: A chili recipe serves 4. You need to serve 8.
- Multiplier: 8 ÷ 4 = 2
- If the recipe calls for 1 lb ground beef → you need 2 lbs
- If it calls for 2 cans of beans → you need 4 cans
Creating Your Shopping List
Combine all ingredient lists from your six items (4 meals + 1 snack + 1 dessert) into one master list. Then:
- Consolidate duplicates. If three recipes call for onions, add them up into one line item.
- Check patrol supplies. Your troop may already have staples like cooking oil, salt, pepper, and spices in the patrol box.
- Note quantities carefully. Write specific amounts (e.g., “3 lbs ground beef,” “2 dozen eggs,” “4 cans diced tomatoes”).
- Consider packaging. Will you need zip-lock bags for repackaging? Cooler ice? Aluminum foil?
Calculating Per-Person Cost
Camp cooking budgets teach financial responsibility. Here is how to calculate the per-person cost:
- Total up all ingredient costs after shopping (save your receipt).
- Add any non-food costs if applicable (charcoal, extra foil, ice for coolers).
- Divide the total by the number of people eating.
| Item | Cost |
|---|---|
| Ground beef (3 lbs) | $15.00 |
| Canned beans (4 cans) | $5.00 |
| Eggs (2 dozen) | $7.00 |
| Bread (2 loaves) | $6.00 |
| Cheese (1 lb) | $5.00 |
| Vegetables & fruit | $12.00 |
| Pancake mix & syrup | $8.00 |
| Dessert ingredients | $6.00 |
| Snack items | $4.00 |
| Charcoal & ice | $10.00 |
| Total | $78.00 |
| Per person (8 people) | $9.75 |
Budget-Saving Strategies for Camp
- Buy store brands for staples like canned goods, rice, and pasta.
- Buy in bulk for items the whole group will share (bread, eggs, cheese).
- Use what is in season — seasonal produce is cheaper and tastes better.
- Avoid waste by planning recipes that share ingredients (if you buy a head of lettuce for sandwiches, use it in the dinner salad too).
- Check the patrol box — your troop may provide basics like oil, condiments, and spices.
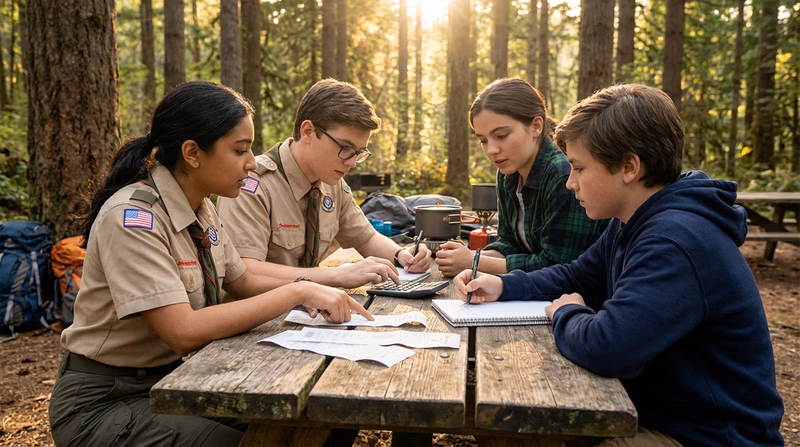
Req 5c — Share Camp Plan
Just as you did for home cooking in Req 4c, you need to review your camp cooking plan with your counselor before heading to the store or the campsite. Camp cooking has additional complexity that your counselor can help you navigate.
What to Present
Bring all of your planning materials, organized and clear:
Camp Plan Review Materials
Have all of these ready- Complete camp menu (2 breakfasts, 1 lunch, 1 dinner, 1 snack, 1 dessert)
- The cooking method assigned to each meal (camp stove, Dutch oven/skillet, foil pack/skewer)
- Recipes for all six items, scaled to your group size
- Shopping list with quantities and estimated costs
- Per-person cost calculation
- Equipment and utensils list
- Food safety plan (cooler strategy, cross-contamination prevention, handwashing plan)
- Notes on food allergies or dietary restrictions for group members
- Waste disposal plan (garbage, gray water, food scraps)
What Your Counselor Will Check
Your counselor will look at your camp plan with a sharper eye than your home plan because the stakes are higher outdoors:
- Can you actually cook this at camp? Some recipes that work great at home are impractical outdoors. Make sure every recipe works with the equipment and conditions you will have.
- Is your cooler plan realistic? Do you have enough ice? Are you using perishable items early enough?
- Are the cooking methods correct? Two meals on a stove, one in a skillet or Dutch oven, one in foil or on a skewer.
- Is the quantity right? Hungry Scouts at camp eat more than you might expect. Are your portions generous enough?
- What is your backup plan? What happens if it rains? What if a recipe fails?
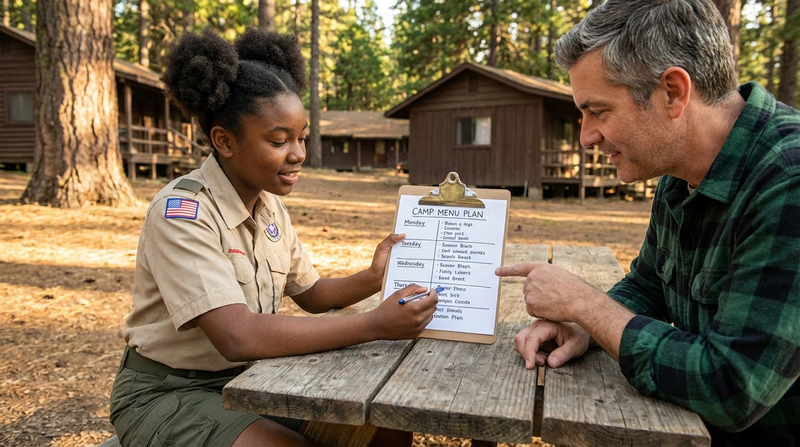
Adjusting Based on Feedback
Your counselor may suggest simplifying a recipe, adjusting portions, or rethinking your cooler strategy. Take their advice — they have likely seen many camp cooking plans and know what works and what does not.
Make your adjustments before the camping trip so you arrive ready to execute a solid plan.
Req 5d — Cook Outdoors
This is the heart of the Cooking merit badge — preparing real meals outdoors for your patrol using three different heat sources. You have planned, shopped, and prepped. Now it is time to cook.
Cooking Method Requirements
Let’s be clear about what is required:
| Meals | Heat Source Options |
|---|---|
| Meal 1 and Meal 2 | Camp stove or backpacking stove |
| Meal 3 | Skillet or Dutch oven over campfire coals |
| Meal 4 | Foil pack or on a skewer |
You get to choose which meals use which method. A smart approach is to match the method to the meal:
- Breakfast on a camp stove — eggs, pancakes, and oatmeal work beautifully on a controlled flame.
- Lunch as foil packs or skewers — quick, fun, and everyone can customize their own.
- Dinner in a Dutch oven — stews, chili, or cobbler benefit from the slow, even heat of coals.
Camp Stove Cooking
Tips for success:
- Light the stove according to the manufacturer’s instructions. Practice before the trip if it is your first time.
- Use a windscreen if your stove has one — wind steals heat and wastes fuel.
- Adjust the flame just as you would at home. Camp stoves have excellent temperature control.
- Keep a pot of water heating on a second burner (if available) for cleanup.
🎬 Video: How to Use a Propane Stove — https://youtu.be/6il0aDjwSGI?si=IMrR6Ycu03lWzTtU
Dutch Oven or Skillet Over Coals
This is where outdoor cooking gets exciting. Cooking over campfire coals gives you a flavor and experience that no kitchen can replicate.
Dutch Oven Tips:
- Start your fire or charcoal 30–45 minutes before you need to cook. You need hot coals, not open flames.
- Use the briquette formula: for a 12-inch Dutch oven at 350°F, use about 24 briquettes — 16 on top, 8 on the bottom. Adjust up or down for higher or lower temperatures.
- Rotate the lid and the oven a quarter turn every 15 minutes to prevent hot spots.
- Use a lid lifter to check food — never set the lid on the ground (it picks up dirt and ash).
Skillet Tips:
- A cast-iron skillet works directly on a grate over coals or on a camp stove.
- Preheat the skillet before adding oil or food.
- Use longer-handled utensils to keep your hands away from the fire.
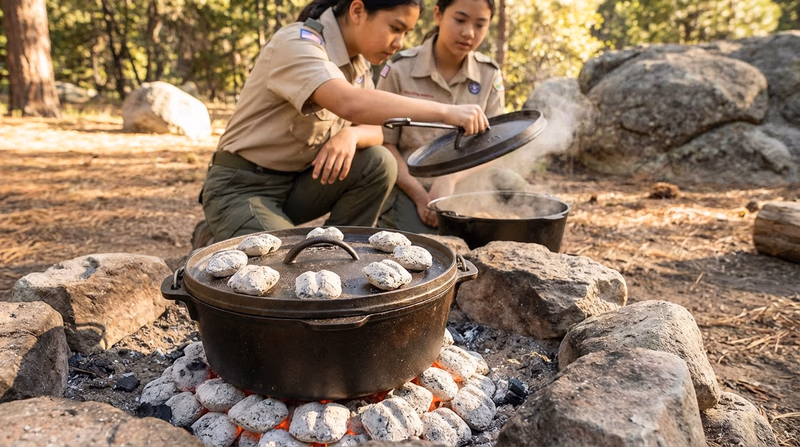
Foil Pack or Skewer Cooking
Foil Pack Tips:
- Use heavy-duty aluminum foil — regular foil tears easily and leaks.
- Cut vegetables into uniform sizes so everything cooks evenly.
- Use the drugstore wrap for a tight seal (fold the top edges together, then fold each end in).
- Place packets on a grate above coals, not directly in the fire. Rotate every 5–10 minutes.
- Cooking time is typically 15–30 minutes depending on contents. Check one packet before declaring them all done.
Skewer Tips:
- If using wooden skewers, soak them in water for 30 minutes before cooking to prevent them from burning.
- Cut all pieces to a similar size for even cooking.
- Leave small gaps between pieces so heat can circulate.
- Rotate skewers frequently for even browning.
Serving Your Patrol
As you finish each meal, serve your patrol promptly. Hot food should be served hot. Announce when the meal is ready and have a system for serving — either a buffet line or plating each person’s portion.
🎬 Video: 6 Tips to Master Foil Packet Cooking — https://youtu.be/HoZElsSBEPk?si=iBtzoe7NaEvwVTfa
Req 5e — Snack & Dessert
Snacks and desserts are more than treats — they keep energy levels up between meals and give your patrol something to look forward to. Preparing them outdoors adds a fun, creative element to your camp cooking experience.
Camp Snack Ideas
A good camp snack is easy to prepare, packs energy, and does not require refrigeration. Think about what your patrol will need between meals:
No-cook snacks:
- Trail mix (nuts, dried fruit, chocolate chips, seeds)
- Granola bars (homemade or store-bought)
- Fresh fruit (apples, oranges, bananas — sturdy fruits that travel well)
- Peanut butter on crackers or celery
Cooked snacks:
- Campfire popcorn in a foil pan or special popper
- Quesadillas on a camp stove
- Nachos heated in a Dutch oven or on a camp stove skillet
- Roasted pumpkin seeds
Camp Dessert Ideas
Dessert at camp is a tradition. Here are options that work well outdoors:
Dutch oven desserts:
- Fruit cobbler (peaches, cherries, or mixed berries with a cake mix topping)
- Brownies or cake baked in a Dutch oven
- Campfire cinnamon rolls
Fire or coal desserts:
- Banana boats — split a banana lengthwise (leave the peel on), stuff with chocolate chips and marshmallows, wrap in foil, and place on coals for 5–10 minutes
- S’mores — the classic campfire dessert
- Grilled pineapple slices with a sprinkle of cinnamon
Camp stove desserts:
- Pancake “crepes” with Nutella and fruit
- Campfire cones — sugar cones filled with marshmallows, chocolate, and fruit, wrapped in foil and heated
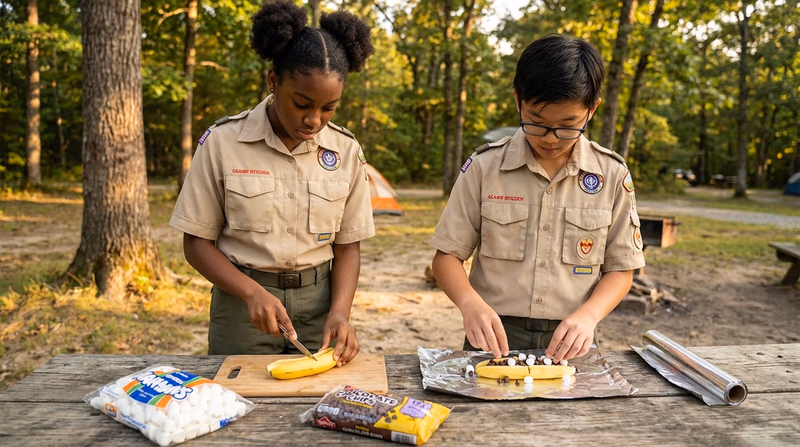
Serving Your Patrol
Serve the snack and dessert with the same care you give your main meals. Presentation counts — even at camp. Hand out snacks in a clean cup or bag. Serve dessert on a plate with a clean utensil.
Req 5f — Camp Meal Evaluation
Feedback at camp is even more valuable than feedback at home. Outdoor cooking has more variables — wind, weather, fire management, limited equipment — and every meal teaches you something new.
Collecting Camp Feedback
After each meal, ask your patrol members two questions:
- How did the food look? Was it well-presented? Did the portions seem right?
- How did it taste? Was it seasoned well? Cooked properly? Would they change anything?
Camp feedback tends to be more honest than home feedback — hungry Scouts are not shy about telling you what they think. Take it in stride and write it down.
Self-Evaluation at Camp
Outdoor cooking adds challenges you do not face at home. Evaluate your performance honestly:
- Fire/stove management: Did you maintain consistent heat? Did the fire burn too hot, too cold, or unevenly?
- Timing: Did all components come out together, or was the patrol waiting while you finished a dish?
- Adaptation: How did you handle unexpected challenges (weather, equipment issues, ingredient problems)?
- Teamwork: If patrol members helped, did you coordinate effectively?
- Safety: Did you follow food safety protocols throughout? Did you check cooking temperatures?
Camp-Specific Lessons Learned
Common lessons that Scouts discover during camp cooking:
- “I underestimated how long charcoal takes to get ready.” Plan 20–30 minutes for briquettes to ash over before cooking.
- “The wind kept blowing out my camp stove.” Use a windscreen and position the stove with the wind at your back.
- “Food took longer to cook than the recipe said.” Altitude, wind, and outdoor temperature all affect cooking time. Build extra time into your plan.
- “I did not make enough food.” Active Scouts eat more than you expect. It is better to have leftovers than hungry patrol members.
- “Cleanup took way longer than I thought.” Start heating wash water before the meal is done.
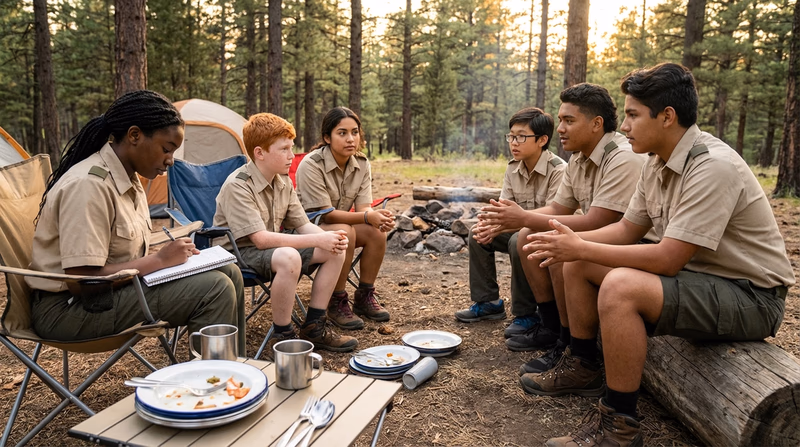
How Planning Ensures Outdoor Success
When you discuss this requirement with your counselor, connect your experience back to the planning process:
- Menu planning ensured balanced nutrition and matched meals to available cooking methods.
- Recipe scaling prevented running out of food for the group.
- Shopping lists meant you had every ingredient when you arrived at camp.
- Equipment lists prevented the frustration of realizing you forgot a critical tool.
- Food safety planning kept everyone healthy despite the challenges of outdoor conditions.
- Timing plans helped you serve hot food on schedule even without a kitchen timer on the wall.
The lesson is the same as home cooking, amplified: preparation is the difference between a stressful scramble and a successful meal.
Req 5g — Cleanup & Storage
Cleanup is not optional — it is a critical part of outdoor cooking. A dirty camp kitchen attracts wildlife, breeds bacteria, and makes the next meal harder to prepare. As the cook, you are responsible for leading the cleanup effort.
The Three-Basin Wash System
The standard camp dishwashing method uses three basins (or large pots) in sequence:
- Wash basin — Hot water with biodegradable camp soap. Scrub dishes, pots, and utensils to remove all food residue.
- Rinse basin — Clean hot water (no soap). Rinse off all soap residue.
- Sanitize basin — Water with a capful of bleach (about 1 tablespoon per gallon) or very hot water. Dip items briefly to kill remaining bacteria.
After the three basins, air-dry everything on a clean surface or dry with a clean towel. Do not stack wet dishes — this traps moisture and promotes bacterial growth.
Handling Food Scraps and Leftovers
Leftover food:
- If you have a cooler with ice and the food is still safe (has not been in the temperature danger zone for more than 2 hours), store it in sealed containers in the cooler for a future meal.
- If you cannot keep it cold or it has been out too long, dispose of it properly.
Food scraps:
- Never scatter food scraps in the woods. This attracts wildlife and habituates animals to human food — which is dangerous for both the animals and future campers.
- Pack food scraps out in your trash bag. Treat food waste like any other garbage.
Disposing of Dishwater (Gray Water)
Gray water is the water left after washing dishes. It contains food particles, grease, and soap. Improper disposal can contaminate water sources and attract animals.
Proper gray water disposal:
- Strain the gray water through a fine mesh strainer or bandana to remove food particles. Pack the food particles out with your trash.
- Scatter the strained water broadly over a wide area at least 200 feet from any water source (stream, lake, river).
- Do not pour gray water into a fire pit — it creates a smelly mess that attracts animals.
Cleaning the Cooking Site
After dishes are done and food is stored, clean the entire cooking area:
Cooking Site Cleanup
Complete these before leaving the cooking area- All food stored in animal-proof containers or coolers
- All trash and food scraps bagged and sealed
- Gray water strained and scattered properly
- Fire pit cleaned (if used): ashes stirred and cold to the touch
- Camp stove wiped down and fuel valve closed
- Cooking surfaces and tables wiped clean
- All equipment and utensils washed, dried, and stored
- Ground around the cooking area checked for dropped food
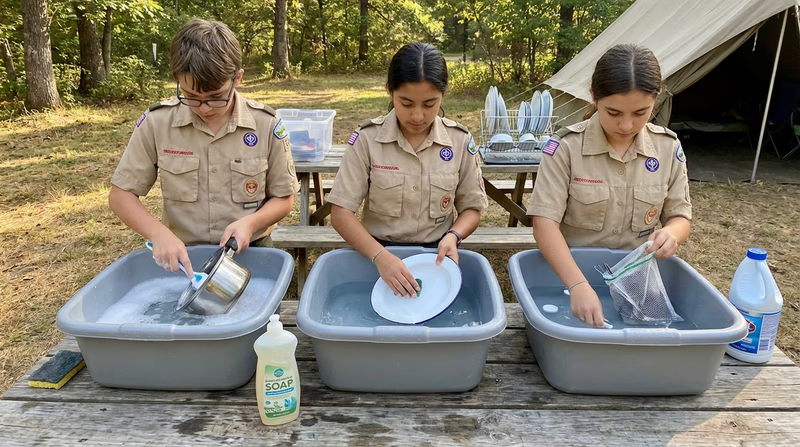
Leading the Cleanup
This requirement says lead the cleanup — not do it all yourself. Good leadership means:
- Delegate tasks. Assign someone to wash, someone to rinse, someone to dry, someone to handle trash, and someone to wipe down the cooking area.
- Set the standard. Check the work before declaring cleanup complete. Run your hand over the cooking surface — if it is sticky or greasy, it is not clean yet.
- Be present. Stay involved and work alongside your team. Do not just give orders and walk away.
Req 5h — Leave No Trace
Cooking outdoors comes with a responsibility: leave the land better than you found it. The Leave No Trace Seven Principles and the Outdoor Code are not just guidelines — they are commitments every Scout makes to the environment and to future visitors.
The Seven Principles Applied to Cooking
Here is how each Leave No Trace principle connects directly to camp cooking:
1. Plan Ahead and Prepare
- You planned your meals in advance, bought the right quantities, and repackaged food to reduce waste.
- You checked fire regulations for your area before planning campfire meals.
- You brought the right equipment for cooking and cleanup.
2. Travel and Camp on Durable Surfaces
- You set up your cooking area on established surfaces — a designated fire ring, a picnic table, or a flat area of compacted ground.
- You did not clear vegetation or dig fire pits in undisturbed areas.
3. Dispose of Waste Properly
- You packed out all trash, food scraps, and packaging — nothing was left behind.
- You strained and scattered gray water at least 200 feet from water sources.
- You let fire ashes cool completely and dispersed them properly (in dispersed camping areas).
4. Leave What You Find
- You did not gather firewood from live trees or strip bark for fire starters.
- You used fallen deadwood only from the ground (where permitted).
- You left the cooking area looking exactly as it did when you arrived.
5. Minimize Campfire Impacts
- You used an existing fire ring or a camp stove instead of creating new fire scars.
- You kept fires small and manageable.
- You burned only wood and clean paper — no trash, no plastics, no foil (aluminum foil does not burn and must be packed out).
6. Respect Wildlife
- You stored food in animal-proof containers, bear canisters, or bear bags — never in your tent.
- You cleaned your cooking area thoroughly to avoid attracting animals.
- You did not feed wildlife, even with scraps.
7. Be Considerate of Other Visitors
- You kept your cooking area clean and orderly.
- You managed smoke and noise from your cooking activities.
- You left shared cooking facilities (pavilions, grills) cleaner than you found them.
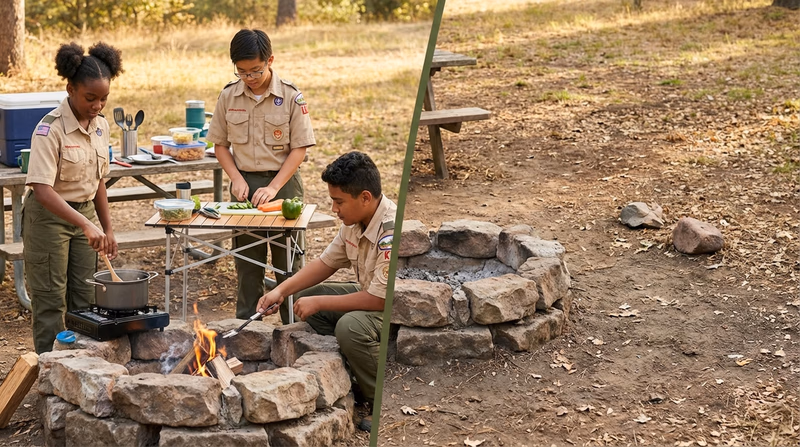
The Outdoor Code
The Outdoor Code is a promise that complements Leave No Trace:
As an American, I will do my best to be clean in my outdoor manners, be careful with fire, be considerate in the outdoors, and be conservation-minded.
When you discuss this with your counselor, connect specific actions you took during camp cooking to each line:
- Clean in outdoor manners: You cleaned up after every meal, disposed of waste properly, and left the site spotless.
- Careful with fire: You managed your fire responsibly, never left it unattended, and ensured it was completely out before leaving.
- Considerate in the outdoors: You cooked in designated areas, minimized noise and smoke, and respected shared spaces.
- Conservation-minded: You minimized waste by planning accurate portions, used reusable containers where possible, and chose a camp stove over a fire when appropriate to reduce environmental impact.
Req 6a — Trail Menu Planning
Trail cooking is the most challenging type of cooking you will do in this merit badge — and the most stripped-down. Every ounce you carry matters, refrigeration does not exist, and your “kitchen” is whatever you can fit in a backpack. This is cooking at its most resourceful.
The Trail Cooking Mindset
On the trail, three factors dominate every food decision:
- Weight — You carry everything on your back. Heavy food means a heavier pack, which means more fatigue and less enjoyment.
- No refrigeration — You cannot bring fresh meat, dairy, or anything that spoils at room temperature.
- Calorie density — You burn a lot of energy hiking. Your food needs to deliver maximum calories per ounce.
Planning Trail Meals
Your one-day trail menu must include breakfast, lunch, dinner, and a snack for 3–5 people. Here is how to approach each meal:
Breakfast — Quick Energy, Minimal Cleanup
- Instant oatmeal with dried fruit and nuts (just add boiling water)
- Granola with powdered milk
- Breakfast bars or energy bars
- Instant coffee, hot cocoa, or tea
Lunch — No-Cook or Minimal Prep Trail lunches should not require a stove. You want to eat quickly and keep moving.
- Tortillas with peanut butter and honey (tortillas are lighter and more durable than bread)
- Hard cheese and crackers with summer sausage (these do not require refrigeration for a day)
- Tuna or chicken in foil packets with crackers
- Trail mix and dried fruit
Dinner — The Hot Meal Dinner is usually when you set up camp and cook your one big meal of the day.
- Instant rice or couscous with a sauce packet
- Pasta with olive oil and parmesan
- Ramen upgraded with dried vegetables, peanut butter, and hot sauce
- Dehydrated meals (just-add-water pouches)
- Soup mix with added instant rice or noodles
Snack — Sustained Energy
- Trail mix (nuts, seeds, dried fruit, chocolate)
- Energy bars or granola bars
- Dried fruit (apricots, mango, banana chips)
- Jerky
Meeting Nutritional Needs on the Trail
Even though trail food is different from home food, you should still aim for nutritional balance:
- Carbohydrates provide quick energy for hiking (oatmeal, pasta, crackers, dried fruit)
- Fats provide sustained energy and calorie density (nuts, peanut butter, olive oil, cheese)
- Protein supports muscle recovery (jerky, tuna, peanut butter, nuts, dried beans)
It is harder to get adequate fruits and vegetables on the trail, but dried fruit, dehydrated vegetables (added to soups and dinners), and vitamin-rich snacks help fill the gap.
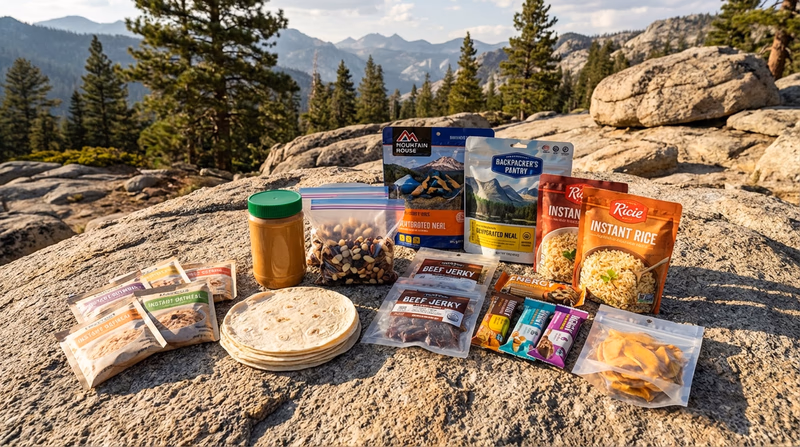
Equipment for Trail Cooking
Your trail cook kit should be ultralight and multipurpose:
Trail Cooking Equipment
Keep it light and simple- Backpacking stove (canister or alcohol) with fuel
- Lighter or waterproof matches (in a sealed bag)
- One pot (1–2 liter, depending on group size)
- Spork or lightweight utensil for each person
- Insulated mug or cup for each person
- Small cutting board (optional — a clean flat surface works)
- Pocket knife
- Biodegradable soap (a tiny amount)
- Small sponge or scrubber
- Trash bag (pack it in, pack it out)
- Bear canister or bear bag with rope (for food storage overnight)
- Water purification method (filter, tablets, or UV)
Req 6b — Trail Shopping List
Trail food shopping is different from grocery shopping for home cooking. You are optimizing for weight and shelf stability, not just taste and nutrition. Every item on your list needs to earn its place in your pack.
Building Your Trail Shopping List
Go through each of your four meals and one snack. For every ingredient, write down:
- The exact amount needed (per person × number of people)
- The weight of that amount
- The cost
Example for a group of 4:
| Meal | Item | Amount | Weight | Cost |
|---|---|---|---|---|
| Breakfast | Instant oatmeal packets | 8 packets (2 per person) | 12 oz | $4.00 |
| Breakfast | Dried fruit | 1 cup | 4 oz | $2.00 |
| Breakfast | Mixed nuts | ½ cup | 3 oz | $1.50 |
| Lunch | Tortillas | 8 (2 per person) | 14 oz | $3.00 |
| Lunch | Peanut butter | 8 tbsp | 5 oz | $1.50 |
| Lunch | Honey packets | 8 packets | 2 oz | $2.00 |
| Dinner | Instant rice | 4 cups dry | 12 oz | $2.50 |
| Dinner | Tuna packets | 4 packets | 10 oz | $6.00 |
| Dinner | Dried veggie mix | 1 cup | 2 oz | $3.00 |
| Snack | Trail mix | 2 cups | 8 oz | $4.00 |
Calculating Total Weight
Add up the weight column to get your total food weight. For a one-day trip with 3–5 people, aim for about 1.5–2 pounds of food per person per day. This gives you roughly 2,500–3,000 calories per person — enough to fuel a day of hiking.
Calculating Cost Per Meal
Just as you did for camp cooking, add up the ingredient costs for each meal and divide by the number of people to get a per-person cost. Trail meals tend to be inexpensive — $2–5 per person per meal is typical for simple backpacking food.
Smart Shopping for Trail Food
- Check the bulk bins. Many grocery stores sell nuts, dried fruit, oatmeal, and trail mix by the pound — you buy exactly what you need, reducing waste and cost.
- Compare fresh vs. dried. Dried and dehydrated options are lighter but can be more expensive per serving. Balance weight savings against budget.
- Don’t forget fuel. Add the cost of stove fuel (a small canister is usually $5–8) and any water purification supplies to your total.
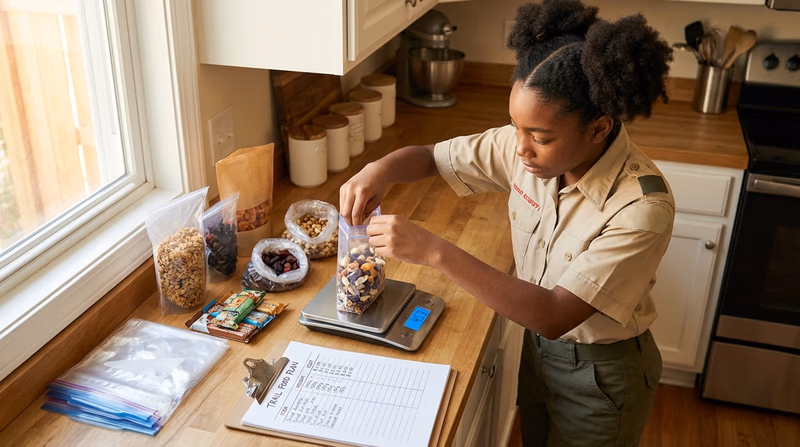
Req 6c — Repackaging & Reducing Waste
Repackaging is one of the smartest things you can do before a trail trip. Store packaging is designed to look good on a shelf — not to be carried on your back. By repackaging at home, you cut weight, reduce bulk, and minimize the trash you have to pack out.
Why Repackage?
- Reduce weight. Cardboard boxes, glass jars, and rigid plastic containers add ounces that you do not need to carry.
- Reduce bulk. A box of crackers takes up far more space than the same crackers in a zip-lock bag.
- Reduce garbage. Less packaging on the trail means less trash to pack out. Trail cooking already generates less waste, and repackaging pushes that number even lower.
- Simplify preparation. Pre-mix ingredients at home (like oatmeal with dried fruit and brown sugar) so you just add hot water on the trail.
Repackaging Techniques
Zip-lock bags are the most common repackaging tool. They are lightweight, sealable, and can be squeezed flat to eliminate air.
- Transfer dry goods (oatmeal, rice, pasta, trail mix, spices) from boxes and heavy bags into quart- or gallon-size zip-lock bags.
- Write the contents and preparation instructions on the bag with a permanent marker.
- Squeeze out as much air as possible before sealing.
Pre-mixing meals saves time and reduces the number of items you need to carry:
- Combine instant oatmeal, dried fruit, brown sugar, and powdered milk in one bag — just add hot water.
- Pre-mix spice blends so you have one bag instead of five separate spice containers.
- Combine instant rice with a dehydrated sauce mix in one bag.
Remove excess packaging layers:
- Take crackers out of the cardboard box but leave them in the inner sleeve.
- Remove energy bars from the display box but keep them in individual wrappers.
- Transfer peanut butter from a heavy jar to a lightweight squeeze tube or small container.
- Repackage cooking oil into a small, leakproof bottle instead of carrying a full-size bottle.
What to Discuss with Your Counselor
When you present your trail plan, your counselor will want to see:
- Your complete menu (breakfast, lunch, dinner, snack) for 3–5 people
- Your shopping list with quantities, weights, and costs
- Your repackaging plan — which items you will repackage and how
- Your waste reduction strategy — how much trash you expect to generate and how you will pack it out
Repackaging Checklist
Do this at home before the trip- All dry goods transferred to zip-lock bags
- Pre-mixed meals assembled and labeled
- Cooking instructions written on each bag
- Excess packaging discarded at home (not on the trail)
- Liquids (oil, sauces) in leak-proof containers
- All items weighed and weight recorded
- A designated “trash bag” packed for trail waste
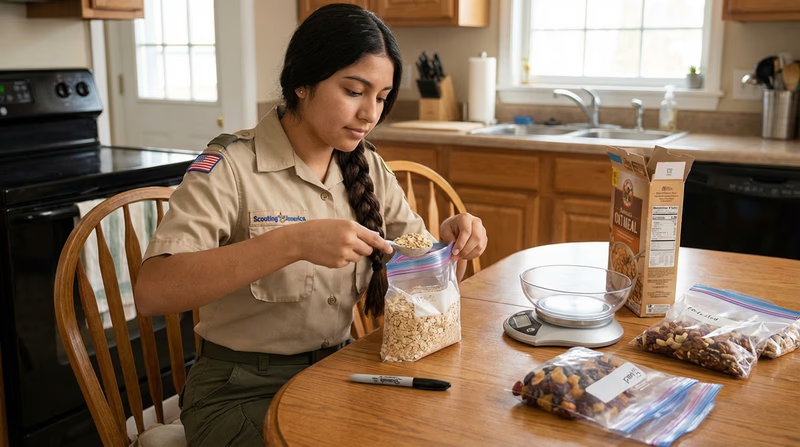
🎬 Video: Repackaging Food for Backpacking — https://youtu.be/r7hQE1zp0uk?si=LrlA2WaX3L5IMzMh
Req 6d — Cook on the Trail
You are on the trail with your group, your food is packed, and it is time to cook. Trail cooking is the ultimate test of preparation — everything you planned at home is now being executed in the field with minimal equipment and no second chances to run to the store.
Setting Up Your Trail Kitchen
When you stop to cook, choose your location carefully:
- Find a flat, stable surface for your stove (a flat rock, bare ground, or a log bench).
- Set up at least 200 feet from water sources to protect them from spills and gray water.
- Position yourself upwind so smoke blows away from you and your cooking area.
- In bear country, cook at least 200 feet from where you will sleep.
Cooking the Hot Meal
At least one of your two meals must be cooked using a fire or trail stove. Here is your workflow:
- Set up and stabilize your stove on a flat surface. If using a canister stove, make sure the canister is securely threaded and the pot sits stable.
- Purify your cooking water if you are using water from a natural source.
- Boil water — most trail meals are designed around boiling water and adding it to dried ingredients.
- Follow your pre-written instructions on the zip-lock bags you prepared at home.
- Let food rehydrate for the specified time (usually 5–15 minutes) before eating.
- Eat directly from the bag or pot to minimize dishes.
Serving the No-Cook Meal
Your second meal (likely lunch) should not require a stove. Serve it quickly so you can keep moving:
- Distribute portions from the zip-lock bags you prepared at home.
- Use the “assembly line” approach — one person lays out tortillas, another spreads peanut butter, another adds toppings.
- Eat at a comfortable spot with a view — trail lunches are a chance to enjoy the scenery.
Serving the Snack
Distribute snacks from the pre-portioned bags. Trail snacks are best served during a rest break — a chance to refuel, hydrate, and check on your group’s energy levels.

Trail Cooking Tips
- Conserve fuel. Use a lid on your pot to boil water faster and use less fuel. Know how much fuel you have and how many meals it needs to cover.
- Conserve water. Plan your water usage for cooking, drinking, and cleanup. Know where your next water source is.
- Minimize dishes. Eat from the pot, eat from the bag, or use a single bowl. Fewer dishes means less water used for cleanup and less weight to carry.
- Pack out everything. Every zip-lock bag, every wrapper, every scrap of food goes into your trash bag and comes out with you.
🎬 Video: Lighting a Liquid Fuel Stove — https://youtu.be/2XRqdVIqimY?si=ZyyBNl0sWqmn5gKI
Req 6e — Trail Meal Evaluation
By now, you have evaluated meals at home and at camp. Trail meal evaluation adds one more dimension: you are also evaluating how well your food performed as trail food — not just whether it tasted good.
Trail-Specific Evaluation Questions
After each trail meal, ask your group and yourself:
Taste and Presentation:
- Did the food taste good after a long hike?
- Were the portions satisfying — or were people still hungry?
- Was the food visually appealing, or did it look like a bag of mush?
Trail Performance:
- Was the food easy to prepare on the trail?
- Did the meal rehydrate fully, or was it still crunchy or dry in spots?
- Was the weight reasonable for the number of calories it provided?
- Did the packaging hold up in your pack (no leaks, no crushed items)?
- How much waste did the meal generate?
Common Trail Cooking Lessons
- “The food did not rehydrate completely.” Next time, use more water, hotter water, or let it sit longer. Insulate the pot or bag to keep the water hot.
- “We were still hungry after dinner.” Trail appetites are bigger than home appetites. Increase portions by 25–50% for your next trip.
- “The trail mix was boring by the afternoon.” Vary your snack flavors. Alternate between salty, sweet, and savory options throughout the day.
- “Cleanup was difficult without much water.” Minimize dishes by eating from the pot or bag. Use a small amount of water and a scraper to clean, then do a full wash when you reach a water source.

Planning and Preparation on the Trail
When you discuss this with your counselor, emphasize how planning was even more critical for trail cooking than for home or camp cooking:
- Repackaging meant less weight and less trash on the trail.
- Pre-mixing meals made cooking fast and simple with limited equipment.
- Knowing your water sources ensured you had enough water for cooking and cleanup.
- Fuel planning prevented running out of stove fuel before your last hot meal.
- Weight calculations helped distribute the load fairly across your group.
The takeaway: on the trail, there is no grocery store, no running water, and no backup plan. Everything depends on the preparation you did before you left home.
Req 6f — Load Sharing & Food Storage
On the trail, nobody should carry everything — and nobody should carry nothing. Distributing the load fairly is a leadership skill, and storing food properly is a safety imperative.
Dividing the Load
The goal is to distribute food and cooking equipment so that everyone carries a fair share and no one is overburdened. Here is how to approach it:
Step 1: Weigh Everything
Before the trip, lay out all group food and cooking equipment and weigh each item. Divide the total weight by the number of people to get a target weight per person.
Step 2: Distribute Thoughtfully
Not everyone in your group is the same size or fitness level. Consider these factors:
- Larger, stronger hikers can carry slightly more group weight.
- Smaller or less experienced hikers should carry slightly less — but still contribute.
- Everyone carries some food. If one person carries all the food and gets separated from the group, nobody eats.
- Spread critical items. The stove should be in one pack, the fuel in another, and the pot in a third. If someone falls behind, the group can still function.
Step 3: Reassess During the Hike
As food gets eaten, the weight distribution changes. At rest stops or after meals, shift remaining food to rebalance the load. The person who carried the heaviest food item for the morning hike should carry less in the afternoon.
Cleaning the Cooking Area
Trail kitchen cleanup follows the same Leave No Trace principles from Req 5h, but in a more austere environment:
Trail Kitchen Cleanup
Complete these before breaking camp- Scrape all food scraps into your trash bag (never scatter or bury them)
- Wash cookware with a small amount of water and biodegradable soap
- Strain dishwater through a bandana to catch food particles; pack out the particles
- Scatter strained gray water broadly, at least 200 feet from water sources
- Inspect the cooking area — pick up any micro-trash (tiny wrappers, crumbs, bits of foil)
- If you used a fire, ensure it is completely out — drown, stir, and feel
- Leave the area looking as if no one was ever there
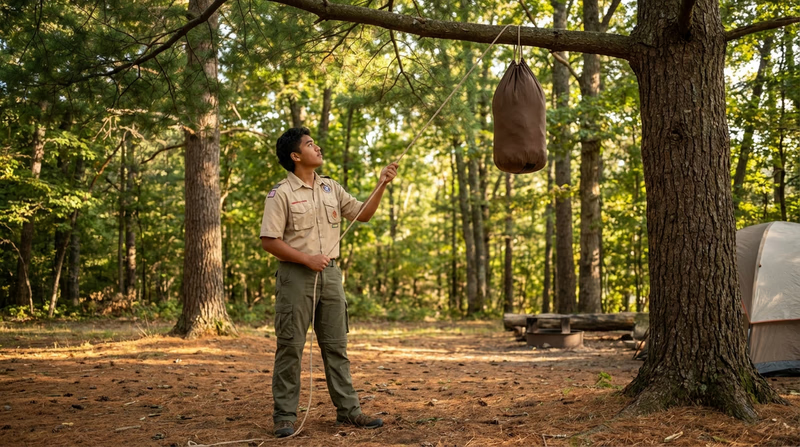
Storing Food from Animals
Wildlife will find your food if you do not protect it. Animals have a much stronger sense of smell than humans, and once they learn to associate hikers with food, they become dangerous nuisances.
Bear Canister
- A rigid, animal-proof container that you carry in your pack.
- Required in many wilderness areas (check regulations).
- Store at least 100 feet from your sleeping area on the ground — not hung from a tree (bears can get to hung canisters).
Bear Bag (PCT Method or Counterbalance)
- A stuff sack hung from a tree branch using a rope system.
- The bag should hang at least 12 feet off the ground, 6 feet from the tree trunk, and 5 feet below the branch.
- This method takes practice — learn it before your trip.
Bear Box (Where Available)
- Some established campsites and trail shelters have metal bear boxes.
- Store all food, trash, and scented items inside and latch it securely.
What Your Counselor Wants to Hear
When discussing this requirement, explain:
- How you divided food and equipment — what each person carried and why.
- How you cleaned your cooking area — what specific steps you took.
- How you stored food overnight — which method you used and why.
- What you would change — did your load distribution feel fair? Was your food storage effective?
Req 7 — Careers & Hobbies
This is a choose one requirement. Read both options below, pick the one that interests you most, and complete it. Both paths ask you to research, reflect, and discuss your findings with your counselor.
Option A — Cooking Careers
The culinary world offers a wide range of careers — far beyond what most people think of when they hear “cooking job.” Here are several paths to consider (you need to identify three and research one in depth):
Executive Chef / Head Chef The leader of a restaurant kitchen. An executive chef creates menus, manages staff, orders ingredients, controls costs, and ensures every plate meets their standards. Most executive chefs have years of experience and formal culinary training.
Pastry Chef / Baker Specializes in breads, desserts, pastries, and confections. Pastry work demands precision and artistry. Pastry chefs work in restaurants, bakeries, hotels, and specialty shops.
Food Scientist / Food Technologist Combines cooking knowledge with science. Food scientists develop new products, improve food safety, study nutrition, and work for food manufacturers, government agencies, or research institutions. This path typically requires a college degree in food science.
Registered Dietitian / Nutritionist Uses nutrition knowledge to help people eat healthier. Dietitians work in hospitals, schools, sports teams, and private practice. This career requires a bachelor’s degree and a supervised internship.
Personal / Private Chef Cooks for individuals or families, often preparing customized meals based on dietary needs and preferences. Personal chefs may work for one client or rotate among several.
Culinary Instructor / Teacher Teaches cooking skills in culinary schools, community colleges, or community programs. Many instructors have professional kitchen experience combined with a passion for education.
Food Writer / Critic / Content Creator Reviews restaurants, develops recipes, writes cookbooks, or creates food content for media outlets and social platforms. This path combines cooking knowledge with strong communication skills.
What to research for your chosen career:
- Education and training required (culinary school, college degree, apprenticeship?)
- Certifications (ServSafe, ACF certification?)
- Typical starting salary and salary range for experienced professionals
- Job outlook — is the field growing or shrinking?
- Advancement path — where can you go from the entry-level position?
- Expenses to get started (tuition, equipment, licensing fees)
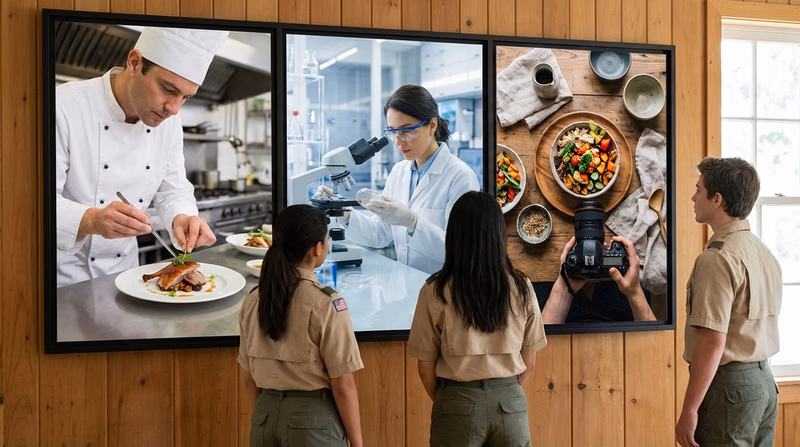
Option B — Cooking as a Hobby or Healthy Lifestyle
Cooking is one of the best hobbies you can have — it is creative, practical, social, and directly improves your health. Here are ways to turn your merit badge skills into a lifelong pursuit:
Home Cooking for Health Using your nutrition knowledge to cook balanced, whole-food meals at home is one of the most impactful health habits you can develop. Research shows that people who cook at home eat better and spend less on food.
Baking and Bread Making Many home cooks discover a passion for baking. Sourdough bread, from-scratch pastries, and cake decorating are popular hobbies with active online communities.
Grilling and Barbecue BBQ is a hobby with a competitive side — from backyard cookouts to regional BBQ competitions. Many communities have BBQ clubs and events where you can learn from experienced pitmasters.
International and Cultural Cooking Exploring the cuisines of different cultures through cooking is a way to travel without leaving your kitchen. Each cuisine teaches different techniques, ingredients, and flavor profiles.
Outdoor and Camp Cooking The skills from this merit badge translate directly to a lifetime of outdoor cooking adventures. Dutch oven cooking, campfire cuisine, and ultralight trail cooking each have dedicated communities and resources.
Meal Prep and Budget Cooking Learning to plan, prep, and cook a week’s worth of meals in advance is a practical hobby that saves time and money. It is especially valuable for college students and young adults.
What to research for your chosen hobby:
- What additional skills or training would help you improve?
- What equipment or tools would you invest in?
- Are there local clubs, classes, or communities you could join?
- What are your short-term goals (next 6 months) and long-term goals (next 5 years)?
- What organizations could support your growth?
Extended Learning
A. Introduction
Congratulations — you have completed the Cooking merit badge, one of the Eagle-required badges and one of the most practical skills you will ever learn. But your culinary journey is just getting started. The techniques, safety knowledge, and planning skills you developed will serve you in kitchens, campsites, and trail shelters for the rest of your life. Let’s explore what comes next.
B. Deep Dive: Mastering Knife Skills
The knife is the most important tool in any kitchen, and mastering it transforms your cooking. Beyond the basic claw grip you learned for safety, there are specific cuts that professional chefs use every day — and learning them will make your prep work faster, safer, and more consistent.
The dice is the most common cut: a uniform cube. Small dice (¼ inch), medium dice (½ inch), and large dice (¾ inch) each have different uses. Small dice is ideal for salsas and sauces where you want ingredients to blend together. Large dice works for stews and roasted vegetables where you want each piece to hold its shape. The key to a good dice is consistency — pieces that are the same size cook at the same rate, which means nothing is raw while something else is overcooked.
The julienne (also called a matchstick cut) creates thin, uniform strips. It is the foundation of stir-fries, slaws, and salads. The technique starts with cutting a vegetable into planks, then stacking the planks and slicing them into strips.
The chiffonade is a technique for leafy herbs and greens: stack the leaves, roll them into a tight cylinder, and slice across the roll to create thin ribbons. This is how restaurants get those beautiful basil ribbons on top of pasta.
Beyond the cuts themselves, knife maintenance matters. A sharp knife is a safe knife — it cuts where you direct it instead of slipping off the food. Learn to use a honing steel before each cooking session (it straightens the blade edge) and have your knives professionally sharpened once or twice a year.
C. Deep Dive: The Science of Heat
Understanding how heat works makes you a smarter cook. There are three ways heat transfers to food, and every cooking method uses one or more of them:
Conduction is heat transfer through direct contact. When you put a steak on a hot skillet, the metal surface conducts heat directly into the meat. This is why preheating pans matters — a cold pan will not sear properly. Cast iron excels at conduction because it holds and distributes heat evenly, which is why it has been the go-to material for camp cooking for centuries.
Convection is heat transfer through moving air or liquid. In an oven, hot air circulates around the food, cooking it from all sides. In a pot of boiling water, the hot water itself carries heat to the food. Convection ovens use a fan to force air circulation, which cooks food faster and more evenly than standard ovens. Air fryers are essentially small, powerful convection ovens — the rapid air circulation is what creates the crispy exterior.
Radiation is heat transfer through electromagnetic waves — no physical contact required. Broiling and grilling over infrared burners use radiant heat. The heat travels through the air and directly warms the food’s surface. This is why broiled food gets a crispy, browned top while the inside stays relatively unchanged — the radiation affects the surface first.
The Maillard reaction is what happens when proteins and sugars in food are exposed to high heat (above 280°F). It creates the brown crust on a seared steak, the golden surface of toasted bread, and the roasted flavor of coffee. Understanding this reaction explains why boiled chicken (which maxes out at 212°F) tastes completely different from grilled chicken (which experiences temperatures well above 400°F on the surface). The Maillard reaction is not the same as caramelization, which is the browning of pure sugar — though both produce delicious results.
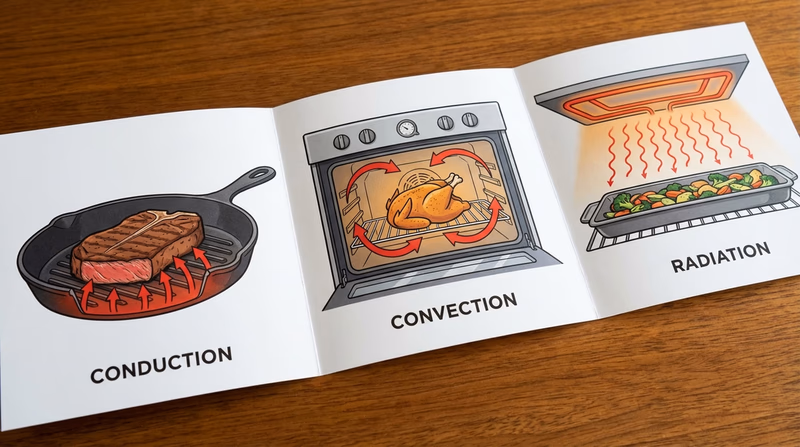
D. Deep Dive: Building Flavor Like a Chef
Professional chefs think about flavor in layers, not as a single addition. Understanding how to build flavor transforms simple ingredients into remarkable meals.
Start with aromatics. Nearly every savory dish in every cuisine begins with aromatic vegetables cooked in fat. French cuisine uses mirepoix (onion, carrot, celery). Cajun cooking uses the “holy trinity” (onion, celery, bell pepper). Asian cuisines often start with garlic, ginger, and scallions. These aromatics create a flavor base that everything else builds upon.
Season in stages. Adding salt only at the end is a common beginner mistake. Season at multiple points: when you sauté aromatics, when you add liquids, and as a final adjustment before serving. Each addition at a different stage builds depth that a single dose at the end cannot achieve.
Use acid to brighten. A squeeze of lemon juice, a splash of vinegar, or a spoonful of salsa can transform a dish that tastes flat into something vibrant. Acid does not make food taste sour (unless you use too much) — it lifts and brightens the other flavors that are already there. If a soup or sauce tastes good but feels like it is missing something, acid is usually the answer.
Finish with fresh elements. A handful of fresh herbs, a drizzle of high-quality olive oil, a sprinkle of flaky sea salt, or a grating of fresh cheese added just before serving adds aroma and texture that cooking would destroy. These finishing touches are the difference between a good meal and a memorable one.
Deglaze the pan. After searing meat in a skillet, you will see brown bits stuck to the bottom — that is pure concentrated flavor (called “fond”). Pour in a splash of broth, wine, or even water, and scrape those bits up with a wooden spoon. The liquid dissolves all that flavor and becomes an instant pan sauce. This one technique can elevate any skillet-cooked meal from ordinary to extraordinary.
E. Real-World Cooking Experiences
Philmont Scout Ranch — Trail Cooking
Local Farmers Market
Community Cooking Class
Scout Camporee Cooking Competition
Volunteer at a Food Bank or Soup Kitchen
F. Organizations
The largest professional chefs’ organization in North America, offering certification, education, and competitions for culinary professionals at all levels.
Organization: American Culinary Federation (ACF) — https://www.acfchefs.org/
Celebrates and supports the people behind America’s food culture, from chefs to farmers to food policy advocates.
Organization: James Beard Foundation — https://www.jamesbeard.org/
The leading nonprofit working on behalf of the 85 million Americans with food allergies and intolerances, providing education and advocacy.
Organization: Food Allergy Research & Education (FARE) — https://www.foodallergy.org/
A community of outdoor cooking enthusiasts dedicated to the art and sport of Dutch oven cooking, with competitions and events nationwide.
Organization: International Dutch Oven Society (IDOS) — https://www.idos.org/
The nation’s largest domestic hunger-relief organization, operating a network of food banks across the country where your cooking skills can make a difference.
Organization: Feeding America — https://www.feedingamerica.org/