Dentistry Merit Badge — Complete Digital Resource Guide
https://merit-badge.university/merit-badges/dentistry/guide/
Introduction & Overview
You use them every single day — to bite into an apple, to speak clearly, to smile at a friend — but how much do you actually know about your teeth? The Dentistry merit badge pulls back the curtain on what is happening inside your mouth and why it matters far beyond just having a nice smile.
This badge will teach you how teeth are built, what destroys them, how dental professionals protect them, and what you can do every day to keep your mouth healthy for life. You will read X-rays, draw tooth anatomy, visit a real dental office, and even teach others what you have learned.
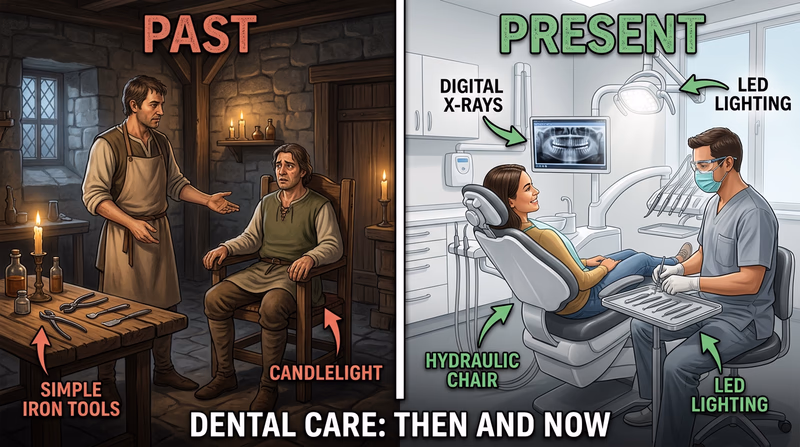
Then and Now
Then — When Toothaches Could Kill
Dental problems are as old as humanity itself. Ancient Egyptians suffered from tooth decay more than 4,000 years ago, and their “dentists” used a mixture of honey, crushed stone, and herbs as toothpaste. Around 2,700 BCE, a Chinese text described “tooth worms” as the cause of decay — an idea that persisted for thousands of years.
In medieval Europe, barber-surgeons were the closest thing to dentists. The same person who cut your hair might yank a rotten tooth with iron pliers — no anesthesia, no sterilization, no X-rays. If the tooth got infected, the infection could spread to the jaw and even the bloodstream, sometimes with fatal results.
The turning point came in 1728, when French surgeon Pierre Fauchard published Le Chirurgien Dentiste (“The Surgeon Dentist”), the first comprehensive textbook on dental science. He described fillings, tooth braces, and even dental prosthetics — earning him the title “Father of Modern Dentistry.”
- Tools: Iron pliers, hand drills, herbal pastes
- Approach: Wait until it hurts, then pull it out
- Legacy: Fauchard’s scientific approach laid the foundation for everything that followed
Now — Precision, Prevention, and Technology
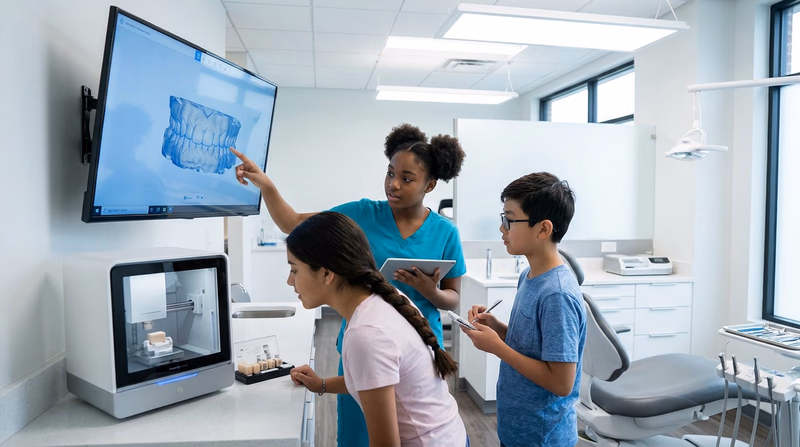
Walk into a dental office today and you will find digital X-rays that expose you to 80% less radiation than film, 3D scanners that map your entire mouth in minutes, and lasers that can treat gum disease without a single cut. Dentists can print custom crowns with a 3D printer while you wait in the chair.
But the biggest revolution is not about technology — it is about prevention. Fluoridated water, modern toothpaste, sealants, and regular checkups mean that most people today can keep their natural teeth for their entire lives. That was almost unheard of just a century ago.
- Tools: Digital X-rays, intraoral cameras, 3D printers, lasers
- Approach: Prevent problems before they start
- Impact: The average American today has far fewer cavities than their grandparents did at the same age
Get Ready! You are about to explore the science behind your smile — from the microscopic structure of enamel to the career paths that keep millions of mouths healthy. Get your pencil ready for some drawing, prepare some good questions for your dental visit, and let’s get started.
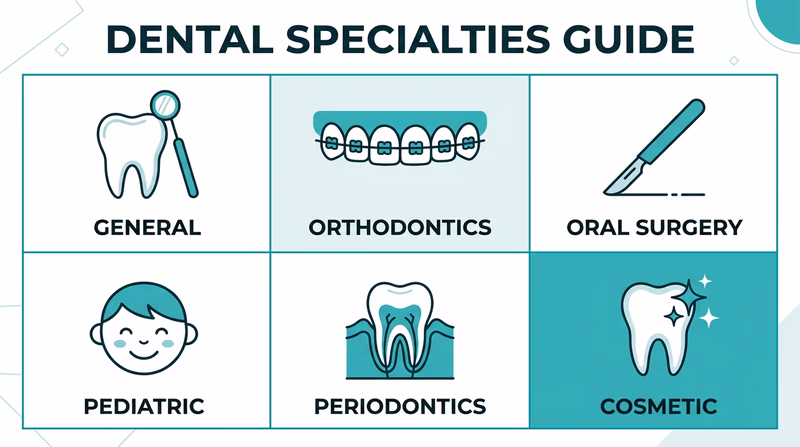
Kinds of Dentistry
Dentistry is not just one profession — it is a whole family of specialties. Here is a look at the major branches.
General Dentistry
This is the dentist you probably visit twice a year. General dentists handle checkups, cleanings, fillings, crowns, and routine care. They are the primary care doctors of the dental world — your first stop for any mouth-related concern. Most dental problems are caught and treated right here.
Orthodontics
Orthodontists specialize in straightening teeth and correcting bite problems. Braces, retainers, and clear aligners are their tools. Treatment usually takes one to three years, but the result is teeth that fit together properly — which is important not just for appearance but for chewing and jaw health.
Oral and Maxillofacial Surgery
Oral surgeons handle procedures that go beyond routine fillings: extracting impacted wisdom teeth, repairing jaw fractures, removing tumors, and performing corrective jaw surgery. They work closely with hospitals and often use general anesthesia.
Pediatric Dentistry
Pediatric dentists focus on children from infancy through the teen years. They are trained in child development and behavior management, and their offices are designed to make younger patients feel comfortable. If you have ever visited a dentist whose waiting room had video games and a treasure chest — that was probably a pediatric dentist.
Periodontics
Periodontists specialize in the gums and the bone that supports your teeth. Gum disease is one of the leading causes of tooth loss in adults, and periodontists treat everything from mild gingivitis to advanced periodontitis that threatens the jawbone itself.
Cosmetic Dentistry
Cosmetic dentists focus on the appearance of teeth — whitening, veneers, bonding, and smile makeovers. While some of this work is purely aesthetic, it can also restore function and confidence after injury or disease.
Ready to look inside a tooth and learn what makes it tick? Grab a pencil — you are going to need it for some detailed drawing.
Req 1 — Tooth Anatomy from X-Rays
This requirement asks you to do four things, all centered on studying and drawing a lower molar:
- Study tooth structure and look for decay on X-ray images
- Draw a lower molar and label its parts and surfaces
- Show where nerves and blood vessels enter and leave the tooth
- Show where bacterial plaque is most likely to collect
Your counselor will provide X-ray images (or digital radiographs) to work from. Before you pick up your pencil, let’s make sure you understand what you are looking at.
Reading a Dental X-Ray
Dental X-rays work because different materials in your mouth absorb radiation differently. Dense materials like enamel and metal fillings appear bright white on the image. Softer materials like gum tissue appear dark gray or black. Decay shows up as a dark shadow within the normally white tooth structure — because the decayed area has lost mineral density.
When you look at a dental X-ray, you should be able to identify:
- Enamel — the bright white outer shell of the crown
- Dentin — the slightly darker layer beneath the enamel
- Pulp chamber — the dark space in the center of the tooth
- Root canals — dark lines running down through the roots
- Bone — the lighter area surrounding the roots
- Dark spots or shadows — possible areas of decay
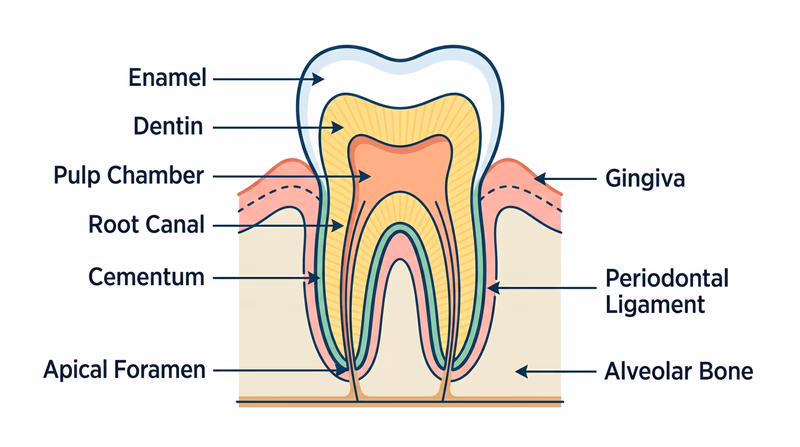
Anatomy of a Lower Molar
A molar is one of the large, flat teeth at the back of your mouth designed for grinding food. A lower molar typically has two roots (upper molars usually have three). Here are the structures you need to know for your drawing.
The Crown (Above the Gumline)
| Part | Description |
|---|---|
| Enamel | The hardest substance in the human body — harder than bone. This thin, white outer layer protects the crown from wear and decay. |
| Dentin | Makes up most of the tooth. Yellowish and slightly softer than enamel, dentin contains microscopic tubes that can transmit sensation to the nerve. |
| Pulp chamber | The hollow center of the crown containing nerves, blood vessels, and connective tissue. This is the “living” part of the tooth. |
The Root (Below the Gumline)
| Part | Description |
|---|---|
| Root canals | Narrow channels running through each root, carrying nerves and blood vessels from the jawbone into the pulp chamber. |
| Cementum | A thin, bone-like layer covering the root surface. It is softer than enamel and helps anchor the tooth to the surrounding bone. |
| Apical foramen | The tiny opening at the tip of each root where nerves and blood vessels enter and exit the tooth. |
Supporting Structures
| Part | Description |
|---|---|
| Gingiva (gums) | The pink soft tissue that covers the bone and surrounds the neck of the tooth. |
| Periodontal ligament | A thin layer of fibers connecting the cementum to the alveolar bone. These fibers act like tiny shock absorbers. |
| Alveolar bone | The part of the jawbone that forms the socket around each tooth root. |
Tooth Surfaces
When dentists describe where a cavity or problem is located, they use specific surface names:
- Occlusal — the biting/chewing surface on top
- Mesial — the side facing toward the front of the mouth
- Distal — the side facing toward the back of the mouth
- Buccal — the side facing the cheek
- Lingual — the side facing the tongue
Drawing Your Molar
Here is a step-by-step approach for creating your labeled drawing:
Start with the outline. Draw the crown shape — a broad, slightly bumpy top surface (the occlusal surface) with sides tapering down to the neck. Then draw two roots extending downward, each tapering to a point.
Add the internal layers. Draw the enamel as a thin outer band on the crown. Fill the interior with dentin. Leave a hollow space in the center for the pulp chamber, and draw narrow root canals running down through each root.
Draw the surrounding structures. Add a wavy line for the gumline (gingiva). Draw bone around the roots with a thin gap between the bone and the root — that gap is the periodontal ligament.
Label everything. Use lines pointing to each structure. Label all parts listed in the tables above, plus the five surfaces.
Mark the nerve and blood vessel entry points. Draw small arrows at the apical foramen (the tip of each root) showing that nerves and blood vessels enter here, travel up through the root canals, and reach the pulp chamber. This is how the tooth receives its blood supply and sensation.
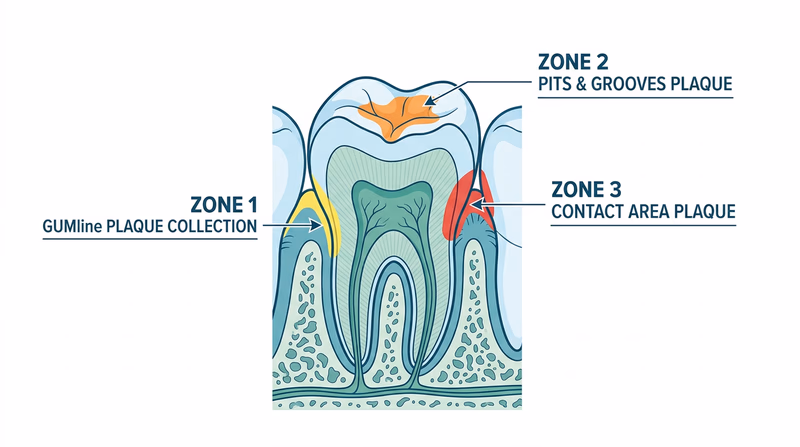
Mark plaque-prone areas. Shade or highlight these zones on your drawing:
- Along the gumline — where the tooth meets the gingiva
- In the pits and fissures — the grooves on the occlusal (chewing) surface
- Between teeth — the mesial and distal contact surfaces
Drawing Checklist
Make sure your molar drawing includes all of these- Enamel covering the crown
- Dentin filling the interior
- Pulp chamber in the center of the crown
- Root canals running through both roots
- Cementum covering root surfaces
- Apical foramen at the tip of each root
- Gingiva (gumline) surrounding the neck
- Periodontal ligament between root and bone
- Alveolar bone forming the socket
- All five surfaces labeled (occlusal, mesial, distal, buccal, lingual)
- Arrows showing nerve/blood vessel entry at root tips
- Plaque-prone zones highlighted (gumline, fissures, between teeth)
Req 2a — Causes of Decay & Gum Disease
Remember those plaque-prone zones you marked on your molar drawing in Req 1? Now you are going to learn exactly what happens in those zones when plaque, sugar, and acid work together to attack your teeth.
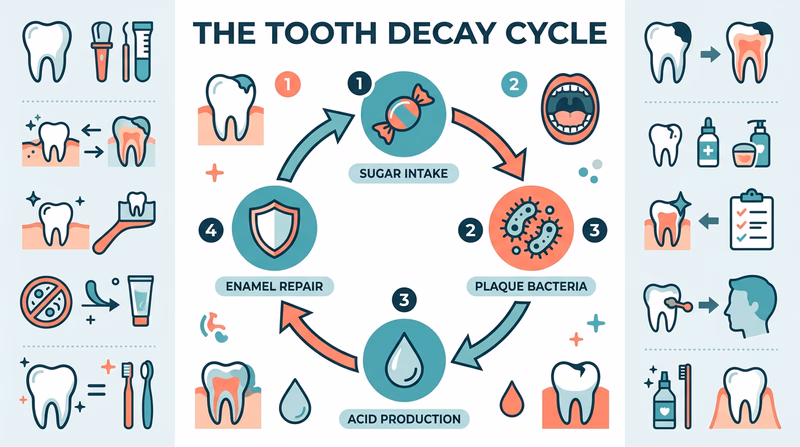
The Decay Triangle
Dental decay is not caused by any single factor — it takes three things working together:
- Bacteria (in the form of plaque)
- Sugar (fuel for the bacteria)
- Acid (the waste product that eats through enamel)
Remove any one of these, and decay slows dramatically. Understanding how they interact is the key to prevention.
Bacterial Plaque — The Invisible Enemy
Your mouth is home to hundreds of species of bacteria. Most of them are harmless or even helpful. But some species — especially Streptococcus mutans — are cavity-causing specialists.
These bacteria form plaque, a sticky, colorless film that constantly builds up on your teeth. You cannot see fresh plaque, but you can feel it — run your tongue along your teeth when you first wake up, and that fuzzy feeling is plaque.
Here is what makes plaque dangerous:
- It sticks tightly to tooth surfaces, especially along the gumline and in the grooves of molars.
- It shelters bacteria from saliva, which would otherwise wash them away.
- If not removed by brushing and flossing, it hardens into tartar (calculus) within 24–48 hours. Tartar can only be removed by a dental professional.
Sugars — Fuel for the Fire
When you eat something sugary — candy, soda, fruit juice, even crackers and chips (which break down into sugars) — the bacteria in plaque have a feast. Streptococcus mutans and similar bacteria metabolize sugars as their energy source.
The problem is not just how much sugar you eat, but how often. Every time sugar enters your mouth, bacteria produce acid for about 20–30 minutes. Three pieces of candy eaten one after another cause one acid attack. Three pieces of candy eaten an hour apart cause three separate acid attacks. Sipping a sugary drink all afternoon is one of the worst things you can do for your teeth.
Foods that are particularly risky:
- Sticky sweets (caramel, gummy candy, dried fruit) — they cling to teeth and feed bacteria longer
- Acidic drinks (soda, sports drinks, juice) — they deliver both sugar and acid at the same time
- Starchy snacks (chips, crackers, bread) — starches break down into sugars in your mouth
Acid — The Destructor
When plaque bacteria digest sugar, they produce lactic acid as a waste product. This acid is what actually dissolves tooth enamel — the process called demineralization. Each acid attack lasts about 20–30 minutes before your saliva can neutralize the pH and begin repairing the damage.
The cycle works like this:
- You eat or drink something containing sugar.
- Plaque bacteria consume the sugar and produce acid.
- The acid lowers the pH on the tooth surface below 5.5 (the critical point for enamel).
- Enamel minerals (calcium and phosphate) dissolve out of the tooth surface.
- Saliva gradually neutralizes the acid and deposits minerals back — a process called remineralization.
If acid attacks happen faster than your saliva can repair the damage, a cavity forms. This is why frequent snacking is more damaging than occasional treats.
Gum Disease — When Plaque Attacks Below the Line
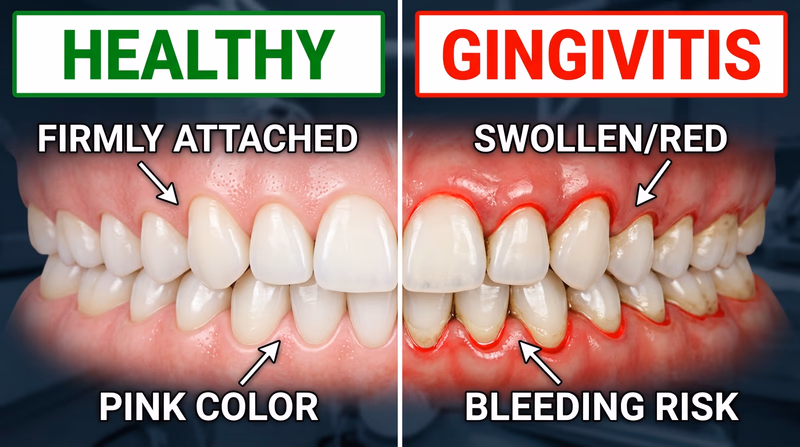
Plaque does not just cause cavities — it also causes gum disease (periodontal disease). When plaque builds up along the gumline, the bacteria irritate the gum tissue and trigger inflammation.
Stage 1: Gingivitis
The early stage of gum disease is called gingivitis. Signs include:
- Red, swollen, or puffy gums
- Gums that bleed when you brush or floss
- Bad breath that does not go away
The good news: gingivitis is completely reversible with better brushing, flossing, and professional cleanings. No permanent damage has occurred yet.
Stage 2: Periodontitis
If gingivitis is not treated, it can progress to periodontitis. The infection spreads below the gumline, and the bacteria begin destroying the periodontal ligament and alveolar bone — the very structures you labeled in your Req 1 drawing. Pockets form between the teeth and gums, trapping more bacteria. Eventually, teeth loosen and may fall out.
Periodontitis is the leading cause of tooth loss in adults, and the damage is not reversible — it can only be managed and slowed.
Breaking the Chain
Since decay requires all three factors (bacteria, sugar, acid), you can fight it by disrupting any part of the chain:
| Strategy | What It Disrupts |
|---|---|
| Brush twice daily + floss daily | Removes plaque before bacteria can produce acid |
| Limit sugary snacks and drinks | Reduces sugar available to bacteria |
| Use fluoride toothpaste | Strengthens enamel against acid attack |
| Drink water after eating | Rinses away sugar and helps neutralize acid |
| Chew sugar-free gum | Stimulates saliva, which neutralizes acid and aids remineralization |
| Regular dental cleanings | Removes tartar (hardened plaque) that brushing cannot reach |
You will learn more about fluoride’s protective role in Req 5.
NIDCR — Tooth Decay (Dental Caries) The National Institute of Dental and Craniofacial Research explains the science of tooth decay in plain language. Link: NIDCR — Tooth Decay (Dental Caries) — https://www.nidcr.nih.gov/health-info/tooth-decayReq 2b — Tooth Trauma & Mouth Guards
A cavity takes months or years to form. A broken tooth takes a fraction of a second. Traumatic dental injuries are sudden, painful, and often preventable — if you know the risks and take one simple precaution.
Causes of Traumatic Tooth Loss
Traumatic tooth loss happens when a strong impact knocks a tooth partially or completely out of its socket. The most common causes include:
- Sports injuries — The single biggest cause of dental trauma in young people. Contact sports like football, hockey, basketball, and lacrosse are high-risk, but even non-contact activities like skateboarding, cycling, and gymnastics cause dental injuries.
- Falls — Slipping on wet surfaces, tripping on stairs, or falling from playground equipment. Falls are the leading cause of dental injuries in children under six.
- Collisions — Running into another player, a goalpost, the ground, or a piece of equipment.
- Bicycle and vehicle accidents — A crash can drive a handlebar or dashboard into the face.
- Physical altercations — A blow to the face during a fight.
- Accidents during recreation — Being hit by a ball, puck, bat, elbow, or stick.
Types of Mouth Guards
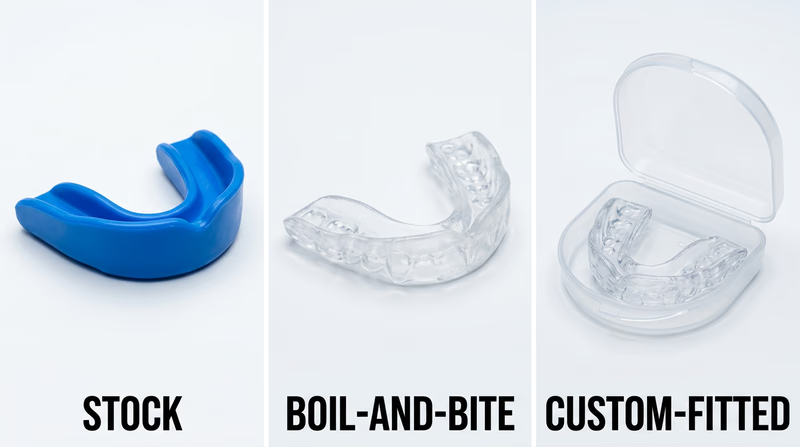
A mouth guard is a flexible protective device worn over the upper teeth to absorb and distribute impact forces. There are three main types:
1. Stock (Ready-Made) Mouth Guards
These come pre-formed and ready to wear right out of the package. They are the least expensive option and can be found at most sporting goods stores.
- Pros: Inexpensive, no preparation needed
- Cons: Poor fit — they are bulky, can make breathing and speaking difficult, and provide the least protection because they cannot be customized
- Best for: Occasional use or when budget is a major constraint
2. Boil-and-Bite Mouth Guards
These are made from thermoplastic material. You soften them in hot water, then bite down to mold them to your teeth. They offer a much better fit than stock guards.
- Pros: Better fit and comfort than stock, affordable, widely available
- Cons: Not as precise as custom-made, can thin out during the molding process
- Best for: Most youth and recreational athletes — the best balance of protection, comfort, and cost
3. Custom-Made Mouth Guards
A dentist takes an impression of your teeth and a dental laboratory creates a guard tailored exactly to your mouth. These provide the best fit, comfort, and protection.
- Pros: Superior fit, most comfortable, best protection, does not interfere with breathing or speech
- Cons: Most expensive, requires a dental visit
- Best for: Athletes in high-contact sports, anyone with braces or dental work, and competitive athletes
When to Wear a Mouth Guard
The ADA and the Academy for Sports Dentistry recommend mouth guards for all sports and recreational activities with a risk of contact to the face. Here is a list organized by risk level:
Required or Strongly Recommended
These sports have the highest rates of dental injury:
- Football
- Ice hockey
- Field hockey
- Lacrosse
- Boxing and martial arts
- Wrestling
- Rugby
Highly Recommended
Significant risk of falls, collisions, or ball impacts:
- Basketball
- Soccer
- Baseball and softball
- Skateboarding and rollerblading
- Mountain biking
- Gymnastics
- Volleyball
- Water polo
Recommended for High-Risk Situations
Lower overall risk, but injuries do occur:
- Cycling (especially BMX or trail riding)
- Skiing and snowboarding
- Surfing
- Rock climbing
- Equestrian activities
- Racquetball and squash

Req 2c — Saving a Knocked-Out Tooth
A permanent tooth gets knocked out during a basketball game. What happens in the next 30 minutes determines whether that tooth survives or is lost forever. This is one of the few first-aid situations where your knowledge can literally save a body part.
Why Speed Matters
When a tooth is knocked out (the dental term is avulsion), the cells on the root surface begin to die within minutes. These cells — the periodontal ligament fibers — are what allow the tooth to reattach to the bone. If the tooth is reimplanted within 30 minutes, there is a strong chance it will survive. After two hours, the odds drop sharply.
The Step-by-Step Procedure
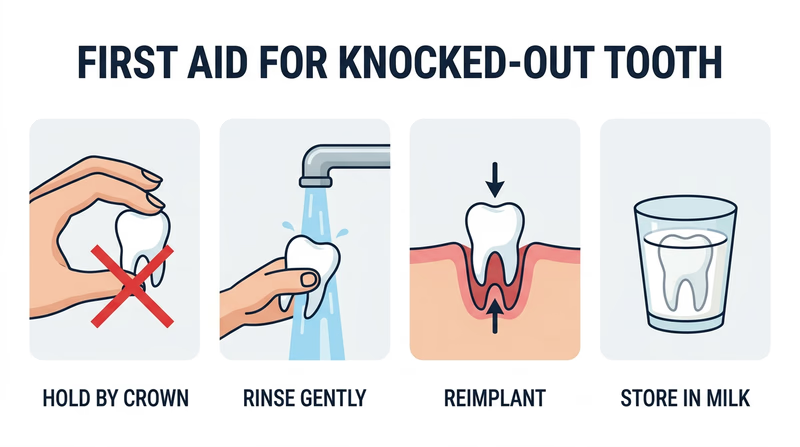
What NOT to Do
These common mistakes can destroy a knocked-out tooth’s chances of survival:
- Do not scrub the root. Even gentle scrubbing destroys the periodontal ligament cells.
- Do not let the tooth dry out. A dry tooth is a dead tooth. Keep it moist at all times.
- Do not store it in tap water for a long time. Water causes root cells to swell and burst (osmotic damage). A few seconds of rinsing is fine, but do not soak the tooth in water.
- Do not wrap it in tissue or cloth. The tooth will dry out and fibers will stick to the root surface.
- Do not try to reimplant a baby tooth. If the injured person is a young child, check whether the tooth is a primary (baby) tooth first. Baby teeth are smaller and whiter than permanent teeth.
- Do not handle the root. Always pick up the tooth by the crown.
Knocked-Out Tooth Response
Quick reference for the field- Find the tooth and pick it up by the crown only
- Confirm it is a permanent tooth (not a baby tooth)
- Rinse gently under water if dirty (no scrubbing)
- Reimplant in the socket if possible; bite on gauze to hold
- If reimplantation is not possible, store in milk, saliva, or saline
- Control bleeding with gauze or clean cloth
- Check for other injuries (concussion, jaw fracture)
- Get to a dentist or ER within 30 minutes
What If You Earned First Aid?
If you have already worked on the First Aid merit badge, you know about scene assessment and calling for help. Those same skills apply here — check the scene, check the person, call for help, and then focus on the tooth. The principles of Check, Call, Care work for dental emergencies just like any other.
ADA — Knocked-Out Tooth The American Dental Association's step-by-step guide for handling an avulsed (knocked-out) tooth. Link: ADA — Knocked-Out Tooth — https://www.mouthhealthy.org/en/az-topics/k/knocked-out-teeth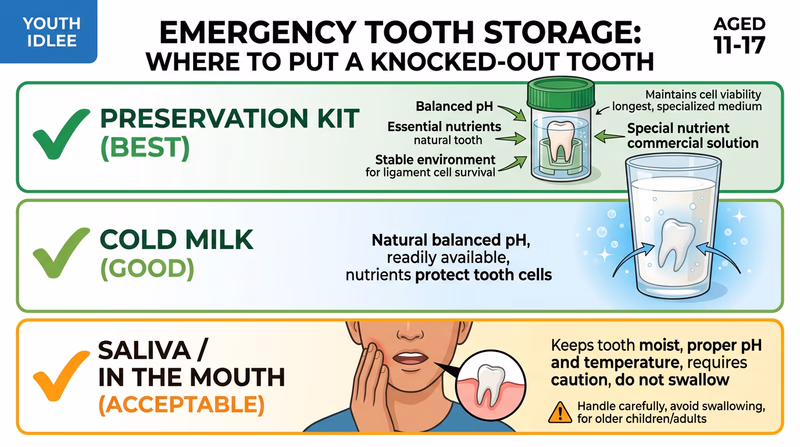
Req 2d — Tobacco & Oral Health
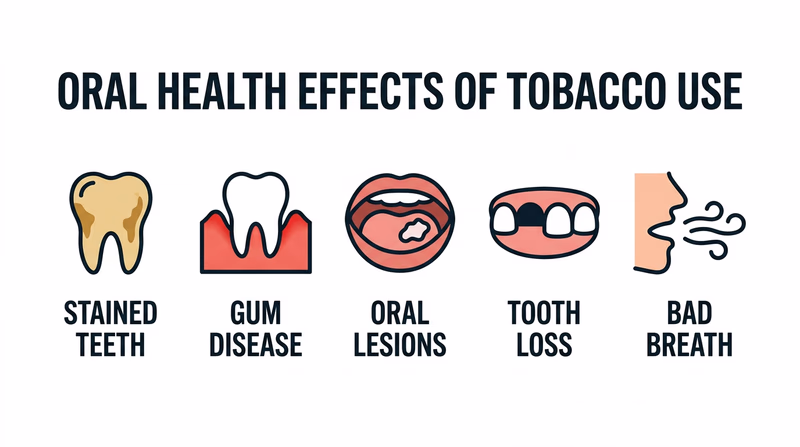
When most people think about tobacco and health, they think about lungs. But your mouth is the first place tobacco touches — and the damage it does there is severe, visible, and sometimes deadly.
How Tobacco Harms Your Mouth
Tobacco affects oral health in multiple ways, whether it is smoked, chewed, vaped, or used in any other form.
Gum Disease
Tobacco use is one of the strongest risk factors for periodontal disease. Nicotine constricts blood vessels in the gum tissue, reducing blood flow. This means:
- Your gums receive fewer immune cells to fight infection
- Healing after dental procedures is significantly slower
- Gum disease often progresses without the usual warning signs — smokers may not notice bleeding gums because the reduced blood flow masks the symptoms
- Smokers are twice as likely to develop gum disease as non-smokers, and treatment is less effective
Remember the stages of gum disease you learned in Req 2a? Tobacco accelerates the progression from gingivitis to periodontitis and makes treatment harder at every stage.
Oral Cancer
This is the most serious oral health consequence of tobacco use. Oral cancer can develop on the lips, tongue, cheeks, floor of the mouth, gums, and throat. About 75% of oral cancers are linked to tobacco use.
Warning signs include:
- A sore or lump in the mouth that does not heal within two weeks
- White or red patches on the gums, tongue, or lining of the mouth
- Difficulty chewing, swallowing, or moving the tongue or jaw
- Numbness in the mouth or lips
- Persistent ear pain
When caught early, oral cancer has a survival rate above 80%. When caught late, that rate drops below 40%.
Tooth Decay and Loss
Tobacco products — especially smokeless tobacco (chewing tobacco and snuff) — contain sugars that feed the same bacteria you learned about in Req 2a. Users who hold a dip of chewing tobacco against their gums are bathing those teeth in sugar for extended periods. The result is accelerated decay at the gum line.
Smokers also lose teeth at higher rates than non-smokers, largely due to the combination of accelerated gum disease and impaired healing.
Other Oral Effects
| Effect | How It Happens |
|---|---|
| Stained teeth | Tar and nicotine discolor enamel yellow to brown over time |
| Bad breath | Tobacco particles and chemicals linger in the mouth; gum disease makes it worse |
| Reduced taste and smell | Tobacco dulls the taste buds and olfactory nerve |
| Delayed healing | Reduced blood flow slows recovery after extractions, surgeries, and even routine cleanings |
| Dry mouth | Tobacco reduces saliva production; less saliva means less natural protection against decay |
| Hairy tongue | A harmless but unpleasant condition where the papillae on the tongue elongate and trap bacteria, giving the tongue a dark, furry appearance |
Vaping and E-Cigarettes
Some people believe vaping is safe for oral health because it does not involve burning tobacco. That is not accurate. Research shows that e-cigarettes:
- Deliver nicotine, which still constricts blood vessels and damages gum tissue
- Expose the mouth to heated chemicals (propylene glycol, vegetable glycerin, and flavorings) that can irritate and dry out oral tissues
- Increase the risk of gum inflammation and cell death in oral tissue
- May contribute to tooth decay because some e-liquid flavors contain sugars and acids
The long-term oral health effects of vaping are still being studied, but early evidence is concerning.
The Bottom Line
Every form of tobacco — cigarettes, cigars, pipes, smokeless tobacco, and e-cigarettes — damages your oral health. The damage is cumulative, meaning it gets worse the longer and more frequently you use tobacco. The best thing you can do for your mouth (and the rest of your body) is to never start.
CDC — Tobacco Use and Oral Health The Centers for Disease Control and Prevention's overview of how tobacco use affects oral health, with current statistics. Link: CDC — Tobacco Use and Oral Health — https://www.cdc.gov/oral-health/about/tobacco-use.html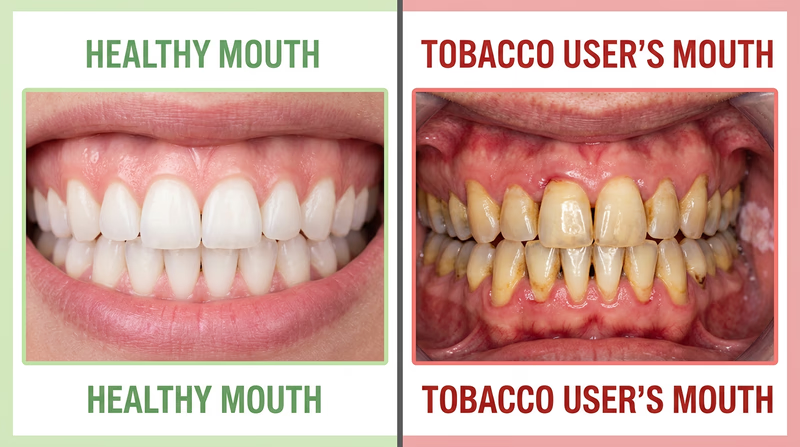
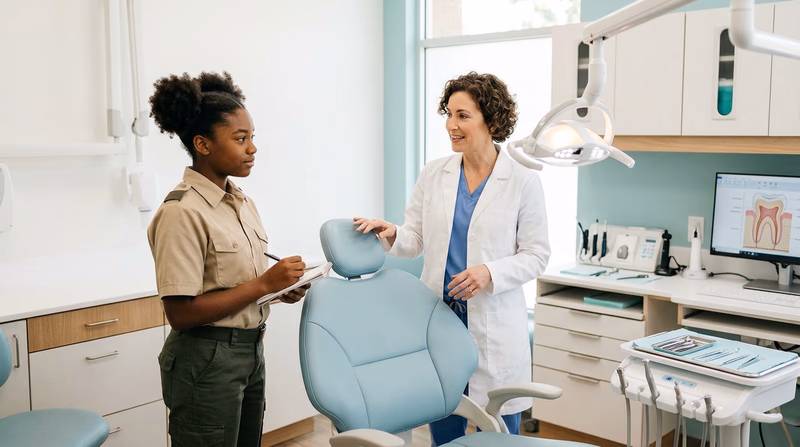
Req 3 — Visiting the Dentist
This is one of the most hands-on requirements in the badge — you are going to see a real dental professional at work and learn by watching. A little preparation will make this visit far more valuable than a routine cleaning appointment.
Before Your Visit
Setting It Up
Contact a dental office and explain that you are working on the Dentistry merit badge. Ask if your visit can include:
- A dental examination — a full checkup, not just a cleaning
- A plaque-control demonstration — where the dentist or hygienist shows you how plaque forms, how to detect it, and how to remove it effectively
Most dental offices are happy to accommodate Scouts. Your own dentist’s office is a great place to start, but any dental professional will work. Your merit badge counselor may also have a connection to a dental office willing to host you.
Prepare Your Questions
Going in with questions prepared shows respect for the dentist’s time and ensures you get the information you need. Here are some strong questions to consider — pick the ones that interest you most:
About the examination:
- What are you looking for when you examine my teeth and gums?
- How do you decide if a tooth needs a filling versus just watching it?
- What do the different things on my X-ray mean?
About plaque control:
- How can I tell where plaque is building up on my teeth?
- What is the most common brushing mistake you see?
- How important is flossing compared to brushing?
- Are electric toothbrushes really better than manual ones?
About the profession:
- What made you decide to become a dentist?
- What is the most interesting case you have worked on?
- How has dentistry changed since you started practicing?
- What do you wish more patients knew about their oral health?

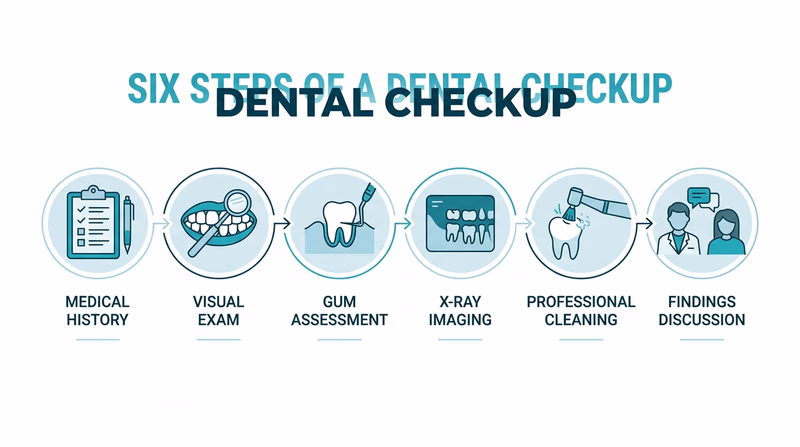
What Happens During a Checkup
When you tell your counselor about the visit, you should be able to describe each step of a typical dental examination. Here is what to watch for:
1. Medical History Review
The dentist or hygienist starts by reviewing your medical history. They need to know about medications, allergies, and health conditions that could affect your dental care. This happens because your mouth is connected to the rest of your body — a concept you will explore more in Req 5b.
2. Visual Examination
The dentist uses a small mirror and an explorer (a thin, pointed instrument) to inspect every tooth surface. They are looking for:
- Signs of decay (soft spots, discoloration, visible holes)
- Cracked, chipped, or worn teeth
- The condition of existing fillings, crowns, or other dental work
- Sores, lesions, or abnormalities in the soft tissues (tongue, cheeks, gums, palate)
3. Periodontal Assessment
The dentist or hygienist measures the depth of the gum pockets around each tooth using a thin instrument called a periodontal probe. Healthy pockets are 1–3 millimeters deep. Pockets deeper than 4 mm suggest gum disease — the same condition you studied in Req 2a.
4. X-Rays (Radiographs)
If X-rays are taken during your visit, watch how the digital sensor or film is positioned. X-rays reveal problems invisible to the naked eye:
- Decay between teeth
- Bone loss around roots
- Infections at the root tips
- Impacted teeth (like wisdom teeth that have not erupted)
You already learned to read X-rays in Req 1, so you should recognize some of what appears on the screen.
5. Professional Cleaning
A dental hygienist typically performs the cleaning, which includes:
- Scaling — removing tartar (hardened plaque) from tooth surfaces and below the gumline using hand instruments or an ultrasonic scaler
- Polishing — using a rotating rubber cup and gritty paste to smooth the tooth surfaces and remove stains
- Flossing — cleaning between every tooth to remove any remaining debris
6. Plaque-Control Demonstration
This is the part you specifically requested. The hygienist or dentist may use disclosing tablets — chewable tablets that stain plaque a bright color (usually pink or purple) so you can see exactly where plaque is hiding on your teeth. This makes it obvious which areas you are missing when you brush.
They will then demonstrate proper brushing and flossing techniques, pointing out the areas where you need to improve.
7. Findings and Recommendations
At the end of the exam, the dentist reviews their findings with you. They will discuss:
- Any problems found (cavities, gum disease, wear patterns)
- Treatment recommendations
- How soon to schedule your next visit
- Areas to focus on in your daily oral care
Visit Preparation Checklist
Before your dental office visit- Call to schedule, mentioning the Dentistry merit badge
- Request a dental examination and plaque-control demonstration
- Prepare at least five questions to ask
- Bring a small notebook and pen to take notes during and after
- Arrive a few minutes early
- Pay attention to every step of the exam so you can describe it to your counselor
Req 4 — Dental Tools & Hands-On Skills
This requirement offers three options — pick the two that interest you most:
- Option a: Name dental instruments and equipment
- Option b: Prepare a dental stone cast
- Option c: Track your sugar intake for three days
Each option gives you a different hands-on perspective on dentistry. Read through all three before deciding.
Option a — Dental Instruments & Equipment
If you visited a dental office for Req 3, you probably saw many of these in action. There is an important distinction: instruments are handheld tools the dentist uses directly on your teeth, while equipment refers to the larger devices and machines in the office.
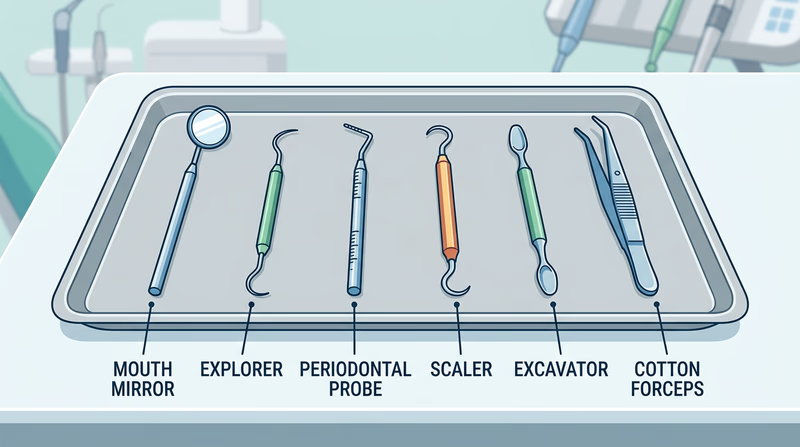
Dental Instruments
| Instrument | What It Does |
|---|---|
| Mouth mirror | A small, angled mirror on a handle. Lets the dentist see the back and sides of teeth, reflects light into dark areas, and retracts the cheek or tongue. |
| Explorer (dental probe) | A thin, curved instrument with a sharp tip. Used to feel for soft spots, rough areas, or edges of cavities on tooth surfaces. |
| Periodontal probe | A blunt-tipped instrument with millimeter markings. Measures the depth of gum pockets to check for periodontal disease. |
| Scaler (hand) | A sharp, hook-shaped instrument used to scrape tartar from tooth surfaces above and below the gumline. |
| Curette | Similar to a scaler but with a rounded tip. Used for scraping tartar and diseased tissue from below the gumline without damaging healthy gum tissue. |
| Excavator | A spoon-shaped instrument used to remove soft, decayed tooth material from a cavity before placing a filling. |
| Cotton forceps | Tweezers with locking handles, used to place and remove small cotton rolls, gauze, and other materials inside the mouth. |
| Dental syringe | Used to deliver local anesthesia (numbing shots). The cartridge-style design allows precise dosing. |
Dental Equipment
| Equipment | What It Does |
|---|---|
| Dental chair | A hydraulic chair that adjusts height, recline, and headrest position so the dentist can access the patient’s mouth comfortably. |
| Overhead light | A high-intensity, adjustable lamp that illuminates the inside of the mouth during procedures. |
| High-speed handpiece (dental drill) | A small, air-driven turbine that rotates a tiny bur at up to 400,000 RPM. Used to remove decay and shape teeth for fillings and crowns. |
| Suction/evacuation system | The tube the dental assistant holds to vacuum saliva, water, and debris from your mouth during procedures. |
| Ultrasonic scaler | Uses high-frequency vibrations and a water spray to break up tartar deposits. Faster and often more comfortable than hand scaling. |
| Digital X-ray system | Includes a sensor (placed inside the mouth), a radiation source, and computer software to capture and display radiographic images instantly. |
| Curing light | A blue LED light used to harden (cure) composite resin fillings. The light activates a chemical reaction that sets the filling material in seconds. |
| Autoclave | A sterilization machine that uses pressurized steam at 250°F (121°C) to kill all bacteria, viruses, and spores on dental instruments between patients. |
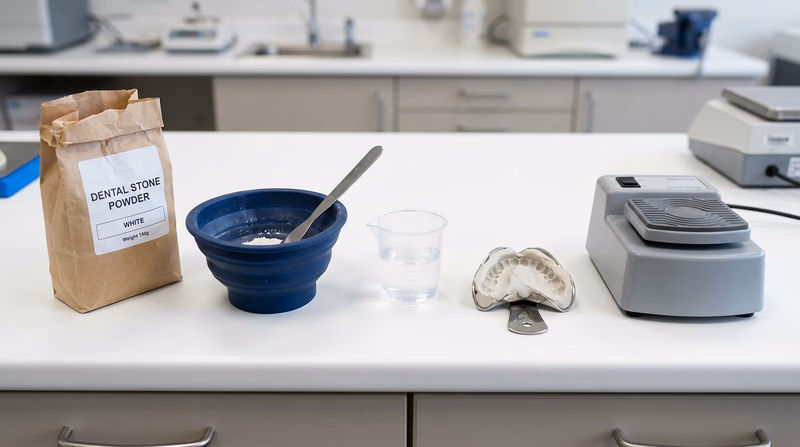
Option b — Making a Dental Stone Cast
A dental stone cast is a hard, precise replica of a patient’s teeth and gums. Dentists use these models to study a patient’s bite, plan treatments, and create custom appliances like retainers, mouth guards, and crowns. Making one is a real hands-on lab skill.
How It Works
Take an impression. The dentist fills a horseshoe-shaped tray with a soft impression material (usually alginate, which feels like thick pudding). You bite into the tray, and the material sets around your teeth in about two minutes. When removed, the tray holds a detailed negative mold of your teeth.
Mix the dental stone. Using the plastic measure, scoop the correct amount of dental stone powder into the mixing bowl. Add the measured amount of water. Stir with the spatula until the mixture is smooth and creamy — about 30 seconds of vigorous mixing.
Vibrate the mix. Place the mixing bowl on the dental vibrator. The vibration shakes air bubbles to the surface, preventing voids in the finished cast. Bubbles trapped in the stone would create bumps on the model and ruin the detail.
Pour the cast. Slowly pour small amounts of the stone mixture into the impression tray, starting at one end. Tilt the tray so the stone flows along the teeth impressions. Place the tray on the vibrator as you pour to help the stone settle into every detail.
Let it set. The stone hardens in about 30–45 minutes. Once fully set, carefully separate the cast from the impression tray.
Trim and finish. The dentist may trim the base of the cast on a model trimmer to create a flat, professional-looking base.
Option c — Three-Day Food Diary
This option connects directly to what you learned in Req 2a about how sugars fuel bacterial acid production. Tracking your own diet for three days will show you exactly how much sugar your teeth are exposed to.
What to Track
For three full days (try to include both weekdays and a weekend day), write down everything you eat and drink, including:
- Meals (breakfast, lunch, dinner)
- Snacks (everything between meals)
- Drinks (including flavored water, juice, soda, sports drinks, and coffee/tea with sugar)
- Condiments and toppings (ketchup, salad dressing, jam — these often contain hidden sugars)
What to Circle
Go through your list and circle any item that provides sugars bacteria can use to make acid. This includes:
- Obvious sugars: Candy, cookies, cake, ice cream, chocolate, soda, juice, sweetened tea
- Hidden sugars: Flavored yogurt, granola bars, breakfast cereals, dried fruit, ketchup, barbecue sauce, sports drinks, flavored milk
- Starches that break down into sugars: White bread, crackers, chips, pretzels, pasta — enzymes in your saliva convert these starches into sugars
Snacks to Avoid
Based on your diary and your understanding of the decay process, list snacks that are worst for your teeth:
- Sticky candy (caramels, taffy, gummy bears) — clings to teeth for extended acid attacks
- Hard candy and lollipops — dissolve slowly, bathing teeth in sugar for a long time
- Soda and sports drinks — deliver sugar and acid together, and sipping extends the exposure
- Dried fruit — naturally high in sugar and sticks to tooth surfaces
- Starchy chips and crackers — pack into the grooves of molars where bacteria thrive
Tooth-Friendly Alternatives
| Instead of… | Try… |
|---|---|
| Soda or juice | Water or unsweetened sparkling water |
| Candy | Fresh fruit (the water and fiber help) |
| Chips | Raw vegetables (carrots, celery, bell peppers) |
| Granola bars | Cheese and whole-grain crackers |
| Dried fruit | Fresh fruit or nuts |
Req 5 — Fluoride & the Mouth-Body Connection
This requirement covers two topics that show how deeply dentistry connects to overall health:
- How fluorides help prevent tooth decay and how they reach your teeth
- How the mouth is related to the rest of the body, including chewing, saliva, enzymes, nutrition, and speech
Part a — Fluoride and Tooth Decay Prevention
In Req 2a, you learned that acid dissolves minerals out of enamel (demineralization) and saliva deposits minerals back (remineralization). Fluoride supercharges that repair process and makes teeth more resistant to future acid attacks.
How Fluoride Works
Fluoride protects teeth in three ways:
Strengthens enamel structure. When fluoride is present during remineralization, it gets incorporated into the enamel crystal structure, forming a compound called fluorapatite. Fluorapatite is harder and more acid-resistant than the original enamel mineral (hydroxyapatite). Think of it as upgrading your tooth’s armor.
Promotes remineralization. Fluoride attracts calcium and phosphate ions from saliva to the tooth surface, speeding up the natural repair process. This can actually reverse early-stage cavities before they become holes.
Inhibits bacteria. Fluoride interferes with the enzymes that bacteria use to metabolize sugar and produce acid. The bacteria are still there, but they produce less acid.
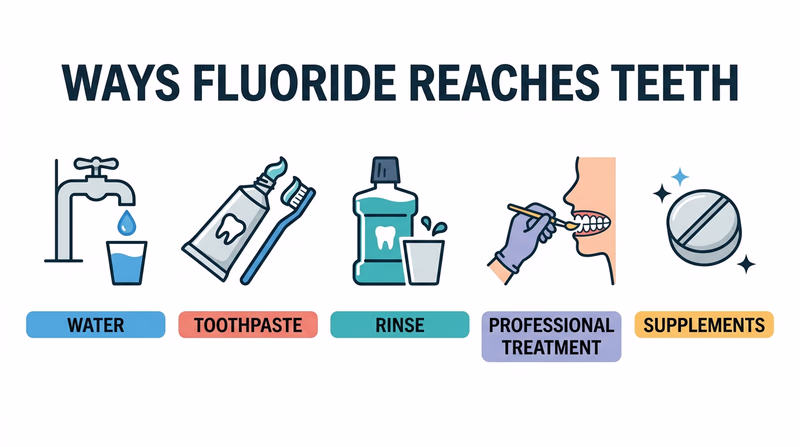
Ways Fluoride Reaches Your Teeth
Fluoride delivery falls into two categories: systemic (ingested, reaches teeth from inside the body) and topical (applied directly to tooth surfaces).
| Method | Type | How It Works |
|---|---|---|
| Community water fluoridation | Systemic + Topical | Fluoride is added to public water supplies at about 0.7 parts per million. When you drink it, fluoride is absorbed systemically and also washes over your teeth topically. |
| Fluoride toothpaste | Topical | The most widely used fluoride delivery method. Brushing twice daily with fluoride toothpaste provides direct contact with tooth surfaces. |
| Fluoride mouth rinse | Topical | Over-the-counter or prescription rinses that bathe teeth in fluoride. Often recommended for people at higher risk of cavities. |
| Professional fluoride treatments | Topical | A dentist or hygienist applies a concentrated fluoride gel, foam, or varnish directly to your teeth during a dental visit. Much stronger than toothpaste. |
| Fluoride supplements | Systemic | Prescription tablets or drops for children in areas without fluoridated water. Taken during the years teeth are developing. |
| Fluoridated dental materials | Topical | Some fillings and sealants slowly release fluoride into the surrounding tooth structure over time. |
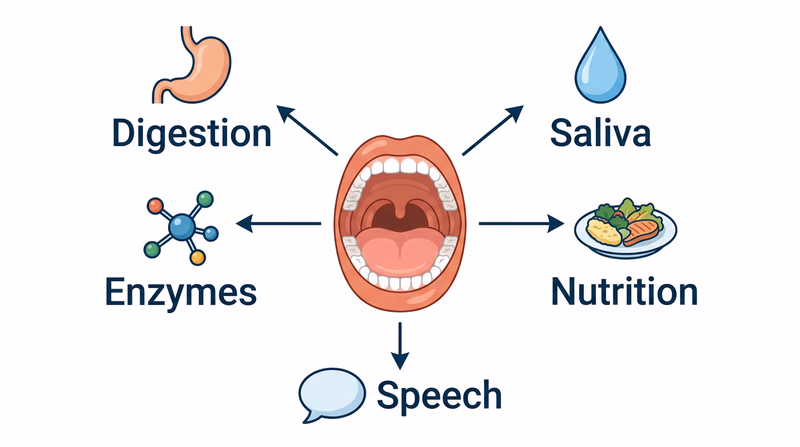
Part b — The Mouth-Body Connection
Your mouth is not an isolated system — it is the gateway to the rest of your body. Nearly everything your body needs passes through your mouth first, and the health of your mouth directly affects your overall health.
Chewing — Where Digestion Begins
Digestion does not start in your stomach. It starts the moment you take a bite. Your teeth mechanically break food into smaller pieces — a process called mastication. This is essential because:
- Smaller food particles have more surface area for digestive enzymes to work on
- Proper chewing mixes food with saliva, starting the chemical breakdown process
- Poorly chewed food puts extra strain on the stomach and intestines
- Missing or damaged teeth can lead to nutritional deficiencies because people avoid hard-to-chew foods like raw vegetables, nuts, and meats
Saliva — Your Mouth’s Secret Weapon
Your salivary glands produce about 1 to 1.5 liters of saliva every day. That may sound unimpressive, but saliva is one of the most important fluids in your body:
- Lubrication: Moistens food so it can be chewed and swallowed comfortably
- Digestion: Contains the enzyme amylase, which begins breaking down starches into sugars right in your mouth
- Protection: Washes bacteria and food particles off tooth surfaces, reducing plaque buildup
- Remineralization: Carries calcium, phosphate, and fluoride ions that repair early enamel damage
- Buffering: Neutralizes acids produced by bacteria, restoring the mouth to a safe pH
- Antimicrobial: Contains antibodies (IgA) and enzymes (lysozyme, lactoferrin) that fight harmful bacteria
Enzymes — Chemical Scissors
Enzymes are proteins that speed up chemical reactions. In your mouth, the key enzyme is salivary amylase (also called ptyalin). It breaks the long-chain starch molecules found in bread, rice, potatoes, and pasta into shorter sugar molecules that your body can absorb.
This is why the mouth is considered part of the digestive system — chemical digestion begins here, not in the stomach.
Nutrition — A Two-Way Street
The relationship between your mouth and nutrition works in both directions:
- Mouth → Nutrition: Healthy teeth and gums allow you to chew a wide variety of foods, ensuring a balanced diet. People who have lost teeth or have severe gum disease tend to eat softer, less nutritious foods.
- Nutrition → Mouth: What you eat directly affects your oral health. Calcium and vitamin D strengthen teeth and bones. Vitamin C keeps gums healthy. A diet high in sugar feeds the bacteria that cause decay.
Speech — Precision Engineering
Try saying the word “teeth” without your tongue touching the back of your upper front teeth. You cannot do it clearly. Your teeth, tongue, lips, palate, and jaw all work together to produce the sounds of speech.
- Teeth shape airflow for sounds like “th,” “f,” “v,” “s,” and “sh”
- The tongue presses against the teeth and palate for “t,” “d,” “n,” and “l”
- The palate (roof of the mouth) is essential for “k,” “g,” and “ng”
- The lips shape sounds like “b,” “p,” “m,” and “w”
Missing or misaligned teeth can cause lisping, whistling, and difficulty producing certain sounds. This is one reason orthodontic treatment matters beyond appearance.
The Systemic Connection
Recent research has found links between oral health and conditions elsewhere in the body:
- Heart disease: Bacteria from gum infections can enter the bloodstream and contribute to inflammation in blood vessels
- Diabetes: Gum disease and diabetes worsen each other — uncontrolled blood sugar increases gum infections, and gum infections make blood sugar harder to control
- Respiratory infections: Bacteria from the mouth can be inhaled into the lungs, potentially causing pneumonia
- Pregnancy complications: Severe gum disease has been linked to premature birth and low birth weight
Req 6 — Dental Health Outreach
This requirement asks you to teach others about dental health. Pick two of the five options below. Each one challenges you to communicate what you have learned in a creative way — through models, art, analysis, writing, or illustration.
Read through all five before choosing.
Option a — Build a Model Tooth and Demonstrate Brushing
This is a teaching demonstration — you build an oversized tooth model and use it to show proper brushing and flossing techniques to an audience.
Building Your Model
Your model tooth should be large enough for an audience to see clearly — about the size of a fist or larger. Choose your material:
- Clay — easiest to shape and most forgiving. Air-dry clay works well and can be painted.
- Soap — a large bar of white soap can be carved with a butter knife. The smooth surface mimics enamel nicely.
- Papier-mâché — lightweight and good for large models. Build over a crumpled paper core.
- Wax — moldable and smooth, but harder to get a large size.
Shape the model to show the crown, two roots (if making a molar), and a clear occlusal (biting) surface with grooves. You can paint different layers in different colors — white for enamel, yellow for dentin, red for the pulp — to connect back to the anatomy you learned in Req 1.
Your Demonstration
Use a large hand brush (like a scrub brush) and thick string or yarn as oversized versions of a toothbrush and floss. Show your audience:
Brushing technique:
- Angle the brush at 45 degrees toward the gumline
- Use short, gentle back-and-forth strokes
- Brush all surfaces: outer, inner, and chewing surfaces
- Brush the tongue (or mention it — tongue bacteria cause bad breath)
- Demonstrate that brushing should take about two minutes
Flossing technique:
- Wrap the string around your fingers, leaving about 18 inches between them
- Guide the string between teeth using a gentle sawing motion
- Curve the string into a C-shape against each tooth
- Slide it up and down under the gumline on both sides
Option b — Create a Prevention Poster
A good prevention poster communicates a clear message visually. It should be eye-catching enough to make someone stop and read it.
Poster Planning
Choose a focused message. “Take care of your teeth” is too vague. Instead, pick one specific angle:
- The decay triangle — how plaque, sugar, and acid work together (and how to break the chain)
- Brush and floss daily — step-by-step visual technique guide
- Gum disease warning signs — what to look for and when to act
- Sugar is hiding everywhere — show the sugar content of common snacks and drinks
- Your mouth, your health — the connection between oral health and overall health
Design Tips
- One main message — do not try to cover everything
- Bold headline that grabs attention
- Large, clear images or drawings — visible from across a room
- Minimal text — a poster is not an essay; use bullet points and short phrases
- Accurate information — draw from what you learned in this badge
Poster Quality Check
Before your poster is finished- Has a clear, focused message (not “everything about teeth”)
- Headline is readable from 10 feet away
- Images or illustrations are large and relevant
- Text is factually accurate
- Sources are cited if statistics are used
- Your name and troop number are included
Option c — Analyze Toothpaste Advertisements
This option builds critical thinking skills. Toothpaste ads make a lot of claims — some backed by science, some stretched thin, and some that are technically true but misleading.
Where to Find Ads
Look in magazines, on TV, on social media, and on toothpaste packaging itself. Collect ads from at least five different brands or product lines. Note the specific claims each one makes.
Common Claims to Evaluate
| Claim | What to Consider |
|---|---|
| “Whitens teeth” | Most whitening toothpastes use mild abrasives or low-concentration peroxide. Results are modest compared to professional whitening. |
| “Fights cavities” | Almost all toothpastes with fluoride fight cavities. This is a genuine benefit, but it is not unique to any one brand. |
| “Strengthens enamel” | Fluoride does strengthen enamel. The claim is accurate if the toothpaste contains fluoride. |
| “Kills 99% of germs” | Usually refers to mouthwash, not toothpaste. Even if true, the bacteria repopulate within hours. |
| “Recommended by dentists” | Often based on surveys asking dentists if they recommend a fluoride toothpaste, not this specific brand. |
| “Natural” or “chemical-free” | Everything is made of chemicals. “Natural” has no regulated definition for toothpaste. Some natural toothpastes skip fluoride, which is a real disadvantage. |
| “Sensitivity relief” | Legitimate claim for toothpastes containing potassium nitrate or stannous fluoride, which block pain signals from exposed dentin. |
Your Analysis
For each ad, note:
- The brand and product name
- The specific claims made
- Whether each claim is accurate, exaggerated, or misleading
- Whether the product carries the ADA Seal of Acceptance
Option d — Write a Feature Story
A feature story is longer and more engaging than a news article. It tells a story, uses quotes, and draws the reader in with an interesting angle.
Story Structure
- Hook — Open with something attention-grabbing. A surprising statistic, a real-life scenario, or a compelling question.
- Context — Why should your classmates care about oral health?
- Core content — The basics of good oral care (brushing, flossing, diet, dental visits).
- Tobacco section — Dedicate at least two paragraphs to how tobacco products damage oral health. Draw from what you learned in Req 2d — gum disease, oral cancer, staining, vaping risks.
- Closing — End with a call to action or a thought-provoking statement.
Writing Tips
- Interview a dentist or hygienist for a quote — it adds credibility and makes the story more professional.
- Include a surprising fact to grab readers who might otherwise skip a “health” article.
- Keep paragraphs short — newspaper paragraphs are typically 2–3 sentences.
- Avoid lecturing — your readers are your peers, not patients. Write like you are telling a friend something interesting, not giving a health class presentation.
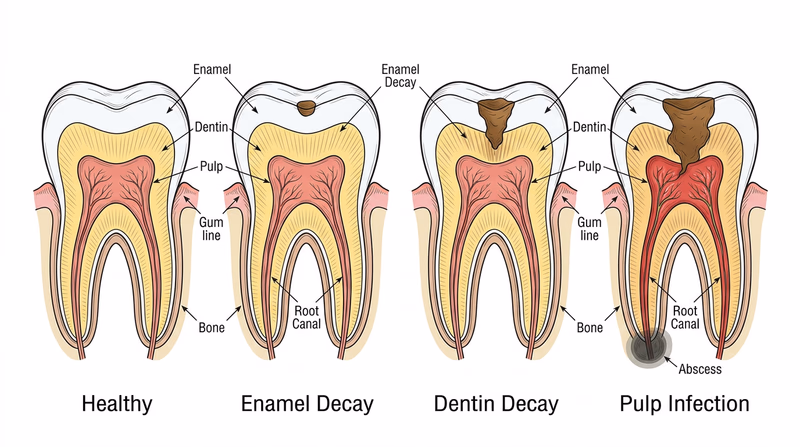
Option e — Draw the Stages of Decay
This option combines art and science. You will create a visual progression of how decay develops and then explain how dentists fix it at each stage.
Stages of Decay to Draw
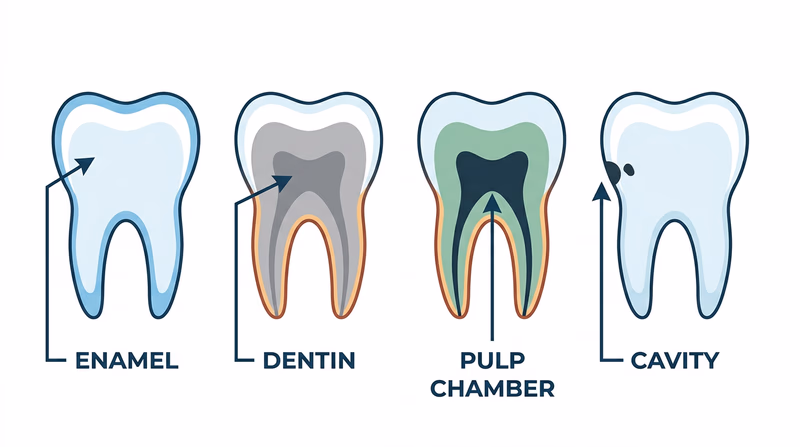
Create a series of drawings showing the same tooth at different stages:
- Healthy tooth — intact enamel, no discoloration
- White spot lesion — a chalky white area where minerals are starting to dissolve. This is the earliest visible sign of decay and can still be reversed with fluoride.
- Enamel decay — the acid has broken through the enamel surface, creating a small cavity. Usually painless at this stage.
- Dentin decay — the cavity has reached the softer dentin layer. The tooth may become sensitive to hot, cold, or sweet foods.
- Pulp involvement — decay has reached the pulp chamber, infecting the nerves and blood vessels. Significant pain, possible abscess (infection at the root tip).
- Abscess — infection spreads beyond the tooth into the surrounding bone. Swelling, severe pain, and potential systemic infection.
Treatments at Each Stage
| Stage | Treatment |
|---|---|
| White spot lesion | Fluoride treatment, improved brushing/flossing — no drilling needed |
| Enamel or dentin cavity | Dental filling — the decayed material is removed and the cavity is filled with composite resin (tooth-colored), amalgam (silver), glass ionomer, or gold |
| Deep cavity near the pulp | Crown — a cap placed over the tooth after decay removal, or a filling with a protective base layer |
| Pulp infection | Root canal — the infected pulp is removed, the canals are cleaned and sealed, and the tooth is covered with a crown |
| Severe infection/abscess | Extraction — if the tooth cannot be saved, it is removed. Replacement options include dental implants, bridges, or partial dentures |
No matter which two options you choose, the goal is the same: take the knowledge you have built throughout this badge and communicate it to others. Teaching is one of the best ways to solidify your own understanding.
ADA — Seal of Acceptance Program Learn how the ADA evaluates dental products and what the Seal of Acceptance means for consumers. Link: ADA — Seal of Acceptance Program — https://www.ada.org/resources/research/science-and-research-institute/ada-seal-of-acceptanceReq 7 — Careers in Dentistry
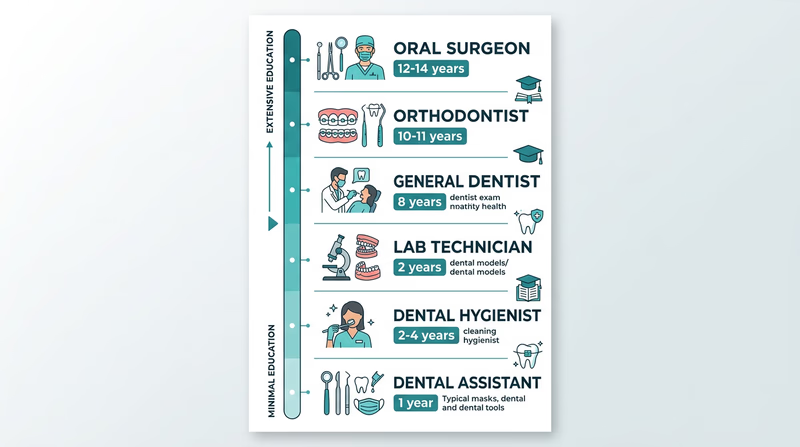
Dentistry is not just one job — it is an entire ecosystem of careers. Some require a decade of education. Others can launch in two years or less. All of them help people keep their mouths healthy.
Career Options in Dentistry
Here are more than three career paths to consider. Pick the ones that interest you, then choose one for your deep-dive research.
Dentist (DDS or DMD)
General dentists are the primary care providers of oral health. They examine, diagnose, and treat a wide range of dental problems. Most dentists own or co-own their practice, which means they are also small business owners.
- Education: 4 years of college + 4 years of dental school
- Degree: Doctor of Dental Surgery (DDS) or Doctor of Dental Medicine (DMD) — these are equivalent degrees
- Licensure: Pass the National Board Dental Examination and a state or regional clinical exam
- Salary range: Approximately $160,000–$210,000 per year (median around $170,000)
Dental Hygienist
Hygienists are licensed professionals who specialize in preventive oral care. They perform cleanings, take X-rays, apply fluoride and sealants, and educate patients about oral hygiene. If you had your teeth cleaned at the dental office for Req 3, a hygienist likely did that work.
- Education: 2–4 years (associate or bachelor’s degree in dental hygiene)
- Licensure: Pass the National Board Dental Hygiene Examination and a state clinical exam
- Salary range: Approximately $65,000–$90,000 per year (median around $81,000)
Dental Assistant
Dental assistants work alongside dentists during procedures, prepare treatment rooms, sterilize instruments, take X-rays, and help with patient comfort. This is one of the fastest entry points into the dental field.
- Education: Certificate or diploma program (9–12 months), or on-the-job training in some states
- Certification: Certified Dental Assistant (CDA) credential is available through the Dental Assisting National Board (DANB) — optional in some states, required in others
- Salary range: Approximately $38,000–$50,000 per year (median around $44,000)
Orthodontist
Orthodontists specialize in aligning teeth and correcting bite problems using braces, aligners, and other appliances. This is a specialty that requires additional training beyond dental school.
- Education: 4 years of college + 4 years of dental school + 2–3 years of orthodontic residency
- Licensure: Same as dentist, plus specialty board certification
- Salary range: Approximately $200,000–$350,000+ per year
Oral Surgeon
Oral and maxillofacial surgeons perform complex procedures including wisdom tooth extractions, jaw surgery, dental implant placement, and facial trauma repair.
- Education: 4 years of college + 4 years of dental school + 4–6 years of surgical residency
- Licensure: Same as dentist, plus specialty board certification
- Salary range: Approximately $250,000–$400,000+ per year
Dental Laboratory Technician
Lab technicians create the crowns, bridges, dentures, and orthodontic appliances that dentists design. This is a craft-based career that combines science with artistry. If you made a dental stone cast in Req 4b, you got a small taste of lab work.
- Education: 2-year associate degree or certificate program, or apprenticeship
- Certification: Certified Dental Technician (CDT) credential is available — voluntary but valued
- Salary range: Approximately $38,000–$58,000 per year (median around $46,000)
Dental Public Health Professional
These professionals work at the population level — designing community programs, conducting research, and developing policy to improve oral health for entire communities. They might work for government agencies, nonprofits, or universities.
- Education: Dental degree + master’s degree in public health (MPH) or related field
- Focus areas: Water fluoridation policy, school-based sealant programs, access to care for underserved communities
Researching Your Chosen Career
For the career you choose to research in depth, gather information on these topics:
Career Research Guide
Information to discuss with your counselor- Training and education required (degrees, years of schooling)
- Certification or licensure requirements
- Estimated cost of education (tuition, books, equipment)
- Typical entry-level experience required
- Employment outlook (is demand growing, stable, or declining?)
- Starting salary and mid-career salary
- Advancement opportunities (specialization, management, teaching, private practice)
- Day-to-day work environment (office, hospital, lab, community settings)
- What you personally find interesting or challenging about this career
Where to Research
Bureau of Labor Statistics — Dentists The BLS Occupational Outlook Handbook provides detailed data on education, pay, job outlook, and working conditions for dental careers. Link: Bureau of Labor Statistics — Dentists — https://www.bls.gov/ooh/healthcare/dentists.htm ADA — Careers in Dentistry The American Dental Association's career exploration resources, including information on dental school, specialties, and related careers. Link: ADA — Careers in Dentistry — https://www.ada.org/resources/careers
Extended Learning
A. Congratulations
You have explored the science behind your smile — from the microscopic structure of enamel to the career paths that keep millions of mouths healthy. Along the way, you learned to read X-rays, understood the chemistry of tooth decay, discovered how to save a knocked-out tooth, and researched what it takes to work in the dental field. That is a serious amount of knowledge.
But dentistry is a field that never stops evolving. Below are some deeper topics, real-world experiences, and organizations that can take your interest even further.
B. Forensic Dentistry — Teeth That Tell Stories
Your teeth are as unique as your fingerprints. Forensic dentists (forensic odontologists) use dental records to identify individuals when other methods are not possible — after natural disasters, accidents, fires, or in criminal investigations.
Every person’s combination of fillings, crowns, missing teeth, root canal treatments, and jaw structure creates a one-of-a-kind dental “signature.” Forensic dentists compare postmortem dental findings against existing dental records, X-rays, and photographs to make identifications.
Forensic dentistry also plays a role in estimating the age of unidentified remains. Children’s teeth erupt in a predictable sequence, and adult teeth show measurable changes with age — wear patterns, root transparency, and secondary dentin formation can all help narrow down an age range.
In criminal cases, forensic dentists analyze bite mark evidence, though this area has become increasingly controversial. Modern DNA analysis has largely replaced bite mark comparison in courtrooms, but the broader field of dental identification remains an indispensable tool for disaster response teams worldwide. Organizations like DMORT (Disaster Mortuary Operational Response Teams) include forensic dentists as core members who deploy to mass casualty events.
If you are interested in both dentistry and criminal justice, forensic odontology sits at the intersection of the two. It requires a dental degree plus specialized training in forensic science.
C. Digital Dentistry — The Future Is Already Here
The dental office you visited for Req 3 is probably already using technology that did not exist 20 years ago. Here is a look at the cutting edge.
Intraoral scanners have largely replaced the messy alginate impression trays you may have used in Req 4b. A small wand with a camera scans your teeth in minutes, creating an exact 3D digital model that can be transmitted electronically — no physical impressions needed.
CAD/CAM (Computer-Aided Design/Computer-Aided Manufacturing) systems let dentists design and mill a custom porcelain crown right in the office. What used to require two appointments and a dental lab now takes about 90 minutes, start to finish. The dentist designs the crown on screen, and a milling machine carves it from a block of ceramic.
3D printing is expanding rapidly. Dental labs use it to create surgical guides, clear aligners, temporary crowns, and models. Some offices are printing custom night guards, retainers, and even implant components in-house.
AI-assisted diagnosis is an emerging frontier. Machine learning algorithms trained on millions of dental X-rays can detect cavities, bone loss, and other conditions with accuracy comparable to experienced dentists. These tools do not replace the dentist — they serve as a “second set of eyes” that catches things that might be missed.
Laser dentistry uses focused light energy to remove decay, reshape gum tissue, and treat infections — often without anesthesia and with faster healing times than traditional methods. Lasers are especially useful for treating soft tissue conditions and preparing small cavities.
D. The Science of Saliva — More Than You Think
In Req 5b, you learned about saliva’s roles in digestion and tooth protection. But saliva is becoming one of the most exciting frontiers in medical diagnostics.
Researchers are developing salivary diagnostics — tests that can detect diseases from a simple saliva sample instead of a blood draw. Saliva contains DNA, RNA, proteins, hormones, and antibodies that reflect what is happening throughout your body. Scientists have identified salivary biomarkers for:
- Oral and breast cancer
- Diabetes (glucose levels in saliva correlate with blood glucose)
- HIV infection
- Hepatitis
- Heart disease risk factors
- Stress hormones (cortisol)
- Drug use
A saliva-based diagnostic test is painless, non-invasive, and can be administered by non-medical personnel. For Scouts working in remote areas during high-adventure activities, imagine being able to run a health screening with a simple spit test instead of a blood draw.
The field is still developing, but the potential is enormous. The mouth may turn out to be the most convenient window into overall health — a concept that connects directly to the mouth-body relationship you explored in Req 5b.
E. Real-World Experiences
These are experiences you can seek out to extend your learning beyond the badge requirements.
F. Organizations
These organizations offer resources, programs, and connections for anyone interested in dentistry and oral health.
American Dental Association (ADA) The largest dental professional organization in the U.S. Offers career resources, oral health information, and the ADA Seal of Acceptance program for dental products. Link: American Dental Association (ADA) — https://www.ada.org/ American Dental Hygienists' Association (ADHA) The professional association for dental hygienists. Provides career information, continuing education resources, and student membership for those exploring the field. Link: American Dental Hygienists' Association (ADHA) — https://www.adha.org/ National Institute of Dental and Craniofacial Research (NIDCR) Part of the National Institutes of Health. Funds dental research and provides comprehensive, science-based oral health information for the public. Link: National Institute of Dental and Craniofacial Research (NIDCR) — https://www.nidcr.nih.gov/ American Student Dental Association (ASDA) A national student-run organization for dental students. Offers pre-dental resources, mentorship, and information about dental school admissions. Link: American Student Dental Association (ASDA) — https://www.asdanet.org/ Give Kids A Smile An ADA Foundation program providing free dental care to underserved children. Look for local events where you can volunteer or receive care. Link: Give Kids A Smile — https://www.ada.org/about/community-involvement/give-kids-a-smile