Req 1 — Tooth Anatomy from X-Rays
This requirement asks you to do four things, all centered on studying and drawing a lower molar:
- Study tooth structure and look for decay on X-ray images
- Draw a lower molar and label its parts and surfaces
- Show where nerves and blood vessels enter and leave the tooth
- Show where bacterial plaque is most likely to collect
Your counselor will provide X-ray images (or digital radiographs) to work from. Before you pick up your pencil, let’s make sure you understand what you are looking at.
Reading a Dental X-Ray
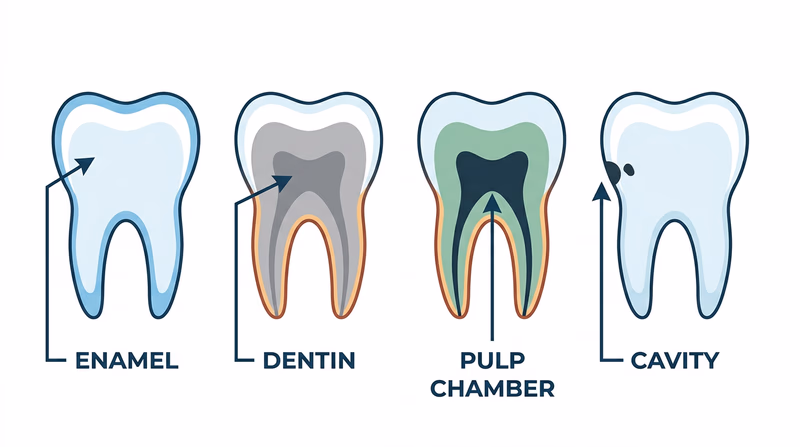
Dental X-rays work because different materials in your mouth absorb radiation differently. Dense materials like enamel and metal fillings appear bright white on the image. Softer materials like gum tissue appear dark gray or black. Decay shows up as a dark shadow within the normally white tooth structure — because the decayed area has lost mineral density.
When you look at a dental X-ray, you should be able to identify:
- Enamel — the bright white outer shell of the crown
- Dentin — the slightly darker layer beneath the enamel
- Pulp chamber — the dark space in the center of the tooth
- Root canals — dark lines running down through the roots
- Bone — the lighter area surrounding the roots
- Dark spots or shadows — possible areas of decay
Anatomy of a Lower Molar
A molar is one of the large, flat teeth at the back of your mouth designed for grinding food. A lower molar typically has two roots (upper molars usually have three). Here are the structures you need to know for your drawing.
The Crown (Above the Gumline)
| Part | Description |
|---|---|
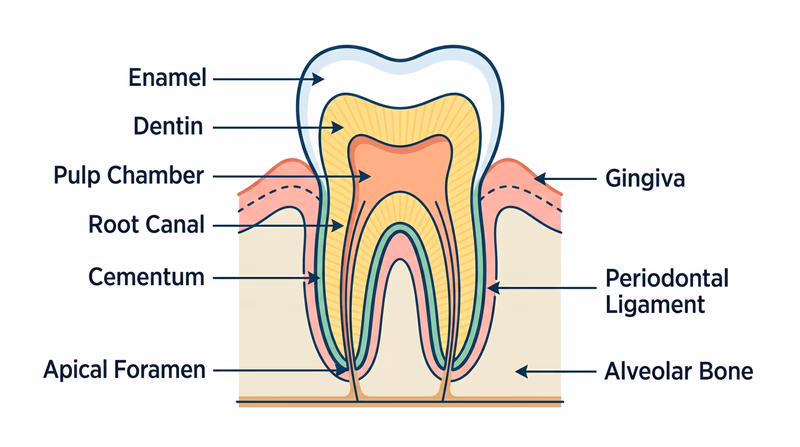
| Enamel | The hardest substance in the human body — harder than bone. This thin, white outer layer protects the crown from wear and decay. |
| Dentin | Makes up most of the tooth. Yellowish and slightly softer than enamel, dentin contains microscopic tubes that can transmit sensation to the nerve. |
| Pulp chamber | The hollow center of the crown containing nerves, blood vessels, and connective tissue. This is the “living” part of the tooth. |
The Root (Below the Gumline)
| Part | Description |
|---|---|
| Root canals | Narrow channels running through each root, carrying nerves and blood vessels from the jawbone into the pulp chamber. |
| Cementum | A thin, bone-like layer covering the root surface. It is softer than enamel and helps anchor the tooth to the surrounding bone. |
| Apical foramen | The tiny opening at the tip of each root where nerves and blood vessels enter and exit the tooth. |
Supporting Structures
| Part | Description |
|---|---|
| Gingiva (gums) | The pink soft tissue that covers the bone and surrounds the neck of the tooth. |
| Periodontal ligament | A thin layer of fibers connecting the cementum to the alveolar bone. These fibers act like tiny shock absorbers. |
| Alveolar bone | The part of the jawbone that forms the socket around each tooth root. |
Tooth Surfaces
When dentists describe where a cavity or problem is located, they use specific surface names:
- Occlusal — the biting/chewing surface on top
- Mesial — the side facing toward the front of the mouth
- Distal — the side facing toward the back of the mouth
- Buccal — the side facing the cheek
- Lingual — the side facing the tongue
Drawing Your Molar
Here is a step-by-step approach for creating your labeled drawing:
Start with the outline. Draw the crown shape — a broad, slightly bumpy top surface (the occlusal surface) with sides tapering down to the neck. Then draw two roots extending downward, each tapering to a point.
Add the internal layers. Draw the enamel as a thin outer band on the crown. Fill the interior with dentin. Leave a hollow space in the center for the pulp chamber, and draw narrow root canals running down through each root.
Draw the surrounding structures. Add a wavy line for the gumline (gingiva). Draw bone around the roots with a thin gap between the bone and the root — that gap is the periodontal ligament.
Label everything. Use lines pointing to each structure. Label all parts listed in the tables above, plus the five surfaces.
Mark the nerve and blood vessel entry points. Draw small arrows at the apical foramen (the tip of each root) showing that nerves and blood vessels enter here, travel up through the root canals, and reach the pulp chamber. This is how the tooth receives its blood supply and sensation.
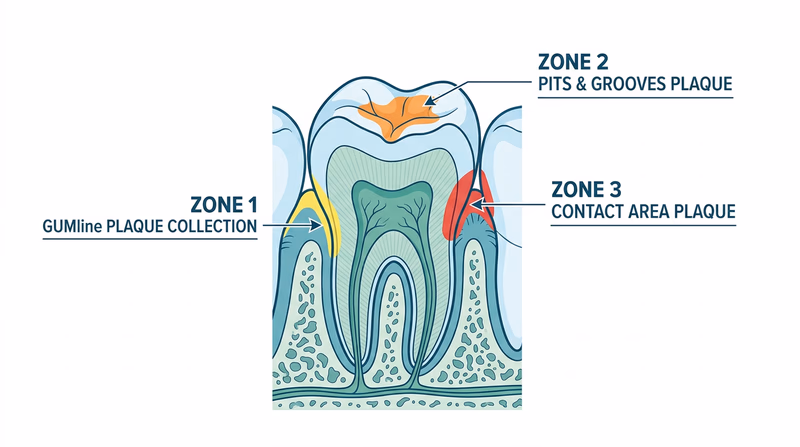
Mark plaque-prone areas. Shade or highlight these zones on your drawing:
- Along the gumline — where the tooth meets the gingiva
- In the pits and fissures — the grooves on the occlusal (chewing) surface
- Between teeth — the mesial and distal contact surfaces
Drawing Checklist
Make sure your molar drawing includes all of these
- Enamel covering the crown
- Dentin filling the interior
- Pulp chamber in the center of the crown
- Root canals running through both roots
- Cementum covering root surfaces
- Apical foramen at the tip of each root
- Gingiva (gumline) surrounding the neck
- Periodontal ligament between root and bone
- Alveolar bone forming the socket
- All five surfaces labeled (occlusal, mesial, distal, buccal, lingual)
- Arrows showing nerve/blood vessel entry at root tips
- Plaque-prone zones highlighted (gumline, fissures, between teeth)