Req 6 — Dental Health Outreach
This requirement asks you to teach others about dental health. Pick two of the five options below. Each one challenges you to communicate what you have learned in a creative way — through models, art, analysis, writing, or illustration.
Read through all five before choosing.
Option a — Build a Model Tooth and Demonstrate Brushing
This is a teaching demonstration — you build an oversized tooth model and use it to show proper brushing and flossing techniques to an audience.
Building Your Model
Your model tooth should be large enough for an audience to see clearly — about the size of a fist or larger. Choose your material:
- Clay — easiest to shape and most forgiving. Air-dry clay works well and can be painted.
- Soap — a large bar of white soap can be carved with a butter knife. The smooth surface mimics enamel nicely.
- Papier-mâché — lightweight and good for large models. Build over a crumpled paper core.
- Wax — moldable and smooth, but harder to get a large size.
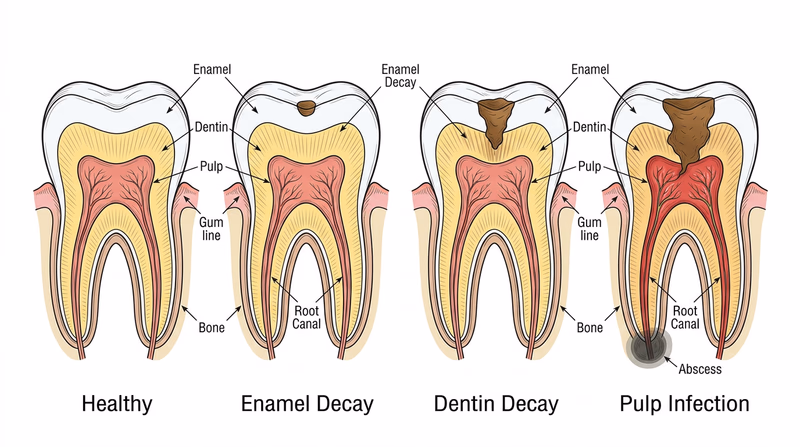
Shape the model to show the crown, two roots (if making a molar), and a clear occlusal (biting) surface with grooves. You can paint different layers in different colors — white for enamel, yellow for dentin, red for the pulp — to connect back to the anatomy you learned in Req 1.
Your Demonstration
Use a large hand brush (like a scrub brush) and thick string or yarn as oversized versions of a toothbrush and floss. Show your audience:
Brushing technique:
- Angle the brush at 45 degrees toward the gumline
- Use short, gentle back-and-forth strokes
- Brush all surfaces: outer, inner, and chewing surfaces
- Brush the tongue (or mention it — tongue bacteria cause bad breath)
- Demonstrate that brushing should take about two minutes
Flossing technique:
- Wrap the string around your fingers, leaving about 18 inches between them
- Guide the string between teeth using a gentle sawing motion
- Curve the string into a C-shape against each tooth
- Slide it up and down under the gumline on both sides
Option b — Create a Prevention Poster
A good prevention poster communicates a clear message visually. It should be eye-catching enough to make someone stop and read it.
Poster Planning
Choose a focused message. “Take care of your teeth” is too vague. Instead, pick one specific angle:
- The decay triangle — how plaque, sugar, and acid work together (and how to break the chain)
- Brush and floss daily — step-by-step visual technique guide
- Gum disease warning signs — what to look for and when to act
- Sugar is hiding everywhere — show the sugar content of common snacks and drinks
- Your mouth, your health — the connection between oral health and overall health
Design Tips
- One main message — do not try to cover everything
- Bold headline that grabs attention
- Large, clear images or drawings — visible from across a room
- Minimal text — a poster is not an essay; use bullet points and short phrases
- Accurate information — draw from what you learned in this badge
Poster Quality Check
Before your poster is finished
- Has a clear, focused message (not “everything about teeth”)
- Headline is readable from 10 feet away
- Images or illustrations are large and relevant
- Text is factually accurate
- Sources are cited if statistics are used
- Your name and troop number are included
Option c — Analyze Toothpaste Advertisements
This option builds critical thinking skills. Toothpaste ads make a lot of claims — some backed by science, some stretched thin, and some that are technically true but misleading.
Where to Find Ads
Look in magazines, on TV, on social media, and on toothpaste packaging itself. Collect ads from at least five different brands or product lines. Note the specific claims each one makes.
Common Claims to Evaluate
| Claim | What to Consider |
|---|---|
| “Whitens teeth” | Most whitening toothpastes use mild abrasives or low-concentration peroxide. Results are modest compared to professional whitening. |
| “Fights cavities” | Almost all toothpastes with fluoride fight cavities. This is a genuine benefit, but it is not unique to any one brand. |
| “Strengthens enamel” | Fluoride does strengthen enamel. The claim is accurate if the toothpaste contains fluoride. |
| “Kills 99% of germs” | Usually refers to mouthwash, not toothpaste. Even if true, the bacteria repopulate within hours. |
| “Recommended by dentists” | Often based on surveys asking dentists if they recommend a fluoride toothpaste, not this specific brand. |
| “Natural” or “chemical-free” | Everything is made of chemicals. “Natural” has no regulated definition for toothpaste. Some natural toothpastes skip fluoride, which is a real disadvantage. |
| “Sensitivity relief” | Legitimate claim for toothpastes containing potassium nitrate or stannous fluoride, which block pain signals from exposed dentin. |
Your Analysis
For each ad, note:
- The brand and product name
- The specific claims made
- Whether each claim is accurate, exaggerated, or misleading
- Whether the product carries the ADA Seal of Acceptance
Option d — Write a Feature Story
A feature story is longer and more engaging than a news article. It tells a story, uses quotes, and draws the reader in with an interesting angle.
Story Structure
- Hook — Open with something attention-grabbing. A surprising statistic, a real-life scenario, or a compelling question.
- Context — Why should your classmates care about oral health?
- Core content — The basics of good oral care (brushing, flossing, diet, dental visits).
- Tobacco section — Dedicate at least two paragraphs to how tobacco products damage oral health. Draw from what you learned in Req 2d — gum disease, oral cancer, staining, vaping risks.
- Closing — End with a call to action or a thought-provoking statement.
Writing Tips
- Interview a dentist or hygienist for a quote — it adds credibility and makes the story more professional.
- Include a surprising fact to grab readers who might otherwise skip a “health” article.
- Keep paragraphs short — newspaper paragraphs are typically 2–3 sentences.
- Avoid lecturing — your readers are your peers, not patients. Write like you are telling a friend something interesting, not giving a health class presentation.
Option e — Draw the Stages of Decay
This option combines art and science. You will create a visual progression of how decay develops and then explain how dentists fix it at each stage.
Stages of Decay to Draw
Create a series of drawings showing the same tooth at different stages:
- Healthy tooth — intact enamel, no discoloration
- White spot lesion — a chalky white area where minerals are starting to dissolve. This is the earliest visible sign of decay and can still be reversed with fluoride.
- Enamel decay — the acid has broken through the enamel surface, creating a small cavity. Usually painless at this stage.
- Dentin decay — the cavity has reached the softer dentin layer. The tooth may become sensitive to hot, cold, or sweet foods.
- Pulp involvement — decay has reached the pulp chamber, infecting the nerves and blood vessels. Significant pain, possible abscess (infection at the root tip).
- Abscess — infection spreads beyond the tooth into the surrounding bone. Swelling, severe pain, and potential systemic infection.
Treatments at Each Stage
| Stage | Treatment |
|---|---|
| White spot lesion | Fluoride treatment, improved brushing/flossing — no drilling needed |
| Enamel or dentin cavity | Dental filling — the decayed material is removed and the cavity is filled with composite resin (tooth-colored), amalgam (silver), glass ionomer, or gold |
| Deep cavity near the pulp | Crown — a cap placed over the tooth after decay removal, or a filling with a protective base layer |
| Pulp infection | Root canal — the infected pulp is removed, the canals are cleaned and sealed, and the tooth is covered with a crown |
| Severe infection/abscess | Extraction — if the tooth cannot be saved, it is removed. Replacement options include dental implants, bridges, or partial dentures |
No matter which two options you choose, the goal is the same: take the knowledge you have built throughout this badge and communicate it to others. Teaching is one of the best ways to solidify your own understanding.
ADA — Seal of Acceptance Program Learn how the ADA evaluates dental products and what the Seal of Acceptance means for consumers.