Req 4 — Review & Revision Process
This requirement introduces you to one of the most important processes in professional drafting: the review-and-revise cycle. No drawing ships without being checked, marked up, corrected, and documented. This is how errors get caught before anything gets built.
Part A: Presenting Your Drawings for Review
In the professional world, a finished drawing goes to a checker — a senior drafter or engineer who reviews it for errors, omissions, and clarity. The checker marks corrections directly on a copy of the drawing using a red pencil or pen. This marked-up copy is called a redline.
Redlines are not punishment — they are a normal and expected part of the process. Even experienced drafters produce drawings that need corrections. The redline review catches mistakes before they become expensive construction or manufacturing errors.
What your counselor may redline:
- A missing or incorrect dimension
- A feature to add, remove, or modify
- A bill of materials quantity change
- A note that needs clarification
- A scale error or inconsistency
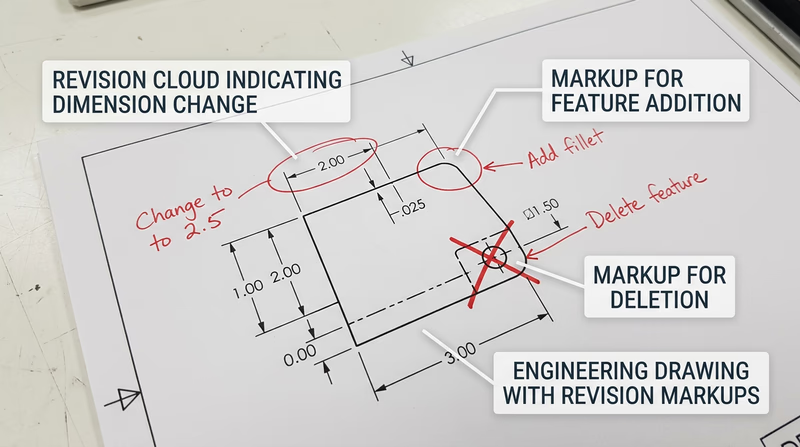
What Redline Markups Look Like
Professional redlines use standard markup conventions:
| Markup | Meaning |
|---|---|
| Cloud/bubble around an area | Something inside needs attention |
| Crossed-out dimension with new number | Change this measurement |
| Arrow with note | Add something at this location |
| X through a feature | Delete this feature |
| Delta triangle (Δ) | Revision identifier |
| “RFI” notation | Request for information — the checker has a question |
Part B: Making Corrections and Adding Revision Tracking
Once you receive your redlined drawings back from your counselor, it is time to make the corrections. But simply fixing the error is not enough — you must also document the revision so anyone looking at the drawing in the future can see what changed.
How to Process a Redline
Read all markups first. Go through the entire redlined drawing before making any changes. Understand the full scope of corrections needed.
Make the corrections. On your manual drawing, carefully erase and redraw the corrected features. In CAD, modify the geometry, dimensions, or notes as indicated.
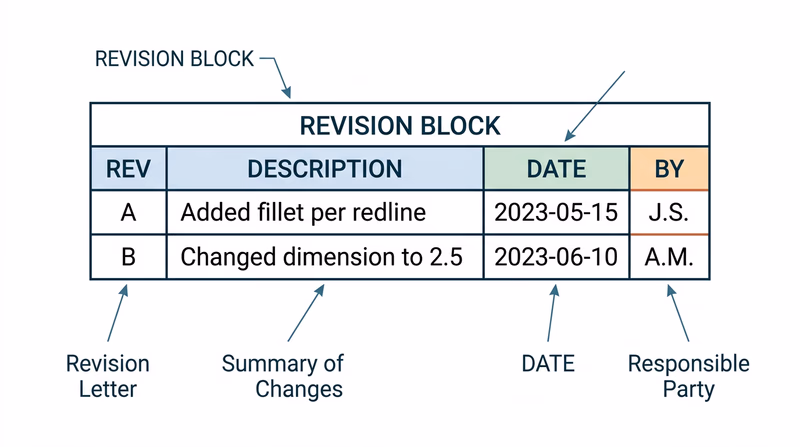
Add a revision marker. Place a small triangle with a revision letter (A, B, C, etc.) next to each corrected area on the drawing. This is called a revision triangle or delta symbol. It tells the reader “something changed here.”
Add a revision block. In the upper-right corner of the drawing (or adjacent to the title block), add a small table called a revision block:
| Rev | Description | Date | By |
|---|---|---|---|
| A | Changed wall thickness per redline | 03/04/2026 | JDS |
The revision block is a permanent record of every change made to the drawing after its initial release.
- Update the title block. Some drafters update the date in the title block to reflect the latest revision. Others leave the original date and let the revision block tell the revision story. Follow your counselor’s preference.
Revision Processing Checklist
Steps to complete Requirement 4b
- Read all redline markups before starting corrections.
- Make every correction indicated by the redline.
- Place a revision triangle (with letter) next to each changed area.
- Add a revision block with revision letter, description, date, and initials.
- Verify the correction matches the redline intent — do not over-correct or under-correct.
- Present the revised drawing to your counselor for final review.
Why Revision Tracking Matters
Imagine a bridge is being built from a set of drawings. The steel fabricator has the original Rev A drawings. The engineer discovers a beam size needs to change and issues Rev B. If the fabricator does not receive Rev B — or cannot tell which parts of the drawing changed — they might build with the wrong beam size.
Revision tracking prevents this. Every changed drawing gets a new revision letter, every changed feature gets a triangle, and every revision block entry explains what happened. In industries like aerospace and medical devices, revision control is required by law.
The experience you are getting here — presenting a drawing, receiving feedback, making corrections, and documenting changes — mirrors exactly what happens in a professional drafting office. It is a cycle that repeats throughout the life of any project.
ASME Y14.35 — Revision of Engineering Drawings The official ASME standard for revision tracking on engineering drawings. This is the professional reference used across industries.Now you have completed both a manual and a CAD drawing, and you have gone through the professional review-and-revise process. Next, you will reflect on how these two approaches compared.