Electricity Merit Badge — Complete Digital Resource Guide
https://merit-badge.university/merit-badges/electricity/guide/
Introduction & Overview
Flip a switch and the lights come on so fast that it is easy to forget how much science, engineering, and safety knowledge are hiding behind that one click. The Electricity merit badge helps you look past the wall plate and understand how power is made, moved, controlled, and used in everyday life. If you have ever wondered why lightning is so dangerous, why breakers trip, or how a motor spins, this badge turns those questions into hands-on learning.
Electricity is one of the most useful tools humans have ever learned to control, but it is also one of the easiest to underestimate. This guide will help you build a strong safety mindset, understand the language of circuits, and try projects that make invisible ideas feel real.
Then and Now
Then
For most of human history, electricity was a mystery that appeared only in nature. People saw lightning split trees, watched static sparks jump from cloth, and noticed that certain rocks could attract bits of iron. In the 1700s and 1800s, scientists like Benjamin Franklin, Alessandro Volta, Michael Faraday, and Thomas Edison began turning those strange effects into experiments, batteries, generators, and lighting systems.
The first electrical systems were limited and local. A city might have a few electric lights, a telegraph office, or a streetcar line, but most homes still depended on candles, wood stoves, and daylight. Learning how to generate and distribute electricity safely changed cities, factories, farms, and homes.
- Early tools: batteries, telegraphs, simple motors, and generators
- Big challenge: moving electricity where it was needed without wasting too much of it
- Big payoff: lighting, communication, industry, and safer indoor work after dark
Now
Today, electricity powers nearly every part of modern life. It keeps refrigerators cold, charges phones, runs traffic lights, powers hospitals, and moves information around the world in milliseconds. The modern grid links power plants, substations, transformers, power lines, solar panels, wind turbines, batteries, and home wiring into one huge system.
Electricity is also changing fast. Renewable energy, electric vehicles, home battery storage, and smart devices are making the system more flexible and more complex. That means people who understand electrical safety and basic electrical ideas are more valuable than ever.
- Modern sources: fossil fuels, nuclear, hydro, wind, and solar
- Modern challenge: making power reliable, affordable, and cleaner
- Modern opportunity: careers in construction, utilities, electronics, renewable energy, and engineering
Get Ready! You are about to study a force you cannot see directly but that you can measure, guide, and use to do amazing work. Stay curious, stay careful, and keep asking how each device around you actually works.
Kinds of Electricity
Electricity shows up in more than one form. Before you dive into the requirements, it helps to know the major categories you will run into.
Static Electricity
Static electricity is a buildup of electric charge that stays in one place until it suddenly moves. The snap you feel after shuffling across carpet, or the crackle when you pull off a fleece jacket in winter, is static electricity. Lightning is the giant outdoor version of the same basic idea: charge builds up until it discharges.
Current Electricity
Current electricity is the steady movement of electric charge through a conductor such as a wire. This is the kind of electricity that powers lights, motors, doorbells, and appliances. In this badge, you will work mostly with current electricity because that is what makes circuits useful.
Household Power
Household electricity is designed for everyday use in buildings. It includes branch circuits, outlets, switches, lighting fixtures, breakers, and safety devices like GFCIs. You will learn how this system is organized, how to inspect it safely, and how to avoid overloads and shock hazards.
Low-Voltage Project Circuits
Low-voltage circuits use small batteries and safe classroom-style components to teach big ideas. A battery, a bulb, a switch, and a few wires are enough to learn about open and closed circuits, resistance, magnetism, motors, and switches. Many of your hands-on badge projects live in this category.
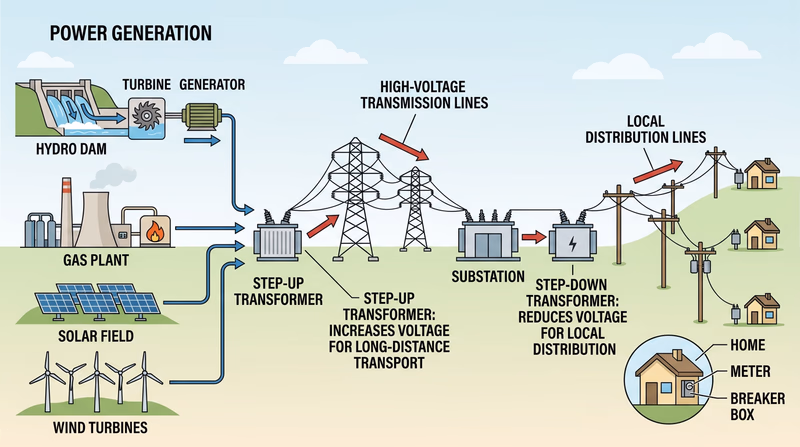
Power Generation and the Grid
Electricity also exists as a system larger than any one room or building. Power plants generate it. Transmission lines move it long distances. Substations and transformers prepare it for neighborhoods and homes. Renewable systems like solar panels and wind turbines add even more ways to produce power.
You have the big picture. Now start where every electrician, lineline worker, engineer, and careful homeowner starts: safety in an emergency.
Req 1 — Electrical Emergencies
Electricity can injure you before you have time to think, which is why this requirement is really about building automatic habits. You need to know how to cut power, avoid becoming a second victim, treat injuries correctly, and respond to fires and storms. Each part of this requirement is connected by one big idea: slow down, spot the hazard, and make the scene safer before you try to help.
What this requirement covers
Seven emergency situations every Scout should be ready to discuss or demonstrate- Turning power off: stopping the flow of electricity at the source.
- Rescuing safely: helping without touching the hazard yourself.
- Vehicle utility-wire danger: knowing when staying put is safer than getting out.
- Electrical shock first aid: caring for an unconscious person after the current is no longer a threat.
- Electrical burns: cooling and covering the injury correctly.
- Electrical fires: choosing the right response and the wrong things to avoid.
- Lightning safety: lowering your risk when a storm moves in fast.
Requirement 1a
A sparking outlet or a smoking appliance is not the time to start guessing which switch does what. If you know where your panel is and how the breakers are labeled, you can shut off power quickly and stop a bad situation from getting worse.
Most homes have a service panel — often called a breaker panel — that contains individual breakers for branch circuits and one main disconnect for the whole house. A particular circuit means one smaller breaker that controls a specific area or group of outlets. The whole house means the main breaker or main disconnect that shuts off power to nearly everything downstream.
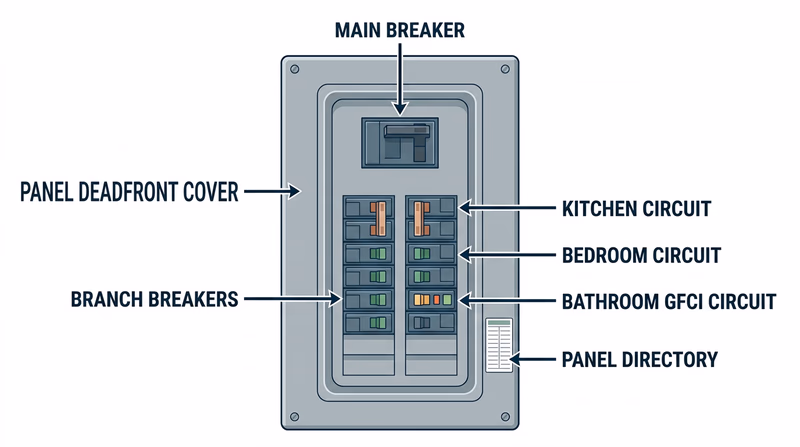
Turning Off One Circuit
If the problem is limited to one room or one device, go to the service panel and look for the breaker label. A well-labeled panel might say “kitchen counter outlets,” “garage,” or “bedrooms.” Move the correct breaker fully to the off position.
If the panel uses fuses instead of breakers, the faulty branch circuit is usually protected by an individual screw-in fuse or cartridge fuse. You should learn how your home is arranged, but for badge work, discussion and identification are more important than doing hands-on work inside the panel.
Turning Off the Whole House
If you cannot quickly identify the bad circuit, if water is involved, or if there is smoke, fire, or severe damage, it may be safer to shut off the main power. The main breaker is usually larger than the others and sits at the top or bottom of the panel. Switching it off cuts power to the branch circuits in the home.
Requirement 1b
The biggest mistake in an electrical rescue is touching the victim too soon. If the person is still part of the circuit, touching them can send the current through you too.
The first choice is always to shut off the power. If you can safely switch off the correct breaker, unplug the device, or use the main disconnect, do that first. Then call 911 and begin care.
If you cannot turn off the power immediately and your counselor is asking for a demonstration, the key point is that you must separate the person from the source without becoming part of the circuit yourself. That means using a dry, nonconductive object such as a wooden broom handle or dry fiberglass tool handle to push the wire away or move the person away from the wire.
Requirement 1c
A car can act like a protective shell if a power line falls on it. The electricity may travel over the outside of the vehicle and into the ground while the people inside remain safer than they would be if they stepped out normally.
The safest answer in most cases is stay in the car. Call 911, warn others to stay away, and wait for the utility company or emergency responders to say it is safe.
If fire or another immediate danger forces you to leave, you must get out without touching the car and ground at the same time. Open the door, keep your arms close, and jump clear with both feet together. Then shuffle away with short steps or hop with both feet together so you do not create a voltage difference across your body.
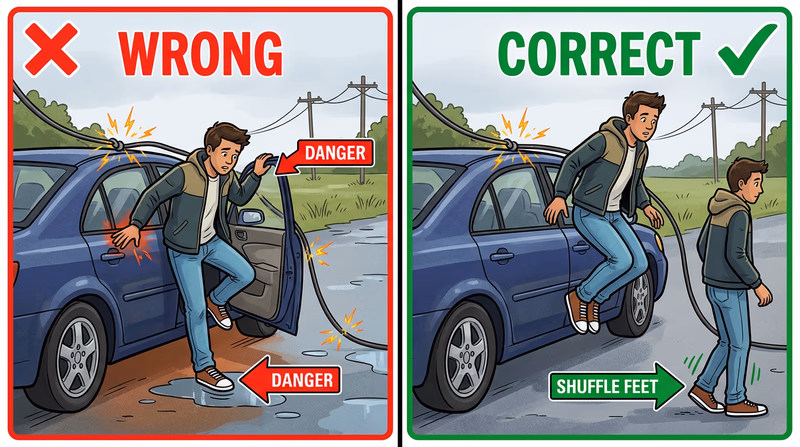
Vehicle and downed-wire safety
What to remember under stress- Best choice: Stay inside unless fire or another life-threatening danger makes that impossible.
- Warn others: Tell everyone to stay far away from the vehicle and the wire.
- If you must exit: Jump clear without touching the car and ground at the same time.
- After landing: Shuffle away with small steps or hop away with feet together.
Requirement 1d
An unconscious electrical-shock victim may have breathing problems, cardiac arrest, burns, or a fall-related injury. Once the electrical hazard is gone, treat the person like any other seriously injured patient — but keep the shock mechanism in mind.
First, confirm the scene is safe. Then tap and shout to check responsiveness. If the person is unconscious, have someone call 911 or do it yourself on speaker phone. Check for normal breathing.
If the person is not breathing normally and you are trained, begin CPR and use an AED if one is available. If the person is breathing, place them in the recovery position only if you do not suspect a neck, back, or major fall injury. Monitor breathing closely until help arrives.
Requirement 1e
Electrical burns can look small on the surface but still cause serious damage deeper inside the body. That is why they should be treated carefully and taken seriously.
After the source of electricity is off and the scene is safe, cool the burned area with cool — not icy — running water for several minutes if that can be done safely. Remove jewelry or tight items near the injury before swelling starts, but do not pull away clothing that is stuck to the burn.
Cover the burn loosely with a clean, dry, nonstick dressing or sterile gauze. Keep the person warm and calm. Seek medical evaluation, especially if the burn is large, deep, on the face or hands, or was caused by household current or more.
Requirement 1f
An electrical fire is dangerous because the wiring or energized equipment can keep feeding the problem. The right response starts with removing the power source if you can do so safely.
If the fire is small and you can reach the breaker or unplug the device without risk, cut the power first. Then use the correct extinguisher — typically a Class C extinguisher for energized electrical equipment. If the fire is growing, producing a lot of smoke, or blocking your exit, get everyone out and call 911.
What to Remember
- Shut off power if it is safe to do so.
- Use the proper extinguisher.
- Keep an exit behind you.
- Evacuate early if the fire is not immediately controlled.
Requirement 1g
If you can hear thunder, you are close enough to be struck by lightning. An open field, hilltop, isolated tree, dock, or metal fence line becomes much more dangerous during a storm.
The best move is to get to a substantial building or a fully enclosed metal-roof vehicle as fast as you safely can. Avoid lone trees, open water, ridge tops, tents, picnic shelters, and metal objects. If you are trapped outside with no better shelter, move to a lower area away from tall isolated objects and spread your group out so one strike does not injure everyone at once.
Older advice sometimes mentioned a crouch position as if it were a safe solution. It is really only a last-ditch way to reduce risk when no real shelter exists. The true goal is always to reach safer shelter early.
National Weather Service — Lightning Safety Official lightning safety guidance for storms, vehicles, buildings, and outdoor activities. Link: National Weather Service — Lightning Safety — https://www.weather.gov/safety/lightningReq 2 — Home Safety Inspection
A home safety inspection is like being a detective in your own house. Most electrical problems do not start with a dramatic spark. They start with clues: a loose plug, an overloaded strip, a missing cover plate, or a cord pinched under furniture. Your job is to notice those small warnings before they turn into shock, overheating, or fire hazards.
The goal is not to prove your home is “good” or “bad.” The goal is to learn how to spot unsafe conditions and talk about them clearly with your counselor and your family.
What You Are Looking For
During your inspection, move room by room and look for patterns like these:
Common home electrical hazards
Use these ideas alongside your counselor-approved checklist- Damaged cords: cracked insulation, fraying, crushed sections, or exposed wire.
- Overloaded outlets or strips: too many high-draw devices on one outlet.
- Missing safety protection: no GFCI near sinks, bathrooms, kitchens, garages, or outdoors where required.
- Blocked ventilation: lamps, chargers, and appliances covered by fabric or stacked too tightly.
- Unsafe cord use: extension cords used as permanent wiring or run under rugs and doors.
- Loose devices: outlet covers missing, plugs falling out, or switches that feel hot.
A Smart Inspection Method
Start with a notebook or phone notes app. Label each room and record what you see. If your counselor approves, take photos to help remember details for later discussion.
Move in a consistent order:
- Entrances and walls: switches, outlets, night-lights, and visible cords.
- Furniture areas: cords hidden under couches, desks, beds, or rugs.
- Appliance areas: kitchens, laundry, bathrooms, workshop spaces, and garage.
- Outdoor points: porch outlets, patio lighting, and exterior extension cords.
Questions to Ask in Each Space
- Is anything hot, buzzing, or giving off a burnt smell?
- Are cords being stretched, pinched, or walked on?
- Are surge protectors being used correctly?
- Are major appliances on appropriate outlets?
- Do outlets near water appear protected by GFCIs?
Red Flags Worth Discussing
Some findings deserve faster action than others. For example, a missing cover plate matters, but a warm outlet or repeated breaker trips matter more urgently. Learn to sort findings into three categories:
- Immediate concern: smoke smell, scorch marks, sparks, shocks, buzzing, damaged cords on active devices.
- Fix soon: overloaded strips, extension cords used long-term, loose plugs, outdoor cords left in place.
- Improve habits: unplugging chargers when not needed, organizing cords, labeling strips more clearly.
Good Discussion Topics for Your Counselor
When you meet with your counselor, be ready to talk about:
- The most surprising thing you noticed.
- Any hazards your family already fixed.
- Hazards you did not know were unsafe before this inspection.
- Areas where protection like GFCIs, better cord routing, or less clutter would improve safety.
This is also a great moment to connect back to Req 1 — Electrical Emergencies. The best emergency response is preventing the emergency in the first place.
Electrical Safety Foundation International — Home Electrical Safety Room-by-room safety guidance, hazard explanations, and practical home electrical safety tips. Link: Electrical Safety Foundation International — Home Electrical Safety — https://www.esfi.org/home-electrical-safety/Req 3 — Build an Electromagnet
A permanent magnet always acts like a magnet. An electromagnet only becomes magnetic when electric current flows through it. That makes electromagnets one of the coolest examples in this badge, because they show electricity doing real physical work.
The basic idea is simple: when current moves through a wire, it creates a magnetic field. If you wrap the wire into coils, those magnetic effects add together. If you wrap the coil around an iron nail or bolt, the iron helps concentrate the field and makes the magnet stronger.
What You Need to Understand
A simple electromagnet usually has four parts:
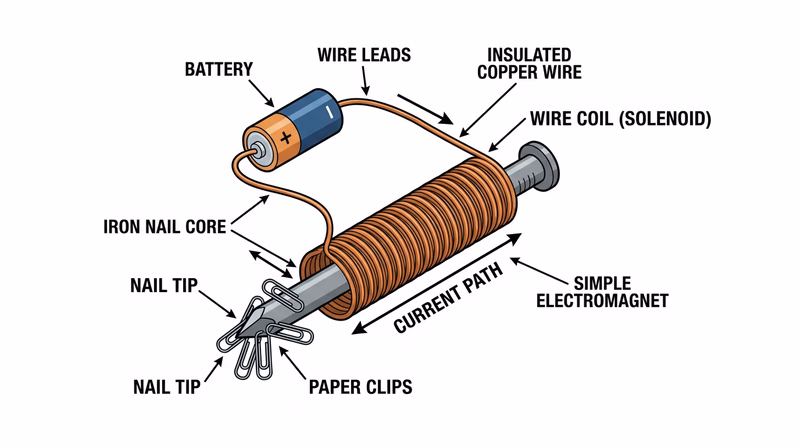
- Battery: pushes current through the circuit.
- Wire: carries the current.
- Coil: strengthens the magnetic field by looping the wire.
- Iron core: focuses and boosts the magnetic effect.
When the circuit is open, nothing happens. When the circuit is closed, the current flows and the nail or bolt can pick up steel objects like paper clips.
A Simple Build Plan
Your counselor may want you to build this live or explain the process clearly. A common setup uses insulated wire wrapped around an iron nail and connected to a battery.
Electromagnet build steps
Keep it simple and safe- Wrap insulated wire around an iron nail, leaving free wire at both ends.
- Strip the insulation from the two ends if needed so the battery can make contact.
- Connect the ends to a battery briefly.
- Test the magnet by picking up paper clips or small steel washers.
- Disconnect the battery when not actively testing so the wire does not overheat.
Showing Attraction and Repulsion
Attraction is the easier part to demonstrate. Your electromagnet should attract iron or steel items when current is flowing.
Repulsion takes a second magnet. If you bring your electromagnet near a permanent magnet or another electromagnet, sometimes the poles will attract and sometimes they will push apart. That depends on which magnetic poles are facing each other. Like poles repel. Opposite poles attract.
One neat experiment is to reverse the battery connections. When you reverse the current direction through the coil, the magnetic poles reverse too. That can change an attraction setup into a repulsion setup.
Why This Matters
Electromagnets are everywhere. Doorbells, relays, motors, speakers, maglev trains, MRI machines, and industrial lifting equipment all rely on the link between electricity and magnetism. This requirement is not just a craft project. It is your first look at a principle that powers real machines.
Khan Academy — Electromagnetism A clear explanation of how electric current creates magnetic fields and how coils make electromagnets stronger. Link: Khan Academy — Electromagnetism — https://www.khanacademy.org/science/physics/magnetic-forces-and-magnetic-fields/magnets-magnetic/v/electromagnetismReq 4 — AC, DC, and Power Generation
This requirement brings together two big ideas. First, you need to understand the two main ways current moves in a circuit: direct current and alternating current. Second, you need to know that electricity does not just appear at an outlet — it has to be produced somewhere by turning motion, heat, light, water, or nuclear energy into electric power.
Requirement 4a
Direct current (DC) flows in one direction. Batteries provide DC, and so do many solar panels before their output is changed by other equipment. DC is easy to store in batteries and works well in electronics that need steady voltage.
Alternating current (AC) changes direction back and forth many times each second. In the United States, household power alternates at 60 hertz, which means it switches direction 60 times per second. AC became the standard for long-distance power distribution because transformers can change its voltage more easily.
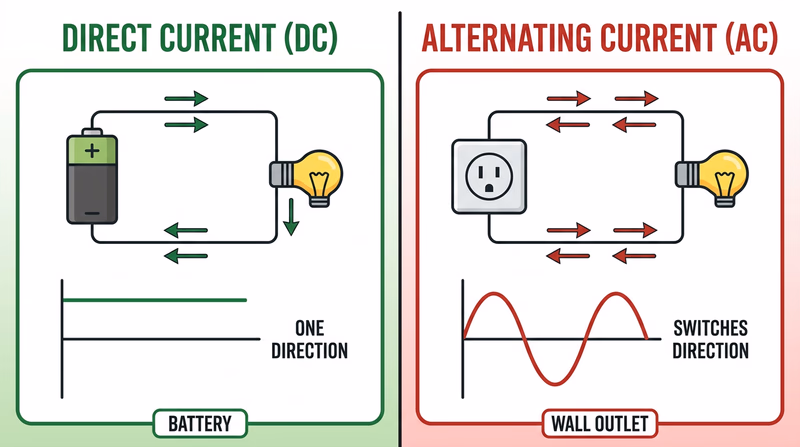
Advantages and Disadvantages
| Type | Advantages | Disadvantages | Everyday example |
|---|---|---|---|
| DC | Great for batteries, electronics, and storage systems | Harder to change voltage with simple traditional equipment | Flashlight, phone battery, car battery |
| AC | Efficient for long-distance transmission and home distribution | Can be more dangerous in household settings because of the voltage and supply system | Wall outlets, household lighting, appliances |
A good way to picture this is to imagine traffic. DC is like cars all moving in one direction on a one-way road. AC is like the direction of flow switching back and forth repeatedly on the same path.
Requirement 4b
Even though the sources look very different, most power generation methods rely on the same core idea: making a conductor move through a magnetic field, or a magnetic field move around a conductor. That motion pushes electrons and produces current.
1. Turbine and Generator Systems
This is the biggest category. Water, steam, wind, or gas turns a turbine. The turbine spins a shaft connected to a generator. Inside the generator, coils and magnets create electric current.
Examples include:
- Hydroelectric power: moving water turns the turbine.
- Wind power: wind spins the blades and shaft.
- Natural gas or coal plants: fuel heats water into steam, and the steam spins the turbine.
- Nuclear power: heat from nuclear reactions makes steam, which spins the turbine.
2. Solar Photovoltaic Cells
Solar panels make electricity directly from light. They do not need spinning parts. When sunlight hits the semiconductor material inside the panel, it knocks electrons loose and creates DC electricity. That is then used directly, stored in batteries, or changed to AC by an inverter.
3. Chemical Action in Batteries
Batteries produce electricity through chemical reactions. Different materials inside the battery create a difference in electrical potential, and that pushes current through a circuit when the battery is connected.
This is why a battery-powered circuit in Req 3 — Build an Electromagnet can work even though there is no generator spinning anywhere nearby.
U.S. Energy Information Administration — Electricity Explained Clear explanations of how electricity is generated, transmitted, and used in the United States. Link: U.S. Energy Information Administration — Electricity Explained — https://www.eia.gov/energyexplained/electricity/Req 5 — How an Electric Bell Works
An electric bell is a great badge example because it combines several ideas you already met: a battery provides current, a switch closes the circuit, and an electromagnet does mechanical work. Press the button and electricity turns into motion and sound almost instantly.
The Main Components
A basic battery-and-bell circuit usually includes these parts:
- Battery: provides the voltage that pushes current through the circuit.
- Wire: connects the parts into one continuous path.
- Switch or button: opens or closes the circuit.
- Electromagnet coil: becomes magnetic when current flows.
- Armature: a moving iron piece attracted by the electromagnet.
- Hammer or striker: attached to the armature and hits the bell.
- Bell or gong: the metal part that makes the sound.
- Contact screw or interrupter: breaks the circuit at the right moment so the armature can spring back.
How It Works Step by Step
When the switch is open, current cannot flow. Nothing moves.
When you close the switch, current flows from the battery through the wire and coil. The coil becomes an electromagnet and pulls the armature toward it. The striker hits the bell and makes a sound.
But the movement does something else too: it breaks the electrical contact at the interrupter. That stops the current. Without current, the coil loses magnetism. A spring or the armature’s own flexibility lets it move back to its starting point, which restores the contact. Current flows again, and the cycle repeats rapidly.
That repeating on-off cycle is why an electric bell can ring again and again while the button is held down.
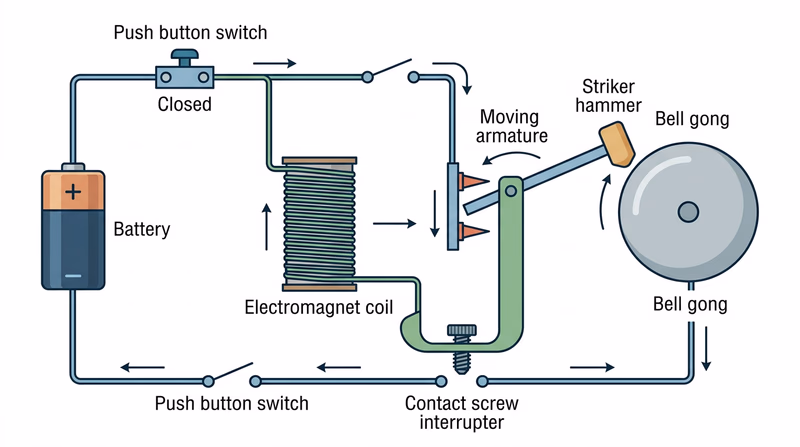
What your drawing should show
Focus on function, not artistic detail- Power source: battery clearly labeled.
- Path: wires showing the circuit loop.
- Control: the switch or push button.
- Action part: coil, armature, striker, and bell.
- Interrupt point: where the moving armature opens and recloses the circuit.
Why Each Part Matters
The easiest way to explain the components to your counselor is by answering one question for each part: What job does it do?
The battery supplies energy. The wire gives current a path. The switch lets the user control the circuit. The coil turns electric current into magnetism. The armature turns magnetism into motion. The striker turns motion into sound. The bell amplifies the sound. The interrupter makes the action repeat.
That chain — energy to current to magnetism to motion to sound — is what makes this requirement so useful.
This requirement also connects directly to Req 3 — Build an Electromagnet. An electric bell is really an electromagnet project that has been turned into a practical device.
Britannica — Electric Bell A concise reference explaining the components and operating cycle of an electric bell. Link: Britannica — Electric Bell — https://www.britannica.com/technology/electric-bellReq 6 — Overloads, Fuses, and Breakers
This requirement is about one of the most practical parts of the whole badge: understanding what your home wiring is trying to protect you from. Circuits are designed to carry only a certain amount of current. When you ask them to carry too much, wires heat up, insulation can fail, and fire risk increases. Fuses and breakers are there to interrupt that danger before the wiring becomes the problem.
Requirement 6a
An overload happens when a circuit is asked to supply more current than it is designed to handle safely. A common branch circuit in a home may be rated for 15 or 20 amps. If too many devices run at once, especially high-wattage devices, the current can climb too high.
A hair dryer, portable heater, microwave, toaster oven, and gaming PC all draw very different amounts of power. A circuit that seems fine with lamps and phone chargers may overload quickly once heating devices are added.
Good habits that help prevent overloads include:
- spreading high-draw appliances across different circuits,
- avoiding daisy-chained power strips,
- not running space heaters on overloaded outlet groups,
- unplugging devices you are not actively using, and
- learning which breakers feed which rooms or outlets.
Requirement 6b
This is where electrical vocabulary becomes useful. The power equation is:
Power = Voltage × Current
Or rewritten for current:
Current = Power ÷ Voltage
In a typical U.S. household branch circuit, voltage is often about 120 volts. So if a device uses 1,200 watts, the current draw is about 10 amps.
Example
Suppose one branch circuit powers:
- microwave: 1,200 W
- toaster: 900 W
- coffee maker: 800 W
Total power = 2,900 W
Current = 2,900 ÷ 120 ≈ 24.2 amps
That would overload a 15-amp or 20-amp branch circuit.
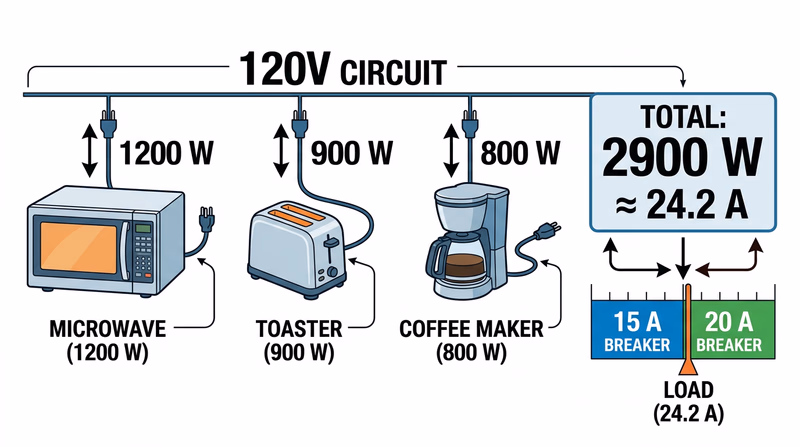
How to check for overload
Use labels or the power equation- Find the devices on the same branch circuit.
- Look for wattage or current labels on each device.
- Add the current draws directly if they are already listed in amps.
- Or convert watts to amps using current = power ÷ voltage.
- Compare the total to the circuit rating.
Requirement 6c
A fuse or breaker does not fail randomly. It responds to dangerous current levels.
A fuse contains a metal element designed to melt if the current gets too high. When it melts, the circuit opens and current stops. A fuse works once and must then be replaced.
A circuit breaker is a resettable protective switch. If the current becomes too high, the breaker trips open. Inside, that trip may happen because of heat, magnetic force, or both, depending on the breaker design.
Both are protecting the wiring, not just the device. That is an important idea. They are trying to stop overheated conductors before the insulation is damaged or a fire starts.
Requirement 6d
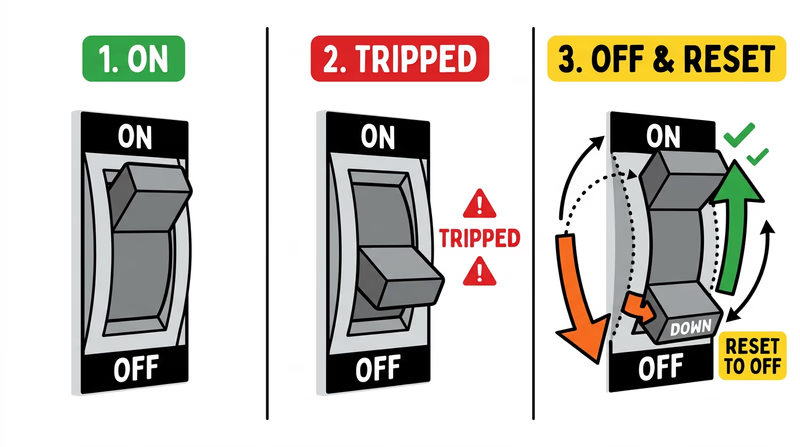
To find a blown fuse, go to the fuse box and look for the affected branch. Depending on the type, the blown fuse may show a broken internal element, discoloration, or a visible indicator.
To find a tripped breaker, go to the service panel and look for a breaker handle that is not lined up with the others. Many tripped breakers sit in a middle position between fully on and fully off.
To reset a breaker safely:
- Turn off or unplug devices on the affected circuit.
- Stand to the side of the panel, not directly in front of it.
- Move the breaker fully to off first.
- Then move it firmly to on.
- Restore loads one at a time.
If it trips again right away, stop. That means the problem is not solved and needs further investigation by a qualified person.
Req 7 — Room Wiring Diagram
This requirement turns your home into a map-reading exercise. Instead of just using a room, you are learning to notice its electrical layout: where the loads are, how the switches control lighting, and which protective device serves each part of the room. That is the kind of observation that helps you understand a house as a system rather than a collection of separate gadgets.
What a Good Diagram Includes
Your floor plan does not need to look like a professional blueprint. It does need to be clear enough that your counselor can follow it.
Include:
- the shape of the room,
- doors and windows for orientation,
- light fixtures,
- switches,
- wall outlets,
- special outlets if present, and
- the breaker or fuse number for each device or group.
If a switch controls a specific ceiling light or lamp outlet, show that connection with a simple line or note.
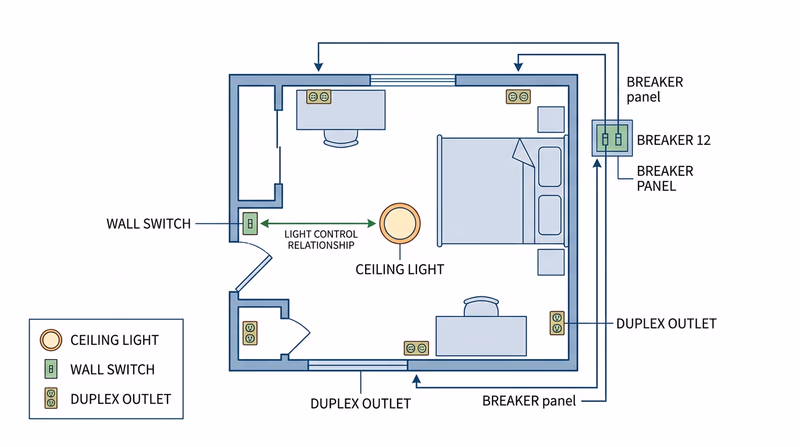
How to Build It Step by Step
Make your wiring diagram
A simple process works best- Choose one room that is easy to observe safely.
- Sketch the room outline from a top-down view.
- Add fixed items like doors, windows, and closets so your diagram is easy to read.
- Mark every switch, outlet, and light fixture you can see.
- Test which switch controls which light by turning them on and off.
- Use your panel labels or family knowledge to identify the protecting breaker or fuse.
- Add labels neatly so the diagram is useful in discussion.
Tips for Identifying the Correct Breaker
Sometimes the panel labels are accurate and easy to use. Sometimes they are vague, like “front rooms” or “general outlets.” If you are working with an adult, you can identify the circuit by switching off one labeled breaker at a time and seeing which devices in the room lose power. Keep it safe and simple.
Do not take anything apart. You are only observing what turns off and on.
Why This Skill Matters
Knowing how a room is wired helps in real life. It makes troubleshooting easier when a light stops working, when a breaker trips, or when you are trying to avoid overloading a circuit. It also reinforces what you learned in Req 6 — Overloads, Fuses, and Breakers: every load in that room depends on a protective device somewhere upstream.
Family Handyman — Understanding Your Home's Electrical System A beginner-friendly overview of panels, circuits, outlets, and how home wiring is organized. Link: Family Handyman — Understanding Your Home's Electrical System — https://www.familyhandyman.com/article/home-electrical-system/Req 8 — Reading Your Electric Bill
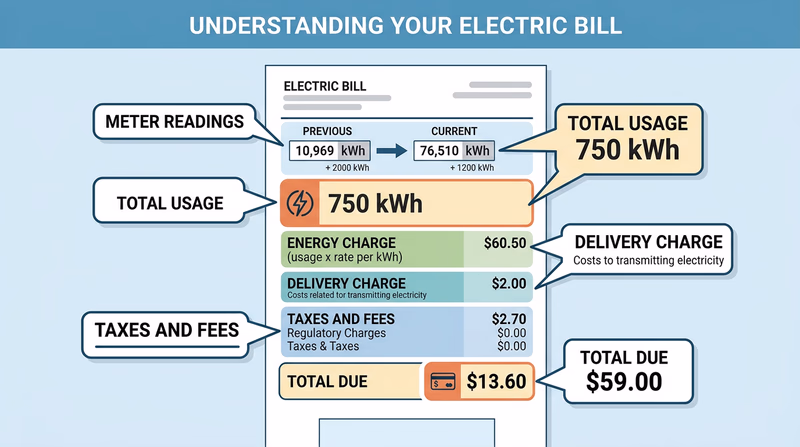
This requirement takes you from wires inside the house to the cost of the power coming into it. You will read a meter or bill, figure out how much energy was used, understand why the total is more than just the energy charge, and think about ways your family can conserve power without making life miserable.
Requirement 8a
Most home electric bills measure energy, not just instant power. The usual unit is the kilowatt-hour (kWh). One kilowatt-hour means using 1,000 watts for one hour.
If your family used 750 kWh during a billing cycle and the energy rate was 15 cents per kWh, the energy portion of the bill would be:
750 × $0.15 = $112.50
If you are reading a meter directly, you are usually comparing the current reading to the previous reading. The difference tells you how much energy was used during that period.
Helpful reminder
- Power tells how fast energy is being used right now.
- Energy tells how much total electricity was used over time.
In everyday conversation, people often say “power bill,” but the bill mainly reflects energy consumption over the month.
Requirement 8b
The total on an electric bill is often larger than the energy-use line alone. Utilities may include:
- service charges for maintaining your account,
- delivery or transmission charges for bringing electricity to your home,
- fuel or generation adjustment charges that reflect changing production costs,
- local or state taxes, and
- public benefit or infrastructure fees that support programs or grid improvements.
These charges vary by state and utility, so your explanation should be based on the actual bill your family receives.
Requirement 8c
Energy conservation works best when it focuses on habits and high-impact devices. Good ideas usually save the most when they target things that run a lot, produce heat, or cool air.
Here are categories to think about with your family:
Five smart conservation strategies
Choose the ones that really fit your home- Lighting: switch to LEDs and turn off lights in unused rooms.
- Heating and cooling: adjust the thermostat sensibly and keep filters clean.
- Hot water: take shorter hot showers and lower water-heater waste.
- Appliances: run dishwashers and laundry with full loads.
- Standby power: unplug unused chargers or use advanced power strips for electronics.
The strongest counselor discussion usually includes both what your family could do and what tradeoffs matter. For example, lowering the thermostat saves money, but comfort matters too. The real skill is balancing convenience, cost, and energy use.
U.S. Department of Energy — Energy Saver Practical home energy-saving advice covering lighting, heating and cooling, appliances, and everyday habits. Link: U.S. Department of Energy — Energy Saver — https://www.energy.gov/energysaver/energy-saverReq 9 — Essential Electrical Terms
This requirement is your electrical vocabulary toolkit. These are the words people use when they talk about circuits, power systems, devices, and safety. If you understand the terms, diagrams, instructions, and badge projects become much easier to follow.
Requirement 9a
- Current: the flow of electric charge through a conductor.
- Energy: the total amount of electrical work used over time.
- Power: the rate at which energy is used or delivered.
- Resistance: how much a material opposes current flow.
- Voltage: the electrical push that drives current through a circuit.
A good analogy is water in pipes. Voltage is like pressure, current is like flow rate, and resistance is like a narrow section of pipe that makes flow harder. The analogy is not perfect, but it helps you picture how these ideas fit together.
Requirement 9b
- Ampere (amp): unit of current.
- Ohm: unit of resistance.
- Volt: unit of voltage.
- Watt: unit of power.
- Watt-hour: unit of energy.
If a device is using 100 watts, that tells you the rate of energy use at that moment. If it runs long enough to use 100 watt-hours, that tells you the total energy consumed over time.
Requirement 9c
- Generating source: the part of a system that produces electrical energy, such as a battery, generator, or solar panel.
- Ground: a reference point in a circuit and, in many systems, a safe path for fault current.
- Open circuit: a broken path where current cannot flow.
- Overvoltage: voltage higher than the circuit or device is designed to handle.
- Potential difference: another way of describing voltage between two points.
- Short circuit: an unintended low-resistance path that allows too much current to flow.
A short circuit is especially important to understand because it can cause sudden high current, sparks, heat, and fast breaker trips.
Requirement 9d
Here is a clear one-line guide to each term:
- Circuit: a complete path that allows current to flow.
- Conductor: a material, like copper, that lets current move easily.
- Ground Fault Circuit Interrupter (GFCI): a safety device that quickly shuts off power if current is leaking where it should not.
- Insulator: a material, like rubber or plastic, that resists current flow.
- Inverter: changes DC into AC.
- Rectifier: changes AC into DC.
- Rheostat: a variable resistor used to control current.
- Substation: part of the grid where voltage is switched, routed, or transformed.
- Surge protection: equipment that helps protect devices from brief voltage spikes.
- Solar panel: device that turns sunlight into DC electricity.
- Transformer: changes AC voltage from one level to another.
- Transmission system: moves electricity long distances at high voltage.
- Distribution system: delivers electricity from substations to homes and businesses at usable levels.
- Wind turbine: machine that captures wind energy and drives a generator.
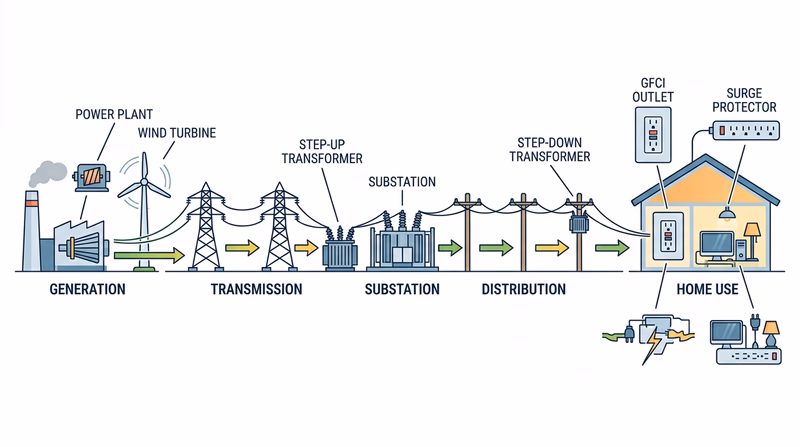
How these terms fit together
From power plant to plug- Generation: a source such as a wind turbine, solar panel, or generator makes electricity.
- Transmission: high-voltage lines move it long distances.
- Substation and transformer: voltage is adjusted for safer local delivery.
- Distribution: neighborhood lines bring electricity to buildings.
- Protection and use: GFCIs, surge protection, circuits, conductors, and insulators help use it safely.
Req 10 — Choose Your Circuit Projects
You must choose exactly two project options for this requirement. This page helps you compare them before you start buying materials or building anything. Some options focus on basic circuits, some focus on control devices, and some help you visualize how current behaves in real systems.
Your Options
- Req 10a — Battery, Switch, and Load: Build the most basic complete circuit using a battery, switch, and buzzer, bell, or light. You will learn how current flows only when the path is closed.
- Req 10b — Simple Electric Motor: Make a small motor and watch electricity turn into spinning motion. You will see electromagnetism doing real work.
- Req 10c — Build a Rheostat: Make a variable resistor and show how changing resistance changes current. This option is great for understanding control rather than just on/off behavior.
- Req 10d — Single-Pole, Double-Throw Switch: Build a switch that sends current down one of two paths. You will learn how circuits are routed and selected.
- Req 10e — How a 3-Way Switch Works: Explain one of the most useful real-home lighting circuits. This option is more about understanding wiring logic than building a battery project.
- Req 10f — Series vs. Parallel Circuits: Build the same two-light setup in two different ways and compare the results. You will learn one of the most important ideas in all of circuit design.
How to Choose
Picking your two projects
Think about materials, difficulty, and what you want to learn- Simplest starting point: 10a and 10f usually need the fewest specialized parts.
- Best for motion and magnetism: 10b connects nicely to Req 3 — Build an Electromagnet.
- Best for understanding circuit control: 10c and 10d teach how changing resistance or switching paths affects behavior.
- Best for real-home wiring ideas: 10e and 10f connect most directly to household lighting circuits.
- What you gain: 10a teaches the complete-circuit idea, 10b teaches energy conversion, 10c teaches resistance control, 10d teaches switching logic, 10e teaches practical lighting control, and 10f teaches circuit comparison.
Req 10a — Battery, Switch, and Load
This is the simplest complete electrical system you can build: a source, a path, a control, and a load. Even though it is basic, it teaches one of the most important truths in electricity: current only flows when the path is complete.
The Four Essential Parts
Your circuit needs:
- Battery: the power source.
- Wires: the path for current.
- Switch or key: the control that opens or closes the path.
- Load: the buzzer, bell, or light that uses the energy.
If any one of those parts is missing or not connected correctly, the circuit will not work.
How to Think About the Build
Connect one battery terminal to the switch. Connect the switch to the load. Connect the load back to the other battery terminal. That creates a loop.
When the switch is open, the loop is broken and the load stays off. When the switch is closed, current flows and the light, bell, or buzzer activates.
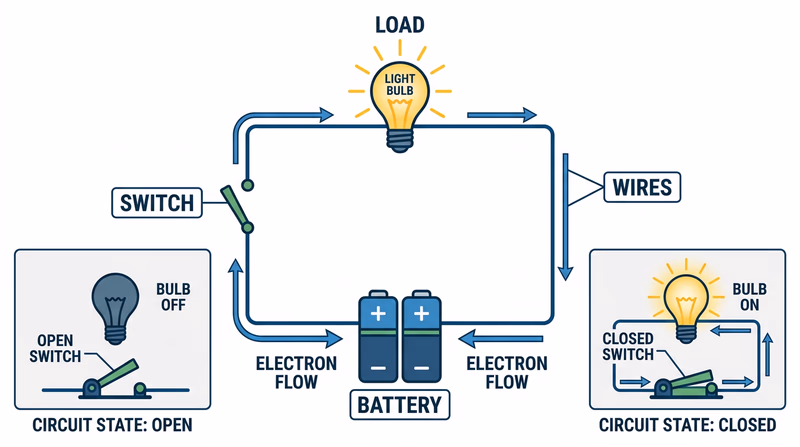
Build and test sequence
A simple way to show your counselor what is happening- Lay out the parts so you can see the full path.
- Connect the loop from battery to switch to load and back to the battery.
- Test with the switch open to show that nothing happens.
- Close the switch to show the load working.
- Explain the current path out loud while you demonstrate.
🎬 Video: How To Make a Simple Electric Circuit | Working Model School Science Project — School Science Project Ideas — https://www.youtube.com/watch?v=oDUAvaXsK1g
This option is a perfect warm-up for Req 10f — Series vs. Parallel Circuits, where you take the same basic idea and compare two different wiring arrangements.
Req 10b — Simple Electric Motor
A motor is one of the clearest examples of electricity turning into motion. Inside even a very simple motor, current creates magnetic forces that push a coil or armature around. That spinning motion is what powers fans, drills, toys, pumps, and countless tools.
What a Simple Motor Needs
A basic classroom-style motor usually includes:
- battery or power source
- wire coil or armature
- magnets
- supports or contacts
- a way to keep current reversing or reconnecting at the right times
The exact design depends on whether you build from raw parts or use a kit, but the idea is the same: current in the coil interacts with a magnetic field and creates torque.
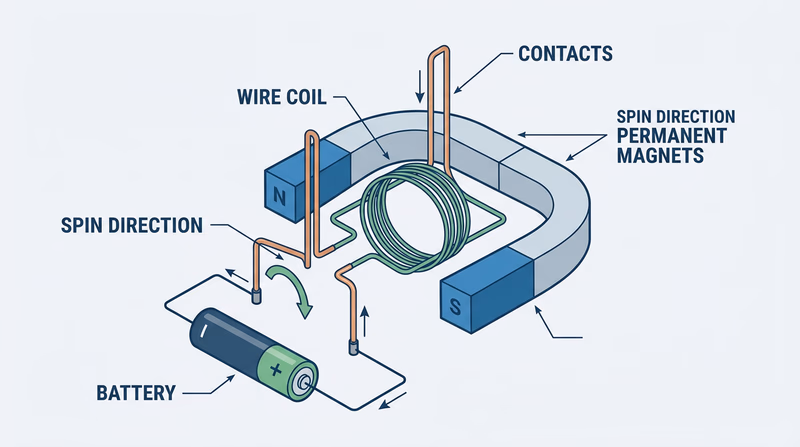
What to Watch For When It Runs
If your motor spins, even slowly, you have proven the principle. If it struggles, that is normal. Very simple motors are sensitive to balance, friction, contact quality, and battery strength.
Keys to a successful simple motor
Small details matter- Keep the coil balanced so it can rotate freely.
- Use clean contacts so current reaches the coil reliably.
- Place the magnets correctly for strong interaction with the coil.
- Use a fresh battery because weak current can make the motor stall.
- Reduce friction anywhere the coil rests or turns.
What the Motor Teaches You
This project connects directly to Req 3 — Build an Electromagnet. In both cases, current creates magnetic force. The difference is that a motor uses that force in a repeating pattern so the motion continues instead of stopping after one pull.
Science Buddies — Build a Simple Electric Motor A step-by-step project explanation of how a simple motor works and what adjustments help it spin. Link: Science Buddies — Build a Simple Electric Motor — https://www.sciencebuddies.org/science-fair-projects/project-ideas/Elec_p009/electricity-electronics/build-a-simple-electric-motorReq 10c — Build a Rheostat
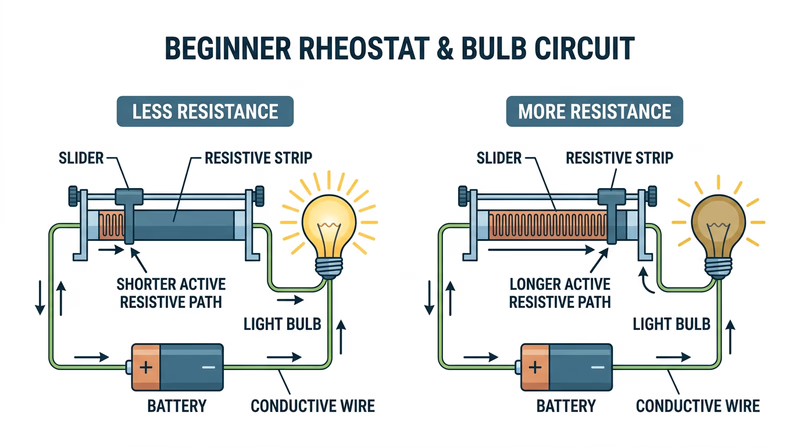
A rheostat is a variable resistor. Instead of just turning a circuit on or off, it lets you change how much current flows. That makes it a great project for understanding control.
What a Rheostat Does
Resistance opposes current. When resistance increases, current decreases. When resistance decreases, current increases. A rheostat gives you a way to change that resistance on purpose.
In a simple demonstration circuit, a rheostat might make a bulb dim or brighten, or change the behavior of a buzzer or small motor.
Simple Build Idea
Many beginner rheostats use a resistive material and a movable contact. As the contact changes position, the length of resistive path in the circuit changes too. More resistive path means more resistance.
Even if your design is simple, your explanation should include the key point: the adjustable contact changes the effective resistance in the circuit.
How to prove it works
Show the before-and-after effect clearly- Set up a low-voltage circuit with your rheostat and a visible load.
- Start at one position and observe the load behavior.
- Move the contact to change the resistance.
- Observe the difference in brightness, sound, or speed.
- Explain why the change happened using the word resistance.
A rheostat is related to the resistance ideas from Req 9 — Essential Electrical Terms. This project lets you see that vocabulary turn into a real effect.
🎬 Video: How a Rheostat works - Step by Step & its different applications — DERF Electronics — https://www.youtube.com/watch?v=isA5I9JFjA4
Req 10d — Single-Pole, Double-Throw Switch
A single-pole, double-throw (SPDT) switch has one input connection and two possible output connections. Instead of simply opening and closing a circuit, it chooses which of two paths the current will take.
What the Name Means
- Single-pole: one common input path.
- Double-throw: two possible output paths.
You can think of it like a railroad switch. One track comes in, but the switch sends the train onto one of two routes.
How to Demonstrate It
An easy way to show an SPDT switch working is to connect one battery source to the common terminal and two different loads to the two output terminals. When you flip the switch one way, load A works. Flip it the other way, and load B works.
That makes the switching action visible right away.
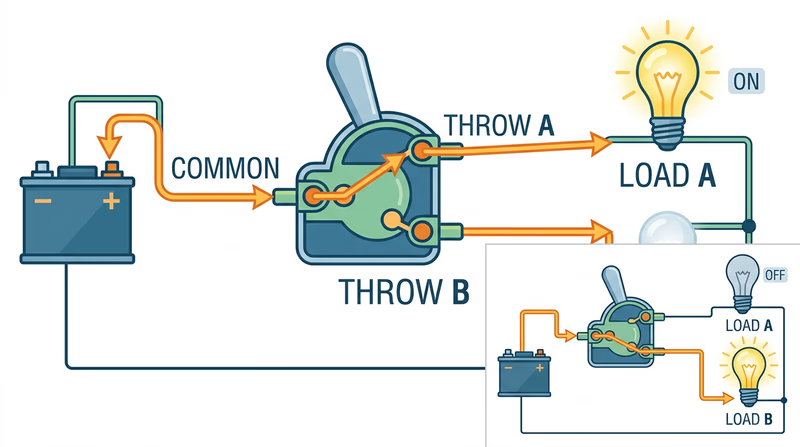
SPDT demonstration idea
Keep the routing obvious- Connect the battery to the common side.
- Connect one load to throw A.
- Connect another load to throw B.
- Flip the switch to show current reaching only one load at a time.
- Explain which connection is common and which two are the alternate paths.
SPDT logic helps you understand more advanced switching ideas, including the 3-way lighting concept in Req 10e — How a 3-Way Switch Works.
🎬 Video: SPDT switch | Home-made robots | Electrical engineering | Khan Academy — Khan Academy - Projects — https://www.youtube.com/watch?v=1_OieLuWGyw
Req 10e — How a 3-Way Switch Works
A 3-way lighting circuit lets two different switches control one light. That is useful in places like hallways, staircases, and large rooms with more than one entrance.
The Core Idea
A 3-way lighting setup uses two special switches. Each switch can connect its common terminal to one of two traveler wires. Depending on how both switches are positioned, the circuit to the light is either complete or broken.
That means either switch can change the state of the light. If the light is on, flipping either switch turns it off. If the light is off, flipping either switch turns it on.
Why It Works
A normal single-pole switch has only one path to open or close. A 3-way system uses two switching points and two traveler wires between them. The traveler wires act like alternate routes.
- If both switches connect through the same traveler path, the circuit is complete and the light turns on.
- If they connect through different paths, the circuit is broken and the light stays off.
This is really an application of SPDT switching logic from Req 10d — Single-Pole, Double-Throw Switch, just arranged so two switches work together.
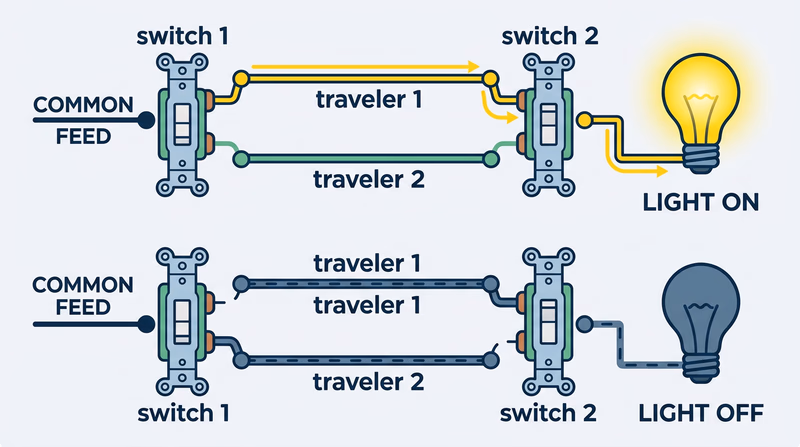
Best way to explain 3-way switching
Focus on path completion, not memorizing wire colors- One light, two switches is the goal.
- Two traveler wires connect the switches.
- Each switch chooses a path for the current.
- Matching path = light on in a simple explanation model.
- Changing either switch changes whether the circuit is complete.
Req 10f — Series vs. Parallel Circuits
This option is one of the best hands-on lessons in the badge because it shows that wiring layout changes how a circuit behaves. You use the same battery, the same switch, and the same two lights — but you get very different results depending on whether the lights are in series or in parallel.
Series Circuit
In a series circuit, the current has only one path. It must pass through the first light and then the second light before returning to the battery.
Because the two lights share the available voltage, they are often dimmer than a single light would be. If one bulb is removed or fails, the path is broken and both lights go out.
Parallel Circuit
In a parallel circuit, each light has its own branch path connected across the battery. The current can travel through either branch.
Each light gets the full battery voltage, so the bulbs usually shine brighter than they do in series. If one branch opens because one bulb fails or is removed, the other branch can still work.
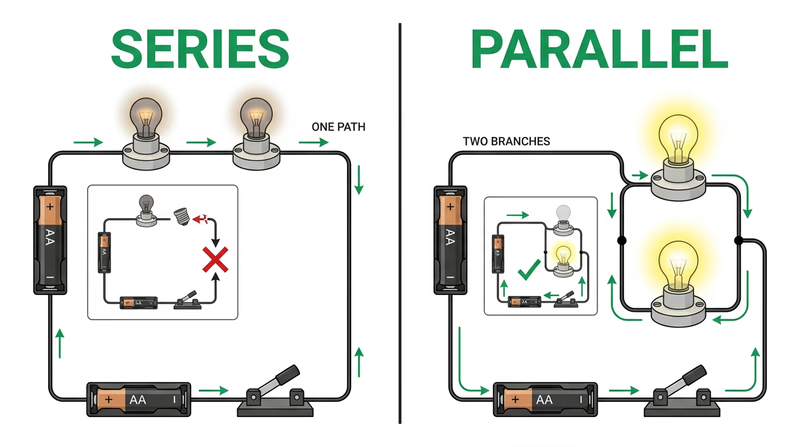
What differences to discuss
These are the observations your counselor will want- Brightness: series is usually dimmer; parallel is usually brighter.
- Number of paths: series has one path; parallel has multiple branches.
- Failure behavior: one failed bulb kills a series circuit but not the other branch of a parallel circuit.
- Real-world use: homes are wired more like parallel circuits so devices can work independently.
Why Homes Use Parallel Wiring
This requirement connects directly to household life. If your kitchen light burns out, your bedroom lights do not go dark too. That independence is one big advantage of parallel wiring.
Series circuits still matter, especially in demonstrations and some electronics, but for buildings, parallel wiring is usually much more practical.
Khan Academy — Series and Parallel Circuits A clear explanation of how circuit layout affects voltage, current paths, and what happens when components fail. Link: Khan Academy — Series and Parallel Circuits — https://www.khanacademy.org/science/physics/circuits-topic/circuits-resistance/v/ee-series-and-parallel-circuitsReq 11 — Electricity Careers
Every time you flipped a switch, traced a circuit, or talked about safety in this badge, you were touching skills that people use for their jobs every day. Electricity careers include hands-on trade work, utility system work, electronics, renewable energy, and engineering. Some paths start with apprenticeships. Others start with college, technical school, or military training.
Three Strong Career Examples
Electrician
Electricians install, maintain, and troubleshoot wiring, panels, lighting, controls, and equipment in homes, schools, businesses, and job sites. This path fits people who like practical problem-solving, tools, and working with real systems.
Power Line Worker
Line workers build and repair the systems that move electricity from substations to neighborhoods. It is physically demanding, safety-heavy work that often takes place outdoors and sometimes in bad weather.
Electrical Engineer or Electronics Technician
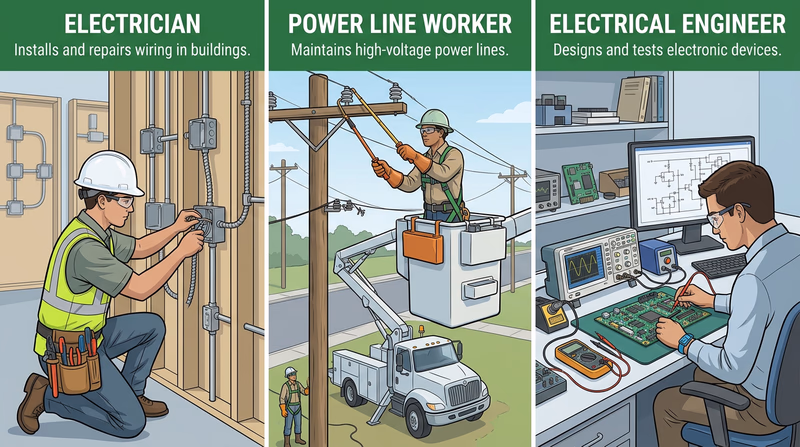
Electrical engineers and electronics technicians design, test, improve, or maintain devices and systems. Depending on the role, that might mean circuit boards, motors, solar systems, communications equipment, robotics, or industrial controls.
A Good Research Framework
Pick one career and organize your research around these questions:
Career research topics
Use these points to structure your counselor discussion- Training path: apprenticeship, trade school, college, military, or employer training?
- Education needed: high school diploma, certificate, associate degree, or bachelor’s degree?
- Certification or licensing: state license, OSHA training, or specialty credentials?
- Experience and expenses: tools, tuition, books, fees, transportation, or unpaid training time?
- Job outlook and advancement: entry-level pay, long-term growth, and leadership opportunities?
Questions Worth Asking Yourself
As you research, do not just collect facts. Think about fit.
- Do you enjoy physical, hands-on work?
- Are you interested in math, design, and problem-solving?
- Would you rather work indoors, outdoors, or both?
- Do you want to build systems, maintain them, or design new ones?
This requirement is a great place to look back over the whole badge. If you loved the emergency and home-wiring parts, trade and utility careers might appeal to you. If you liked the motor, electromagnet, and circuit projects, electronics or engineering might be a better fit.
U.S. Bureau of Labor Statistics — Electrical and Electronics Occupations Career outlook information for electrical and electronics engineering, including education, pay, and job growth. Link: U.S. Bureau of Labor Statistics — Electrical and Electronics Occupations — https://www.bls.gov/ooh/architecture-and-engineering/electrical-and-electronics-engineers.htm U.S. Bureau of Labor Statistics — Electricians Career information for electricians, including training paths, wages, and outlook. Link: U.S. Bureau of Labor Statistics — Electricians — https://www.bls.gov/ooh/construction-and-extraction/electricians.htmExtended Learning
A. Congratulations
You have finished a badge that most people use every day without really understanding. You now know how to talk about electrical safety, read the basics of circuits, compare series and parallel wiring, and connect electrical ideas to real careers. That puts you in a strong position to keep learning, because electricity touches almost every other technical field around you.
B. Deep Dive: The Grid Is a Giant Team Project
It is easy to imagine electricity as something that just “comes from the wall,” but the grid is really one of the largest coordinated systems humans have ever built. Power may start at a hydroelectric dam, natural gas plant, nuclear plant, wind farm, or solar field. From there, it moves through transmission lines at high voltage so less energy is lost as heat over long distances. Substations route and reshape that power. Transformers reduce the voltage step by step until it is ready for neighborhoods, schools, and homes.
One reason this system is so impressive is that generation and use have to stay balanced all the time. Utilities cannot simply make a month’s worth of electricity on Monday and stack it in a warehouse. Instead, the grid constantly adjusts to demand. On a hot summer afternoon, air-conditioner use can rise fast. On a cold winter morning, heaters and lights may all come on around the same time. Operators use data, forecasting, and automated controls to keep the system stable. The next time a light turns on instantly, remember that you are seeing the final moment of a huge teamwork chain.
C. Deep Dive: Electricity and Renewable Energy
Renewable energy is one of the most exciting areas for future learning. Solar panels and wind turbines both produce electricity without burning fuel, but they do it in different ways. Solar panels make DC electricity directly from sunlight. Wind turbines use moving air to spin a generator. Both methods can reduce pollution and diversify the energy supply, but both also raise good engineering questions.
For example, what happens when the Sun is not shining or the wind is weak? That is where battery storage, smart controls, and a flexible grid become important. Engineers are working on better batteries, smarter inverters, and cleaner ways to keep energy available around the clock. If you liked the part of this badge that connected electricity to the real world, renewable systems are a great next subject to explore because they combine physics, construction, electronics, economics, and environmental science.
D. Deep Dive: Hidden Electricity All Around You
Once you begin noticing electrical systems, you will see them everywhere. A refrigerator cycles a motor on and off to move heat. A phone charger converts AC from the wall into DC for the battery. A smoke alarm depends on reliable power and a warning circuit. Traffic lights, elevators, school intercoms, routers, and arcade games all rely on circuits, switching, and protection devices.
This is one reason electricity knowledge is so powerful: it transfers. Even if you never become an electrician or engineer, understanding circuits helps you become a better troubleshooter, a safer homeowner, and a smarter user of technology. It also pairs well with other merit badges. Robotics, Engineering, Electronics, Radio, and Sustainability all connect naturally to what you learned here. The badge may be finished, but the subject is now attached to almost everything around you.
E. Real-World Experiences
Try these next
Real places and activities that make electricity more concrete- Visit a science museum or children’s museum with electricity exhibits: hands-on stations often let you experiment with generators, motors, and circuits.
- Tour a utility or public power open house if available in your area: many utilities host safety days, line-worker demonstrations, or facility tours.
- Build a larger low-voltage project: try a hobby electronics kit, snap-circuit set, or beginner robotics project.
- Compare household devices: read the wattage labels on small appliances and estimate which ones use the most power.
- Attend a career day or trade fair: talk with electricians, technicians, utility workers, or engineers about what they actually do.