Emergency Preparedness Merit Badge — Complete Digital Resource Guide
https://merit-badge.university/merit-badges/emergency-preparedness/guide/
Introduction & Overview
Emergencies don’t send invitations. Fires, floods, tornadoes, and accidents can strike anyone, anywhere, at any time. The Emergency Preparedness merit badge teaches you how to think, plan, and act before, during, and after a crisis — so you can protect yourself, your family, and your community when it matters most.
Emergency preparedness is one of the core principles of Scouting. The Scout motto — “Be Prepared” — was written with exactly this kind of readiness in mind. This badge takes that motto and turns it into real-world skills you will carry for the rest of your life.
Then and Now
Then — Disaster by Instinct
For most of human history, people responded to emergencies by instinct alone. When a fire broke out, you ran. When a flood came, you climbed. When someone was injured, you did whatever came to mind. There were no emergency plans, no 911, no organized disaster response. Communities relied on each other, but preparation was rare and survival was uncertain.
- Purpose: React and survive
- Mindset: Hope for the best, deal with what comes
Now — Prepared by Design
Today, emergency preparedness is a science. Governments, communities, and families create detailed plans to prevent, respond to, and recover from disasters. We have early warning systems, trained first responders, disaster kits, and national frameworks like NIMS and ICS that coordinate responses across entire regions. Being prepared is no longer about luck — it is about planning.
- Purpose: Prevent harm, protect lives, and recover faster
- Mindset: Think ahead, plan thoroughly, act decisively
Get Ready! The skills you learn in this badge could save a life — maybe even your own. All it takes is the willingness to learn, plan, and practice. Let’s get started.
Kinds of Emergencies
Emergencies come in many forms. Understanding the different categories helps you prepare for the wide range of situations you might face.
Natural Disasters
Nature is powerful and unpredictable. Tornadoes, hurricanes, earthquakes, floods, wildfires, and blizzards can cause widespread destruction. These events often affect entire communities and require coordinated response efforts.
Human-Caused Emergencies
Some emergencies are the result of human actions — whether accidental or intentional. House fires caused by cooking mistakes, automobile crashes, chemical spills, and acts of violence all fall into this category. Many of these can be prevented with awareness and planning.
Technological Emergencies
Power outages, gas leaks, nuclear plant incidents, and toxic chemical releases are examples of technological emergencies. These events often require specialized knowledge to respond safely — and sometimes the best response is to evacuate immediately.
Personal and Household Emergencies
Not every emergency makes the news. Food poisoning, a kitchen fire, a family member’s medical crisis, or getting lost in the backcountry — these personal emergencies demand the same level of preparedness and clear thinking as any large-scale disaster.
Now let’s explore the requirements for the Emergency Preparedness merit badge!
Req 1a — Five Aspects of Emergency Preparedness
Before you can prepare for an emergency, you need a framework — a way of thinking about emergencies that covers every angle. The five aspects of emergency preparedness give you that framework. Think of them as five lenses you can use to examine any emergency situation, from a kitchen fire to a hurricane.
These five aspects are not random — they follow the logical order of a crisis. Some happen before the emergency, some during, and some after. Together, they create a complete picture of what it means to be truly prepared.
1. Prevention — Stop It Before It Starts
Prevention means taking action to avoid an emergency in the first place. This is always your first and best line of defense. Many emergencies — especially human-caused ones — can be prevented entirely with awareness and good habits.
Key questions to ask yourself:
- What could go wrong in this situation?
- What actions can I take right now to stop this from happening?
- Are there hazards I can remove or reduce?
Examples:
- Installing and testing smoke detectors prevents undetected fires.
- Storing flammable liquids away from heat sources prevents accidental ignition.
- Wearing a seatbelt prevents injuries in a crash.
- Checking weather forecasts before a hike prevents getting caught in a storm.
2. Protection — Shield Yourself and Others
Protection means putting safeguards in place that reduce the chance of harm if an emergency does occur. While prevention tries to stop the event, protection prepares you to survive it.
Key questions to ask yourself:
- If this emergency happens, what will protect me and my family?
- What equipment, structures, or systems are in place to keep people safe?
- What protective actions should I take right now?
Examples:
- A storm shelter protects your family during a tornado.
- Fire-resistant building materials protect a home from wildfire.
- Life jackets protect boaters during a capsizing.
- Helmets and proper gear protect you during outdoor activities.
3. Mitigation — Reduce the Damage
Mitigation means taking steps to reduce the severity of an emergency’s impact. Even when you cannot prevent an emergency or fully protect against it, you can lessen the damage it causes.
Key questions to ask yourself:
- If this emergency happens, what actions can reduce the harm?
- How can I minimize property damage, injuries, or loss of resources?
- What long-term steps can be taken to reduce future risk?
Examples:
- Elevating a home in a flood zone mitigates flood damage.
- Trimming trees near power lines mitigates storm-related outages.
- Learning CPR mitigates the impact of a cardiac emergency.
- Keeping a fire extinguisher in the kitchen mitigates the spread of a cooking fire.
4. Response — Act When It Happens
Response is what you do during and immediately after an emergency. This is the moment when your training, planning, and preparation pay off. A good response saves lives and prevents a bad situation from getting worse.
Key questions to ask yourself:
- What should I do first?
- Who needs help, and how can I help them safely?
- Who should I contact for professional assistance?
- What is my role in this situation?
Examples:
- Calling 911 is often the most important first response.
- Evacuating a building during a fire is a response action.
- Administering first aid to an injured person is a response.
- Following your family’s shelter-in-place plan during a chemical spill is a response.
5. Recovery — Get Back on Your Feet
Recovery is everything that happens after the immediate danger has passed. It is the process of returning to normal — or building a new normal. Recovery can take hours, days, or even years depending on the severity of the emergency.
Key questions to ask yourself:
- What are the immediate needs of those affected?
- How do we restore safety, shelter, and basic services?
- What can we learn from this emergency to be better prepared next time?
- What emotional or psychological support might people need?
Examples:
- Cleaning up debris after a storm is part of recovery.
- Filing insurance claims after property damage is part of recovery.
- Conducting an after-action review to learn what went right and wrong is recovery.
- Providing emotional support to those affected by a traumatic event is recovery.
Putting It All Together
These five aspects are not separate steps that happen one at a time. They overlap and reinforce each other. A strong emergency plan addresses all five:
| Aspect | When | Focus |
|---|---|---|
| Prevention | Before | Stop the emergency from happening |
| Protection | Before | Shield people and property |
| Mitigation | Before & During | Reduce the damage |
| Response | During | Take action to save lives |
| Recovery | After | Restore and rebuild |
Video Resource
🎬 Video: 5 Steps of Disaster Risk Management — https://youtu.be/xjlPmSXj24Y
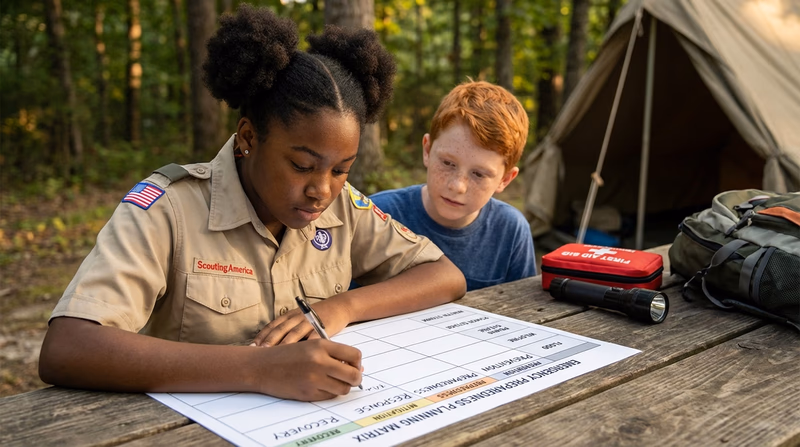
Req 1b — 10 Emergency Scenarios
This is one of the biggest requirements in the merit badge — and one of the most important. You will choose 10 emergency situations from the list of 21 below and analyze each one through the five aspects you learned in Requirement 1a: Prevention, Protection, Mitigation, Response, and Recovery.
The goal is not to memorize a list of answers. The goal is to build a way of thinking that you can apply to any emergency — even ones not on this list.
Building Your Chart
Your chart should have six columns:
| Emergency Situation | Prevention | Protection | Mitigation | Response | Recovery |
|---|---|---|---|---|---|
| (scenario name) | What can stop this from happening? | What safeguards protect people? | How can damage be reduced? | What do you do when it happens? | How do you get back to normal? |
You can use a spreadsheet, a poster, a notebook — whatever works for you and your counselor. The key is to think through each column for each scenario.
The 21 Emergency Scenarios
Below are all 21 scenarios organized by category. Choose any 10 to include in your chart. The brief guidance for each scenario will help you think through the five aspects — but remember, your chart should reflect your own thinking and research.
Fire Emergencies
1. Home Stovetop or Oven Fire
Kitchen fires are the number one cause of home fires. Grease fires are especially dangerous because water makes them worse. Know the difference between grease fires and other cooking fires — the response is completely different.
Think about: What causes most kitchen fires? What type of fire extinguisher works on grease? Why should you never throw water on a grease fire?
🎬 Video: How to Put Out a Stovetop Fire — https://youtu.be/AFwkGTEles8
2. Home Flammable Liquid Fire
Flammable liquids — gasoline, paint thinner, lighter fluid — can ignite quickly and burn intensely. These fires spread fast and produce toxic fumes. Proper storage is the key to prevention.
Think about: Where should flammable liquids be stored? What type of fire extinguisher is rated for flammable liquid fires (Class B)? Why is ventilation important?
🎬 Video: Flammable Liquids — https://youtu.be/ofH8KxvtfZw
12. Fire or Explosion in a Public Place
Fires in public buildings — malls, schools, theaters — create unique dangers because of crowds and unfamiliar layouts. Knowing where exits are before an emergency begins is critical.
Think about: Why should you always locate exits when entering a public building? What does “run, hide, fight” mean in this context? How do stampedes happen, and how can they be avoided?
🎬 Video: How to Survive a Building Explosion — https://youtu.be/uXG31J68dcY
🎬 Video: How to Survive a Burning High-Rise — https://youtu.be/P8Naa4pzDdo?si=PAoTGFJgturiTeSm
14. Wildland Fire
Wildfires can move faster than a person can run, especially when driven by wind. They destroy homes, ecosystems, and communities. Defensible space around homes and early evacuation are lifesavers.
Think about: What is “defensible space” and why does it matter? When should you evacuate versus shelter in place? What causes most wildfires?
🎬 Video: If You Are Trapped by a Wildfire — https://youtu.be/fhiaP01lfhk
Weather & Natural Disaster Emergencies
15. Avalanche (Snowslide or Rockslide)
Avalanches can bury a person in seconds. In mountainous winter terrain, understanding avalanche conditions and carrying the right gear can mean the difference between life and death.
Think about: What conditions cause avalanches? What equipment should you carry in avalanche country (beacon, probe, shovel)? What should you do if caught in an avalanche?
🎬 Video: Survive an Avalanche — https://youtu.be/levLNlIEViI
🎬 Video: How to Survive a Landslide — https://youtu.be/9j_StYqR_Pg
16. Earthquake
Earthquakes strike without warning. Buildings can collapse, roads can crack, and aftershocks can continue for days. Knowing what to do in the first few seconds is critical.
Think about: What does “Drop, Cover, and Hold On” mean? Why should you stay away from windows? What should you do after the shaking stops?
🎬 Video: 10 Ways to Survive an Earthquake — https://youtu.be/hWSu4l1RxLg?si=jO2xOSPR0uj-ZtE6
17. Tsunami
Tsunamis are triggered by underwater earthquakes or volcanic eruptions. A wave can travel across an ocean at jet speed and arrive with little warning. Coastal communities must know the signs and evacuation routes.
Think about: What natural warnings signal a tsunami (ocean suddenly recedes)? How high should you go to be safe? Why is speed more important than distance?
🎬 Video: How to Survive a Tsunami — https://youtu.be/PSMXZPjJwAw
18. Major Flooding or Flash Flood with Water Outage
Floods are the most common natural disaster in the United States. Flash floods can develop in minutes. Just six inches of moving water can knock you off your feet, and two feet can carry away a vehicle.
Think about: Why should you never walk or drive through floodwater? Where is the safest place during a flood? How do you purify water if the supply is contaminated?
🎬 Video: How to Survive a Flood — https://youtu.be/rV1iqRD9EKY
19. Hurricane with Power Outage
Hurricanes bring sustained winds, torrential rain, storm surge, and often tornadoes. Power outages can last for days or weeks. Preparation before the storm arrives is essential.
Think about: When should you evacuate versus shelter in place? What supplies do you need for an extended power outage? Why is storm surge often more dangerous than wind?
🎬 Video: How to Survive a Hurricane — https://youtu.be/TqZ3M7xh8jM
20. Tornado
Tornadoes can form in minutes and destroy entire neighborhoods in seconds. They are most common in “Tornado Alley” but can occur anywhere. Knowing where to shelter is the most important thing you can do.
Think about: Where is the safest place in your home during a tornado? Why should you avoid windows? What is the difference between a tornado watch and a tornado warning?
🎬 Video: How to Survive a Tornado — https://youtu.be/donE6SxyHXw?si=cHfxJ0HuR3lLgw9S
21. Lightning Storm
Lightning kills about 20 people per year in the United States and injures hundreds more. Most lightning deaths happen outdoors, and many are preventable.
Think about: What is the 30/30 rule for lightning safety? Where should you go if you are caught in the open? Why are open fields, hilltops, and tall trees dangerous?
🎬 Video: What Happens When You Are Struck by Lightning — https://youtu.be/T3BT-cnHjik
Vehicle & Travel Emergencies
5. Automobile Crash
Car crashes are a leading cause of death for young people. Knowing how to respond at the scene — checking for injuries, calling 911, and avoiding further danger — can save lives.
Think about: What should you do first at a crash scene? When is it safe to move an injured person? Why should you turn off the vehicle’s engine?
🎬 Video: Responding to a Car Crash — https://youtu.be/uMAgxMFjz6A?si=HSF5Su0SyabxF-Rl
6. Vehicle Stalled in the Desert
A stalled vehicle in the desert puts you at risk of dehydration, heat stroke, and exposure. The vehicle itself is your best shelter — it provides shade, is visible to rescuers, and stores supplies.
Think about: Why should you stay with your vehicle? How much water does a person need in desert heat? What signals can you use to attract attention?
🎬 Video: A Desert Survival Experience — https://youtu.be/Do2DSJwMpVw
7. Vehicle Trapped in a Blizzard
Getting trapped in a blizzard can happen suddenly. Visibility drops to zero, roads become impassable, and temperatures plummet. Your vehicle becomes your shelter — but carbon monoxide from a running engine is a deadly risk.
Think about: Why should you crack a window if running the engine for heat? What supplies should you carry in your car during winter? How do you signal for help in a whiteout?
🎬 Video: What to Do If Stranded in a Snowstorm — https://www.youtube.com/watch?v=_elbVNM4Rvg
Outdoor & Backcountry Emergencies
8. Backcountry Injury
Injuries in the backcountry — sprains, fractures, snake bites, allergic reactions — are complicated by the fact that you may be hours from medical help. Self-reliance and a well-stocked first aid kit are essential.
Think about: What should your backcountry first aid kit include? When should you try to hike out versus stay and signal for help? How do you stabilize a fracture with improvised materials?
🎬 Video: Backpacking First Aid — https://youtu.be/nxExCQiWa_U?si=oF8Tjni8vOmZT6hH%20
9. Boating or Water Accident
Capsizing, falling overboard, or swamping a boat can lead to drowning, hypothermia, or being stranded on the water. Life jackets save lives — but only if you are wearing one.
Think about: Why should you always wear a life jacket? What should you do if your boat capsizes? How does cold water affect your ability to swim?
Preventing and Managing Boating Accidents Learn the proper response to capsizing, swamping, and falling overboard. Link: Preventing and Managing Boating Accidents — https://www.boat-ed.com/indiana/studyGuide/If-You-Capsize-Swamp-or-Fall-Overboard/10101602_35419/Chemical, Toxic & Technological Emergencies
3. Gas Leak in or Near a Home
Natural gas is odorless, but utility companies add a rotten-egg smell (mercaptan) so you can detect leaks. A gas leak can cause an explosion, fire, or suffocation. Knowing the signs and response is critical.
Think about: What does a gas leak smell like? What should you avoid doing (no flames, no light switches)? How do you turn off the main gas valve?
🎬 Video: What to Do If You Smell Gas — https://youtu.be/RPJGdDOeGx0?si=1sYjSYZy3Hn1xwUW
🎬 Video: How to Turn Off Main Gas Valve — https://youtu.be/W8OKKu0dVUA
10. Toxic Chemical Spills and Releases
Chemical spills can occur at industrial facilities, during transportation, or even in your home with household cleaners. Toxic fumes can be invisible and deadly.
Think about: What household chemicals should never be mixed? How do you shelter in place during a chemical release? What does an emergency broadcast tell you to do?
🎬 Video: Chemical Spill Preparedness — https://www.youtube.com/watch?v=K30BBRgt7BM
11. Nuclear Power Plant Emergency
Nuclear emergencies are rare, but communities near nuclear plants must have evacuation plans in place. Radiation is invisible and requires specialized detection equipment.
Think about: How far is the nearest nuclear power plant from your home? What does “shelter in place” mean during a nuclear emergency? What is potassium iodide and when is it used?
🎬 Video: How to Stay Safe in a Nuclear Emergency — https://youtu.be/tqDna6z4F9c
Personal Safety Emergencies
4. Food Poisoning
Food poisoning affects millions of people every year. Improper food handling, storage, and cooking temperatures are the most common causes. Prevention through safe food practices is the best defense.
Think about: What temperature kills most harmful bacteria? How long can perishable food sit at room temperature? What are the signs of food poisoning and when should you seek medical help?
🎬 Video: Stomach Flu and Food Poisoning — https://youtu.be/VKw0cpNLALI?si=c2nZIN0OgYjoKABA
🎬 Video: Safe Food Handling — https://www.youtube.com/watch?v=nf4R6XHCU4Q
13. Violence in a Public Place
Active violence situations are terrifying but survivable. The “Run, Hide, Fight” framework gives you a clear decision tree. Awareness of your surroundings is your most important tool.
Think about: What are the three options in “Run, Hide, Fight” and in what order should you consider them? Why is knowing the exits in any building important? How can you help others while keeping yourself safe?
🎬 Video: A Navy SEAL Reveals How to Survive an Active Shooter — https://youtu.be/5pgxzPoxv4w?si=jqbo9MdHYyjz6bLP
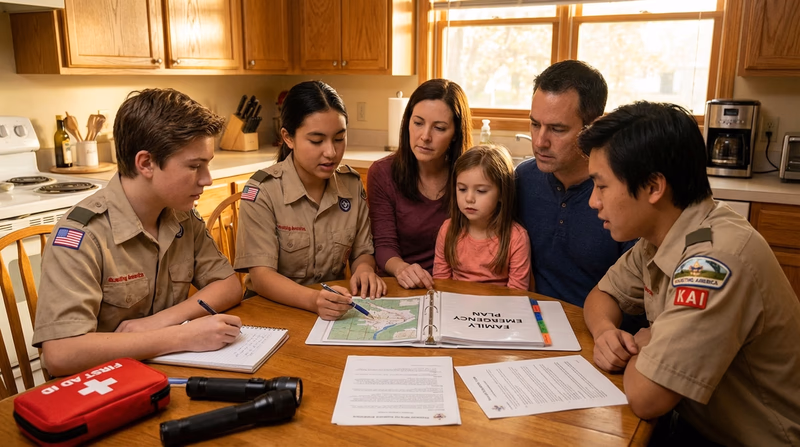
Req 2a — Family Emergency Plans
Now it is time to take what you learned in Requirements 1a and 1b and bring it home — literally. This requirement asks you to sit down with your family and talk through real emergency plans. This is one of the most practical things you will do in Scouting, and your family will benefit from it for years to come.
Family Emergency Plan Resource: Family Emergency Plan — /merit-badges/emergency-preparedness/guide/family-emergency-plan/Why a Family Meeting Matters
Everyone in your household needs to be part of the plan. A plan that only one person knows is not a plan — it is a secret. During a real emergency, every family member should know exactly what to do without needing to be told.
Who should be there: Everyone who lives in your home — parents, siblings, grandparents, and anyone else. Even young children can learn simple actions like “go to the safe spot” or “stay with an adult.”
Sheltering in Place
Sheltering in place means staying inside your home (or another building) because going outside would be more dangerous. This might happen during a tornado, a chemical spill, or an active threat in your area.
Your shelter-in-place plan should cover:
- Safe room: Which room in your home is the safest? For tornadoes, this is usually an interior room on the lowest floor with no windows (like a bathroom or closet). For chemical spills, choose a room you can seal — close windows, doors, and vents.
- Supplies: What do you need in your safe room? Think water, flashlight, radio, first aid kit, and phone charger.
- Communication: How will you know when it is safe to come out? A battery-powered or hand-crank NOAA weather radio can provide updates when the power is out and cell towers are down.
- Pets: Do you have a plan for your pets? They need to shelter with you.
🎬 Video: How to Shelter in Place — https://youtu.be/xjpoh7lGqLg
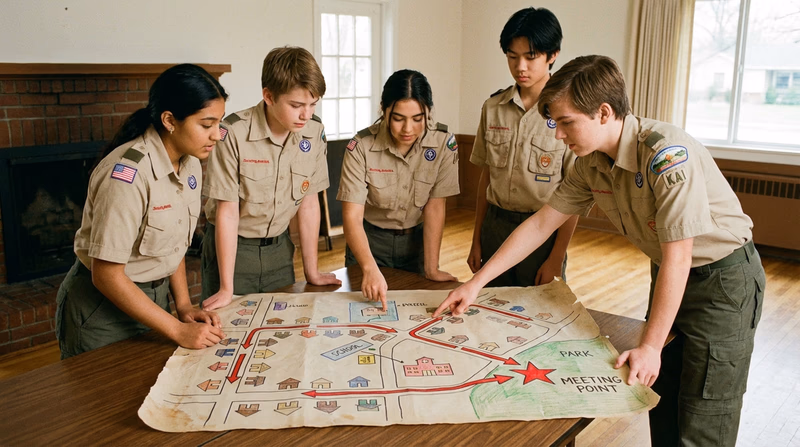
Evacuation
Evacuation means leaving your home because staying is too dangerous. This could happen during a wildfire, flood, hurricane, or gas leak. The key to a successful evacuation is planning it before you need it.
Your evacuation plan should cover:
- Routes: Identify at least two ways out of your neighborhood. Roads can be blocked, so having an alternate route is essential.
- Meeting place: Choose two meeting locations — one near your home (like a neighbor’s mailbox) and one outside your neighborhood (like a community center or relative’s house).
- Transportation: How will your family travel? Who drives? What if someone is not home when the evacuation order comes?
- Go bag: Each family member should have a pre-packed bag ready to grab. (You will build this in Requirement 2c.)
- Important documents: Keep copies of identification, insurance papers, and medical records in a waterproof container that is easy to grab.
🎬 Video: How to Evacuate From Wildfires — https://youtu.be/kb95NzvM92g
Running the Family Meeting
Here is a simple agenda for your family meeting:
- Share your chart from Requirement 1b. Explain the 10 scenarios you studied and what you learned about each one.
- Discuss local risks. Which emergencies are most likely in your area? A family in Florida focuses on hurricanes. A family in Kansas focuses on tornadoes. A family in California focuses on earthquakes and wildfires.
- Create your shelter-in-place plan. Walk through the house together. Pick your safe room. Decide what supplies go there.
- Create your evacuation plan. Map your routes. Choose your meeting places. Assign roles (who grabs the go bag, who gathers pets, who checks on neighbors).
- Exchange contact information. Make sure every family member has a list of emergency phone numbers — including an out-of-area contact who can serve as a communication hub if local phone lines are overwhelmed.
Discussing with Your Counselor
When you meet with your counselor, be ready to explain:
- How you organized and ran the family meeting
- What shelter-in-place and evacuation plans your family created
- How your family decided which emergencies to prioritize
- What challenges or surprises came up during the discussion
Family Emergency Plan
Back to Requirement 2aFamily Emergency Plan
Emergency Preparedness Merit Badge — Requirement 2a
Fill this out with your family during your emergency planning meeting. Post a copy where everyone can see it.
Family Contact Information
| Name | Phone Number | Role / Notes |
|---|---|---|
Meeting Places
Out-of-Area Emergency Contact
A relative or friend in another city who can relay messages if local phone lines are jammed.
Emergency Numbers
Evacuation Routes
Special Needs & Medications
List any family members with medical conditions, medications, mobility needs, or other special requirements.
Pet Plan
Communication Plan
Who calls whom? Write the chain of communication so every family member knows their role.
Counselor Review
Req 2b — Home Fire Escape Plan
A home fire gives you very little time. You may have as little as two minutes to get out safely once a smoke alarm sounds. That is why every family needs a fire escape plan that is practiced, not just discussed.
This requirement asks you to do three specific things: draw a floor plan, mark escape routes, and identify a safe meeting place. Then practice the plan with your family.
Drawing Your Floor Plan
Start with a simple sketch of your home. It does not need to be to scale or architecturally perfect — it just needs to show:
- Every room in the house (bedrooms, kitchen, living room, bathrooms, basement)
- Every door and window that could be used as an exit
- Hallways and stairways
Label each room so anyone looking at the plan can quickly understand the layout.
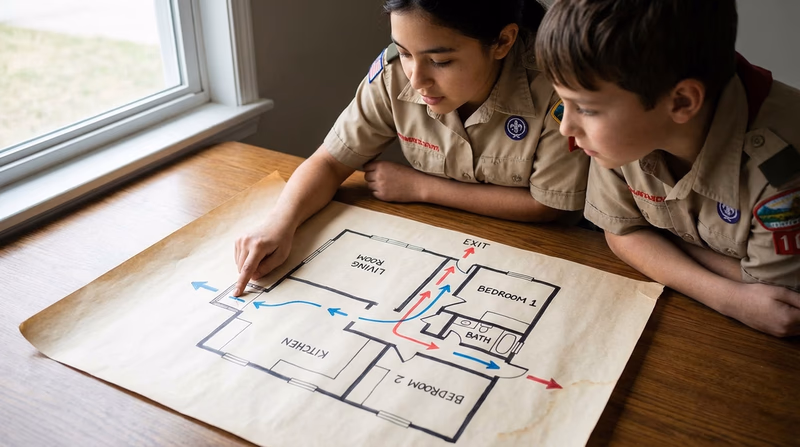
Marking Escape Routes
For each room — especially bedrooms — identify two ways out:
- Primary route: Usually through the door and down the hallway to the nearest exit.
- Secondary route: Usually through a window. This matters if the hallway is blocked by fire or smoke.
Draw arrows on your floor plan showing both routes for each room. Use different colors or line styles (solid vs. dashed) to distinguish primary from secondary routes.
Key Fire Escape Rules
Fire Escape Rules
Rules every family member should know- When the smoke alarm sounds, get out immediately. Do not stop to gather belongings.
- Feel doors with the back of your hand before opening them. If the door is hot, do not open it — use your secondary exit.
- Stay low to the ground. Smoke and toxic gases rise, so the cleanest air is near the floor.
- Once you are out, stay out. Never go back into a burning building for any reason.
- Go to the meeting place and make sure everyone is accounted for.
- Call 911 from outside the house using a cell phone or a neighbor’s phone.
Choosing a Safe Meeting Place
Your meeting place should be:
- Outside your home but close enough that everyone can reach it quickly
- Easy to identify — a specific spot like the mailbox, a large tree, or a neighbor’s driveway
- Away from the building — far enough that falling debris, heat, or smoke will not reach you
Make sure every family member knows the meeting place. Mark it clearly on your floor plan.
Practice Your Plan
A plan on paper is only as good as the practice behind it. Hold a family fire drill at least twice a year — once during the day and once at night.
During your practice drill:
- Sound the smoke alarm (press the test button) so everyone knows what it sounds like
- Time how long it takes for everyone to reach the meeting place
- Practice using the secondary escape routes at least once
- Make sure young children and elderly family members can navigate the routes
Smoke Detectors: Your Early Warning System
Your escape plan depends on early warning. Make sure your home has working smoke detectors:
- On every level of the home (including the basement)
- Inside every bedroom
- Outside each sleeping area
Test smoke detectors monthly and replace batteries at least once a year (or when the alarm chirps). Replace the entire unit every 10 years.

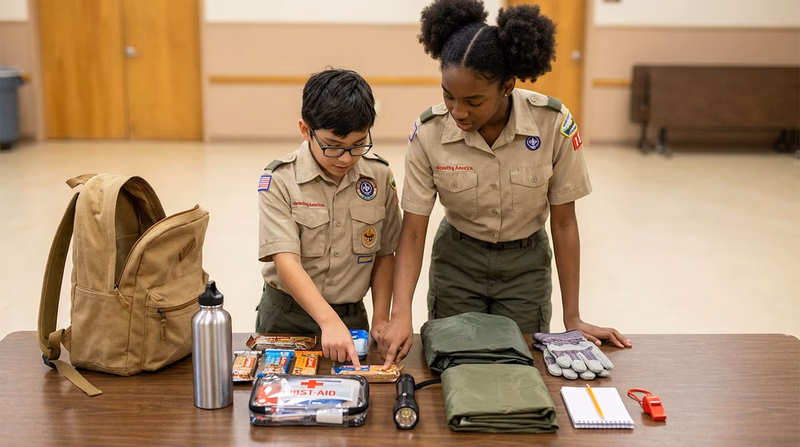
Req 2c — Family Disaster Kit
A disaster kit is your family’s lifeline when normal systems fail. When the power is out, the water is off, and the stores are closed, your kit is what keeps your family safe, fed, and sheltered.
This requirement asks you to prepare two types of kits — one for sheltering in place (staying home) and one for evacuation (leaving home). Each has a different purpose and different contents.
Shelter-in-Place Kit
Your shelter-in-place kit is designed to sustain your family at home for at least 72 hours (three days) without power, running water, or access to stores. This kit stays in your home in an accessible location.
Shelter-in-Place Kit Essentials
Enough supplies for your family for 72 hours- Water: One gallon per person per day (3 gallons per person minimum)
- Food: Non-perishable items that do not require cooking (canned goods, granola bars, peanut butter, dried fruit)
- Manual can opener
- Flashlights and extra batteries (at least two flashlights)
- Battery-powered or hand-crank NOAA weather radio
- First aid kit
- Medications: A 7-day supply of any prescription medications
- Whistle to signal for help
- Dust masks and plastic sheeting with duct tape (for sealing a room during chemical emergencies)
- Moist towelettes, garbage bags, and plastic ties (for sanitation)
- Wrench or pliers to turn off utilities (gas, water)
- Cell phone charger (battery pack or solar charger)
- Important documents in a waterproof container (IDs, insurance, medical records)
- Cash in small bills (ATMs may be offline)
- Blankets or sleeping bags
- Change of clothes for each family member
- Entertainment for children (books, cards, games)
- Pet supplies if applicable (food, water, leash, carrier)
Evacuation Kit (Go Bag)
Your evacuation kit — often called a “go bag” — is a portable kit you can grab and carry on foot or load into a car within minutes. It should be lighter and more compact than your shelter-in-place kit because you may need to carry it.
Evacuation Kit (Go Bag) Essentials
Ready to grab in 5 minutes or less- Water: At least one liter per person (water bottles or hydration bladder)
- Food: Compact, high-calorie items (energy bars, trail mix, jerky)
- First aid kit (personal size)
- Medications: 3-day supply of prescriptions
- Flashlight and extra batteries
- Portable phone charger (fully charged)
- Copies of important documents in a waterproof bag
- Cash in small bills
- Change of clothes and sturdy shoes
- Rain poncho or lightweight jacket
- Whistle
- Multi-tool or pocket knife
- Emergency blanket (space blanket)
- Local map (paper — do not rely on your phone)
- N95 masks
- Comfort items for children
- Pet supplies if applicable

Key Differences Between the Two Kits
| Feature | Shelter-in-Place Kit | Evacuation Kit (Go Bag) |
|---|---|---|
| Location | Stored at home | Stored near the door or in the car |
| Weight | Can be heavy — not meant to carry | Lightweight and portable |
| Duration | 72+ hours of supplies | 24-72 hours of supplies |
| Water supply | 1 gallon per person per day | Minimum 1 liter per person |
| Food | Canned goods, bulk items | Compact, lightweight items |
Maintaining Your Kit
A kit you build and forget is a kit that will fail you. Schedule a check-up at least every six months.
Kit Maintenance Checklist
Review every 6 months- Check expiration dates on food and water — rotate as needed
- Replace expired medications
- Test flashlight batteries — replace if weak
- Charge battery packs and solar chargers
- Update copies of important documents
- Adjust clothing for current season and sizes (especially for growing children)
- Check that the kit is in its designated location and easy to access
Build a Kit — Ready.gov
FEMA’s Ready.gov website provides detailed guidance on building and maintaining emergency kits for all types of disasters.
Build a Kit — Ready.gov FEMA's comprehensive guide to building your family emergency kit. Link: Build a Kit — Ready.gov — https://www.ready.gov/kitReq 3 — Preventing Accidents
Prevention is the most powerful tool in emergency preparedness — it stops emergencies before they start. This requirement gives you two options. Choose the one that fits your situation best, and complete it thoroughly.
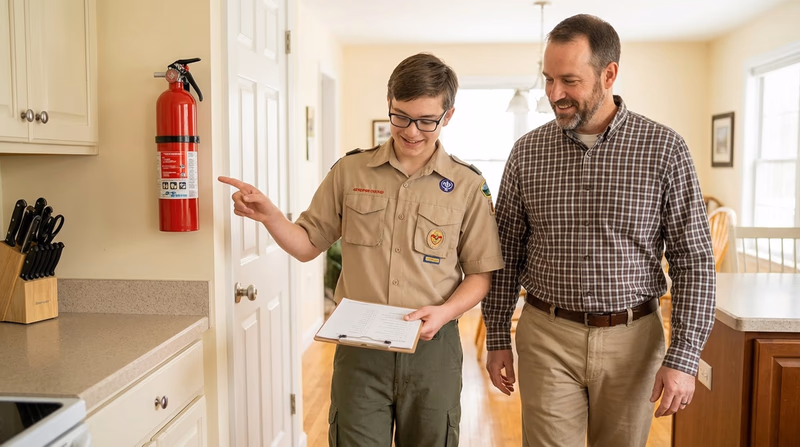
Option A: Home Safety Inspection
A home safety inspection is a room-by-room walkthrough of a home, looking for hazards that could cause fires, injuries, poisoning, or other emergencies. You will use a checklist to guide your inspection and record what you find.
How to Conduct the Inspection
Walk through each area of the home with an adult. Look at the space with fresh eyes — hazards that people live with every day often become invisible to them.
Kitchen Safety
Common hazards to look for- Smoke detector present and working
- Fire extinguisher accessible and charged (check the gauge)
- Pot handles turned inward on the stove
- Flammable items (towels, curtains) kept away from the stove
- Cleaning chemicals stored separately from food
- Electrical outlets not overloaded
- No frayed cords on appliances
Living Areas & Bedrooms
Common hazards to look for- Smoke detectors on every level and in every bedroom
- Carbon monoxide detectors near sleeping areas
- Extension cords not run under rugs or through doorways
- Space heaters at least 3 feet from anything flammable
- Candles placed on stable surfaces away from curtains
- Exits clear of clutter and furniture
- Night lights in hallways for safe navigation in the dark
Garage & Storage Areas
Common hazards to look for- Flammable liquids stored in approved containers, away from ignition sources
- Tools and sharp objects stored securely
- Chemicals labeled and stored properly
- Gas-powered equipment stored with empty fuel tanks or properly sealed
- Fire extinguisher accessible
Outside the Home
Common hazards to look for- House number visible from the street (so emergency vehicles can find you)
- Walkways and stairs in good repair, well-lit
- Gutters clear of debris (fire hazard in dry climates)
- Trees trimmed away from power lines
- Garden hose accessible for small fires
Option B: Emergency Prevention Plans for Family Activities
For this option, you develop emergency prevention plans for five different family activities that take place outside your home. The key is to think through each activity using the five aspects of emergency preparedness you learned in Requirement 1a.
How to Build Each Plan
For each activity, create a plan that covers:
- Activity description: Where, when, and who is involved
- Possible hazards: What could go wrong? (Think about weather, traffic, crowds, terrain, health)
- Prevention: What can you do to stop emergencies from happening?
- Protection: What safeguards should be in place?
- Mitigation: How can you reduce the impact if something goes wrong?
- Response: What do you do if an emergency happens during this activity?
- Recovery: How do you help everyone get back to normal after an incident?
Example Activities and Hazards to Consider
| Activity | Possible Hazards |
|---|---|
| Picnic at a park | Severe weather, insect stings, allergic reactions, heat exhaustion, getting lost |
| Movie theater | Fire, active threat, medical emergency in a crowd, loss of power |
| Beach outing | Drowning, rip currents, sunburn, jellyfish stings, severe weather |
| Road trip to visit a relative | Vehicle breakdown, crash, getting lost, fatigue |
| Attending a concert or ball game | Crowd crush, severe weather, dehydration, lost child, medical emergency |
🎬 Video: Building an Emergency Kit — https://www.youtube.com/watch?v=x2GkeNvgzG8
Req 4 — Dangerous Situations
Each of these four situations is life-threatening — and in every case, the most important rule is the same: do not become a second victim. A rescuer who gets hurt or killed cannot help anyone. Every technique in this requirement is designed to keep you safe while you help someone else.
4a. Live Household Electric Wire
Electricity can kill instantly. A person who is touching or near a live wire may be unable to let go because the electric current causes muscles to lock up. If you touch them directly, the current will flow through you too.
How to help safely:
- Do not touch the person while they are in contact with the wire.
- Disconnect the power if possible — unplug the appliance, flip the breaker, or turn off the main power switch.
- If you cannot disconnect the power, use a dry, non-conductive object (wooden broom handle, rubber-soled shoe, thick rope, dry towel) to push or pull the person away from the wire or push the wire away from the person.
- Stay dry. Water conducts electricity. Do not stand in water or on wet ground near a live wire.
- Call 911 and begin first aid once the person is clear of the electrical source.
🎬 Video: Rescue and First Aid for Electric Shock — https://youtu.be/O2VpgB8Xrzs?si=gEteTmTENwWE4AWh
4b. A Structure Filled with Carbon Monoxide
Carbon monoxide (CO) is called the “silent killer” because it is colorless and odorless. You cannot see it, smell it, or taste it. It is produced by anything that burns fuel — furnaces, gas stoves, generators, car engines, and fireplaces. Breathing CO causes confusion, unconsciousness, and death.
How to help safely:
- Do not enter the structure without fresh air. If you walk into a CO-filled building without protection, you will be overcome within minutes.
- Open doors and windows from the outside if possible to ventilate the area.
- If the person is near the door, reach in and pull them out while holding your breath — but only if you can do it in seconds.
- Call 911 immediately. Firefighters have self-contained breathing apparatus (SCBA) to enter CO-filled structures safely.
- Move the person to fresh air once they are out of the structure.
- Begin CPR if the person is not breathing.
🎬 Video: Rescue from CO Poisoning — https://youtu.be/bnjg17WkxHI
4c. Clothes on Fire
When a person’s clothes catch fire, panic is their worst enemy. People instinctively run, which fans the flames and makes the fire worse. The correct response is universally known — but many people forget it in the moment.
How to help safely:
- Stop the person from running. Shout “STOP!” and physically block them if you can do so safely.
- Get them to drop to the ground. This takes the upright flame pattern away from their face.
- Roll them on the ground to smother the flames. If a blanket, coat, or rug is nearby, throw it over them to cut off the fire’s oxygen supply.
- Cool the burn with cool (not cold) water once the fire is out.
- Call 911 for any significant burns. Do not remove burned clothing that is stuck to the skin.
If YOUR clothes catch fire:
- Stop — do not run
- Drop — fall to the ground
- Roll — roll back and forth to smother the flames
- Cover your face with your hands to protect your airway and eyes while rolling
🎬 Video: Stop. Drop. Roll. Get Low and Go. — https://youtu.be/stNSH-wy5nI
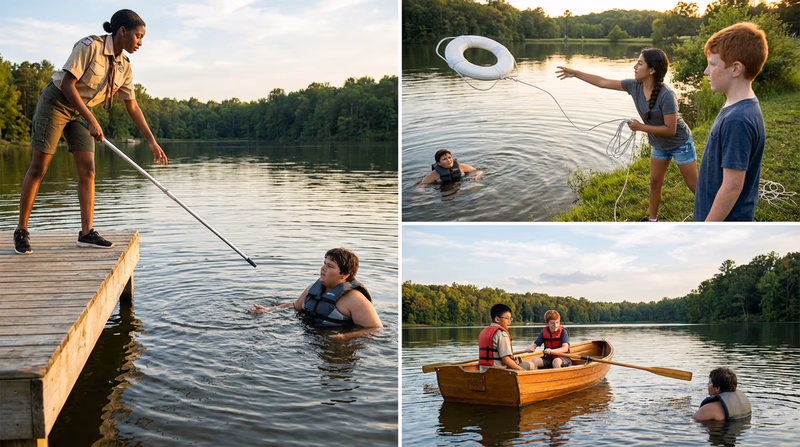
4d. Drowning — Nonswimming Rescues
Drowning is one of the leading causes of accidental death. A drowning person is in a state of panic and will grab onto anything — including you. Swimming rescues should only be attempted by trained lifeguards. For everyone else, the safe approach is: Reach, Throw, Row — Don’t Go.
Reach: Extend something to the person — a pole, branch, paddle, towel, or belt. Lie down on the dock or bank to brace yourself so you do not get pulled in.
Throw: Toss a flotation device — a life ring, throw bag, cooler, or even a sealed empty jug — to the person. Aim beyond them so the rope or the current carries it to them.
Row: If a boat is available, row or paddle out to the person. Approach carefully and extend something for them to grab. Do not let them climb into the boat — they can capsize it. Have them hold on while you tow them to safety.
Don’t Go: Do not swim out to a drowning person unless you are a trained lifeguard with proper equipment. A panicking person will push you underwater.
🎬 Video: Reach, Throw, Row, but Don't Go! — https://youtu.be/WyOkVhEEFQI
🎬 Video: A Patrol Performs an Ice Rescue — https://youtu.be/plTSz7in_Xk
Req 5 — Signaling for Help
When you are lost, stranded, or injured, being found is everything. Signaling is the art of making yourself visible, audible, or detectable to the people searching for you. The right signal at the right time can save your life.
5a. Signaling Rescue Aircraft or Drones
From the air, you are very small. A person standing in a forest or on a mountainside is almost invisible to a pilot flying overhead. Your signals need to be big, bright, and different from the natural surroundings.
Three methods for signaling aircraft:
1. Signal Fire (or Smoke)
Build a fire in an open area. During the day, add green branches or damp leaves to create thick white smoke — this contrasts against the ground and is visible for miles. At night, a bright fire is the most visible signal from the air.
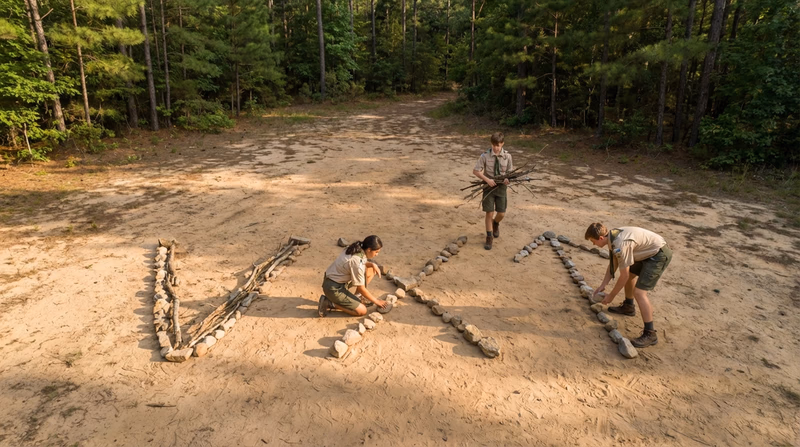
2. Ground-to-Air Signals
Use rocks, logs, clothing, or any contrasting material to create large symbols on the ground. The international ground-to-air signals are recognized by pilots worldwide:
| Symbol | Meaning |
|---|---|
| V | Need assistance |
| X | Need medical help |
| I | Need supplies |
| → (arrow) | Traveling this direction |
| LL | All is well |
Make symbols at least 10 feet long using materials that contrast with the ground — dark rocks on light sand, bright fabric on dark earth.
3. Signal Mirror
A signal mirror can be seen from over 50 miles away on a clear day. Even a reflective surface like a phone screen, a piece of foil, or a belt buckle can work. Aim the reflected sunlight at the aircraft by sighting along your outstretched fingers.
🎬 Video: Ground to Air Signals — https://youtu.be/JgNVuxOMOF8
5b. Signaling Ground Searchers
When searchers are looking for you on the ground, they are using their eyes and ears. Sound carries farther than you think in the wilderness, and anything out of place visually will catch a trained searcher’s eye.
Methods for attracting ground searchers:
Whistle: A whistle is louder than your voice, carries farther, and takes almost no energy to use. Three short blasts is the universal distress signal. Keep blowing every few minutes — searchers may be just out of range.
Bright clothing or markers: Hang brightly colored clothing, a space blanket, or flagging tape on trees at eye level near your position. These catch the light and stand out against natural colors.
Noise makers: Bang rocks together, clap sticks, or yell at regular intervals. Any rhythmic, repeating sound that is not natural will attract attention.
Trail markers: If you are moving, leave markers along your path — stacked rocks (cairns), broken branches, arrows scratched in the dirt, or strips of cloth tied to branches. Make it easy for searchers to follow your route.
Stay put: If you are truly lost, the best thing you can do is stop moving. Searchers work from your last known position. Every step you take makes their search area larger.
🎬 Video: Ways to Signal for Help in the Wilderness — https://youtu.be/4BHi5lBYwro
5c. Signaling on the Water
Being stranded on the water presents unique challenges. You may be low in the water, making you hard to see. Waves, glare, and distance all work against you. Water rescue signals must be highly visible and repetitive.
Methods for attracting water searchers:
Distress flag: An orange distress flag is the standard visual signal on the water. If you do not have one, wave any brightly colored cloth or clothing.
Signal mirror: Extremely effective on the water because the flat, reflective surface of the water already catches light. Aim the mirror at any vessel or aircraft you see.
Whistle or horn: Sound carries well over water. Three blasts means distress. Keep signaling at regular intervals.
Flares: If your boat carries flares (required on many vessels), fire them high and in the direction of any vessels you see. Use them sparingly — you may have limited supply.
Dye marker: Sea dye creates a large, brightly colored patch on the water surface that is visible from aircraft. It can last for hours in calm water.
EPIRB / PLB: An Emergency Position-Indicating Radio Beacon (EPIRB) or Personal Locator Beacon (PLB) transmits your GPS coordinates to rescue satellites. If your boat has one, activate it immediately when you are in distress. These devices alert Coast Guard and rescue teams worldwide.
🎬 Video: Signaling Devices for a Water Rescue — https://www.youtube.com/shorts/-0euvnZe_OM
🎬 Video: Water Rescue Signaling — https://youtu.be/mQUXLU4bQkE?si=vlr7MfwEZ4DGzzpB
🎬 Video: How does an EPIRB work? — https://youtu.be/xwbgU9envik
🎬 Video: PLB and EPIRB Emergency Beacons — https://youtu.be/CGLDG7n7g5U?si=AEWhOs7SVf-2zWCR
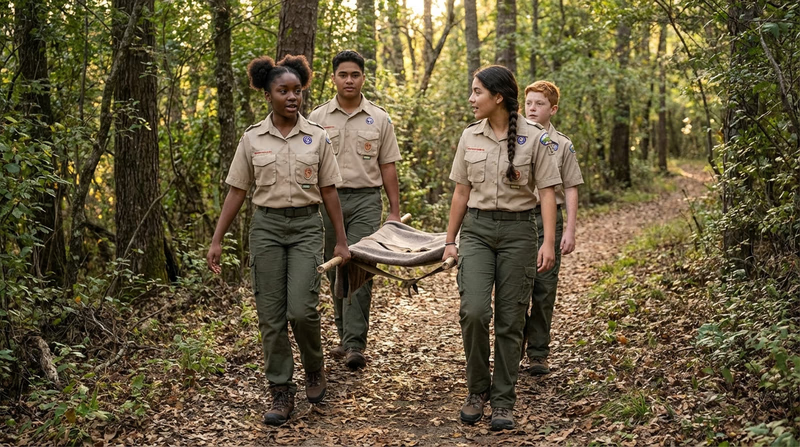
Req 6 — Moving an Injured Person
Moving an injured person is one of the most physically demanding and mentally challenging tasks in emergency response. Done wrong, it can make injuries worse — especially spinal injuries. Done right, it can get a person to safety when professional help is far away.
When to Move an Injured Person
Move someone only when:
- The area is immediately dangerous (fire, flood, falling debris, chemical exposure)
- Professional help cannot reach them and they need medical care urgently
- Weather conditions (hypothermia, heat stroke) make staying in place dangerous
Improvised Stretcher Methods
You will not always have a commercial stretcher in the backcountry. These two methods use common materials to create a stable, comfortable stretcher that distributes the patient’s weight and conserves rescuers’ energy.
Method 1: Blanket and Poles Stretcher
Materials needed: Two sturdy poles (6-7 feet long — hiking sticks, tent poles, or straight branches) and a blanket, tarp, or sleeping bag.
How to build it:
- Lay the blanket flat on the ground.
- Place one pole about one-third of the way from one edge of the blanket.
- Fold the short side of the blanket over the pole.
- Place the second pole on top of the folded blanket, near the fold.
- Fold the remaining blanket over the second pole.
- The weight of the patient on the blanket locks the folds in place — no knots or ties are needed.
Why it works: The patient’s weight creates friction that holds the blanket wrapped around the poles. The wider the blanket, the more stable and comfortable the stretcher.
Method 2: Jacket Stretcher
Materials needed: Two sturdy poles (same as above) and two or three buttoned or zippered jackets.
How to build it:
- Zip or button the jackets closed and turn them inside out, leaving the sleeves inside.
- Thread the poles through the sleeves of each jacket so the poles run along the inside of the jacket.
- Space the jackets evenly along the poles to support the patient’s head, torso, and legs.
Why it works: The jacket sleeves act as loops that hold the poles in place. Multiple jackets distribute the weight across the length of the stretcher. This method is fast to assemble with materials almost always available on a camping trip.
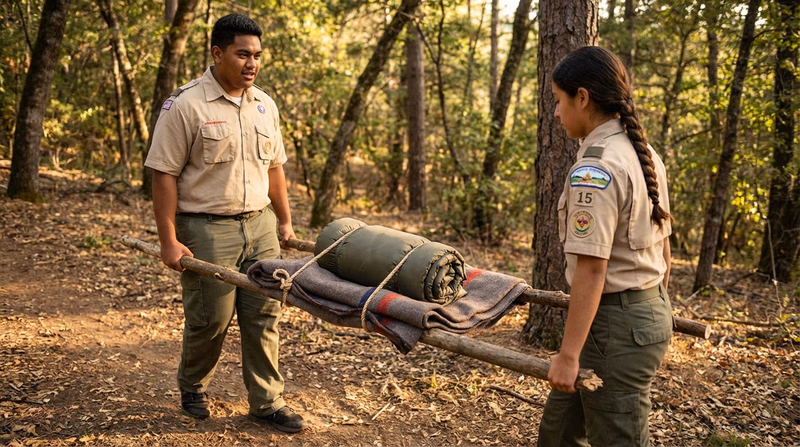
Carrying the Stretcher
Once the stretcher is built, the carrying technique matters just as much as the construction.
Stretcher Carrying Tips
Keep the patient safe and conserve your energy- Use at least two carriers (four is better for longer carries)
- Carriers should be on the same side of the stretcher and walk in step
- Carry the patient feet-first so the lead carrier can watch for obstacles
- Keep the stretcher as level as possible — especially on slopes
- Switch carriers frequently to prevent exhaustion (every 5-10 minutes)
- Communicate clearly: “Step up,” “Rock ahead,” “Turning left”
- If going uphill, carry the patient head-first so blood flows to the head
- If going downhill, carry the patient feet-first
Protecting the Patient
While transporting, your priority is the patient’s well-being:
- Stabilize injuries before moving. Splint fractures, bandage wounds, and control bleeding first.
- Immobilize the spine if you suspect a spinal injury — pad around the head and neck to prevent movement.
- Keep the patient warm — cover them with a blanket or extra clothing. Injured people lose body heat quickly.
- Talk to the patient. Reassure them, explain what you are doing, and monitor their condition during the carry.
- Monitor for shock. Signs include pale skin, rapid breathing, confusion, and cold clammy skin. Keep the patient lying down with legs elevated (unless a spinal injury is suspected).
🎬 Video: Improvised Stretchers — https://youtu.be/EYfgxODBlwY
Req 7 — NIMS and ICS
When a disaster strikes, dozens — sometimes hundreds — of agencies respond. Fire departments, police, ambulance crews, utility companies, the National Guard, Red Cross volunteers, and more all converge on the scene. Without a common system for organizing all these people, the response would be chaos. That is exactly why NIMS and ICS exist.
7a. What Are NIMS and ICS?
National Incident Management System (NIMS)
NIMS is a nationwide framework created by FEMA that provides a consistent approach to managing emergencies at every level — local, state, tribal, and federal. It is not a response plan for a specific disaster. Instead, it is a set of guidelines that ensures everyone speaks the same language, uses the same organizational structure, and follows the same procedures, no matter where they are or what agency they represent.
Key features of NIMS:
- Common terminology: Everyone uses the same words for the same things, eliminating confusion between agencies.
- Unified command: Multiple agencies can work together under a single coordinated leadership structure.
- Scalability: The system works for a small local incident (a house fire) and scales up to a massive disaster (a hurricane affecting multiple states).
- Mutual aid: Standardized processes allow agencies from different regions to assist each other seamlessly.
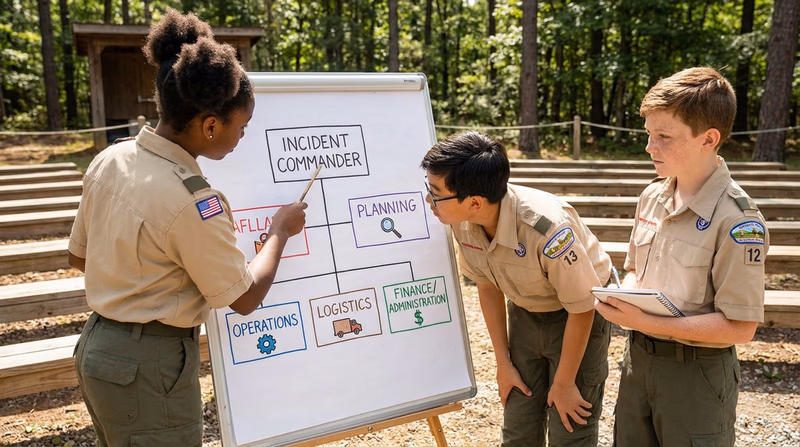
Incident Command System (ICS)
ICS is the operational component of NIMS — the system used on the ground to manage the actual response. Every incident has an Incident Commander (IC) who is responsible for the overall management of the response. Under the IC, the response is organized into five major functions:
| Function | Responsibility |
|---|---|
| Command | Overall incident management, safety, and communication |
| Operations | Carrying out the response (fighting the fire, rescuing people, etc.) |
| Planning | Collecting and analyzing information, developing the action plan |
| Logistics | Providing resources — food, water, equipment, facilities, transportation |
| Finance/Administration | Tracking costs, contracts, and personnel time |
🎬 Video: NIMS — https://youtu.be/d39esZe-NXg
🎬 Video: ICS — https://youtu.be/phcKeMWaN3o?si=UJEgaKfVdkod4Yd2
7b. How Your Community Manages Disasters
Every community has an emergency management structure. Your task is to find out how yours works. Here are some ways to research this:
Who to contact:
- Your city or county Emergency Management Agency (EMA)
- Your local fire department or police department (they often coordinate with the EMA)
- Your city or county government website — most have an emergency preparedness section
Questions to ask:
- Who is the local emergency management coordinator?
- What types of disasters does your community plan for?
- How does the community alert residents about emergencies? (Sirens, text alerts, radio broadcasts?)
- Does your community conduct disaster drills or exercises? How often?
- Are there Community Emergency Response Team (CERT) programs in your area?
- What shelters or evacuation routes have been identified?
7c. How a Scout Troop Fits into ICS
Scout troops are not first responders, but they can be a valuable part of the emergency response when properly organized and supervised. Under ICS, a troop would typically be assigned to the Operations or Logistics section, depending on the task.
Roles a Scout troop can fill:
- Crowd and traffic control: Directing pedestrians away from a hazard area
- Messenger service: Carrying messages between command posts when electronic communication is down
- Collection and distribution: Helping organize and distribute donated supplies (food, water, clothing)
- Shelter support: Assisting with setup and operation of emergency shelters (cots, food service, sanitation)
- Search assistance: Helping form search lines under adult supervision for missing persons
How ICS applies to the troop:
When a troop mobilizes for emergency service, it should use ICS principles:
- The Scoutmaster acts as the troop’s Incident Commander, coordinating with the community’s IC.
- Patrol leaders lead their patrols as team leaders within the assigned section.
- Everyone follows the chain of command — individual Scouts do not freelance.
- Communication flows up and down the chain — patrol members report to patrol leaders, patrol leaders report to the Scoutmaster, the Scoutmaster reports to the community IC.
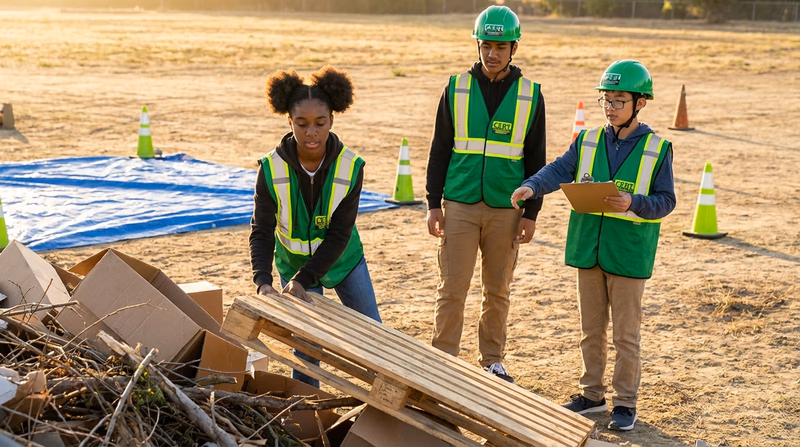
Req 8 — Emergency Service
This requirement brings everything together. You have learned about emergency preparedness, made family plans, and studied rescue techniques. Now it is time to put your skills to work — as part of a team, serving your community.
8a. Emergency Service Duties
For each of the four emergency services below, think about three things: What would the troop actually do? What training would they need first? What safety precautions are essential?
1. Crowd and Traffic Control
Duties: Directing pedestrian traffic away from hazard areas, keeping onlookers from interfering with emergency operations, guiding vehicles through detours, and maintaining order at shelters or distribution points.
Training needed: Clear hand signals, verbal communication techniques, understanding of traffic safety, conflict de-escalation.
Safety precautions: Wear high-visibility vests or reflective gear. Never step into traffic. Work in pairs. Always follow the directions of professional law enforcement.
Guidelines for Managing Crowds Cornell University's guide to crowd management principles and best practices. Link: Guidelines for Managing Crowds — https://ehs.cornell.edu/campus-health-safety/event-management/event-crowd-management2. Messenger Service During an Incident
Duties: Carrying written or verbal messages between command posts, staging areas, and field teams when electronic communication is down or overloaded.
Training needed: How to take and relay messages accurately, how to navigate the incident scene safely, how to use maps and ICS organizational charts.
Safety precautions: Travel in pairs. Know the layout of the incident scene. Stay on designated routes. Report back to your supervisor after every delivery.
3. Collection and Distribution Services
Duties: Receiving, sorting, organizing, and distributing donated supplies — food, water, clothing, blankets, hygiene items — to people affected by the disaster.
Training needed: Inventory management, food safety basics, respectful interaction with disaster survivors, lifting and carrying techniques.
Safety precautions: Wear gloves when handling donated items. Follow food safety guidelines (check expiration dates, keep hot food hot and cold food cold). Do not distribute damaged or contaminated items.
🎬 Video: Food Bank — https://youtu.be/zz6sEdM6y_4
4. Group Feeding, Shelter, and Sanitation
Duties: Helping set up and operate emergency shelters — assembling cots, serving meals, maintaining clean restroom facilities, and assisting with waste disposal.
Training needed: Basic food preparation and serving, sanitation standards, how to set up cots and bedding, how to interact compassionately with displaced families.
Safety precautions: Follow health department guidelines for food handling. Use personal protective equipment when cleaning. Ensure shelter areas have adequate ventilation and fire exits.
🎬 Video: Feeding LA Wildfire Evacuees — https://www.youtube.com/shorts/9zWTauGVX6w
🎬 Video: Agency Cooperation in an ICS — https://youtu.be/P-dPBso2xPM
8b. Troop Mobilization Plan
A mobilization plan is a written document that tells your troop how to assemble quickly when called for emergency service. Think of it as your troop’s version of a fire drill — everyone knows their role, and no time is wasted.
Your plan should include:
Mobilization Plan Elements
What every troop mobilization plan should cover- Notification system: How will troop members be alerted? (Phone tree, group text, email)
- Assembly point: Where does the troop meet?
- Timeline: How quickly should members report? (Goal: within 2 hours of notification)
- Roles and assignments: Who does what? (Scoutmaster = IC, patrol leaders = team leads)
- Equipment list: What does each Scout bring? (Personal emergency service pack — see 8c)
- Transportation plan: How will the troop get to the incident?
- Communication plan: How will the troop stay in contact during the event?
- Parent/guardian notification: How will parents be informed?
- Check-in and check-out procedures: How will you account for every Scout?
8c. Personal Emergency Service Pack (Go Bag)
Your personal emergency service pack is what you grab when the call comes in. It should be packed and ready to go at all times.
Personal Emergency Service Pack
Ready for a mobilization call- Water bottle (filled) and water purification method
- Food for 24 hours (energy bars, trail mix, jerky)
- First aid kit (personal size)
- Flashlight or headlamp with extra batteries
- Rain gear or poncho
- Extra socks and underwear
- Work gloves
- Pocket knife or multi-tool
- Notepad and pencil
- Whistle
- Sunscreen and insect repellent
- Personal medications
- Emergency blanket (space blanket)
- Small amount of cash
- Copy of your emergency contact information
8d. Emergency Service Project
The final part of Requirement 8 is participation. You need to take part in an actual emergency service project or a practice exercise. Here are some options:
- Community disaster drill organized by your local emergency management agency
- Red Cross shelter exercise at a local school or community center
- Search and rescue practice with a community SAR team
- Scout camp emergency drill during a campout or summer camp
- School safety exercise such as a fire drill, lockdown drill, or evacuation practice
After the exercise, reflect on what you learned:
- What went well? What was the team good at?
- What did not go as planned? What surprised you?
- What would you do differently next time?
- How did ICS principles show up in the exercise?
🎬 Video: Emergency Procedures at Camp — https://youtu.be/NeaZKfqji1w
Req 9 — First Aid Merit Badge
The First Aid merit badge is a prerequisite for Emergency Preparedness. You must earn it before (or at the same time as) you complete this badge. The two badges are deeply connected — emergency preparedness gives you the framework for thinking about emergencies, and first aid gives you the hands-on skills to help people when they are hurt.
Why First Aid Is Required
Think about everything you have learned in this merit badge so far:
- In Requirement 4, you learned how to rescue someone from dangerous situations — electric shock, carbon monoxide, fire, and drowning. But what do you do after the rescue? You provide first aid.
- In Requirement 6, you learned how to transport an injured person on an improvised stretcher. But before you move them, you need to assess and stabilize their injuries — that is first aid.
- In Requirement 8, you prepared for emergency service, where first aid skills are essential for any Scout responding to a disaster.
First aid is not a separate skill — it is the foundation of every emergency response.
What You Will Learn in First Aid
The First Aid merit badge covers:
- How to check a scene for safety and assess an injured person
- CPR and rescue breathing
- Treatment for bleeding, shock, burns, fractures, and sprains
- How to handle choking, heat exhaustion, hypothermia, and allergic reactions
- Bandaging techniques and splinting
- When and how to call for professional medical help
First Aid Merit Badge on This Site
You can find the complete requirements and a Digital Resource Guide for the First Aid merit badge right here on Merit Badge University.
First Aid Merit Badge View the requirements for the First Aid merit badge on Merit Badge University. Link: First Aid Merit Badge — /merit-badges/first-aid/Req 10 — Careers
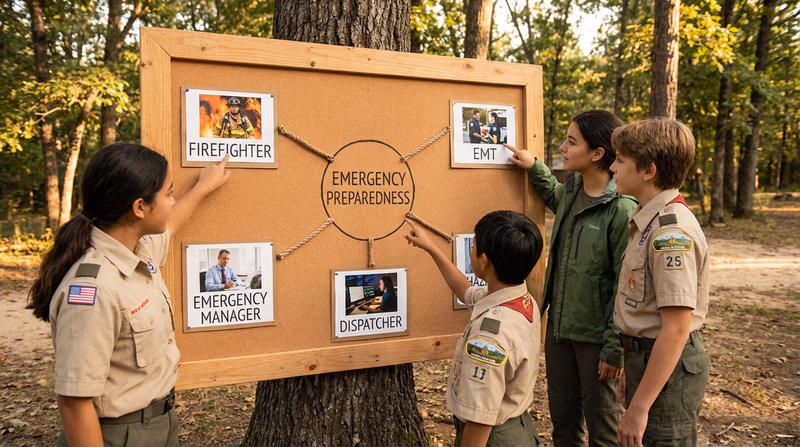
The skills you learn in this merit badge are not just for earning a badge — they open doors to meaningful careers and lifelong hobbies. Choose one of the three options below and explore how emergency preparedness connects to your future.
Option A: Interview an Emergency Professional
Find and interview someone who works in emergency management or disaster response. This could be:
- A city or county emergency management coordinator
- A fire department captain or chief
- A Red Cross disaster response manager
- A FEMA employee or contractor
- A 911 dispatcher
- A hospital emergency preparedness director
- A school safety coordinator
Questions to ask in your interview:
- What does a typical day look like in your role?
- How did you get started in this career? What education or training did you need?
- What is the most challenging part of your job?
- What is the most rewarding part?
- What skills are most important for someone in your position?
- How has emergency management changed during your career?
- What advice would you give a young person interested in this field?
🎬 Video: NYC Emergency Management Interns — https://youtu.be/vqXWZ1tvLZE
Option B: Research a Career in Emergency Services
Identify three careers in the emergency services field, then pick one to research in depth. Here are some careers to consider:
| Career | Description |
|---|---|
| Emergency Management Director | Plans and coordinates disaster response for cities, counties, or states |
| Firefighter/Paramedic | Responds to fires, medical emergencies, and rescues |
| Emergency Medical Technician (EMT) | Provides pre-hospital emergency medical care |
| Search and Rescue Specialist | Locates and rescues people in wilderness, urban, and water environments |
| Hazardous Materials (HAZMAT) Technician | Responds to chemical, biological, and radiological incidents |
| 911 Dispatcher | Receives emergency calls and dispatches first responders |
| Public Health Emergency Planner | Prepares communities for disease outbreaks and health emergencies |
| Disaster Relief Coordinator | Manages relief operations for organizations like the Red Cross or FEMA |
| Wildland Firefighter | Fights wildfires in forests, grasslands, and wildland-urban interface areas |
For your chosen career, research:
- Education and certification requirements (degree, academy, certifications)
- Training programs and how long they take
- Starting salary and salary range with experience
- Job outlook and demand in your area
- Advancement opportunities (what positions can you grow into?)
- Day-to-day duties and work conditions
- Physical and mental requirements
🎬 Video: Explore a Career in Disaster and Emergency Management — https://youtu.be/bmZVwRg-4ps
Option C: Emergency Preparedness as a Hobby or Lifestyle
Emergency preparedness is not just a career — it can be a fulfilling personal pursuit. Many people find meaning and confidence in being prepared for anything life throws their way.
Ways to use emergency preparedness skills personally:
- CERT Training: The Community Emergency Response Team (CERT) program trains civilians to assist in emergencies. CERT members help with light search and rescue, fire suppression, first aid, and disaster psychology. Training is usually free and offered by local fire departments.
- Amateur (Ham) Radio: Licensed ham radio operators provide critical communication during disasters when cell networks and the internet go down. Getting your license requires studying and passing an exam, but the equipment and community are accessible to anyone.
- Wilderness First Responder (WFR): This certification teaches advanced backcountry medical skills. It is popular with hikers, climbers, and outdoor leaders who spend time far from hospitals.
- Preparedness Lifestyle: Building and maintaining disaster kits, developing skills in water purification, food preservation, and off-grid living, and staying informed about local hazards.
For your chosen hobby or lifestyle, research:
- What additional training or certifications are needed?
- What are the costs (equipment, courses, memberships)?
- What organizations can you join to learn more and connect with others?
- What are your short-term goals (within the next year)?
- What are your long-term goals (within the next 5 years)?
🎬 Video: Teen CERT Team Training — https://youtu.be/UidlepnW93k
Extended Learning
A. Introduction
Congratulations — you have completed the Emergency Preparedness merit badge! You now have a framework for thinking about emergencies that most adults never learn. But emergency preparedness is not a one-time event. It is a lifelong practice of awareness, planning, and readiness. The resources below will help you take your skills to the next level.
B. Deep Dive: Community Emergency Response Teams (CERT)
CERT is one of the best programs available for young people who want to go beyond the merit badge. Sponsored by FEMA and run by local fire departments, CERT trains civilians to help their neighbors during the critical hours between a disaster and the arrival of professional responders.
What you learn in CERT:
- Light search and rescue techniques
- Basic fire suppression with extinguishers
- Disaster medical operations (triage, first aid under pressure)
- Team organization using ICS principles
- Disaster psychology — helping people cope with stress and fear
How to get involved:
- Search for “CERT program” + your city or county name
- Many programs accept participants as young as 15 (Teen CERT programs)
- Training is typically free and runs over several weekends
- After training, you become a registered CERT volunteer in your community
C. Deep Dive: Emergency Communication
When disaster strikes, cell networks and the internet are often the first systems to fail. Understanding alternative communication methods is a valuable skill that extends far beyond this merit badge.
Amateur (Ham) Radio
Ham radio operators are often called “the communicators of last resort.” During hurricanes, earthquakes, and other major disasters, ham radio provides a reliable communication network when everything else goes dark.
- Getting started: You need to pass an exam to get your license (Technician class is the entry level). Study guides and practice exams are available free online.
- Cost: A basic handheld radio costs $25-$50. More capable base stations range from $200-$1,000.
- Organizations: The Amateur Radio Relay League (ARRL) is the national organization for ham radio operators. Many local clubs offer free classes and exam sessions.
NOAA Weather Radio
A dedicated weather radio receives continuous broadcasts from the National Weather Service, including severe weather warnings, watches, and emergency alerts. Every household should have one.
Wireless Emergency Alerts (WEA)
Your cell phone can receive WEA messages — those loud alerts about severe weather, AMBER alerts, and presidential alerts. Make sure this feature is enabled on your phone.
D. Real-World Experiences
FEMA Youth Preparedness Program
Red Cross Disaster Volunteering
National Weather Service Skywarn Spotter Training
Stop the Bleed Training
E. Deep Dive: Building Community Resilience
Community resilience is the ability of a community to prepare for, absorb, recover from, and adapt to adverse events. Scouts play a unique role in building resilience because of their training, their organization, and their values.
How Scouts build community resilience:
- Teaching others: Share what you have learned with younger Scouts, your school, or your neighborhood. A family preparedness workshop is an excellent Eagle Scout project idea.
- Volunteering: Join local emergency response teams, volunteer at shelters, or assist with community disaster drills.
- Leading by example: When your neighbors see a young person who is prepared and knowledgeable, it inspires them to prepare too.
- Staying current: Emergency preparedness evolves. New threats emerge (cyberattacks, pandemics), new technologies help (drones for search and rescue, AI for disaster prediction), and best practices change. Stay informed.
F. Organizations
The federal agency responsible for coordinating disaster preparedness, response, and recovery across the United States. FEMA offers free training courses, including the CERT program.
Organization: Federal Emergency Management Agency (FEMA) — https://www.fema.gov/
Provides disaster relief, emergency shelter, first aid training, and blood services. The Red Cross is often the first nonprofit on the scene after a disaster.
Organization: American Red Cross — https://www.redcross.org/
FEMA’s public-facing preparedness website with guides for building emergency kits, making family plans, and preparing for specific disaster types.
Organization: Ready.gov — https://www.ready.gov/
Provides weather forecasts, warnings, and emergency alerts. Their Skywarn program trains volunteer severe weather spotters across the country.
Organization: National Weather Service — https://www.weather.gov/
A FEMA-supported program that trains civilians in basic disaster response skills — fire safety, light search and rescue, team organization, and disaster medical operations.
Organization: Community Emergency Response Team (CERT) — https://www.ready.gov/cert
The national association for amateur radio operators. ARRL supports emergency communication, education, and licensing for ham radio enthusiasts of all ages.
Organization: Amateur Radio Relay League (ARRL) — https://www.arrl.org/
A coalition of organizations that coordinate planning, mitigation, response, and recovery efforts during disasters. Members include the Red Cross, Salvation Army, and many faith-based organizations.
Organization: National Voluntary Organizations Active in Disaster (NVOAD) — https://www.nvoad.org/