Req 6 — Moving an Injured Person
Moving an injured person is one of the most physically demanding and mentally challenging tasks in emergency response. Done wrong, it can make injuries worse — especially spinal injuries. Done right, it can get a person to safety when professional help is far away.
When to Move an Injured Person
Move someone only when:
- The area is immediately dangerous (fire, flood, falling debris, chemical exposure)
- Professional help cannot reach them and they need medical care urgently
- Weather conditions (hypothermia, heat stroke) make staying in place dangerous
Improvised Stretcher Methods
You will not always have a commercial stretcher in the backcountry. These two methods use common materials to create a stable, comfortable stretcher that distributes the patient’s weight and conserves rescuers’ energy.
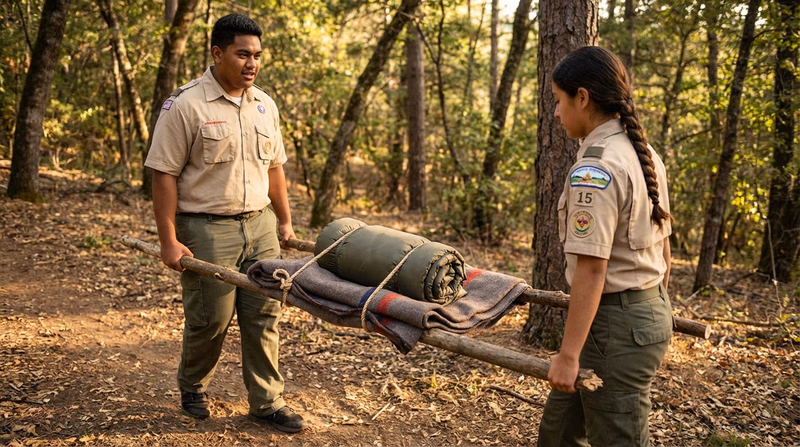
Method 1: Blanket and Poles Stretcher
Materials needed: Two sturdy poles (6-7 feet long — hiking sticks, tent poles, or straight branches) and a blanket, tarp, or sleeping bag.
How to build it:
- Lay the blanket flat on the ground.
- Place one pole about one-third of the way from one edge of the blanket.
- Fold the short side of the blanket over the pole.
- Place the second pole on top of the folded blanket, near the fold.
- Fold the remaining blanket over the second pole.
- The weight of the patient on the blanket locks the folds in place — no knots or ties are needed.
Why it works: The patient’s weight creates friction that holds the blanket wrapped around the poles. The wider the blanket, the more stable and comfortable the stretcher.
Method 2: Jacket Stretcher
Materials needed: Two sturdy poles (same as above) and two or three buttoned or zippered jackets.
How to build it:
- Zip or button the jackets closed and turn them inside out, leaving the sleeves inside.
- Thread the poles through the sleeves of each jacket so the poles run along the inside of the jacket.
- Space the jackets evenly along the poles to support the patient’s head, torso, and legs.
Why it works: The jacket sleeves act as loops that hold the poles in place. Multiple jackets distribute the weight across the length of the stretcher. This method is fast to assemble with materials almost always available on a camping trip.
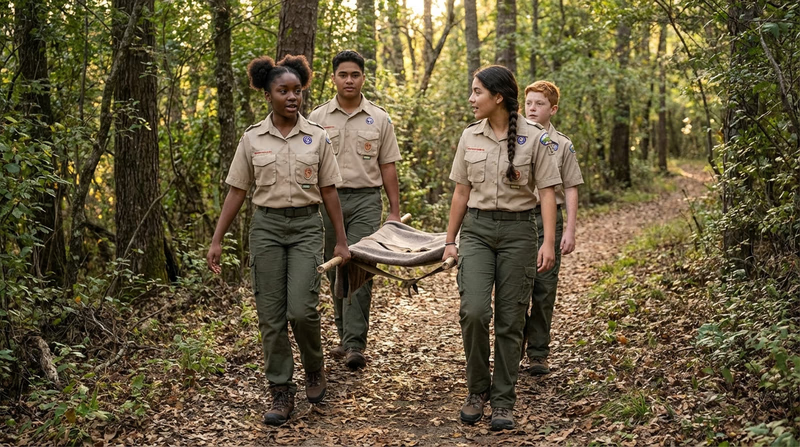
Carrying the Stretcher
Once the stretcher is built, the carrying technique matters just as much as the construction.
Stretcher Carrying Tips
Keep the patient safe and conserve your energy
- Use at least two carriers (four is better for longer carries)
- Carriers should be on the same side of the stretcher and walk in step
- Carry the patient feet-first so the lead carrier can watch for obstacles
- Keep the stretcher as level as possible — especially on slopes
- Switch carriers frequently to prevent exhaustion (every 5-10 minutes)
- Communicate clearly: “Step up,” “Rock ahead,” “Turning left”
- If going uphill, carry the patient head-first so blood flows to the head
- If going downhill, carry the patient feet-first
Protecting the Patient
While transporting, your priority is the patient’s well-being:
- Stabilize injuries before moving. Splint fractures, bandage wounds, and control bleeding first.
- Immobilize the spine if you suspect a spinal injury — pad around the head and neck to prevent movement.
- Keep the patient warm — cover them with a blanket or extra clothing. Injured people lose body heat quickly.
- Talk to the patient. Reassure them, explain what you are doing, and monitor their condition during the carry.
- Monitor for shock. Signs include pale skin, rapid breathing, confusion, and cold clammy skin. Keep the patient lying down with legs elevated (unless a spinal injury is suspected).