Req 5 — Systems Engineering Design Project
A 13-year-old Scout was tired of losing tent stakes in the dark. So he designed a tent stake with a glow-in-the-dark head, a built-in pull loop for easy removal, and a wider foot plate to hold in sandy soil. He didn’t just draw a picture — he defined the problem, listed his requirements, sketched three different designs, picked the best one, and built a prototype from a wooden dowel and some craft supplies. That is systems engineering in action.
This requirement asks you to be the engineer. You will follow the same process that professional engineers use — the systems engineering approach — to design something original.
What Is Systems Engineering?
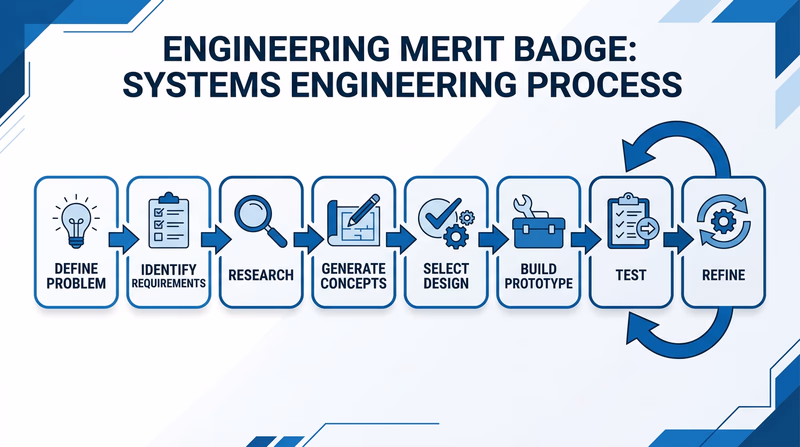
Systems engineering is a step-by-step method for designing complex things. Instead of jumping straight to building, you work through a structured process that helps you make better decisions, catch problems early, and create something that actually solves the problem you set out to solve.
Think of it as a map for the design journey. Each step builds on the one before it:
Step 1: Define the Problem
What need are you trying to fill? Be specific. “I want to build something cool” is not a problem statement. “Our patrol needs a way to organize cooking utensils so we can find them quickly at camp” — that is a problem statement an engineer can work with.
Ask yourself:
- What problem am I solving?
- Who will use this? (Your patrol, your family, yourself?)
- Where will it be used? (Outdoors, in a garage, at a desk?)
Step 2: Identify Requirements
Requirements are the rules your design must follow. They come in two types:
- Functional requirements — What must the device do? (Hold 10 utensils, fold flat for transport, keep items dry)
- Constraints — What limits exist? (Must cost under $15, must weigh less than 2 pounds, must fit in a backpack)
Step 3: Research Existing Solutions
Before inventing something new, look at what already exists. What products are available? What do they do well? What do they do poorly? Your design should improve on what is already out there — not reinvent something that already works perfectly.
Step 4: Generate Design Concepts
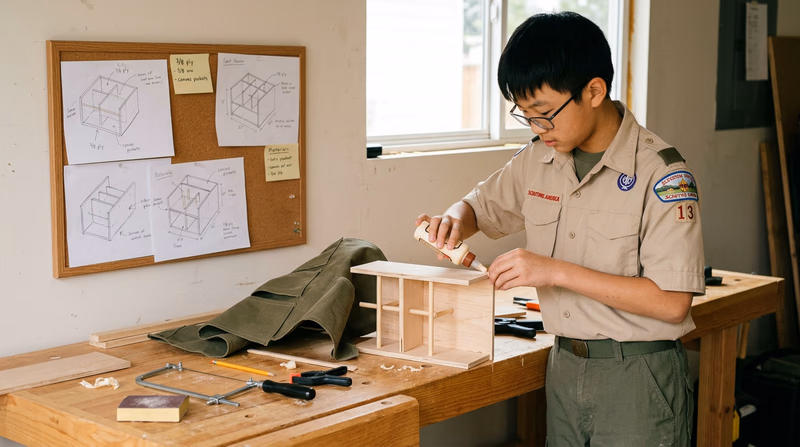
Sketch at least three different approaches to solving the problem. They do not need to be artistic — rough sketches with labels are perfect. The goal is to explore different ideas before committing to one.
For each concept, note:
- How it works
- What materials it needs
- Its strengths and weaknesses
- How well it meets your requirements
Step 5: Select the Best Design
Compare your concepts against your requirements list. Which design meets the most requirements? Which is most practical to build? A decision matrix can help:
| Requirement | Design A | Design B | Design C |
|---|---|---|---|
| Holds 10 utensils | Yes | Yes | No |
| Folds flat | No | Yes | Yes |
| Costs under $15 | Yes | Yes | Yes |
| Weighs under 2 lbs | Yes | No | Yes |
| Score | 3/4 | 3/4 | 3/4 |
When scores are close, consider which requirements matter most. Portability might be more important than capacity for a backpacking patrol.
Step 6: Build a Prototype
A prototype is a first version built to test your ideas. It does not need to be perfect or pretty — it needs to be functional enough to test whether your design works. Use whatever materials are available: cardboard, wood, PVC pipe, duct tape, 3D printing, or craft supplies.
Step 7: Test and Evaluate
Does your prototype actually solve the problem? Test it against your requirements. Have the intended users try it out and give feedback. Note what works and what needs improvement.
Step 8: Refine the Design
Based on testing, make changes to improve your design. Real engineering projects go through many rounds of testing and refinement. Professional engineers call this iteration — repeating the design-test-improve cycle until the product meets all requirements.
Project Ideas
The requirement gives you three categories. Here are ideas within each:
Patrol Equipment
- A lightweight, foldable camp table
- A utensil organizer roll for patrol cooking gear
- A fire-starting kit case that keeps materials dry and organized
- A patrol flag stand that is easy to transport and set up
- A lantern hanger for a dining fly
Toys
- A rubber-band-powered car
- A marble run made from recycled materials
- A simple catapult or trebuchet
- A spinning top with interchangeable weights
- A wind-powered vehicle
Useful Home/Office/Garage Devices
- A phone charging station organizer
- A tool holder for a workbench
- A key and wallet landing pad for the entryway
- A cable management system for a desk
- A jar opener assist device
Documenting Your Design
Keep a design notebook or folder with:
- Problem statement — One or two sentences defining the need
- Requirements list — Numbered functional requirements and constraints
- Research notes — What existing solutions you found and their limitations
- Concept sketches — At least three ideas with labels and notes
- Decision matrix — How you compared and selected your design
- Prototype photos — Pictures of your prototype at different stages
- Test results — How the prototype performed against requirements
- Refinements — Changes you made and why
This documentation is what your counselor will want to see. It proves you used the systems engineering approach, not just trial and error.