First Aid Merit Badge — Complete Digital Resource Guide
https://merit-badge.university/merit-badges/first-aid/guide/
Introduction & Overview
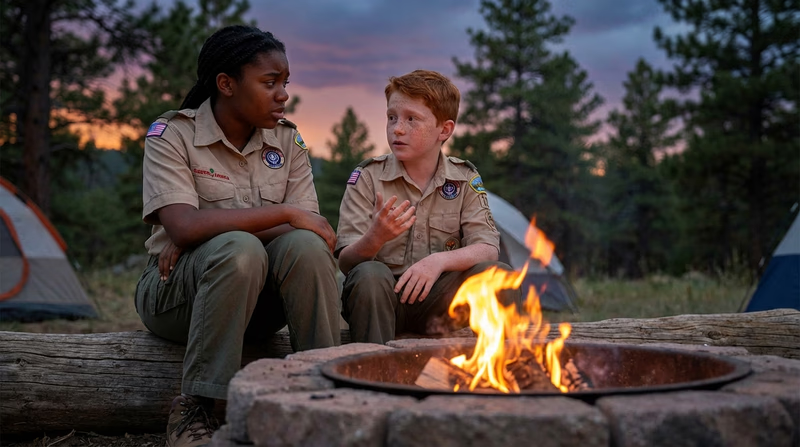
Imagine you are on a camping trip when a fellow Scout trips on a rock and goes down hard. Their ankle is twisted at a strange angle and they are in serious pain. Everyone looks around — and then they look at you. Do you know what to do?
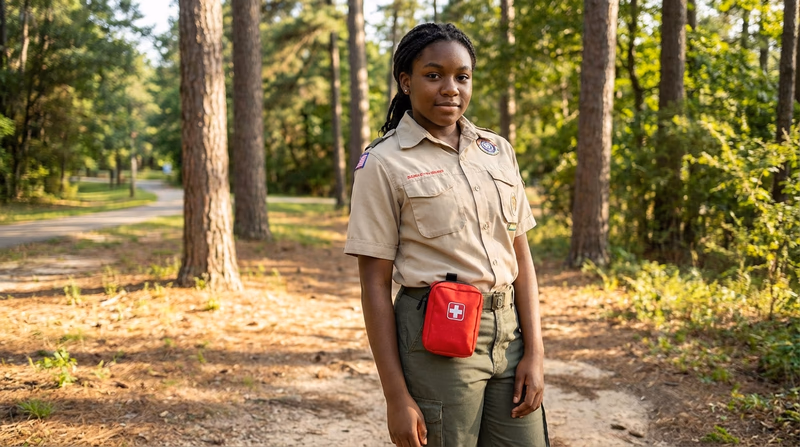
First aid is the immediate care you give to someone who is sick or injured before professional medical help arrives. It can be as simple as cleaning a scrape or as critical as performing CPR. The First Aid merit badge teaches you the skills and confidence to act when it matters most — and as an Eagle-required badge, it is one of the most important badges you will earn.
Then and Now
Then — From Battlefields to the Boy Scouts
Organized first aid has roots on the battlefield. During the Civil War, Clara Barton rushed to the front lines to bandage wounds and comfort soldiers — earning the nickname “Angel of the Battlefield.” She later founded the American Red Cross in 1881. Around the same time, the St. John Ambulance organization in England began teaching first aid to civilians, factory workers, and police officers.
When Scouting began in 1910, first aid was one of the original merit badges. Scouts were expected to know how to stop bleeding, splint a broken bone, and carry an injured person to safety — all skills that remain at the heart of the badge today.
- Purpose: Saving lives on battlefields, in factories, and in communities with no ambulances or hospitals nearby
- Mindset: Learn a few critical skills and hope you never need them
Now — First Aid for Everyone
Today, first aid education is everywhere. The American Red Cross trains millions of people each year. Public places have automated external defibrillators (AEDs) mounted on walls. The national Stop the Bleed campaign teaches ordinary people how to control life-threatening bleeding in minutes. Smartphone apps can guide you through CPR in real time and pinpoint the nearest AED.
Modern first aid is faster, smarter, and more accessible than ever — but the most important tool is still the same: a trained person who is willing to help.
- Purpose: Bridging the gap between an emergency and professional medical care
- Mindset: Be prepared, stay calm, and take action — anyone can make a difference
Get Ready! You are about to learn skills that could genuinely save a life — maybe even the life of someone you love. That is not an exaggeration. Let’s get started.
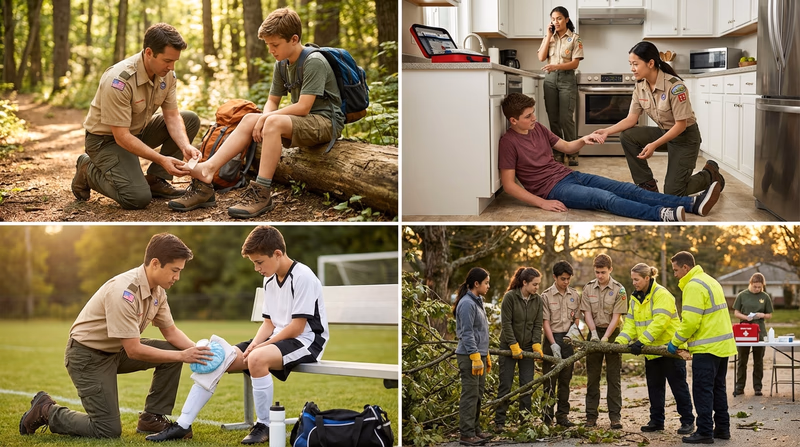
Kinds of First Aid
First aid is not one-size-fits-all. The situation you are in — and the resources available — shape how you respond. Here are the main types of first aid you should know about.
Wilderness First Aid
When you are miles from the nearest road, help might be hours away. Wilderness first aid focuses on improvisation — using what you have, stabilizing injuries for longer periods, and making tough decisions about when to evacuate. Scouting trips, backpacking, and summer camp are all places where wilderness first aid skills shine.
Community & Home First Aid
Most injuries and medical emergencies happen at home, at school, or in your neighborhood — not in the wilderness. Kitchen burns, sports injuries, allergic reactions, and falls are all everyday situations where first aid knowledge makes a real difference.
Sports & Activity First Aid
Athletes deal with a specific set of injuries — sprains, strains, concussions, heat exhaustion, and dehydration. Sports first aid emphasizes quick assessment, the R.I.C.E. method (Rest, Ice, Compression, Elevation), and knowing when an injury is serious enough to stop playing.
Disaster & Mass Casualty First Aid
Natural disasters, severe weather, and large-scale accidents can injure many people at once. In these situations, first responders may be overwhelmed. That is where triage comes in — sorting patients by the severity of their injuries so the most critical get help first. You will learn about triage in this badge.
Now let’s dive into the first requirement — learning how to assess and handle a first aid emergency.
Req 1 — Handling a First Aid Emergency
This requirement is your emergency-response foundation. Keep it simple: make the scene safe, get help, protect yourself, check airway and breathing, examine the victim, watch for shock, and think about triage if more than one person is hurt.
Assess and Handle the Emergency
- Check the scene first. Look for fire, traffic, electricity, chemicals, unstable ground, or anything else that could hurt you.
- Check the victim next. Are they awake? Breathing? Bleeding badly?
- Call for help early. If it is serious, send someone to call 911 while you start care.
- Treat life threats first. Airway, breathing, severe bleeding, then shock.
🎬 Video: Check for Scene Safety — https://youtu.be/nrNAhMg-uS4?si=ylunwA5D8hAqAOcu
Get Emergency Help
- At home or in town: call 911, give your exact location, explain what happened, how many people are hurt, and what condition they are in.
- In the backcountry: use a phone, satellite messenger, PLB, or send two people for help if needed.
- Before the trip: leave a route plan and emergency contact information with a responsible adult.
Prevent Infection
- Use barriers. Gloves, CPR mask, or other protective equipment.
- Avoid direct contact with blood and body fluids.
- Wash hands or sanitize as soon as possible after care.
- Dispose safely of used gloves, dressings, and contaminated items.
🎬 Video: Using Personal Protective Equipment in First Aid — https://youtu.be/tpovFysp4IE
Airway and Breathing
- Open the airway. Use head-tilt chin-lift unless you suspect a spine injury.
- Check breathing. Look, listen, and feel for normal breathing.
- If not breathing, begin rescue breathing or CPR based on pulse and responsiveness.
- Keep the airway clear and monitor the person closely.
Examine the Victim
- Start with life threats.
- Then do a head-to-toe exam.
- Check for pain, bleeding, swelling, deformity, burns, and changes in alertness.
- Ask what happened, where it hurts, and about medical conditions if the person is conscious.
🎬 Video: Head to Toe Exam — https://youtu.be/7xANZ0IjgEs?si=qAupHu1rGfl0bqas
Shock and Triage
- Shock means the body is not getting enough blood flow. Organs can begin to fail quickly.
- Warning signs include pale skin, cool clammy skin, fast pulse, weakness, confusion, and anxiety.
- Treat by keeping the person lying down, controlling bleeding, keeping them warm, and getting help.
- Triage means deciding who needs help first when there are multiple victims.
- Triage situations include car crashes, storms, camp emergencies, and any event with more injured people than helpers.
- People who cannot breathe, have severe bleeding, or are unresponsive are treated first.
🎬 Video: Triage — https://youtu.be/zeC2hFcziZI?si=YRyMCxm9qKxLbiZv
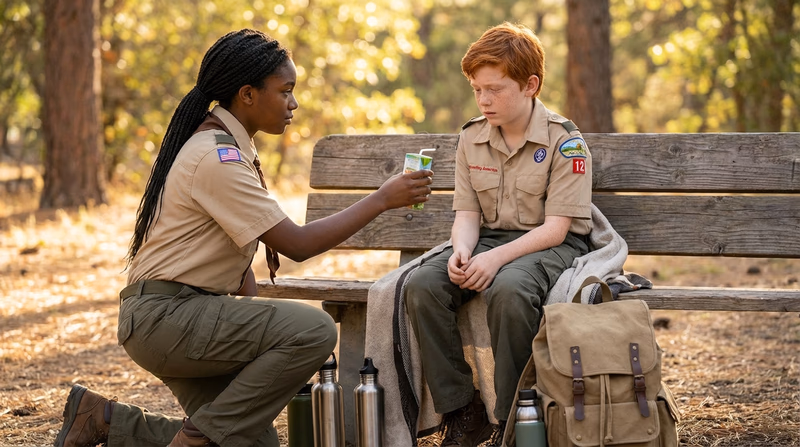
Req 2 — Preparing for First Aid Emergencies
This requirement is about being ready before anything goes wrong. Know where medical information is kept, build a usable personal kit, and inspect larger kits so you can trust what is inside them.
Health and Medical Records
- The Annual Health and Medical Record (AHMR) tells first aiders about allergies, medications, medical conditions, and other health concerns.
- In an emergency, that information can explain what is happening faster than guesswork.
- If the victim is unconscious, the AHMR may be one of the only reliable sources of medical history.
- Know where these forms are stored before the event begins.
Build a Personal First-Aid Kit
Keep your personal kit small, organized, and trail-ready. It should cover the most likely problems, not every possible emergency.
Personal Kit Basics
Core items for hiking and backpacking- Gloves
- Adhesive bandages and gauze
- Tape and roller bandage
- Blister care
- Tweezers and small scissors
- CPR barrier
- Triangular bandage or sling material
- Any personal medications you are authorized to carry
When you show your kit to your counselor, be ready to explain what each item is for and demonstrate the basics of using it.
Personal, Family, and Troop First Aid Kit Checklist Official Scouting checklist for comparing what belongs in different kinds of first-aid kits. Link: Personal, Family, and Troop First Aid Kit Checklist — https://filestore.scouting.org/filestore/Merit_Badge_ReqandRes/Requirement%20Resources/First%20Aid/Personal%20Family%20Troop%20First%20Aid%20Kit%20Checklist.pdfInspect a Larger Kit
When you inspect a larger kit, check:
- completeness — are important items missing?
- condition — are packages sealed and usable?
- expiration dates — especially medications and ointments
- organization — can you find what you need quickly?
- fit for purpose — does the kit match the activity and group size?
Req 3 — Wounds Without External Bleeding
This page is a quick field guide. For each injury, know what it looks like, the first thing to do, and how to avoid it.
Bruises and hematomas
- Signs: pain, swelling, discoloration, tenderness.
- First aid: rest, cold pack wrapped in cloth, elevate if possible.
- Prevention: wear protective gear and avoid unnecessary impacts.
Heat burns and scalds
- Signs: red or blistered skin; severe burns may look white, brown, black, or waxy.
- First aid: stop the burning, cool with cool water, cover loosely, do not pop blisters.
- Prevention: use caution around stoves, fires, and hot liquids.
Chemical burns
- Signs: pain, redness, blistering, burning after chemical contact.
- First aid: protect yourself, remove contaminated clothing, flush with water for at least 20 minutes.
- Prevention: read labels and wear gloves and eye protection.
Electrical burns
- Signs: small entrance wound, deeper internal injury, trouble breathing, irregular pulse.
- First aid: do not touch the person until the power source is off; call 911.
- Prevention: avoid damaged cords, wet hands, and downed lines.
Sunburn
- Signs: red, warm, painful skin; severe cases may blister.
- First aid: get out of the sun, cool the skin, drink water.
- Prevention: sunscreen, hat, sunglasses, and shade.
Snow blindness
- Signs: painful, red, watery eyes and light sensitivity after snow or glare exposure.
- First aid: move to shade, cover closed eyes with cool cloths, do not rub.
- Prevention: wear UV-blocking sunglasses or goggles.
Cold injuries
- Signs: numbness, pale or waxy skin, swelling, pain, or hard tissue.
- First aid: get out of the cold, remove wet clothing, warm gradually.
- Prevention: stay dry, layer clothing, and check exposed skin often.
Abrasions, chafing, and rope burns
- Signs: scraped or raw skin, burning pain, redness.
- First aid: clean gently, cover if needed, reduce friction.
- Prevention: proper clothing, gloves for rope work, and early attention to hot spots.
Blisters
- Signs: hot spot, tenderness, fluid-filled pocket.
- First aid: protect the area, pad around the blister, keep it clean.
- Prevention: break in gear, keep skin dry, stop early when rubbing starts.
Puncture wounds
- Signs: small entry wound with pain and infection risk.
- First aid: clean the wound, remove small splinters if easy, seek help for deep wounds or fish hooks.
- Prevention: gloves, footwear, and careful tool use.
Poisonous plant rash
- Signs: itchy red rash and blisters after plant contact.
- First aid: wash skin and clothing, use anti-itch treatment, avoid scratching.
- Prevention: learn the plants and cover exposed skin.
Bug bites
- Signs: itchy bumps; ticks may stay attached and can spread disease.
- First aid: wash the area; remove ticks with tweezers pulled straight out.
- Prevention: repellent, long clothing, and tick checks.
Bee stings
- Signs: sharp pain, redness, swelling.
- First aid: scrape out the stinger, wash, and use a cold pack.
- Prevention: avoid provoking bees and keep food covered.
Spider bites
- Signs: pain, redness, swelling; serious bites may cause muscle pain or worsening skin damage.
- First aid: wash, cool, and get medical help if serious symptoms appear.
- Prevention: shake out gear and use gloves in dark storage areas.
Scorpion stings
- Signs: intense pain, numbness, tingling.
- First aid: wash, use a cold pack, and seek medical advice.
- Prevention: shake out shoes and bedding, especially in desert areas.
Mammal or human bites
- Signs: broken skin, bleeding, swelling, infection risk.
- First aid: wash well, control bleeding, cover, and get medical care.
- Prevention: do not approach wild animals and use caution with pets.
Venomous snake bites
- Signs: puncture marks, severe pain, swelling, nausea, trouble breathing.
- First aid: move away, keep the person calm, and call 911.
- Prevention: watch where you step and reach, especially in snake country.
Req 4 — Bleeding Wounds
Keep this page simple: know how serious the bleeding is, control it fast, and protect against infection.
Nosebleed
- Signs: blood from the nose, usually after dry air, irritation, or a bump.
- First aid: sit up, lean forward, pinch the soft part of the nose for 10–15 minutes.
- Prevention: avoid nose picking, use moisture in dry air, and protect the face during sports.
Mild or moderate bleeding
- Signs: steady bleeding from a scrape, scratch, or shallow cut.
- First aid: use gloves, apply direct pressure, rinse clean, and cover with a bandage.
- Prevention: handle sharp tools carefully and wear protective gear.
Severe bleeding
- Signs: heavy bleeding, soaking dressings, spurting blood, or signs of shock.
- First aid: call 911, press hard with both hands, add dressings on top if soaked.
- Prevention: use knives, axes, and saws safely, and wear proper gear.
Tourniquets
- Appropriate: life-threatening bleeding from an arm or leg when direct pressure is not enough.
- Not appropriate: mild bleeding or wounds on the head, neck, chest, abdomen, groin, or armpit.
- Benefits: can stop deadly limb bleeding fast and buy time until EMS arrives.
- Dangers: very painful, can damage tissue if used wrong or left too long.
- Demo basics: place high and tight on the limb, avoid joints, secure it, and note the time.
Req 5 — Breathing Emergencies
Breathing emergencies are among the most time-critical situations you will face. When someone cannot breathe, you may have only minutes to act. For each condition below, focus on three things: the warning signs, the first aid response, and the best ways to prevent the emergency from happening in the first place.
Choking
Choking occurs when food, a small object, or liquid blocks the airway. A person who is choking may not be able to speak, cough, or breathe.
Signs: Clutching the throat (the universal choking sign), inability to speak or cough, wheezing or high-pitched sounds, blue lips or face, panic.
First aid — Conscious adult or child (over 1 year):
- Ask, “Are you choking? Can I help?” If they cannot speak or nod, act immediately.
- Stand behind the person and wrap your arms around their waist.
- Make a fist with one hand and place it just above the navel, thumb side in.
- Grab your fist with the other hand and deliver quick, upward abdominal thrusts (the Heimlich maneuver).
- Repeat until the object is expelled or the person becomes unconscious.
If the person becomes unconscious:
- Lower them gently to the ground.
- Call 911.
- Begin CPR. Each time you open the airway to give breaths, look in the mouth for the object. If you see it, remove it.
Prevention: Chew food thoroughly. Do not talk or laugh with food in your mouth. Cut food into small pieces for young children. Keep small objects away from children.
Asthma Attack
Asthma is a chronic condition that narrows the airways and makes breathing difficult. An asthma attack can be triggered by exercise, cold air, allergens, smoke, strong emotions, or respiratory infections.
Signs: Wheezing (a whistling sound when breathing), shortness of breath, tight feeling in the chest, coughing, difficulty speaking in full sentences, sitting in a tripod position (leaning forward with hands on knees).
First aid:
- Help the person sit up in a comfortable position — sitting upright opens the airways more than lying down.
- Help them use their rescue inhaler (usually albuterol, a blue inhaler). Shake it, have them exhale fully, then inhale the medication deeply and hold their breath for 10 seconds.
- Stay calm and reassure them. Anxiety worsens an attack.
- If the inhaler does not relieve symptoms within 15 minutes, or if the person cannot speak, has blue lips, or is getting worse — call 911 immediately.
Prevention: Avoid known triggers. Always carry a rescue inhaler. Warm up gradually before exercise. In cold weather, breathe through a scarf or neck gaiter to warm the air.
Anaphylaxis
Anaphylaxis is a severe, whole-body allergic reaction that can kill within minutes. It happens when the immune system overreacts to a trigger — most commonly insect stings, foods (peanuts, tree nuts, shellfish), or medications.
Signs: Swelling of the face, lips, tongue, or throat. Difficulty breathing or swallowing. Hives or widespread rash. Rapid pulse. Dizziness or fainting. Nausea, vomiting, or abdominal pain. A feeling of “impending doom.”
First aid:
- Call 911 immediately. This is always a life-threatening emergency.
- Help the person use their epinephrine auto-injector (EpiPen or similar) if they have one. Inject into the outer thigh — it works through clothing.
- Have the person lie down with legs elevated, unless they are having trouble breathing — in that case, let them sit up.
- Monitor breathing. Be prepared to perform CPR if they stop breathing.
- A second dose of epinephrine may be needed if symptoms do not improve in 5–10 minutes.
Prevention: People with known severe allergies should carry two epinephrine auto-injectors at all times. Wear a medical alert bracelet. Read food labels carefully. Inform Scout leaders, counselors, and friends about your allergies.
Inhalation Injuries
Inhalation injuries occur when a person breathes in harmful substances — smoke, toxic gases, steam, or chemical fumes. These injuries can damage the airways and lungs even when the person looks fine on the outside.
Signs: Coughing, hoarse voice, soot around the mouth or nose, singed nasal hairs, difficulty breathing, wheezing, chest pain, confusion, headache.
First aid:
- Move the person to fresh air immediately — but only if you can do so safely. Do not enter a smoke-filled room or chemical environment without proper respiratory protection.
- Call 911.
- Monitor breathing. Airway swelling from heat or chemical exposure can worsen rapidly.
- If the person is not breathing, begin rescue breathing or CPR.
- Keep the person calm and sitting upright if they are conscious and breathing.
Prevention: Never enter a confined space without proper ventilation. Use a campfire responsibly — do not inhale smoke. Never mix cleaning chemicals (bleach + ammonia creates toxic chloramine gas). Install carbon monoxide detectors at home.
Altitude Sickness
Altitude sickness (acute mountain sickness, or AMS) occurs when you ascend to high elevation faster than your body can adjust to the lower oxygen levels. It typically starts above 8,000 feet and is common at high-adventure bases like Philmont Scout Ranch.
Signs and symptoms: Headache, nausea, dizziness, fatigue, loss of appetite, shortness of breath, difficulty sleeping. Symptoms usually appear 6–12 hours after arrival at altitude.
More severe forms:
- HACE (High Altitude Cerebral Edema): Brain swelling. Confusion, loss of coordination, irrational behavior. Life-threatening.
- HAPE (High Altitude Pulmonary Edema): Fluid in the lungs. Severe shortness of breath, cough with pink or frothy sputum, inability to walk uphill. Life-threatening.
First aid:
- Stop ascending. Rest at the current altitude until symptoms improve.
- Hydrate. Drink plenty of water.
- Descend if symptoms worsen or do not improve within 24 hours. Descent is the definitive treatment.
- For severe symptoms (HACE or HAPE), descend immediately and call for emergency evacuation. These are medical emergencies.
Prevention: Ascend gradually — no more than 1,000–1,500 feet of elevation gain per day above 8,000 feet. Stay hydrated. Avoid alcohol. Listen to your body and report symptoms honestly to your group.
🎬 Video: How to Perform the Heimlich Maneuver — Red Cross — https://www.youtube.com/watch?v=7CgtIgSyAiU
Choking occurs when food, a small object, or liquid blocks the airway. A person who is choking may not be able to speak, cough, or breathe.
Signs: Clutching the throat (the universal choking sign), inability to speak or cough, wheezing or high-pitched sounds, blue lips or face, panic.
First aid — Conscious adult or child (over 1 year):
- Ask, “Are you choking? Can I help?” If they cannot speak or nod, act immediately.
- Stand behind the person and wrap your arms around their waist.
- Make a fist with one hand and place it just above the navel, thumb side in.
- Grab your fist with the other hand and deliver quick, upward abdominal thrusts (the Heimlich maneuver).
- Repeat until the object is expelled or the person becomes unconscious.
If the person becomes unconscious:
- Lower them gently to the ground.
- Call 911.
- Begin CPR. Each time you open the airway to give breaths, look in the mouth for the object. If you see it, remove it.
Prevention: Chew food thoroughly. Do not talk or laugh with food in your mouth. Cut food into small pieces for young children. Keep small objects away from children.
Asthma Attack
Asthma is a chronic condition that narrows the airways and makes breathing difficult. An asthma attack can be triggered by exercise, cold air, allergens, smoke, strong emotions, or respiratory infections.
Signs: Wheezing (a whistling sound when breathing), shortness of breath, tight feeling in the chest, coughing, difficulty speaking in full sentences, sitting in a tripod position (leaning forward with hands on knees).
First aid:
- Help the person sit up in a comfortable position — sitting upright opens the airways more than lying down.
- Help them use their rescue inhaler (usually albuterol, a blue inhaler). Shake it, have them exhale fully, then inhale the medication deeply and hold their breath for 10 seconds.
- Stay calm and reassure them. Anxiety worsens an attack.
- If the inhaler does not relieve symptoms within 15 minutes, or if the person cannot speak, has blue lips, or is getting worse — call 911 immediately.
Prevention: Avoid known triggers. Always carry a rescue inhaler. Warm up gradually before exercise. In cold weather, breathe through a scarf or neck gaiter to warm the air.
Anaphylaxis
Anaphylaxis is a severe, whole-body allergic reaction that can kill within minutes. It happens when the immune system overreacts to a trigger — most commonly insect stings, foods (peanuts, tree nuts, shellfish), or medications.
Signs: Swelling of the face, lips, tongue, or throat. Difficulty breathing or swallowing. Hives or widespread rash. Rapid pulse. Dizziness or fainting. Nausea, vomiting, or abdominal pain. A feeling of “impending doom.”
First aid:
- Call 911 immediately. This is always a life-threatening emergency.
- Help the person use their epinephrine auto-injector (EpiPen or similar) if they have one. Inject into the outer thigh — it works through clothing.
- Have the person lie down with legs elevated, unless they are having trouble breathing — in that case, let them sit up.
- Monitor breathing. Be prepared to perform CPR if they stop breathing.
- A second dose of epinephrine may be needed if symptoms do not improve in 5–10 minutes.
Prevention: People with known severe allergies should carry two epinephrine auto-injectors at all times. Wear a medical alert bracelet. Read food labels carefully. Inform Scout leaders, counselors, and friends about your allergies.
Inhalation Injuries
Inhalation injuries occur when a person breathes in harmful substances — smoke, toxic gases, steam, or chemical fumes. These injuries can damage the airways and lungs even when the person looks fine on the outside.
Signs: Coughing, hoarse voice, soot around the mouth or nose, singed nasal hairs, difficulty breathing, wheezing, chest pain, confusion, headache.
First aid:
- Move the person to fresh air immediately — but only if you can do so safely. Do not enter a smoke-filled room or chemical environment without proper respiratory protection.
- Call 911.
- Monitor breathing. Airway swelling from heat or chemical exposure can worsen rapidly.
- If the person is not breathing, begin rescue breathing or CPR.
- Keep the person calm and sitting upright if they are conscious and breathing.
Prevention: Never enter a confined space without proper ventilation. Use a campfire responsibly — do not inhale smoke. Never mix cleaning chemicals (bleach + ammonia creates toxic chloramine gas). Install carbon monoxide detectors at home.
Altitude Sickness
Altitude sickness (acute mountain sickness, or AMS) occurs when you ascend to high elevation faster than your body can adjust to the lower oxygen levels. It typically starts above 8,000 feet and is common at high-adventure bases like Philmont Scout Ranch.
Signs and symptoms: Headache, nausea, dizziness, fatigue, loss of appetite, shortness of breath, difficulty sleeping. Symptoms usually appear 6–12 hours after arrival at altitude.
More severe forms:
- HACE (High Altitude Cerebral Edema): Brain swelling. Confusion, loss of coordination, irrational behavior. Life-threatening.
- HAPE (High Altitude Pulmonary Edema): Fluid in the lungs. Severe shortness of breath, cough with pink or frothy sputum, inability to walk uphill. Life-threatening.
First aid:
- Stop ascending. Rest at the current altitude until symptoms improve.
- Hydrate. Drink plenty of water.
- Descend if symptoms worsen or do not improve within 24 hours. Descent is the definitive treatment.
- For severe symptoms (HACE or HAPE), descend immediately and call for emergency evacuation. These are medical emergencies.
Prevention: Ascend gradually — no more than 1,000–1,500 feet of elevation gain per day above 8,000 feet. Stay hydrated. Avoid alcohol. Listen to your body and report symptoms honestly to your group.
🎬 Video: How to Perform the Heimlich Maneuver — Red Cross — https://www.youtube.com/watch?v=7CgtIgSyAiU
Choking
Choking occurs when food, a small object, or liquid blocks the airway. A person who is choking may not be able to speak, cough, or breathe.
Signs: Clutching the throat (the universal choking sign), inability to speak or cough, wheezing or high-pitched sounds, blue lips or face, panic.
First aid — Conscious adult or child (over 1 year):
- Ask, “Are you choking? Can I help?” If they cannot speak or nod, act immediately.
- Stand behind the person and wrap your arms around their waist.
- Make a fist with one hand and place it just above the navel, thumb side in.
- Grab your fist with the other hand and deliver quick, upward abdominal thrusts (the Heimlich maneuver).
- Repeat until the object is expelled or the person becomes unconscious.
If the person becomes unconscious:
- Lower them gently to the ground.
- Call 911.
- Begin CPR. Each time you open the airway to give breaths, look in the mouth for the object. If you see it, remove it.
Prevention: Chew food thoroughly. Do not talk or laugh with food in your mouth. Cut food into small pieces for young children. Keep small objects away from children.
Asthma Attack
Asthma is a chronic condition that narrows the airways and makes breathing difficult. An asthma attack can be triggered by exercise, cold air, allergens, smoke, strong emotions, or respiratory infections.
Signs: Wheezing (a whistling sound when breathing), shortness of breath, tight feeling in the chest, coughing, difficulty speaking in full sentences, sitting in a tripod position (leaning forward with hands on knees).
First aid:
- Help the person sit up in a comfortable position — sitting upright opens the airways more than lying down.
- Help them use their rescue inhaler (usually albuterol, a blue inhaler). Shake it, have them exhale fully, then inhale the medication deeply and hold their breath for 10 seconds.
- Stay calm and reassure them. Anxiety worsens an attack.
- If the inhaler does not relieve symptoms within 15 minutes, or if the person cannot speak, has blue lips, or is getting worse — call 911 immediately.
Prevention: Avoid known triggers. Always carry a rescue inhaler. Warm up gradually before exercise. In cold weather, breathe through a scarf or neck gaiter to warm the air.
Anaphylaxis
Anaphylaxis is a severe, whole-body allergic reaction that can kill within minutes. It happens when the immune system overreacts to a trigger — most commonly insect stings, foods (peanuts, tree nuts, shellfish), or medications.
Signs: Swelling of the face, lips, tongue, or throat. Difficulty breathing or swallowing. Hives or widespread rash. Rapid pulse. Dizziness or fainting. Nausea, vomiting, or abdominal pain. A feeling of “impending doom.”
First aid:
- Call 911 immediately. This is always a life-threatening emergency.
- Help the person use their epinephrine auto-injector (EpiPen or similar) if they have one. Inject into the outer thigh — it works through clothing.
- Have the person lie down with legs elevated, unless they are having trouble breathing — in that case, let them sit up.
- Monitor breathing. Be prepared to perform CPR if they stop breathing.
- A second dose of epinephrine may be needed if symptoms do not improve in 5–10 minutes.
Prevention: People with known severe allergies should carry two epinephrine auto-injectors at all times. Wear a medical alert bracelet. Read food labels carefully. Inform Scout leaders, counselors, and friends about your allergies.
Inhalation Injuries
Inhalation injuries occur when a person breathes in harmful substances — smoke, toxic gases, steam, or chemical fumes. These injuries can damage the airways and lungs even when the person looks fine on the outside.
Signs: Coughing, hoarse voice, soot around the mouth or nose, singed nasal hairs, difficulty breathing, wheezing, chest pain, confusion, headache.
First aid:
- Move the person to fresh air immediately — but only if you can do so safely. Do not enter a smoke-filled room or chemical environment without proper respiratory protection.
- Call 911.
- Monitor breathing. Airway swelling from heat or chemical exposure can worsen rapidly.
- If the person is not breathing, begin rescue breathing or CPR.
- Keep the person calm and sitting upright if they are conscious and breathing.
Prevention: Never enter a confined space without proper ventilation. Use a campfire responsibly — do not inhale smoke. Never mix cleaning chemicals (bleach + ammonia creates toxic chloramine gas). Install carbon monoxide detectors at home.
Altitude Sickness
Altitude sickness (acute mountain sickness, or AMS) occurs when you ascend to high elevation faster than your body can adjust to the lower oxygen levels. It typically starts above 8,000 feet and is common at high-adventure bases like Philmont Scout Ranch.
Signs and symptoms: Headache, nausea, dizziness, fatigue, loss of appetite, shortness of breath, difficulty sleeping. Symptoms usually appear 6–12 hours after arrival at altitude.
More severe forms:
- HACE (High Altitude Cerebral Edema): Brain swelling. Confusion, loss of coordination, irrational behavior. Life-threatening.
- HAPE (High Altitude Pulmonary Edema): Fluid in the lungs. Severe shortness of breath, cough with pink or frothy sputum, inability to walk uphill. Life-threatening.
First aid:
- Stop ascending. Rest at the current altitude until symptoms improve.
- Hydrate. Drink plenty of water.
- Descend if symptoms worsen or do not improve within 24 hours. Descent is the definitive treatment.
- For severe symptoms (HACE or HAPE), descend immediately and call for emergency evacuation. These are medical emergencies.
Prevention: Ascend gradually — no more than 1,000–1,500 feet of elevation gain per day above 8,000 feet. Stay hydrated. Avoid alcohol. Listen to your body and report symptoms honestly to your group.
🎬 Video: How to Perform the Heimlich Maneuver — Red Cross — https://www.youtube.com/watch?v=7CgtIgSyAiU
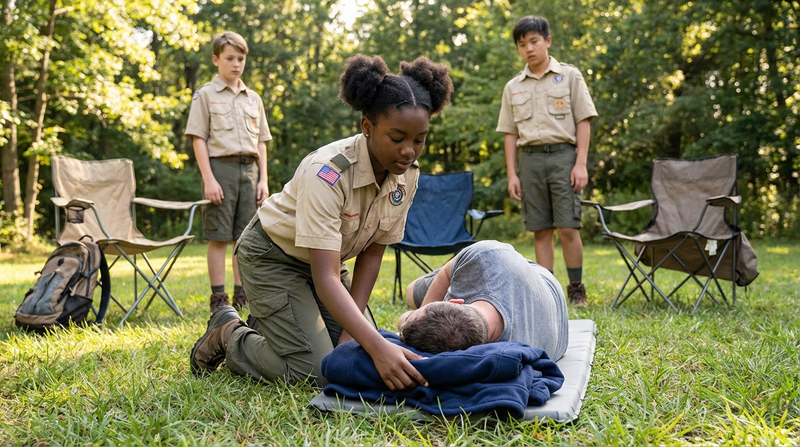
Req 6 — Loss of Consciousness
These emergencies can happen fast and look overwhelming, but the same pattern helps you stay focused: recognize the warning signs, give the right first aid, and understand how the emergency might have been prevented. Work through each condition below with that three-part frame in mind.
Fainting (Syncope)
Fainting happens when the brain temporarily does not get enough blood flow. It is usually brief — the person collapses, then wakes up within a minute or two. Common triggers include standing for long periods, heat, dehydration, emotional stress, and standing up too quickly.
Signs before fainting: Lightheadedness, pale or gray skin, sweating, nausea, blurred or tunnel vision, feeling warm.
First aid:
- If you notice warning signs, help the person sit or lie down immediately. Have them put their head between their knees if sitting.
- If they have already fainted, check for breathing and pulse. Place them on their back and elevate their legs about 12 inches.
- Loosen tight clothing around the neck and waist.
- Do not splash water on their face or slap them — this is not helpful.
- When they wake up, keep them lying down for several minutes. Offer water. Help them sit up slowly.
- Call 911 if the person does not regain consciousness within a minute, if they hit their head during the fall, if they have chest pain or difficulty breathing, or if this is their first fainting episode with no clear cause.
Prevention: Stay hydrated. Avoid standing still for long periods — shift your weight, flex your calves. If you feel faint, lie down or sit with your head between your knees right away. Eat regular meals.
🎬 Video: Fainting — https://youtu.be/7lTWGG2ZvK4
Hypoglycemia (Low Blood Sugar)
Hypoglycemia occurs when blood sugar drops too low — usually below 70 mg/dL. It most commonly affects people with diabetes who take insulin or certain medications, but it can also happen to anyone who has not eaten for a long time, especially during intense physical activity.
Signs and symptoms: Shakiness, sweating, pale skin, hunger, irritability, confusion, dizziness, rapid heartbeat, weakness, slurred speech, and in severe cases, loss of consciousness and seizures.
First aid:
If the person is conscious and can swallow, give them fast-acting sugar immediately:
- Glucose tablets (the best option — carried by many diabetics)
- Fruit juice (4 oz)
- Regular soda (not diet)
- Hard candy
- Honey or sugar packets
Wait 15 minutes, then check if they feel better. If not, give another dose of sugar.
Once they improve, have them eat a snack with protein and carbohydrates (peanut butter crackers, cheese and crackers) to stabilize blood sugar.
If the person is unconscious or unable to swallow, do not put anything in their mouth. Call 911 immediately. Place them in the recovery position and keep the airway clear (review Req 1). If they carry a glucagon kit, a trained person can administer it by injection.
Prevention: People with diabetes should monitor blood sugar regularly, carry fast-acting sugar at all times, and eat balanced meals. For all Scouts — eat regular meals and snacks during activities, especially in hot weather or during strenuous exercise.
🎬 Video: Diabetic Emergencies — https://www.youtube.com/watch?v=ASqdE2sqHgM
Seizure
A seizure occurs when there is a sudden burst of abnormal electrical activity in the brain. Seizures can be caused by epilepsy, head injuries, high fever, low blood sugar, drug overdose, or other medical conditions. Some seizures involve full-body convulsions; others may appear as staring spells or repetitive movements.
Signs of a generalized (tonic-clonic) seizure: Sudden stiffening of the body, uncontrolled jerking or shaking, loss of consciousness, drooling or foaming at the mouth, eyes rolling back, loss of bladder control, confusion or sleepiness after the seizure ends.
First aid:
- Do not restrain the person. You cannot stop a seizure by holding someone down. Restraining them can cause injuries.
- Do not put anything in their mouth. Despite the old myth, people cannot swallow their tongues during a seizure. Putting objects in the mouth can break teeth or cause choking.
- Protect their head. Place something soft (jacket, towel, your hands) under their head to prevent it from hitting the ground.
- Clear the area. Move furniture, rocks, or anything the person could hit during the seizure.
- Time the seizure. This information is critical for medical professionals.
- After the seizure stops, turn the person onto their side (recovery position) to keep the airway clear.
- Stay with them. The person will be confused and disoriented when they wake up. Speak calmly and reassure them.
When to call 911:
- The seizure lasts more than 5 minutes
- The person does not regain consciousness
- Another seizure begins shortly after the first
- The person is injured during the seizure
- This is their first seizure or you do not know their seizure history
- The person is pregnant, has diabetes, or is in water
Prevention: People with epilepsy should take prescribed medications consistently, get adequate sleep, and avoid known triggers. For other causes — prevent head injuries with helmets, manage diabetes, and avoid substance abuse.
🎬 Video: Seizure First Aid — Epilepsy Foundation — https://www.youtube.com/watch?v=Ovsw7tdneqE
Drug Overdose and Alcohol Poisoning
An overdose occurs when a person takes more of a substance than their body can safely process. This can happen with prescription medications, over-the-counter drugs, illegal drugs, or alcohol.
Alcohol poisoning is a specific type of overdose caused by drinking a dangerous amount of alcohol in a short period. It is a leading cause of death among young people.
Signs and symptoms: Confusion or unresponsiveness, slow or irregular breathing (fewer than 8 breaths per minute), blue or pale skin, vomiting (especially while unconscious), seizures, low body temperature, inability to be woken up.
First aid:
- Call 911 immediately. Do not wait to “see if they get better.”
- Check breathing. If the person is not breathing, begin CPR.
- Place them in the recovery position if they are breathing but unconscious — this prevents choking on vomit.
- Stay with them. Monitor breathing continuously.
- If you suspect an opioid overdose (heroin, fentanyl, prescription painkillers) and naloxone (Narcan) is available, administer it as a nasal spray. Naloxone temporarily reverses opioid effects and is available without a prescription in most states.
- Do not give them coffee, cold showers, or try to “walk it off.” These do not reverse an overdose and waste precious time.
Prevention: Never misuse prescription medications. Avoid alcohol and drugs entirely — they are illegal for minors and dangerous at any age. If you see someone in danger, call for help. Good Samaritan laws in many states protect people who call 911 for an overdose from prosecution.
🎬 Video: Naloxone Treatment of an Opioid Overdose — https://youtu.be/8eUUf5ssH_4
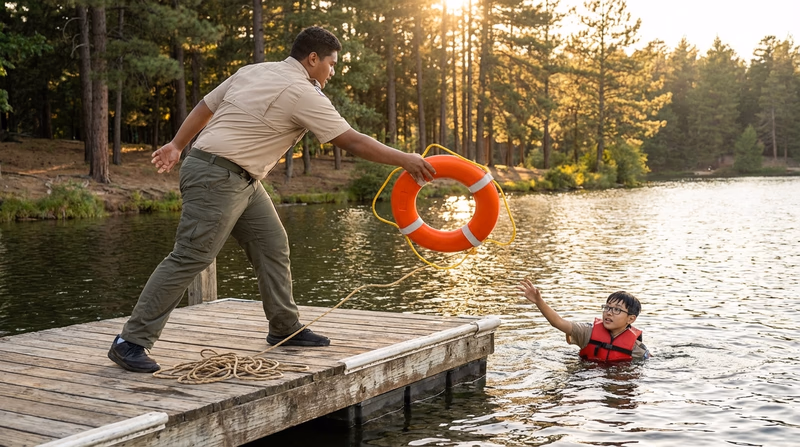
Underwater Hypoxic Blackout
Underwater hypoxic blackout (also called shallow water blackout) happens when a swimmer loses consciousness underwater due to low oxygen levels in the blood. It is most often caused by hyperventilating before diving — taking several fast, deep breaths to “load up” on air. This does not actually increase oxygen — it just lowers carbon dioxide, which is the signal that tells your brain to breathe. The swimmer feels fine, dives under, and blacks out without warning.
Signs: A swimmer who suddenly stops moving underwater. An unconscious person at the bottom of a pool. A swimmer who surfaces unconscious or limp.
First aid:
- Get the person out of the water immediately. If you are trained in water rescue, follow safe rescue techniques. If not, use a reaching or throwing assist — do not swim to the victim unless you are a trained lifeguard.
- Call 911.
- Check breathing and pulse. Begin CPR immediately if needed.
- Do not give up. Drowning victims — especially in cold water — have survived after extended submersion. Continue CPR until EMS arrives.
Prevention: Never hyperventilate before swimming underwater. Swim with a buddy who watches you from the surface. Never swim alone. Follow the BSA Safe Swim Defense guidelines.
Underwater Blackout A focused educational resource explaining shallow-water blackout, why hyperventilation is dangerous, and how to prevent this silent drowning hazard. Link: Underwater Blackout — https://underwaterhypoxicblackout.org/Cold Water Shock and Drowning
Cold water shock is the body’s involuntary response to sudden immersion in cold water (below 70°F / 21°C). Within the first minute, the body gasps, hyperventilates, and the heart rate spikes. This can cause a person to inhale water and drown even if they are a strong swimmer.
If a person survives the initial shock, cold water rapidly saps strength and coordination. Within 10–15 minutes, the muscles may become so weak that the person cannot swim or hold onto a rescue device.
Drowning is death by suffocation in water. It is the leading cause of unintentional death for children ages 1–4 and a top cause for all ages.
Signs of a drowning person: Head low in the water with mouth at water level. Head tilted back with mouth open. Glassy, unfocused eyes. Vertical body position, not using legs. Trying to swim but making no forward progress. Attempting to roll over on the back. Silence — drowning is almost always silent.
First aid:
- Do not jump in unless you are trained in water rescue. More than half of people who die trying to rescue a drowning person are untrained bystanders.
- Reach, throw, row, go — in that order. Extend a pole or branch. Throw a flotation device. Use a boat. Enter the water only as a last resort with proper training.
- Call 911.
- Once the person is out of the water, check breathing and begin CPR if needed.
- Treat for hypothermia. Remove wet clothing. Wrap in blankets. Warm gradually.
Prevention: Always wear a PFD when boating or paddling. Never swim alone. Follow BSA Safe Swim Defense and Safety Afloat policies. Learn to swim well. Know the water temperature before entering.
🎬 Video: How to Perform CPR for a Drowning Victim — https://youtu.be/mnfhnyY-Udk?si=hDJw11X7ejwN54WI
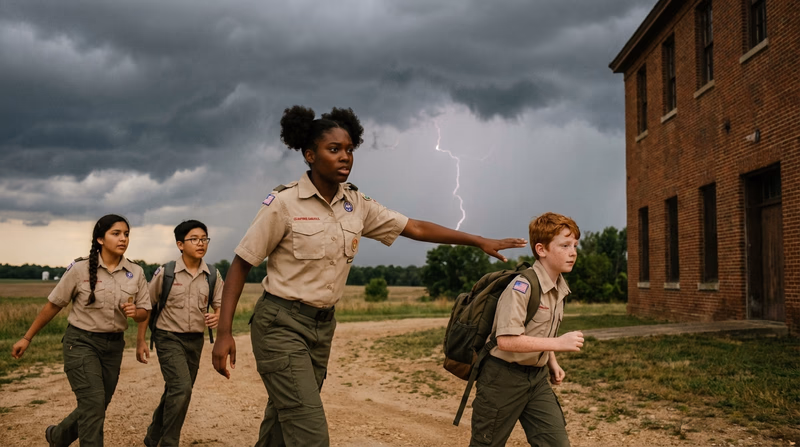
Lightning Strike and Electric Shock
A lightning strike delivers up to 300 million volts in a fraction of a second. Lightning can cause cardiac arrest, severe burns, nerve damage, and brain injury. Electric shock from power lines, outlets, or equipment can cause similar injuries.
Signs and symptoms: Loss of consciousness, cardiac arrest (no pulse), burns (entry and exit points), confusion, muscle pain, numbness, difficulty breathing, seizures.
First aid:
- Ensure the scene is safe. For lightning: if there is still a storm, move the victim and yourself to a safe structure or vehicle if you can do so quickly. For electrical shock: make sure the power source is off before touching the victim.
- Call 911 immediately.
- Check for breathing and a pulse. Lightning can stop the heart. Begin CPR immediately if there is no pulse — lightning victims have a high survival rate with prompt CPR.
- Treat burns at entry and exit points.
- Treat for shock — lay the person down, elevate legs, keep warm.
- Check for spinal injuries — the force of a lightning strike or fall from electrical contact can cause fractures.
Prevention: Follow the 30/30 rule — if the time between a lightning flash and thunder is 30 seconds or less, go inside. Wait 30 minutes after the last thunder before going back outside. Avoid open fields, hilltops, tall isolated trees, and bodies of water during storms. Stay away from downed power lines.
Req 7 — Heart Attack, CPR & AEDs
A heart attack can turn into cardiac arrest in minutes, which is why this requirement moves from recognizing the emergency to taking action with CPR and an AED. Work through the sections in order: understand what is happening, recognize the warning signs, know when to start CPR, and learn how an AED fits into the rescue.
What Is a Heart Attack?
A heart attack (myocardial infarction) happens when blood flow to part of the heart muscle is blocked — usually by a blood clot in one of the coronary arteries. Without blood flow, that section of the heart begins to die.
A heart attack is not the same as cardiac arrest:
| Heart Attack | Cardiac Arrest | |
|---|---|---|
| What happens | Blocked artery reduces blood flow to the heart | Heart stops beating effectively |
| Consciousness | Usually conscious | Unconscious |
| Breathing | Usually breathing | Not breathing (or only gasping) |
| Pulse | Has a pulse | No pulse |
| Treatment | Call 911, aspirin, keep calm | CPR + AED immediately |
A heart attack can lead to cardiac arrest if the heart’s electrical system is disrupted — which is why rapid treatment matters.
🎬 Video: What Happens During a Heart Attack — https://youtu.be/3_PYnWVoUzM?si=FlnFcSGpYJuxGIo5
Heart Attack Signs and First Aid
Signs and symptoms:
- Chest pain or pressure — often described as “squeezing,” “tightness,” or “a heavy weight on my chest.” May come and go.
- Pain radiating to the left arm, shoulder, neck, jaw, or back
- Shortness of breath — with or without chest pain
- Nausea, vomiting, or indigestion
- Cold sweat, lightheadedness, or dizziness
- Fatigue — especially unusual, sudden fatigue
- Anxiety — a feeling that “something is very wrong”
First Aid for a Heart Attack
- Call 911 immediately. Do not drive the person to the hospital yourself unless there is absolutely no other option — they could go into cardiac arrest in the car.
- Have the person sit or lie down in whatever position is most comfortable.
- Give aspirin if the person is not allergic to it and is not already taking blood thinners. Have them chew (not swallow whole) one regular aspirin (325 mg) or four baby aspirin (81 mg each). Aspirin helps prevent the blood clot from growing.
- Loosen tight clothing.
- Keep them calm. Anxiety increases heart rate and oxygen demand.
- Monitor breathing and pulse. Be prepared to begin CPR if the person becomes unresponsive and stops breathing.
🎬 Video: Symptoms & Signs of a Heart Attack in Women & Men — https://youtu.be/jouwrfr7_S0?si=By1f--Oq9UPUcHkd
When to Perform CPR
CPR is performed when all three of these conditions exist:
- The person is unresponsive — they do not respond to tapping and shouting
- The person is not breathing normally — no breath, or only gasping (agonal breathing)
- There is no pulse — check the carotid pulse (side of the neck) for no more than 10 seconds
If these three conditions are present, begin CPR immediately. Every minute without CPR reduces the chance of survival by 7–10%.
🎬 Video: Responding to Cardiac Arrest — https://youtu.be/DByqyhLV1zg?si=RO4saCDlfXZu2TN6
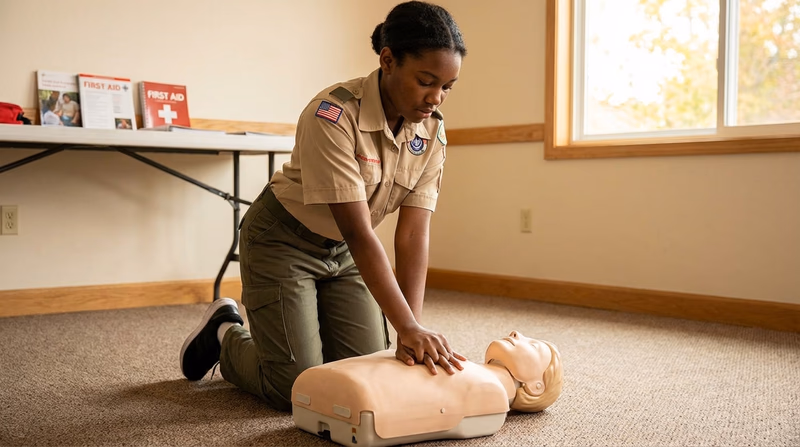
CPR Technique
CPR is the technique used to manually pump blood through the body when the heart has stopped. It keeps oxygen flowing to the brain and vital organs until a defibrillator or paramedics can restart the heart.
Hands-Only CPR
For bystanders without CPR training, Hands-Only CPR (compression-only, no rescue breaths) is recommended by the American Heart Association. It is simple and effective:
- Call 911 (or have someone else call).
- Place the heel of one hand on the center of the chest (on the breastbone, between the nipples).
- Place your other hand on top and interlace your fingers.
- Push hard and fast — compress the chest at least 2 inches deep at a rate of 100–120 compressions per minute.
- Do not stop until EMS arrives, an AED is ready to use, or the person starts breathing on their own.
The rhythm: Push to the beat of the song “Stayin’ Alive” by the Bee Gees — it is exactly 100 beats per minute.
Conventional CPR (with Rescue Breaths)
If you are trained in full CPR, the cycle is 30 compressions : 2 rescue breaths:
- Perform 30 chest compressions (hard and fast, 2 inches deep).
- Open the airway with head-tilt, chin-lift.
- Give 2 rescue breaths (1 second each, watching for chest rise). Use a CPR barrier.
- Repeat the 30:2 cycle until help arrives.
For two-rescuer CPR: One person does compressions while the other gives breaths. Switch roles every 2 minutes to prevent fatigue — compression quality degrades quickly when you are tired.
CPR for Children and Infants
| Adult/Teen | Child (1–puberty) | Infant (under 1) | |
|---|---|---|---|
| Compression depth | At least 2 inches | About 2 inches | About 1.5 inches |
| Compression method | Two hands on sternum | One or two hands | Two fingers on sternum |
| Rate | 100–120/min | 100–120/min | 100–120/min |
| Ratio | 30:2 | 30:2 (one rescuer) or 15:2 (two rescuers) | 30:2 (one rescuer) or 15:2 (two rescuers) |
🎬 Video: Hands-Only CPR — https://youtu.be/A5PnI4I-vd8?si=ERt7HtnwcmqFJmQA
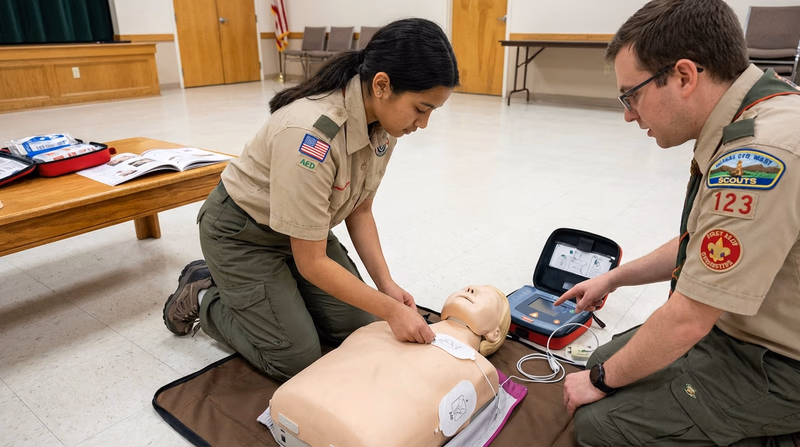
What an AED Does
An automated external defibrillator (AED) is a portable device that analyzes the heart’s rhythm and, if needed, delivers an electrical shock to restore a normal heartbeat. It is used during cardiac arrest — when the heart has stopped beating effectively.
When the heart goes into cardiac arrest, it often enters a chaotic rhythm called ventricular fibrillation (V-fib). The heart muscle quivers rapidly instead of pumping blood. An AED delivers a controlled electrical shock that stops the chaotic rhythm, giving the heart a chance to reset and resume beating normally.
🎬 Video: Using an AED — https://youtu.be/in8j2Q2z3HE
Using an AED Correctly
Step-by-Step
- Continue CPR until the AED is powered on and ready. Every second without compressions reduces survival.
- Turn on the AED. Press the power button or open the lid (some models turn on automatically when opened).
- Attach the pads. Peel the adhesive pads from the packaging and place them on the victim’s bare chest as shown in the diagram on the pads:
- One pad on the upper right chest, below the collarbone
- One pad on the lower left side, below the armpit
- Clear the victim. Make sure no one is touching the person. The AED needs a clear reading.
- Let the AED analyze. The device will say “Analyzing heart rhythm — do not touch the patient.” Wait.
- If a shock is advised: The AED will say “Shock advised. Stand clear.” Make sure no one is touching the victim. Press the shock button when prompted.
- Resume CPR immediately after the shock. The AED will prompt you to continue compressions.
- If no shock is advised: The AED will tell you. Continue CPR. The AED will re-analyze every 2 minutes.
Important Details
- Bare chest required. Remove clothing from the chest. If the chest is wet, dry it quickly. If the person has excessive chest hair, the pads may not stick — some AED kits include a razor.
- Medication patches. If the person has a medication patch (nitroglycerin, nicotine) where a pad needs to go, remove it with a gloved hand and wipe the area before placing the pad.
- Implanted pacemaker or defibrillator. Look for a lump under the skin on the upper chest. Place the AED pad at least one inch away from it.
- Children under 8 or under 55 pounds. Use pediatric pads if available. If not, adult pads can be used — place one on the front of the chest and one on the back.
Finding AEDs in Your Community
AEDs are placed in locations where large numbers of people gather and where cardiac arrest is most likely to be witnessed. For this requirement, identify AED locations at places like:
- Schools — often in the main office, gymnasium, or cafeteria
- Places of worship — in the foyer or main gathering area
- Scout meeting places — your troop’s regular meeting location
- Sports facilities — gyms, pools, fields, and recreation centers
- Community buildings — libraries, community centers, government offices
- Airports, malls, and transit stations
- Camp — the health lodge or dining hall at Scout camp
Why These Locations?
AEDs are placed where:
- Many people are present (higher statistical chance of a cardiac event)
- Physical exertion occurs (sports facilities, gyms)
- Older adults gather (places of worship, community centers)
- Emergency response time may be long (remote camps, large buildings)
Smartphone AED Locators
Several apps and websites map AED locations:
PulsePoint AED — AED Locator App A free app that shows nearby AED locations and alerts CPR-trained bystanders when someone nearby is in cardiac arrest. Link: PulsePoint AED — AED Locator App — https://www.pulsepoint.org/ Where to Place AEDs American Heart Association guidance on where AEDs are most useful and how facilities should choose their locations. Link: Where to Place AEDs — https://cpr.heart.org/en/-/media/CPR-Files/Training-Programs/AED-Implementation/2023-updates/KJ1683-AED-Guide.pdf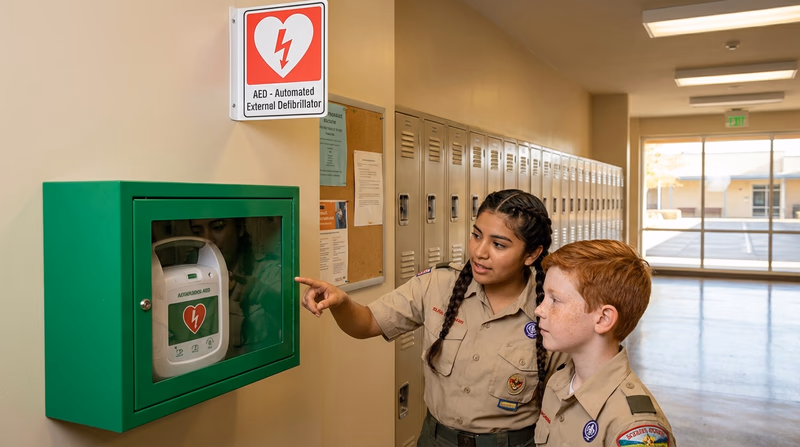
Req 8 — Muscle & Bone Injuries
This page is the short version: know what kind of injury you are looking at, immobilize it, and avoid making it worse.
Compare common injuries
- Strain: stretched or partly torn muscle or tendon.
- Muscle tear: more serious muscle damage with more pain and loss of use.
- Tendon rupture: complete tendon tear with major loss of function.
- Sprain: stretched or torn ligament at a joint.
- Dislocation: bone forced out of position at a joint.
- Simple fracture: broken bone with skin intact.
- Compound fracture: broken bone with an open wound.
Strains, tears, and tendon ruptures
- Signs: pain, swelling, bruising, weakness, or a sudden pop.
- First aid: rest, ice, compression, elevation, and immobilize if severe.
- Big clue: a tendon rupture often means the limb cannot work normally at all.
Sprains, fractures, and dislocations
- Signs: pain, swelling, deformity, bruising, and trouble using the limb.
- Complications: nerve damage, blood vessel damage, infection in open fractures, or long-term instability.
- First aid: splint in position found and get medical help when needed.
Bandages
Demonstrate bandages for these injuries:
- Arm slings for forearm or upper arm or collarbone fractures
- Elastic wrap and cravat bandages for ankle sprain
- Elastic wrap and cravat bandages for wrist sprain or hand injury.
- Arm sling: support the arm, knot at the side of the neck, hand slightly elevated.
- Ankle wrap: use a figure-eight pattern and check toe circulation.
- Wrist or hand wrap: secure the injury while leaving fingers visible for circulation checks.
Splinting
Demonstrate the proper procedures for handling and splinting of suspected closed or open fractures or dislocations of the:
- Finger and toe
- Forearm or wrist
- Upper leg
- Lower leg or ankle.
- General rule: immobilize the joint above and below the injury.
- Finger or toe: buddy tape with padding.
- Forearm or wrist: rigid splint plus sling.
- Upper leg: call 911 and keep movement minimal.
- Lower leg or ankle: pad and splint both sides if possible.
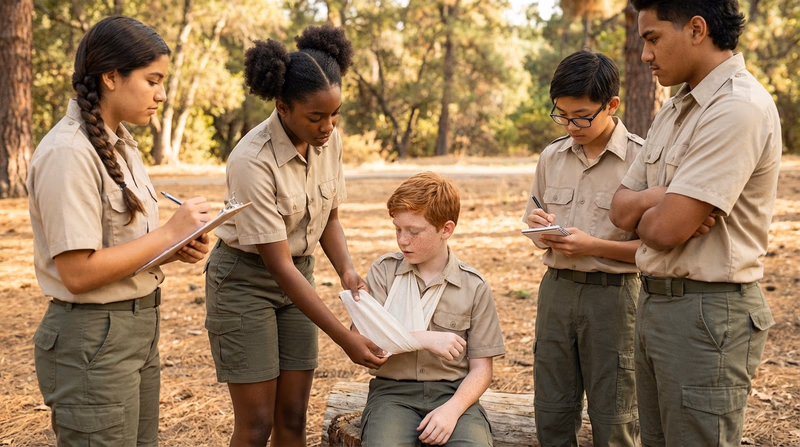
Req 9 — Head & Spine Injuries
Head and spine injuries are high-risk. Keep this simple: suspect them early, minimize movement, and get help.
Head, neck, and back injuries
- Related because: the brain and spinal cord work together, so a head injury can also mean a neck or spine injury.
- Signs: headache, confusion, neck or back pain, numbness, weakness, deformity, or trouble moving limbs.
- Complications: paralysis, internal bleeding, breathing problems, and permanent disability.
- Prevention: helmets, seatbelts, safe diving, and following activity rules.
Concussion
- Signs: headache, dizziness, confusion, nausea, blurry vision, memory problems, or acting “off.”
- First aid: stop activity, watch closely, and get urgent help for worsening symptoms, seizure, or loss of consciousness.
- Prevention: helmets, safe play, and taking hits to the head seriously.
Open head wound
- Put on gloves.
- Use gentle pressure with gauze unless you suspect a skull fracture.
- Hold the dressing in place with a triangular or similar bandage.
- Tie at the side of the head, not over the wound.
Suspected neck or back injury
- Approach from the front so the person does not turn their head.
- Hold the head still in a neutral position.
- Tell the person not to move.
- Call 911 and keep stabilizing until help arrives.
Req 10 — Moving a Patient
Default rule: do not move the patient unless you have a good reason.
When to move
- Move only if needed: fire, smoke, traffic, collapse risk, unsafe water, or you must reach the airway/start CPR.
- Do not move: suspected spine injury, unstable fracture, or when EMS can safely handle it.
- If unsure: stabilize and wait.
Choosing the method
Pick the method based on:
- the injury
- how many helpers you have
- distance and terrain
- how urgent the danger is
Smoke-filled room
- Stay low.
- Check for heat before opening doors.
- Use a drag that gets the person out fast.
- With two rescuers, one takes shoulders and one takes legs.
Sprained ankle transport
- One helper: assisted walk / human crutch.
- Two helpers: two-person assisted walk.
- If they cannot walk: use a carry.
Improvised stretcher
- Use poles plus a blanket, sleeping bag, or jackets.
- Keep the stretcher level.
- Use enough helpers and move in step.
- Secure the patient before moving.
Req 11 — Heat & Cold Conditions
Environmental problems can get serious fast. Focus on spotting them early, stopping exposure, and cooling or warming the person.
Dehydration and over-hydration
- Dehydration signs: thirst, dark urine, headache, dizziness.
- Over-hydration signs: nausea, headache, confusion, swollen hands.
- First aid: rest, adjust fluids, and get urgent help for confusion, vomiting, or seizures.
- Prevention: drink sensibly and replace salts during long exertion.
Heat cramps
- Signs: painful muscle cramps while sweating.
- First aid: stop activity, cool down, stretch gently, drink water or electrolytes.
- Prevention: hydrate, pace yourself, and take breaks.
Heat exhaustion
- Signs: heavy sweating, pale clammy skin, weakness, nausea, dizziness.
- First aid: move to shade, loosen clothing, cool with wet cloths, give sips of water.
- Prevention: shade, fluids, rest breaks, and lighter activity in extreme heat.
Heat stroke
- Signs: confusion, collapse, very high temperature, hot skin, or seizures.
- First aid: call 911 and cool the person immediately.
- Prevention: avoid overheating, hydrate, and act early when heat illness starts.
Cold-related chest pain
- Signs: chest tightness or pain in the cold, possibly with shortness of breath.
- First aid: stop activity, move to warmth, and treat it like a possible heart emergency.
- Prevention: dress in layers, warm up gradually, and avoid sudden hard exertion in cold weather.
Hypothermia
- Signs: shivering, clumsiness, confusion, slurred speech, then worsening unresponsiveness.
- First aid: get to shelter, remove wet clothes, warm the core, handle gently.
- Prevention: stay dry, layer up, eat and drink, and act early.
Req 12 — Mental Health & Stress
First aid is not just for physical injuries. Mental and emotional well-being are just as important as physical health — and as a Scout trained in first aid, you should be able to recognize when someone is struggling emotionally and know what to do about it.
Stress Reactions
Stress is a normal part of life. Your body’s stress response — the “fight, flight, or freeze” reaction — is designed to help you deal with challenges. But when stress becomes overwhelming, it can cause real physical and emotional symptoms.
Common Stressful Situations in Scouting
Everyone responds to stress differently. Here are situations many Scouts find stressful, along with the reactions they might trigger:
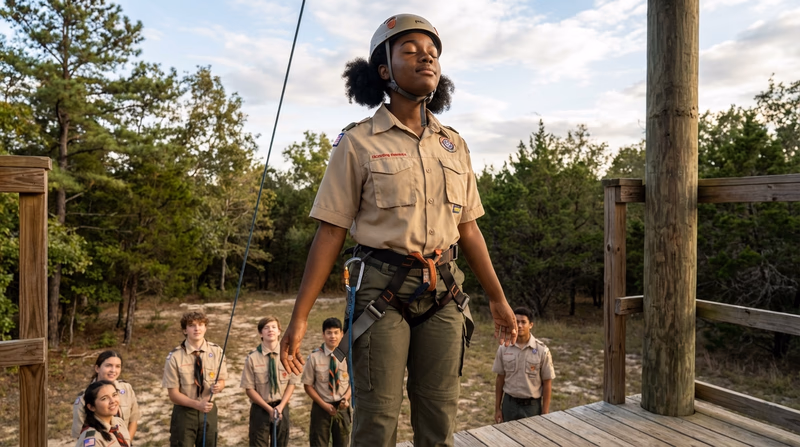
High-adventure activities (rappelling, ropes course, cliff jumping):
- Racing heart, sweaty palms, shaking
- Freezing in place — unable to move
- Feeling nauseated or dizzy
- Crying or wanting to quit
Performance situations (speaking to a group, swim test, sports tryouts):
- Dry mouth, voice shaking
- Mind going blank
- Stomach pain or “butterflies”
- Wanting to avoid the situation entirely
Social situations (meeting new people, calling an adult, homesickness):
- Anxiety, worry, feeling “on edge”
- Difficulty sleeping
- Withdrawing from the group
- Tearfulness or irritability
Preparing for and Managing Stress
Before the stressful event:
- Practice and prepare. The more familiar you are with a skill, the less stressful it feels. Rehearse presentations. Practice knots before climbing. Take a swim test at your pool first.
- Learn about it. Fear of the unknown is a powerful stressor. Learn what to expect — watch videos, talk to people who have done it, ask questions.
- Visualize success. Athletes use visualization to perform under pressure. Picture yourself succeeding.
- Talk about it. Tell a friend, parent, or leader that you are nervous. Just saying it out loud reduces its power.
During the stressful event:
- Breathe. Slow, deep breaths (4 seconds in, hold 4, out 4) activate the calming part of your nervous system. This is one of the most effective stress management techniques that exists.
- Focus on one step at a time. Do not think about the whole rappel — just focus on the next foot placement.
- Use positive self-talk. “I can do this. I am prepared. I have done hard things before.”
- Accept imperfection. You do not have to be perfect. You just have to try.
After the stressful event:
- Reflect on what went well. Even if it was hard, you did it.
- Talk about it. Sharing the experience helps process the emotions.
- Rest. Stress is exhausting — your body and mind need recovery time.
Recognizing Danger to Self or Others
This section is serious. As a Scout, you spend time with peers in settings where adults may not always be present — hiking, camping, late-night conversations in tents. You may be the first person to notice that someone is in crisis.
Warning Signs That Someone May Be a Danger to Themselves
- Talking about wanting to die or wanting to kill themselves
- Talking about feeling hopeless, having no reason to live, or being a burden to others
- Withdrawing from friends, family, and activities they used to enjoy
- Giving away possessions — especially meaningful items
- Sudden calmness after a period of depression (may indicate they have made a decision)
- Increased use of alcohol or drugs
- Reckless or self-destructive behavior — taking unusual risks
- Changes in eating or sleeping — too much or too little
- Expressing rage, anger, or desire for revenge
- Researching methods of self-harm
Warning Signs That Someone May Be a Danger to Others
- Threats of violence — spoken, written, or posted online
- Fascination with weapons or past acts of violence
- Expressing a desire to hurt specific people
- History of bullying, cruelty to animals, or violent behavior
- Extreme anger that seems out of proportion
- Plans or preparations for a violent act
What to Do
If You Suspect Someone Is a Danger to Themselves
- Take it seriously. Never dismiss or minimize what someone tells you.
- Listen without judgment. You do not need to fix the problem — just be present. Say things like, “I hear you. I’m glad you told me.”
- Ask directly. It is okay to ask, “Are you thinking about hurting yourself?” Research shows this question does not increase risk — it opens the door to help.
- Do not promise to keep it a secret. Say, “I care about you too much to keep this to myself. We need to get you help.”
- Tell a trusted adult immediately — a parent, Scout leader, teacher, school counselor, or religious leader.
- Call or text 988 (the Suicide and Crisis Lifeline) if you are unsure what to do or if the person is in immediate danger.
- Stay with the person until help arrives. Do not leave them alone.
If You Suspect Someone Is a Danger to Others
- Do not confront them. Your safety is the priority.
- Tell a trusted adult immediately.
- If the threat is imminent, call 911.
- Remove yourself and others from the situation if possible.
- Document what you saw or heard — specific words, dates, and context. This helps adults and authorities assess the situation.
Req 13 — Miscellaneous Conditions
These are a mix of common problems and true emergencies. Know when simple care is enough and when to get help fast.
Object in the eye
- Signs: pain, tearing, redness, blinking, feeling like something is stuck.
- First aid: do not rub; try flushing gently with clean water.
- Prevention: wear eye protection during dusty or sharp-work activities.
Dental injury
- Signs: pain, bleeding, loose tooth, broken tooth, or a tooth knocked out.
- First aid: control bleeding, use a cold pack, and see a dentist quickly.
- Prevention: mouth guards and caution during sports and rough play.
Food poisoning
- Signs: nausea, vomiting, diarrhea, cramps, weakness.
- First aid: rest and take small sips of fluid.
- Prevention: clean hands, safe cooking, and proper food storage.
Abdominal pain
- Signs: stomach pain, guarding, worsening pain, or pain with fever or vomiting.
- First aid: rest, do not give food if the cause is unclear, and watch closely.
- Prevention: safe food, hydration, and paying attention to worsening symptoms.
Stroke
- Signs: use BE FAST — balance, eyes, face, arm, speech, time.
- First aid: call 911 immediately, note when symptoms started, and do not give food or drink.
- Prevention: healthy habits and taking stroke warning signs seriously.
Req 14 — Teaching First Aid
Teaching is one of the most powerful ways to solidify your own knowledge. When you teach a first aid skill, you do not just pass on information — you deepen your own understanding and give others the ability to help in an emergency. This requirement asks you to plan and deliver a first aid lesson using the EDGE method.
The EDGE Method
EDGE is Scouting’s teaching framework. It stands for:
Explain
Tell your learners what the skill is and why it matters. Give them context before diving into the how-to.
- “Today I’m going to teach you how to apply a tourniquet. This skill can stop life-threatening bleeding in seconds. Here’s why it’s important…”
Demonstrate
Show the skill step by step while narrating what you are doing. Go slowly. Your learners should be watching, not doing — yet.
- “Watch me. First, I place the tourniquet high on the limb, above the wound…”
Guide
Now let them try it while you watch and coach. Give feedback in real time. Correct mistakes gently and encourage progress.
- “Great, now you try it. Remember — high and tight. Good. Now twist the windlass… that’s it. One more turn.”
Enable
Step back and let them practice independently. Check in, answer questions, but let them build confidence by doing it on their own.
- “Now do it again on your own, start to finish. I’ll be right here if you need me.”
Choosing Your Topic
Pick a skill that is:
- Practical and demonstrable — you can actually show the steps, not just talk about them
- Appropriate for your audience — match the complexity to who you are teaching
- Something you know well — you should be able to teach it confidently
Good First Aid Topics for EDGE Teaching
Topic Ideas
Skills that work well for EDGE teaching- CPR (Hands-Only): High impact, easy to practice with demonstrations
- Tourniquet application: Timely, life-saving, straightforward steps
- Arm sling: Hands-on bandaging skill with clear steps
- Choking response (Heimlich maneuver): Practical and universally useful
- Wound cleaning and bandaging: Basic skill everyone should know
- Splinting a forearm: Uses improvised materials — engaging for Scouts
- Recovery position: Quick to learn, critical for unconscious victims
- Tick removal: Especially relevant for outdoor Scouts
- Blister prevention and treatment: Practical trail skill
- Treating for shock: Important and often misunderstood
Planning Your Lesson
Before you teach, plan your lesson. Here is a framework:
Lesson Plan Template
- Topic: What skill are you teaching?
- Audience: Who are you teaching? (Family members, younger Scouts, patrol members)
- Objective: What should learners be able to do after the lesson?
- Materials needed: What supplies do you need? (Bandages, splints, mannequin, etc.)
- EDGE steps:
- Explain (2–3 minutes): What is this skill? Why does it matter? When would you use it?
- Demonstrate (3–5 minutes): Show the complete skill step by step.
- Guide (5–10 minutes): Have each learner practice while you coach.
- Enable (5 minutes): Let learners practice independently. Assess their competence.
- Assessment: How will you know they learned the skill? (Can they demonstrate it correctly without prompts?)
Tips for Teaching Well
- Keep it short. A 15–20 minute focused lesson is better than a 45-minute lecture.
- Use real scenarios. “Imagine you’re hiking and your buddy trips and sprains their ankle. What do you do?”
- Let them practice. Hands-on time is where learning actually happens.
- Give constructive feedback. Be specific: “Try placing your hands a little higher on the chest” rather than “You’re doing it wrong.”
- Be patient. Not everyone learns at the same speed.
- Make it fun. Use a scenario, create a mini-competition, or set up a realistic practice station.
After You Teach
Discuss the experience with your counselor:
- What topic did you choose and why?
- How did the EDGE method work for you?
- What went well?
- What would you do differently next time?
- Did your learners achieve the objective?
Req 15 — EMS Careers
This is a choose-one requirement. Pick the option that interests you most — each one is a valid path to completing this requirement. This page provides guidance and resources for all four options.
Option A: Visit a Station House or Training Center
This option gives you a first-hand look at how EMS professionals work. Contact your local fire department, ambulance service, or hospital to arrange a visit.
Planning Your Visit
Visit Preparation
Steps to arrange a successful visit- Contact the station: Call the non-emergency number for your local fire department or EMS agency and ask about ride-alongs, tours, or career day events.
- Ask your counselor: They may have contacts in the local EMS community.
- Prepare questions: Write down 5–10 questions before you go (see suggestions below).
- Bring a notebook: Take notes during the visit so you can discuss your experience with your counselor later.
- Dress appropriately: Clean, neat clothing. Closed-toe shoes are usually required in station houses.
Questions to Ask
- What does a typical shift look like?
- What is the most common type of call you respond to?
- What training and certifications are required?
- What is the most rewarding part of the job?
- What is the most challenging part?
- How do you take care of your own mental health after difficult calls?
- What advice would you give to a young person interested in EMS?
Option B: Interview an EMS Professional
If a visit is not possible, you can interview an EMS professional in person, over the phone, or via video call.
Finding Someone to Interview
- Your local fire department
- Hospital emergency department staff (nurses, doctors, EMTs)
- Event medical teams at Scout camps or sporting events
- Community volunteer ambulance companies
- Your family doctor or pediatrician (ask about their emergency medicine experience)
- Search and rescue team members
Interview Tips
- Introduce yourself and explain that you are working on the First Aid merit badge.
- Be respectful of their time — aim for 15–20 minutes.
- Listen more than you talk.
- Take notes or (with permission) record the conversation.
- Follow up with a thank-you note or email.
Option C: Research EMS Careers
Emergency medical services offer a range of career paths — from entry-level to advanced specializations. Here are some careers to consider:
EMS Career Overview
| Career | Training | Typical Salary Range | Description |
|---|---|---|---|
| Emergency Medical Responder (EMR) | 40–60 hours | Volunteer or $25,000–$35,000 | Basic emergency care. Many volunteer fire departments. |
| Emergency Medical Technician (EMT) | 120–150 hours | $30,000–$45,000 | Ambulance care, vital signs, basic life support. Most common entry point. |
| Advanced EMT (AEMT) | 150–300 additional hours | $35,000–$50,000 | Can start IVs, give some medications. Bridge between EMT and Paramedic. |
| Paramedic | 1,200–1,800 hours (often an associate degree) | $40,000–$65,000 | Advanced life support, cardiac monitoring, medications, intubation. |
| Flight Paramedic / Critical Care | Paramedic + 1–2 years experience + specialty training | $55,000–$85,000 | Helicopter and fixed-wing medical transport. Critically ill patients. |
| Registered Nurse (RN) — Emergency | BSN degree (4 years) | $60,000–$100,000+ | Emergency department nursing. Combines nursing skills with emergency medicine. |
| Physician Assistant (PA) — Emergency | Master’s degree (6–7 years total) | $100,000–$140,000 | Diagnoses, prescribes, and treats patients in the ED. |
| Emergency Physician (MD/DO) | Medical school + residency (11–15 years total) | $250,000–$400,000+ | Board-certified emergency medicine doctor. Leads the ED team. |
Where EMS Professionals Work
EMS careers are not limited to ambulances. Professionals with emergency medical training work in:
- Fire departments and ambulance services
- Hospital emergency departments
- Helicopter air ambulance programs
- Wilderness search and rescue teams
- Sports medicine and event medical teams
- Industrial and corporate safety
- Military and law enforcement tactical medicine
- Disaster relief organizations (FEMA, Red Cross)
- Theme parks, cruise ships, and outdoor adventure companies
Option D: Personal Hobby or Healthy Lifestyle
First aid skills enhance many personal interests and activities. Here are some ideas:
Outdoor adventure: Wilderness first aid certification (WFR or WFA) makes you a safer hiker, climber, paddler, and camper. Organizations like NOLS and SOLO offer courses.
Community service: Become a certified first aid or CPR instructor through the Red Cross or American Heart Association and teach in your community.
Volunteer emergency services: Many communities have volunteer fire departments, ambulance corps, or search and rescue teams that accept members starting at age 14–16.
Event medical support: Provide medical standby at Scout events, sporting events, or community festivals.
Fitness and health: Understanding the body’s response to exertion, heat, cold, and injury makes you a smarter athlete and helps you train more safely.
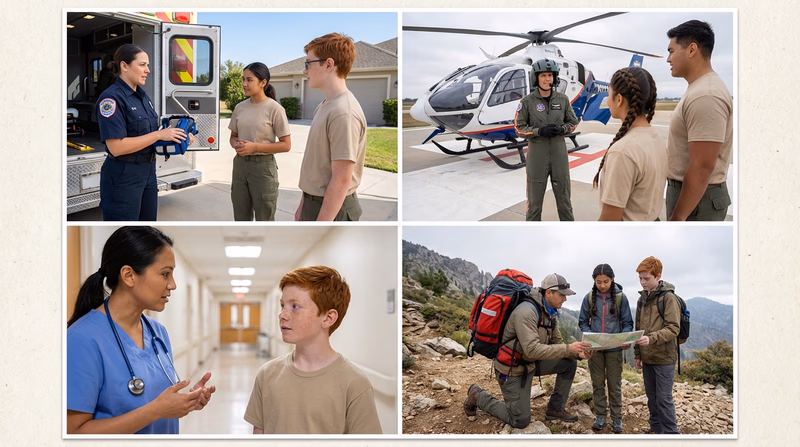
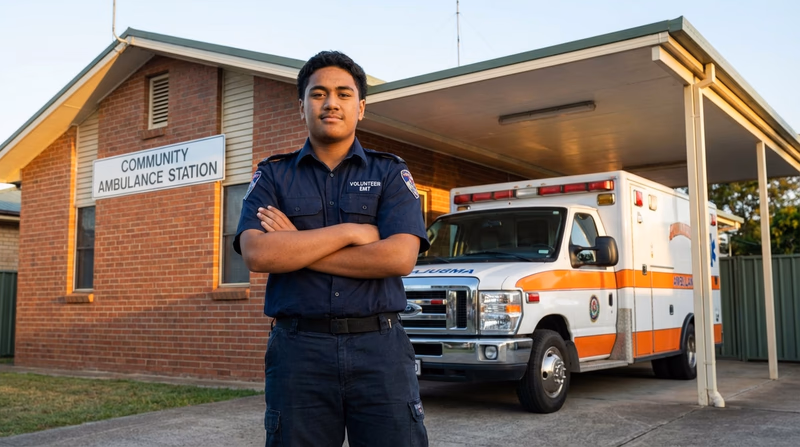
Extended Learning
A. Congratulations!
You have worked through one of the most comprehensive merit badges in the Scouting program. The skills you have learned — from assessing an emergency scene to performing CPR to recognizing a stroke — are not just requirements on a checklist. They are genuine, life-saving capabilities that set you apart. Let’s explore some ways to take your first aid knowledge even further.
B. Building a Home Emergency Plan
First aid skills are most powerful when they are part of a broader emergency preparedness strategy. Creating a family emergency plan means you are ready not just for a scraped knee at camp, but for the unexpected events that can affect your home and community.
Start by identifying the emergencies most likely in your area — severe storms, earthquakes, floods, wildfires, or power outages. Then build a plan around three pillars: communication, supplies, and practice.
A communication plan means everyone in your family knows who to call, where to meet, and how to get in touch if cell phone networks are down. Choose two meeting points — one near your home (like a neighbor’s mailbox) and one outside your neighborhood (like a library or community center).
Stock a home emergency kit with 72 hours of water (one gallon per person per day), non-perishable food, flashlights, a battery-powered radio, extra medications, copies of important documents, and — of course — a well-stocked first-aid kit. Store it in a place the whole family can access quickly.
Finally, practice. Run a family fire drill. Walk through what you would do during a severe weather warning. Quiz each other on where the emergency kit is kept and how to turn off the water and gas. Plans that never get practiced are just good intentions on paper.
C. Advanced Certifications: What Comes Next
The First Aid merit badge gives you a strong foundation, but there are certifications that take your skills to the next level — and some of them are available to you right now.
CPR/AED Certification through the American Heart Association or American Red Cross is the most common next step. Many courses are available for teens and take just a few hours. Certification typically lasts two years and is required for many jobs, including lifeguarding and coaching.
Wilderness First Aid (WFA) is a 16-hour course designed for people who lead trips in remote settings. It teaches you how to handle emergencies when professional help is hours or even days away — how to improvise splints, manage evacuations, and make tough decisions with limited resources. The Wilderness Medical Society, NOLS, and SOLO all offer WFA courses, and many accept students 16 and older.
Wilderness First Responder (WFR) is the gold standard for outdoor professionals — an 80-hour intensive course covering advanced assessment, wound management, medications, and evacuation decision-making. Many summer camps, outdoor programs, and guiding companies require their leaders to hold a WFR certification.
EMT Certification is the entry point to a career in emergency medical services. EMT courses are typically 120–150 hours and include clinical rotations in emergency departments and ambulance ride-alongs. Some states allow certification starting at age 16, though most require 18.
D. Stop the Bleed: A Movement You Can Join
The Stop the Bleed campaign was launched in 2015 by the White House in response to the Sandy Hook tragedy. Its mission is simple: train as many people as possible to control life-threatening bleeding before professional help arrives. Just as CPR training transformed cardiac arrest survival rates over the past 50 years, Stop the Bleed aims to do the same for hemorrhaging.
The training covers three key skills: applying direct pressure, packing a wound, and using a tourniquet — all skills you practiced in this badge. What makes Stop the Bleed unique is its focus on making these skills available to everyone, everywhere. Bleeding control kits are now being installed alongside AEDs in schools, airports, sports stadiums, and houses of worship across the country.
You can take a free Stop the Bleed class in your community, often hosted by hospitals, fire departments, and trauma centers. Better yet, once you are trained, you can help teach others — bringing the skills back to your troop, school, or faith community. Many Scouts have used Stop the Bleed as the foundation for Eagle Scout service projects, installing bleeding control kits in public buildings and training community members to use them.
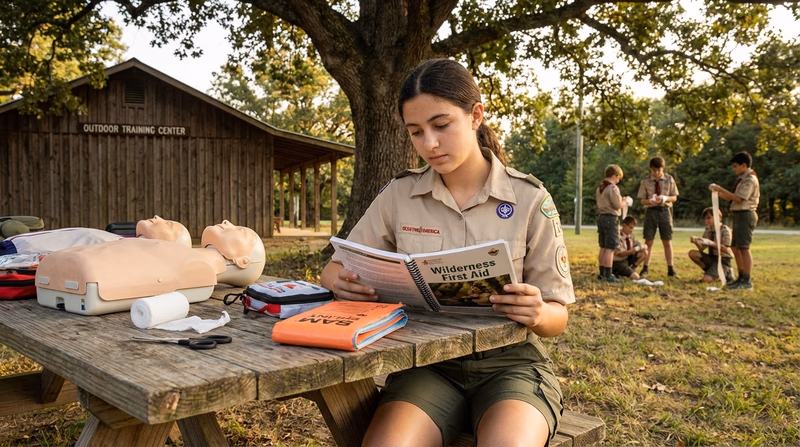
E. Real-World Experiences
Stop the Bleed Course
American Red Cross Volunteer
CERT Training (Community Emergency Response Team)
Hospital or EMS Ride-Along
Lifeguard Certification
F. Organizations
The nation’s premier first aid, CPR, and disaster response organization. Offers free and low-cost training, volunteer opportunities, and resources for communities and individuals.
Organization: American Red Cross — https://www.redcross.org/
The leading authority on CPR and cardiovascular emergency care. Provides CPR/AED certification courses, Heartsaver programs, and community training resources.
Organization: American Heart Association — https://www.heart.org/
America’s leading nonprofit safety advocate. Offers first aid training, workplace safety programs, and defensive driving courses. Publishes the annual Injury Facts report.
Organization: National Safety Council — https://www.nsc.org/
A national awareness campaign and training program to empower bystanders to help in bleeding emergencies. Offers free courses and instructor training.
Organization: Stop the Bleed — https://www.stopthebleed.org/
The professional organization representing EMTs and paramedics. Offers advanced training courses, advocacy, and career resources.
Organization: National Association of Emergency Medical Technicians (NAEMT) — https://www.naemt.org/
The leading medical organization focused on wilderness and environmental medicine. Publishes clinical practice guidelines and offers educational programs.
Organization: Wilderness Medical Society — https://wms.org/