First Aid Merit Badge — Complete Digital Resource Guide
https://merit-badge.university/merit-badges/first-aid/guide/
Introduction & Overview
Overview
Every year, thousands of lives are saved — not by paramedics, not by surgeons, but by ordinary people who knew what to do in the first few minutes of an emergency. First Aid teaches you to be that person. Whether you’re on a trail three miles from the nearest road or standing in your own backyard, the skills you’ll learn in this badge could mean the difference between a close call and a tragedy.
First Aid is one of the oldest and most respected merit badges in Scouting. It covers an extraordinary range of skills: from recognizing when someone has gone into shock to performing hands-only CPR, from pulling a fishhook out of a finger to managing a suspected spinal injury. When you earn this badge, you don’t just add it to your sash — you carry it everywhere you go.
Then and Now
Then
The roots of organized first aid trace back to the battlefield. In the 1860s, Swiss businessman Henry Dunant watched thousands of wounded soldiers die at the Battle of Solferino — not from their injuries, but from lack of basic care. His outrage inspired the founding of the International Red Cross in 1863 and the push to codify first aid training for ordinary citizens.
In the early 1900s, the St. John Ambulance Brigade and the American Red Cross began teaching first aid systematically — using techniques like direct pressure, improvised splints, and artificial respiration that would have seemed revolutionary just decades earlier. When Scouting was founded in 1910, first aid was built in from the start. Baden-Powell understood that a Scout prepared to help others was worth ten times a Scout who could only look after themselves.
For most of the 20th century, standard first aid relied on techniques like the Holger Nielsen method of artificial respiration (which had Scouts pressing on a victim’s back), and tourniquets were so feared as limb-threatening that they were nearly banned from the first aid kit. A lot has changed.
Now
Modern first aid is built on evidence, not tradition. We now know that hands-only CPR (no mouth-to-mouth required) is highly effective for cardiac arrest. Tourniquets — once shunned — are now recognized as life-saving tools in cases of severe limb bleeding. Automated External Defibrillators (AEDs) can be used by anyone with two minutes of training. Naloxone, a medication that reverses opioid overdoses, is now available without a prescription in most states.
Emergency communication has transformed too. Where Scouts once had to hike out to find help, today’s wilderness travelers can use personal locator beacons (PLBs) and satellite messengers to summon help from almost anywhere on Earth. The skills remain essential — technology doesn’t replace knowing how to stop bleeding or manage shock — but the tools available to rescuers have never been more powerful.
Get Ready!
First Aid is a badge where you’ll use your hands as much as your head. You’ll practice on training mannequins, build a kit from scratch, bandage imaginary injuries on your friends, and run through scenarios that push you to think clearly under pressure. The counselor conversations will challenge you to explain not just what to do, but why it works. Come ready to engage — and ready to get a little hands-on.
Kinds of First Aid
Immediate Life-Saving Care
Some emergencies can’t wait even 10 minutes for professional help. Cardiac arrest, severe bleeding, and airway obstruction can cause irreversible harm in minutes. Immediate life-saving care — including CPR, bleeding control, and clearing an airway — is the most time-critical part of first aid. This guide dedicates multiple requirements to these skills precisely because speed matters.
Wound and Injury Management
Most first aid calls aren’t life-or-death. They’re twisted ankles, splinters, bee stings, and blisters — the kind of minor injuries that happen at every campout. Managing these injuries well keeps small problems from becoming big ones. A blister treated promptly stays a blister; ignored for two more days on a long trek, it becomes an infection that ends the hike.
Environmental Emergency Response
Scouts spend a lot of time outdoors, and the outdoors has its own menu of hazards: heat exhaustion, hypothermia, dehydration, sunburn, and venomous critters. Environmental emergency response means recognizing when the environment itself is hurting someone and knowing how to interrupt that process before it goes too far.
Mental Health First Aid
A Scout who panics during a rappel, freezes before a swim test, or spirals into anxiety during a high-pressure situation is in distress — just not the kind that shows up on an x-ray. Requirement 12 asks you to understand how stress and anxiety affect people, and what you can do to help. Mental health first aid is increasingly recognized as a critical skill, and you’ll find it woven throughout Scouting’s broader wellness mission.
Patient Assessment and Transport
Knowing what to do is only half of first aid. The other half is figuring out what’s wrong in the first place and — when needed — moving the patient safely to where more help is available. Patient assessment, including the head-to-toe exam, and patient transport are skills that tie the entire badge together.
Ready to start building the skills that could save a life? Your first stop is learning how to assess any emergency — and how to stay calm while you do it.
Req 1 — Handling an Emergency
A campsite accident. A car crash on the side of the road. A teammate who suddenly collapses. In any emergency, the first 60 seconds set the tone for everything that follows. Requirement 1 builds your foundational response — the mental model you’ll fall back on no matter what kind of emergency you’re facing. This page covers all seven sub-requirements in order:
- 1a — Assessing and handling any emergency (the 3 C’s)
- 1b — Calling for help, from home and from the wilderness
- 1c — Protecting yourself from infection while providing care
- 1d — Evaluating a patient’s airway and breathing
- 1e — Conducting a thorough head-to-toe victim examination
- 1f — Understanding shock as a medical emergency
- 1g — Triage when multiple people are injured
Requirement 1a: Assess and Handle Any Emergency
The first question every rescuer asks is not “What’s wrong?” — it’s “Is this scene safe?” Rushing to help someone who’s been electrocuted, without checking for live wires, can turn a one-victim emergency into a two-victim emergency.
The American Red Cross distills emergency response into three steps: Check, Call, Care — sometimes called the 3 C’s.
Step 1: Check
Before touching anyone, survey the entire scene.
- Is the scene safe? Look for ongoing hazards: traffic, fire, unstable ground, downed power lines, aggressive animals, or a possible attacker.
- What happened? Understanding the mechanism of injury (a fall vs. a vehicle impact vs. a suspected overdose) tells you what injuries to expect.
- How many victims? A crash that looks like one casualty may reveal additional patients when you look carefully.
- Who can help? Scan for bystanders who can assist, call 911, or retrieve equipment.
If the scene is unsafe and you cannot make it safe, do not enter. Wait for trained responders. A dead hero helps no one.
Step 2: Call
Call 911 (or have someone else call) as soon as possible. Early activation of the emergency medical system (EMS) is one of the most life-saving actions a bystander can take — because advanced care can only arrive if someone requests it. If you are alone with an adult who has collapsed, call first, then begin care. With a child who has collapsed, start care first (CPR for 2 minutes), then call.
Step 3: Care
Now provide first aid appropriate to the situation. Stay with the victim until professional help arrives. Keep them calm and still. Monitor for changes in their condition.
The 3 C's of First Aid: Check, Call, Care The American Red Cross explains their universal approach to any emergency in plain language that's easy to remember under pressure. Link: The 3 C's of First Aid: Check, Call, Care — https://www.redcross.org/take-a-class/resources/articles/the-three-cs-of-first-aid-check-call-care🎬 Video: Check for Scene Safety — https://youtu.be/nrNAhMg-uS4?si=ylunwA5D8hAqAOcu
Requirement 1b: Getting Emergency Help
Calling for help sounds simple — until you’re the one who has to do it clearly and calmly while someone next to you is in crisis.
Calling 911 from Home
When you call 911, stay on the line. The dispatcher will ask you:
- What is the emergency? (Brief, clear description — “My dad is unconscious and not breathing.”)
- Where are you? (Street address, city, floor/unit if applicable — know this in advance.)
- Your name and callback number. (Don’t hang up until told to.)
The dispatcher can guide you through first aid instructions while help is on the way. Follow their directions — they do this all day, every day.
Calling for Help in the Wilderness
Remote wilderness emergencies require a different approach. Your cell phone may have no signal. The nearest road could be 10 miles away. Plan before you go:
- Tell someone your trip plan. A responsible person who isn’t on the trip should know your route, your campsite, and when to start worrying if you don’t check in.
- Personal Locator Beacons (PLBs) and satellite messengers (like Garmin inReach or SPOT) can transmit an SOS signal with GPS coordinates from almost anywhere on Earth. Consider carrying one on backcountry trips.
- Satellite phones allow two-way voice communication in areas without cell coverage.
- If you must send someone for help, send at least two people together. Give them a written note with the victim’s condition, location, and time of injury. Stay with the victim.
🎬 Video: What to Say When You Call 911 — https://youtu.be/spGJ9Ii5W3o
🎬 Video: What Happens When You Call 911 — https://youtu.be/J3efgWPPp4k
Requirement 1c: Infection Control
Blood and bodily fluids can carry pathogens — disease-causing organisms — including HIV, Hepatitis B, and Hepatitis C. Standard precautions means treating every patient’s blood as potentially infectious, every time, no exceptions.
What to Use
- Nitrile or latex gloves — Don a pair before touching any wound or bodily fluid. If none are available, use multiple layers of plastic bags, extra bandages, or have the victim apply pressure themselves.
- Eye protection — If there’s a risk of blood splashing (arterial bleeding, for example), protect your eyes.
- Masks — For rescue breathing, use a CPR face mask or face shield; avoid direct mouth-to-mouth whenever possible.
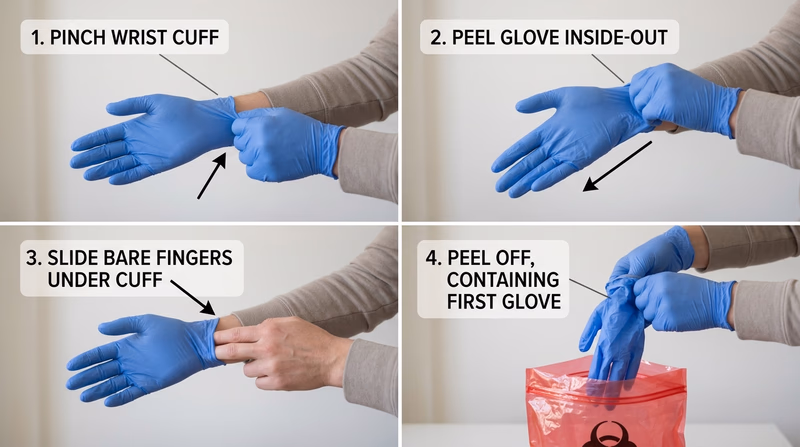
Putting On and Taking Off Gloves
Putting on gloves is easy. Taking them off safely is a skill:
- With your dominant hand, pinch the outside of the non-dominant glove near the wrist.
- Peel the glove off inside-out, holding it in your gloved hand.
- Slide two fingers inside the remaining glove at the wrist.
- Peel it off inside-out, enclosing the first glove inside it.
- Dispose of both gloves in a sealed bag or trash container.
Never touch your face or any clean surface with used gloves.
After Care
- Wash your hands thoroughly with soap and water for at least 20 seconds immediately after removing gloves.
- Dispose of used gloves, bandages, and any blood-soaked materials in a sealed bag. Treat them as biohazardous waste.
- If you are exposed to blood or bodily fluids on broken skin, mucous membranes, or eyes, seek medical attention and report the exposure.
🎬 Video: Standard Precautions — https://youtu.be/rdKWvw8CZLg
🎬 Video: How to Remove Disposable Gloves — https://youtu.be/kesQF_G3pQ8?si=89uHvaZRRuoy3mBu
🎬 Video: Using Personal Protective Equipment in First Aid — https://youtu.be/tpovFysp4IE
Requirement 1d: Airway and Breathing
The brain begins to die within 4–6 minutes without oxygen. An obstructed airway or stopped breathing is an immediate life threat. Your job is to open the airway and verify that the patient is actually breathing.
Opening the Airway
For an unconscious patient with no suspected spinal injury:
- Head-tilt, chin-lift: Place one hand on the forehead and gently tilt the head back. Use two fingers under the chin to lift it forward. This moves the tongue off the back of the throat.
For a patient with a suspected neck injury:
- Jaw thrust: Kneel at the head, place your fingers behind the angles of the jaw, and push the jaw forward without tilting the head. This opens the airway without moving the cervical spine.
Look, Listen, Feel
After opening the airway, spend no more than 10 seconds checking for breathing:
- Look for chest rise and fall.
- Listen for the sound of breath.
- Feel for airflow on your cheek.
Normal breathing is quiet, regular (12–20 breaths per minute), and effortless. Abnormal signs include:
- No breathing — begin CPR immediately.
- Gasping (agonal breathing) — occasional gasps are a sign of cardiac arrest, not adequate breathing. Begin CPR.
- Labored breathing — visible effort, nasal flaring, or the use of neck muscles to breathe. This person needs emergency care.
- Noisy breathing — gurgling suggests fluid in the airway; stridor (high-pitched crowing) suggests a partial obstruction above the vocal cords.
🎬 Video: Head Tilt, Chin Lift, Jaw Thrust — https://youtu.be/7NNe_Qje3yg?si=2hoWHZGQutU5Q2GD
🎬 Video: Look, Listen, Feel — https://youtu.be/hk1_Bcp3Gc0?si=V1kVr9paHb3O8jDJ
Requirement 1e: Head-to-Toe Examination
A conscious patient can usually tell you what hurts. An unconscious or confused patient cannot — so you systematically examine the entire body, looking for injuries that may not be obvious.
The SAMPLE History (for conscious patients)
Before the physical exam, gather a quick history:
- Signs and Symptoms — what’s bothering them right now?
- Allergies — to medications, foods, or anything else?
- Medications — what are they taking?
- Past medical history — any relevant conditions?
- Last oral intake — when did they last eat or drink?
- Events leading up to this — what happened?
The Head-to-Toe Physical Exam
Work systematically from head to toe, looking, feeling, and comparing left to right:
- Head and skull — feel for deformities, swelling, or bleeding; check the scalp.
- Eyes — are the pupils equal, round, and responsive to light?
- Nose and ears — is there blood or clear fluid (possible sign of skull fracture)?
- Mouth — are the airway and teeth intact? Any foreign material?
- Neck — feel for tenderness along the spine; look for medical alert jewelry.
- Chest — look for equal rise on both sides; feel for crepitus (crunching sensation indicating possible rib fracture); listen if possible.
- Abdomen — gently palpate all four quadrants for tenderness, rigidity, or guarding.
- Pelvis — gentle compression to check stability.
- Legs — compare both for deformity, swelling, or tenderness.
- Arms — same as legs; check grip strength if the patient can squeeze.
- Back — log-roll if spinal injury is not suspected; palpate the spine.
Head-to-Toe Exam Checkpoints
Use this as a mental checklist during your assessment- Head: Deformity, swelling, or blood
- Eyes: PEARL — pupils equal and reactive to light
- Ears/Nose: Blood or clear fluid leaking
- Neck: Midline tenderness, medical alert jewelry
- Chest: Symmetric rise, tenderness, crepitus
- Abdomen: Tenderness, guarding, rigidity
- Pelvis: Stability
- Extremities: Deformity, pulse, sensation, movement
- Back: Spinal tenderness (if no suspected spinal injury)
🎬 Video: Head to Toe Exam — https://youtu.be/7xANZ0IjgEs?si=qAupHu1rGfl0bqas
Requirement 1f: Shock
“Shock” in everyday conversation means being startled or upset. In medicine, shock is something far more dangerous: the body’s circulation is failing to deliver enough oxygen to the tissues. Left untreated, shock kills.
Why Shock Happens
Circulation depends on three things: a pump (the heart), pipes (the blood vessels), and fluid (the blood). Shock occurs when any of these fail:
- Hypovolemic shock — not enough fluid in the system, usually from blood loss or severe dehydration.
- Cardiogenic shock — the pump fails (heart attack, for example).
- Distributive shock — the blood vessels dilate uncontrollably, so blood pressure drops (anaphylaxis, sepsis, spinal injury).
- Obstructive shock — something blocks the flow (like a tension pneumothorax or a pulmonary embolism).
Signs and Symptoms
A patient going into shock may show:
- Pale, cool, clammy skin (blood is shunting away from the skin to protect vital organs)
- Rapid, weak pulse
- Rapid, shallow breathing
- Confusion, restlessness, or anxiety
- Nausea or vomiting
- Extreme thirst
- Weakness, dizziness, or fainting
Early shock is hard to recognize. Late shock is a medical emergency with a high mortality rate. Whenever you suspect shock, act quickly.
First Aid for Shock
- Control the cause if possible — stop bleeding, treat anaphylaxis with epinephrine.
- Lay the patient flat. (Unless there’s a head injury or difficulty breathing.)
- Raise the legs 6–12 inches if there’s no suspected spinal injury and no fractures. This shifts blood toward the core.
- Keep them warm. Shock patients lose body heat quickly.
- Do not give anything by mouth. A patient in shock may need surgery.
- Call 911 and monitor continuously until help arrives.
🎬 Video: Recognizing Shock — https://youtu.be/4-cPuXaZACg
🎬 Video: Shock From Bleeding — https://youtu.be/He1RQ9STCHc
🎬 Video: Shock and Bleeding — https://youtu.be/V4R9GSah93g
Requirement 1g: Triage
Triage (from the French word meaning “to sort”) is the process of prioritizing patients when there are more victims than rescuers can immediately help. In a single-victim emergency, you give that person everything you have. In a multi-victim emergency, you have to make rapid decisions about who needs care first.
The Basic Triage Principle
You do the greatest good for the greatest number. That sometimes means passing by someone with a critical injury to treat someone whose injury is survivable with quick intervention — because the critical patient would consume all your resources and others would die waiting.
Formal triage systems (like START — Simple Triage and Rapid Treatment) categorize victims into four groups:
| Color | Priority | Meaning |
|---|---|---|
| Red | Immediate | Life-threatening, but survivable with prompt care |
| Yellow | Delayed | Serious, but stable for a short time |
| Green | Minor | “Walking wounded” — can wait |
| Black | Expectant | Not breathing, or injuries too severe to survive |
Scout-Level Triage Scenarios
You probably won’t manage a mass casualty incident. But multi-victim situations happen at every level:
- A canoe tips and two Scouts are in the water — one is swimming, one is face down. Who do you go to first?
- Your troop is hiking and a tree falls, injuring three people — one is screaming (conscious, probably less critical), one is silent (check immediately), one has a visible broken arm (painful but not life-threatening). Who do you assess first?
- At a campout, several Scouts get food poisoning. Most are sick but walking; one is unconscious. Triage is simple: unconscious first, others can wait.
The key skill isn’t memorizing a color code — it’s staying calm enough to look at the whole scene before committing to a single patient.
🎬 Video: Multiple Casualties in a Remote Location — https://youtu.be/_IdJD7UDN2w
🎬 Video: Triage — https://youtu.be/zeC2hFcziZI?si=YRyMCxm9qKxLbiZv
The skills on this page are the foundation everything else in First Aid builds on. Up next, you’ll prepare for emergencies before they happen — starting with health records and first aid kits.
Req 2a — Health Records
You can’t give good first aid to someone you know nothing about. A Scout with a penicillin allergy and a Scout without one need completely different treatment for the same wound. A Scout on blood thinners bleeds more. A Scout with epilepsy may have a seizure — and their leader needs to know that before it happens, not during.
The Scout Annual Health and Medical Record (often called the AHMR) is Scouting’s solution to this problem. Every Scout and adult leader participating in a Scouting event is supposed to have a current one on file.
What’s on the Form
The AHMR is divided into three parts:
Part A — Annual Health and Medical Record: Completed by every participant for all Scouting events. Covers emergency contacts, allergies, current medications, immunization dates, and health history. Parents/guardians complete this for Scouts under 18.
Part B — Pre-Participation Physical: A physician signature is required for events with an overnight stay or higher physical demands. The doctor reviews the Scout’s health history and confirms they’re fit to participate.
Part C — Extended Trip Examination: Required for high-adventure activities and camps longer than 72 hours. It’s a more thorough physical examination with additional sections for activities like swimming, climbing, and altitude trekking.
Why It Matters for First Aid
When you’re administering first aid at a Scouting event, you’re often dealing with someone you may not know well. The AHMR tells you:
- Allergies — including medication allergies (critical before giving anything like an antihistamine), food allergies (relevant to anaphylaxis), and environmental allergies (bee stings, latex in gloves).
- Current medications — some medications affect how the body responds to injury or illness. Blood thinners cause heavier bleeding; certain diabetes medications cause low blood sugar; some heart medications affect pulse rate.
- Immunizations — is the Scout current on tetanus? A puncture wound has different implications for a vaccinated vs. unvaccinated Scout.
- Health conditions — asthma, diabetes, epilepsy, heart conditions, and anxiety disorders all change how you respond to an emergency involving that person.
- Emergency contacts — who to call, in what order, with what phone numbers.
Discussing the Form with Your Counselor
Your counselor will want to discuss why each section of the AHMR matters. Think through concrete scenarios:
- What would happen if a Scout with a severe nut allergy ate something at a campout and nobody knew about the allergy?
- Why does it matter that a medication is listed even if the Scout is “just” on it for something minor?
- How does knowing a Scout’s tetanus vaccination date change your first aid for a nail puncture wound?
Come to this discussion ready to talk through real examples, not just recite the sections of the form.
Scout Annual Health and Medical Record Scouting America's official page for downloading the current AHMR form and understanding which parts apply to different types of events. Link: Scout Annual Health and Medical Record — https://www.scouting.org/health-and-safety/safety-moments/annual-health-and-medical-record/Next up: you’ll build the first aid kit that will sit in your pack for every hike and backpacking trip you take.
Req 2b — First Aid Kits
This requirement has two parts: building your own personal first aid kit for hiking and backpacking, and then inspecting a larger shared kit (your unit’s, a vehicle kit, or a home kit) with your counselor.
Requirement 2b1: Build a Personal Hiking First Aid Kit
A personal hiking first aid kit is small, light, and built for the specific hazards of outdoor activity: blisters, cuts, sprains, insect stings, and the occasional more serious injury. Think of it as the kit that’s always with you, even when you’re far from the troop’s gear bag.
Core Items for a Hiking Kit
Use the BSA’s official checklist as your starting point. Here are the categories to cover and why each matters:
Wound care:
- Assorted adhesive bandages (multiple sizes — a tiny bandage won’t cover a heel blister)
- Gauze pads (2" × 2" and 4" × 4") for larger wounds
- Medical tape (athletic or medical-grade — holds dressings and supports rolled ankles)
- Antiseptic wipes or solution (to clean wounds before dressing)
- Antibiotic ointment packets (single-use)
- Moleskin and a blister treatment (foam or gel pads)
Tools:
- Tweezers with sharp tips (for splinters, ticks, cactus spines)
- Small scissors (cutting tape, clothing around wounds)
- Safety pins (slings, securing bandages)
- Digital thermometer (know when a fever warrants evacuation)
Medications (confirm with parents/counselor before packing):
- Antihistamine (diphenhydramine) — for mild allergic reactions, insect bites
- Pain reliever (ibuprofen or acetaminophen) — injury management and fever
- Anti-diarrheal medication — stomach illness in the field
Protection:
- Nitrile gloves × 2 pairs (infection control — see Req 1c)
- CPR face shield (one-way valve for rescue breathing)
- Emergency mylar blanket (shock management, hypothermia prevention)
Documentation:
- A small card with emergency contacts, your blood type, and any known allergies
What “Demonstrate Proper Use” Means
Your counselor will ask you to show them each item and explain when and how you’d use it. This isn’t memorization — it’s practical. For example:
- Moleskin: Show how to cut a donut shape around a hot spot before it fully blisters, and how to apply it so it relieves pressure.
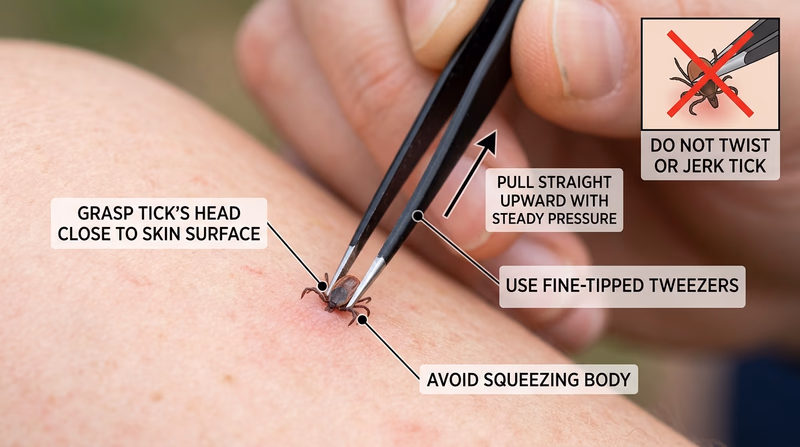
- Tweezers: Explain the correct angle for removing a tick (straight out, no twisting).
- Gloves: Demonstrate how to put them on and take them off without contaminating yourself.
- Gauze and tape: Show a basic wound dressing — gauze over the wound, taped down at all four edges.
Requirement 2b2: Inspect a Shared First Aid Kit
Larger shared first aid kits — the kind kept in a patrol box, the family medicine cabinet, or the glove compartment — are only useful if they’re well-stocked, organized, and current. This part of the requirement teaches you to evaluate a kit critically.
What to Look For During Your Inspection
Work through the kit systematically with your counselor and note:
- Completeness: Are all essential categories represented? Compare against the BSA checklist.
- Expiration dates: Medications and some supplies have expiration dates. Expired medications can be less effective or potentially harmful.
- Condition: Are sterile items still sealed? Are adhesive bandages dried out or wrinkled? Is tape dried and crumbling?
- Organization: Can you find what you need in an emergency without emptying the whole kit?
- Appropriateness for intended use: A vehicle kit should have supplies relevant to car accidents (e.g., a tourniquet). A camp kit should cover outdoor-specific injuries. A home kit should include temperature-taking tools and medications.
What to Discuss
After the inspection, your counselor will want to talk through:
- What’s missing and why it matters?
- What should be restocked?
- Are there items specific to the group’s needs (known allergies, regular medications for participants) that should be added?
- Who is responsible for maintaining this kit and checking it regularly?
Now that you’re prepared — health records in place, kit assembled — you’ll learn about the wide range of skin and environmental injuries you might encounter in the outdoors.
Req 3 — Wounds Without External Bleeding
This page is a quick field guide. For each injury, know what it looks like, the first thing to do, and how to avoid it.
Bruises and hematomas
- Signs: pain, swelling, discoloration, tenderness.
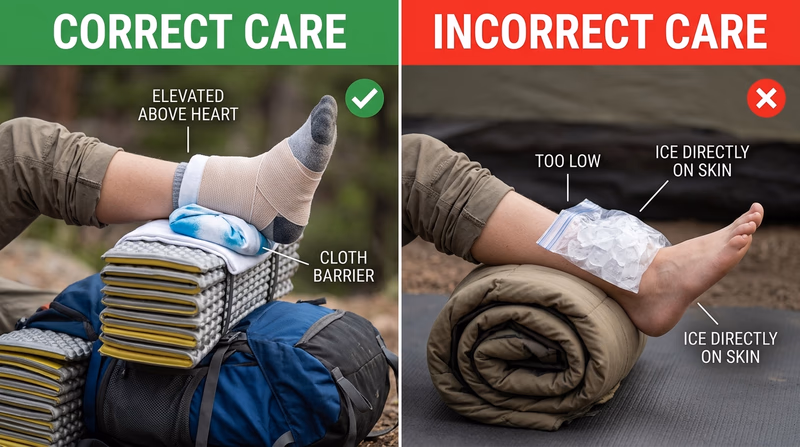
- First aid: rest, cold pack wrapped in cloth, elevate if possible.
- Prevention: wear protective gear and avoid unnecessary impacts.
Heat burns and scalds
- Signs: red or blistered skin; severe burns may look white, brown, black, or waxy.
- First aid: stop the burning, cool with cool water, cover loosely, do not pop blisters.
- Prevention: use caution around stoves, fires, and hot liquids.
Chemical burns
- Signs: pain, redness, blistering, burning after chemical contact.
- First aid: protect yourself, remove contaminated clothing, flush with water for at least 20 minutes.
- Prevention: read labels and wear gloves and eye protection.
Electrical burns
- Signs: small entrance wound, deeper internal injury, trouble breathing, irregular pulse.
- First aid: do not touch the person until the power source is off; call 911.
- Prevention: avoid damaged cords, wet hands, and downed lines.
Sunburn
- Signs: red, warm, painful skin; severe cases may blister.
- First aid: get out of the sun, cool the skin, drink water.
- Prevention: sunscreen, hat, sunglasses, and shade.
Snow blindness
- Signs: painful, red, watery eyes and light sensitivity after snow or glare exposure.
- First aid: move to shade, cover closed eyes with cool cloths, do not rub.
- Prevention: wear UV-blocking sunglasses or goggles.
Cold injuries
- Signs: numbness, pale or waxy skin, swelling, pain, or hard tissue.
- First aid: get out of the cold, remove wet clothing, warm gradually.
- Prevention: stay dry, layer clothing, and check exposed skin often.
Abrasions, chafing, and rope burns
- Signs: scraped or raw skin, burning pain, redness.
- First aid: clean gently, cover if needed, reduce friction.
- Prevention: proper clothing, gloves for rope work, and early attention to hot spots.
Blisters
- Signs: hot spot, tenderness, fluid-filled pocket.
- First aid: protect the area, pad around the blister, keep it clean.
- Prevention: break in gear, keep skin dry, stop early when rubbing starts.
Puncture wounds
- Signs: small entry wound with pain and infection risk.
- First aid: clean the wound, remove small splinters if easy, seek help for deep wounds or fish hooks.
- Prevention: gloves, footwear, and careful tool use.
Poisonous plant rash
- Signs: itchy red rash and blisters after plant contact.
- First aid: wash skin and clothing, use anti-itch treatment, avoid scratching.
- Prevention: learn the plants and cover exposed skin.
Bug bites
- Signs: itchy bumps; ticks may stay attached and can spread disease.
- First aid: wash the area; remove ticks with tweezers pulled straight out.
- Prevention: repellent, long clothing, and tick checks.
Bee stings
- Signs: sharp pain, redness, swelling.
- First aid: scrape out the stinger, wash, and use a cold pack.
- Prevention: avoid provoking bees and keep food covered.
Spider bites
- Signs: pain, redness, swelling; serious bites may cause muscle pain or worsening skin damage.
- First aid: wash, cool, and get medical help if serious symptoms appear.
- Prevention: shake out gear and use gloves in dark storage areas.
Scorpion stings
- Signs: intense pain, numbness, tingling.
- First aid: wash, use a cold pack, and seek medical advice.
- Prevention: shake out shoes and bedding, especially in desert areas.
Mammal or human bites
- Signs: broken skin, bleeding, swelling, infection risk.
- First aid: wash well, control bleeding, cover, and get medical care.
- Prevention: do not approach wild animals and use caution with pets.
Venomous snake bites
- Signs: puncture marks, severe pain, swelling, nausea, trouble breathing.
- First aid: move away, keep the person calm, and call 911.
- Prevention: watch where you step and reach, especially in snake country.
Req 4 — Bleeding Control
Uncontrolled bleeding is one of the most preventable causes of death in traumatic emergencies. In combat and civilian trauma, the simple skills you’ll learn in this requirement — direct pressure, wound packing, and proper tourniquet use — save lives every year. This requirement covers four scenarios:
- 4a — Nosebleed
- 4b — Minor open wounds (scrapes and shallow cuts)
- 4c — Severe open wound (deep cut on an arm or leg)
- 4d — Tourniquets — when to use them, benefits, dangers, and how to apply one
Requirement 4a: Nosebleed
What it is: Nosebleeds (epistaxis) are usually caused by dry air, allergies, trauma (a bump on the nose or nose-picking), or fragile blood vessels near the front of the nasal septum.
Signs and symptoms: Blood flowing from one or both nostrils; if the bleed is from the back of the nose (posterior — less common), blood may drain down the throat.
First aid:
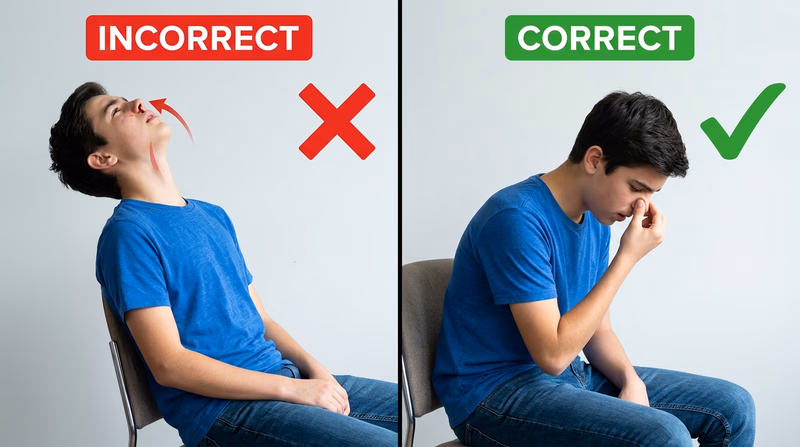
- Have the person sit upright and lean slightly forward. (Leaning back causes swallowing blood, which can cause nausea and vomiting.)
- Pinch the soft part of the nose firmly — just below the bony bridge — with thumb and forefinger.
- Breathe through the mouth.
- Hold continuous pressure for 10–15 minutes without releasing to check.
- Apply a cold compress to the bridge of the nose.
When to seek care:
- Bleeding doesn’t stop after 20–30 minutes of direct pressure
- Caused by a head injury
- The patient is on blood-thinning medication
- Accompanied by significant trauma to the face
- Blood is draining down the throat in large amounts (possible posterior bleed)
Prevention: Keep indoor air humidified; use saline nasal spray in dry climates; trim nails to discourage nose-picking; wear protective helmets in contact sports.
🎬 Video: Nosebleed — https://youtu.be/rF8aXjRFu_I
Requirement 4b: Minor Open Wounds
What it is: Minor bleeding wounds include abrasions (scrapes), shallow lacerations (cuts), and small punctures where the bleeding is controllable.
Signs and symptoms: Visible break in the skin; mild to moderate bleeding that oozes or flows steadily but can be controlled with pressure; pain and tenderness at the wound site.
First aid:
- Control bleeding: Apply direct pressure with a clean cloth or sterile gauze. Maintain pressure for 5–10 minutes.
- Clean the wound: Once bleeding is controlled, rinse thoroughly with clean water. Remove visible debris with tweezers if needed.
- Inspect: Check for deep tissue damage, embedded objects, or signs of contamination that warrant professional care.
- Apply antibiotic ointment to the wound surface.
- Bandage: Use an appropriately sized adhesive bandage or sterile dressing. Change daily and whenever it gets wet or dirty.
Prevention: Wearing appropriate protective gear (gloves for woodworking, kneepads for skating); situational awareness; keeping tools properly maintained and sharp (dull knives require more force and are more likely to slip).
Signs of infection to watch for over the next several days:
- Increasing redness, warmth, or swelling
- Pus or cloudy discharge
- Red streaks radiating from the wound
- Fever
🎬 Video: Care of Minor Wounds — https://youtu.be/7bTVimEqkKo?si=Qpro1vC8l4Z42Sx5
Requirement 4c: Severe Bleeding — Deep Cut on an Arm or Leg
A deep cut on an extremity — especially one that severs a major vein or artery — can cause life-threatening blood loss in minutes. This is when first aid becomes critical.
Signs of severe bleeding:
- Blood soaking through dressings rapidly
- Blood spurting in pulses (arterial bleeding)
- Large pooling of blood
- Signs of shock developing in the victim (pale, cool skin; rapid weak pulse; confusion)
First aid:
- Apply firm, direct pressure immediately with the cleanest material available. Do not remove dressings to check — if they soak through, add more on top.
- Maintain pressure — 10–15 minutes minimum without releasing.
- Wound packing: For deep wounds that don’t respond to surface pressure, pack gauze firmly into the wound cavity and apply pressure over the packed gauze. This technique stops bleeding from deeper vessels.
- Elevate the limb above heart level if no fracture is suspected.
- Call 911 for any bleeding that isn’t quickly controlled.
Hemostatic dressings: Modern first aid kits may include hemostatic agents (like QuikClot) — gauze or granules impregnated with a clotting agent. These are significantly more effective than standard gauze for severe limb bleeding and are now carried by trained wilderness first responders.
🎬 Video: Using Direct Pressure to Control Life-Threatening Bleeding — https://www.youtube.com/watch?v=YJB3fI3T1oo
Requirement 4d: Tourniquets
For decades, tourniquets were taught as a last resort, feared as limb-threatening devices that should be avoided at all costs. Military trauma experience in Iraq and Afghanistan completely changed this view. Properly applied, early tourniquets save lives. The fear of using them has killed people who could have been saved.
When to Use a Tourniquet
Use a tourniquet when:
- Severe bleeding from a limb cannot be controlled with direct pressure
- There is amputation or partial amputation of a limb
- The wound is in a location where direct pressure is impossible to maintain
- You are treating multiple casualties and cannot maintain pressure on all wounds
Do NOT use a tourniquet:
- As a first response before trying direct pressure (unless bleeding is catastrophically severe, like amputation)
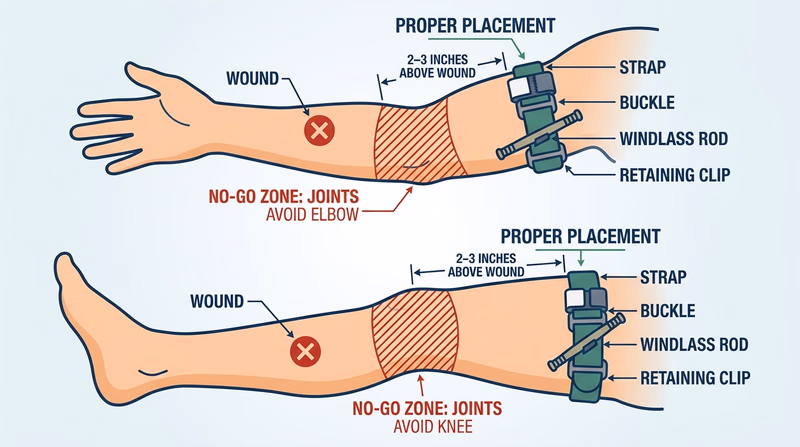
- On neck, chest, or abdominal wounds (only for extremities)
- Over a joint (knee or elbow)
Benefits
- Can stop life-threatening limb hemorrhage within seconds
- Frees up rescuers’ hands for other tasks
- Allows a solo responder to control multiple injuries
- Modern commercial tourniquets are reliable and self-applicable
Dangers
- Impairs blood flow to everything distal (below) the tourniquet — too long can cause tissue death
- Painful when properly tightened
- Can cause nerve damage if applied incorrectly
- However: The risk of death from uncontrolled bleeding significantly outweighs the risk of tourniquet complications when applied appropriately.
Note the Time
When applying a tourniquet, write the time of application on the patient’s skin or the tourniquet itself. Medical personnel need to know how long circulation has been cut off.
Demonstrating Application (Without Tightening)
Your counselor will have you demonstrate placing a commercial tourniquet (like a CAT tourniquet) on an extremity without actually tightening it to the point of stopping blood flow. Know the steps:
- Position 2–3 inches above the wound (proximal to the injury).
- Route the strap through the buckle and back through again.
- Pull the strap as tight as possible through the friction adapter.
- Twist the windlass rod until tightened enough (in a real scenario) to stop bleeding.
- Lock the rod in the clip.
- Note the time.
🎬 Video: How to Use a Tourniquet — https://youtu.be/k98ilfQmUWw?si=3e6zkvJz517hfiE5
🎬 Video: Tourniquet Mistakes — https://www.youtube.com/shorts/mZTgQikH1sQ
Bleeding is controlled. Now you’ll tackle emergencies that affect breathing — from choking to altitude sickness.
Req 5 — Choking, Asthma & Altitude
The airway is a short, narrow tube between the outside world and the lungs. It doesn’t take much to block it — a piece of food, a swollen airway, smoke inhalation, or altitude-induced fluid in the lungs can all cause the same terrifying result: the victim can’t breathe. This requirement covers five breathing emergencies:
- 5a — Choking
- 5b — Asthmatic attack
- 5c — Anaphylaxis
- 5d — Inhalation injuries
- 5e — Altitude sickness
Requirement 5a: Choking
What it is: Choking occurs when a foreign object (usually food) partially or completely blocks the upper airway, preventing adequate airflow.
Recognizing a Choking Victim
Mild choking (partial obstruction): The person can cough forcefully, speak, or cry. The airway is not completely blocked. Encourage them to keep coughing — this is the body’s best clearing mechanism. Do NOT interfere.
Severe choking (complete obstruction): The person cannot cough effectively, cannot speak, or can only produce a weak cough. May be grabbing their throat (the universal choking sign), turning blue around the lips (cyanosis), and showing panic. Cannot breathe.
First Aid for a Conscious Adult or Child (Over 1 Year)
- Ask: “Are you choking?” If they cannot answer, act.
- Give 5 firm back blows: Stand to the side, support the chest with one hand, and deliver 5 firm blows between the shoulder blades with the heel of your other hand.
- Give 5 abdominal thrusts (Heimlich maneuver): Stand behind the person, make a fist, place it above the navel and below the breastbone. Grab your fist with the other hand. Give 5 quick, inward-and-upward thrusts.
- Alternate 5 back blows and 5 abdominal thrusts until the object is expelled or the person becomes unconscious.
If the person becomes unconscious, lower them to the ground, call 911, and begin CPR. Look in the mouth before each breath — if you see the object, remove it.
Special Situations
- Pregnant or obese individual: Use chest thrusts instead of abdominal thrusts.
- Infant (under 1 year): Do NOT use abdominal thrusts. Use 5 back blows and 5 chest thrusts (two fingers on the center of the chest).
- Self-treatment: Thrust your own abdomen against the back of a chair or use your own hands for abdominal thrusts.
🎬 Video: Back Blows and Abdominal Thrusts for Choking — https://youtu.be/8R3RWC-xx1I
🎬 Video: First Aid for an Unresponsive Choking Adult — https://youtu.be/9pTnepZd5as
Requirement 5b: Asthmatic Attack
What it is: Asthma is a chronic condition in which the airways become inflamed and hypersensitive. During an attack, the airways narrow (bronchoconstriction) and produce excess mucus, making breathing difficult. Triggers include allergens, cold air, exercise, respiratory infections, and smoke.
Signs and symptoms:
- Wheezing (high-pitched whistling sound when breathing, especially on exhale)
- Shortness of breath
- Chest tightness
- Coughing — often worse at night or with exertion
- In severe attacks: inability to complete sentences, blue lips or fingertips, labored breathing using neck and chest muscles
First aid:
- Help the person use their prescribed rescue inhaler (bronchodilator) — usually albuterol (blue inhaler). This is a fast-acting medication that relaxes the airway muscles.
- Have them sit upright and lean forward slightly — this position opens the airways.
- Stay calm and reassuring — anxiety worsens bronchospasm.
- Remove the trigger if identifiable (move away from smoke, cold air, the allergen).
- If symptoms don’t improve within 15 minutes of using the inhaler, or if this is a severe attack from the start, call 911.
When to call 911: Blue lips or fingertips (cyanosis), no relief after rescue inhaler, too breathless to speak, silent chest (no wheeze — means no airflow at all).
Prevention for Scouts with asthma: Carry a rescue inhaler at all times; know your personal triggers; warm up gradually before exercise; keep an asthma action plan accessible to adults in the troop.
🎬 Video: What is Asthma? — https://youtu.be/batzSytA1Y0
🎬 Video: Using Albuterol for an Asthma Attack — https://youtu.be/VyqzylUADp0
🎬 Video: Pursed Lip Breathing for Asthma — https://youtu.be/wcKgqYXF2gA
Requirement 5c: Anaphylaxis
What it is: Anaphylaxis is a severe, whole-body allergic reaction that can kill within minutes. It occurs when the immune system overreacts catastrophically to an allergen — most commonly bee stings, peanuts, tree nuts, shellfish, fish, milk, eggs, or certain medications. The airway swells, blood pressure drops, and multiple body systems fail simultaneously.
Signs and symptoms (which may develop within seconds to minutes of exposure):
- Skin: Hives, flushing, itching — often appearing first
- Airway: Throat tightening, difficulty swallowing, hoarse voice, stridor
- Breathing: Wheezing, shortness of breath
- Circulation: Dizziness, rapid or weak pulse, pale or clammy skin, fainting
- GI: Nausea, vomiting, abdominal cramps
- Mental status: Anxiety, confusion, loss of consciousness
First Aid: Epinephrine First
Epinephrine (EpiPen) is the only effective treatment for anaphylaxis. Antihistamines, inhalers, and other medications are not fast enough — they do not reverse the life-threatening effects.
- Administer epinephrine auto-injector (EpiPen) into the outer thigh (can be given through clothing). This is the FIRST action, not a last resort.
- Call 911 immediately.
- Lay the person flat with legs elevated (unless breathing is easier sitting up).
- If a second dose is available and symptoms return or persist after 5–15 minutes, administer it.
- Do NOT give epinephrine and then consider the emergency over — anaphylaxis can have a biphasic reaction where symptoms return hours later. Hospital monitoring is essential.
If no epinephrine is available: Call 911 immediately. You can give an oral antihistamine as a bridging measure, but it will not stop anaphylaxis — it only may slow the progression slightly. Prioritize getting to emergency services.
🎬 Video: Food Allergy with Anaphylaxis — https://youtu.be/veHAMX6vukY?si=jtG07MJUuoWZVQfU
🎬 Video: How to Inject an EpiPen — https://youtu.be/K7QyCMNDHAs?si=T0eBEn7GpbW9BjQa
Requirement 5d: Inhalation Injuries
What it is: Inhalation injuries occur when the lungs and airway are damaged by inhaling hot gases, smoke, or toxic chemicals. They are a leading cause of death in structure fires — not the flames themselves, but what’s in the smoke.
Smoke Inhalation
Signs and symptoms: Soot around the nose or mouth; hoarse voice; stridor; coughing; eye irritation; singed nose hairs; confusion; blue lips.
First aid:
- Move the victim to fresh air immediately.
- Call 911 — even mild smoke inhalation can cause delayed pulmonary edema (fluid in the lungs) that isn’t apparent initially.
- If the victim is unresponsive, begin CPR if needed.
- Do NOT go back into a burning building to rescue someone.
Airway Burns
Breathing superheated air can burn the larynx, vocal cords, and upper airway. This is a true airway emergency — the airway can swell shut within minutes.
Signs: stridor (a harsh crowing sound), hoarseness, and difficulty breathing after being in a fire.
This is a 911 emergency. The airway may need to be secured by advanced medical providers.
Carbon Monoxide Poisoning
Carbon monoxide (CO) is an odorless, colorless gas produced by incomplete combustion — faulty heaters, generators used indoors, exhaust from vehicles in enclosed spaces. It binds to hemoglobin more effectively than oxygen, starving tissues of oxygen without any outward sign.
Signs and symptoms: Headache, dizziness, nausea, confusion, cherry-red skin (a late and unreliable sign); unconsciousness. The insidious danger: victims are often unaware they’re being poisoned.
First aid: Move to fresh air immediately. Call 911. Begin CPR if unconscious and not breathing. CO poisoning requires hyperbaric oxygen treatment in severe cases.
Prevention: Carbon monoxide detectors in sleeping areas; never run generators, grills, or camp stoves inside a tent or enclosed space.
🎬 Video: Airway Burns — https://youtu.be/YJVGTJPQMEw?si=_HQifwBCjA3Lzgh8
🎬 Video: Carbon Monoxide Poisoning — https://youtu.be/PqiAtelp-Qc?si=Q2Klj56m0pB95pEm
Requirement 5e: Altitude Sickness
What it is: At higher altitudes, the air has less oxygen per breath. Most people begin to feel effects above 8,000 feet (2,400 m) — especially if they ascend rapidly. Altitude sickness is the body struggling to adjust to less available oxygen.
Forms of Altitude Illness
Acute Mountain Sickness (AMS): The mildest and most common form. Symptoms begin 6–12 hours after arrival at altitude.
- Headache (the cardinal symptom)
- Fatigue and weakness
- Loss of appetite, nausea, dizziness
- Difficulty sleeping
High Altitude Pulmonary Edema (HAPE): Fluid in the lungs. A potentially fatal escalation of AMS.
- Shortness of breath at rest
- Dry cough that may become productive (pink, frothy sputum)
- Blue lips or fingertips
- Crackling sounds in the lungs
High Altitude Cerebral Edema (HACE): Fluid on the brain. The most severe form; can be rapidly fatal.
- Severe headache unresponsive to medication
- Loss of coordination (ataxia) — test by walking heel-to-toe in a straight line
- Confusion, altered mental status
- Loss of consciousness
First Aid
- Immediate descent is the definitive treatment for HAPE and HACE — descend 1,000–2,000 feet minimum.
- For mild AMS: Stop ascending and rest at the same altitude until symptoms resolve; hydrate; ibuprofen for headache.
- Portable hyperbaric chambers (Gamow bags) can simulate descent if available.
- Supplemental oxygen helps.
- Do not ascend further with any symptoms of altitude illness.
Prevention: “Climb high, sleep low” — the golden rule of altitude acclimatization. Ascend no more than 1,000 feet per day above 8,000 feet. Allow rest days. Avoid alcohol and sedatives at altitude.
🎬 Video: High Altitude Illness Treatment and Prevention — https://youtu.be/8D9dwH16GLw?si=HDHXNT8t1mw5QijT
You’ve covered the major threats to the airway. Next, you’ll learn what to do when someone loses consciousness entirely.
Req 6 — Fainting, Seizures & Drowning
When someone loses consciousness, it’s immediately alarming — and a whole range of different causes require different responses. This requirement covers seven causes of loss of consciousness:
- 6a — Fainting
- 6b — Hypoglycemia (low blood sugar)
- 6c — Seizure
- 6d — Drug overdose and alcohol poisoning
- 6e — Underwater hypoxic blackout
- 6f — Cold water shock and drowning
- 6g — Lightning strike and electric shock
Requirement 6a: Fainting
What it is: Fainting (syncope) is a brief loss of consciousness caused by temporarily reduced blood flow to the brain. It’s usually harmless — but the fall can cause injury, and it sometimes signals something more serious.
Common triggers: Standing up too quickly, prolonged standing in heat, emotional shock (seeing blood, receiving bad news), pain, dehydration, or standing in a hot shower.
Warning signs before fainting: Dizziness or lightheadedness; nausea; pale, clammy skin; visual changes (tunnel vision or spots); ringing in the ears; weakness in the legs.
If someone is about to faint: Help them lie down or sit down with head between knees. This restores blood flow to the brain before loss of consciousness.
After fainting:
- Lay them on their back with legs elevated (unless injured from the fall).
- Loosen any tight clothing.
- Ensure the airway is open and check for breathing.
- Most people recover within 1–2 minutes.
- Don’t give anything by mouth until fully conscious.
When to call 911: No regaining of consciousness within 1–2 minutes; fainting during exertion (a warning sign for cardiac problems); accompanying chest pain, shortness of breath, or heart palpitations; head injury from the fall.
🎬 Video: Fainting — https://youtu.be/7lTWGG2ZvK4
Requirement 6b: Hypoglycemia
What it is: Hypoglycemia (low blood sugar, below 70 mg/dL) occurs most commonly in people with diabetes who take insulin or certain diabetes medications. It can also occur in people who haven’t eaten in a long time and have been exercising heavily.
The brain runs almost exclusively on glucose. When blood sugar drops, brain function deteriorates rapidly.
Signs and symptoms (mild to moderate):
- Shakiness, trembling
- Sweating, pale skin
- Rapid heartbeat
- Hunger
- Headache
- Dizziness
- Confusion, irritability, or unusual behavior
Signs and symptoms (severe): Seizures, unconsciousness.
First aid for a conscious patient: Give 15–20 grams of fast-acting sugar (the “15-15 rule”):
- 4 oz of fruit juice or regular soda (not diet)
- 3–4 glucose tablets
- A tablespoon of honey or sugar Recheck symptoms in 15 minutes. Repeat if still symptomatic. Follow with a snack containing protein and carbohydrates.
If unconscious: Do NOT give anything by mouth. Call 911. If the person carries a glucagon kit and you are trained to use it, administer it.
🎬 Video: Diabetic Emergencies — https://www.youtube.com/watch?v=ASqdE2sqHgM
Requirement 6c: Seizure
What it is: A seizure is caused by abnormal electrical activity in the brain. Most seizures in Scouts with epilepsy are familiar and expected. But seizures can also result from head injury, high fever, low blood sugar, poisoning, or cardiac arrest.
Generalized (tonic-clonic) seizure signs: Sudden loss of consciousness; rigid body (tonic phase); rhythmic jerking of limbs (clonic phase); possible frothing at the mouth; possible loss of bladder or bowel control. Usually lasts 1–3 minutes.
What to do during a seizure:
- Keep them safe: Move objects that could cause injury.
- Ease them to the floor if standing.
- Protect the head: Place something soft under it.
- Roll them on their side (recovery position) after convulsive movements stop — this prevents choking on saliva or vomit.
- Note the time — duration matters.
- Stay with them and reassure them as they regain consciousness; a postictal (post-seizure) state of confusion is normal.
What NOT to do:
- Do NOT restrain the person
- Do NOT put anything in their mouth — the “swallowing their tongue” belief is a myth
- Do NOT give water or food until fully conscious
When to call 911:
- Seizure lasts more than 5 minutes
- No return to consciousness between seizures
- Injury during the seizure
- First seizure (no known epilepsy)
- Breathing problems after the seizure
- Seizure in water
🎬 Video: First Aid for a Seizure — https://www.youtube.com/watch?v=nnpttMlAG_w
Requirement 6d: Drug Overdose and Alcohol Poisoning
Opioid Overdose
Opioids (heroin, fentanyl, oxycodone) suppress the brain’s drive to breathe. An opioid overdose victim stops breathing and dies of hypoxia (oxygen deprivation).
Signs: Unresponsive or unconscious; slow, shallow, or stopped breathing; pinpoint (very small) pupils; blue lips.
First aid:
- Call 911.
- Administer naloxone (Narcan) if available — it reverses opioid effects in 2–5 minutes. It is available without a prescription in most states. First responders, schools, and many pharmacies stock it.
- If not breathing, begin rescue breathing or CPR.
- Place in recovery position if breathing but unconscious.
- Stay until EMS arrives — naloxone wears off in 30–90 minutes, and the overdose can return.
Alcohol Poisoning
Alcohol is a central nervous system depressant. High blood alcohol levels can cause unconsciousness, breathing suppression, choking on vomit, and cardiac arrest.
Signs: Unconscious or minimally responsive; cold, clammy, pale or blue skin; slow or irregular breathing; strong alcohol odor; vomiting.
First aid:
- Call 911.
- Roll to the recovery position (on their side) — people who are drunk and unconscious can vomit and aspirate (inhale) it.
- Monitor breathing continuously.
- Do NOT give coffee or food; do NOT put in a cold shower; do NOT leave them alone.
🎬 Video: Naloxone Treatment of an Opioid Overdose — https://youtu.be/8eUUf5ssH_4
🎬 Video: Alcohol Poisoning — https://youtu.be/UqY7DZ46prA?si=BB3yLWOqqxd-jhsG
Requirement 6e: Underwater Hypoxic Blackout
What it is: Shallow water blackout (more accurately, underwater hypoxic blackout) kills swimmers — including fit, athletic, competitive swimmers — every year. It is completely preventable once you understand the mechanism.
The mechanism: Some swimmers hyperventilate (take many rapid deep breaths) before an underwater swim to extend their breath-hold time. This works by lowering CO₂ levels — but CO₂ is what triggers the urge to breathe. The swimmer can stay underwater until oxygen levels drop to the point of unconsciousness, all without feeling any warning urge to surface.
Why it’s uniquely dangerous: Unlike most drownings, there are often no signs of struggle. The swimmer simply stops moving and sinks.
First aid: Rescue from the water immediately; begin CPR if not breathing; call 911.
Prevention: Never hyperventilate before underwater swimming. Never swim alone. Never do breath-holding contests. Swim with a buddy who knows what to look for.
Underwater Hypoxic Blackout A dedicated educational site explaining the mechanism, statistics, and prevention of hypoxic blackout in swimmers. Link: Underwater Hypoxic Blackout — https://underwaterhypoxicblackout.org/Requirement 6f: Cold Water Shock and Drowning
Cold Water Shock
Sudden immersion in cold water (below 59°F / 15°C) triggers an immediate, involuntary gasp reflex and hyperventilation. This gasp can happen before you have a chance to take a breath — meaning you can inhale water in the first seconds.
Cold water shock can also trigger cardiac arrhythmias in susceptible individuals, causing sudden death in the water unrelated to drowning.
Response: If you fall into cold water, fight the urge to swim hard immediately. Float on your back, breathe, and wait for the cold shock response to subside (1–3 minutes). Then assess your situation before attempting to swim to safety.
Drowning
A drowning person is often silent — they don’t have the breath to yell for help. True drowning is vertical, with mouth at or near the water surface, arms pressing down at the sides, head tilted back.
Rescue priority: Reach, throw, don’t go. Reach with a paddle or rope; throw a flotation device; only enter the water as an absolute last resort (a panicking drowning victim can push you underwater).
First aid after removal from water:
- Call 911 immediately.
- Begin CPR if the person is not breathing — do NOT wait for the person to “wake up” on the way to shore.
- Drowning victims are often hypothermic — protect from further heat loss after CPR is established.
- All near-drowning patients need hospital evaluation even if they seem fine — secondary drowning (delayed pulmonary edema) can occur hours later.
🎬 Video: Understanding Cold Water Shock — https://youtu.be/RypLau65Wa0?si=c25FnmssnqvQqecU
🎬 Video: How to Perform CPR for a Drowning Victim — https://youtu.be/mnfhnyY-Udk?si=hDJw11X7ejwN54WI
Requirement 6g: Lightning Strike and Electric Shock
Lightning Strike
Lightning strikes carry 100 million to 1 billion volts — but they’re extremely brief (a few milliseconds). Most lightning deaths are from cardiac arrest caused by the massive current disrupting the heart’s electrical system.
Contrary to common myth: Lightning strike victims are NOT electrically charged after the strike. You can touch them safely.
Signs: Burns at entry and exit points (often the top of the head or shoulders and the feet); cardiac arrest; confusion or loss of consciousness; keraunoparalysis (temporary paralysis of limbs); flash blindness.
First aid:
- Ensure the scene is safe — move to shelter if lightning is still active.
- Begin CPR immediately if the victim is unresponsive and not breathing.
- Call 911.
- Treat burns with cool water and sterile dressings.
Prevention: If caught outside in a storm, avoid the tallest trees, open fields, and ridgelines. Spread out (don’t huddle together — ground current can injure multiple people). Crouch low with feet together and hands over ears if no shelter is available.
Electric Shock
See also Req 3d for electrical burns. Cardiac arrest and respiratory arrest are the primary life threats from electric shock. Begin CPR if needed; call 911; do not touch the victim until the power source is confirmed off.
🎬 Video: First Aid for Electrical Shocks and Lightning Strikes — https://youtu.be/oFLAKfjEjcg?si=GCT03PYYxBdE4jNd
Now that you know how to respond when someone loses consciousness, you’ll learn the most famous — and most important — first aid skill of all: CPR.
Req 7 — CPR and AED
Cardiac arrest is the single most common cause of adult death in the United States. Every minute without CPR reduces survival by 7–10%. The skills in this requirement — recognizing a heart attack, performing CPR, and using an AED — could realistically save someone you know. This requirement covers seven sub-requirements:
- 7a — What is a heart attack?
- 7b — Symptoms of a heart attack and first aid
- 7c — When to start CPR
- 7d — Demonstrating CPR technique
- 7e — How an AED works
- 7f — Demonstrating AED use
- 7g — Finding AEDs in your community
Requirement 7a: What Is a Heart Attack?
The heart is a muscle. Like all muscles, it needs a constant blood supply to stay alive. The arteries that supply the heart muscle itself (coronary arteries) can become narrowed or blocked by plaque — a buildup of cholesterol and other materials inside the artery wall. When a clot forms at a plaque site and completely blocks a coronary artery, part of the heart muscle is deprived of oxygen and begins to die. This is a myocardial infarction — a heart attack.
The longer the blocked artery goes untreated, the more heart muscle dies. Time is muscle.
Heart Attack vs. Cardiac Arrest
These terms are often confused but refer to different events:
- A heart attack is a plumbing problem — a blocked artery causing damage to heart muscle. The heart is still beating, but part of it is dying.
- Cardiac arrest is an electrical problem — the heart’s electrical system fails and the heart stops beating effectively. No pulse, no blood circulation, no consciousness. This is immediately life-threatening.
A heart attack can trigger cardiac arrest — the damaged muscle causes electrical instability. CPR is for cardiac arrest, not for a heart attack. (A conscious, breathing person with chest pain is having a heart attack; call 911 and keep them calm.)
🎬 Video: What Happens During a Heart Attack — https://youtu.be/3_PYnWVoUzM?si=FlnFcSGpYJuxGIo5
🎬 Video: Heart Attack vs. Cardiac Arrest — https://youtu.be/psx-QcxL1A8
Requirement 7b: Heart Attack Symptoms and First Aid
Classic Symptoms
- Chest discomfort: Pressure, squeezing, fullness, or pain in the center of the chest, lasting more than a few minutes or going away and coming back.
- Radiation: Discomfort spreading to the arms (usually left), back, jaw, or stomach.
- Shortness of breath: With or without chest discomfort.
- Other signs: Cold sweat, nausea, lightheadedness.
Non-Classic Presentations
Heart attack symptoms can be subtler, especially in women, diabetics, and elderly patients. Some people experience only:
- Unusual fatigue
- Jaw pain or upper back pain
- Indigestion or heartburn that doesn’t respond to antacids
- No pain at all (a “silent” heart attack)
First Aid for a Suspected Heart Attack
- Call 911 immediately. Time is critical.
- Keep the person calm and have them sit or lie in a position of comfort.
- Loosen tight clothing.
- If the person is not allergic to aspirin, is conscious, and can swallow, have them chew (not swallow whole) one adult aspirin (325 mg) or four baby aspirin (81 mg each). Aspirin inhibits clotting and can slow the blockage.
- Be ready to perform CPR if they lose consciousness and stop breathing.
🎬 Video: Symptoms & Signs of a Heart Attack in Women & Men — https://youtu.be/jouwrfr7_S0?si=By1f--Oq9UPUcHkd
Requirement 7c: When to Perform CPR
CPR is performed when a person is in cardiac arrest — meaning their heart is not pumping blood effectively. The three conditions that indicate CPR should be started:
- Unresponsive — tap the shoulders and shout “Are you okay?” No response.
- Not breathing normally — absent or abnormal breathing. Gasping/agonal breathing looks like breathing but is a sign of cardiac arrest — begin CPR.
- No pulse — check the carotid pulse (neck) for no more than 10 seconds. If unsure, start CPR — starting CPR on someone who doesn’t need it causes little harm, while not starting it on someone who does is fatal.
Do not start CPR if: The person is breathing normally; they have an obvious, unsurvivable injury; they have a valid Do Not Resuscitate (DNR) order; the scene is unsafe.
🎬 Video: Responding to Cardiac Arrest — https://youtu.be/DByqyhLV1zg?si=RO4saCDlfXZu2TN6
Requirement 7d: Performing CPR
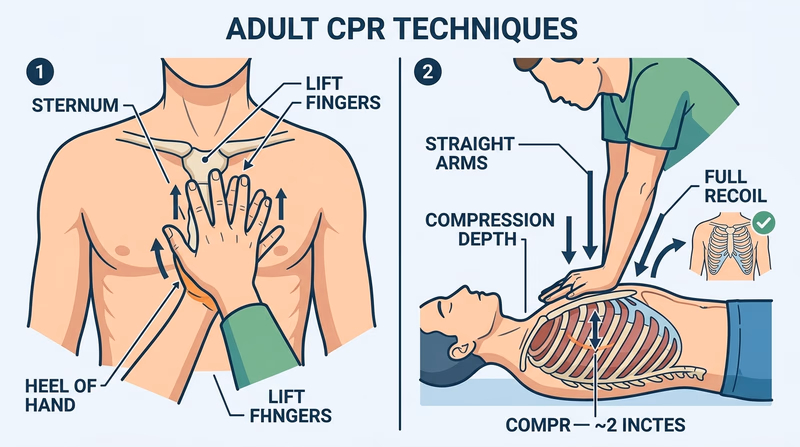
Hands-Only CPR (recommended for untrained or newly trained bystanders, and effective for adult cardiac arrest):
- Call 911 (or have someone else call).
- Place the heel of one hand on the center of the chest (lower half of the breastbone).
- Place the second hand on top; interlace fingers and keep them off the chest.
- Keep arms straight, lean over the victim.
- Compress the chest at least 2 inches deep at a rate of 100–120 compressions per minute (the beat of “Stayin’ Alive” by the Bee Gees).
- Allow full chest recoil between compressions — don’t lean on the chest.
- Don’t stop except to use an AED.
CPR with breaths (for trained responders, especially for children and drowning):
- 30 chest compressions followed by 2 rescue breaths (tilt the head, lift the chin, seal the mouth, breathe in over 1 second, watch for chest rise).
- Continue the 30:2 cycle.
For infants (under 1 year): Use two fingers on the center of the chest; compress about 1.5 inches; 30:2 ratio.
For children (1 year through puberty): Use one or two hands depending on the child’s size; compress about 2 inches; 30:2 ratio.
Your counselor will have you practice CPR on a training mannequin. The physical practice is essential — knowing the steps intellectually is very different from doing effective chest compressions with proper depth and rate.
🎬 Video: Hands-Only CPR — https://youtu.be/A5PnI4I-vd8?si=ERt7HtnwcmqFJmQA
Requirement 7e: Automated External Defibrillators (AEDs)
What an AED does: The most common cause of sudden cardiac arrest is ventricular fibrillation (VF) — the heart’s ventricles are quivering chaotically instead of pumping. A defibrillator delivers a brief, controlled electrical shock that momentarily stops all electrical activity in the heart, giving the heart’s natural pacemaker a chance to restart a normal rhythm.
An AED is designed to be used by anyone — it talks you through the entire process. It also analyzes the heart rhythm automatically and will NOT deliver a shock if one isn’t needed.
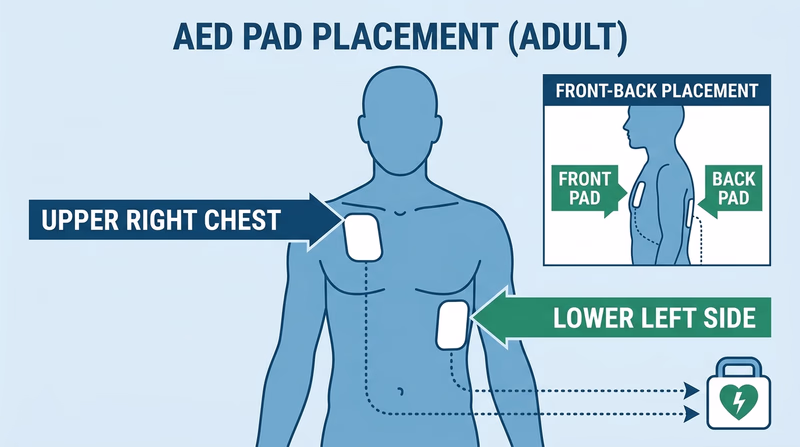
How to Use an AED
- Turn it on (usually by opening the case or pressing a button).
- Follow the voice and visual prompts.
- Attach the pads as shown in the diagrams on the pads — one on the upper right chest, one on the lower left side.
- Make sure no one is touching the victim when the AED analyzes the rhythm and when it delivers a shock.
- Resume CPR immediately after the shock, or as directed by the AED.
The key takeaway: Don’t delay CPR waiting for an AED. But when an AED is available, use it as soon as possible — defibrillation within the first few minutes dramatically increases survival.
🎬 Video: Using an AED — https://youtu.be/in8j2Q2z3HE
Requirement 7f: Demonstrating AED Use
Your counselor will have you walk through the AED process — ideally using an AED trainer (a device that simulates the real AED experience without delivering any actual electricity). The key skills to demonstrate:
- Powering on the device
- Correct pad placement on the chest
- Ensuring no one is touching the victim during analysis and shock
- Resuming CPR after the shock per the device’s instructions
Many schools, community centers, gyms, and businesses have AEDs. Knowing where they are in your community is just as important as knowing how to use them.
AEDs in Scouting Scout Life discusses whether Scout units should have AEDs and how to make the case for acquiring one. Link: AEDs in Scouting — https://blog.scoutingmagazine.org/2024/06/13/does-your-scout-unit-have-an-aed/Requirement 7g: Finding AEDs in Your Community
Why location matters: An AED is only useful if someone can find it and bring it to the victim within minutes. Most cardiac arrests occur in homes or public places, not hospitals. Strategic placement of AEDs in high-traffic areas maximizes the chance that one will be available quickly.
Common AED placement locations:
- Schools (gym, front office, hallways)
- Sports arenas and stadiums
- Shopping malls
- Airports
- Health clubs and fitness centers
- Places of worship
- Government buildings
AED Finder apps and maps: Several smartphone apps (AED Finder, PulsePoint AED, and others) allow users to locate registered AEDs in their area. Some communities maintain public registries.
For this requirement: Physically locate at least one AED at your school, meeting place, or another regular gathering spot. Know exactly where it is so you could retrieve it in under 2 minutes.
Why these locations are chosen: The logic is simple — large crowds, people under stress (sporting events, hot environments), and people with known cardiac risk (older populations at some venues) all increase the likelihood of someone experiencing cardiac arrest nearby.
Where to Place AEDs The American Heart Association's evidence-based guide to AED placement strategy in public facilities. Link: Where to Place AEDs — https://cpr.heart.org/en/-/media/CPR-Files/Training-Programs/AED-Implementation/2023-updates/KJ1683-AED-Guide.pdfYou now have the most critical life-saving skills in the entire First Aid badge. Next, you’ll move into musculoskeletal injuries — sprains, strains, and fractures.
Req 8a — Understanding Musculoskeletal Injuries
Every hike, climb, and game of capture-the-flag carries a chance of injuring a muscle, tendon, or bone. Being able to distinguish between these injury types — and knowing why it matters — is the foundation of Requirement 8. This page focuses purely on understanding what these injuries are, before you move into treatment and splinting.
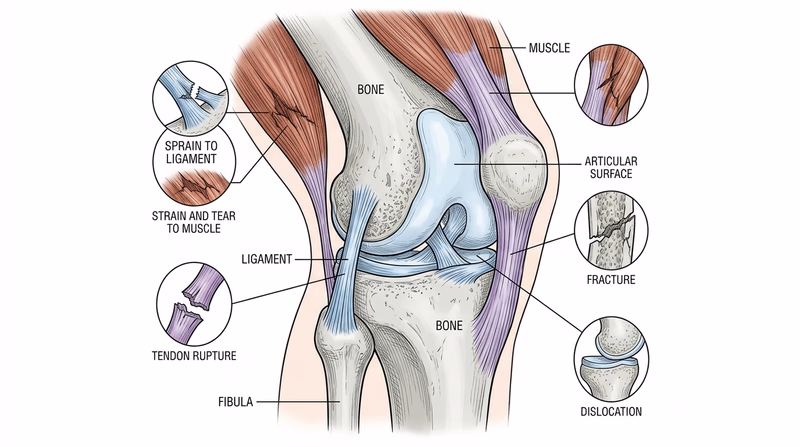
The Tissue Types Involved
Muscles are the contractile tissue that moves your bones. They attach to bones via tendons — tough, fibrous cords.
Ligaments are tough bands that connect bone to bone, holding joints together and limiting motion to a healthy range.
Bones provide the rigid framework of the skeleton.
Understanding which of these is injured helps you understand the mechanism, the severity, and the care required.
Soft Tissue Injuries (Muscles and Tendons)
Strain
A strain is an overstretching or minor tearing of muscle fibers or the tendon connecting muscle to bone. Strains happen when a muscle is overloaded — asked to do more than it’s ready for.
Cause: Lifting something too heavy; overexerting on a climb; a sudden movement that overstretches a muscle. Signs: Pain and tenderness at the injured muscle; mild swelling; reduced strength; pain with use. Severity: Strains range from mild (stretched fibers) to moderate (partial tearing) to severe (nearly complete rupture).
Muscle Tear
A muscle tear is a more significant disruption of muscle tissue — from a partial tear to a complete rupture. A complete muscle tear means the muscle has been separated entirely.
Cause: High-force contractions (sprinting, explosive movements) or direct trauma (a blow to the muscle). Signs: Sudden, severe pain during activity; sometimes a visible or palpable defect in the muscle (“bump” from the torn end bunching up); significant bruising; loss of strength.
Tendon Rupture
A tendon rupture is a complete or near-complete tear of a tendon. The most notorious examples are the Achilles tendon (back of the heel) and the quadriceps or patellar tendon (front of the knee).
Cause: Sudden, forceful contraction of the attached muscle; a direct blow. Signs: A pop sensation at the time of injury; sudden severe pain; inability to use the affected muscle group (can’t point the foot, can’t straighten the knee); a gap in the tendon may be palpable.
Joint Injuries (Ligaments)
Sprain
A sprain is a stretching or tearing of a ligament — the band holding a joint together. The ankle is by far the most commonly sprained joint.
Cause: A sudden twist or force that takes a joint beyond its normal range of motion. Signs: Pain over the ligament (not the muscle); swelling; bruising; joint feels unstable or gives way; pain with weight bearing. Severity: Grade I (mild stretch), Grade II (partial tear), Grade III (complete tear).
Dislocation
A dislocation is when the bones that form a joint are forced out of their normal position. The shoulder and finger joints are most commonly dislocated.
Cause: A fall onto an outstretched arm; a direct blow; a sudden, forced motion. Signs: Visible deformity of the joint; severe pain; inability to move the joint; possible numbness or weakness if nerves or blood vessels are compressed. Important: Do NOT attempt to reduce (put back in place) a dislocated joint unless you are specially trained. You can worsen damage to blood vessels and nerves.
Bone Injuries
Simple (Closed) Fracture
A fracture is a break in bone continuity. A simple or closed fracture is one where the bone is broken but the overlying skin is intact.
Cause: Falls, direct impact, or stress over time (stress fractures). Signs: Point tenderness directly over the bone; swelling; bruising; possible deformity; pain with movement or weight bearing; audible crack at time of injury.
Compound (Open) Fracture
A compound fracture (also called an open fracture) is one where the bone has broken through the skin, or the skin over the fracture is lacerated, exposing the bone or fracture site.
Cause: High-energy trauma (falls from height, vehicular accidents). Signs: Visible bone protruding through skin; wound over the fracture site; significant bleeding. Why it’s more serious: Open fractures have a dramatically higher risk of deep bone infection (osteomyelitis) and require surgical treatment. They are true emergencies.
Quick Reference Comparison
| Injury | Tissue Involved | Key Distinguishing Sign |
|---|---|---|
| Strain | Muscle or tendon (partial) | Pain in belly of muscle with use |
| Muscle tear | Muscle (complete) | Visible/palpable muscle defect |
| Tendon rupture | Tendon (complete) | Can’t use the muscle’s function |
| Sprain | Ligament | Pain at the joint; instability |
| Dislocation | Joint surfaces | Visible joint deformity |
| Simple fracture | Bone | Point tenderness over bone |
| Compound fracture | Bone + skin | Bone visible through skin |
🎬 Video: Understanding Limb Injuries: Strains, Sprains, Dislocations, Fractures — https://www.youtube.com/watch?v=qi0YYFt5RCY
🎬 Video: Muscle Strains and Tears — https://www.youtube.com/watch?v=uyxcdJkFvrw
🎬 Video: Dislocations and Types of Fractures — https://www.youtube.com/watch?v=Xulug1uqisM
Now that you understand the difference between these injury types, you’ll learn specific first aid for each of the soft tissue injuries.
Req 8b — Strains, Tears & Tendon Injuries
In Req 8a, you learned the difference between a strain, a muscle tear, and a tendon rupture. Now you’ll focus on the specific symptoms and first aid for each. Note that the management of soft tissue injuries follows a consistent framework — the differences are mainly in severity and what to do about returning to activity.
First Aid Framework: RICE
For strains and mild muscle tears, the foundational first aid is RICE:
- Rest — stop the activity causing pain; protect from further injury
- Ice — apply ice or cold pack (wrapped in cloth) 20 minutes on, 20 minutes off, for the first 24–48 hours
- Compress — a light elastic bandage reduces swelling
- Elevate — raise the injured area above heart level when possible
Some guidelines now use POLICE (Protection, Optimal Loading, Ice, Compression, Elevation) to emphasize that some gentle movement during recovery promotes healing — but rest is still appropriate in the acute phase (first 24–48 hours).
Muscle Strain
Symptoms and signs:
- Muscle pain that intensifies with use or stretching
- Mild to moderate swelling
- Stiffness — the muscle feels tight or knotted
- Possible bruising appearing 24–48 hours after injury
- Weakness of the involved muscle group
- Movement is painful but the muscle still functions
Grades:
- Grade I: Mild — minor fiber tearing, minimal strength loss
- Grade II: Moderate — partial tearing, noticeable strength loss
- Grade III: Severe — nearly complete rupture (transitioning into “muscle tear”)
First aid:
- Apply RICE (see above).
- For Grade I–II strains: the Scout may be able to continue a hike with modified pace; monitor for worsening.
- For Grade III: treat as a muscle tear (see below).
- Over-the-counter pain relievers (ibuprofen/naproxen) help with both pain and inflammation.
- Return to activity only when pain-free — premature return worsens the injury.
Muscle Tear (Complete Rupture)
Symptoms and signs:
- A sudden, intense pain during activity — often described as being “hit” or “shot” in the muscle
- A pop or snap may be felt or heard
- Rapid onset of swelling and bruising (blood pooling from the tear)
- A visible or palpable “dent” or “gap” where the torn muscle has retracted
- Significant loss of strength — the affected muscle group may be nearly nonfunctional
First aid:
- Immobilize and support the injured extremity.
- Apply ice to limit swelling.
- Do NOT massage or try to “stretch out” the injury.
- Evacuate if in the wilderness — complete muscle tears typically require orthopedic evaluation and potentially surgery.
- Keep the person from using the affected limb.
Tendon Rupture
Symptoms and signs:
- A sudden, severe pain at the tendon location (Achilles tendon: back of the heel; patellar tendon: front of the knee; biceps tendon: front of the shoulder/elbow)
- A “pop” or “snap” at the moment of injury
- Rapid swelling
- A palpable gap in the tendon
- Inability to perform the function of the muscle attached to that tendon: can’t push off the foot (Achilles), can’t fully straighten the knee (patellar/quad), can’t flex the elbow against resistance (biceps)
First aid:
- Immobilize the joint in a neutral position; do not allow weight-bearing on an Achilles or knee tendon rupture.
- Apply ice to limit swelling and pain.
- Transport/evacuate for medical care — complete tendon ruptures almost always require surgical repair for full functional recovery.
🎬 Video: Muscle Strains and Tears — https://www.youtube.com/watch?v=IM7BIO_kdk8
Now you know the soft tissue injuries. Next, you’ll learn about joint injuries (sprains and dislocations) and bone fractures.
Req 8c — Sprains, Fractures & Dislocations
This requirement focuses specifically on the symptoms, signs, and potential complications of these three injury types. Understanding complications is critical — it’s what determines whether “wrap it and walk” is appropriate or whether the patient needs emergency evacuation.
Sprains
What it is: A sprain is a ligament injury at a joint — most commonly the ankle, knee, or wrist. See Req 8a for the full definition.
Symptoms and signs:
- Immediate pain at the joint (over the ligament, not the belly of the muscle)
- Swelling and bruising that develops over minutes to hours
- Tenderness directly over the injured ligament
- Joint instability — the joint “gives way” or feels loose
- Pain with weight-bearing or movement through the injured range
- A pop or snap may be felt at the time of injury (with Grade III sprains)
Potential complications:
- Avulsion fracture: The ligament can pull off a small piece of bone at its attachment point. This looks and feels like a sprain but is actually a fracture. X-ray is needed to rule it out.
- Chronic instability: A Grade III sprain that isn’t properly treated can result in permanent joint instability, increasing the risk of future sprains.
- Osteochondral injury: The force that sprains the ligament can also bruise or chip the joint cartilage or underlying bone.
- Compartment syndrome (rare): Severe swelling in a closed compartment (the ankle/leg) can impair circulation. Signs: severe, escalating pain; swelling that seems out of proportion; pain with passive stretching; tingling or numbness; pale or bluish toes.
Field assessment tip: If the Scout can bear weight and take four steps, it’s unlikely to be a fracture — but when in doubt, splint and transport.
Fractures
What it is: A break in bone continuity. See Req 8a for the distinction between simple and compound fractures.
Symptoms and signs:
- Point tenderness — pressing directly on the fracture site causes intense pain (distinguishes fractures from soft tissue injuries, which have more diffuse tenderness)
- Deformity — the limb may be bent or shortened
- Swelling and bruising
- Crepitus — a grating or crunching sensation when the fracture site moves
- Loss of function — the patient cannot use the limb normally
- An audible crack at the time of injury
- With compound fractures: visible bone or wound overlying the fracture
Potential complications:
- Neurovascular injury: Bone fragments or swelling can compress or lacerate nearby nerves and blood vessels. Check distal pulse, sensation, and movement (PSM) beyond the fracture — a missing pulse or numbness is an emergency.
- Compartment syndrome: Bleeding and swelling inside fascial compartments (tight tissue wrappings around muscle groups) can build up pressure, compressing vessels and nerves. Classic sign: “pain out of proportion” to the injury, particularly with passive stretching of the muscles. This is a surgical emergency.
- Bone infection (osteomyelitis): Open fractures are at serious risk.
- Fat embolism: Large bone fractures (especially the femur) can release fat into the bloodstream, potentially causing respiratory failure. More common in delayed treatment.
- Shock: The femur can contain 1–2 liters of blood in a closed fracture. Pelvic fractures can contain even more. Significant blood loss leads to hypovolemic shock.
Dislocations
What it is: Bones forming a joint forced out of normal alignment. Most common: shoulder, finger, kneecap, elbow.
Symptoms and signs:
- Visible deformity — the joint looks “wrong”
- Extreme pain, often immediately
- The joint is held in a fixed, abnormal position
- Swelling
- Complete loss of normal joint motion
- Possible numbness or tingling distal to the injury (nerve involvement)
Potential complications:
- Neurovascular compromise: The brachial artery and brachial plexus nerves run through the shoulder — a shoulder dislocation can stretch or compress them. Check PSM of the hand immediately.
- Associated fractures: Up to 25% of shoulder dislocations have an associated fracture. This is why dislocations should not be reduced in the field without training.
- Recurrence: A first-time shoulder dislocation significantly increases the risk of future dislocations, especially in young people.
- Rotator cuff tears: The force of a dislocation can tear the surrounding muscles.
Distal PSM Check
Do this every time you splint or suspect a limb injury- Pulse: Is there a pulse distal to the injury? (radial pulse for arm injuries; dorsalis pedis or posterior tibial for leg)
- Sensation: Can the patient feel a light touch or pinprick distal to the injury?
- Movement: Can the patient wiggle their fingers or toes distal to the injury?
If any PSM check is abnormal, this becomes an urgent evacuation — blood supply or nerve function may be compromised.
🎬 Video: Fractures and Dislocations — https://www.youtube.com/watch?v=sPzXAVNVJr0
Understanding what can go wrong with these injuries prepares you for the hands-on work ahead — bandaging and splinting.
Req 8d — Bandaging Techniques
Bandaging is a hands-on skill. Reading about it helps you understand the technique, but your counselor will want to see you actually apply each bandage. This requirement covers three categories of bandaging:
- 8d1 — Arm slings for forearm, upper arm, or collarbone fractures
- 8d2 — Elastic wrap and cravat bandages for ankle sprain
- 8d3 — Elastic wrap and cravat bandages for wrist sprain or hand injury
Requirement 8d1: Arm Slings
An arm sling immobilizes the arm, supports the weight of the forearm and hand, and prevents further injury during transport. A triangular bandage (cravat) is the traditional material; a triangular piece of cloth or a large shirt can be improvised.
Standard Arm Sling (for forearm or upper arm fracture)
- Place the triangular bandage with one point at the elbow; the long edge runs along the uninjured side.
- Support the arm at a 90-degree angle or slightly above, with the hand slightly higher than the elbow.
- Bring the bottom point of the triangle up over the forearm and tie behind the neck. Pad the knot for comfort.
- The wrist and thumb should be exposed to monitor circulation (check color, warmth, and capillary refill).
- Secure the elbow point with a pin or by twisting and tucking it.
Elevation Sling (for shoulder or collarbone injury)
For collarbone (clavicle) fractures, the arm needs to be supported with the elbow slightly elevated — not in the standard 90-degree position.
- Place the triangular bandage as above, but angle the forearm higher, so fingertips point toward the opposite shoulder.
- The injured shoulder should be allowed to drop naturally — not forced up.
- Add a swathe (a second bandage wrapped around the arm and torso) to prevent arm movement against the body.
After Sling Application — Always Check
After any sling, check the fingers for:
- Capillary refill (press a fingernail for 2 seconds, release — color should return within 2 seconds)
- Sensation (can they feel you touch each finger?)
- Movement (can they wiggle their fingers?)
If circulation is impaired, loosen the sling immediately.
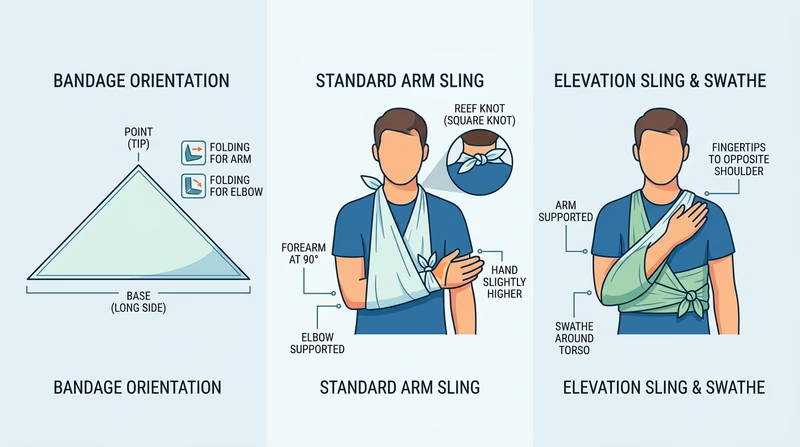
🎬 Video: Bandages for Sprained Ankle, Head, Upper Arm, Collarbone — https://youtu.be/ybpr7nCelK0?si=2SjPp8f4iMAzfVBv
Requirement 8d2: Elastic Wrap and Cravat for Ankle Sprain
Ankle wrapping supports the joint, limits excessive movement, and reduces swelling — it’s one of the most practically useful bandaging skills for any Scouting trip.
Elastic Wrap (Ace Bandage) for Ankle
- Start with the foot at 90 degrees (neutral position — toes pointing straight ahead).
- Begin wrapping at the ball of the foot.
- Use a figure-8 pattern: wrap around the foot, then angle up and across the front of the ankle, behind the ankle, and back across the front — repeating the figure-8 several times.
- Continue wrapping up the lower leg in overlapping spiral turns.
- Secure with medical tape or clips.
- Leave the toes exposed to monitor circulation.
- The wrap should feel supportive and snug — not tight enough to cause tingling or color change in the toes.
Cravat Bandage for Ankle
A cravat is a triangular bandage folded lengthwise to form a strip. It can be used as a figure-8 wrap for the ankle in the same manner as the elastic wrap above.
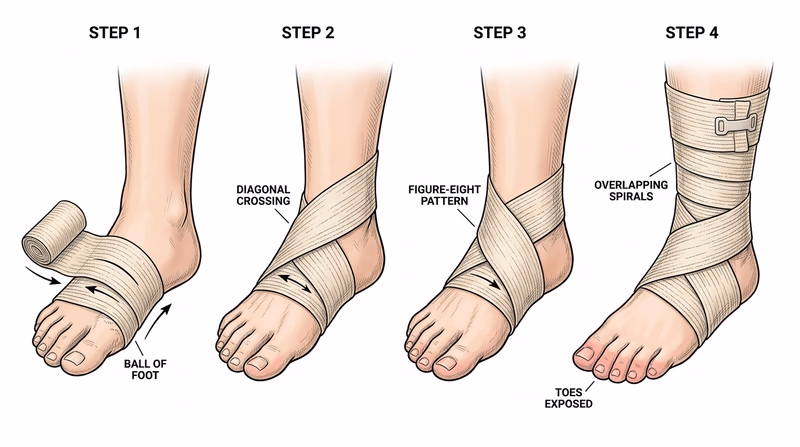
Field tip: If no elastic bandage is available, a clothing strip, rolled sock, or bandana can be used as an improvised cravat.
🎬 Video: Elastic Wrap for Ankle Sprain — https://youtu.be/KRyaemlcJAM?si=_A2ie3PNfdiH1n-0
Requirement 8d3: Wrist Sprain and Hand Injury Bandaging
Elastic Wrap for Wrist Sprain
- Begin at the palm side of the hand, just below the fingers.
- Wrap twice around the hand.
- Angle across the back of the hand, around the wrist, and back across the front — forming a figure-8 that crosses at the wrist.
- Continue wrapping up the lower forearm in overlapping spirals.
- Secure with tape or clips.
- Leave the thumb and fingers exposed.
Cravat Bandage for Wrist
A folded cravat can be tied around the wrist in a figure-8 pattern, passed under the thumb, and tied or secured. This provides support and some compression.
Hand/Palm Injury
For a wound or injury to the palm or back of the hand, use a gauze pad over the wound, then wrap the hand with gauze roll or an elastic bandage. Wrap between the fingers if needed. Maintain the hand in a functional position (slightly curled, as if holding a ball) rather than flat.
🎬 Video: Wrist Wrap — https://youtu.be/tdRMJIu2E08
Good bandaging knowledge is essential — but for suspected fractures in the field, you’ll need splinting skills.
Req 8e — Splinting Fractures
A splint immobilizes a suspected fracture or dislocation to prevent further injury, reduce pain, and protect blood vessels and nerves near the break. The rule is “splint it as it lies” — don’t try to straighten or realign the injury. You immobilize the joint above and the joint below the fracture.
This requirement covers four locations:
- 8e1 — Finger and toe
- 8e2 — Forearm or wrist
- 8e3 — Upper leg (femur)
- 8e4 — Lower leg or ankle
Before Any Splint: Check PSM
Before and after applying any splint, check distal pulse, sensation, and movement (PSM):
- Pulse: Is there a pulse below the injury?
- Sensation: Can the patient feel touch distal to the injury?
- Movement: Can they wiggle fingers or toes?
If PSM is abnormal before splinting, document it and transport urgently. If PSM becomes abnormal after splinting, the splint is too tight — loosen and recheck.
Requirement 8e1: Finger and Toe
Buddy Taping (Toes)
Toes are almost always managed with buddy taping — the injured toe is taped to the adjacent toe, which acts as a natural splint.
- Place a small pad of gauze between the toes to prevent skin breakdown.
- Use medical tape to secure the injured toe to its neighbor (usually 1–2 loops of tape above and below the injury).
- Do not tape over the joint itself.
- Check for capillary refill and sensation in the taped toe.
Splinting a Finger
For suspected finger fractures or dislocations:
- Gently place the finger in a slightly flexed (“functional”) position — as if loosely holding a cylinder.
- Apply a padded rigid splint (a stick, a tongue depressor, a folded card) under the finger.
- Secure with tape above and below the fracture, not over it.
- Check circulation (capillary refill of fingernail) and sensation.
Note: If a finger is clearly dislocated (joint deformed, bent at an angle), do not attempt to reduce it in the field unless trained. Splint it as it lies.
🎬 Video: Buddy Taping Toes — https://youtu.be/P-D0njmVMVA
Requirement 8e2: Forearm or Wrist
A forearm fracture (radius, ulna, or both) is common after falling on an outstretched hand. It is often called a “FOOSH” injury — Fall On OutStretched Hand.
Splinting:
- Support the arm in a comfortable position — usually with the elbow bent at 90 degrees, forearm parallel to the ground, palm facing down.
- Place padding (rolled clothing, sleeping pad) under and over the forearm.
- Apply a rigid splint (a stick, tent pole, folded SAM splint, or rolled sleeping pad) on the underside of the forearm, extending from the palm to well above the elbow.
- Secure with cravats, bandages, or strips of clothing — above the fracture, over the fracture, and below it.
- Place the arm in a sling for support during transport.
- Check distal PSM after application.
🎬 Video: Splints for Arms and Legs — https://youtu.be/jhXWT4UpC-8
Requirement 8e3: Upper Leg (Femur)
A femur fracture is one of the most serious orthopedic injuries. As discussed in Req 8c, it can bleed 1–2 liters internally, causing shock. It is extremely painful. Traction splints are the definitive field device for mid-shaft femur fractures, but improvised rigid splinting is the Scout-level skill.
Improvised rigid splinting:
- Check for shock and begin treating it (lay flat, elevate legs if no spinal injury, keep warm).
- Gently but firmly support the leg — do not move it unnecessarily.
- Place padded splints on the outside of the leg (from armpit to foot) and inside of the leg (from groin to foot). You need two long, rigid objects (trekking poles, straight branches).
- Secure with cravats above the fracture, at the fracture, and below it (ankle, knee, hip level). Tie on the outer splint side.
- Check distal PSM after.
- A femur fracture patient should be evacuated as a priority — this injury requires hospital care.
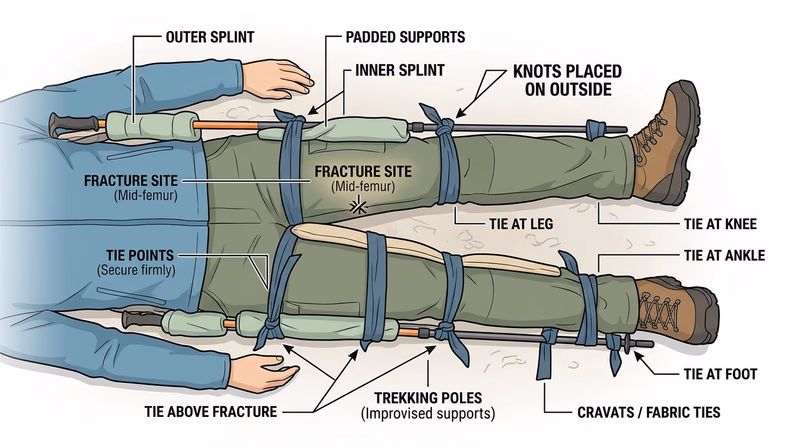
🎬 Video: Upper Leg Splint — https://youtu.be/5KJIojnNAPU?si=qfwme0YazWPIMn0c
Requirement 8e4: Lower Leg or Ankle
Lower leg fractures (tibia and fibula) range from hairline fibula fractures (the patient can often walk with pain) to severe tibial fractures (non-weight-bearing). When in doubt in the field, splint and do not allow weight-bearing.
Splinting:
- Assess the injury and check PSM.
- For a lower leg fracture: place padded splints on each side of the leg (lateral and medial), extending from below the knee to well past the heel.
- For an ankle fracture: use a “sugar-tong” or “posterior slab” configuration — a padded splint along the bottom of the foot, around the heel, and up the back of the calf.
- Secure with bandages or cravats.
- Recheck PSM — ankle swelling can compress blood vessels quickly.
- Elevate the leg if the patient is stationary; transport on a stretcher or improvised carry if evacuation is needed (see Req 10).
🎬 Video: Leg Splints — https://youtu.be/TacM-3A5Ozk
You’ve mastered the full range of musculoskeletal injury management. Next, you’ll tackle the injuries that require the most careful handling: head, neck, and back.
Req 9 — Head, Neck & Back
The spine is the most unforgiving structure in the human body. A fractured vertebra that hasn’t yet injured the spinal cord can become permanently paralytic with a single wrong movement. That’s why head and spine injuries demand a different approach from every other injury in this badge — your default is to treat every unconscious trauma patient as if they have a spinal injury until proven otherwise.
This requirement covers four sub-requirements:
- 9a — Symptoms, relationships, and prevention of head/neck/back injuries
- 9b — Concussion symptoms and first aid
- 9c — Bandaging an open head wound
- 9d — First aid for suspected neck or back injury
Requirement 9a: Head, Neck, and Back Injuries
Why These Injuries Are Linked
A head injury and a spinal injury often occur together. The same force that causes a brain injury (a fall, a vehicle crash, a dive into shallow water) can also fracture vertebrae in the neck. You can’t always evaluate the spine while managing an urgent head injury — so when in doubt, you protect both.
Symptoms and Signs
Head injury:
- Loss of consciousness (brief or prolonged)
- Headache, especially one that is worsening
- Confusion, disorientation, or altered mental status
- Nausea and vomiting (especially repeated vomiting)
- Unequal pupils
- Memory loss (before and/or after the injury)
- Drainage of blood or clear fluid from ears or nose (sign of skull fracture)
Spine injury (neck or back):
- Pain, tenderness, or rigidity along the spine
- Weakness, numbness, or tingling in the arms or legs
- Loss of movement in a limb
- Loss of bladder or bowel control
- An unusual posture of the head or neck
- In an unconscious patient: cannot assess; assume spinal injury
Relationships Between Injuries
- A person who is unconscious after head trauma has an undetermined spinal status — assume both.
- A “distracting injury” (a painful obvious fracture elsewhere) can mask spinal tenderness — the person is focused on the obvious pain.
- Alcohol and drugs impair assessment: an intoxicated trauma patient cannot reliably report neck pain.
Possible Complications
- Epidural or subdural hematoma: blood pooling between the skull and brain, causing increasing pressure. Can be immediately dangerous or develop over hours (the “talk and die” phenomenon — a patient seems fine, then deteriorates).
- Spinal cord injury: compression of the cord by fractured vertebrae, with potential for permanent paralysis.
- Diffuse axonal injury: widespread microscopic brain damage from rotational forces (shaken baby syndrome is an extreme example).
Prevention
- Helmets for cycling, skateboarding, skiing, rock climbing, and equestrian activities
- Dive only into water of known depth and with established dive protocols
- Seat belts and appropriate car seats at all times
- Fall prevention in high-risk environments (proper anchor systems for climbing, etc.)
- Neck stretching and strengthening for contact sports athletes
🎬 Video: Head, Neck, and Spine Injuries — https://youtu.be/x-YYjkokQ6U?si=m2OLxLuy7hoS7Yiq
🎬 Video: Assessing a Head Injury — https://youtu.be/9hEjyLabTRE
Requirement 9b: Concussion
What it is: A concussion is a traumatic brain injury caused by a blow or jolt to the head. Despite the name, you don’t have to be “knocked out” to have a concussion — most concussions do not involve loss of consciousness.
Symptoms and signs:
- Headache or pressure in the head
- “Foggy” thinking, difficulty concentrating or remembering
- Confusion or disorientation right after the injury
- Nausea, vomiting
- Balance problems or dizziness
- Blurry or double vision
- Sensitivity to light or noise
- Slowed processing — feels “not right”
- Sleep disturbances (sleeping more than usual, or difficulty sleeping)
- Irritability or emotional changes
First aid:
- Remove the person from play or activity immediately. There is no such thing as “playing through” a concussion safely.
- Assess the ABCs (airway, breathing, circulation).
- If any loss of consciousness occurred, even briefly, treat as a potential spine injury until proven otherwise.
- Watch for red flag symptoms that require immediate 911: one pupil larger than the other; worsening headache; repeated vomiting; seizure; increasing confusion; inability to recognize people or places; weakness or numbness in a limb.
- For a mild concussion with no red flags: rest (both physical and cognitive — no screens, no studying); follow up with a doctor.
Return to play: A Scout with a concussion should not return to contact activities, climbing, or water activities until cleared by a medical professional. Second-impact syndrome — a second concussion before the first heals — can be fatal.
🎬 Video: What Is a Concussion? — https://youtu.be/xvjK-4NXRsM
🎬 Video: First Aid for Concussions — https://youtu.be/mlWaByoT24s
Requirement 9c: Bandaging an Open Head Wound
The scalp is highly vascular — it bleeds a lot, even from relatively minor wounds. Don’t be misled by the bleeding volume into thinking the injury is more severe than it is. However, never apply direct pressure to a head wound where you feel a depression or deformity in the skull, because you could push bone into the brain.
Applying a Head Bandage (Triangular Bandage)
- If no skull deformity: Apply a sterile gauze pad directly over the wound.
- Fold a triangular bandage into a wide cravat (fold from the point down, folding in half several times until you have a strip about 3–4 inches wide).
- Place the center of the cravat over the dressing on the wound.
- Bring both ends around the head to the opposite side and tie snugly (not tight enough to constrict).
- Alternatively, use the full triangular bandage: place the base at the forehead (with the hem just above the eyebrows), fold the point up and over the top of the head, bring the two ends behind the head, tie them together, and then fold the point down and tuck it in.
If skull fracture is suspected:
- Do NOT apply direct pressure.
- Cover loosely with a clean dressing to prevent infection.
- Transport immediately.
🎬 Video: Forehead Cravat Bandage — https://youtu.be/FvAWy4mCm7U?si=lQPX3DLPLhYK1r1Q
Requirement 9d: Suspected Neck or Back Injury
A suspected spinal injury is one of the most important situations to recognize in first aid — and one of the few where the primary instruction is do less, not more.
When to Suspect a Spinal Injury
- High-energy trauma: vehicle crash, fall from height, diving accident, being struck by a high-speed object
- Any unconscious trauma patient
- Any significant head injury
- Patient complaining of neck or back pain, numbness, tingling, or weakness
First Aid
If the patient is conscious and stable:
- Keep them completely still. Tell them calmly but firmly: “Don’t move. I need to keep your head still.”
- Manually stabilize the head and neck in the position you found them (neutral, unless the head is already in an extreme position — then leave it as found).
- Manual cervical stabilization means: place your hands on both sides of the head, with your fingers behind the ears, holding the head still without pressing on it.
- Maintain this until advanced help arrives or the patient can be properly immobilized on a backboard (not a Scout-level skill).
- Call 911.
If the patient is unconscious and not breathing: An airway takes priority over a possible spinal injury. Use the jaw thrust technique (not head-tilt, chin-lift) to open the airway without moving the neck.
What NOT to do:
- Do not remove a helmet in the field (unless you cannot maintain the airway with it on)
- Do not try to straighten the head or neck to a “neutral” position if it’s in a locked or abnormal position
- Do not allow the patient to sit up, stand, or walk
🎬 Video: Head, Neck, and Spine Injuries During Sports — https://youtu.be/D_ZKcO8Ww_c
Head and spine injuries are the most careful — next, you’ll practice the logistics of physically moving a patient when necessary.
Req 10 — Patient Transport
The cardinal rule in first aid is: don’t move a patient unless you must. Moving an injured person poorly can cause pain, worsen injuries, and — in cases of spinal injury — cause paralysis. But sometimes, not moving is more dangerous than moving. This requirement covers the complete decision-making process and five transport scenarios:
- 10a — When to move and when to stay
- 10b — Choosing the best method and demonstrating carries
- 10c — Transporting from a smoke-filled room
- 10d — Transporting someone with a sprained ankle
- 10e — Improvising a stretcher
Requirement 10a: When to Move an Injured Person
When NOT to Move
- Unless there is an immediate threat to life, leave the patient where they are and wait for professional help.
- Specifically: suspected spinal injury, unconscious trauma patient, or any situation where moving could worsen injury.
When Moving IS Necessary
Move a patient when the scene itself is dangerous and cannot be made safe:
- Fire or risk of explosion
- Rising water or flood
- Structural collapse
- Unstable terrain (patient on a slope)
- Toxic atmosphere (smoke, gas)
- When the patient cannot be assessed or treated in their current position (e.g., face-down in a puddle)
The principle: A calculated move that might worsen an injury is still better than leaving someone in a burning building.
When to Move an Injured Person A practical summary of the clinical reasoning behind the decision to move or hold an injured person in place. Link: When to Move an Injured Person — https://www.firstaidbristol.co.uk/blog/2024/09/10/when-is-it-okay-to-move-a-casualty/Requirement 10b: Choosing and Demonstrating a Transport Method
Factors to consider when choosing a transport method:
- Level of consciousness: Is the patient awake and cooperative, or unconscious?
- Type and location of injury: Leg injury? Spinal injury? Arm injury?
- Distance to move: A few feet to safety vs. a quarter-mile to a trailhead
- Available helpers: One person, or several?
- Terrain: Flat floor vs. rough trail vs. stairs
Common Transport Methods
One-person drags (for immediate danger, no spinal injury suspected):
- Clothes drag: Grasp the back of the collar or shirt and drag backward.
- Blanket drag: Roll patient onto a blanket and drag.
One-person carries (conscious, cooperative patient, no spinal injury):
- Pack-strap carry: Patient is on your back, arms around your neck; use for short distances.
- Firefighter’s carry: Patient draped across shoulders; challenging but frees hands.
Two-person carries:
- Two-person seat carry: Rescuers interlock wrists under the patient’s thighs and behind their back.
- Human crutch: One or two helpers support the patient under the arms while they hop on their good leg (see Req 10d).
Stretcher carries: Best for longer distances with suspected fractures (see Req 10e).
Lifts and Carries Illustrated guide to CERT (Community Emergency Response Team) lifting and carrying techniques. Link: Lifts and Carries — https://www.cert-la.com/cert-training-education/lifts-carries/Requirement 10c: Transport from a Smoke-Filled Room
Solo Rescue from Smoke
The first principle: stay low. Smoke and hot gases rise — the cleanest, coolest air is at floor level.
Solo drag technique:
- Stay below the smoke. Crawl to the victim.
- Roll them face up if face down.
- Place both hands under their armpits from behind, interlacing your fingers over their chest.
- Back-drag them toward the exit, keeping both their head and yours as low as possible.
Alternative — clothes drag: Grip the collar or shirt tightly and drag backward.
Two-Person Rescue
- One rescuer at the shoulders/head; one at the legs.
- Lift on a coordinated count — keep the patient as horizontal as possible.
- One person walks backward toward the exit; the other forward.
Safety: Do not attempt a smoke rescue if you cannot stay below the smoke level, if you are not physically capable of moving the patient, or if the room is on fire. Call 911 and provide as much information about the patient’s location as you can.
🎬 Video: Fire and EMS Training: Moving a Patient — https://youtu.be/dC8dC8-ZAoU?si=wQlOwOobpXhJD_3_
Requirement 10d: Transport with a Sprained Ankle
Human Crutch (Solo)
- Stand beside the injured person on their injured side.
- Place your arm around their waist; they place their arm around your shoulder.
- Walk at their pace, letting them hop on their good leg.
- For longer distances, this is tiring — switch sides with another helper periodically.
Two-Person Human Crutch
Two helpers flank the injured person — one on each side — each supporting one arm over their shoulder while holding the patient’s hand. All three move together.
Note for 25-yard demonstration: Your counselor will ask you to demonstrate this on a real person (or yourself). Practice coordinating the movement — “left foot, right foot” together prevents stumbling.
🎬 Video: Human Crutch Techniques — https://youtu.be/U0yDJ0udMkg?si=dB8YruPw7vFL8YC4
Requirement 10e: Improvising a Stretcher
Building an Improvised Stretcher
Option 1: Clothing and poles
- Lay two trekking poles, straight branches, or tent poles parallel, about 18–24 inches apart.
- Button two jackets (or thread the poles through the sleeves of two jackets).
- The result is a stretcher — the jackets form the carrying surface, the poles are the handles.
- Test it with a light weight before trusting it with a person.
Option 2: Tarp or sleeping bag Lay the patient on a tarp or sleeping bag. All helpers grab the edges and lift simultaneously. This works for short distances on relatively flat terrain.
Carrying the Stretcher
- Assign one person at the head to call pace and coordinate.
- Keep the patient’s head elevated slightly above feet (unless shock is suspected — then feet up).
- Position carriers at each end and on the sides of a long stretcher.
- Count “1-2-3, lift” — everyone lifts at the same time to the same height.
- Move slowly and communicate about terrain changes, obstacles, and rest stops.
- Rotate carriers every 25–50 yards to prevent fatigue.
For the 25-yard demonstration: You will be directing the team — give clear instructions, coordinate the lift, and maintain steady pace.
🎬 Video: Improvised Stretchers — https://youtu.be/EYfgxODBlwY?si=dNtz-3lO0Lronu8G
You can now assess, treat, and move patients. Next, you’ll learn about the thermal emergencies that Scouts face in the outdoors — from dehydration in the summer heat to hypothermia in a mountain storm.
Req 11 — Temperature Emergencies
The outdoors is full of thermal hazards. Scouts have died from heat stroke in summer camp and from hypothermia on autumn backpacking trips in conditions that seemed manageable. These emergencies are almost entirely preventable — and highly treatable when caught early. This requirement covers six conditions:
- 11a — Dehydration and over-hydration
- 11b — Heat cramps and muscle pain after exertion
- 11c — Heat exhaustion
- 11d — Heat stroke
- 11e — Chest pains associated with cold exposure
- 11f — Hypothermia
Requirement 11a: Dehydration and Over-Hydration
Dehydration
Water is the medium for nearly every chemical reaction in the human body. Even mild dehydration impairs physical performance and cognition. Severe dehydration can cause kidney failure, heat stroke, and death.
Signs and symptoms:
- Thirst (a late sign — you’re already mildly dehydrated by the time you feel thirsty)
- Decreased urine output; dark, concentrated urine
- Headache
- Fatigue and weakness
- Dizziness when standing
- Dry mouth and skin
- Severe: confusion, rapid heart rate, sunken eyes, no urination
First aid:
- Mild dehydration: oral fluid replacement — water, sports drinks, or broth.
- Moderate to severe: oral fluids if conscious; IV fluids in a hospital setting.
- Stop exertion in the heat; move to cool environment.
Prevention: Drink before you’re thirsty. A useful guide: clear to light yellow urine = adequate hydration. Dark yellow or amber = drink more.
Over-Hydration (Hyponatremia)
Drinking too much plain water dilutes the blood’s sodium concentration — a condition called hyponatremia. It can develop in endurance athletes and hikers who drink only water over many hours without replacing electrolytes.
Signs and symptoms: Nausea and vomiting; headache; confusion or disorientation; swelling of hands and feet; seizures (in severe cases).
First aid:
- Stop drinking plain water.
- For mild cases: consume salty food or an electrolyte drink.
- Severe cases require emergency medical treatment — do not give more water.
Prevention: Drink to thirst (not more); use sports drinks or electrolyte tablets for prolonged exertion lasting more than 2–3 hours.
🎬 Video: What is Dehydration? — https://youtu.be/KahsIEbFROI?si=6m37jPgHqsLiRl_2
🎬 Video: Overhydration — https://youtu.be/sD6j5sNo5Zk
Requirement 11b: Heat Cramps and Muscle Pain After Exertion
Heat Cramps
Heat cramps are painful muscle spasms caused by sodium loss through sweating, usually during or after heavy exercise in hot weather. They most commonly affect the calves, thighs, and abdomen.
Signs and symptoms: Sudden, painful muscle spasms; sweating; otherwise normal mental status.
First aid:
- Stop activity; move to a cool environment.
- Stretch and gently massage the cramped muscle.
- Drink fluid containing sodium (sports drink, lightly salted water, broth).
- Do not return to strenuous activity until cramps resolve.
Prevention: Maintain hydration with electrolyte-containing fluids during prolonged exercise; acclimatize to heat gradually before intense exertion.
Muscle Pain After Exertion (DOMS)
Delayed onset muscle soreness (DOMS) isn’t a heat condition, but this requirement asks you to address it. DOMS is microscopic muscle damage from unaccustomed exercise — it peaks 24–48 hours after the activity and resolves in 3–5 days.
Symptoms: Aching, stiff muscles; reduced strength and range of motion; worse going down stairs or with eccentric movements.
Management: Active recovery (light movement); anti-inflammatory medication; gentle stretching; time.
🎬 Video: Heat Cramps, Heat Exhaustion, and Heat Stroke — https://youtu.be/KOQJB3jlln4?si=F-O0xr3ak9Hk-rbg
🎬 Video: Muscle Damage from Over-exercising — https://youtu.be/6nZOTJ_8guI?si=UgozPCQZg125bGoC
Requirement 11c: Heat Exhaustion
What it is: Heat exhaustion occurs when the body’s cooling system is overwhelmed — the core temperature is elevated but not yet at the critical threshold. It’s a warning that heat stroke may follow.
Signs and symptoms:
- Heavy sweating
- Pale, cool, clammy skin (sweating mechanism still working)
- Rapid, weak pulse
- Weakness, fatigue
- Nausea or vomiting
- Headache
- Dizziness, possible fainting
- Normal or slightly elevated core temperature (up to 104°F)
- Normal mental status (may be mildly confused)
First aid:
- Move immediately to a cool environment — air conditioning, shade, near water.
- Lay the person down with feet elevated.
- Loosen or remove tight clothing.
- Apply cool, wet cloths to the skin.
- Fan the person.
- Give cool fluids slowly if conscious and not nauseated (sports drinks preferred).
- Monitor for progression to heat stroke.
When to call 911: If symptoms don’t improve within 30 minutes, if vomiting prevents fluid intake, or if mental status changes — call immediately.
🎬 Video: Heat Exhaustion vs Heat Stroke — https://youtu.be/8gn3DEYOPuE
Requirement 11d: Heat Stroke
What it is: Heat stroke is a life-threatening emergency. The body’s thermoregulation has failed completely. Core temperature exceeds 104°F (40°C), and the brain and other organs are being damaged by the heat.
There are two forms:
- Classic heat stroke: Occurs in elderly or medically compromised individuals during environmental heat waves. Skin is typically hot and dry (sweating mechanism may have failed).
- Exertional heat stroke: Occurs in young, physically active people exercising intensely in the heat. Skin may still be sweating.
Signs and symptoms:
- Hot skin (may be dry OR sweating)
- Core temperature above 104°F
- Altered mental status — confusion, irrational behavior, combativeness, or loss of consciousness (this is the key difference from heat exhaustion)
- Rapid, strong pulse
- Possible seizures
First aid:
- Call 911 immediately.
- Begin cooling immediately — every minute matters. The faster you lower core temperature, the less organ damage occurs.
- Best method: Cold water immersion — if available, immerse the patient in cold water up to the neck, stirring the water. This is the most effective cooling method.
- If immersion isn’t possible: apply ice packs to the neck, armpits, and groin (where major blood vessels are close to the surface); pour cold water over the body; fan aggressively.
- Do not give fluids to an altered-level-of-consciousness patient.
🎬 Video: Diagnosis and Treatment of Heat Stroke — https://youtu.be/PpHM4DfPZQU?si=mb_BftAlZP8amve9
Requirement 11e: Chest Pains Associated with Cold Exposure
What it is: Cold air and cold temperatures increase the workload on the heart. Coronary arteries can constrict in cold, reducing blood flow to the heart muscle. For people with underlying heart disease (including undiagnosed heart disease), this can trigger a heart attack. Even shoveling snow — a familiar winter activity — kills thousands of Americans each year.
Signs and symptoms: Chest pain, pressure, or tightness that comes on during exertion in cold weather; shortness of breath; radiation to the arm or jaw; cold sweats; possible collapse.
First aid:
- Stop the activity immediately; move to warmth.
- If symptoms suggest heart attack: call 911; have the person rest in a position of comfort; consider aspirin (see Req 7b).
- Begin CPR if they lose consciousness and stop breathing.
Prevention: Warm up gradually before outdoor exertion in cold weather; know if you or group members have cardiac risk factors; pace yourself with snow shoveling; take breaks.
🎬 Video: Heart Attacks from Shoveling Snow — https://youtu.be/xP6Nya7nH_g?si=Lk2KfMloGzl6ZgPk
Requirement 11f: Hypothermia
What it is: Hypothermia occurs when core body temperature drops below 95°F (35°C). The body’s heat-generating mechanisms — shivering, vasoconstriction, increased metabolic rate — are overwhelmed by heat loss. Mild hypothermia is uncomfortable; severe hypothermia is fatal.
Most wilderness hypothermia is not from extreme cold — it results from being wet (from rain, sweat, or immersion), cold, and windy. A Scout who gets soaked and stops moving can develop hypothermia in temperatures well above freezing.
Stages:
| Stage | Core Temp | Key Signs |
|---|---|---|
| Mild | 90–95°F | Shivering, slurred speech, confusion, impaired coordination |
| Moderate | 82–90°F | Shivering stops, increasing confusion, muscle rigidity |
| Severe | Below 82°F | Unconsciousness, cardiac arrhythmias, appears dead |
The “umbles”: Memory aid for hypothermia progression — the patient tumbles (loss of coordination), grumbles (irritability), stumbles (ataxia), mumbles (slurred speech).
First aid:
- Stop heat loss first: Get the person out of wind, rain, and wet clothes. Cover with dry insulation (sleeping bag, emergency blanket, dry clothing).
- Handle gently: A hypothermic heart is irritable — rough handling can trigger fatal arrhythmias.
- Rewarm gradually: body-to-body warmth in a sleeping bag, warm (not hot) packs to the neck/armpits/groin.
- Give warm, sweet fluids if conscious and able to swallow.
- Do NOT rub the extremities vigorously — this drives cold blood to the core.
- For moderate or severe hypothermia: do not assume dead. Begin CPR if no pulse (even in moderate hypothermia the pulse may be very weak). Continue until rewarmed. “You’re not dead until you’re warm and dead” is a real guideline.
🎬 Video: Hypothermia — https://youtu.be/my6JB41apTw
🎬 Video: Recognize the 'Umbles' and Avoid Hypothermia — https://youtu.be/aDAqWLpHXXU
You’ve covered the full range of environmental threats. Next, you’ll tackle a less visible but equally real category of emergencies: mental health and stress reactions.
Req 12 — Mental Health First Aid
First aid has always been about responding to physical injury. But requirement 12 broadens that definition: fear, anxiety, stress, and the mental states that make someone a danger to themselves or others are legitimate first aid situations. This requirement covers four sub-requirements:
- 12a — Reactions to stressful Scouting situations
- 12b — Actions to prepare for and manage those situations
- 12c — Warning signs that someone might be dangerous to themselves or others
- 12d — What to do if you suspect someone is a danger to themselves or others
Requirement 12a: Stress Reactions in Scouting Situations
Stress is the body’s response to a perceived challenge or threat. The stress response is hardwired — it exists to keep you alive in genuinely dangerous situations. The problem is that the brain can’t always tell the difference between a tiger and a swim test.
The Physiology of Stress
When you encounter something stressful, your hypothalamus triggers the release of adrenaline and cortisol. The result: faster heart rate, increased breathing, heightened alertness, muscle tension, and suppressed digestion. This is the “fight-or-flight” response.
This is not weakness. It’s biology. Even experienced athletes, military personnel, and emergency responders experience it.
Three Scouting Scenarios
1. Rappelling for the first time
Reactions: Heart pounding; shaky hands; freezing at the cliff edge; refusing to lean back; tears; anger or frustration directed outward; tunnel vision on the drop below.
Why it happens: The brain registers “vertical drop” as a mortal threat. Standing at the edge triggers the primal fear of falling. The rappel harness doesn’t immediately override that fear.
2. Taking a swim test at camp
Reactions: Anxiety for days before; churning stomach at the dock; inability to perform a stroke you know perfectly well in practice; going stiff in the water; shutting down.
Why it happens: Performance anxiety triggers the same stress response as physical danger. The evaluation aspect (“being watched and judged”) amplifies the physiological response.
3. Missing home at a long camp or high-adventure trip
Reactions: Difficulty sleeping; low appetite; irritability; crying; withdrawal from the group; physical symptoms (headache, stomachache) without a clear physical cause.
Why it happens: Separation from familiar environments and attachment figures is a genuine psychological stressor, especially early in development. Homesickness is not a sign of weakness or immaturity.
🎬 Video: 3 Tools for Situational Anxiety — https://youtu.be/_H5QFfiU0s0
🎬 Video: Overcoming Social Anxiety — https://youtu.be/BmX6GXDvlLM
🎬 Video: Power of Self-Confidence — https://www.youtube.com/watch?v=gTd6Lq1M9Tc
🎬 Video: Getting Ready for Tryouts — https://youtu.be/a_dVK2EEWKE
Requirement 12b: Managing Stress Reactions
Before the Stressful Event (Preparation)
- Exposure: Gradually approach the stressor in low-stakes settings. A Scout who fears heights benefits from climbing a short wall before standing at a rappel cliff.
- Information: Fear of the unknown amplifies stress. Knowing what rappelling will feel like before you do it reduces the surprise factor.
- Physical preparation: Exercise, adequate sleep, and proper nutrition reduce baseline stress levels and improve recovery from acute stress.
- Positive self-talk: Replace “I can’t do this” with “This is hard, but I’ve done hard things before.”
During the Stressful Situation
Controlled breathing is the most powerful immediate tool you have. Slowing and deepening your breath directly counteracts the physiological stress response.
Box breathing (used by military and first responders):
- Inhale for 4 counts
- Hold for 4 counts
- Exhale for 4 counts
- Hold for 4 counts
- Repeat 4–6 times
Grounding: When panic or anxiety is overwhelming, anchor yourself to the present moment. Identify 5 things you can see; 4 things you can touch; 3 things you can hear. This interrupts the anxious thought loop.
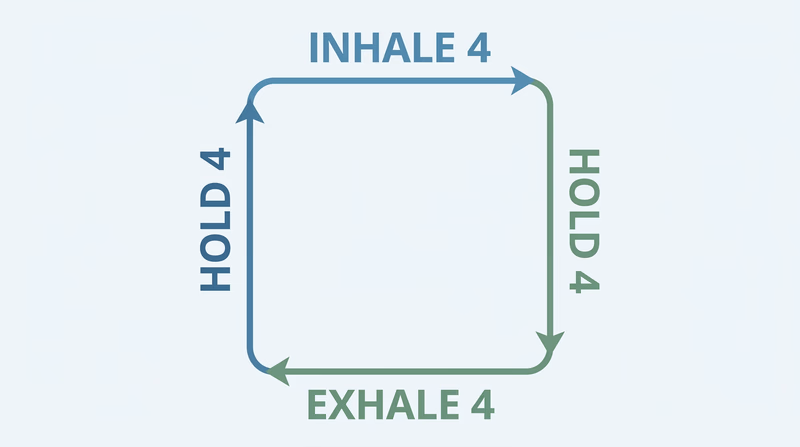
Supporting Someone Else
When a fellow Scout is overwhelmed:
- Stay calm yourself. A calm presence is contagious.
- Don’t minimize. “It’s not a big deal” increases shame. “I can see this is tough for you” validates the experience.
- Give them control. Let them set the pace. A Scout who feels forced through a fear usually develops a harder version of it.
- Stay nearby — don’t leave them alone — but don’t hover or pressure.
🎬 Video: Techniques to Manage Stress — https://youtu.be/h2zWopNUUJE
🎬 Video: Box Breathing | The Breathing Exercise Used By Navy SEALs — https://youtu.be/UC6HUrneIWI
🎬 Video: Tips for Overcoming Phone Anxiety — https://youtu.be/QcKbxaGpwf4
🎬 Video: How to Stop Letting Social Anxiety Control You — https://youtu.be/wbroM1Di-bI
Requirement 12c: Warning Signs of Danger to Self or Others
This is sensitive but important content. Being able to recognize when someone has crossed from ordinary stress into genuine crisis — where they might hurt themselves or someone else — is a real first aid skill.
Signs Someone May Be a Danger to Themselves
- Talking about wanting to die, disappear, or not exist: Any statement about suicide or self-harm should be taken seriously. There is no “crying wolf” when it comes to suicidal ideation.
- Giving away important possessions — especially suddenly or unexpectedly
- Saying goodbye in ways that feel final
- Researching methods of self-harm or acquiring means
- Withdrawal from friends, family, and activities they used to enjoy
- Dramatic mood changes, especially a sudden calm after a period of crisis (this can indicate resolution to act)
- Increasing use of alcohol or drugs
- Expressing feelings of being a burden to others (“Everyone would be better off without me”)
Signs Someone May Be a Danger to Others
- Explicit threats directed at specific individuals or places
- Access to weapons combined with grievance: Someone who has been talking about being wronged and suddenly has or is seeking access to a weapon
- History of violence combined with escalating behavior
- Extreme social isolation paired with fixation on revenge or blame
- Talk of a final act or “teaching someone a lesson”
What Doesn’t Necessarily Indicate Danger
Normal expressions of anger, frustration, or distress — even dramatic ones — are not the same as warning signs. Context matters enormously. The difference is usually specificity, intensity, and whether the person has made a plan.
Requirement 12d: What to Do When You Suspect Danger
If You’re Concerned About a Friend or Troop Member
- Talk to them directly if you can do so safely. Asking someone directly about suicidal thoughts does not plant the idea — research shows it actually reduces the risk by opening the door to conversation.
- Tell an adult immediately. This is not tattling — this is potentially saving a life. Tell a parent, Scoutmaster, school counselor, or other trusted adult. You are not expected to handle a mental health crisis alone.
- Do not leave the person alone if you believe the danger is immediate.
- Call 911 if there is immediate danger to the person or to others.
Crisis Resources
If a Scout or someone you know is in crisis:
- 988 Suicide and Crisis Lifeline: Call or text 988 (US)
- Crisis Text Line: Text HOME to 741741
- Emergency: Call 911
The Scout’s Role
You are not expected to be a therapist, counselor, or crisis negotiator. Your role is simple: recognize the warning signs, tell a trusted adult, and stay with the person until that help arrives. That’s enough — and it can make all the difference.
Mental health first aid is some of the most human work in this entire badge. Next, you’ll wrap up the medical conditions section with eyes, teeth, digestive emergencies, and stroke.
Req 13 — Eyes, Teeth & Strokes
This final medical conditions requirement covers five situations that don’t fit neatly into the previous categories — but that Scouts commonly encounter at campouts, games, and in daily life:
- 13a — Object in the eye
- 13b — Dental injuries (broken, chipped, or knocked out tooth)
- 13c — Vomiting and diarrhea from food poisoning
- 13d — Abdominal pain
- 13e — Stroke
Requirement 13a: Object in the Eye
What it is: Foreign objects — dust, dirt, sawdust, sand, metal chips, or insects — commonly get into the eye. A small, superficial object often comes out with the eye’s own tearing response. An embedded or penetrating object is a serious eye emergency.
Signs and symptoms: Intense tearing; pain or a “gritty” sensation; redness; difficulty opening the eye; blurry vision.
First aid for a small, non-embedded object:
- Do NOT rub the eye — rubbing can embed the object or scratch the cornea.
- Blink rapidly several times — natural tearing may flush the object.
- If blinking doesn’t work, flush the eye with clean, room-temperature water for several minutes. Tilt the head so the affected eye is lower; pour water from the inner corner outward.
- Gently lift the upper eyelid to look under it for the object; gently pull down the lower lid. If you see the object on the white of the eye or inside the lid, gently remove it with a damp corner of a clean cloth.
- If the object is on the cornea (the colored part), do not attempt to remove it.
First aid for a penetrating eye injury:
- Do NOT remove any object embedded in the eye.
- Cover both eyes loosely (covering one reduces sympathetic eye movement).
- Do not apply pressure.
- Seek emergency care immediately.
Prevention: Safety glasses for power tools, woodworking, and chemistry; protective eyewear for outdoor activities in dusty or debris-prone environments.
🎬 Video: 5 Ways to Safely Remove Something Stuck in Your Eye — https://youtu.be/uJFZPFsHcCE?si=YgmlNzHWSWm3iWWH
🎬 Video: Penetrating and Chemical Eye Injuries — https://youtu.be/46UgImUrAG0
Requirement 13b: Dental Injuries
Chipped or Broken Tooth
Signs and symptoms: Visible chip or fracture; pain (especially with air, cold, or pressure); sharp tooth edge that cuts the tongue.
First aid:
- Rinse the mouth with warm water.
- Apply a cold pack to the cheek to reduce swelling.
- Cover sharp edges temporarily with dental wax or sugar-free chewing gum.
- Save any tooth fragments in milk if possible.
- See a dentist promptly.
Loosened Tooth
Signs and symptoms: Tooth is mobile in the socket; pain; possibly displaced.
First aid:
- Do NOT try to push it back into position.
- Bite down gently on a piece of gauze.
- See a dentist as soon as possible — a loosened permanent tooth can often be saved with prompt treatment.
Knocked-Out Tooth (Avulsed Tooth)
A knocked-out permanent tooth is a dental emergency. It can often be re-implanted successfully if treated within 30–60 minutes.
First aid:
- Find the tooth; handle it by the crown (top), not the root.
- If dirty, gently rinse with water or milk — do not scrub.
- Best option: Reinsert the tooth in the socket immediately and bite down gently on gauze to hold it.
- If reimplantation isn’t possible: Store the tooth in milk, the patient’s own saliva, or a commercial tooth preservation solution (Save-A-Tooth). Do NOT let it dry out; do NOT store in plain water.
- Get to a dentist or emergency room within 30–60 minutes.
Note: This applies only to permanent teeth. Baby teeth should not be reimplanted.
🎬 Video: Dental Emergencies — https://youtu.be/eJnKf1jM6xY
Requirement 13c: Vomiting and Diarrhea from Food Poisoning
What it is: Food poisoning results from consuming food or water contaminated with bacteria, viruses, or their toxins. Common culprits: Salmonella, E. coli, Norovirus, and Staphylococcus aureus (the “hours later” type from food left out too long).
Signs and symptoms: Nausea, vomiting, diarrhea, abdominal cramps; sometimes fever; typically begins within 2–48 hours of eating the contaminated food; usually self-limiting (resolves in 24–72 hours).
First aid:
- Rest the stomach: small, frequent sips of clear fluids (water, diluted juice, electrolyte drinks).
- Rehydration is the priority — vomiting and diarrhea can cause significant fluid and electrolyte loss.
- If vomiting is severe, wait 15–30 minutes after vomiting before attempting any fluids.
- Gradually reintroduce bland foods (crackers, toast, plain rice) when tolerated.
- Do NOT force food.
- Oral rehydration salts (ORS) are excellent for fluid replacement, especially for children.
When to seek care: Blood in vomit or stool; high fever (above 102°F); severe dehydration; symptoms lasting more than 72 hours; or any severe abdominal pain that might suggest appendicitis.
Prevention at camp: Proper food storage (cold food cold, hot food hot); prompt refrigeration; thorough cooking; handwashing before food prep and after bathroom use; treat backcountry water sources.
🎬 Video: First Aid for Vomiting and Diarrhea — https://youtu.be/K5UxbbnSjxc?si=pf6WbrBictHhwad8
Requirement 13d: Abdominal Pain
What it is: Abdominal pain has dozens of causes, ranging from gas and muscle strain to appendicitis and bowel obstruction. Your job as a first aider is not to diagnose — it’s to assess severity, manage comfort, and recognize when the situation requires professional care.
Signs and symptoms by location and character:
| Location | Possible Cause |
|---|---|
| Lower right quadrant | Appendicitis |
| Upper right quadrant | Gallbladder disease |
| Central/diffuse | Gas, constipation, food poisoning, general abdominal illness |
| Lower left (often older adults) | Diverticular disease |
Appendicitis Specifics
Appendicitis is the most critical cause a Scout should know. It begins with pain around the navel, then migrates to the lower right abdomen. It worsens over hours and is accompanied by fever, nausea, and loss of appetite. It is a surgical emergency — an untreated appendix can rupture, causing peritonitis (widespread abdominal infection), which is life-threatening.
Warning signs requiring emergency care:
- Worsening pain unrelieved by any position
- Fever with abdominal pain
- Rigid abdomen (board-like stiffness — suggests peritonitis)
- Vomiting with inability to keep any fluids down
- Worsening over hours, especially if pain starts centrally and moves to the right lower quadrant
Basic first aid:
- Rest in a comfortable position.
- Do not give pain medications unless directed by a healthcare provider (pain masking can complicate diagnosis).
- Do not give laxatives.
- Monitor and seek care if pain doesn’t resolve quickly or shows any warning signs.
🎬 Video: Causes of Abdominal Pain — https://youtu.be/2RxEHcGpwnA
🎬 Video: Appendicitis — https://youtu.be/pFCfQwYWxcM?si=r3inhA-IMeSBDkCz
🎬 Video: What Does Appendix Pain Feel Like? — https://youtu.be/8CUEPNcGtWs?si=c7X8WPlAAwQvtPWC
Requirement 13e: Stroke
What it is: A stroke occurs when blood supply to part of the brain is cut off — either by a clot (ischemic stroke, 87% of cases) or by a burst blood vessel (hemorrhagic stroke). Every minute without treatment, approximately 1.9 million brain cells die. “Time is brain.”
Types:
- Ischemic stroke: Blood clot blocks an artery supplying the brain.
- Hemorrhagic stroke: An artery bursts, bleeding into or around the brain.
- TIA (Transient Ischemic Attack): A “mini-stroke” — symptoms resolve within 24 hours. It is a warning sign that a major stroke may follow; always seek emergency care.
Recognizing a Stroke: FAST
The FAST acronym is the standard public recognition tool:
| Letter | What to Check |
|---|---|
| F — Face | Ask them to smile. Does one side droop? |
| A — Arms | Ask them to raise both arms. Does one drift down? |
| S — Speech | Ask them to repeat a phrase. Is it slurred or garbled? |
| T — Time | If ANY of these signs are present, call 911 immediately. Note the time symptoms began. |
Other stroke signs: Sudden severe headache with no known cause (“the worst headache of my life” — a classic sign of hemorrhagic stroke); sudden vision loss or double vision in one or both eyes; sudden loss of coordination or balance; sudden confusion.
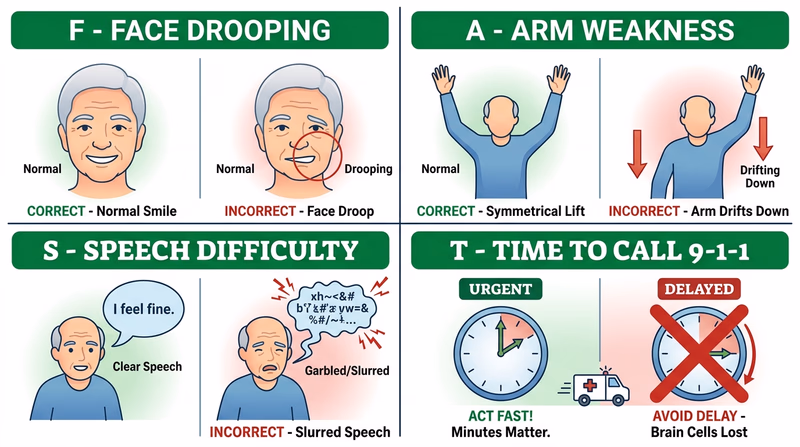
First aid:
- Call 911 immediately — stroke is a time-critical emergency. Note what time symptoms started.
- Keep the person calm and lying down.
- Do NOT give anything by mouth — they may have difficulty swallowing.
- Do NOT leave them alone.
- Prepare to perform CPR if they lose consciousness and stop breathing.
🎬 Video: Types of Strokes — https://youtu.be/EsshJLm5CN8
🎬 Video: First Aid for Stroke — https://youtu.be/v0AqhXminV8
🎬 Video: FAST Symptoms and Signs of a Stroke — https://youtu.be/mkpbbWZvYmw
🎬 Video: What Causes Strokes? — https://youtu.be/-NJm4TJ2it0?si=Q1rK65yZDzBZ9V47
You’ve covered the full spectrum of medical emergencies. Now for a requirement that’s completely different — teaching.
Req 14 — Teaching with EDGE
You’ve learned an enormous amount about first aid. Now you’ll pass some of it on — because teaching is one of the deepest forms of learning, and because the whole point of first aid knowledge is for it to spread.
The EDGE Method
EDGE is Scouting’s framework for teaching any practical skill. It stands for:
| Letter | Step | What It Means |
|---|---|---|
| E | Explain | Tell the learner what they’re about to learn and why it matters |
| D | Demonstrate | Show them exactly how to do it, step by step |
| G | Guide | Help them do it — with your hands, your voice, and your presence |
| E | Enable | Step back and let them do it on their own while you observe |
EDGE isn’t just a mnemonic — it reflects a genuine learning progression. You can’t guide someone through a skill they haven’t seen demonstrated, and you can’t enable someone who hasn’t been guided. The order matters.
Choosing Your Skill or Topic
You have tremendous flexibility here. Some questions to help you choose:
- What skill from this badge was most surprising or impactful for you?
- What skill would be most immediately useful to the people you’re teaching?
- What can you credibly demonstrate with the equipment you have?
Strong choices for a family teaching session:
- Hands-only CPR (demonstrated on a training mannequin or pillow)
- Using an EpiPen (or demonstrated with a trainer device)
- Stopping severe bleeding with direct pressure and improvised dressing
- Removing a tick properly
- Recognizing and responding to a stroke (FAST)
Strong choices for a Scout teaching session:
- Building a personal first aid kit and demonstrating each item
- Applying an ankle wrap or arm sling
- Scene assessment and the 3 C’s
- Recognizing shock
Building Your Teaching Plan
Work through the four EDGE steps as a written or verbal plan before discussing with your counselor.
Explain Phase (2–3 minutes)
- What is this skill? Give a clear, one-sentence definition.
- Why does it matter? Give a specific, realistic scenario where this skill would be used.
- What will the learner be able to do by the end? Make it concrete: “By the end of this lesson, you’ll be able to apply an arm sling that safely immobilizes the arm for transport.”
Demonstrate Phase (3–5 minutes)
- Do the skill yourself, slowly, talking through each step.
- Emphasize the parts that are counterintuitive or easy to get wrong.
- Demonstrate any equipment needed.
Guide Phase (5–10 minutes)
- Have the learner try the skill while you’re right there.
- Give specific, actionable feedback: not “that’s wrong” but “bring your elbow a little higher — there, that’s the position.”
- Let them make small mistakes and correct; this is better for learning than jumping in immediately.
Enable Phase (3–5 minutes)
- Have the learner perform the skill independently while you observe without coaching.
- Evaluate: did they get the key steps right? Are there safety-critical errors?
- Give brief, positive reinforcement of what worked, and identify one specific improvement.
Tips for an Effective Teaching Session
Before Your Lesson
Preparation makes the difference- Practice the skill yourself until it’s fluent — you can’t teach what you’re unsure of
- Gather all needed materials ahead of time
- Decide who your learner(s) will be and adjust vocabulary for their age/background
- Plan for about 15–20 minutes total
- Know what success looks like — you need a clear standard to evaluate against
Discussing Your Plan with Your Counselor
Before you teach, talk through your plan. Your counselor will likely ask:
- Why did you choose this skill?
- Who are you teaching it to, and why is this appropriate for that audience?
- Walk me through your EDGE plan step by step.
- What materials do you need?
- How will you know if the learner successfully learned the skill?
After you’ve taught it, come back to your counselor with a brief report on how it went — what worked, what didn’t, and what you’d do differently next time.
The Teaching EDGE: The Best Way to Teach Someone a New Skill Scout Life's explanation of the EDGE teaching method with examples of how to apply it to Scouting skills. Link: The Teaching EDGE: The Best Way to Teach Someone a New Skill — https://blog.scoutingmagazine.org/2017/05/05/living-on-the-edge-this-is-the-correct-way-to-teach-someone-a-skill/Almost there — the final requirement gives you a chance to explore emergency medicine as a possible career or life path.
Req 15 — Explore EMS Careers
The final requirement shifts from emergency skills to the world of people who live this work professionally. Requirement 15 asks you to pick one path to explore emergency medical services — the careers, the people, and the role EMS plays in your community.
Your Options
Req 15a — Visit an EMS Station: Tour an emergency medical services facility or training center and interview the first responders you meet about their careers and how they serve the community.
Req 15b — Interview an EMS Professional: Conduct an in-depth interview with an EMT, paramedic, flight nurse, or other EMS professional about their career path and what the job is really like.
Req 15c — Research an EMS Career: Choose one EMS-related career and research the training, education, certifications, job prospects, and salary in depth.
Req 15d — EMS as a Hobby or Lifestyle: Explore how EMS knowledge can enrich a personal hobby or healthy lifestyle — from volunteering to search-and-rescue to wilderness medicine.
How to Choose
Choosing Your Path
Consider what will be most meaningful to you- Time and logistics: Option 15a requires coordinating a site visit; 15b requires setting up an interview; 15c and 15d can be done independently with research.
- Career interest: If you’re genuinely curious about medicine as a career, 15b or 15c will give you the most useful information.
- Access: Do you know anyone in EMS? A personal connection makes 15b especially valuable.
- What you’ll gain: 15a gives you a firsthand look at the environment; 15b gives you insight into one person’s path; 15c gives you a practical career picture; 15d helps you think about applying these skills to your own life.
Ready to explore? Pick the option that fits your situation and interests.
Req 15a — Visit an EMS Station
This option puts you face to face with the professionals who do emergency medicine every day — not through a screen, but in person, in the spaces where they train and respond. Most EMS stations, fire departments with EMS capability, and ambulance corps welcome Scout visits.
Planning Your Visit
Finding a Facility
- Your local fire department often has an EMS division. Call and ask to speak with the community outreach or public affairs contact.
- Your county or city may have a dedicated EMS agency separate from the fire department.
- Community ambulance corps (many are volunteer-based) are usually very welcoming to Scout groups.
- Hospital-based EMS training centers are another option — they often run EMT certification courses and have training manikins and simulated scenarios you can observe.
Scheduling
- Call or email at least 2–3 weeks in advance.
- Identify yourself as a Scout working on the First Aid merit badge.
- Ask who would be the right person to host your visit and whether there is a preferred day/time when the station is less busy with calls.
- Confirm whether you’ll be doing a facility tour, talking with personnel, or both.
What to Bring
- A notebook and pencil (or your phone for notes).
- A list of questions prepared ahead of time (see below).
- A genuine curiosity — the people you meet chose this career to help others, and they usually enjoy talking about it.
Questions to Ask the First Responders
Go beyond the basic tour. Come ready with thoughtful questions:
About the work:
- What does a typical shift look like for you?
- What types of calls do you respond to most often?
- What’s the most challenging type of call — physically, emotionally, or technically?
- How has the job changed in the past 5–10 years?
About the career path:
- How did you decide to go into EMS?
- What certifications or training did you need to start?
- What’s the difference between an EMT and a paramedic?
- What does continuing education look like in this field?
About serving the community:
- What do you wish the general public knew about calling 911?
- What first aid skill do you think every civilian should know?
- Is there anything Scouts specifically could do to be better prepared to assist in an emergency?
What to Observe
While you’re there, pay attention to:
- The equipment on the ambulance or in the station (How does it compare to what you’ve learned?)
- How the crew interacts — teamwork under stress is a learned skill
- The training tools they use (mannequins, simulation equipment, defibrillator trainers)
- The physical setup of the station — what does life between calls look like?
Discussing Your Visit with Your Counselor
After your visit, come prepared to discuss:
- What surprised you most about what you saw or heard?
- How do the professionals’ skills and knowledge compare to what you’ve learned in this badge?
- Did any aspect of EMS work interest you as a possible career?
- What role do community first responders play that professional EMS cannot?
🎬 Video: EMS Training Center Virtual Tour — https://youtu.be/p9s3agPQR4g?si=JBiBzZWsCnwz0J9D
Req 15b — Interview an EMS Professional
A great interview is a conversation, not a questionnaire. This option gives you the chance to understand the human story behind an EMS career — what drew someone to this work, what keeps them in it, and what the reality of the job is when the adrenaline fades.
Who to Interview
“EMS professional” covers a wider range of people than you might expect:
- EMT (Emergency Medical Technician): Basic life support certification; the entry-level EMS provider on most ambulances.
- AEMT (Advanced EMT): Intermediate certification with some advanced skills.
- Paramedic: Advanced life support certification; the highest pre-hospital level; 1,000–2,000+ hours of training.
- Flight nurse or flight paramedic: Works on medical helicopters; combines intensive care nursing or paramedicine with aviation medicine.
- ER nurse or emergency physician: Hospital-based but intimately connected to the EMS system; sees the patients after the ambulance delivers them.
- Wilderness EMT or WEMS provider: Applies EMS skills in backcountry and remote settings.
- Dispatcher: The 911 dispatcher is part of the EMS chain; they can be fascinating to interview about the communication side of emergency response.
Finding someone to interview:
- Ask your parents or family friends if anyone in your network works in EMS or healthcare.
- Contact your local fire station or ambulance corps and ask if anyone would be willing to be interviewed by a Scout.
- Many EMS agencies have community outreach contacts who coordinate exactly this kind of educational request.
Preparing for the Interview
Before
- Research the basic EMS certification levels so you understand the answers you receive.
- Write out your questions in advance — you’ll be a better interviewer if you’re not thinking of questions on the spot.
- Decide whether you’ll take notes by hand, record audio (always ask permission), or type.
During
- Start with open-ended questions that invite stories, not yes/no answers.
- Listen actively — follow up on interesting things they say.
- It’s okay to pause and think before your next question.
- Thank them at the end.
Suggested Interview Questions
About choosing the career:
- What made you decide to go into EMS?
- Was there a specific incident or experience that influenced your decision?
- What did your path look like — school, certifications, first job?
About daily work:
- What does a typical shift look like?
- What types of calls are the most common? The most challenging?
- What’s the most satisfying part of the job?
About training and continuing education:
- What certifications do you hold, and how do you maintain them?
- How do you stay current with new protocols and skills?
- Is there specialization within EMS?
About working in your community:
- How does your work connect to the fire department, hospital, and other agencies?
- What do you wish more people understood about calling 911?
- What first aid knowledge would you most want Scouts to have?
About career outlook:
- Would you recommend this career to a young person today?
- What’s the hardest part of the work — not just the calls, but the career?
Discussing Your Interview with Your Counselor
Come to your counselor conversation with specific things you learned. Shallow answers (“it was interesting”) are not enough. Engage with the content:
- What surprised you most about the work or the career path?
- How does the reality of EMS work compare to what you expected from TV or movies?
- Is there anything about this career that genuinely appeals to you? Genuinely concerns you?
- Whether or not you pursue EMS professionally, how might understanding this field make you a better community member?
🎬 Video: A Day with a Paramedic — https://www.youtube.com/watch?v=k0k6tWrISBM
🎬 Video: Female EMS Helicopter Pilot: A Day in a Life — https://youtu.be/s9U0nwy9te4?si=_u3rRX4XniQToGka
🎬 Video: An ER Nurse — https://www.youtube.com/watch?v=3GzBKoCK3Ik
Req 15c — Research an EMS Career
This option asks you to treat the research itself as seriously as any other research project — which means going beyond the first search result. Real career research tells you what a job actually costs to enter (time and money), what the entry-level experience is really like, and where the career can go over 10–20 years.
Three EMS Career Opportunities
You need to identify three first, then research one in depth.
Option A: Emergency Medical Technician (EMT)
EMTs provide basic life support — CPR, oxygen, bleeding control, medication assist, and patient assessment. They are the backbone of most ambulance crews in the US.
Quick overview:
- Training: EMT-Basic certification requires approximately 120–150 hours of classroom and clinical time.
- Certification: National Registry of Emergency Medical Technicians (NREMT) exam.
- Employment: Fire departments, private ambulance companies, hospitals, ski resorts, industrial sites.
Option B: Paramedic
Paramedics are the advanced level of pre-hospital care. They can administer IV medications, intubate patients, perform cardioversion, read EKGs, and manage complex medical and trauma emergencies. Most work on advanced life support (ALS) ambulances.
Quick overview:
- Training: Typically 1,200–1,800 hours; usually requires EMT certification first.
- Certification: NREMT Paramedic exam, state licensure.
- Employment: Fire departments, private EMS, critical care transport, flight programs.
Option C: Emergency Nurse (RN)
Emergency room nurses handle patients across the spectrum — from minor injuries to cardiac arrests. They work in collaboration with physicians and technicians in high-speed, high-acuity hospital environments.
Quick overview:
- Training: Associate’s or Bachelor’s degree in nursing (2–4 years); NCLEX-RN licensing exam.
- Certification: Certified Emergency Nurse (CEN) credential for experienced ER nurses.
- Employment: Hospital emergency departments, trauma centers, urgent care.
Other careers to consider:
- Emergency Medical Dispatcher (EMD): 911 call taker who also provides pre-arrival medical instructions.
- Flight Paramedic or Flight Nurse: Helicopter EMS, requiring advanced certification and significant field experience.
- Emergency Medicine Physician (MD/DO): 4 years of college + 4 years of medical school + 3–4 year EM residency.
- Physician Assistant (PA) or Nurse Practitioner (NP) in Emergency Medicine
- Search and Rescue Technician: May combine EMS with wilderness medicine, rope rescue, and other technical skills.
In-Depth Research Guide
After identifying your three careers, pick one for deep research. Use reliable sources: the Bureau of Labor Statistics (BLS.gov), NREMT (nremt.org), the National Association of EMS Educators (naemse.org), and professional associations.
What to Research
Training and education:
- What are the prerequisites? (High school diploma, CPR cert, prior EMS experience?)
- How long is the initial training program?
- Where can you take the training in your area?
Certification requirements:
- What exams are required?
- What clinical hours are required?
- How is certification maintained (continuing education, recertification)?
Cost to enter the field:
- Tuition for training programs
- Exam fees
- Equipment (uniforms, stethoscope, etc.)
Employment prospects:
- Is demand growing or declining? (BLS Occupational Outlook Handbook)
- Are there geographic areas with strong demand?
- Full-time vs. part-time vs. volunteer opportunities?
Salary:
- Starting salary (entry level)
- Median salary (BLS data)
- Salary range (entry to experienced)
- Salary differences by region, employer type, and certification level
Advancement opportunities:
- Can an EMT become a paramedic? A paramedic become a flight medic or supervisor?
- What additional certifications can enhance career development?
- Are there management or leadership tracks?
Discussing with Your Counselor
Come prepared to walk your counselor through your research findings — not just recite them, but interpret them. Think about:
- What did you find out that you didn’t expect?
- What aspect of this career is most appealing to you?
- What aspect would be challenging for you?
- Given the training, time, and money required — does this career path seem realistic and worthwhile to you?
- Even if this isn’t the career for you, what’s valuable about understanding how this system works?
🎬 Video: 5 Careers that Require CPR and First Aid Certification — https://youtu.be/2MzVijGmUrk
Req 15d — EMS as a Lifestyle
Not everyone who earns First Aid merit badge will become an EMT or paramedic. But the knowledge you’ve built in this badge doesn’t have to stay on a shelf until a career decides. This option asks you to think about how EMS skills fit into the life you’re already living or planning to live.
Ways EMS Knowledge Enriches Everyday Life
Wilderness First Aid and Wilderness First Responder
Scouts who love backcountry hiking, backpacking, climbing, or paddling have a natural entry into wilderness medicine. Wilderness medicine applies emergency care principles to remote settings where professional help may be hours or days away.
Wilderness First Aid (WFA): A 20-hour course focused on backcountry emergency care basics. Appropriate for campers, hikers, and outdoor educators.
Wilderness First Responder (WFR, pronounced “woofer”): The gold-standard backcountry certification. 70–80 hours of training. Required or strongly preferred for many outdoor leadership and guide positions (NOLS guides, Outward Bound instructors, ski patrol, mountain rescue teams).
Organizations: NOLS Wilderness Medicine, Wilderness Medical Associates (WMA), Wilderness Medicine Institute (WMI).
Cost: WFA courses typically run $150–$250. WFR courses run $600–$900 depending on provider.
Volunteer EMS
Most rural and suburban EMS systems depend heavily on volunteer providers. Becoming a volunteer EMT is one of the most direct ways to apply first aid skills while serving your community — without making it a full-time career.
Minimum requirements: Usually 18 years old and EMT-Basic certified. Some agencies allow Explorer posts for younger volunteers in observer/support roles.
Time commitment: Varies widely — some volunteer corps ask for a certain number of shifts per month; others are fully on-call.
Benefits: Practical skill development; team experience; genuine community service; possible path to paid EMS career later.
Sport Medicine and Athletic Training
Scouts who are involved in athletics — team sports, climbing, trail running, cycling — can apply EMS knowledge to sports settings as athletes, coaches, or support staff.
Certified Athletic Trainer (ATC): A healthcare profession focused on injury prevention, evaluation, and rehabilitation for athletes. Requires a bachelor’s or master’s degree and board certification.
Sports First Responder: Informal role (team parent, coach, recreation league safety officer) using CPR/AED/first aid certification to be prepared during games and practices.
Organizations: National Athletic Trainers’ Association (NATA); American College of Sports Medicine (ACSM).
Search and Rescue (SAR)
Search and rescue teams find lost or injured people in wilderness, urban, and technical environments. Many SAR teams include EMS capability — finding the person is only half the job; providing medical care and packaging for evacuation is the other half.
SAR teams typically need volunteers with outdoor navigation skills, physical fitness, and first aid training (WFA or WFR preferred). Many counties and regions have SAR volunteer units.
Organizations: National Association for Search and Rescue (NASAR); your county sheriff’s department may have a SAR unit.
CPR/First Aid Instruction
Once certified in CPR and first aid, you can pursue instructor certification and teach others — in your troop, at school, in your community. Sharing these skills is how communities become safer.
Certification: American Red Cross and American Heart Association both offer first aid/CPR instructor courses. Instructor candidates typically need current CPR/AED certification, an instructor course, and a teaching practicum.
Planning Your Goals
Your counselor will ask you to share short-term and long-term goals. Think specifically:
Short-term (1–2 years):
- Maintain current CPR certification
- Complete a Wilderness First Aid course
- Join a volunteer ambulance corps as an Explorer or observer
Long-term (5–10 years):
- Earn EMT certification and volunteer with a local EMS agency
- Complete WFR certification before a long-distance trail expedition
- Become a certified CPR/AED instructor and teach in your community
The discussion with your counselor: Come ready to talk about which of these paths genuinely interests you, what the realistic first step would be, and why investing time and resources in this direction makes sense for your life and values.
🎬 Video: EMS and Fire Volunteers in Washington State — https://youtu.be/gEkzn15Jpzc
You’ve completed all fifteen requirements. One last stop — extended learning — before the guide is finished.
Extended Learning
A
You’ve done something significant. First Aid is one of the most demanding Eagle-required merit badges, and not just because of the volume of material — it’s because every skill you’ve learned is asking something real of you. You’re being asked to stay calm when someone is bleeding, to think clearly when someone has stopped breathing, to recognize the signs of a silent crisis before it becomes fatal.
Carry that seriously. The badge goes on your sash; the skills go with you everywhere else.
If you’re ready to go further — to deepen specific skills, connect with the organizations that do this work professionally, and plan your next steps in the world of emergency medicine — read on.
B: The Science Behind CPR
You’ve learned how to do CPR. Here’s why it works — and why it sometimes doesn’t.
The heart’s job is to maintain blood pressure — the force that pushes oxygen-carrying blood to the brain. In cardiac arrest, the pumping stops. Chest compressions physically compress the heart between the sternum and the spine, squeezing blood out into the arteries. On recoil, the chest expands, the heart fills again. This mechanical CPR maintains roughly 25–30% of normal cardiac output — enough to prevent rapid brain death, not enough to restart the heart.
That’s where defibrillation comes in. The most common cause of sudden cardiac arrest in adults is ventricular fibrillation (VF) — a chaotic, disorganized electrical state where the heart is quivering but not pumping. The defibrillator delivers a current that momentarily depolarizes the entire heart simultaneously, giving the natural pacemaker (the SA node) a chance to restart organized electrical activity.
Hands-only CPR is highly effective for VF arrest in adults because the lungs and blood still contain adequate oxygen for the first several minutes. Rescue breathing becomes more important for children (whose arrest is usually from respiratory failure, not VF) and for drowning victims.
The survival chain: The American Heart Association describes the “chain of survival” for cardiac arrest: early recognition → early CPR → early defibrillation → early advanced care → post-resuscitation care. Breaking any link reduces survival. Your role as a bystander is to hold the first three links as strongly as possible until professional help arrives.
C: Wilderness Medicine — First Aid Amplified
Wilderness medicine is what happens when you apply emergency care principles to settings where the hospital is hours — or days — away. It’s first aid under pressure, without the resources you’re used to.
In a hospital, an EMT transfers care within minutes. In the backcountry, you might be the only care for 24 hours. That changes everything. You need to make decisions about whether to improvise treatment or wait; whether to evacuate immediately or monitor; whether a stable injury can tolerate a 10-mile hike out or needs a helicopter.
Improvisation becomes essential. A SAM splint is a foam-and-metal spine that can be molded into almost any shape. But if you don’t have one, a trekking pole and a sleeping pad work. A cervical collar can be improvised from a foam sleeping pad, duct tape, and cravats. The skill isn’t memorizing what improvised gear looks like — it’s understanding what the device is supposed to accomplish (immobilization, compression, padding) and working backward to what materials can achieve that.
Assessment becomes the whole game. Without diagnostic tools, your hands, eyes, and ears are your stethoscope and CT scanner. The head-to-toe exam you practiced in Req 1e becomes your primary diagnostic tool. Pattern recognition — understanding that a confused, cold, shivering patient with poor coordination is probably hypothermic, not drunk — is a skill that develops with practice and study.
The Wilderness First Responder (WFR) course is the single best next step if wilderness medicine interests you. It covers everything in this badge — and then the wilderness-specific situations where protocol diverges from urban first aid.
D: The Mental Side of Emergency Response
No first aid training fully prepares you for the psychological reality of using it.
The body’s stress response — the flood of adrenaline, the tunnel vision, the shaking hands — doesn’t care that you know the theory. Real emergencies are chaotic in ways that tabletop scenarios never quite replicate. The victim you’re trying to help may be screaming. Bystanders may be panicking or demanding answers you don’t have. Time will feel distorted.
This is normal. Experienced emergency responders still feel it. What separates a trained responder from an untrained bystander isn’t the absence of the stress response — it’s the presence of automatic, trained behaviors that persist even under cognitive load.
Automaticity through repetition: The reason CPR courses have you practice compressions repeatedly — on a mannequin, counting out loud, with feedback — is to build motor memory. When the moment comes and your prefrontal cortex is partially offline from adrenaline, you want the first actions to be automatic. Push hard, push fast. Two inches deep. 100–120 per minute.
Stress inoculation: The best way to perform under stress is to have trained under stress — scenarios with time pressure, unexpected complications, and role-players who don’t cooperate the way mannequins do. If your troop or a local first aid organization runs scenario-based drills, participate. Push yourself to the edge of your competence in training so the edge in real life feels familiar.
After the emergency: First responders — even professional ones — can experience psychological after-effects of stressful calls. It’s okay to need to talk about what happened, to feel shaken, or to replay the scenario wondering if you did the right things. If you ever respond to a real emergency and find yourself struggling with it afterward, talk to a trusted adult, a mental health professional, or a peer support line.
E: Real-World Experiences
If you want to build on what you’ve learned in this badge, these experiences are worth seeking out:
First Aid Experiences Worth Pursuing
From Scouting and beyond- Take a CPR/AED class with a training mannequin. Reading about it is one thing; chest compressions on a real mannequin with feedback is another.
- Attend a Wilderness First Aid course. 20 hours, genuinely life-changing for any outdoor enthusiast.
- Become a volunteer for a local community health event. First aid tables at 5K races, fairs, and sporting events let you practice triage and patient interaction in low-stakes settings.
- Shadow an EMT or paramedic for a ride-along. Many agencies allow community members to observe on the ambulance. Ask your local EMS agency.
- Take a Stop the Bleed course. A 90-minute course specifically focused on hemorrhage control — the single most time-critical first aid skill for traumatic emergencies.
- Earn the Scouting Lifesaving merit badge. Extends your water safety and rescue knowledge with aquatic emergency skills.
F: Organizations Worth Knowing
These organizations are doing the most important work in emergency medicine education, research, and standards.
American Red Cross The nation's largest first aid and CPR training organization. Take a course, get certified, or explore volunteering opportunities at your local chapter. Link: American Red Cross — https://www.redcross.org American Heart Association Sets the evidence-based CPR and cardiovascular emergency care guidelines used by healthcare providers and lay responders worldwide. Link: American Heart Association — https://www.heart.org National Registry of EMTs (NREMT) The national certification body for EMTs and paramedics. Their website explains the full certification path and continuing education requirements. Link: National Registry of EMTs (NREMT) — https://www.nremt.org Stop the Bleed Campaign A national program teaching hemorrhage control to the general public. Free 90-minute courses available through partners nationwide. Link: Stop the Bleed Campaign — https://www.stopthebleed.org NOLS Wilderness Medicine One of the premier providers of Wilderness First Aid and Wilderness First Responder courses — often partnered with Scouting high-adventure bases. Link: NOLS Wilderness Medicine — https://www.nols.edu/wilderness-medicine National Association for Search and Rescue (NASAR) The membership organization for search and rescue professionals and volunteers. Explore how EMS skills connect to SAR operations. Link: National Association for Search and Rescue (NASAR) — https://www.nasar.org