Req 1 — Handling an Emergency
A campsite accident. A car crash on the side of the road. A teammate who suddenly collapses. In any emergency, the first 60 seconds set the tone for everything that follows. Requirement 1 builds your foundational response — the mental model you’ll fall back on no matter what kind of emergency you’re facing. This page covers all seven sub-requirements in order:
- 1a — Assessing and handling any emergency (the 3 C’s)
- 1b — Calling for help, from home and from the wilderness
- 1c — Protecting yourself from infection while providing care
- 1d — Evaluating a patient’s airway and breathing
- 1e — Conducting a thorough head-to-toe victim examination
- 1f — Understanding shock as a medical emergency
- 1g — Triage when multiple people are injured
Requirement 1a: Assess and Handle Any Emergency
The first question every rescuer asks is not “What’s wrong?” — it’s “Is this scene safe?” Rushing to help someone who’s been electrocuted, without checking for live wires, can turn a one-victim emergency into a two-victim emergency.
The American Red Cross distills emergency response into three steps: Check, Call, Care — sometimes called the 3 C’s.
Step 1: Check
Before touching anyone, survey the entire scene.
- Is the scene safe? Look for ongoing hazards: traffic, fire, unstable ground, downed power lines, aggressive animals, or a possible attacker.
- What happened? Understanding the mechanism of injury (a fall vs. a vehicle impact vs. a suspected overdose) tells you what injuries to expect.
- How many victims? A crash that looks like one casualty may reveal additional patients when you look carefully.
- Who can help? Scan for bystanders who can assist, call 911, or retrieve equipment.
If the scene is unsafe and you cannot make it safe, do not enter. Wait for trained responders. A dead hero helps no one.
Step 2: Call
Call 911 (or have someone else call) as soon as possible. Early activation of the emergency medical system (EMS) is one of the most life-saving actions a bystander can take — because advanced care can only arrive if someone requests it. If you are alone with an adult who has collapsed, call first, then begin care. With a child who has collapsed, start care first (CPR for 2 minutes), then call.
Step 3: Care
Now provide first aid appropriate to the situation. Stay with the victim until professional help arrives. Keep them calm and still. Monitor for changes in their condition.
The 3 C's of First Aid: Check, Call, Care The American Red Cross explains their universal approach to any emergency in plain language that's easy to remember under pressure. Link: The 3 C's of First Aid: Check, Call, Care — https://www.redcross.org/take-a-class/resources/articles/the-three-cs-of-first-aid-check-call-care🎬 Video: Check for Scene Safety — https://youtu.be/nrNAhMg-uS4?si=ylunwA5D8hAqAOcu
Requirement 1b: Getting Emergency Help
Calling for help sounds simple — until you’re the one who has to do it clearly and calmly while someone next to you is in crisis.
Calling 911 from Home
When you call 911, stay on the line. The dispatcher will ask you:
- What is the emergency? (Brief, clear description — “My dad is unconscious and not breathing.”)
- Where are you? (Street address, city, floor/unit if applicable — know this in advance.)
- Your name and callback number. (Don’t hang up until told to.)
The dispatcher can guide you through first aid instructions while help is on the way. Follow their directions — they do this all day, every day.
Calling for Help in the Wilderness
Remote wilderness emergencies require a different approach. Your cell phone may have no signal. The nearest road could be 10 miles away. Plan before you go:
- Tell someone your trip plan. A responsible person who isn’t on the trip should know your route, your campsite, and when to start worrying if you don’t check in.
- Personal Locator Beacons (PLBs) and satellite messengers (like Garmin inReach or SPOT) can transmit an SOS signal with GPS coordinates from almost anywhere on Earth. Consider carrying one on backcountry trips.
- Satellite phones allow two-way voice communication in areas without cell coverage.
- If you must send someone for help, send at least two people together. Give them a written note with the victim’s condition, location, and time of injury. Stay with the victim.
🎬 Video: What to Say When You Call 911 — https://youtu.be/spGJ9Ii5W3o
🎬 Video: What Happens When You Call 911 — https://youtu.be/J3efgWPPp4k
Requirement 1c: Infection Control
Blood and bodily fluids can carry pathogens — disease-causing organisms — including HIV, Hepatitis B, and Hepatitis C. Standard precautions means treating every patient’s blood as potentially infectious, every time, no exceptions.
What to Use
- Nitrile or latex gloves — Don a pair before touching any wound or bodily fluid. If none are available, use multiple layers of plastic bags, extra bandages, or have the victim apply pressure themselves.
- Eye protection — If there’s a risk of blood splashing (arterial bleeding, for example), protect your eyes.
- Masks — For rescue breathing, use a CPR face mask or face shield; avoid direct mouth-to-mouth whenever possible.
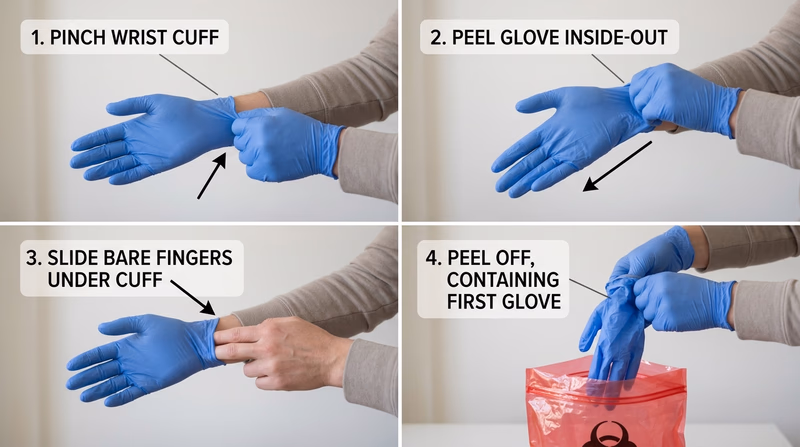
Putting On and Taking Off Gloves
Putting on gloves is easy. Taking them off safely is a skill:
- With your dominant hand, pinch the outside of the non-dominant glove near the wrist.
- Peel the glove off inside-out, holding it in your gloved hand.
- Slide two fingers inside the remaining glove at the wrist.
- Peel it off inside-out, enclosing the first glove inside it.
- Dispose of both gloves in a sealed bag or trash container.
Never touch your face or any clean surface with used gloves.
After Care
- Wash your hands thoroughly with soap and water for at least 20 seconds immediately after removing gloves.
- Dispose of used gloves, bandages, and any blood-soaked materials in a sealed bag. Treat them as biohazardous waste.
- If you are exposed to blood or bodily fluids on broken skin, mucous membranes, or eyes, seek medical attention and report the exposure.
🎬 Video: Standard Precautions — https://youtu.be/rdKWvw8CZLg
🎬 Video: How to Remove Disposable Gloves — https://youtu.be/kesQF_G3pQ8?si=89uHvaZRRuoy3mBu
🎬 Video: Using Personal Protective Equipment in First Aid — https://youtu.be/tpovFysp4IE
Requirement 1d: Airway and Breathing
The brain begins to die within 4–6 minutes without oxygen. An obstructed airway or stopped breathing is an immediate life threat. Your job is to open the airway and verify that the patient is actually breathing.
Opening the Airway
For an unconscious patient with no suspected spinal injury:
- Head-tilt, chin-lift: Place one hand on the forehead and gently tilt the head back. Use two fingers under the chin to lift it forward. This moves the tongue off the back of the throat.
For a patient with a suspected neck injury:
- Jaw thrust: Kneel at the head, place your fingers behind the angles of the jaw, and push the jaw forward without tilting the head. This opens the airway without moving the cervical spine.
Look, Listen, Feel
After opening the airway, spend no more than 10 seconds checking for breathing:
- Look for chest rise and fall.
- Listen for the sound of breath.
- Feel for airflow on your cheek.
Normal breathing is quiet, regular (12–20 breaths per minute), and effortless. Abnormal signs include:
- No breathing — begin CPR immediately.
- Gasping (agonal breathing) — occasional gasps are a sign of cardiac arrest, not adequate breathing. Begin CPR.
- Labored breathing — visible effort, nasal flaring, or the use of neck muscles to breathe. This person needs emergency care.
- Noisy breathing — gurgling suggests fluid in the airway; stridor (high-pitched crowing) suggests a partial obstruction above the vocal cords.
🎬 Video: Head Tilt, Chin Lift, Jaw Thrust — https://youtu.be/7NNe_Qje3yg?si=2hoWHZGQutU5Q2GD
🎬 Video: Look, Listen, Feel — https://youtu.be/hk1_Bcp3Gc0?si=V1kVr9paHb3O8jDJ
Requirement 1e: Head-to-Toe Examination
A conscious patient can usually tell you what hurts. An unconscious or confused patient cannot — so you systematically examine the entire body, looking for injuries that may not be obvious.
The SAMPLE History (for conscious patients)
Before the physical exam, gather a quick history:
- Signs and Symptoms — what’s bothering them right now?
- Allergies — to medications, foods, or anything else?
- Medications — what are they taking?
- Past medical history — any relevant conditions?
- Last oral intake — when did they last eat or drink?
- Events leading up to this — what happened?
The Head-to-Toe Physical Exam
Work systematically from head to toe, looking, feeling, and comparing left to right:
- Head and skull — feel for deformities, swelling, or bleeding; check the scalp.
- Eyes — are the pupils equal, round, and responsive to light?
- Nose and ears — is there blood or clear fluid (possible sign of skull fracture)?
- Mouth — are the airway and teeth intact? Any foreign material?
- Neck — feel for tenderness along the spine; look for medical alert jewelry.
- Chest — look for equal rise on both sides; feel for crepitus (crunching sensation indicating possible rib fracture); listen if possible.
- Abdomen — gently palpate all four quadrants for tenderness, rigidity, or guarding.
- Pelvis — gentle compression to check stability.
- Legs — compare both for deformity, swelling, or tenderness.
- Arms — same as legs; check grip strength if the patient can squeeze.
- Back — log-roll if spinal injury is not suspected; palpate the spine.
Head-to-Toe Exam Checkpoints
Use this as a mental checklist during your assessment
- Head: Deformity, swelling, or blood
- Eyes: PEARL — pupils equal and reactive to light
- Ears/Nose: Blood or clear fluid leaking
- Neck: Midline tenderness, medical alert jewelry
- Chest: Symmetric rise, tenderness, crepitus
- Abdomen: Tenderness, guarding, rigidity
- Pelvis: Stability
- Extremities: Deformity, pulse, sensation, movement
- Back: Spinal tenderness (if no suspected spinal injury)
🎬 Video: Head to Toe Exam — https://youtu.be/7xANZ0IjgEs?si=qAupHu1rGfl0bqas
Requirement 1f: Shock
“Shock” in everyday conversation means being startled or upset. In medicine, shock is something far more dangerous: the body’s circulation is failing to deliver enough oxygen to the tissues. Left untreated, shock kills.
Why Shock Happens
Circulation depends on three things: a pump (the heart), pipes (the blood vessels), and fluid (the blood). Shock occurs when any of these fail:
- Hypovolemic shock — not enough fluid in the system, usually from blood loss or severe dehydration.
- Cardiogenic shock — the pump fails (heart attack, for example).
- Distributive shock — the blood vessels dilate uncontrollably, so blood pressure drops (anaphylaxis, sepsis, spinal injury).
- Obstructive shock — something blocks the flow (like a tension pneumothorax or a pulmonary embolism).
Signs and Symptoms
A patient going into shock may show:
- Pale, cool, clammy skin (blood is shunting away from the skin to protect vital organs)
- Rapid, weak pulse
- Rapid, shallow breathing
- Confusion, restlessness, or anxiety
- Nausea or vomiting
- Extreme thirst
- Weakness, dizziness, or fainting
Early shock is hard to recognize. Late shock is a medical emergency with a high mortality rate. Whenever you suspect shock, act quickly.
First Aid for Shock
- Control the cause if possible — stop bleeding, treat anaphylaxis with epinephrine.
- Lay the patient flat. (Unless there’s a head injury or difficulty breathing.)
- Raise the legs 6–12 inches if there’s no suspected spinal injury and no fractures. This shifts blood toward the core.
- Keep them warm. Shock patients lose body heat quickly.
- Do not give anything by mouth. A patient in shock may need surgery.
- Call 911 and monitor continuously until help arrives.
🎬 Video: Recognizing Shock — https://youtu.be/4-cPuXaZACg
🎬 Video: Shock From Bleeding — https://youtu.be/He1RQ9STCHc
🎬 Video: Shock and Bleeding — https://youtu.be/V4R9GSah93g
Requirement 1g: Triage
Triage (from the French word meaning “to sort”) is the process of prioritizing patients when there are more victims than rescuers can immediately help. In a single-victim emergency, you give that person everything you have. In a multi-victim emergency, you have to make rapid decisions about who needs care first.
The Basic Triage Principle
You do the greatest good for the greatest number. That sometimes means passing by someone with a critical injury to treat someone whose injury is survivable with quick intervention — because the critical patient would consume all your resources and others would die waiting.
Formal triage systems (like START — Simple Triage and Rapid Treatment) categorize victims into four groups:
| Color | Priority | Meaning |
|---|---|---|
| Red | Immediate | Life-threatening, but survivable with prompt care |
| Yellow | Delayed | Serious, but stable for a short time |
| Green | Minor | “Walking wounded” — can wait |
| Black | Expectant | Not breathing, or injuries too severe to survive |
Scout-Level Triage Scenarios
You probably won’t manage a mass casualty incident. But multi-victim situations happen at every level:
- A canoe tips and two Scouts are in the water — one is swimming, one is face down. Who do you go to first?
- Your troop is hiking and a tree falls, injuring three people — one is screaming (conscious, probably less critical), one is silent (check immediately), one has a visible broken arm (painful but not life-threatening). Who do you assess first?
- At a campout, several Scouts get food poisoning. Most are sick but walking; one is unconscious. Triage is simple: unconscious first, others can wait.
The key skill isn’t memorizing a color code — it’s staying calm enough to look at the whole scene before committing to a single patient.
🎬 Video: Multiple Casualties in a Remote Location — https://youtu.be/_IdJD7UDN2w
🎬 Video: Triage — https://youtu.be/zeC2hFcziZI?si=YRyMCxm9qKxLbiZv
The skills on this page are the foundation everything else in First Aid builds on. Up next, you’ll prepare for emergencies before they happen — starting with health records and first aid kits.