Req 4 — Bleeding Control
Uncontrolled bleeding is one of the most preventable causes of death in traumatic emergencies. In combat and civilian trauma, the simple skills you’ll learn in this requirement — direct pressure, wound packing, and proper tourniquet use — save lives every year. This requirement covers four scenarios:
- 4a — Nosebleed
- 4b — Minor open wounds (scrapes and shallow cuts)
- 4c — Severe open wound (deep cut on an arm or leg)
- 4d — Tourniquets — when to use them, benefits, dangers, and how to apply one
Requirement 4a: Nosebleed
What it is: Nosebleeds (epistaxis) are usually caused by dry air, allergies, trauma (a bump on the nose or nose-picking), or fragile blood vessels near the front of the nasal septum.
Signs and symptoms: Blood flowing from one or both nostrils; if the bleed is from the back of the nose (posterior — less common), blood may drain down the throat.
First aid:
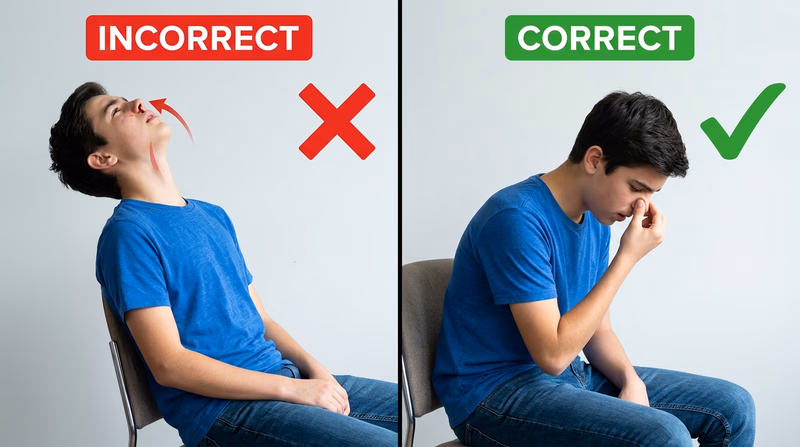
- Have the person sit upright and lean slightly forward. (Leaning back causes swallowing blood, which can cause nausea and vomiting.)
- Pinch the soft part of the nose firmly — just below the bony bridge — with thumb and forefinger.
- Breathe through the mouth.
- Hold continuous pressure for 10–15 minutes without releasing to check.
- Apply a cold compress to the bridge of the nose.
When to seek care:
- Bleeding doesn’t stop after 20–30 minutes of direct pressure
- Caused by a head injury
- The patient is on blood-thinning medication
- Accompanied by significant trauma to the face
- Blood is draining down the throat in large amounts (possible posterior bleed)
Prevention: Keep indoor air humidified; use saline nasal spray in dry climates; trim nails to discourage nose-picking; wear protective helmets in contact sports.
🎬 Video: Nosebleed — https://youtu.be/rF8aXjRFu_I
Requirement 4b: Minor Open Wounds
What it is: Minor bleeding wounds include abrasions (scrapes), shallow lacerations (cuts), and small punctures where the bleeding is controllable.
Signs and symptoms: Visible break in the skin; mild to moderate bleeding that oozes or flows steadily but can be controlled with pressure; pain and tenderness at the wound site.
First aid:
- Control bleeding: Apply direct pressure with a clean cloth or sterile gauze. Maintain pressure for 5–10 minutes.
- Clean the wound: Once bleeding is controlled, rinse thoroughly with clean water. Remove visible debris with tweezers if needed.
- Inspect: Check for deep tissue damage, embedded objects, or signs of contamination that warrant professional care.
- Apply antibiotic ointment to the wound surface.
- Bandage: Use an appropriately sized adhesive bandage or sterile dressing. Change daily and whenever it gets wet or dirty.
Prevention: Wearing appropriate protective gear (gloves for woodworking, kneepads for skating); situational awareness; keeping tools properly maintained and sharp (dull knives require more force and are more likely to slip).
Signs of infection to watch for over the next several days:
- Increasing redness, warmth, or swelling
- Pus or cloudy discharge
- Red streaks radiating from the wound
- Fever
🎬 Video: Care of Minor Wounds — https://youtu.be/7bTVimEqkKo?si=Qpro1vC8l4Z42Sx5
Requirement 4c: Severe Bleeding — Deep Cut on an Arm or Leg
A deep cut on an extremity — especially one that severs a major vein or artery — can cause life-threatening blood loss in minutes. This is when first aid becomes critical.
Signs of severe bleeding:
- Blood soaking through dressings rapidly
- Blood spurting in pulses (arterial bleeding)
- Large pooling of blood
- Signs of shock developing in the victim (pale, cool skin; rapid weak pulse; confusion)
First aid:
- Apply firm, direct pressure immediately with the cleanest material available. Do not remove dressings to check — if they soak through, add more on top.
- Maintain pressure — 10–15 minutes minimum without releasing.
- Wound packing: For deep wounds that don’t respond to surface pressure, pack gauze firmly into the wound cavity and apply pressure over the packed gauze. This technique stops bleeding from deeper vessels.
- Elevate the limb above heart level if no fracture is suspected.
- Call 911 for any bleeding that isn’t quickly controlled.
Hemostatic dressings: Modern first aid kits may include hemostatic agents (like QuikClot) — gauze or granules impregnated with a clotting agent. These are significantly more effective than standard gauze for severe limb bleeding and are now carried by trained wilderness first responders.
🎬 Video: Using Direct Pressure to Control Life-Threatening Bleeding — https://www.youtube.com/watch?v=YJB3fI3T1oo
Requirement 4d: Tourniquets
For decades, tourniquets were taught as a last resort, feared as limb-threatening devices that should be avoided at all costs. Military trauma experience in Iraq and Afghanistan completely changed this view. Properly applied, early tourniquets save lives. The fear of using them has killed people who could have been saved.
When to Use a Tourniquet
Use a tourniquet when:
- Severe bleeding from a limb cannot be controlled with direct pressure
- There is amputation or partial amputation of a limb
- The wound is in a location where direct pressure is impossible to maintain
- You are treating multiple casualties and cannot maintain pressure on all wounds
Do NOT use a tourniquet:
- As a first response before trying direct pressure (unless bleeding is catastrophically severe, like amputation)
- On neck, chest, or abdominal wounds (only for extremities)
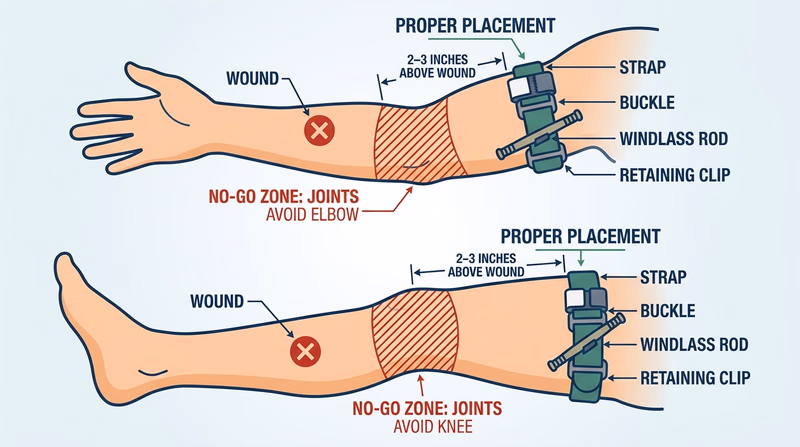
- Over a joint (knee or elbow)
Benefits
- Can stop life-threatening limb hemorrhage within seconds
- Frees up rescuers’ hands for other tasks
- Allows a solo responder to control multiple injuries
- Modern commercial tourniquets are reliable and self-applicable
Dangers
- Impairs blood flow to everything distal (below) the tourniquet — too long can cause tissue death
- Painful when properly tightened
- Can cause nerve damage if applied incorrectly
- However: The risk of death from uncontrolled bleeding significantly outweighs the risk of tourniquet complications when applied appropriately.
Note the Time
When applying a tourniquet, write the time of application on the patient’s skin or the tourniquet itself. Medical personnel need to know how long circulation has been cut off.
Demonstrating Application (Without Tightening)
Your counselor will have you demonstrate placing a commercial tourniquet (like a CAT tourniquet) on an extremity without actually tightening it to the point of stopping blood flow. Know the steps:
- Position 2–3 inches above the wound (proximal to the injury).
- Route the strap through the buckle and back through again.
- Pull the strap as tight as possible through the friction adapter.
- Twist the windlass rod until tightened enough (in a real scenario) to stop bleeding.
- Lock the rod in the clip.
- Note the time.
🎬 Video: How to Use a Tourniquet — https://youtu.be/k98ilfQmUWw?si=3e6zkvJz517hfiE5
🎬 Video: Tourniquet Mistakes — https://www.youtube.com/shorts/mZTgQikH1sQ
Bleeding is controlled. Now you’ll tackle emergencies that affect breathing — from choking to altitude sickness.