Req 7 — CPR and AED
Cardiac arrest is the single most common cause of adult death in the United States. Every minute without CPR reduces survival by 7–10%. The skills in this requirement — recognizing a heart attack, performing CPR, and using an AED — could realistically save someone you know. This requirement covers seven sub-requirements:
- 7a — What is a heart attack?
- 7b — Symptoms of a heart attack and first aid
- 7c — When to start CPR
- 7d — Demonstrating CPR technique
- 7e — How an AED works
- 7f — Demonstrating AED use
- 7g — Finding AEDs in your community
Requirement 7a: What Is a Heart Attack?
The heart is a muscle. Like all muscles, it needs a constant blood supply to stay alive. The arteries that supply the heart muscle itself (coronary arteries) can become narrowed or blocked by plaque — a buildup of cholesterol and other materials inside the artery wall. When a clot forms at a plaque site and completely blocks a coronary artery, part of the heart muscle is deprived of oxygen and begins to die. This is a myocardial infarction — a heart attack.
The longer the blocked artery goes untreated, the more heart muscle dies. Time is muscle.
Heart Attack vs. Cardiac Arrest
These terms are often confused but refer to different events:
- A heart attack is a plumbing problem — a blocked artery causing damage to heart muscle. The heart is still beating, but part of it is dying.
- Cardiac arrest is an electrical problem — the heart’s electrical system fails and the heart stops beating effectively. No pulse, no blood circulation, no consciousness. This is immediately life-threatening.
A heart attack can trigger cardiac arrest — the damaged muscle causes electrical instability. CPR is for cardiac arrest, not for a heart attack. (A conscious, breathing person with chest pain is having a heart attack; call 911 and keep them calm.)
🎬 Video: What Happens During a Heart Attack — https://youtu.be/3_PYnWVoUzM?si=FlnFcSGpYJuxGIo5
🎬 Video: Heart Attack vs. Cardiac Arrest — https://youtu.be/psx-QcxL1A8
Requirement 7b: Heart Attack Symptoms and First Aid
Classic Symptoms
- Chest discomfort: Pressure, squeezing, fullness, or pain in the center of the chest, lasting more than a few minutes or going away and coming back.
- Radiation: Discomfort spreading to the arms (usually left), back, jaw, or stomach.
- Shortness of breath: With or without chest discomfort.
- Other signs: Cold sweat, nausea, lightheadedness.
Non-Classic Presentations
Heart attack symptoms can be subtler, especially in women, diabetics, and elderly patients. Some people experience only:
- Unusual fatigue
- Jaw pain or upper back pain
- Indigestion or heartburn that doesn’t respond to antacids
- No pain at all (a “silent” heart attack)
First Aid for a Suspected Heart Attack
- Call 911 immediately. Time is critical.
- Keep the person calm and have them sit or lie in a position of comfort.
- Loosen tight clothing.
- If the person is not allergic to aspirin, is conscious, and can swallow, have them chew (not swallow whole) one adult aspirin (325 mg) or four baby aspirin (81 mg each). Aspirin inhibits clotting and can slow the blockage.
- Be ready to perform CPR if they lose consciousness and stop breathing.
🎬 Video: Symptoms & Signs of a Heart Attack in Women & Men — https://youtu.be/jouwrfr7_S0?si=By1f--Oq9UPUcHkd
Requirement 7c: When to Perform CPR
CPR is performed when a person is in cardiac arrest — meaning their heart is not pumping blood effectively. The three conditions that indicate CPR should be started:
- Unresponsive — tap the shoulders and shout “Are you okay?” No response.
- Not breathing normally — absent or abnormal breathing. Gasping/agonal breathing looks like breathing but is a sign of cardiac arrest — begin CPR.
- No pulse — check the carotid pulse (neck) for no more than 10 seconds. If unsure, start CPR — starting CPR on someone who doesn’t need it causes little harm, while not starting it on someone who does is fatal.
Do not start CPR if: The person is breathing normally; they have an obvious, unsurvivable injury; they have a valid Do Not Resuscitate (DNR) order; the scene is unsafe.
🎬 Video: Responding to Cardiac Arrest — https://youtu.be/DByqyhLV1zg?si=RO4saCDlfXZu2TN6
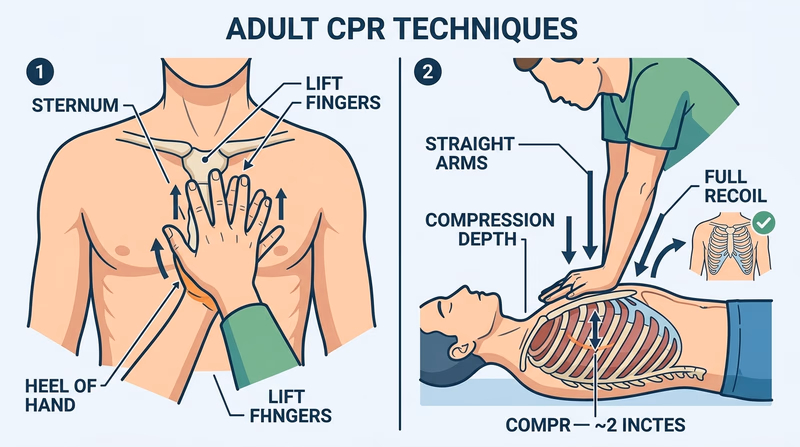
Requirement 7d: Performing CPR
Hands-Only CPR (recommended for untrained or newly trained bystanders, and effective for adult cardiac arrest):
- Call 911 (or have someone else call).
- Place the heel of one hand on the center of the chest (lower half of the breastbone).
- Place the second hand on top; interlace fingers and keep them off the chest.
- Keep arms straight, lean over the victim.
- Compress the chest at least 2 inches deep at a rate of 100–120 compressions per minute (the beat of “Stayin’ Alive” by the Bee Gees).
- Allow full chest recoil between compressions — don’t lean on the chest.
- Don’t stop except to use an AED.
CPR with breaths (for trained responders, especially for children and drowning):
- 30 chest compressions followed by 2 rescue breaths (tilt the head, lift the chin, seal the mouth, breathe in over 1 second, watch for chest rise).
- Continue the 30:2 cycle.
For infants (under 1 year): Use two fingers on the center of the chest; compress about 1.5 inches; 30:2 ratio.
For children (1 year through puberty): Use one or two hands depending on the child’s size; compress about 2 inches; 30:2 ratio.
Your counselor will have you practice CPR on a training mannequin. The physical practice is essential — knowing the steps intellectually is very different from doing effective chest compressions with proper depth and rate.
🎬 Video: Hands-Only CPR — https://youtu.be/A5PnI4I-vd8?si=ERt7HtnwcmqFJmQA
Requirement 7e: Automated External Defibrillators (AEDs)
What an AED does: The most common cause of sudden cardiac arrest is ventricular fibrillation (VF) — the heart’s ventricles are quivering chaotically instead of pumping. A defibrillator delivers a brief, controlled electrical shock that momentarily stops all electrical activity in the heart, giving the heart’s natural pacemaker a chance to restart a normal rhythm.
An AED is designed to be used by anyone — it talks you through the entire process. It also analyzes the heart rhythm automatically and will NOT deliver a shock if one isn’t needed.
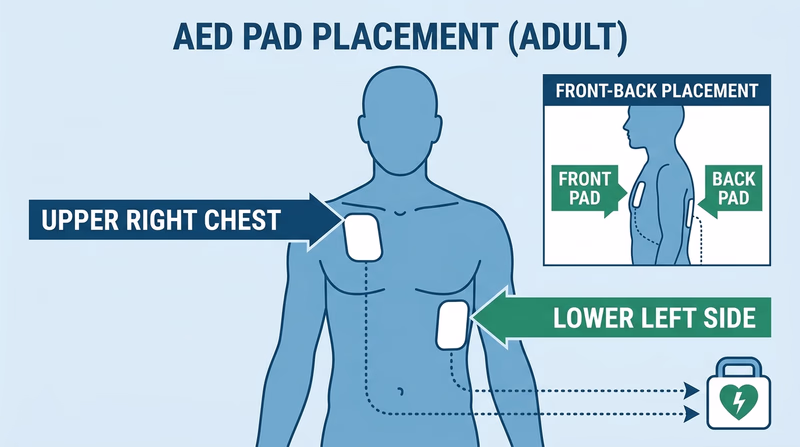
How to Use an AED
- Turn it on (usually by opening the case or pressing a button).
- Follow the voice and visual prompts.
- Attach the pads as shown in the diagrams on the pads — one on the upper right chest, one on the lower left side.
- Make sure no one is touching the victim when the AED analyzes the rhythm and when it delivers a shock.
- Resume CPR immediately after the shock, or as directed by the AED.
The key takeaway: Don’t delay CPR waiting for an AED. But when an AED is available, use it as soon as possible — defibrillation within the first few minutes dramatically increases survival.
🎬 Video: Using an AED — https://youtu.be/in8j2Q2z3HE
Requirement 7f: Demonstrating AED Use
Your counselor will have you walk through the AED process — ideally using an AED trainer (a device that simulates the real AED experience without delivering any actual electricity). The key skills to demonstrate:
- Powering on the device
- Correct pad placement on the chest
- Ensuring no one is touching the victim during analysis and shock
- Resuming CPR after the shock per the device’s instructions
Many schools, community centers, gyms, and businesses have AEDs. Knowing where they are in your community is just as important as knowing how to use them.
AEDs in Scouting Scout Life discusses whether Scout units should have AEDs and how to make the case for acquiring one. Link: AEDs in Scouting — https://blog.scoutingmagazine.org/2024/06/13/does-your-scout-unit-have-an-aed/Requirement 7g: Finding AEDs in Your Community
Why location matters: An AED is only useful if someone can find it and bring it to the victim within minutes. Most cardiac arrests occur in homes or public places, not hospitals. Strategic placement of AEDs in high-traffic areas maximizes the chance that one will be available quickly.
Common AED placement locations:
- Schools (gym, front office, hallways)
- Sports arenas and stadiums
- Shopping malls
- Airports
- Health clubs and fitness centers
- Places of worship
- Government buildings
AED Finder apps and maps: Several smartphone apps (AED Finder, PulsePoint AED, and others) allow users to locate registered AEDs in their area. Some communities maintain public registries.
For this requirement: Physically locate at least one AED at your school, meeting place, or another regular gathering spot. Know exactly where it is so you could retrieve it in under 2 minutes.
Why these locations are chosen: The logic is simple — large crowds, people under stress (sporting events, hot environments), and people with known cardiac risk (older populations at some venues) all increase the likelihood of someone experiencing cardiac arrest nearby.
Where to Place AEDs The American Heart Association's evidence-based guide to AED placement strategy in public facilities. Link: Where to Place AEDs — https://cpr.heart.org/en/-/media/CPR-Files/Training-Programs/AED-Implementation/2023-updates/KJ1683-AED-Guide.pdfYou now have the most critical life-saving skills in the entire First Aid badge. Next, you’ll move into musculoskeletal injuries — sprains, strains, and fractures.