Req 8b — Bandaging & Splinting
Demonstrate bandages for these injuries:
- Arm slings for forearm or upper arm or collarbone fractures
- Elastic wrap and cravat bandages for ankle sprain
- Elastic wrap and cravat bandages for wrist sprain or hand injury.
Demonstrate the proper procedures for handling and splinting of suspected closed or open fractures or dislocations of the:
- Finger and toe
- Forearm or wrist
- Upper leg
- Lower leg or ankle.
This is where first aid gets hands-on. Bandaging and splinting are practical skills that you need to practice until they become second nature. Your counselor will ask you to demonstrate these techniques, so work with a partner and rehearse them multiple times.
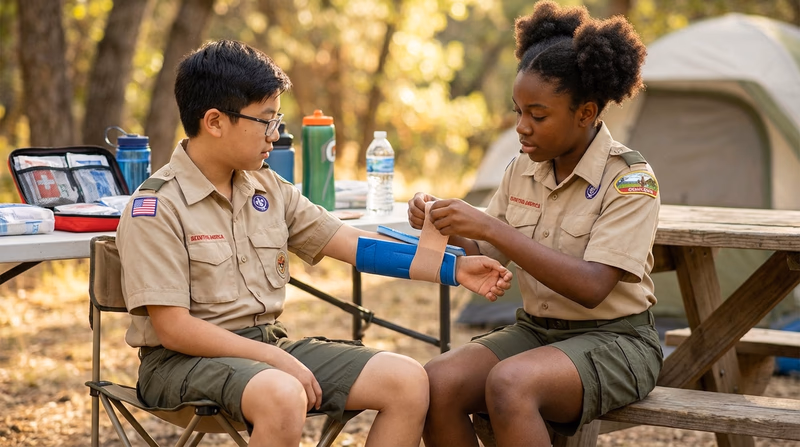
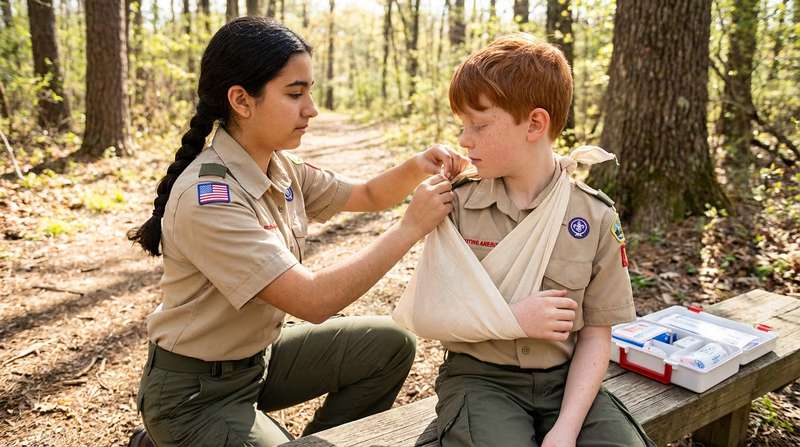
Bandaging Techniques
Arm Sling
An arm sling supports an injured forearm, upper arm, or collarbone by immobilizing it against the body. You can make one from a triangular bandage (cravat), a Scout neckerchief, or even a belt or shirt.
Triangular bandage sling:
- Place one end of the triangular bandage over the shoulder on the uninjured side.
- Let the bandage hang down in front of the body with the point toward the elbow of the injured arm.
- Bring the bottom end up over the injured arm and tie it to the other end at the side of the neck (not directly on the spine).
- Fold the point of the bandage at the elbow and pin or tuck it.
- The hand should be slightly higher than the elbow to reduce swelling.
For a collarbone fracture: Use a sling and then bind the arm against the body with a second bandage (swathe) wrapped around the chest and the slung arm. This prevents any movement of the shoulder.
Elastic Wrap for Ankle Sprain
An elastic (ACE) bandage provides compression and support for a sprained ankle:
- Start at the ball of the foot with the foot at a 90-degree angle.
- Wrap around the foot twice, moving toward the ankle.
- Use a figure-eight pattern — wrap around the ankle, cross over the top of the foot, under the arch, and back around the ankle.
- Continue the figure-eight, overlapping each layer by half.
- Finish above the ankle and secure with clips or tape.
- Check circulation — the toes should remain warm with normal color.
Cravat Bandage for Ankle
A cravat (folded triangular bandage) can also stabilize an ankle:
- Fold the triangular bandage into a long strip about 3 inches wide.
- Place the center of the strip under the foot arch.
- Cross the ends behind the ankle.
- Bring them forward and cross again over the top of the foot.
- Tie off at the front of the ankle.
Elastic Wrap for Wrist or Hand
For a wrist sprain or hand injury:
- Start wrapping at the wrist.
- Make two anchor wraps around the wrist.
- Wrap diagonally across the back of the hand.
- Wrap around the knuckles (leaving the fingers free unless specifically treating a finger injury).
- Continue figure-eight wraps between the hand and wrist.
- Finish at the wrist and secure.
- Check finger circulation — color, warmth, and sensation.
Splinting Techniques
A splint immobilizes a broken bone or dislocated joint to prevent further injury. The golden rule of splinting: splint the joint above and the joint below the fracture.
General Splinting Principles
Splinting Rules
Follow these for every splint you apply
- Splint in the position found: Do not straighten or realign a deformed limb.
- Immobilize above and below: The splint must extend past the joints on both sides of the fracture.
- Pad the splint: Place soft padding between the splint and the skin (socks, towels, clothing).
- Check circulation before and after: Pulse, skin color, warmth, and sensation below the splint.
- Expose the injury: Cut away clothing to see the injury before splinting (for open fractures, cover the wound first).
- Secure firmly but not too tight: The splint should prevent movement without cutting off blood flow.
Splinting a Finger or Toe
- Buddy splinting: Tape the injured finger to an adjacent, uninjured finger with padding (gauze or cotton) between them. The healthy finger acts as the splint.
- Tongue depressor or popsicle stick: Place alongside the finger and wrap with tape or gauze.
- For toes: Buddy-tape to an adjacent toe. Place padding between toes. Wear a stiff-soled shoe.
Splinting a Forearm or Wrist
- Use a rigid material — a SAM splint, rolled newspaper or magazine, a stick padded with cloth, or a piece of cardboard.
- Place the splint along the underside of the forearm, extending from the elbow to past the fingers.
- Pad the splint with a towel or shirt.
- Secure with an elastic bandage, gauze rolls, or strips of cloth at three points — above the fracture, below the fracture, and at the wrist.
- Place the splinted arm in a sling.
Splinting an Upper Leg (Femur)
A femur fracture is a serious emergency — the thighbone is the strongest bone in the body, and breaking it requires tremendous force. There is also a high risk of severe internal bleeding.
- Call 911 immediately.
- Do not attempt to move the victim unless they are in danger.
- Use a long, rigid object (board, ski pole, sturdy branch) extending from the armpit to past the foot.
- Place a second splint along the inside of the leg from groin to past the foot.
- Pad generously — especially at the hip, knee, and ankle.
- Secure with wide bandages at the chest, hip, thigh (above the fracture), knee, and ankle.
- Treat for shock — femur fractures can cause the loss of one or more liters of blood internally.
Splinting a Lower Leg or Ankle
- Use rigid material extending from above the knee to past the foot.
- Place splints on both sides of the lower leg for stability.
- Pad the splint, especially at the knee and ankle bones.
- Immobilize the foot in a natural position (90 degrees if possible).
- Secure with bandages above the knee, below the knee, and at the ankle.
- Check toe circulation after application.
Improvised Splinting Materials
In the field, you may not have a SAM splint. You can improvise with:
- Sticks, branches, or trekking poles
- Rolled-up newspapers or magazines
- A sleeping pad cut to size
- Cardboard
- An inflatable sleeping pad wrapped around a limb
- A pillow (for ankle injuries)
Padding can come from socks, shirts, towels, or anything soft. Ties can be strips of cloth, bandannas, belts, or duct tape.