Req 8d — Bandaging Techniques
Bandaging is a hands-on skill. Reading about it helps you understand the technique, but your counselor will want to see you actually apply each bandage. This requirement covers three categories of bandaging:
- 8d1 — Arm slings for forearm, upper arm, or collarbone fractures
- 8d2 — Elastic wrap and cravat bandages for ankle sprain
- 8d3 — Elastic wrap and cravat bandages for wrist sprain or hand injury
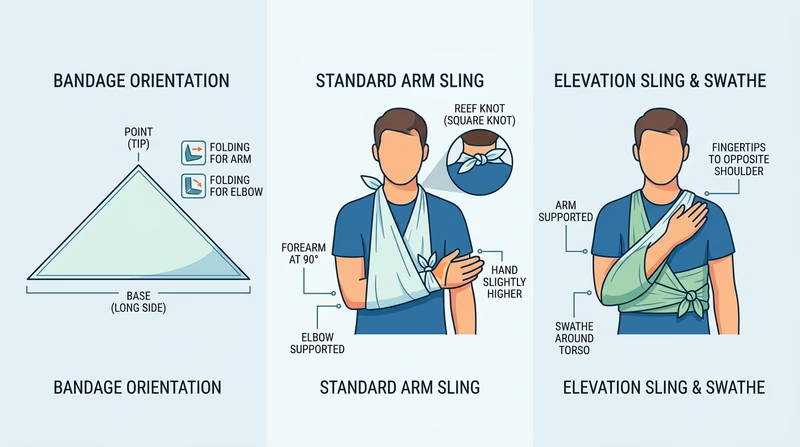
Requirement 8d1: Arm Slings
An arm sling immobilizes the arm, supports the weight of the forearm and hand, and prevents further injury during transport. A triangular bandage (cravat) is the traditional material; a triangular piece of cloth or a large shirt can be improvised.
Standard Arm Sling (for forearm or upper arm fracture)
- Place the triangular bandage with one point at the elbow; the long edge runs along the uninjured side.
- Support the arm at a 90-degree angle or slightly above, with the hand slightly higher than the elbow.
- Bring the bottom point of the triangle up over the forearm and tie behind the neck. Pad the knot for comfort.
- The wrist and thumb should be exposed to monitor circulation (check color, warmth, and capillary refill).
- Secure the elbow point with a pin or by twisting and tucking it.
Elevation Sling (for shoulder or collarbone injury)
For collarbone (clavicle) fractures, the arm needs to be supported with the elbow slightly elevated — not in the standard 90-degree position.
- Place the triangular bandage as above, but angle the forearm higher, so fingertips point toward the opposite shoulder.
- The injured shoulder should be allowed to drop naturally — not forced up.
- Add a swathe (a second bandage wrapped around the arm and torso) to prevent arm movement against the body.
After Sling Application — Always Check
After any sling, check the fingers for:
- Capillary refill (press a fingernail for 2 seconds, release — color should return within 2 seconds)
- Sensation (can they feel you touch each finger?)
- Movement (can they wiggle their fingers?)
If circulation is impaired, loosen the sling immediately.
🎬 Video: Bandages for Sprained Ankle, Head, Upper Arm, Collarbone — https://youtu.be/ybpr7nCelK0?si=2SjPp8f4iMAzfVBv
Requirement 8d2: Elastic Wrap and Cravat for Ankle Sprain
Ankle wrapping supports the joint, limits excessive movement, and reduces swelling — it’s one of the most practically useful bandaging skills for any Scouting trip.
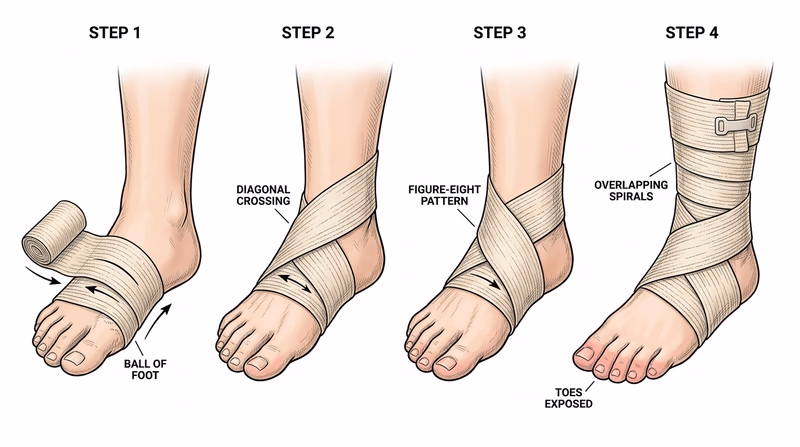
Elastic Wrap (Ace Bandage) for Ankle
- Start with the foot at 90 degrees (neutral position — toes pointing straight ahead).
- Begin wrapping at the ball of the foot.
- Use a figure-8 pattern: wrap around the foot, then angle up and across the front of the ankle, behind the ankle, and back across the front — repeating the figure-8 several times.
- Continue wrapping up the lower leg in overlapping spiral turns.
- Secure with medical tape or clips.
- Leave the toes exposed to monitor circulation.
- The wrap should feel supportive and snug — not tight enough to cause tingling or color change in the toes.
Cravat Bandage for Ankle
A cravat is a triangular bandage folded lengthwise to form a strip. It can be used as a figure-8 wrap for the ankle in the same manner as the elastic wrap above.
Field tip: If no elastic bandage is available, a clothing strip, rolled sock, or bandana can be used as an improvised cravat.
🎬 Video: Elastic Wrap for Ankle Sprain — https://youtu.be/KRyaemlcJAM?si=_A2ie3PNfdiH1n-0
Requirement 8d3: Wrist Sprain and Hand Injury Bandaging
Elastic Wrap for Wrist Sprain
- Begin at the palm side of the hand, just below the fingers.
- Wrap twice around the hand.
- Angle across the back of the hand, around the wrist, and back across the front — forming a figure-8 that crosses at the wrist.
- Continue wrapping up the lower forearm in overlapping spirals.
- Secure with tape or clips.
- Leave the thumb and fingers exposed.
Cravat Bandage for Wrist
A folded cravat can be tied around the wrist in a figure-8 pattern, passed under the thumb, and tied or secured. This provides support and some compression.
Hand/Palm Injury
For a wound or injury to the palm or back of the hand, use a gauze pad over the wound, then wrap the hand with gauze roll or an elastic bandage. Wrap between the fingers if needed. Maintain the hand in a functional position (slightly curled, as if holding a ball) rather than flat.
🎬 Video: Wrist Wrap — https://youtu.be/tdRMJIu2E08
Good bandaging knowledge is essential — but for suspected fractures in the field, you’ll need splinting skills.