Req 8e — Splinting Fractures
A splint immobilizes a suspected fracture or dislocation to prevent further injury, reduce pain, and protect blood vessels and nerves near the break. The rule is “splint it as it lies” — don’t try to straighten or realign the injury. You immobilize the joint above and the joint below the fracture.
This requirement covers four locations:
- 8e1 — Finger and toe
- 8e2 — Forearm or wrist
- 8e3 — Upper leg (femur)
- 8e4 — Lower leg or ankle
Before Any Splint: Check PSM
Before and after applying any splint, check distal pulse, sensation, and movement (PSM):
- Pulse: Is there a pulse below the injury?
- Sensation: Can the patient feel touch distal to the injury?
- Movement: Can they wiggle fingers or toes?
If PSM is abnormal before splinting, document it and transport urgently. If PSM becomes abnormal after splinting, the splint is too tight — loosen and recheck.
Requirement 8e1: Finger and Toe
Buddy Taping (Toes)
Toes are almost always managed with buddy taping — the injured toe is taped to the adjacent toe, which acts as a natural splint.
- Place a small pad of gauze between the toes to prevent skin breakdown.
- Use medical tape to secure the injured toe to its neighbor (usually 1–2 loops of tape above and below the injury).
- Do not tape over the joint itself.
- Check for capillary refill and sensation in the taped toe.
Splinting a Finger
For suspected finger fractures or dislocations:
- Gently place the finger in a slightly flexed (“functional”) position — as if loosely holding a cylinder.
- Apply a padded rigid splint (a stick, a tongue depressor, a folded card) under the finger.
- Secure with tape above and below the fracture, not over it.
- Check circulation (capillary refill of fingernail) and sensation.
Note: If a finger is clearly dislocated (joint deformed, bent at an angle), do not attempt to reduce it in the field unless trained. Splint it as it lies.
🎬 Video: Buddy Taping Toes — https://youtu.be/P-D0njmVMVA
Requirement 8e2: Forearm or Wrist
A forearm fracture (radius, ulna, or both) is common after falling on an outstretched hand. It is often called a “FOOSH” injury — Fall On OutStretched Hand.
Splinting:
- Support the arm in a comfortable position — usually with the elbow bent at 90 degrees, forearm parallel to the ground, palm facing down.
- Place padding (rolled clothing, sleeping pad) under and over the forearm.
- Apply a rigid splint (a stick, tent pole, folded SAM splint, or rolled sleeping pad) on the underside of the forearm, extending from the palm to well above the elbow.
- Secure with cravats, bandages, or strips of clothing — above the fracture, over the fracture, and below it.
- Place the arm in a sling for support during transport.
- Check distal PSM after application.
🎬 Video: Splints for Arms and Legs — https://youtu.be/jhXWT4UpC-8
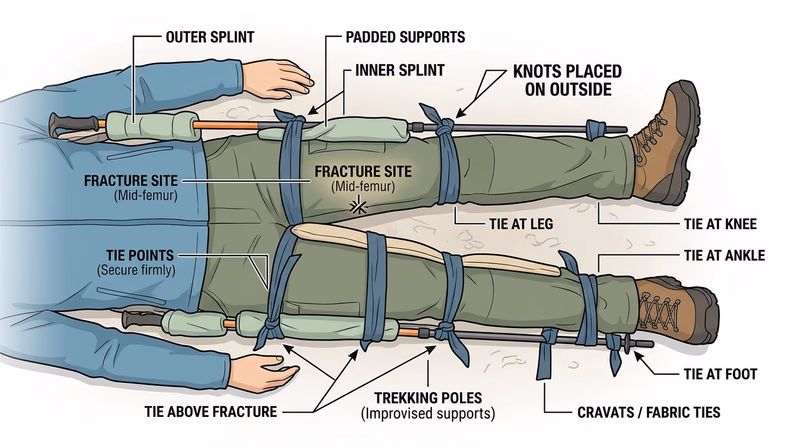
Requirement 8e3: Upper Leg (Femur)
A femur fracture is one of the most serious orthopedic injuries. As discussed in Req 8c, it can bleed 1–2 liters internally, causing shock. It is extremely painful. Traction splints are the definitive field device for mid-shaft femur fractures, but improvised rigid splinting is the Scout-level skill.
Improvised rigid splinting:
- Check for shock and begin treating it (lay flat, elevate legs if no spinal injury, keep warm).
- Gently but firmly support the leg — do not move it unnecessarily.
- Place padded splints on the outside of the leg (from armpit to foot) and inside of the leg (from groin to foot). You need two long, rigid objects (trekking poles, straight branches).
- Secure with cravats above the fracture, at the fracture, and below it (ankle, knee, hip level). Tie on the outer splint side.
- Check distal PSM after.
- A femur fracture patient should be evacuated as a priority — this injury requires hospital care.
🎬 Video: Upper Leg Splint — https://youtu.be/5KJIojnNAPU?si=qfwme0YazWPIMn0c
Requirement 8e4: Lower Leg or Ankle
Lower leg fractures (tibia and fibula) range from hairline fibula fractures (the patient can often walk with pain) to severe tibial fractures (non-weight-bearing). When in doubt in the field, splint and do not allow weight-bearing.
Splinting:
- Assess the injury and check PSM.
- For a lower leg fracture: place padded splints on each side of the leg (lateral and medial), extending from below the knee to well past the heel.
- For an ankle fracture: use a “sugar-tong” or “posterior slab” configuration — a padded splint along the bottom of the foot, around the heel, and up the back of the calf.
- Secure with bandages or cravats.
- Recheck PSM — ankle swelling can compress blood vessels quickly.
- Elevate the leg if the patient is stationary; transport on a stretcher or improvised carry if evacuation is needed (see Req 10).
🎬 Video: Leg Splints — https://youtu.be/TacM-3A5Ozk
You’ve mastered the full range of musculoskeletal injury management. Next, you’ll tackle the injuries that require the most careful handling: head, neck, and back.