Fishing Merit Badge — Complete Digital Resource Guide
https://merit-badge.university/merit-badges/fishing/guide/
Introduction & Overview
A still pond at sunrise, a trout stream rushing over rocks, a pier buzzing with voices at sunset — fishing can feel peaceful, exciting, and full of surprises all at once. It teaches patience, observation, outdoor skills, and respect for the water and the life in it.
The Fishing merit badge is about far more than catching something on a hook. You will learn how to stay safe, choose gear, tie reliable knots, handle fish responsibly, and understand the rules and ethics that protect waterways for everyone.
Then and Now
Then — Fishing for Food and Survival
For thousands of years, people fished because they needed food. Long before modern rods and reels, people made hooks from bone, carved spears, braided lines from plant fibers, and used nets, traps, and weirs to catch fish in rivers, lakes, and along coasts. Knowing where fish gathered — and when they moved — could help a family survive.
Scouting picked up that same spirit of self-reliance. Early Scouts learned fishing as an outdoor skill tied to camping, conservation, and learning how to provide for yourself in the field.
- Purpose: Food, survival, and practical outdoor skill
- Tools: Hand lines, simple poles, handmade hooks, nets, and traps
- Mindset: Know the water, understand fish behavior, and waste nothing
Now — Recreation, Conservation, and Skill
Today, many people fish for enjoyment, challenge, and connection to nature. Modern gear is lighter, stronger, and more specialized than ever. At the same time, anglers now know much more about habitat loss, invasive species, fish stress, and the need for responsible catch-and-release practices.
Modern fishing mixes skill with stewardship. A good angler is not just someone who can catch fish, but someone who protects the places fish live and treats other anglers, landowners, and wildlife with respect.
- Purpose: Recreation, food, family tradition, and conservation
- Tools: Spinning outfits, baitcasting gear, fly rods, sonar, and specialized tackle
- Mindset: Enjoy the sport while protecting the resource
Get Ready! You are about to learn skills that can turn a frustrating day of tangles and missed bites into a confident day on the water. Pay attention to the details in this guide — small habits make a big difference in fishing.
Kinds of Fishing
Fishing is not one single activity. Different places, fish species, and goals create very different styles of angling.
Bank and Shore Fishing
This is where many Scouts begin. You fish from the edge of a pond, lake, river, or canal with simple gear and easy access. Bank fishing teaches the basics well because you can focus on casting, lure choice, and reading the water without worrying about controlling a boat.
Boat Fishing
Fishing from a boat lets you reach deeper water, offshore structure, and spots that shore anglers cannot easily access. It also adds extra responsibilities like life jackets, weather awareness, and safe movement around hooks and gear.
Fly Fishing
Fly fishing uses a weighted line to cast very light flies that imitate insects, baitfish, or other natural food. It can look fancy, but at its core it is about understanding what fish are eating and presenting something that looks alive and natural.
Freshwater Fishing
Ponds, lakes, rivers, and streams hold species like bass, bluegill, trout, catfish, and crappie. Freshwater fishing is the most common starting point for Scouts because it is often close to home and does not require expensive equipment.
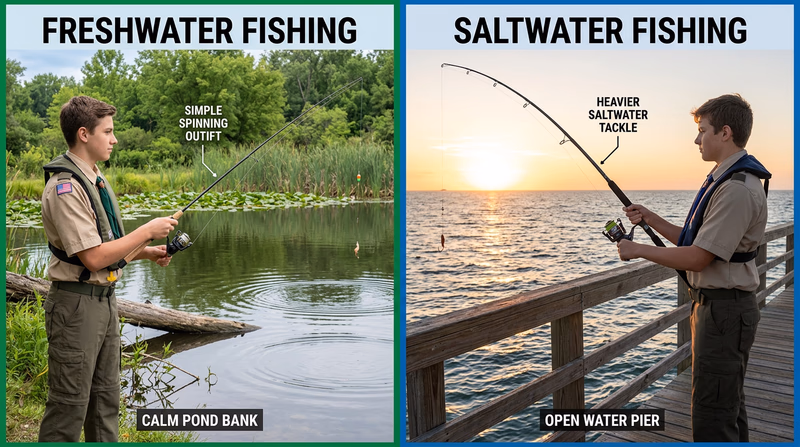
Saltwater Fishing
Saltwater fishing can happen from beaches, piers, bays, flats, or offshore boats. Saltwater fish are often stronger and faster, and the salt itself is hard on gear. That means anglers must rinse and maintain equipment carefully after every trip.
Catch-and-Keep and Catch-and-Release
Some anglers fish to bring home food. Others release nearly every fish they catch. Many do both, depending on the species, season, regulations, and the condition of the fish. Learning when to keep fish and when to release them is part of becoming a responsible angler.
Ready to start with the most important part of the badge — safety? Before you worry about gear or knots, make sure you know how to prevent problems and respond when something goes wrong.
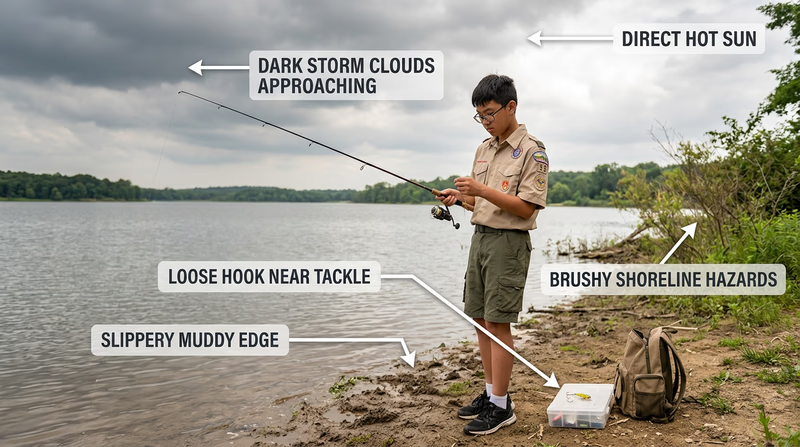
Req 1a — Fishing Hazards
A fishing trip can go from calm to dangerous fast. A hook in skin, lightning moving in over open water, a slip on a muddy bank, or heat building up after hours in the sun can end the day in a hurry. Good anglers do not just react to hazards — they look ahead and reduce the chance of trouble before the first cast.
Think in Four Steps
This requirement uses four key ideas: anticipate, prevent, mitigate, and respond.
- Anticipate means noticing what could go wrong before it does.
- Prevent means taking steps to stop the problem from happening.
- Mitigate means reducing the seriousness if the problem does happen.
- Respond means acting correctly once there is an actual emergency.
If you use those four steps every time you fish, you will sound prepared when you talk to your counselor — because you will be prepared.
Common Fishing Hazards
Hooks, Knives, and Sharp Gear
Fishing gear is full of sharp points and edges. Hooks, fillet knives, fish spines, gill plates, and even broken fishing line can injure you if you rush or get careless.
To anticipate this hazard, look around before every cast and before reaching into a tackle box. Notice who is standing behind you and whether lures are swinging loose.
To help prevent injuries, keep hooks covered when possible, store knives in sheaths, carry pliers, and cast only when your area is clear. Polarized sunglasses are smart because they protect your eyes from glare and from flying hooks.
To mitigate the problem, keep a basic first-aid kit nearby, along with bandages, antiseptic wipes, and tools for removing hooks when appropriate.
To respond, stop fishing immediately, control bleeding, clean the wound, and decide whether the injury needs professional medical care.
Slippery Banks, Docks, and Boats
Water and mud make surfaces slick. Wet rocks can be even more dangerous than they look. Docks may wobble, and boats shift under your feet.
Anticipate this by checking where you plan to stand before you unpack gear. Ask yourself, “If I hook a fish here, can I move safely?”
Prevent slips by wearing shoes with grip, moving slowly, and keeping your area uncluttered. On a boat, stow tackle so nobody steps on it.
Mitigate the risk by fishing with a buddy when possible and by keeping emergency gear easy to reach. On boats, that includes life jackets.
Respond by helping the person out of immediate danger first, then checking for head, back, or limb injuries before moving them more than necessary.
Weather and Lightning
Fishing often puts you in open places: shorelines, docks, flats, and boats. Those are bad places to be during a thunderstorm.
Anticipate weather by checking the forecast before you leave and watching the sky while you fish. Dark clouds, rising wind, distant thunder, and a sudden drop in temperature all matter.
Prevent trouble by ending the trip early instead of waiting too long. A metal rod in an open area is not something you want in a lightning storm.
Mitigate by already knowing where shelter is: a building, a hard-topped vehicle, or your route back to camp.
Respond by getting off the water and away from open banks, lone trees, and metal structures as soon as thunder is heard.
Environmental and Health Hazards
Sun, Heat, and Dehydration
Hours on the water can bake you. Sun reflects off the water and hits you from above and below, which makes sunburn and overheating happen faster than many Scouts expect.
Anticipate this on hot, bright days, especially when there is little shade. Prevent it with sunscreen, a hat, sunglasses, lightweight long sleeves, and regular water breaks. Mitigate by planning shady rest periods and bringing more water than you think you need.
Respond to early warning signs like headache, dizziness, nausea, or cramps by stopping, cooling down, and hydrating right away. In Req 1b, you will look closer at heat-related illness.
Cold Water and Hypothermia
Cold air is not the only danger. Cold water can pull heat out of your body very quickly, even on a day that does not feel freezing.
Anticipate extra risk when fishing in rain, wind, early spring water, or from small boats. Prevent it with layers, rain gear, dry spare clothes, and avoiding unnecessary wading. Mitigate by packing towels and a dry bag.
Respond by getting the person out of wet clothes, drying and warming them gradually, and getting medical help if symptoms are serious.
Wildlife, Insects, and Plants
Mosquitoes, ticks, bees, poison ivy, snakes, and even aggressive fish or turtles can all be part of the fishing environment.
Anticipate local hazards before the trip. Ask what plants, insects, or animals are common at the site.
Prevent problems with insect repellent, long pants in brushy areas, gloves when needed, and by watching where you put your hands and feet.
Mitigate with a first-aid kit and by knowing any allergies in your group.
Respond based on the injury or exposure: remove ticks properly, wash plant oils off skin, monitor stings, and get emergency help for allergic reactions.
A Pre-Trip Hazard Check
Before You Fish
A fast hazard scan before the first cast- Weather: Check forecast, storm timing, wind, and temperature.
- Water conditions: Notice current, depth, waves, and slippery edges.
- Gear safety: Inspect hooks, line, knife storage, and tackle layout.
- Personal readiness: Bring water, first-aid supplies, sunscreen, and proper shoes.
- Emergency plan: Know who is with you, where you are, and how to get help.
Talk Like an Angler Who Plans Ahead
When you explain hazards to your counselor, do not just list dangers. Show that you understand what to do about them. A strong answer sounds like this: “One hazard is lightning. I would anticipate it by checking the forecast and watching the sky, prevent problems by leaving the water early, mitigate the risk by knowing where shelter is, and respond by getting everyone to a building or vehicle as soon as thunder starts.”
That kind of answer shows judgment, not memorization.
NOAA Lightning Safety Clear guidance on recognizing lightning danger and getting to safety fast. Link: NOAA Lightning Safety — https://www.weather.gov/safety/lightningNow that you have looked at overall hazards, it is time to focus on the specific injuries and health problems anglers may need to prevent and treat.
Req 1b — Treating Fishing Injuries
A small scrape from a rock may be no big deal. Heatstroke is a medical emergency. This requirement asks you to know the difference and to understand both prevention and treatment for several problems that are common on fishing trips.
Cuts and Scratches
Cuts and scratches happen around hooks, fish fins, knives, docks, and shoreline brush.
Prevention: Move slowly around sharp gear, use pliers to handle hooks, keep knives sheathed, and wear shoes instead of going barefoot near the water.
Treatment: Wash the wound with clean water, stop bleeding with gentle pressure, and cover it with a clean bandage. Watch for signs of infection such as redness, swelling, warmth, or pus.
Puncture Wounds
A puncture wound is deeper and narrower than a simple cut. Hooks, fish spines, and sharp plant stems can all cause punctures.
Prevention: Keep tackle organized, never leave hooks dangling loose, and use tools instead of fingers when removing hooks from fish.
Treatment: Clean the area carefully and control bleeding. Because puncture wounds can push dirt and bacteria deep into the skin, they deserve extra attention. If a hook or other object is deeply embedded, do not dig around carelessly. Get medical help when needed.
Insect Bites
Mosquitoes, biting flies, chiggers, ticks, and stinging insects are part of fishing in many places.
Prevention: Use insect repellent, wear long sleeves or pants when appropriate, avoid heavy brush, and check for ticks after the trip.
Treatment: Clean the bite or sting area, use a cold pack for swelling or pain, and try not to scratch. Remove ticks promptly with tweezers by pulling steadily near the skin. Watch for allergic reactions or signs of tick-borne illness.
Hypothermia
Hypothermia happens when the body loses heat faster than it can make it. Rain, wind, cold water, and wet clothing all increase the risk.
Prevention: Dress in layers, bring rain gear, avoid staying wet, and pack dry clothes.
Treatment: Move the person out of wind and wet conditions, replace wet clothing with dry layers, warm them gradually, and give warm drinks only if they are alert and able to swallow. Serious cases need medical help.
Dehydration
Dehydration is easy to miss because it builds slowly. By the time you feel very thirsty, you may already be behind.
Prevention: Drink water regularly, especially in sun and heat. Eat snacks during long outings because fluids and electrolytes both matter.
Treatment: Rest in shade and sip water or an oral rehydration drink. If the person becomes confused, cannot keep fluids down, or stops sweating in dangerous heat, think beyond simple dehydration.
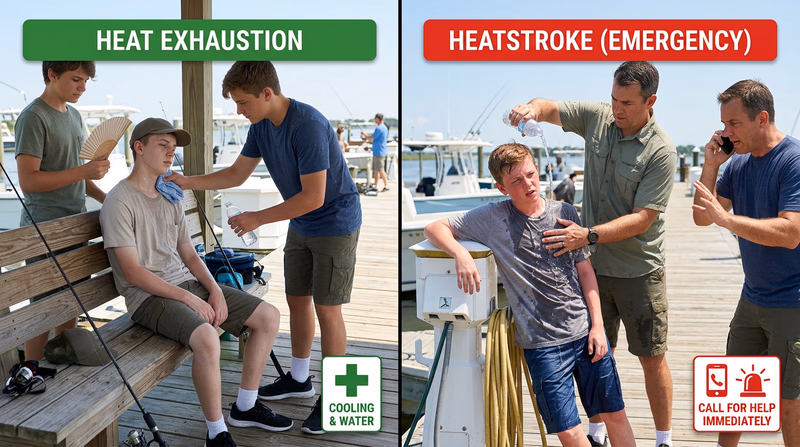
Heat Exhaustion vs. Heatstroke
These two are related, but not the same.
Heat exhaustion is serious, but usually comes before heatstroke. Signs include heavy sweating, weakness, headache, dizziness, nausea, and cool or clammy skin.
Prevention: Take breaks, wear breathable clothing, drink water often, and fish during cooler parts of the day when possible.
Treatment for heat exhaustion: Move the person to shade, loosen clothing, cool them with wet cloths or fanning, and give water if they are alert.
Heatstroke is a life-threatening emergency. Warning signs can include confusion, hot skin, altered behavior, fainting, or a body temperature that keeps rising. The person may stop sweating.
Treatment for heatstroke: Call emergency help immediately. Cool the person fast with cold wet towels, ice packs at the neck, armpits, and groin if available, or other rapid cooling methods while waiting for help.
Sunburn
Sunburn is damage from ultraviolet radiation. It hurts, increases long-term skin cancer risk, and can make the rest of a fishing trip miserable.
Prevention: Use broad-spectrum sunscreen, reapply it, wear a hat, cover exposed skin when possible, and use polarized sunglasses.
Treatment: Get out of the sun, cool the skin, drink water, and use gentle lotion if needed. Severe blistering or signs of heat illness mean the problem may be bigger than a simple sunburn.
Quick Comparison Guide
Know the Difference
What matters most in the moment- Cut or scratch: Clean it, stop bleeding, and cover it.
- Puncture wound: Clean carefully and take it more seriously because infection can go deep.
- Insect bite or sting: Reduce swelling, monitor for allergy, and remove ticks properly.
- Hypothermia: Get dry, get warm, and warm gradually.
- Dehydration: Rest and rehydrate early.
- Heat exhaustion: Cool down and recover before it gets worse.
- Heatstroke: Call for emergency medical help and cool fast.
- Sunburn: Prevent it first; once it happens, protect the skin and rehydrate.
In Req 1a, you looked at broad hazards like weather and slippery footing. Here, you are turning that awareness into specific first-aid knowledge. Next, you will focus on one of the most fishing-specific injuries of all: a barbed hook in skin.
CDC — About Heat Stress Plain-language guidance on recognizing, preventing, and responding to heat-related illness. Link: CDC — About Heat Stress — https://www.cdc.gov/niosh/heat-stress/about/Req 1c — Removing a Barbed Hook
A barbed hook is designed not to back out easily. That is great when you are fighting a fish, but terrible when the hook is in a person’s arm. This is one of the most memorable fishing safety topics because it feels very specific, very real, and very important.
First, Slow Everything Down
If someone gets hooked, panic makes the situation worse. The injured person may jerk, the line may still be attached, and other hooks may still be swinging around. Start by making the area safe.
- Stop casting immediately.
- Set the rod down securely.
- Cut or control any line that is pulling on the hook.
- Help the person stay still.
Then look at the hook carefully. Is it shallow or deeply embedded? Is it in a simple area like the fleshy part of the arm, or somewhere dangerous like the eye, face, hand tendon area, neck, or near a major joint?
The Basic Idea
For a hook lodged in someone’s arm, the usual idea is to avoid simply yanking it backward through the barb. That tears tissue. Instead, you either remove it using a technique that controls the barb, or you get medical help if the hook is too deep, the location is unsafe, or you are not trained to do it.
For discussion with your counselor, you should understand the advance-and-cut method because it shows why the barb matters.
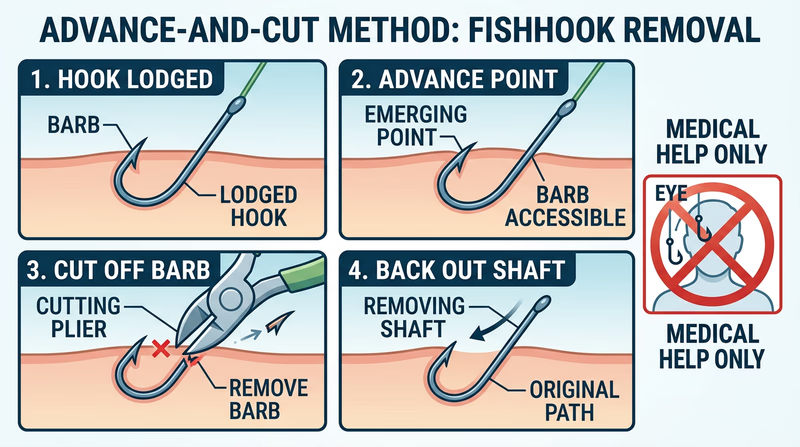
Advance-and-Cut Method
- Clean the area as best you can. Use clean water and antiseptic if available.
- Push the hook point forward through the skin until the barb comes out the other side.
- Cut off the barb with proper cutting pliers or wire cutters.
- Back the remaining shaft out through the original entry path.
- Clean the wound again, apply pressure if needed, and bandage it.
This method makes sense because once the barb is removed, the hook can slide back without catching more tissue.
When Not to Try It Yourself
Even if the hook is in an arm, there are times when the right answer is still medical help.
- The hook is very deep.
- You cannot clearly see the point and barb.
- The person is a small child or is panicking badly.
- The wound is bleeding heavily.
- More than one hook point is embedded.
- You do not have the right tools.
- The person may need tetanus follow-up or additional wound care.
🎬 Video: How To Remove A Fish Hook Quick and Easy! — Richard Gene The Fishing Machine — https://www.youtube.com/watch?v=dL53j3MViWk
After the Hook Is Out
Hook removal is not the end of the job.
- Wash the wound thoroughly.
- Apply an antibiotic ointment if appropriate.
- Cover it with a clean bandage.
- Watch for infection.
- Make sure the person knows to ask about tetanus protection if needed.
If the person feels faint, sits down suddenly, or looks pale, treat that seriously too. Sometimes the injury itself is minor, but the person’s reaction is the bigger issue.
What Your Counselor Wants to Hear
Your counselor is not looking for you to act like an emergency room doctor. They want to know that you understand the safety logic.
A strong explanation includes these points:
- A barbed hook should not usually be ripped backward through tissue.
- You first decide whether the location is safe for field removal.
- In a simple arm location, you can explain the advance-and-cut method.
- Dangerous locations or deep hooks need professional care.
- After removal, the wound must be cleaned and monitored.
That answer shows judgment, which matters as much as the technique itself.
Mayo Clinic — Fishhook Removal Medical guidance on when fishhook removal can be handled simply and when professional care is the better choice. Link: Mayo Clinic — Fishhook Removal — https://www.mayoclinic.org/first-aid/first-aid-fishhooks/basics/art-20056628You have now covered one of the most specific fishing injuries. Next, zoom back out and lock in the safety habits every angler should follow on every trip.
Req 1d — Core Fishing Safety Practices
The word always matters here. Some fishing decisions depend on species, season, or location. Safety habits do not. The best anglers follow the same core practices whether they are on a quiet farm pond or a crowded pier.
1. Keep Control of Hooks and Casting Space
Before every cast, look behind you and beside you. Make sure the line is clear and nobody is in the path of the hook. When you are not casting, store lures and hooks so they are not swinging loose.
This practice prevents eye injuries, puncture wounds, and tangled chaos. It also shows courtesy, which connects directly to Req 8.
2. Watch the Weather and Water Conditions
Do not treat weather as background scenery. Wind, lightning, rising water, waves, and sudden storms change fishing risk fast. Strong anglers know when to leave.
Checking the forecast before the trip and keeping an eye on the sky during the trip are both part of this habit. It is easier to quit early than to escape late.
3. Wear the Right Protection
Protection includes more than a life jacket. It also means eye protection, sun protection, and footwear with good grip.
Polarized sunglasses help you see into the water, but they also shield your eyes from flying hooks. Shoes protect your feet from rocks, hooks, and slippery surfaces. Hats and sunscreen protect you from long hours of reflected sunlight.
4. Keep Gear Organized and Use Tools
Loose hooks in a pocket, a knife left open, or line piled on the deck is an accident waiting to happen. Good organization is a safety skill.
Use pliers to handle hooks, store knives safely, keep tackle boxes latched, and pack extra line or trash back out instead of leaving it behind. Neat gear is faster to use and safer to manage.
5. Fish with Awareness and a Plan
Know where you are, who is with you, and how to get help. Tell someone your location if you are fishing somewhere remote. Carry water, first-aid supplies, and whatever local conditions require.
Awareness also means paying attention to your own body. If you are overheating, getting chilled, dizzy, or sunburned, deal with it early.
Five Safety Habits to Always Follow
Simple rules that prevent many fishing accidents- Clear your casting zone: Never cast until you know the area is safe.
- Respect weather: Leave before storms or dangerous water conditions reach you.
- Protect eyes, skin, and feet: Sunglasses, shoes, hats, and sunscreen matter.
- Control your gear: Hooks, knives, and line should always be managed, not scattered.
- Have an emergency plan: Know your location, supplies, and response options.
Explaining the “Why”
Your counselor will probably want more than just a list. Be ready to explain why each practice matters.
For example, do not just say, “Wear sunglasses.” Say, “Wear polarized sunglasses because they protect your eyes from hooks and reduce glare so you can see hazards in the water better.” That kind of answer shows you understand the practice instead of repeating words.
In Req 1a, you looked at hazards. In Req 1b, you learned treatment. This page turns that knowledge into habits that help prevent emergencies in the first place.
U.S. Coast Guard Boating Safety Safety guidance that is especially useful for anglers fishing from boats, docks, and launch ramps. Link: U.S. Coast Guard Boating Safety — https://www.uscgboating.org/You now have a solid safety foundation. Next comes the gear itself — rods, reels, and the fishing outfits that match different situations.
Req 2 — Fishing Outfits & Equipment Care
Walking into a tackle shop for the first time can feel like walking into a different language. Spinning reel. Baitcaster. Drag. Spool. Rod power. Rod action. The good news is that most fishing outfits follow a few clear patterns, and once you understand those patterns, the gear starts making sense fast.
Two Common Fishing Outfits
The two outfits most Scouts are likely to compare are spinning and baitcasting.
Spinning Outfit
A spinning outfit uses a spinning rod and a spinning reel mounted below the rod. The spool stays fixed, and the line peels off during the cast.
Why it is popular: Spinning gear is easy to learn, handles light lures well, and works for many freshwater situations.
When to use it: Shore fishing, panfish, trout, bass, and general-purpose fishing. It is often the best choice for beginners.
Baitcasting Outfit
A baitcasting outfit uses a reel mounted on top of the rod. The spool turns during the cast, which gives more control and power but also creates the chance of backlash if the reel is not adjusted well.
Why anglers like it: It offers strong control, accuracy, and power for heavier lures and bigger fish.
When to use it: Bass fishing with heavier lures, target casting near cover, and situations where line control matters.
Parts of a Rod
🎬 Video: 3 Types of Fishing Reels and How to Use Them for Beginners - Spinning vs. Spincast vs. Baitcasting — Fishing with Nat — https://www.youtube.com/watch?v=C7CWIywYmxk
Most rods share the same basic parts:
- Tip — the thin end of the rod
- Guides — rings that direct the line down the rod
- Blank — the main body of the rod
- Handle or grip — where you hold it
- Reel seat — where the reel attaches
- Butt — the bottom end of the rod
You may also hear about power and action.
- Power describes how strong the rod is: ultralight, light, medium, medium-heavy, and so on.
- Action describes where the rod bends: fast, moderate, or slow.
A light, fast rod may be great for trout or panfish. A medium-heavy rod may be better for larger bass lures or stronger fish around cover.
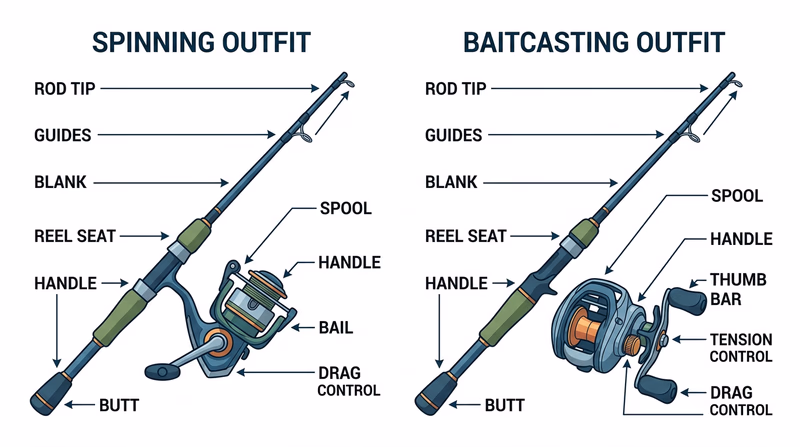
Parts of a Spinning Reel
A spinning reel usually includes:
- Spool — holds the line
- Bail — flips open for casting and closes for retrieve
- Handle — turns the reel
- Drag knob — adjusts resistance when a fish pulls line
- Body and rotor — support the moving parts
Parts of a Baitcasting Reel
A baitcasting reel includes:
- Spool — rotates during the cast
- Handle — retrieves line
- Drag star — adjusts drag pressure
- Thumb bar or spool release — disengages spool for casting
- Braking/tension controls — help manage spool speed and prevent backlash
How and When Each Is Used
A Scout should be able to explain this in real-world terms, not just definitions.
A spinning outfit is great when you want to cast light baits, fish from shore, or keep things simple. It is forgiving and versatile.
A baitcasting outfit shines when you need stronger line, heavier lures, better control around docks or weeds, or extra power for pulling fish away from cover.
If you discuss a third type, you could mention a spincast outfit, which is beginner-friendly and often used by younger anglers, or a fly outfit, which is specialized for presenting flies.
Caring for Fishing Equipment
Good care keeps your equipment smooth, reliable, and safe.
Basic Gear Care
What smart anglers do after a trip- Rinse and wipe down gear: Especially after saltwater use.
- Check line for damage: Frayed line should be cut back or replaced.
- Inspect guides and reel parts: Cracks or rough spots damage line.
- Loosen drag before storage: This helps protect drag washers.
- Store rods and reels carefully: Avoid crushing, bending, or leaving them in extreme heat.
Saltwater adds an extra step. Salt left on gear attracts moisture and speeds corrosion, so rinsing is essential.
What to Say to Your Counselor
A strong discussion might sound like this: “A spinning outfit is easier for beginners and better for light lures. A baitcasting outfit gives more control and power for heavier lures. On a rod, I can point out the tip, guides, reel seat, handle, and butt. On reels, I can identify the spool, drag, handle, and casting controls. I would care for them by rinsing, drying, checking the line, and storing them properly.”
That covers the requirement clearly and practically.
Take Me Fishing — Rods and Reels Basics A beginner-friendly overview of common rod and reel types and how they are used. Link: Take Me Fishing — Rods and Reels Basics — https://www.takemefishing.org/how-to-fish/fishing-gear-and-tackle/fishing-rods-reels/Now that you understand the parts and purposes of common outfits, it is time to put equipment into action and think about how to use it correctly.
Req 3 — Using Fishing Equipment
This requirement is about action. Your counselor wants to see that you can actually handle equipment correctly, not just talk about it. The best way to prepare is to choose two types of gear and practice the basic motions until they feel controlled and safe.
What Counts as Different Types?
Different types of fishing equipment could mean different rod-and-reel setups, such as spinning and baitcasting, or different tools such as a rod outfit and a landing net. Most Scouts complete this requirement by demonstrating two different fishing outfits.
A strong pair is:
- Spinning outfit
- Baitcasting outfit
If baitcasting gear is not available, a spinning outfit and a spincast outfit can still let you show the differences in setup and use.
Proper Use Starts Before the Cast
Using equipment properly begins with setup.
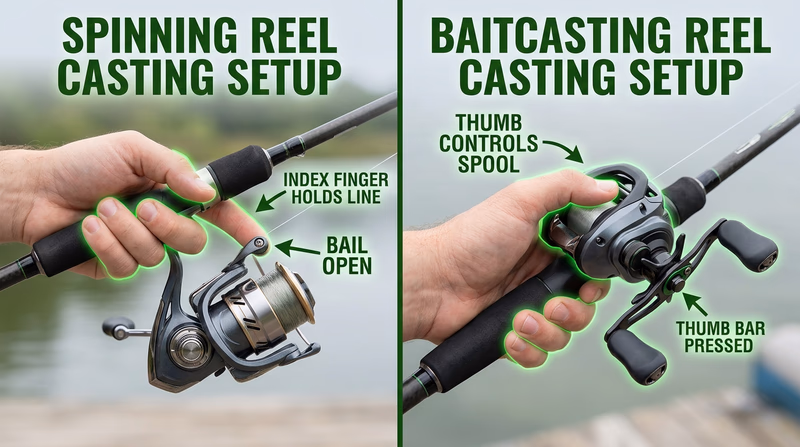
For a Spinning Outfit
- Check that the line is threaded through every guide.
- Make sure the bail is working smoothly.
- Hold the line lightly against the rod with your finger.
- Open the bail by hand.
- Cast in a controlled motion.
- Release the line at the right moment.
- Close the bail by hand after the cast.
Closing the bail by hand instead of cranking it shut helps reduce twist and wear.
For a Baitcasting Outfit
- Set spool tension and braking for the lure you are using.
- Keep your thumb lightly on the spool.
- Press the spool release.
- Make a smooth cast — not a wild power throw.
- Feather the spool with your thumb during flight.
- Stop the spool as the lure lands.
That thumb control is what keeps the line from exploding into a backlash.
Demonstrating Retrieval and Fish Control
Proper use is not just about casting. It also includes what happens after the lure lands.
- Keep slight tension on the line so you can detect strikes.
- Use the rod tip intentionally, not randomly.
- Reel smoothly.
- Set the hook appropriately for the lure and species.
- Let the drag work instead of trying to win every fish by brute force.
In Req 2, you learned about drag and outfit differences. Here, you show that you can use those ideas under control.
Other Equipment You May Demonstrate
You can also strengthen your discussion by mentioning other fishing tools and how they should be used.
- Landing net: Scoop head-first when possible, and avoid chasing the fish wildly.
- Pliers: Use them to remove hooks safely from fish and keep hands away from teeth or spines.
- Stringer or livewell tools: Use only where legal and appropriate.
- Tackle storage: Handle lures carefully and return them safely after use.
Common Mistakes
Common Beginner Errors
What to avoid during your demonstration- Casting without checking behind you
- Snapping the rod too hard instead of making a smooth motion
- Closing a spinning reel bail by cranking
- Ignoring baitcaster spool tension and thumb control
- Holding the rod awkwardly so you cannot react to a strike
Practice Plan Before Meeting Your Counselor
What Your Counselor Is Looking For
The demonstration does not have to be flashy. It should be safe, controlled, and purposeful. You want your counselor to see that you can:
- handle the outfit correctly,
- cast safely,
- explain what you are doing,
- and use equipment without creating danger for yourself or others.
That is much more impressive than one long cast with poor control.
Take Me Fishing — Learn How to Cast Simple casting basics for beginners using common fishing outfits. Link: Take Me Fishing — Learn How to Cast — https://www.takemefishing.org/how-to-fish/fishing-techniques/how-to-cast-a-fishing-rod/The next skill is one every angler depends on: tying knots that hold when the fish is finally on.
Req 4 — Essential Fishing Knots
Fish do not care how expensive your rod is if your knot fails. A good knot transfers strength from line to hook, lure, swivel, or reel spool. A bad knot slips, cuts into itself, or weakens the line so badly that even a small fish can break it.
Why Knot Choice Matters
Different knots solve different problems.
- Some tie your line to a hook or lure.
- Some join two lines together.
- One secures line to the reel spool.
That is why this requirement includes five knots instead of just one “best” knot.
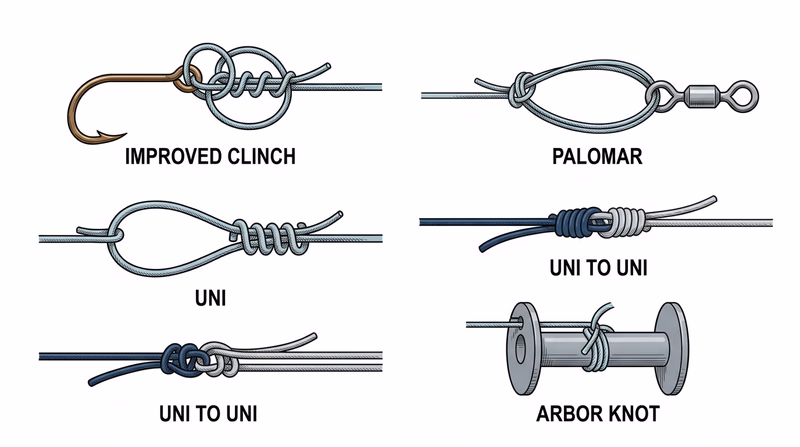
Improved Clinch Knot
The improved clinch knot is a classic knot for tying line to a hook, lure, or swivel. Many anglers learn it first.
How it is used: Pass the tag end through the eye, wrap it around the standing line several times, pass it through the small loop near the eye, then back through the larger loop that forms, moisten, and tighten.
When to use it: Light to medium line, common terminal tackle, and simple general fishing situations.
Palomar Knot
The Palomar knot is known for strength and simplicity, especially with braided line.
How it is used: Double the line, pass the loop through the eye, tie an overhand knot with the doubled line, pass the lure or hook through the loop, moisten, and tighten evenly.
When to use it: Hooks, lures, and swivels when you want a strong, reliable knot with minimal fuss.
Uni Knot
The uni knot is one of the most versatile fishing knots around.
How it is used: Pass the line through the eye, form a loop alongside the standing line, wrap the tag end through the loop several times, moisten, and snug it down.
When to use it: Tying line to terminal tackle. Many anglers also use variations of it in other line-connection jobs.
Uni to Uni Knot
This knot joins two fishing lines together, often lines of different materials or diameters.
How it is used: Overlap the two lines, tie a uni knot with one tag end around the other line, repeat from the other side, then pull the standing lines so the two knots slide together.
When to use it: Connecting main line to leader, such as braid to fluorocarbon or mono.
Arbor Knot
This knot attaches fishing line to the reel spool.
How it is used: Wrap the line around the spool, tie an overhand knot in the tag end, tie another overhand knot in the standing part area as a stopper, and tighten so the knot cinches onto the spool.
When to use it: When loading new line onto a reel.
What Each Knot Does
Match the knot to the job- Improved clinch: Tie line to hook, lure, or swivel.
- Palomar: Strong line-to-hook or line-to-lure knot.
- Uni: Versatile line-to-terminal-tackle knot.
- Uni to uni: Join two lines together.
- Arbor: Attach line to the reel spool.
🎬 Video: How to Tie the Improved Clinch Knot (Fishermans Knot) — Fishing with Nat — https://www.youtube.com/watch?v=2YO7JWNdVC0
Tips for Stronger Knots
No matter which knot you tie, the same quality habits matter.
- Moisten the knot before tightening. This reduces heat and friction.
- Tighten evenly instead of jerking suddenly.
- Trim the tag end neatly, but not so close that it slips.
- Test the knot with a firm pull before you cast.
Preparing for the Demonstration
Your counselor will likely want to see more than one knot in real time. That means repetition matters.
How to Explain “How and When”
Your counselor will not just ask for the names. Be ready with a one-sentence purpose for each knot.
Example: “I would use an arbor knot when putting new line on a reel spool. I would use a uni to uni knot when connecting main line to a leader. I would use a Palomar or improved clinch knot to attach a hook or lure.”
That shows that you understand the job each knot performs.
Animated Knots — Fishing Knots Clear step-by-step knot animations that are useful for practice before demonstrating knots to your counselor. Link: Animated Knots — Fishing Knots — https://www.animatedknots.com/fishing-knotsOnce your knots are solid, you can start thinking about what goes on the end of the line — natural bait, artificial lures, and why baitfish should never be released carelessly.
Req 5 — Lures, Baits, and Baitfish
The bait or lure you choose sends a message to the fish: “This looks like food.” Sometimes that message is a natural smell and taste. Sometimes it is flash, movement, vibration, or color. Understanding the difference between natural bait and artificial lures is one of the biggest steps from beginner fishing to intentional fishing.
Artificial Lures
Artificial lures are designed to imitate prey or trigger a strike. You do not have to use exactly these five examples when talking to your counselor, but you should be able to identify five basic types and explain how they work.
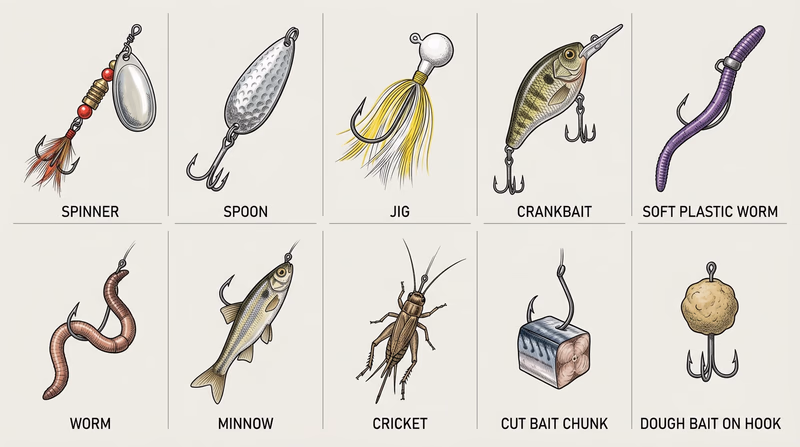
Spinner
A spinner uses a metal blade that flashes and vibrates as it moves through the water.
How to fish it: Cast and retrieve steadily. Change speed until you find what the fish want.
Spoon
A spoon is curved metal that wobbles and flashes like an injured baitfish.
How to fish it: Cast and retrieve, jig it up and down, or troll it depending on the setting.
Jig
A jig is a weighted hook, often dressed with hair, rubber, or soft plastic.
How to fish it: Bounce it along the bottom, hop it, or swim it slowly.
Crankbait
A crankbait is a hard-bodied lure with a diving lip that makes it wobble when retrieved.
How to fish it: Cast and reel so it runs at the depth you want. It is great for covering water and locating active fish.
Soft Plastic Worm or Creature Bait
These imitate worms, crawfish, or other prey.
How to fish it: Rig it in a way that matches the habitat and retrieve it slowly, with pauses and subtle movement.
🎬 Video: 5 Best Freshwater Fishing Lures for Beginners — Take Me Fishing — https://www.youtube.com/watch?v=nhCl88xGfF0
Natural Baits
Natural bait is real food that fish recognize by scent, taste, and appearance.
Worms
A classic bait for many freshwater species.
How to fish it: Use under a bobber, on the bottom, or lightly weighted depending on depth and species.
Minnows
Small live baitfish can be effective for predators.
How to fish it: Hook them carefully so they stay lively and natural in the water.
Crickets or Grasshoppers
Good for sunfish, trout, and other species that eat insects.
How to fish it: Present naturally near the surface or just below it.
Cut Bait
Pieces of fish used to attract catfish or other scent-feeding species.
How to fish it: Fish it on the bottom where scent can spread through the water.
Dough Bait or Prepared Bait
Common for species like trout or catfish depending on the formula.
How to fish it: Mold it securely to the hook and fish it where the target species feeds.
Artificial vs. Natural
How anglers think about the choice- Artificial lures: Cover water faster and imitate movement or vibration.
- Natural baits: Offer real scent and taste that fish recognize.
- Lures often need more technique: Retrieve speed, rod movement, and depth matter.
- Bait often needs more patience: Presentation and keeping it natural matter.
Why Baitfish Should Not Be Released
This is one of the most important conservation ideas in the badge.
Released baitfish can create real ecological problems. They may:
- spread diseases or parasites,
- compete with native fish,
- become invasive if they are not native to that water,
- or mix species between waters in ways that harm ecosystems.
Even if the baitfish looks healthy, releasing it where it did not come from can damage the fishery you are trying to enjoy.
How to Talk About Fishing With Each One
Your counselor will want you to explain not just what these are, but how you would fish them.
That means talking about things like retrieve speed, depth, whether the bait should drift naturally, and what type of fish or habitat matches each choice. A spinner worked steadily along a weed edge is very different from a worm fished quietly below a bobber.
In Req 4, you learned the knots that attach these choices to your line. Here, you are learning why you might choose one presentation over another.
Take Me Fishing — Fishing Bait and Lures Guide A simple overview of common bait and lure types, including when to use them. Link: Take Me Fishing — Fishing Bait and Lures Guide — https://www.takemefishing.org/how-to-fish/fishing-gear-and-tackle/fishing-baits-and-lures/You now understand what goes on the end of the line. Next, shift from catching fish to protecting the waters and habitats that make fishing possible.
Req 6a — Leave No Trace While Fishing
A beautiful fishing spot can be ruined quietly. Not by one giant disaster, but by dozens of small bad choices: discarded line, trampled banks, bait containers left behind, fish cleaned where they should not be, and people pushing into habitat without care. This requirement is about understanding that fishing is not just a sport — it is a responsibility.
Leave No Trace and the Outdoor Code
The Leave No Trace Seven Principles are a framework for reducing human impact outdoors. The Outdoor Code is Scouting’s promise to be clean, careful, considerate, and conservation-minded in the outdoors.
Together, they shape how an angler should behave before, during, and after a trip.
How Leave No Trace Applies to Fishing
Plan Ahead and Prepare
Know the regulations, weather, access points, and what gear you need. When anglers show up prepared, they are less likely to make rushed, damaging decisions.
Travel and Camp on Durable Surfaces
Repeated foot traffic can erode banks and destroy plants along shorelines. Use established paths and access points when possible.
Dispose of Waste Properly
This is huge in fishing. Old line, hooks, bait containers, food wrappers, and sinkers do real harm when left behind.
Leave What You Find
Do not tear up habitat, damage nests, or move rocks and logs around just for convenience.
Minimize Campfire Impacts
If you are camping while fishing, follow local fire rules and use existing fire rings where allowed.
Respect Wildlife
Handle fish gently, avoid stressing wildlife, and do not crowd nesting birds or shoreline animals.
Be Considerate of Other Visitors
Share the shoreline, avoid casting across others, keep noise down, and leave the place better than you found it.
How the Outdoor Code Fits Anglers
- Clean — Pack out trash and tackle waste.
- Careful — Use land and water responsibly.
- Considerate — Respect others using the area.
- Conservation-minded — Think long-term about fish populations, habitat, and water quality.
🎬 Video: Leave What You Find While Kayaking — Leave No Trace — https://www.youtube.com/watch?v=39hmFb2q8gE
Positive Effects on Fishing Resources
When anglers follow these principles, fishing resources improve.
- Shorelines stay healthier and resist erosion.
- Wildlife avoid fewer dangerous hooks and line tangles.
- Water stays cleaner.
- Fish habitat remains stronger.
- Access stays open because landowners and agencies see respectful behavior.
That last point matters more than many people realize. A few careless anglers can get a dock, bank, or pond closed to everyone.
Leave No Trace for Anglers
Practical ways to protect a fishing spot- Use established access points instead of making new paths.
- Pack out line, hooks, and trash every time.
- Handle fish and wildlife gently and only when necessary.
- Respect private property and posted rules so access stays open.
- Leave the area cleaner than you found it when possible.
In Req 5, you learned why baitfish should not be released. That is a perfect example of Outdoor Code thinking: your choices should protect the ecosystem, not just your own success that day.
Leave No Trace — Seven Principles The official Leave No Trace overview of the seven principles and how they reduce outdoor impact. Link: Leave No Trace — Seven Principles — https://lnt.org/why/7-principles/The next page stays in that same stewardship mindset, but focuses on one of the biggest ethical decisions in modern angling: catch and release.
Req 6b — Catch and Release
Catch and release means catching a fish and returning it to the water alive instead of keeping it. Done well, it helps protect fish populations, preserve quality fishing, and support conservation. Done poorly, it can still injure or kill fish even if they swim away at first.
Why Catch and Release Matters
Catch and release matters most when:
- regulations require release,
- the fish is undersized or out of season,
- the fish is a species you choose not to keep,
- or the angler wants to protect the fishery.
It helps maintain breeding populations, allows fish to grow larger, and supports long-term balance in the waterway. Many good fisheries exist partly because anglers release fish responsibly.
Safe Fish Handling Basics
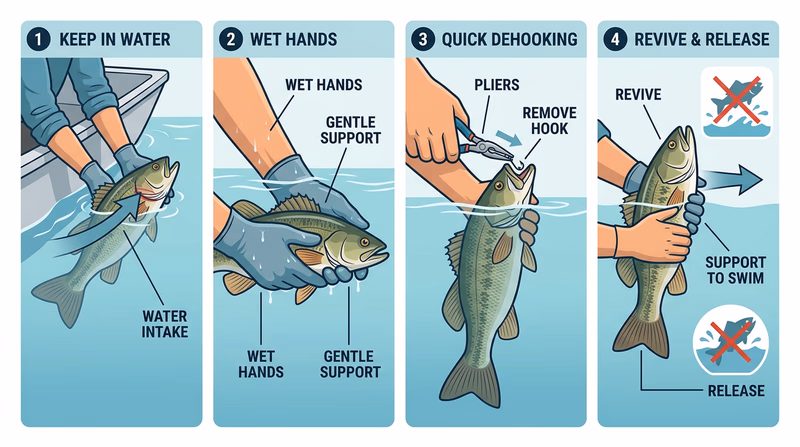
A fish is built for water, not for dry land or rough hands. To release a fish safely, think about reducing air exposure, handling time, and physical damage.
Keep the Fish in the Water When Possible
The safest release often happens without fully lifting the fish out of the water. If you can remove the hook while the fish stays partly submerged, that is usually best.
Wet Your Hands
Dry hands can damage the fish’s protective slime layer. Wet hands first if you need to hold the fish.
Support the Fish Properly
Support the body. Do not squeeze hard. For larger fish, do not hang the whole fish by the jaw unless that is clearly safe for that species and size.
Remove the Hook Quickly and Carefully
Use pliers or a hook remover. Barbless hooks or pinched barbs can make release easier and safer.
Revive the Fish if Needed
If the fish seems exhausted, hold it upright in the water and allow water to move gently past its gills until it can swim away on its own.
A Good Release Sequence
Safe Catch-and-Release Steps
From strike to swim-away- Land the fish efficiently: Do not overplay it to exhaustion.
- Prepare tools before handling: Have pliers ready.
- Keep it wet and handle it briefly: Wet hands and reduce air time.
- Remove the hook carefully: Avoid tearing tissue.
- Support and release gently: Let the fish regain strength if needed.
Why Technique Matters
Some anglers think release success only means “the fish swam away.” That is not always true. A fish may swim off and still die later from stress, injury, or poor handling.
That is why small details matter:
- using tackle strong enough to land fish efficiently,
- avoiding long photo sessions,
- and knowing when water temperature makes release harder on fish.
Catch and Release as an Ethical Skill
In Req 6a, you learned how Leave No Trace and the Outdoor Code apply to fishing resources. Catch and release is one of the clearest examples of that mindset. It says, “I value the fishery beyond this one moment.”
Keep Fish Wet Science-based guidance on fish handling practices that improve catch-and-release survival. Link: Keep Fish Wet — https://www.keepfishwet.org/The next requirement zooms out from personal ethics to the legal side of fishing: regulations and why they exist.
Req 7 — Fishing Regulations
Fishing regulations are not random rules made to annoy anglers. They are tools for protecting fish populations, habitat, public access, and fairness. This requirement asks you to find the real regulations where you live and understand the reason behind them.
What Regulations Usually Cover
Gamefishing regulations often include:
- Seasons — when a species can be legally targeted or kept
- Size limits — minimum, maximum, or protected slot sizes
- Bag limits — how many fish you may keep
- Tackle rules — such as hook restrictions or bait restrictions
- License rules — who needs a license and when
- Location rules — special waters, closures, or access restrictions
Why They Were Adopted
Each regulation usually solves a specific problem.
- Seasons protect fish during spawning or vulnerable times.
- Size limits protect young fish so they can reproduce before being harvested.
- Bag limits prevent overharvest.
- Tackle restrictions can reduce bycatch or improve survival after release.
- Special regulations can protect fragile fisheries or restore struggling populations.
In short, regulations help make sure there are still fish to catch next year — and ten years from now.
What Following Regulations Accomplishes
When anglers follow regulations, they help create:
- healthier fish populations,
- more balanced ecosystems,
- fair use of shared resources,
- and better long-term fishing opportunities.
Ignoring regulations can damage a fishery quickly. A few people keeping too many fish, harvesting spawning fish, or moving bait illegally can hurt the resource for everyone.
How to Review Your Local Rules
What to bring to your counselor discussion- Find the current regulations from your state wildlife or natural resources agency.
- Identify the species you are most likely to fish for.
- Check seasons, size limits, and bag limits for those species.
- Look for local water-specific rules because some lakes or rivers differ from statewide rules.
- Be ready to explain why those rules exist, not just repeat them.
Example Thinking
Suppose your local regulations say a bass must be at least a certain length to keep. Why? Usually because smaller fish may not have spawned yet. Protecting them helps the population reproduce.
Suppose another rule says you can only keep a certain number of trout each day. Why? Because without a limit, too many fish could be removed from the water too quickly.
This is the kind of explanation your counselor is looking for.
In Req 6b, you learned why catch and release matters. Regulations and ethical release practices work together. One is the legal minimum. The other is the mindset of a responsible angler.
Take Me Fishing — State Fishing License and Regulation Finder A quick way to find official state licensing and regulation resources before you review your local rules. Link: Take Me Fishing — State Fishing License and Regulation Finder — https://www.takemefishing.org/state-fishing-license/The next requirement moves from legal rules to personal behavior — what good sportsmanship looks like when you are actually on the water with other people.
Req 8 — Sportsmanship for Anglers
A skilled angler can cast accurately, tie strong knots, and catch fish. A sportsmanlike angler does all that while also showing respect — for the fish, the place, the rules, and the people around them. This requirement is really about character on the water.
What Sportsmanship Means in Fishing
Good outdoor sportsmanship means acting fairly, respectfully, and responsibly whether or not anyone is watching. In fishing, that includes:
- following regulations,
- respecting private property,
- cleaning up after yourself,
- giving other anglers space,
- and treating fish humanely.
Sportsmanship matters because fishing happens in shared places. One rude, careless, or selfish person can ruin the day for everyone nearby.
Littering
Fishing litter is especially harmful. Hooks, line, bait containers, drink bottles, and soft-plastic scraps do not just look bad — they can injure wildlife and damage the water.
A sportsmanlike angler packs out trash and often picks up extra trash left by others.
Trespassing
Not every shoreline is public. Some of the best-looking water may run through private land.
A good angler asks permission, respects fences and signs, and leaves immediately if access is not allowed. Trespassing is not just rude — it can cause landowners to close access for everyone.
Courteous Behavior
Courtesy can be small, but it matters.
- Do not cast across someone else’s line.
- Do not crowd a spot someone is already fishing.
- Keep noise reasonable.
- Watch where children or beginners are standing.
- Offer help without taking over.
Courtesy also means handling success well. Bragging, mocking, or acting like you own the best water is the opposite of sportsmanship.
Obeying Fishing Regulations
In Req 7, you learned what regulations do. Sportsmanship means obeying them even when it would be easy not to.
That includes size limits, bag limits, licenses, seasons, bait rules, and special water regulations. A true angler does not look for loopholes. They look for ways to fish well within the rules.
Connecting to Leave No Trace and the Outdoor Code
This requirement overlaps directly with Req 6a. That is not accidental. Ethical fishing depends on the same ideas.
- Leave No Trace: Protect the place and reduce your impact.
- Outdoor Code: Be clean, careful, considerate, and conservation-minded.
A fishing sports enthusiast should be all of those things.
What Good Angler Sportsmanship Looks Like
Habits that earn trust and respect- Pack out all trash and line so the place stays safe and clean.
- Respect property boundaries and get permission when needed.
- Give other anglers room and avoid interfering with their fishing.
- Follow all regulations honestly whether or not anyone checks.
- Handle fish and wildlife responsibly because the resource matters more than ego.
You have now covered safety, gear, conservation, regulations, and sportsmanship. Next, the badge turns toward the hands-on experience every angler waits for: catching and identifying a fish.
Req 9 — Catching and Identifying a Fish
This requirement sounds simple, but it combines almost everything you have learned so far. To catch one fish and identify it, you need safe habits, suitable gear, good knot tying, a smart bait or lure choice, patience, and enough observation skill to know what you actually caught.
Start With Realistic Expectations
Your goal is not to catch the biggest fish in the lake. Your goal is to catch a fish and identify it correctly. That means success often comes from choosing a likely species, a manageable location, and a simple technique.
For many Scouts, a pond with bluegill or other panfish is a better place to meet this requirement than a difficult river where one trophy fish is the only target.
Improve Your Chances of Catching a Fish
Match the Spot to the Species
Fish are not spread evenly through the water. They gather where food, oxygen, cover, and comfortable water conditions come together.
Look for:
- weed edges,
- fallen trees,
- shady banks,
- docks,
- drop-offs,
- current seams,
- or areas where insects are active.
Keep Your Presentation Simple
A simple hook, a small bait, and a bobber can be very effective for panfish. A spinner or soft plastic may work well for bass. A basic trout setup may drift naturally in current.
The point is not to use the fanciest method. It is to use a method that fits the fish and water.
Fish at Good Times
Early morning and evening are often productive. Midday can still work, but bright light and heat sometimes make fish less active or push them deeper.
Identifying the Fish
Once you catch a fish, slow down and observe.
Look at:
- body shape,
- mouth position,
- fin shape,
- color pattern,
- markings,
- and size.
Where you caught it also helps. A trout in a cold stream and a bluegill in a farm pond do not just look different — they live in different kinds of water.
Good ID Habits
How to Identify a Fish
Clues that matter more than a quick guess- Notice the body shape: Long and narrow or tall and rounded?
- Look at the fins: Especially dorsal fin shape and tail shape.
- Check the mouth: Large, small, turned up, or turned down?
- Observe markings: Stripes, spots, bars, or a dark ear flap.
- Use location as a clue: Habitat and region matter.
If you are unsure, use a local field guide, a state agency fish ID page, or ask your counselor to walk through the features with you.
Handle the Fish Responsibly
This requirement is not permission to be rough with the fish while you admire it.
If you are releasing it, use the safe handling ideas from Req 6b. If you are keeping it legally for Req 10, dispatch and store it according to local rules and good practice.
A Smart Strategy for This Requirement
U.S. Fish & Wildlife Service — Fish Identification Resources Federal wildlife resources that can help you find state and regional fish identification information. Link: U.S. Fish & Wildlife Service — Fish Identification Resources — https://www.fws.gov/Once you have caught and identified a fish, the final requirement asks what comes next if keeping a legal fish for food is allowed: cleaning and cooking it responsibly.
Req 10 — Cleaning and Cooking Your Catch
This final requirement brings fishing full circle. Catching a fish is exciting, but using it responsibly for food teaches another level of outdoor skill and respect. It reminds you that fish are not just trophies. They are a natural resource that should be handled carefully and never wasted.
First Question: Is It Legal and Safe?
Before you clean or cook any fish, make sure all of these are true:
- the species is legal to keep,
- the fish meets size and bag rules,
- the water body does not have a health advisory that affects eating fish,
- and the fish has been kept cold and clean enough for safe food use.
This is where Req 7 matters again. A fish that is illegal to keep is not your dinner.
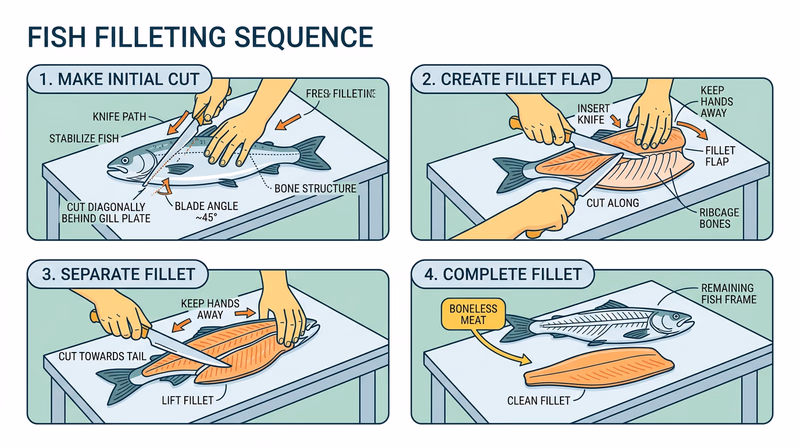
Cleaning a Fish
Cleaning methods vary by species, but most start with the same ideas: work on a clean surface, use a sharp fillet knife carefully, and keep the fish cool.
Common cleaning steps may include:
- Scale the fish if the skin will stay on and the species requires scaling.
- Open the body cavity or begin filleting, depending on the method.
- Remove entrails or fillets carefully.
- Rinse briefly if needed and keep the meat clean.
- Dispose of remains properly according to local rules.
Some species are usually filleted. Others may be cooked whole or dressed differently.
Cooking the Fish
The cooking method can be simple. Pan-frying, baking, grilling, or foil-packet cooking are all common options.
What matters most is safe food handling:
- keep raw fish cold until cooking,
- avoid cross-contamination with ready-to-eat food,
- cook thoroughly,
- and clean tools and surfaces afterward.
A simple seasoning and careful cooking often tastes better than trying to hide the fish under too many ingredients.
If You Did Not Catch a Fish for Eating
The requirement gives a backup plan. If regulations, conditions, or bad luck keep you from catching an edible fish, you may acquire one and still demonstrate the cleaning and cooking skills.
That keeps the focus where it belongs: learning the process, not pretending success always comes easy on the water.
Respect for the Resource
This requirement connects back to the history in the Introduction page. For most of human history, catching fish meant food. Cleaning and cooking a fish teaches respect for that tradition. It also teaches that if you keep a fish, you should use it well.
Before You Clean and Cook
A quick reality check- Is the fish legal to keep?
- Is it safe to eat from this water?
- Has it been kept cold and clean?
- Do you have a safe workspace and sharp knife?
- Do you have a simple cooking plan before you start cutting?
You have reached the end of the Fishing badge requirements. The next page looks beyond the badge to deeper skills, experiences, and organizations that can keep you learning.
Extended Learning
A. Introduction
Congratulations — you have completed the Fishing merit badge requirements. You now know how to stay safe, choose and care for gear, tie essential knots, fish responsibly, and think like an angler who respects both the resource and the people around you. But fishing is one of those skills that keeps expanding the more time you spend with it. The deeper you go, the more you notice.
B. Deep Dive: Reading Water Like an Angler
Experienced anglers do not just cast at random water. They look for clues. In a pond, that might mean a weed edge, a fallen tree, or a shady drop-off. In a river, it might mean a current seam where fast water meets slow water, an eddy behind a rock, or a deeper hole below a riffle. Fish gather where they can rest, hide, and feed efficiently.
Learning to read water means asking a few simple questions. Where would food drift? Where can a fish stay protected from predators? Where does the water temperature feel most comfortable? In summer, deeper or shaded water may be more productive. In cold weather, fish may hold in slower, more stable areas. Wind matters too. A windy bank can push food into one side of a pond and make that shoreline more active.
This skill takes time because every water body behaves differently. A reservoir is not a trout stream. A farm pond is not a tidal flat. But the habit of observing before you cast is universal. The more you study the water, the more fishing begins to feel less like luck and more like informed problem-solving.
C. Deep Dive: Seasonal Patterns and Fish Behavior
Fish do not behave the same way all year long. Water temperature, daylight length, spawning cycles, and food availability all shape where fish go and how willing they are to bite. If you understand the season, you can make better decisions before the trip even begins.
In spring, many fish become more active as the water warms. Some species move shallow to spawn. That can make them easier to find, but it also means regulations may be especially important during sensitive times. Summer often pushes fish deeper, earlier, or later in the day, especially in warm water. Fall can be excellent because many fish feed aggressively before winter. Winter slows many species down, which means slower presentations and more patience.
The lesson is not to memorize one rule for every season. It is to notice patterns. Keep notes on date, weather, water type, bait choice, and what happened. Over time, you will build your own understanding of fish behavior in your local waters.
D. Deep Dive: Conservation Beyond Catch and Release
Catch and release matters, but conservation goes much further. Healthy fisheries depend on clean water, intact habitat, good spawning areas, healthy insect populations, and smart management. Pollution, shoreline erosion, invasive species, drought, dams, and habitat destruction can all affect fish long before an angler ever makes a cast.
That means anglers can be powerful conservation allies. They can report pollution, join stream cleanups, support habitat restoration, install monofilament recycling tubes, and speak up for access and stewardship. They can also share good habits with younger Scouts and newer anglers. One person who handles fish well, packs out trash, and respects regulations influences everyone nearby.
If you want to keep fishing for years, conservation is not extra credit. It is part of the sport itself. Good fishing depends on healthy ecosystems, and healthy ecosystems depend on people making good choices over and over again.
E. Real-World Experiences
Local Stocking Day or Youth Fishing Event
Guided River Float or Kayak Fishing Trip
Fish Hatchery Tour
Conservation Workday
Pier, Surf, or Saltwater Charter Experience
F. Organizations
A beginner-friendly fishing education site with gear guides, species basics, and easy-to-understand how-to articles for new anglers.
Organization: Take Me Fishing — https://www.takemefishing.org/
A major angling organization that promotes bass fishing, conservation, youth engagement, and responsible fisheries practices.
Organization: B.A.S.S. Conservation — https://www.bassmaster.com/conservation/
Works to protect and restore coldwater fisheries and the watersheds that support trout and salmon.
Organization: Trout Unlimited — https://www.tu.org/
Supports recreational fishing and boating through education, advocacy, and industry-wide conservation efforts.
Organization: American Sportfishing Association — https://asafishing.org/
Provides fisheries science, hatchery information, habitat work, and wildlife conservation resources across the country.
Organization: U.S. Fish & Wildlife Service — https://www.fws.gov/
Offers outdoor ethics education that directly supports responsible fishing, boating, camping, and shoreline use.
Organization: Leave No Trace — https://lnt.org/