Fly Fishing Merit Badge — Complete Digital Resource Guide
https://merit-badge.university/merit-badges/fly-fishing/guide/
Introduction & Overview
A trout rises just once, sips something from the surface, and disappears. If you were holding a spinning rod, you might cast a lure into the same spot and hope. A fly angler tries to answer a more interesting question first: What did that fish just eat?
Fly fishing is a style of fishing that uses a weighted line and an artificial fly to imitate insects, baitfish, and other food. It blends science, observation, knot tying, casting skill, patience, and outdoor ethics. Scouts who learn fly fishing discover that success is not just about catching fish. It is about reading water, noticing small details, and treating streams, lakes, and shorelines with care.
Then and Now
Then — Fur, Feathers, and Craftsmanship
People have been tying simple artificial flies for centuries. Early anglers in Europe and Asia used hooks dressed with feathers, fur, and thread to imitate insects that fish were already eating. By the 1800s, fly fishing had become especially popular on trout and salmon rivers in Britain, where anglers carefully matched local insects and developed classic casting styles and fly patterns.
In North America, fly fishing spread into mountain streams, warmwater ponds, and coastal flats. Bamboo rods, silk lines, and handmade flies demanded patience and care. Learning the sport meant practicing knots, casting in open fields, and spending long hours beside the water watching fish behavior.
- Purpose: Present a lifelike food item to fish with a lightweight fly
- Mindset: Observe first, cast second
Now — More Waters, Better Gear, Same Curiosity
Today, fly anglers still rely on observation and skill, but the equipment is lighter, stronger, and easier to maintain. Graphite rods replaced most bamboo. Modern fly lines float, sink, or hover at different depths. Leaders and tippets are made from precise materials that help flies move naturally in the water.
Fly fishing is also broader than many people expect. People use it for trout in cold streams, bass in ponds, carp in city lakes, redfish on saltwater flats, and panfish close to home. Modern anglers also think more seriously about conservation, habitat protection, and catch-and-release practices so fish populations stay healthy.
- Purpose: Combine fishing skill with observation, ethics, and stewardship
- Mindset: Learn the water, respect the fish, leave the place better than you found it
Get Ready! This guide will help you understand the gear, insects, fish behavior, and outdoor skills behind the Fly Fishing merit badge. You do not need to be an expert yet. You just need curiosity, patience, and a willingness to practice.
Kinds of Fly Fishing
Fly fishing is not one single style. The place you fish, the species you target, and the flies you use all change the experience.
River and Stream Fly Fishing
This is what many people picture first: standing in moving water and casting to trout in riffles, runs, and pools. Stream fly fishing rewards careful reading of current seams, underwater structure, and insect activity. A short drift in exactly the right place often matters more than a long cast.
Lake and Pond Fly Fishing
Stillwater fly fishing often means longer casts, slower retrieves, and close attention to depth. Fish in lakes and ponds may cruise weed edges, drop-offs, or shoreline cover. Fly anglers often use nymphs, streamers, poppers, and bass bugs here.
Warmwater Fly Fishing
Bass, bluegill, and other warmwater fish are exciting targets for Scouts because they often live close to home. Poppers that chug across the surface and streamers stripped near weeds can create explosive strikes. Warmwater fly fishing is a great way to practice the sport without needing a mountain trout stream.
Saltwater Fly Fishing
Saltwater fly fishing targets species like redfish, bonefish, striped bass, and other coastal fish. The gear is usually tougher because salt corrodes equipment and many saltwater fish are powerful. Wind, tides, and sunlight angle matter a lot.
Tying Flies at the Bench
Not every part of fly fishing happens on the water. Many anglers tie their own flies using hooks, thread, feathers, fur, flash, foam, and synthetic materials. Fly tying helps you understand why certain patterns work and what they are trying to imitate.
Now you are ready to start with the most important part of the badge: staying safe around hooks, water, weather, and the outdoors.
Req 1a — Hazards on the Water
A fly line whipping through the air with a sharp hook on the end can turn a fun outing into an injury in one second. Add slippery rocks, moving water, hot sun, changing weather, and remote locations, and it becomes clear why safety is the real first skill in fly fishing.
The Hazards You Are Most Likely to Face
Fly fishing hazards usually fall into a few common groups. If you can spot them early, you can prevent most problems before they start.
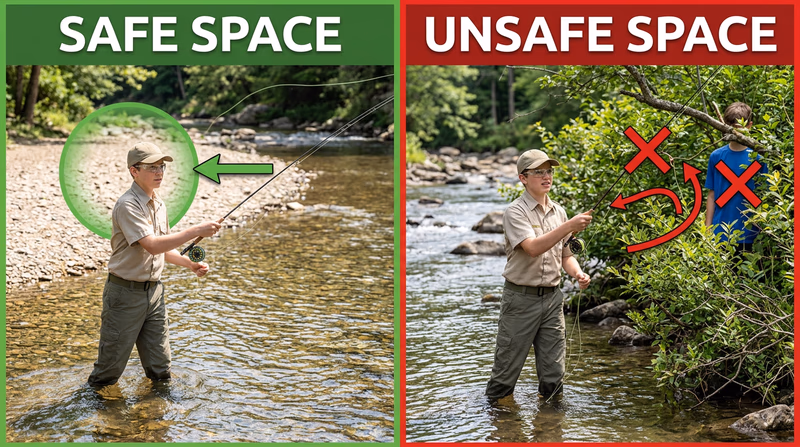
Hooks, Flies, and Casting Space
A fly may be small, but the hook is still sharp enough to puncture skin, clothing, ears, or eyes. False casting increases the chance of hooking yourself or someone standing too close. Trees and brush can also snag a back cast and send the fly in an unexpected direction.
To prevent this, check behind you before every cast, keep a safe bubble around yourself, and wear eye protection. If you are teaching a friend or fishing with a group, spread out so nobody is in another angler’s casting lane.
Slippery Banks, Mud, and Wading Hazards
Many good fishing spots have wet rocks, steep banks, hidden holes, or uneven bottoms. Moving water pushes against your legs and can make even shallow streams unstable. A fall near rocks or current can cause cuts, sprains, or a dangerous sweep downstream.
Anticipate this hazard by studying the area before stepping in. Move slowly, shuffle your feet, and test each foothold. If conditions look questionable, fish from shore instead of wading.
Weather and Temperature Stress
Fly fishing often means long stretches outdoors with little shade. Hot days can cause dehydration, sunburn, heat exhaustion, and heatstroke. Cold rain, wind, or icy water can lead to hypothermia even when the air temperature does not seem extreme.
Check the forecast before you leave. Pack layers, water, snacks, sun protection, and rain gear. If thunder is nearby, stop fishing immediately and move away from open water and rods.
Insects, Plants, and Wildlife
Mosquitoes, ticks, bees, wasps, poison ivy, and thorny plants all show up where fish live. In some areas you may also encounter snakes, alligators, bears, or aggressive nesting birds. Most wildlife problems happen when people move carelessly or leave food out.
Reduce the risk by knowing local conditions, using insect repellent when appropriate, wearing long pants in brushy places, and giving wildlife plenty of space. Check for ticks after the trip.
Remote Locations and Limited Help
A peaceful stream can also be far from roads, cell coverage, or medical help. A minor injury in town may become a serious problem when you are far away and alone.
That is why you should tell someone where you are going, fish with a buddy when possible, and carry basic first-aid supplies. Think about how you would get help before you need it.
How to Anticipate, Prevent, Mitigate, and Respond
Your counselor may ask you to explain not just the hazard, but what to do about it. This four-part approach helps:
- Anticipate by studying the location, forecast, regulations, and water conditions before you go.
- Prevent by using the right clothing, gear, spacing, and habits.
- Mitigate by lowering the severity of a problem when it starts, such as leaving the water when current feels too strong or moving to shade before heat illness develops.
- Respond by using first aid, getting help, and ending the outing if safety is no longer under control.
Five Safety Practices Every Fly Angler Should Follow
These are strong examples to discuss with your counselor- Wear eye protection and a hat: Sunglasses protect your eyes from hooks, branches, glare, and UV light. A brimmed hat adds another layer of defense.
- Look behind you before casting: A safe back cast prevents hooking people, pets, or brush.
- Use proper footing near water: Move slowly on rocks, mud, and stream bottoms, and avoid wading when conditions are unsafe.
- Dress for weather and drink water: Layers, rain gear, sunscreen, and hydration prevent many common outdoor emergencies.
- Fish with a plan: Tell someone where you are going, carry first aid supplies, and know how to leave the area quickly if conditions change.
A Real-World Safety Scenario
Good fly anglers are not fearless. They are careful. They notice risks early and make smart choices before those risks become emergencies. That judgment is part of what makes someone trustworthy on the water.
Leave No Trace — Seven Principles Review the seven core outdoor ethics principles that also help keep anglers safer and more aware in the field. Link: Leave No Trace — Seven Principles — https://lnt.org/why/7-principles/Before you can handle hazards well, you also need to know the first-aid side of the sport — what to do when common fishing injuries or outdoor illnesses happen.
Req 1b — Preventing Fishing Injuries
A day of fly fishing can put you in cold water, bright sun, rough brush, and buggy places all at once. Most fishing-related medical problems are preventable, but only if you recognize them early and respond before a small problem grows into a serious one.
This requirement covers eight common health concerns you may face while fly fishing:
- Cuts and scratches from rocks, branches, and fish fins
- Puncture wounds from hooks and sharp gear
- Insect bites from mosquitoes, ticks, and stinging insects
- Hypothermia from cold water, wind, and wet clothing
- Dehydration from sun, heat, and long hours outside
- Heat exhaustion when your body starts to overheat
- Heatstroke when overheating becomes a true emergency
- Sunburn from long UV exposure, especially near reflective water
Cuts, Scratches, and Puncture Wounds
Brushy banks, fish teeth, fins, hooks, and uneven rocks can all break skin. Small wounds may not look dramatic, but they can become painful or infected if ignored.
Prevention: Wear sturdy clothing, move carefully through brush, keep flies secured when not in use, and handle fish calmly. Keep a small first-aid kit with bandages, gauze, antiseptic wipes, and tape.
Treatment: Wash the wound with clean water, remove dirt if possible, apply pressure if it is bleeding, then cover it with a clean dressing. Watch for infection signs later, such as redness, warmth, swelling, pus, or fever.
A puncture wound is different from a shallow scratch because the damage goes deeper and may trap bacteria inside. That means hook wounds deserve extra attention, especially if the hook was dirty or used on a fish.
Insect Bites and Stings
Mosquitoes are annoying, but ticks and stinging insects deserve more respect. Ticks can carry disease. Bees and wasps can trigger allergic reactions. Some bites also become infected after scratching.
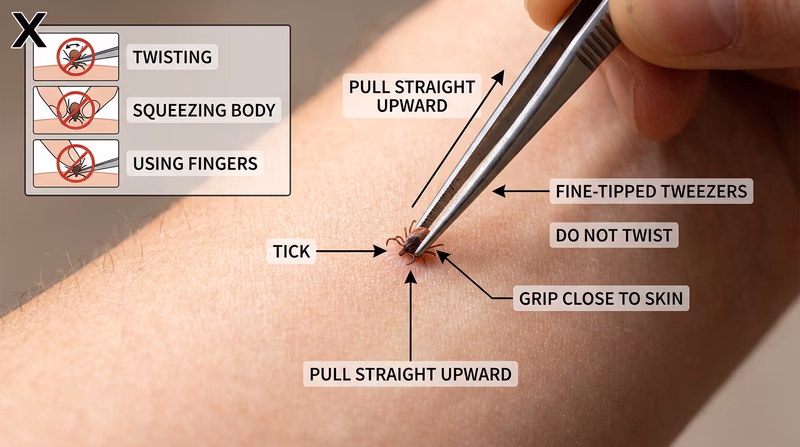
Prevention: Use repellent according to label directions, wear long sleeves or pants in brushy areas, and avoid disturbing nests. Check your body and clothing for ticks after fishing, especially behind knees, around the waist, under arms, and at the hairline.
Treatment: Clean the bite area, use a cold pack for swelling, and avoid scratching. If you find a tick attached, remove it promptly with fine-tipped tweezers by pulling straight out. For a sting, remove the stinger if present, wash the area, and monitor for trouble breathing, swelling of the face, or widespread hives.
Cold Problems: Hypothermia
Hypothermia happens when your body loses heat faster than it can make it. Many people think this only happens in snow, but wet clothing, wind, and cold water can bring it on during fishing season too.
Early signs include shivering, clumsiness, numb hands, slow thinking, and slurred speech. A Scout with cold hands may struggle to tie knots or clip tippet. That is often an early warning sign.
Prevention: Dress in layers, avoid staying wet, bring rain gear, and pack dry spare clothing if conditions are cold. Limit time in cold water and eat and drink enough to keep your body fueled.
Treatment: Move the person out of wind and wet conditions, remove wet clothing if possible, wrap them in dry layers and blankets, and warm them gradually. Give warm drinks only if they are alert and able to swallow.
Hot Problems: Dehydration, Heat Exhaustion, and Heatstroke
Water reflects sunlight, and many fishing spots offer little shade. That makes heat problems very common.
Dehydration
Dehydration means your body is losing more fluid than you are replacing. Signs include thirst, headache, dark urine, dry mouth, dizziness, and tired muscles.
Prevention: Drink water regularly, not just when you feel thirsty. Eat snacks, take shade breaks, and avoid waiting until you feel weak.
Treatment: Rest in shade, sip water or an electrolyte drink, and cool down. Mild dehydration often improves quickly if you act early.
Heat Exhaustion
Heat exhaustion is more serious. Signs can include heavy sweating, weakness, nausea, headache, dizziness, muscle cramps, and cool, clammy skin.
Prevention: Same as dehydration, plus wear light-colored clothing and plan hard activity for cooler parts of the day.
Treatment: Move to shade or air conditioning, loosen clothing, apply cool wet cloths, fan the person, and give fluids if they are fully awake and not vomiting.
Heatstroke
Heatstroke is a medical emergency. The body can no longer control its temperature. Signs may include confusion, altered behavior, collapse, seizure, or very high body temperature. The skin may be hot and dry or still sweaty.
Sunburn
Sunburn is more than red skin. It is damage from ultraviolet radiation, and water reflects UV light back at you. That means anglers often get burned under the chin, on the ears, and on the backs of hands.
Prevention: Use broad-spectrum sunscreen, reapply it as directed, wear polarized sunglasses, a brimmed hat, sun-protective clothing, and seek shade when possible.
Treatment: Get out of the sun, cool the skin with damp cloths or a cool shower, drink fluids, and use aloe or moisturizer if helpful. Severe blistering, fever, or widespread pain may need medical attention.
Build a Fishing Health Kit
Simple items that help with the problems in this requirement- Bandages and gauze: For cuts and scrapes
- Antiseptic wipes: For cleaning small wounds
- Tweezers: Helpful for ticks and splinters
- Cold pack or cooling cloth: Useful for bites, stings, and overheating
- Sunscreen and lip balm: For UV protection
- Water and electrolyte drink mix: For hydration and heat prevention
In Req 1a, you learned how to spot risks before they cause trouble. This requirement adds the first-aid side: once a problem happens, stay calm, treat the person, and decide whether the trip should end.
CDC — Heat Stress Learn to recognize heat exhaustion, heatstroke, and other heat-related illnesses and how to respond. Link: CDC — Heat Stress — https://www.cdc.gov/niosh/heat-stress/about/One special puncture wound deserves its own requirement because it happens often in fishing and needs careful handling: a hook lodged in skin.
Req 1c — Removing a Hook Safely
Getting hooked is one of the most common accidents in fishing, and it often happens fast. A back cast catches a branch, the line snaps free, and suddenly the fly is in someone’s sleeve or skin. This requirement is about understanding the basic response and, just as important, knowing when not to try removal yourself.
First Decision: Is It Safe to Remove Here?
Not every embedded hook should be removed in the field. Some need professional medical care right away.
Do not try to remove the hook yourself if:
- It is in or near the eye, face, neck, throat, or genitals
- It is buried deeply in a joint, tendon, nerve-rich area, or blood vessel area
- The victim is panicking, moving suddenly, or you cannot control the situation safely
- The hook is very large, has multiple treble points, or is deeply embedded past the barb
- There is severe bleeding or other major trauma
If the hook is in the arm, shallow, and the situation is calm, you may be able to explain the correct field response to your counselor.
The Basic Removal Idea
Most hooks are hard to remove because of the barb, the backward-pointing spike that keeps the hook from sliding out easily. If you pull straight back on a barbed hook, it tears tissue. That is why removal methods focus on controlling the hook, minimizing movement, and getting the barb out with as little extra damage as possible.
A common field method for a barbed hook in the arm is the string-yank technique, but Scouts should discuss this with a counselor as knowledge, not as permission to improvise beyond their training.
General Steps to Explain
- Stay calm and stop movement. Secure the rod and line so nothing tugs on the hook.
- Assess the location. Make sure it is really an arm injury and not near a sensitive structure.
- Clean the surrounding skin if supplies are available.
- Choose an appropriate removal method only if the hook is shallow and safe to address in the field.
- Control bleeding and clean the wound after removal.
- Bandage the area and monitor for infection.
- Seek medical care if there is any doubt, especially for tetanus concerns or deep punctures.
What the String-Yank Method Does
In the string-yank method, a loop of strong line is placed around the bend of the hook while pressure is applied to the shank. The quick pull backs the barb out along the entry path. It works best on a single hook embedded in fleshy tissue like the arm.
The important point for your counselor discussion is why it works: pressing down on the shank helps disengage the barb, and the quick pull follows the same path the hook took going in. A slow pull usually hurts more and tears more tissue.
Aftercare Matters Too
Once the hook is out, the job is not over. Puncture wounds can become infected, especially after contact with fish slime, muddy water, or dirty gear.
- Wash the wound with clean water.
- Apply gentle pressure if bleeding continues.
- Cover it with a clean bandage.
- Watch over the next day or two for redness, warmth, swelling, pus, fever, or increasing pain.
- Check whether a tetanus booster may be needed.
One good way to avoid this whole problem is the same lesson from Req 1a: wear eye protection, check your back cast, and give other anglers room.
Mayo Clinic — Puncture Wounds: First Aid A reliable guide to cleaning puncture wounds, controlling bleeding, and knowing when to get medical care. Link: Mayo Clinic — Puncture Wounds: First Aid — https://www.mayoclinic.org/first-aid/first-aid-puncture-wounds/basics/art-20056665With safety covered, the guide now shifts to the tackle system itself — how rod, line, and leader work together.
Req 2 — Balanced Fly Tackle
Fly tackle works best when the parts are matched like members of the same team. If your rod, line, and leader do not fit together, casting feels awkward, accuracy drops, and the fly lands poorly. A balanced system helps the rod load correctly, the line turn over smoothly, and the fly reach the fish in a natural way.
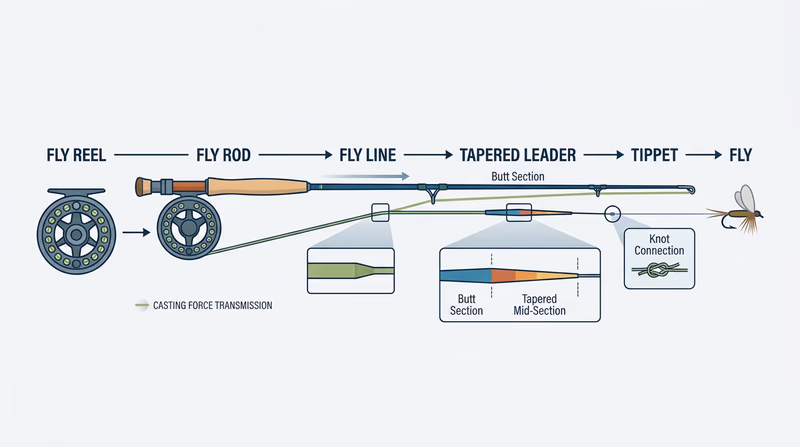
What a Balanced System Means
In fly fishing, the rod, reel, line, leader, and tippet all affect one another. The biggest match is between the rod weight and the fly line weight. A 5-weight rod is designed to cast a 5-weight line. If you put a much heavier or lighter line on it, the rod will not flex the way it was meant to.
The leader also matters. It transfers energy from the thicker fly line to the tiny fly. If the leader is too short, too long, too stiff, or too heavy for the setup, the fly may crash down or fail to straighten out.
A simple balanced trout setup might look like this:
- Rod: 9-foot 5-weight
- Line: Weight-forward floating 5-weight line
- Leader: 9-foot tapered 5X leader
- Tippet: 5X or 6X depending on fly size and fish conditions
That is not the only right answer, but it shows the idea: the pieces are chosen to work together.
Matching Rod, Line, and Leader
Rod
The rod provides casting power and control. Lighter rods are used for smaller flies and fish, while heavier rods are for wind, big flies, or stronger fish.
- 3–4 weight: Small streams, panfish, small trout
- 5–6 weight: All-around trout and many beginner setups
- 7–8 weight: Bass, bigger streamers, light saltwater use
- 9 weight and up: Large saltwater fish and heavy flies
Fly Line
The line carries the weight that loads the rod. That is very different from spinning gear, where the lure weight does most of the work. In fly fishing, the line is the engine of the cast.
Leader
The leader connects the thick fly line to the small fly in a way fish are less likely to notice. Tapered leaders start thick and end fine. This helps the cast unroll smoothly. A short strong leader may suit bass bugs. A longer finer leader may suit trout sipping small dry flies.
How to Build a Balanced Setup
Questions to ask before you rig up- What fish are you targeting? Small trout need different gear than bass or redfish.
- What size flies are you casting? Tiny dries turn over differently than wind-resistant poppers.
- How big is the water? Tight creeks favor different rods and leader lengths than open lakes.
- What are the conditions? Wind, current, and casting distance all influence your setup.
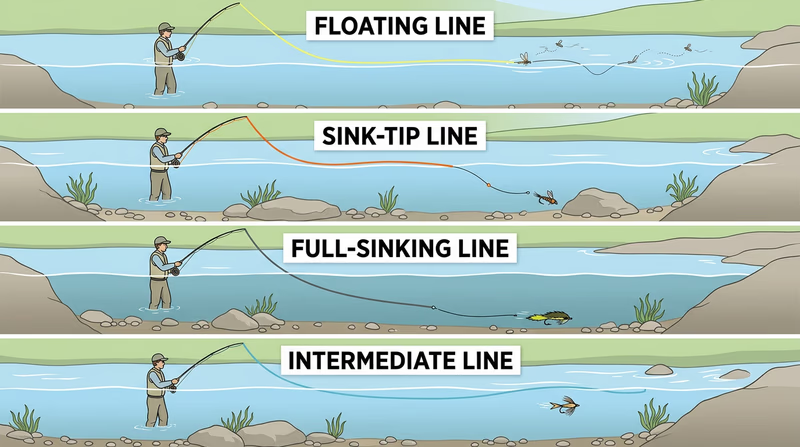
Common Types of Fly Lines
Different fly lines are made to fish at different depths and in different situations.
Floating Line
A floating line stays on the surface. It is the most common beginner line and the most versatile. Use it for dry flies, shallow nymph rigs, poppers, and many streamers when you want easier line control.
Sinking Tip Line
A sinking tip line has a floating body and a front section that sinks. This helps get flies deeper while still allowing easier mending and handling than a full sinking line. It is useful in rivers or lakes when fish are feeding below the surface.
Full Sinking Line
A full sinking line sinks along its whole length. Anglers use it in lakes, reservoirs, or deep runs where fish are holding well below the surface. It is less convenient for surface control, but excellent for depth.
Intermediate Line
An intermediate line sinks slowly. It is especially useful in stillwater or saltwater when fish are below the surface but not deep. It keeps a fly in the strike zone longer than a floater without plunging quickly.
Specialty Tapers
You may also hear about weight-forward, double taper, and specialty tapers. Weight-forward lines place more mass near the front for easier distance and turnover. Double taper lines are more delicate and can be nice for shorter casts and roll casts.
Caring for Fly Tackle
Gear care is part of being a responsible angler. Dirty lines cast poorly. Damaged leaders break. Rods get stepped on. Reels corrode.
Here are the big habits to discuss with your counselor:
- Rinse and wipe down gear after fishing, especially after muddy or saltwater trips.
- Check guides and line for cracks, nicks, and wear.
- Stretch and clean fly line occasionally so it shoots better and lasts longer.
- Store rods in tubes and avoid leaning them where they can be knocked over.
- Replace worn leaders and tippet before they fail on a fish.
- Dry flies and boxes before sealing everything up to reduce rust.
A balanced setup does not guarantee fish, but it gives you a system that works with you instead of against you. Once you understand how the parts fit together, the next step is learning the knots that connect them.
Orvis Learning Center — Fly Fishing Lines, Leaders, and Tippet A reliable overview of how fly lines, leaders, and tippet work together in a complete fly-fishing system. Link: Orvis Learning Center — Fly Fishing Lines, Leaders, and Tippet — https://howtoflyfish.orvis.com/fly-fishing-basics/line-leader-and-tippet🎬 Video: How to Set Up Your Fly Line, Leader, Tippet, & Flies | Episode 8 — Ventures Fly Co. — https://www.youtube.com/watch?v=w_5V08fYXnQ
Now it is time to rig the setup piece by piece, starting at the reel.
Req 3a — Backing to the Reel
When a fish makes a long run, the extra line that saves the day is called backing. It is the thin line stored under your fly line on the reel. Before it can help, though, it has to be attached securely to the reel spool, also called the arbor.
What the Arbor Knot Does
The arbor knot attaches line to the spool itself. It is simple, compact, and strong enough for this job because the backing stays under steady tension around the arbor instead of taking shock the way some other knots do.
The knot works by creating a stopper around the standing line after the first wrap around the spool. When tension comes on the backing, the knot tightens against the arbor and holds in place.
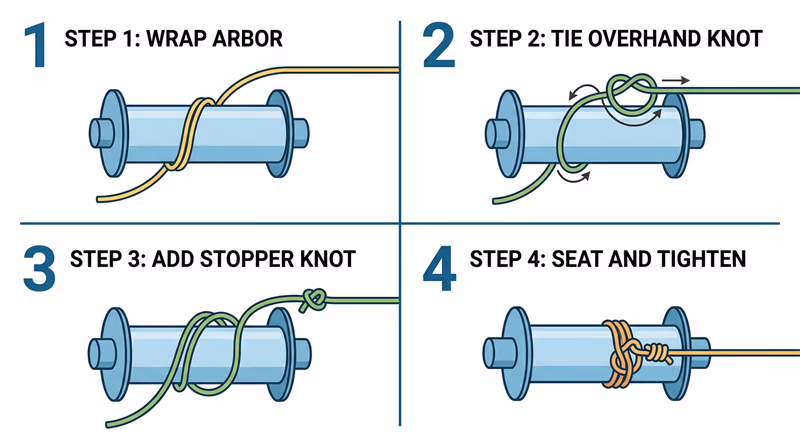
Step-by-Step
- Wrap the backing around the reel arbor one full turn.
- Tie an overhand knot in the tag end around the standing line.
- Tie a second overhand knot in the very end of the tag as a stopper knot.
- Pull on the standing line until the first knot slides down and jams against the stopper knot at the arbor.
- Trim the tag neatly.
That is the basic sequence your counselor will want to see. Practice it a few times off the reel first so the steps feel automatic.
Why Backing Matters
For smaller fish, you may never see your backing leave the reel. But it still matters because it fills the spool to the right diameter and provides reserve line for stronger fish. Without backing, your fly line would sit too deep on the reel and retrieve more slowly.
Backing is usually made from braided dacron or gel-spun materials. Dacron is common for beginners because it is easy to handle and works well for many freshwater situations.
Practice Advice
When tying knots for this requirement, focus on clean steps rather than speed. A rushed knot is often crossed, twisted, or poorly seated. If the wraps do not look neat, untie it and start again.
What Your Counselor May Look For
Demonstration details that matter- Correct wrap around the arbor: The backing must actually go around the spool, not just itself.
- Two distinct overhand knots: One knot around the standing line and one stopper knot in the tag end.
- Proper tightening: The knot should seat snugly at the arbor.
- Neat finish: Tag end trimmed without cutting too close.
In Req 2, you learned how each part of the tackle system depends on the others. This page starts building that system from the inside out.
Animated Knots — Arbor Knot Step-by-step visuals for tying an arbor knot correctly and understanding how it seats on the spool. Link: Animated Knots — Arbor Knot — https://www.animatedknots.com/arbor-knot🎬 Video: A short film showing how to attach backing to a fly reel — RIO Products — https://www.youtube.com/watch?v=xkWyoYyhd40
Once backing is on the reel, the next connection is between backing and fly line.
Req 3b — Backing to the Fly Line
The connection between backing and fly line needs to be smooth enough to move through guides and strong enough to hold if a fish takes you deep into the reel. One classic way to make that connection is the nail knot, often tied with a small tube or knot tool to guide the wraps.
Why the Nail Knot Is Used Here
Fly line is thick and has a plastic coating around a core. Backing is thinner and softer. A nail knot lets the backing grip the outside of the fly line in a slim, tidy connection. That slim profile matters because bulky knots can catch in rod guides.
The name comes from the old practice of using a small nail as a temporary spacer while making the wraps. Many anglers now use a tube, straw, or knot tool instead.
How the Knot Works
The backing is wrapped several times around the fly line and the tube. Then the tag end is fed back through the tube path. When tightened, those wraps cinch down evenly around the fly line coating.
The exact hand motions take practice, but the big ideas are simple:
- Keep the wraps neat and snug beside one another.
- Do not let them cross.
- Tighten gradually so the wraps seat evenly.
- Wet the knot before final tightening to reduce friction.
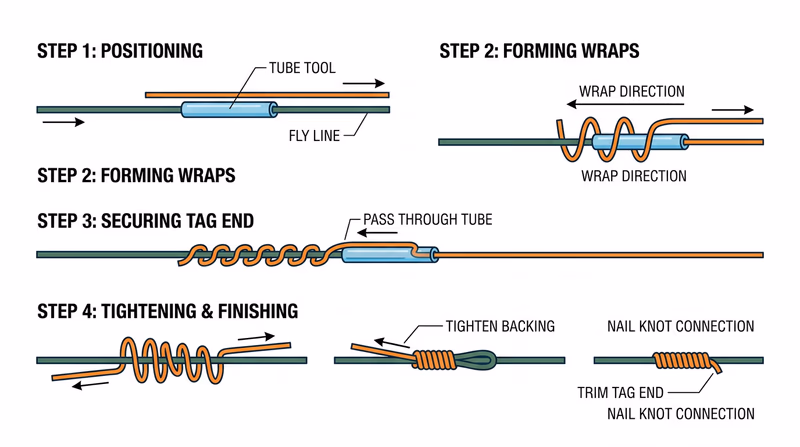
Practice Sequence
- Lay the end of the backing alongside the end of the fly line.
- Place a small tube or nail beside the fly line.
- Wrap the backing 5 to 7 times around the fly line and tube.
- Pass the tag end back through the tube.
- Remove the tube and tighten the wraps carefully.
- Trim the tag and test the connection with steady pressure.
Why Smoothness Matters
A backing-to-line knot usually spends most of its life on the reel, but if a fish runs far enough, that knot may pass in and out of the guides. A lumpy knot can catch and jerk. A smooth knot travels much better.
This is also why many anglers inspect this connection every season. If the line coating is cracked or the knot looks loose, it is time to redo it.
Common Beginner Mistakes
- Wrapping too loosely so the knot slips
- Crossing wraps instead of stacking them neatly
- Pulling one side hard before the knot is evenly seated
- Cutting the tag too soon before the knot has been tested
Nail Knot Success Check
Signs the knot is tied well- Wraps look even: No crossing or bunching
- Connection feels slim: The knot should not be bulky
- Tension test passes: A firm pull does not make it slip
- Ends are trimmed neatly: No long tag waving loose
Knots like the arbor knot and nail knot may seem like small details, but they are what make a fly outfit trustworthy. If one connection fails, the whole system fails with it.
Orvis Learning Center — How to Tie a Nail Knot A clear tutorial showing the nail knot and why it is useful for attaching backing and leaders to fly line. Link: Orvis Learning Center — How to Tie a Nail Knot — https://howtoflyfish.orvis.com/fly-fishing-knots/1634-how-to-tie-the-nail-knotWith backing secured to the fly line, the next connection brings you closer to the fly itself.
Req 3c — Leader to Fly Line
By the time energy reaches the end of your fly line, it still needs one more job done: turning over the fly gently enough that it lands naturally. That is the leader’s job. This requirement asks you to connect the leader to the fly line using one of two common methods.
Option 1: Nail Knot
A nail knot gives a clean, direct connection from leader butt section to fly line. It is slim and dependable, but it takes a little more time to tie and is not the fastest method to change on the water.
The process is similar to the nail knot in Req 3b: the thicker butt end of the leader is wrapped around the fly line with the help of a tube, then tightened carefully.
This method is useful when you want a permanent or semi-permanent leader connection.
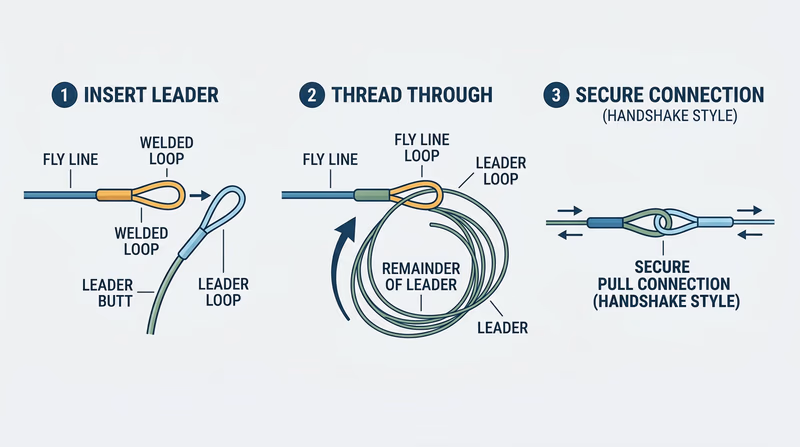
Option 2: Loop-to-Loop Connection
Many modern fly lines have a welded loop at the front end. Some leaders are sold with a loop in the butt section too. If both sides have loops, you can connect them quickly by passing the leader loop through the fly-line loop and then threading the leader through its own loop.
This creates a handshake-style connection that is easy to change.
Why anglers like loop-to-loop
- Fast leader changes
- Easy to learn
- No knot tool needed in the field
- Great for Scouts who are still building confidence with rigging
Why some anglers still prefer a nail knot
- Slightly smoother profile
- Fewer hinges in certain setups
- Good for custom leader systems
What Makes a Good Leader Connection
The connection should be:
- Strong enough that it does not slip or pull apart
- Straight enough that energy moves cleanly from line to leader
- Smooth enough that it passes through guides without trouble
- Convenient enough for the kind of fishing you are doing
A trout angler changing leader size during the day may love loop-to-loop. An angler who wants one sleek setup for a while may prefer a nail knot.
Leader Basics to Remember
The butt section of the leader is the thick end that attaches to the line. The fine end near the fly is the tippet end. If the leader is backward, it will not turn over properly.
This is also a good time to look for cracks, wind knots, or abrasions. A damaged leader can fail on a fish even if the connection knot was perfect.
Before You Cast
Quick rigging check after attaching a leader- Butt end connected correctly: Thick end to the fly line
- Connection seated firmly: No slipping or twisting
- Leader straightened: Remove coils before fishing
- Tippet end intact: No nicks, frays, or wind knots
Learning both methods is useful because not every line and leader come with loops. A well-rounded fly angler can rig either way and understand the tradeoffs.
RIO Products — Loop to Loop Connection A practical explanation of loop-to-loop rigging and why it is popular for modern fly-fishing setups. Link: RIO Products — Loop to Loop Connection — https://farbank.com/blogs/rio/how-to-make-a-loop-to-loop-connection🎬 Video: Nail Knot Tutorial - Attach your leader to your fly line with this method! — Mad River Outfitters — https://www.youtube.com/watch?v=_I0u9URCbNM
Once the leader is attached, you are ready to lengthen or refresh the fine terminal section with tippet.
Req 3d — Tippet Connections
Tippet is the final, finer section between your leader and your fly. It is what you replace most often because it gets shortened by reties, scraped on rocks, or weakened by fish and branches. Knowing how to add fresh tippet keeps your rig fishing properly.
Why Tippet Matters
The tippet affects how naturally the fly moves and how visible the end of your rig is to fish. Smaller flies often need finer tippet. Larger flies, wind-resistant flies, or stronger fish may need thicker tippet.
Adding tippet lets you:
- Extend the life of a tapered leader
- Change diameters without replacing the entire leader
- Adjust to different flies and fish conditions
Surgeon’s Knot
A surgeon’s knot is a fast, practical way to connect two pieces of line, especially when the diameters are fairly close. It is popular because it is easier than some other joining knots and works well on the water.
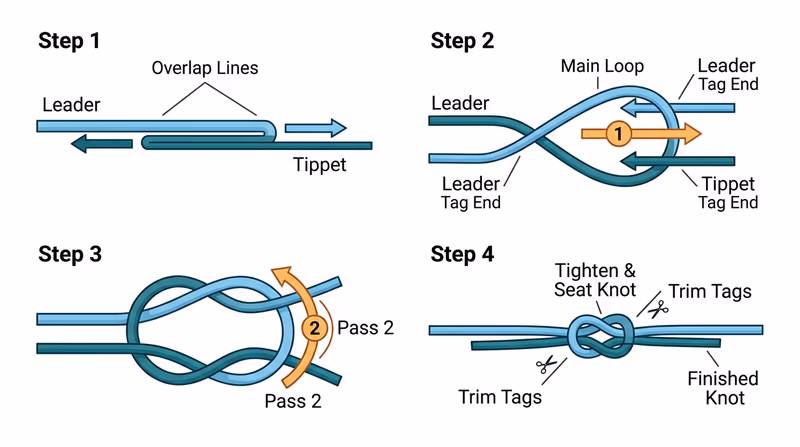
Basic idea
You overlap the leader end and the tippet, create a loop with both lines together, and pass both tag ends through the loop twice. Then you moisten and tighten evenly.
Why it works
The doubled pass increases friction, and the knot seats compactly when pulled down correctly. It is a good knot for Scouts because it is simple enough to learn without special tools.
Loop-to-Loop Connection
If both the leader end and the tippet section have loops, you can use a loop-to-loop connection. This is less common for standard trout tippet than for some specialty systems, but it is allowed by the requirement and useful to understand.
The advantage is speed. The tradeoff is that it can create a slightly hinging connection in very delicate presentations.
Choosing the Right Tippet Size
Tippet sizes often use an X system. Bigger X numbers mean finer tippet.
- 0X–2X: Stronger, thicker tippet for larger flies or bigger fish
- 3X–4X: General-purpose medium sizes
- 5X–6X: Finer tippet for smaller dries and cautious trout
A good match between fly size and tippet helps the cast turn over and the fly drift naturally. Too heavy, and the fly may look stiff. Too light, and it may break easily.
Practical Field Habits
- Check the end of your leader often for abrasion.
- Replace tippet after a fish, a snag, or repeated fly changes if it looks rough.
- Pull knots tight with steady pressure, not jerky yanks.
- Trim tag ends neatly but leave enough so the knot does not slip.
Tippet Connection Check
Signs your knot is ready to fish- Diameters are appropriate: Not wildly mismatched for the knot
- Knot is moistened and seated: Helps it tighten smoothly
- Tag ends trimmed neatly: Clean but not cut too close
- Pull test completed: Better to fail in your hands than on a fish
As you keep building this system, notice how each connection gets you closer to the fly. The final knot is the one the fish will test directly.
Animated Knots — Surgeon’s Knot An easy visual reference for tying a surgeon’s knot and understanding when it is useful. Link: Animated Knots — Surgeon’s Knot — https://www.animatedknots.com/surgeons-knot🎬 Video: How To Attach Tippet To Your Leader With The Surgeon's Knot — Mad River Outfitters — https://www.youtube.com/watch?v=AlQqrtzprtw
The last knot in this rigging chain connects the fly itself.
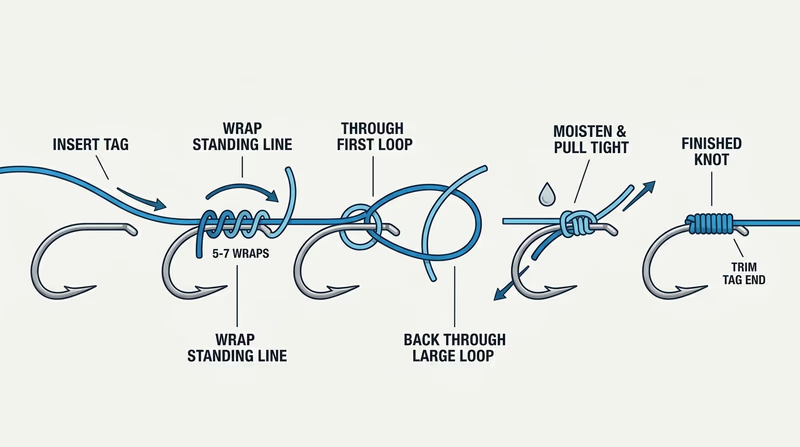
Req 3e — Tying on the Fly
After all the rod rigging, backing knots, and leader connections, everything finally ends here: one small knot holding the fly you want the fish to eat. The improved clinch knot is one of the most common fishing knots because it is compact, reliable, and practical for tying flies and hooks.
What the Improved Clinch Knot Does
This knot secures the fly to the tippet by wrapping the tag end around the standing line several times, then passing it through a loop and back through a second loop created by the knot’s shape. That extra pass is what makes it the improved clinch knot.
For many freshwater fly-fishing situations, it is a solid choice that Scouts can learn quickly and tie without special tools.
Step-by-Step
- Pass the tippet through the hook eye.
- Wrap the tag end around the standing line about 5 to 7 times.
- Pass the tag end through the small loop near the eye.
- Then pass it through the larger loop you just created.
- Moisten the knot.
- Pull the standing line and tag carefully until the knot seats snugly.
- Trim the tag end.
When demonstrating, slow hands beat fast hands. A neat clinch knot almost always outperforms a rushed one.
When It Works Best
The improved clinch knot is great for many standard flies and tippet sizes. Like any knot, it has limits. Very heavy tippet, very large hook eyes, or slick line materials may lead some anglers to choose a different knot. But for merit badge purposes, this knot is a strong all-around skill to know.
Common Problems
Too Few or Too Many Wraps
Too few wraps can let the knot slip. Too many can make it bunch up poorly. The right number depends somewhat on line size, but 5 to 7 is a good starting point.
Dry Tightening
If you tighten without moisture, friction can weaken the line. A little water or saliva helps the knot cinch smoothly.
Crooked Seating
If the wraps cross or pile up, the knot may not tighten evenly. Start over rather than trusting a messy knot.
Fly Changes Happen Constantly
You may tie this knot many times in one trip because fly anglers change patterns often. A hatch changes. Light changes. Fish start feeding deeper. Your popper stops working and a nymph starts working. Retying quickly and correctly is part of real fishing.
That means efficiency matters, but accuracy matters more. Many beginners lose flies not because fish were strong, but because the knot was poorly tied.
A Good Improved Clinch Knot
What to look for before you fish it- Wraps are neat and stacked: Not crossed or tangled
- Knot seats against the eye: Snug and compact
- Line is moistened before tightening: Reduces friction damage
- Pull test completed: Confirms it is safe to cast
In Req 3d, you connected fresh tippet to your leader. This page finishes the rig so you can start thinking less about knots and more about what different flies are trying to imitate.
Animated Knots — Improved Clinch Knot A clear animation showing the exact path of an improved clinch knot for hooks and flies. Link: Animated Knots — Improved Clinch Knot — https://www.animatedknots.com/improved-clinch-knotNow that your fly is finally tied on, it is time to understand the different kinds of flies and what they represent in the water.
Req 4 — Fly Types and Imitation
A fish does not know the name of your fly. It reacts to what the fly looks like, where it is in the water, and how it moves. This requirement is about learning the big fly categories so you can understand what each one imitates and when anglers choose it.
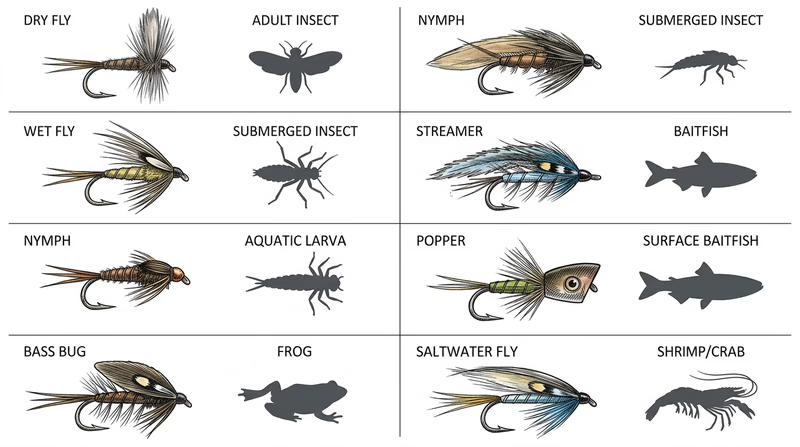
Dry Flies
Dry flies float on the surface. They imitate adult insects such as mayflies, caddisflies, and midges that are resting on or trapped in the surface film.
Use dry flies when you see fish rising, insects hatching, or surface feeding activity. Dry-fly fishing is exciting because you can watch the take happen.
Typical imitation:
- Adult mayflies
- Adult caddisflies
- Midges on the surface
- Land insects like ants or beetles in some cases
Wet Flies
Wet flies fish below the surface, usually just under it or drifting slightly deeper. They can imitate emerging insects, drowned adults, or small general food items.
Wet flies are useful when fish are feeding just below the surface or when you want a simple swung presentation across current.
Nymphs
Nymphs imitate immature aquatic insects living underwater before they hatch into adults. Many trout eat far more nymphs than dry flies because nymphs are available underwater for a much longer time.
Use nymphs when fish are feeding subsurface, when surface activity is low, or when you want a dependable way to cover water. Matching the size and depth often matters more than perfect color.
Streamers
Streamers imitate larger prey such as minnows, baitfish, leeches, and sometimes crayfish. They are usually stripped, swung, or pulsed through the water to suggest movement.
Use streamers when fish are chasing bigger meals, when water is stained, when temperatures are cooler, or when targeting aggressive species.
Bass Bugs
Bass bugs are often larger topwater flies for bass and other warmwater fish. They imitate frogs, mice, injured baitfish, or just create a tempting surface disturbance.
Use bass bugs around cover such as lily pads, logs, weed edges, or shorelines, especially in low-light conditions.
Poppers
Poppers are surface flies with shaped heads that push water and make noise when stripped. They often imitate struggling prey or simply trigger reaction strikes.
Use poppers when fish are willing to attack on top. Bluegill and bass are famous for smashing them.
Saltwater Flies
Saltwater flies imitate shrimp, crabs, baitfish, and other coastal food sources. They are often tied with materials that shed water, resist corrosion, and show up well in bright conditions.
Use saltwater flies based on the species and habitat. A bonefish fly might imitate a shrimp on a sandy flat. A striped bass fly may imitate a baitfish in surf or estuary water.
How to Choose the Right Category
Think about three things:
- Where are fish feeding? Surface, just under it, or deep?
- What food is available? Insects, baitfish, frogs, crayfish, shrimp?
- How do you want the fly to move? Dead drift, swing, strip, pop, or skitter?
What Each Fly Category Imitates
A fast comparison to help you explain this requirement- Dry flies: Adult insects on the surface
- Wet flies: Emerging or drowned insects just under the surface
- Nymphs: Immature aquatic insects underwater
- Streamers: Minnows, leeches, crayfish, and larger prey
- Bass bugs: Frogs, mice, baitfish, or noisy topwater meals
- Poppers: Surface prey or disturbance that triggers strikes
- Saltwater flies: Shrimp, crabs, baitfish, and other coastal forage
About Tying Flies
The requirement also asks you to tie at least two types of flies from this list. That does not mean you need to become a master fly tier overnight. It means you should understand the parts of a fly and try building patterns that match a category.
A simple dry fly teaches proportion and floating materials. A basic nymph teaches weighting and slim underwater bodies. A streamer teaches profile and movement. Even if your first flies look rough, tying helps you see what fish are actually responding to.
In Req 6, you will use this same thinking to observe real fish food at the water and match your fly choice to it.
Orvis Learning Center — Fly Fishing Flies A beginner-friendly overview of the main fly categories and what they imitate. Link: Orvis Learning Center — Fly Fishing Flies — https://howtoflyfish.orvis.com/fly-fishing-basics/types-of-flies🎬 Video: Fly Fishing Flies Explained (Streamers, Nymphs, Dry Flies & More) — Trident Fly Fishing — https://www.youtube.com/watch?v=jz189rWAMfw
Once you understand the flies, you still need to put them where the fish are. That means casting.
Req 5 — Casting with Control
Thirty feet is not a giant cast in fly fishing, but it is far enough to expose weak timing, poor loop control, and sloppy aim. This requirement is really about control. A shorter accurate cast that lands softly is much more useful than a longer cast that crashes down or misses the target.
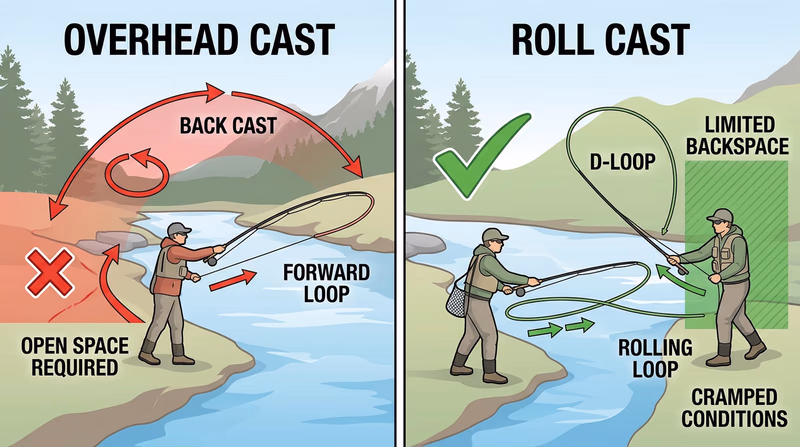
Overhead Cast
The overhead cast is the classic fly cast. The rod moves back and forward in a controlled path, and the line forms loops behind and in front of you.
A good overhead cast depends on four simple ideas:
- Smooth acceleration instead of jerking the rod
- A clear stop on the back cast and forward cast
- Good timing so you wait for the line to straighten behind you
- A straight casting path so the loop stays tight and efficient
Many beginners rush the forward cast before the back cast has unrolled. That sends the line into a tailing loop or a pile.
Roll Cast
The roll cast is especially important when trees, brush, or banks block your back cast. Instead of carrying line in the air behind you, the roll cast uses line already on the water to load the rod and send the fly forward.
This makes it perfect for tight streams and quick repositioning.
Key roll cast ideas
- Start with line on the water in front of you.
- Lift into a controlled setup position.
- Form a D-loop behind the rod.
- Drive the cast forward with a crisp stop.
If the D-loop is weak or blocked by bushes, the cast usually collapses.
Accuracy at 30 Feet
Consistency comes from repeatable mechanics. Try practicing at 20 feet first, then 25, then 30. Use paper plates, hoops, or cones as targets. Accuracy is easier to judge when you have something specific to aim at.
Aiming in fly fishing usually means aiming with the line and leader turnover, not just the fly itself. That is another reason a balanced system from Req 2 matters.
Practice Habits That Help
30-Foot Practice Routine
A smart way to build skill before your demonstration- Start on grass: Practice without water distractions and with visible targets.
- Measure the distance: Do not guess. Mark 30 feet so you know what success looks like.
- Practice both casts separately: Build one skill at a time.
- Focus on clean loops first: Accuracy usually improves once loop shape improves.
- Stop before fatigue wrecks form: Short, focused practice beats wild flailing for an hour.
Common Casting Problems
Tailing loops
These happen when the rod tip dips and rises during the cast. The line crosses itself and often tangles. A smoother stroke and cleaner stop usually help.
Line crashing down
This usually means poor timing, too much force, or the rod tip dropping too low on the forward cast.
No power in the roll cast
Often the D-loop never formed correctly, or too little line was anchored on the water.
Casting Is About Presentation
The goal is not just to send line through the air. The goal is to place the fly where the fish can eat it naturally. That is why fly anglers practice on lawns and ponds before heading to prime water. Good mechanics free your attention to think about current, insects, and fish behavior.
Orvis Learning Center — Fly Casting Lessons A large collection of casting tutorials covering overhead casts, roll casts, accuracy, and common mistakes. Link: Orvis Learning Center — Fly Casting Lessons — https://howtoflyfish.orvis.com/video-lessons/fly-castingOnce you can put the fly where you want it, the next question becomes even more interesting: what should that fly imitate right now?
Req 6 — Matching the Hatch
A fish rising on the surface is giving you a clue, not a guarantee. To solve the puzzle, you have to observe the whole food scene: what is drifting on top, what is moving below, what insects are hatching, and how fish are feeding. That process is called matching the hatch.
What “Matching the Hatch” Means
A hatch happens when aquatic insects become active in large numbers, especially when nymphs or larvae emerge and transform into adults. Fish notice this quickly because it creates a concentrated, predictable food source.
Matching the hatch means choosing a fly that imitates the size, shape, color, stage, and behavior of what fish are actually eating. The better your imitation matches the real food, the more likely the fish will accept it.
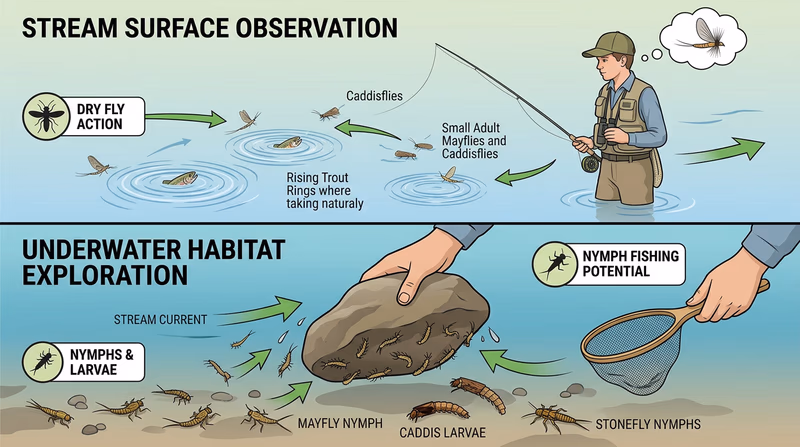
Observe Above the Surface
Look for:
- Insects floating or skittering on top
- Fish rising, sipping, or slashing at the surface
- Birds feeding over the water, which may signal insect activity
- Spent insects collecting in eddies
If fish are gently sipping, they may be taking tiny dries or emergers. If they are crashing loudly, they may be chasing baitfish or striking larger prey.
Observe Beneath the Surface
The most important food may be invisible unless you look carefully. Turn over a stream rock, use a small aquarium net, or watch the shallows for movement. You might find nymphs, larvae, crayfish, minnows, or other prey.
This matters because fish often feed below the surface much more than they feed on top. A stream with no visible rises may still be full of actively feeding trout taking nymphs along the bottom.
What to Match
You do not need a perfect scientific match every time, but you should think through these factors:
- Size: Is the natural insect tiny, medium, or large?
- Stage: Is it a nymph, emerger, adult, drowned insect, or baitfish?
- Color: What general shades dominate?
- Profile: Slim mayfly? bushy caddis? minnow shape?
- Behavior: Dead drifting, swimming, twitching, struggling on top?
A fly that matches the right size and behavior often works even if the color is not exact.
Observation Routine at the Water
How to study what fish are eating before choosing a fly- Watch the water for a few minutes before casting: Do not rush straight into fishing.
- Study surface activity: Look for rises, insects, and drift lines.
- Check below the surface: Examine rocks, weeds, and shallow edges.
- Notice fish behavior: Sipping, chasing, cruising, or holding deep all suggest different foods.
- Choose a fly based on evidence: Do not just tie on your favorite pattern by habit.
Why Matching the Hatch Matters
Matching the hatch matters because fish become selective when easy, familiar food is abundant. If trout are feeding on tiny olive mayflies, a large black streamer may get ignored. If bass are blowing up on baitfish in the shallows, a tiny midge may not get noticed.
This idea separates fly fishing from random casting. It turns the sport into a mix of observation, natural history, and presentation.
A Scout-Level Example
Imagine you arrive at a creek and see no surface rises. You turn over a rock and find many small dark nymphs. That suggests starting with a nymph pattern and fishing below the surface.
Later, as the light changes, you see delicate insects lifting off the water and trout begin sipping. Now it makes sense to switch to a dry fly or emerger closer to what is hatching. The fish changed behavior because the food available changed too.
In Req 4, you learned what the main fly types imitate. This requirement puts that knowledge into the real world by asking you to compare your flies to actual fish food.
Orvis Learning Center — Matching the Hatch A practical explanation of how anglers observe insect activity and choose flies that better match what fish are eating. Link: Orvis Learning Center — Matching the Hatch — https://howtoflyfish.orvis.com/fly-fishing-basics/matching-the-hatch🎬 Video: First Cast Fly Fishing Academy: How to Match the Hatch! — Postfly — https://www.youtube.com/watch?v=kro47XlZVMM
Once you understand fish behavior, it is time to think about something bigger than catching fish: how to protect the places where fly fishing happens.
Req 7a — Leave No Trace on the Water
The best fly-fishing spots stay productive only if people treat them with care. A stream bank trampled into mud, a shoreline littered with line, or a spawning area walked over carelessly can hurt fish long after the angler has gone home. This requirement asks you to connect outdoor ethics to the health of fishing water.
Why Leave No Trace Matters in Fly Fishing
Fly fishing takes you right into sensitive places: stream banks, shallow flats, gravel beds, marsh edges, and quiet coves. These are not just places to stand. They are fish habitat. Insects hatch there. Fish spawn there. Birds, amphibians, and mammals depend on them too.
The Leave No Trace Seven Principles help anglers reduce damage while still enjoying the outdoors.
1. Plan Ahead and Prepare
Know the access points, local rules, weather, and gear you need. Good planning prevents bad decisions like bushwhacking through fragile vegetation or leaving trash because you forgot a bag.
2. Travel and Camp on Durable Surfaces
Stay on established paths and firm surfaces when possible. Repeatedly sliding down soft banks or cutting new routes to the water erodes soil and sends sediment into streams, which can harm fish eggs and aquatic insects.
3. Dispose of Waste Properly
Fishing line, snack wrappers, bait containers, and clipped tippet do not belong in the water or on shore. Even small scraps of line can tangle birds, turtles, and fish.
4. Leave What You Find
Do not move rocks unnecessarily, carve trees, or damage streamside plants. Turning over rocks to study insects is useful in moderation, but put them back gently.
5. Minimize Campfire Impacts
Near fishing trips, fire scars and ash can damage shorelines. Use existing fire rings where allowed and follow local fire rules.
6. Respect Wildlife
Do not crowd nesting birds, feeding fish, or other animals. Stressing wildlife for a better photo or cast is poor ethics.
7. Be Considerate of Other Visitors
Give other anglers space, avoid casting across someone else’s water, and keep noise low. Courtesy is part of conservation because crowded conflict can damage the experience for everyone.
Outdoor Code on the Water
How the Scout Outdoor Code connects directly to fly fishing- Be clean in your outdoor manners: Pack out every scrap of line, leader, and trash.
- Be careful with fire: Protect streamsides and camps from unnecessary fire damage.
- Be considerate in the outdoors: Respect other anglers, landowners, and wildlife.
- Be conservation-minded: Think beyond today’s catch and protect habitat for the future.
Positive Effects on Fly-Fishing Resources
Practicing Leave No Trace and the Outdoor Code leads to real benefits:
- Cleaner water and shorelines
- Healthier fish habitat
- Less erosion and bank damage
- Fewer wildlife entanglements from discarded line
- Better public access because landowners and agencies see anglers acting responsibly
- More enjoyable fishing for everyone
Ethics Show Up in Small Choices
Outdoor ethics are not just about giant conservation projects. They show up when you choose not to stomp through reeds for a better angle, when you pack out someone else’s trash, or when you back away from fish spawning in shallow gravel.
In Req 6, you learned to observe what fish are eating. Ethical anglers also observe what the habitat needs and change their behavior to protect it.
Leave No Trace — Seven Principles The official Leave No Trace overview explaining each principle and how it applies in the outdoors. Link: Leave No Trace — Seven Principles — https://lnt.org/why/7-principles/Protecting habitat is one part of stewardship. The next part is how you handle fish after you catch them.
Req 7b — Catch and Release
Catch and release means returning a fish to the water after it is caught instead of keeping it. For many fly anglers, it is not just a rule. It is a conservation habit that helps protect fish populations, preserve quality fishing, and respect the resource.
Why Catch and Release Matters
Some waters depend on catch and release to keep fish numbers healthy. In other places, it helps large breeding fish survive and continue reproducing. Even where keeping some fish is legal, responsible release gives anglers another option when a fish is too small, out of season, or simply better left in the ecosystem.
Catch and release is especially important when:
- Fish populations are fragile
- Water temperatures are stressful
- Regulations require release
- You catch a species or size class that should not be harvested
A Released Fish Still Needs Care
Just because a fish swims away does not mean it was handled well. Poor handling can remove protective slime, damage gills, stress the fish, or leave it too exhausted to survive.
That means proper release is about reducing fight time, handling time, and physical damage.
Steps for Safe Release
- Land the fish quickly using tackle strong enough for the species.
- Keep the fish in the water as much as possible.
- Wet your hands before touching it.
- Avoid squeezing the body or putting fingers in the gills.
- Use hemostats or forceps to remove the fly carefully.
- Support the fish upright in the water if it needs time to recover.
- Release it only when it can swim away on its own.
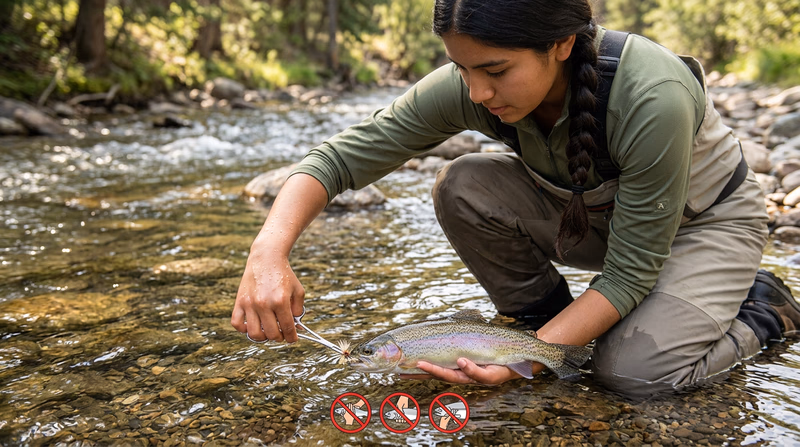
Barbless Hooks and Better Release
Many anglers pinch down barbs or use barbless hooks because fish can be unhooked faster and with less tissue damage. This also makes accidental hook injuries to people easier to handle, which connects directly to Req 1c.
Water Temperature Matters
Warm water holds less oxygen, and fish tire faster in it. A fish released during stressful warm conditions may look fine at first but die later. Smart anglers change tactics or stop fishing when conditions are hard on fish.
Catch and Release Is About Respect
A fish is not a prop. It is part of a living system. Releasing it carefully shows respect for the resource and for the next angler who may encounter that fish later.
Catch and release works best when paired with good regulations, habitat protection, and sportsmanship. That makes the next requirement a natural follow-up: why fishing rules exist in the first place.
Keep Fish Wet A conservation-focused resource showing best practices for handling and releasing fish with minimal stress and injury. Link: Keep Fish Wet — https://www.keepfishwet.org/🎬 Video: ETHICAL CATCH AND RELEASE FISHING — The Orvis Company — https://www.youtube.com/watch?v=SMGO50R_lrA
Now that you understand how to release fish responsibly, it is time to study the rules that guide legal and sustainable fishing where you live.
Req 8 — Fishing Regulations
Fishing regulations are not random obstacles created to annoy anglers. They are tools used by wildlife agencies to protect fish populations, habitat, and fair access. If you want to be a responsible fly angler, you need to know not only what the rules say, but why they exist.
What Regulations Commonly Cover
Your local regulations may include:
- Fishing seasons
- License requirements
- Daily creel or harvest limits
- Minimum or maximum size limits
- Gear restrictions, such as fly-fishing-only or barbless-hook rules
- Protected species
- Closed areas or special management waters
Each of these rules changes angler behavior in a way that helps conserve the resource.
Why These Rules Are Adopted
To Protect Spawning Fish
Some seasons or closed areas protect fish when they are reproducing. Disturbing fish on spawning beds can reduce future populations.
To Prevent Overharvest
Bag limits and size limits keep too many fish from being removed. Protecting larger breeding fish or requiring small fish to be released helps the population stay healthy.
To Manage Fishing Pressure
Special regulations can spread out pressure, protect popular waters, or create high-quality fisheries where fish have a better chance to grow.
To Protect Native Species
Some waters have native trout or other species that are more vulnerable than stocked fish. Regulations may be stricter there for a reason.
To Improve Fairness and Safety
Rules also help reduce conflict between anglers and ensure shared waters are used responsibly.
Questions to Ask When Reading Regulations
This helps you explain them to your counselor- What species does this rule apply to?
- What dates, waters, or zones are included?
- What gear is allowed or prohibited?
- What happens to fish populations if people ignore this rule?
- How does this rule improve sustainability or fairness?
What Following Regulations Accomplishes
When anglers follow the rules, the results are bigger than one trip:
- Fish populations stay healthier over time.
- Spawning success improves.
- Habitat gets less pressure during vulnerable periods.
- Access stays open because agencies and landowners see responsible behavior.
- Anglers share the resource more fairly.
Where to Find Regulations
The best source is your state wildlife or natural resources agency. Many publish regulations as downloadable PDFs, phone apps, or interactive maps. Read the exact rules for the body of water you plan to fish, not just the statewide summary.
A Good Scout Habit
Bring a copy of the rules or save them offline before heading out. Cell service is often weakest where the fishing is best.
In Req 7b, you learned why responsible release matters. Regulations turn that same conservation mindset into official rules that apply to everyone.
Take Me Fishing — State Fishing License and Regulation Finder A directory that helps anglers quickly locate official state fishing regulations and licensing pages. Link: Take Me Fishing — State Fishing License and Regulation Finder — https://www.takemefishing.org/state-fishing-license-and-boat-registration/Knowing the law is important, but good angling also depends on character. That leads to sportsmanship.
Req 9 — Sportsmanship for Anglers
Outdoor sportsmanship is what turns someone from a person who fishes into an angler others trust and respect. It means you care about more than your own success. You care about the fish, the water, the landowner, the rules, and the other people sharing the place with you.
What Good Sportsmanlike Behavior Looks Like
A sportsmanlike angler:
- Follows regulations even when no one is watching
- Respects private property and access rules
- Packs out trash and often picks up litter left by others
- Gives other anglers room and avoids crowding
- Handles fish responsibly
- Speaks honestly about catches, conditions, and rules
Sportsmanship is character in action.
Littering
Discarded line, cans, bait containers, and food wrappers damage habitat and make anglers look careless. Litter also threatens wildlife. Birds and turtles can become tangled in fishing line, and animals may eat trash.
Leave No Trace and the Outdoor Code both make this simple: pack it out. Better yet, leave the place cleaner than you found it.
Trespassing
Some of the best fishing crosses private land or borders sensitive management areas. Entering without permission can get access closed for everyone. Landowners are much more likely to welcome respectful anglers than rude ones.
Good sportsmanship means reading signs, respecting boundaries, closing gates if asked, and thanking landowners who grant access.
Courteous Behavior
Courtesy matters on crowded water. That includes keeping noise down, not walking through the water someone is actively fishing, and not casting across another angler’s drift.
Obeying Regulations
In Req 8, you learned why regulations exist. Sportsmanship means following them willingly, not just to avoid a ticket. The rule is part of respecting the fishery.
How Leave No Trace and the Outdoor Code Fit In
These ethics systems are not separate from sportsmanship. They are the framework underneath it.
Sportsmanship and Scout Ethics
How these ideas connect directly to angling- Leave No Trace: Protect habitat, avoid damage, pack out waste, and respect wildlife.
- Outdoor Code: Be clean, careful, considerate, and conservation-minded.
- Sportsmanship: Put those values into daily actions around fish, people, and places.
Reputation Matters
Anglers build reputations. So do Scout troops. If a landowner sees courteous Scouts who clean up after themselves, follow rules, and ask permission, future Scouts are more likely to be welcomed. If not, access disappears.
Sportsmanship is the human side of conservation. It shows whether your knowledge is turning into responsibility.
Scouting America — Outdoor Code Review the Outdoor Code and its connection to clean, respectful, conservation-minded outdoor behavior. Link: Scouting America — Outdoor Code — https://www.scouting.org/outdoor-programs/outdoor-code/Now the guide shifts from ethics back to action on the water: catching and identifying a fish on the fly.
Req 10 — Catch and Identify a Fish
This requirement sounds simple, but it combines almost everything in the badge. You need safe habits, balanced gear, solid knots, casting control, smart fly choice, and enough observation to recognize what species you caught. It is the moment where your preparation finally meets a real fish.
Catching a Fish on a Fly
The exact strategy depends on where you fish and what species live there. A small pond bluegill on a popper counts just as honestly as a stream trout on a nymph. The point is to catch a fish using fly-fishing methods.
Good beginner targets often include:
- Bluegill and other panfish
- Small bass
- Stocked trout where available
- Creek chub or other willing small fish in local streams
These species can teach timing, presentation, and fish handling without requiring advanced travel or difficult conditions.
Improving Your Chances
- Fish where fish actually live. Local knowledge matters.
- Match your fly to likely food, using the thinking from Req 6.
- Keep casts manageable. Accurate short casts often outfish heroic long ones.
- Stay observant and willing to change flies.
- Fish during active periods such as morning, evening, or insect activity windows.
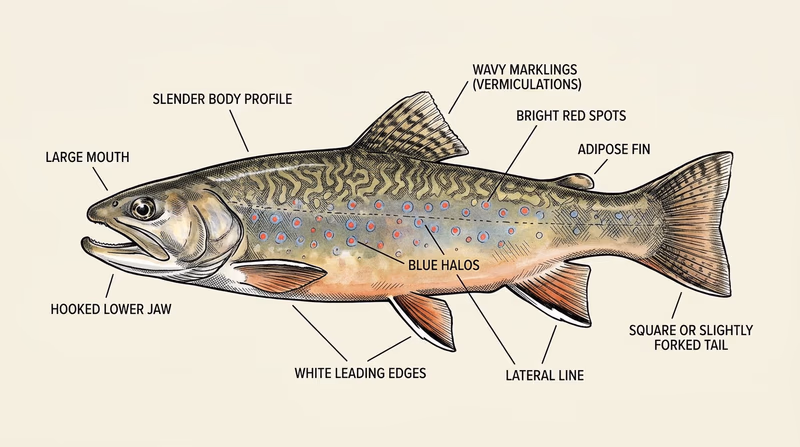
Identifying the Fish
Once you catch the fish, slow down and observe. Identification means more than blurting out your best guess.
Look at:
- Body shape: Long and streamlined? Tall and round?
- Mouth position: Large bass mouth? small trout mouth? downturned sucker mouth?
- Fins: Count, size, and placement can help
- Color and markings: Spots, stripes, bars, or iridescent colors
- Habitat: Where you caught it is also a clue
If local regulations allow keeping the fish, you may have more time to study it. If you are releasing it, make your observation quick and respectful.
Common Beginner Mistakes
Guessing too fast
A fish with spots is not automatically a trout, and a sunfish is not always a bluegill. Learn the field marks that separate similar species.
Mishandling while identifying
Do not turn identification into a long photo session. Keep the fish wet and supported while you look.
Forgetting the fly method requirement
This badge is not asking you to catch a fish any way possible. It specifically asks for a fish caught on a fly.
Fast Fish ID Checklist
Observe these before releasing the fish- Species group: Trout, bass, sunfish, panfish, or something else?
- Body markings: Spots, stripes, bars, or plain?
- Mouth and fins: Do they match your guess?
- Where caught: Stream, pond, lake edge, riffle, weed line, or flat?
A Good Scout Mindset
If you do not catch a fish right away, that does not mean the trip failed. Every outing still teaches you something about water, insects, presentation, or fish behavior. But when the fish finally does take, you will know the catch came from real skill instead of luck alone.
Take Me Fishing — Fish Identification A beginner-friendly starting point for learning common freshwater fish groups and identification clues. Link: Take Me Fishing — Fish Identification — https://www.takemefishing.org/fishing/freshwater-fishing/fish-species/After catching and identifying a fish, the final requirement asks what comes next if local rules and health conditions allow the fish to become a meal.
Req 11 — Clean and Cook Your Catch
This final requirement connects fishing to responsibility. If a fish is going to become food, the angler should handle it lawfully, humanely, and cleanly. If local advisories, seasons, or regulations make that a bad idea, the requirement wisely allows you to work with an acquired fish instead.
First Question: Should This Fish Be Kept?
Not every fish should be harvested. Before keeping one, ask:
- Is the species legal to keep here?
- Is it in season?
- Does it meet size and bag rules from Req 8?
- Are there local health advisories about eating fish from this water?
- Can you keep it cold and clean until cooking time?
If the answer to any of those questions is no, use the alternative allowed by the requirement and acquire a fish legally from another source.
Cleaning the Fish
Cleaning means removing the internal organs and preparing the fish for cooking. The exact steps vary by species and by whether you plan to fillet or cook it whole, but the big goals are the same: clean work, safe knife handling, and proper disposal of waste where allowed.
Typical process:
- Rinse or wipe the fish clean of slime and dirt.
- Use a sharp knife carefully and cut away from yourself.
- Remove the guts and any unwanted parts.
- Rinse again if appropriate.
- Keep edible portions cold until cooking.
Your counselor is likely more interested in whether you can do the task safely and responsibly than in whether your fillets look perfect.
Cooking the Fish
Simple cooking methods are often best for Scouts:
- Pan-frying
- Foil packet cooking over coals or a grill
- Baking
- Camp stove skillet cooking
The goal is to cook the fish until it is done safely and flakes easily. Avoid undercooking. Also avoid leaving raw fish warm for long periods.
Safe Fish-to-Meal Process
A smart sequence from catch to camp kitchen- Confirm it is legal and safe to keep: Regulations and health advisories first
- Keep it clean and cold: Heat and dirt spoil fish quickly
- Use knives carefully: Stable cutting surface, controlled movements
- Cook thoroughly: No guessing with food safety
- Dispose of remains properly: Follow local rules and Leave No Trace practices
If You Need to Acquire a Fish Instead
That option is not a shortcut. It is a responsible backup. Sometimes fish populations, regulations, or water contamination make it smarter not to eat what you catch. Using a legally acquired fish still teaches the cleaning and cooking skills without breaking rules or making an unsafe choice.
Respect for the Resource
Keeping a fish for food carries responsibility. Catch-and-release from Req 7b shows one form of respect. Harvesting a legal fish and using it well shows another. Waste is never respectful.
You have now worked through safety, gear, observation, ethics, and practical fishing skill. The merit badge requirements end here, but the subject keeps going.
FDA — Safe Minimum Internal Temperatures Food safety guidance for cooking fish and other foods to safe temperatures. Link: FDA — Safe Minimum Internal Temperatures — https://www.foodsafety.gov/food-safety-charts/safe-minimum-internal-temperaturesYou are ready to go beyond the badge and explore where fly fishing can lead next.
Extended Learning
A. Keep Exploring the Water
You have finished the badge, but fly fishing gets more interesting the longer you stay curious. The next level is not just catching more fish. It is understanding more about insects, water temperature, seasonal fish behavior, habitat, weather, and how your own decisions affect success. Every stream, pond, and shoreline teaches different lessons.
A great next step is keeping a simple fishing journal. Record where you went, water conditions, weather, flies used, fish seen, and what actually worked. Over time, those notes become your own field guide. You start noticing patterns such as when bluegill attack poppers, when trout move into riffles, or how wind changes casting difficulty.
You can also keep developing your non-fishing skills. Practice knots at home. Cast on grass. Learn local insect groups. Spend time watching water without even making a cast. Scouts who become strong fly anglers usually become strong observers first.
B. Learn Stream Ecology
One of the best deep dives after this badge is stream and lake ecology. Fish do not live alone. They depend on oxygen levels, clean gravel, aquatic insects, streamside shade, stable banks, and healthy food webs. When one part of the system changes, the fishing changes too.
Start by learning which insects are common in your area and what their life cycles look like. Mayflies, caddisflies, stoneflies, midges, dragonflies, and damselflies all tell you something about the water. You can also study how current creates riffles, runs, pools, seams, and undercut banks. Each kind of water holds fish differently.
This kind of learning makes you a better angler and a better conservation-minded Scout. Instead of asking only, “Where are the fish?” you begin asking, “Why are fish here, and what keeps this place healthy?” That is a bigger and more valuable question.
C. Explore Fly Tying and Rod Craft
Fly tying can become its own hobby. It teaches patience, proportion, and close observation. When you sit at a vise and build a nymph, streamer, or popper, you start noticing exactly how shape, movement, and materials matter. You also learn that “close enough” sometimes works — and sometimes does not.
You do not need a huge expensive setup to begin. A basic vise, thread, scissors, bobbin, and a few materials can take you far. Start with simple patterns tied for local species. As you improve, you can branch into bass bugs, saltwater flies, or careful imitations of specific hatches.
Some anglers also get interested in rod building, line design, and reel maintenance. Even if you never build a rod from scratch, learning how gear is made deepens your appreciation for balance and performance.
D. Think About Access and Conservation
A fly-fishing future depends on more than personal skill. It depends on access to fishable water and on healthy fish habitat. That is why many anglers volunteer for stream cleanups, tree planting, erosion control projects, invasive species removal, and youth education.
You do not have to wait until adulthood to help. Scouts can assist with habitat days, citizen science projects, and club conservation events. These experiences show that conservation is not an abstract idea. It is hands-on work that improves real places.
This also helps you see why regulations, catch and release, and good sportsmanship matter. They are all pieces of the same larger mission: keeping fisheries healthy enough that future anglers can enjoy them too.
E. Real-World Experiences to Try
- Visit a local fly shop or outfitter and ask how they match flies to local water conditions through the seasons.
- Attend a trout unlimited, casting club, or conservation event to meet experienced anglers and volunteers.
- Practice at a pond close to home with bluegill or bass to sharpen casting and presentation without a long trip.
- Join a stream cleanup or habitat project to see conservation work in action.
- Take a guided outing or beginner clinic if one is available through a park, club, or state agency.