Req 3b — Backing to the Fly Line
The connection between backing and fly line needs to be smooth enough to move through guides and strong enough to hold if a fish takes you deep into the reel. One classic way to make that connection is the nail knot, often tied with a small tube or knot tool to guide the wraps.
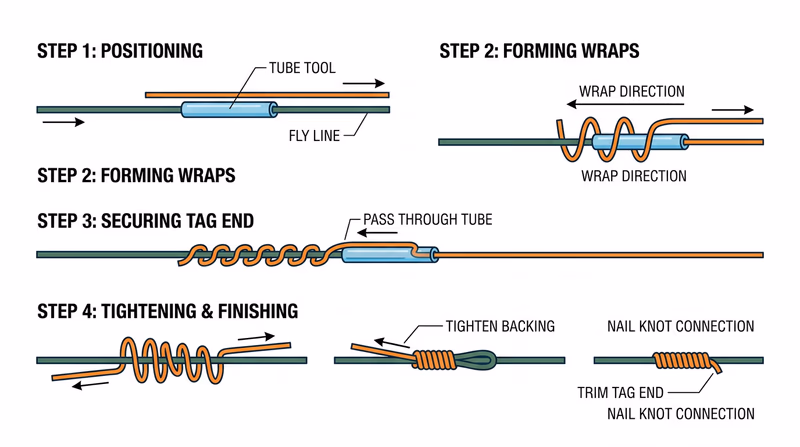
Why the Nail Knot Is Used Here
Fly line is thick and has a plastic coating around a core. Backing is thinner and softer. A nail knot lets the backing grip the outside of the fly line in a slim, tidy connection. That slim profile matters because bulky knots can catch in rod guides.
The name comes from the old practice of using a small nail as a temporary spacer while making the wraps. Many anglers now use a tube, straw, or knot tool instead.
How the Knot Works
The backing is wrapped several times around the fly line and the tube. Then the tag end is fed back through the tube path. When tightened, those wraps cinch down evenly around the fly line coating.
The exact hand motions take practice, but the big ideas are simple:
- Keep the wraps neat and snug beside one another.
- Do not let them cross.
- Tighten gradually so the wraps seat evenly.
- Wet the knot before final tightening to reduce friction.
Practice Sequence
- Lay the end of the backing alongside the end of the fly line.
- Place a small tube or nail beside the fly line.
- Wrap the backing 5 to 7 times around the fly line and tube.
- Pass the tag end back through the tube.
- Remove the tube and tighten the wraps carefully.
- Trim the tag and test the connection with steady pressure.
Why Smoothness Matters
A backing-to-line knot usually spends most of its life on the reel, but if a fish runs far enough, that knot may pass in and out of the guides. A lumpy knot can catch and jerk. A smooth knot travels much better.
This is also why many anglers inspect this connection every season. If the line coating is cracked or the knot looks loose, it is time to redo it.
Common Beginner Mistakes
- Wrapping too loosely so the knot slips
- Crossing wraps instead of stacking them neatly
- Pulling one side hard before the knot is evenly seated
- Cutting the tag too soon before the knot has been tested
Nail Knot Success Check
Signs the knot is tied well
- Wraps look even: No crossing or bunching
- Connection feels slim: The knot should not be bulky
- Tension test passes: A firm pull does not make it slip
- Ends are trimmed neatly: No long tag waving loose
Knots like the arbor knot and nail knot may seem like small details, but they are what make a fly outfit trustworthy. If one connection fails, the whole system fails with it.
Orvis Learning Center — How to Tie a Nail Knot A clear tutorial showing the nail knot and why it is useful for attaching backing and leaders to fly line.With backing secured to the fly line, the next connection brings you closer to the fly itself.