Req 3e — Tying on the Fly
After all the rod rigging, backing knots, and leader connections, everything finally ends here: one small knot holding the fly you want the fish to eat. The improved clinch knot is one of the most common fishing knots because it is compact, reliable, and practical for tying flies and hooks.
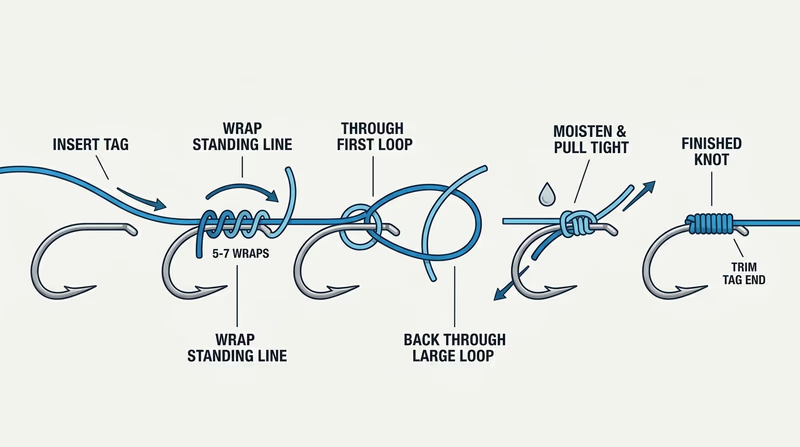
What the Improved Clinch Knot Does
This knot secures the fly to the tippet by wrapping the tag end around the standing line several times, then passing it through a loop and back through a second loop created by the knot’s shape. That extra pass is what makes it the improved clinch knot.
For many freshwater fly-fishing situations, it is a solid choice that Scouts can learn quickly and tie without special tools.
Step-by-Step
- Pass the tippet through the hook eye.
- Wrap the tag end around the standing line about 5 to 7 times.
- Pass the tag end through the small loop near the eye.
- Then pass it through the larger loop you just created.
- Moisten the knot.
- Pull the standing line and tag carefully until the knot seats snugly.
- Trim the tag end.
When demonstrating, slow hands beat fast hands. A neat clinch knot almost always outperforms a rushed one.
When It Works Best
The improved clinch knot is great for many standard flies and tippet sizes. Like any knot, it has limits. Very heavy tippet, very large hook eyes, or slick line materials may lead some anglers to choose a different knot. But for merit badge purposes, this knot is a strong all-around skill to know.
Common Problems
Too Few or Too Many Wraps
Too few wraps can let the knot slip. Too many can make it bunch up poorly. The right number depends somewhat on line size, but 5 to 7 is a good starting point.
Dry Tightening
If you tighten without moisture, friction can weaken the line. A little water or saliva helps the knot cinch smoothly.
Crooked Seating
If the wraps cross or pile up, the knot may not tighten evenly. Start over rather than trusting a messy knot.
Fly Changes Happen Constantly
You may tie this knot many times in one trip because fly anglers change patterns often. A hatch changes. Light changes. Fish start feeding deeper. Your popper stops working and a nymph starts working. Retying quickly and correctly is part of real fishing.
That means efficiency matters, but accuracy matters more. Many beginners lose flies not because fish were strong, but because the knot was poorly tied.
A Good Improved Clinch Knot
What to look for before you fish it
- Wraps are neat and stacked: Not crossed or tangled
- Knot seats against the eye: Snug and compact
- Line is moistened before tightening: Reduces friction damage
- Pull test completed: Confirms it is safe to cast
In Req 3d, you connected fresh tippet to your leader. This page finishes the rig so you can start thinking less about knots and more about what different flies are trying to imitate.
Animated Knots — Improved Clinch Knot A clear animation showing the exact path of an improved clinch knot for hooks and flies.Now that your fly is finally tied on, it is time to understand the different kinds of flies and what they represent in the water.