Game Design Merit Badge — Complete Digital Resource Guide
https://merit-badge.university/merit-badges/game-design/guide/
Introduction & Overview
A game can make you laugh, make you think, or make you shout, “One more round!” Whether you are rolling dice, tapping buttons, drawing cards, or running across a field, every game is built from choices made by a designer.
The Game Design merit badge teaches you to look behind the fun and see how games really work. You will compare different kinds of games, test how rules change player behavior, and build your own playable prototype. By the end, you will not just play games — you will think like someone who can create them.
Then and Now
Then — From Ancient Boards to Homemade Rule Sets
Games are older than almost any other form of entertainment. Archaeologists have found ancient board games in Egypt and Mesopotamia that are thousands of years old. Long before computers existed, people made games out of carved stones, sticks, cards, paper, and imagination. Families taught rules by word of mouth, and many games changed a little each time they were played.
Early game design was usually informal. A person might invent a race game, a strategy challenge, or a sport variation, but there was rarely a big team, a publisher, or a digital platform behind it.
- Tools: Boards, cards, dice, fields, simple tokens
- Design style: Small rule sets, face-to-face play, lots of local variations
Now — Physical, Digital, and Hybrid Design
Today, game design is a huge creative industry. A single game might involve writers, artists, programmers, educators, audio designers, and playtesters. At the same time, one person with index cards and a pencil can still invent something amazing. Modern designers build mobile games, tabletop games, classroom simulations, role-playing games, party games, and escape-room style experiences.
The biggest change is not just technology. It is intention. Designers now think carefully about player experience, accessibility, balance, safety, difficulty, and replay value. Great games do not happen by accident.
- Tools: Paper prototypes, design notebooks, art software, game engines, analytics
- Design style: Deliberate testing, repeated revision, many possible mediums
Get Ready! This badge is your chance to turn “I like games” into “I understand how games work.” Keep a notebook close by, because good designers notice patterns, write down ideas, and improve them step by step.
Kinds of Game Design
Game design is much broader than video games. As you work through this badge, you will see how the same design ideas show up in very different formats.
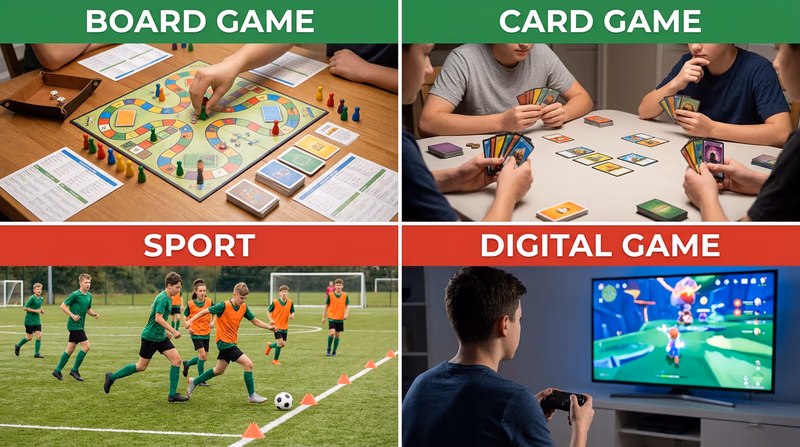
Board and Card Games
These games use physical pieces, visible rules, and shared space. Designers think about turn order, randomness, hidden information, and how easy the game is to learn from printed instructions. Board and card games are great for fast prototyping because you can test ideas with paper right away.
Sports and Playground Games
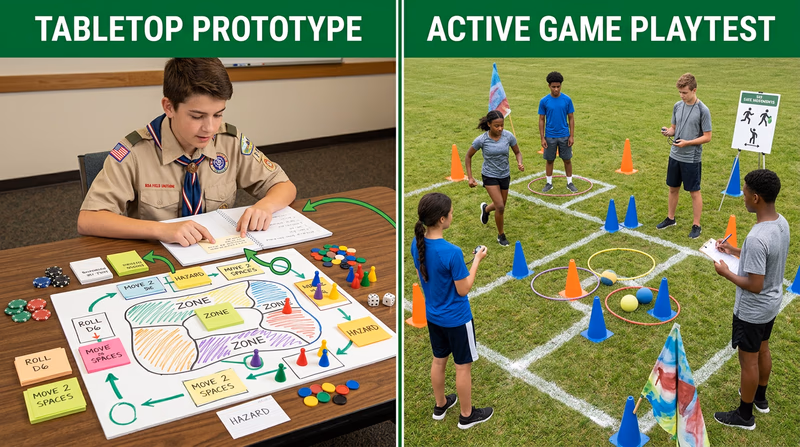
Some games use bodies, motion, and space instead of tokens and screens. In these games, designers think about safety, fairness, scoring, physical skill, and how rules shape teamwork or competition. Requirement 4 will have you explore exactly this kind of rule change in action.
Role-Playing and Story Games
These games focus on characters, setting, and imagination. Some use dice and rulebooks. Others use almost no equipment at all. Designers balance story freedom with enough structure to help players know what they can do next.
Video and Digital Games
Digital games can track complex rules automatically and respond instantly to player choices. Designers think about interface design, pacing, feedback, levels, tutorials, sound, and visual clarity. Even though the medium is different, the same big questions still matter: Is it fun? Is it fair? Do players want to keep going?
Educational and Training Games
Not every game is made only for entertainment. Some games teach math, history, teamwork, safety, or leadership. A good educational game still needs real play value. If it feels like a worksheet wearing a costume, players will notice.
Next, you will compare games from different media and figure out what each one does well.
Req 1a — Comparing Games
A fast phone game, a sport on a field, a card game at a table, and a story-heavy video game may feel completely different, but they all answer the same basic design questions. Who is playing? What are they trying to do? What rules guide them? What tools or materials do they need?
This requirement asks you to become a game detective. Instead of saying, “I liked it” or “It was boring,” you will learn to explain why a game feels the way it does. That is one of the most important skills a designer can build.
Start with Four Different Media
Pick four games that come from clearly different media. For example, you might choose a board game, a card game, a sport or playground game, and a digital game. You could also include a role-playing game, party game, escape-room style game, or trivia game. The goal is variety.
When the media are different, the design tradeoffs become easier to see. A digital game can hide complex calculations from the player. A board game needs physical pieces and printed rules. A sport depends on real bodies moving through real space. A role-playing game may rely more on imagination than equipment.
What to record for each game
Use the same categories every time so your chart is easy to compare- Medium: Board, card, digital, sports, role-playing, party, or another format.
- Player format: Solo, head-to-head, teams, cooperative group, or large multiplayer.
- Objective: How do players win, score, survive, escape, or finish?
- Rules: What actions are allowed, limited, or required?
- Resources: What pieces, space, devices, cards, tokens, or time does the game need?
- Theme: What setting, story, or mood wraps around the mechanics?
- Play experience: How does it feel while playing — tense, funny, strategic, chaotic, calm?
Medium Changes Everything
The medium shapes what a game can do well. A card game is portable and easy to set up, but it cannot create sound effects or hidden computer logic. A digital game can react instantly and track hundreds of values, but it may require a device, battery life, and interface design that players must learn.
A physical sport has almost no loading time and creates strong face-to-face energy, but it depends on weather, space, and safety rules. A tabletop strategy game may create deep planning with simple materials, but it can also slow down if turns take too long.
When you compare your four games, notice how the medium affects pacing, complexity, and social interaction.
Look Beyond the Surface
Two games can share a theme and still feel very different. For example, two fantasy games may both have dragons and treasure, but one might be mostly about quick reflexes while the other is about long-term planning. That is why you should separate theme from mechanics.
Theme is the story wrapper. Mechanics are the actions and rules that drive play. A racing game might use a space theme, a car theme, or an animal theme, but if players are still choosing when to speed up, block, or conserve resources, the underlying design may be similar.
What You Enjoy — and What You Don’t
This part matters just as much as the chart. Designers need to understand player reactions, including their own. Ask yourself questions like these:
- Do you enjoy having lots of choices, or do you prefer simple rules?
- Do you like games that feel fair and balanced, or games that are wild and unpredictable?
- Do you enjoy direct competition, teamwork, or solo problem-solving?
- Do you like games that tell a story, or games that stay abstract?
- Do you lose interest when a game takes too long, repeats itself, or leaves players waiting?
There is no single correct answer. The point is to connect your feelings to design choices. “I got bored because turns were too slow” is useful. “I liked it because every round forced me to make a tough tradeoff” is even more useful.
Build a Comparison Chart
Your counselor wants to see that you can compare and contrast, not just list facts one game at a time. Make a chart with one row for each game and one column for each category. Once you fill it out, look across the rows.
Which games had the clearest objectives? Which required the most resources? Which one created the strongest emotions? Which one was easiest to teach? Which one had the most replay value?
That last step turns a worksheet into analysis.
Smithsonian Lemelson Center — The Art of Video Game Design A museum resource about the design choices that shape how games work and what players experience. Link: Smithsonian Lemelson Center — The Art of Video Game Design — https://invention.si.edu/video-game-designIn the next requirement, you will go deeper into a big question every designer asks: why do people play at all?
Req 1b — Why People Play
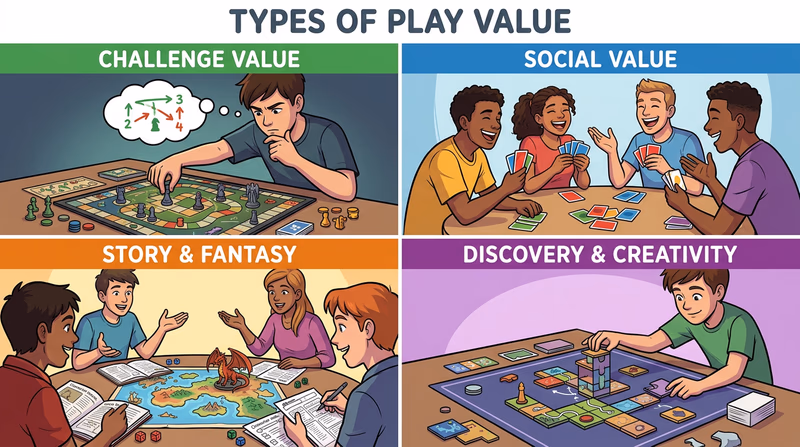
Some games are exciting because they test skill. Others are fun because they tell a story, make people laugh, or let friends spend time together. Designers call these different kinds of enjoyment play value. If you understand what kind of value a game offers, you are much better at explaining why players come back.
There is no single official list of play values, so the important thing is to describe real categories clearly and connect them to real games. Here are four strong types you can discuss with your counselor.
1. Challenge Value
Challenge value comes from trying to overcome difficulty. Players enjoy the feeling of improvement, mastery, and earned success. Puzzle games, strategy games, platformers, sports, and many action games depend heavily on challenge.
A game built around challenge value usually has clear goals, obstacles, and feedback. If it is too easy, players get bored. If it is too hard, players may quit. Good challenge feels possible but not automatic.
Example: Chess is built heavily around challenge value. The fun comes from planning ahead, reading your opponent, and making better decisions over time.
2. Social Value
Social value comes from interacting with other people. The game may create teamwork, competition, negotiation, bluffing, or shared laughter. In these games, the people at the table are part of the fun.
Party games, cooperative games, sports, and many online multiplayer games rely on social value. Even a simple game can become memorable if it creates strong group moments.
Example: A game like Uno has social value because the table talk, surprise reversals, and reactions from other players are a big part of the experience.
3. Story or Fantasy Value
Some games give players a chance to enter a different world. They might take on a role, explore a setting, or feel like the hero of an adventure. The fun comes from immersion, imagination, and emotional connection.
Role-playing games, adventure games, and many digital games use story or fantasy value. Theme matters a lot here, but it still needs mechanics that support the story instead of getting in the way.
Example: A tabletop role-playing game built around quests and characters offers story value because players are not just solving problems — they are living inside the game world.
4. Discovery or Creativity Value
Some games are fun because players get to experiment, build, explore, or invent. The game rewards curiosity more than victory. This can include sandbox games, world-building games, open-ended design games, or even games where players create their own content.
Example: A sandbox building game offers creativity value because players enjoy making structures, trying ideas, and seeing what is possible, even without a strict win condition.
Other Reasons People Play
Your counselor will probably want more than four labels. Think about the many real-life reasons people choose games:
- to relax after a stressful day
- to spend time with friends or family
- to compete and prove skill
- to explore a world they find interesting
- to laugh and be silly
- to feel progress and achievement
- to practice teamwork
- to learn something new
- to solve problems
- to enjoy surprise and unpredictability
Different players may want different things from the same game. One person may love a game because it is strategic. Another may love it because it creates funny group moments. Great designers know their audience and decide which reasons matter most.
Use Specific Examples
When you explain a play value, do not stop at a game title. Say what part of the design creates that value. For example, if you choose social value, explain whether the game creates it through teamwork, bluffing, communication, or chaos. If you choose challenge value, explain whether the challenge comes from reflexes, planning, memory, or risk.
That level of detail will help later when you design your own game in Req 5a and Req 5b. You will need to decide what kind of fun your own design is trying to create.
Questions to ask about play value
Use these when choosing your examples- What feeling keeps players engaged? Tension, curiosity, laughter, pride, immersion?
- What mechanic creates that feeling? Turns, teamwork, speed, hidden information, story choices?
- Would the game still be fun if that element disappeared? If not, you probably found its core play value.
- Who is this value for? Competitive players, casual players, creative players, younger kids, families?
In Req 1a, you compared whole games. Next you will zoom in on the language designers use to describe how those games are built.
Req 2 — Core Design Terms
This requirement covers many terms, but they all help answer one question: what kind of experience is this game trying to create?
Because the requirement says to discuss five terms, you do not need to master all 17 at once. Still, it helps to understand the whole list so you can choose strong examples. Below is a quick guide to every term, along with ideas for how to talk about them.
Story, Setting, and Characters
These three terms shape the world around the player.
- Story is what happens. Does the game follow a plot, a mission, or a series of events?
- Setting is where and when the game takes place.
- Characters are the people, creatures, or roles involved.
A fantasy quest game may have a strong story and memorable characters. A pure logic puzzle may have almost none. That does not make one better than the other — it just means the design focus is different.
Play Sequence and Level Design
Play sequence means the order of actions in the game. Who goes first? What happens on a turn? What repeats each round? In a digital game, it can also describe the order of menus, missions, and player actions.
Level design matters most in games with spaces to move through. A level should teach, challenge, and reward the player. The layout itself can create tension, surprise, or learning.
Interface Design
Interface design is how players understand and control the game. In a board game, the interface may be the layout of the board, the player aids, and the symbols on the cards. In a video game, it includes menus, buttons, icons, health bars, maps, and tutorials.
A bad interface can make a good game feel confusing. A clear interface helps players focus on choices instead of wrestling with the controls.
Difficulty, Balance, and Depth
These three terms are often mixed up, so separate them carefully.
- Difficulty is how hard the game is to succeed at.
- Balance is whether options, players, or strategies feel fair compared with one another.
- Depth is how many meaningful decisions the game creates over time.
A game can be easy but deep. It can be hard but unbalanced. It can be balanced but shallow. When you give examples, explain which of those is true and why.
Pace and Replay Value
Pace is the speed and rhythm of the experience. Does the game move quickly with constant action, or does it encourage careful thinking between turns? Pace is not just about time. It is about how the game feels minute to minute.
Replay value is how much players want to come back after one session. Random setups, multiple strategies, changing player groups, unlockable content, and strong social interaction can all increase replay value.
Age Appropriateness
A game should match the age and maturity of its intended players. Younger players may need simpler rules, shorter play time, and gentler themes. Older players may enjoy more complexity or more intense competition.
Age appropriateness is not just about content. It also includes reading level, fine motor skills, frustration level, and how much patience the game expects.
Comparing Player Structures
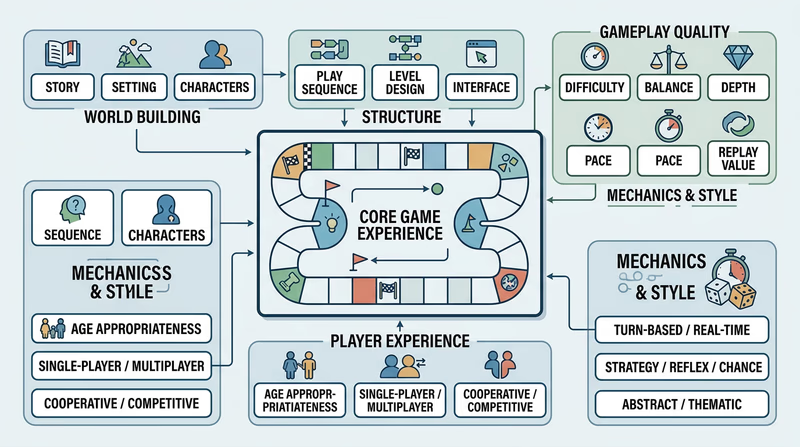
Several terms on this list ask you to compare two design directions:
- Single-player vs. multiplayer: Is the experience built for one person or several?
- Cooperative vs. competitive: Do players work together or against one another?
- Turn-based vs. real-time: Do players act in order, or all at once?
- Strategy vs. reflex vs. chance: Does success come mostly from planning, speed, luck, or a mix?
- Abstract vs. thematic: Does the game focus mostly on pure mechanics, or does it wrap them in a clear story or setting?
These pairs are useful because they show how design choices change behavior. A cooperative game encourages communication. A competitive game may create tension and bluffing. Real-time play creates urgency. Turn-based play often allows deeper planning.
How to Choose Your Five Terms
Pick terms that fit games you know well. It is easier to discuss balance in a game you have played many times than in a game you barely remember. Choose terms that let you say something specific.
For example:
- Use interface design for a game with menus, icons, or player aids.
- Use pace for a game that feels either thrilling or painfully slow.
- Use replay value for a game your group keeps revisiting.
- Use abstract vs. thematic for a game where the theme is either extremely strong or barely there.
A strong counselor discussion answer
What makes an explanation better than a definition- Name the term clearly.
- Define it in your own words.
- Connect it to a specific game.
- Describe how that term changes the player experience.
- Give an opinion backed by evidence. For example: “I think the pace works because downtime stays short.”
Once you can talk about mechanics and player experience, you are ready for a different side of design: who owns creative work, and how that work is protected.
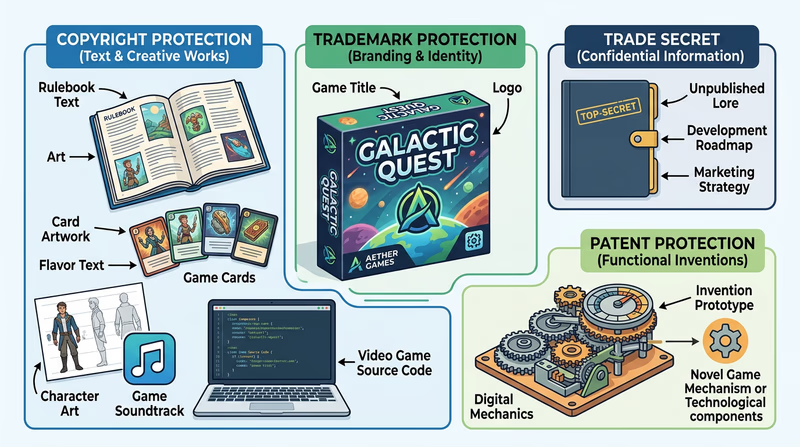
Req 3 — Intellectual Property
You cannot hold an idea in your hand the way you hold a game token or a soccer ball. But ideas, art, names, music, code, stories, and characters still have value. That is why designers need to understand intellectual property, often shortened to IP.
Intellectual property means creative work and identifying marks that the law can protect. In game design, IP can include a game’s name, logo, artwork, written story, original characters, music, computer code, and sometimes technical inventions.
The Main Types of IP in Games
The game industry usually talks about four big types of protection.
Copyright
Copyright protects original creative expression. In games, that can include artwork, written rules, character backstories, soundtracks, animations, and software code. Copyright does not protect a broad idea like “a game where players race to collect treasures.” It protects the specific way someone expressed that idea.
Trademark
Trademark protects brand identity — names, logos, slogans, and symbols that tell people who made something. A game title, publisher logo, or special emblem can become a trademark. Trademark law helps prevent confusion in the marketplace.
Patent
A patent protects certain new inventions or technical processes. Some games and game technologies have used patents for special hardware, control systems, or unique technical methods. Patents are less common for Scouts to deal with directly, but they matter in the larger industry.
Trade Secret
A trade secret is valuable information a company keeps private, such as internal tools, unreleased plans, secret formulas, or special development methods. A game studio might protect unreleased story details, secret balancing tools, or private engine technology this way.
Why Protection Matters
Protection gives creators a reason to keep making things. If anyone could copy a game’s art, logo, soundtrack, and code instantly without consequences, the original creators could lose money, recognition, and control.
Protection also helps players. It makes it easier to know what is official, what is copied, and who is responsible for the product. When you see a trusted brand name, you know what experience you are likely to get.
How IP Is Protected
Protection happens in several ways:
- creators automatically receive copyright in original work when it is fixed in a tangible form, such as writing, art files, or code
- companies register trademarks for names and logos
- inventors apply for patents when they believe they created a new patentable invention
- studios use contracts, passwords, and private workflows to guard trade secrets
- licenses and permissions spell out who may use a property and under what terms
As a Scout designer, one of the best habits you can build is keeping clear notes in your notebook. Date your sketches, rules, and revisions. That does not replace legal advice, but it does show your creative process.
What Is a Licensed Property?
A licensed property is an IP that one person or company allows another to use under specific conditions. For example, a game studio might receive permission to make a game based on a movie, sports league, comic book, or toy brand. The studio does not own the property outright. It has a license to use it.
A board game based on a superhero movie is a good example of a licensed property. So is a sports video game that uses real team names and player likenesses under license.
What This Means for Your Own Design
When you create your own game later in this badge, make it yours. Do not build it as a copy of a famous brand or a mashup of someone else’s characters and story world. Learn from what you like, but create original rules, presentation, and themes.
U.S. Copyright Office — What Is Copyright? An official overview of what copyright protects and what it does not protect. Link: U.S. Copyright Office — What Is Copyright? — https://www.copyright.gov/what-is-copyright/ USPTO — Basic Facts About Trademarks A beginner-friendly guide from the U.S. Patent and Trademark Office on how trademarks work. Link: USPTO — Basic Facts About Trademarks — https://www.uspto.gov/trademarks/basics/basic-facts-about-trademarksIn the next requirement, you will stop talking about existing designs and start changing one yourself by testing rule changes in action.
Req 4a — Play the Original Game
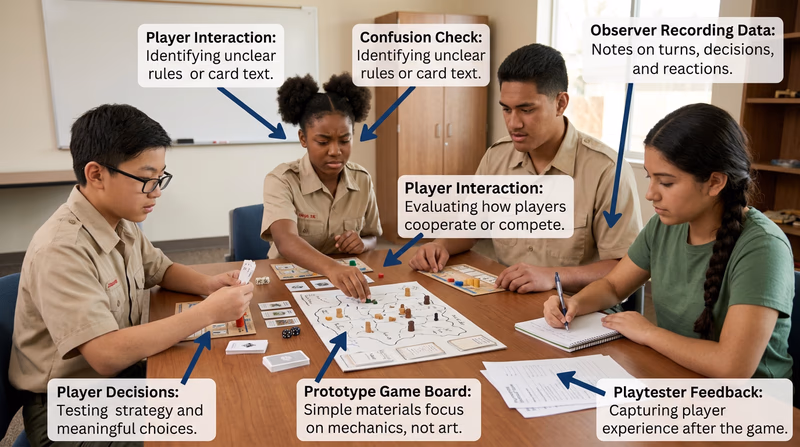
Some of the best game design lessons happen when you start with an existing game instead of a blank page. This requirement is your control test. Before you change anything, you need to understand how the original version works.
Pick a game with clear rules and enough structure that a change will matter. Sports, card games, playground games, and classic tabletop games all work well. The best choice is a game your group can actually play more than once without a huge setup.
What Makes a Good Choice?
Choose a game that meets three tests:
- the objective is easy to explain
- the rules are stable enough that players know what “normal” feels like
- one change could realistically affect decisions, emotions, or outcomes
Kickball works because changing the number of bases or outs would matter. A card game works because changing hand size or scoring could shift strategy. Chess works because even a small rule change can reshape the whole experience.
Before you play
Build a useful baseline- State the objective: How does a player or team win?
- Summarize the normal rules: Focus on the rules that most shape decisions.
- List the players: How many people are playing, and in what format?
- Note the resources: Field, cards, timer, pieces, score sheet, or other materials.
- Record first impressions: What do players expect before the game begins?
Keep the Summary Brief but Clear
Your summary does not need every tiny rule. It should cover the main loop of play. In other words, what do players do again and again until the game ends?
For example, in a card game, the loop may be draw, choose, play, score, repeat. In a sport, it may be possession, movement, defense, scoring chance, reset. In a board game, it may be move, collect, trade, block, score.
If you cannot explain the game clearly in a short paragraph, you may not understand the design well enough yet.
Play It Normally First
This part is important. Do not rush to the “creative” part. If you skip the normal playthrough, you will not know whether later changes actually mattered.
Watch how players behave under the default rules:
- Which choices come up most often?
- Where do players get excited or frustrated?
- Does the pace feel fast, slow, or uneven?
- Are some players more engaged than others?
- Does the game feel fair?
These observations will become very helpful in Req 4b and Req 4c.
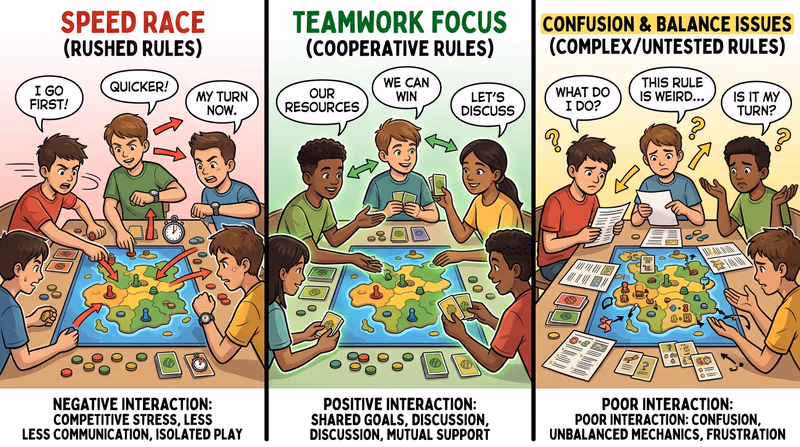
Look for Pressure Points
Every game has “pressure points” — rules that strongly shape behavior. In basketball, the shot clock changes urgency. In hearts, the passing phase changes planning. In chess, piece movement defines everything. Pressure points are the best places to test rule changes later.
When you spot a pressure point, ask: if this one rule changed, what would players do differently?
Emotional Experience Counts Too
The requirement does not just ask about actions. It also leads toward player experience. Designers care about feelings because feelings drive memory and replay value. Did the normal version feel tense, silly, competitive, relaxed, or frustrating? Those emotional notes will help you measure the impact of each change later.
Common Sense Education — How Games Build Systems Thinking An education article that shows how games help players notice systems, rules, and cause-and-effect relationships. Link: Common Sense Education — How Games Build Systems Thinking — https://www.commonsense.org/education/articles/what-playing-games-can-teach-us-about-learningNext, you will become the designer by proposing rule changes before you test them.
Req 4b — Predict Rule Changes
This is where game design starts to feel like science. You are making a hypothesis: “If I change this rule, I think players will behave this way.” Good designers do not change rules randomly. They predict cause and effect.
The strongest changes are small enough to test clearly but big enough to matter. If you change ten things at once, you will never know what caused the result. If you change something too tiny, players may not notice.
Change One Lever at a Time
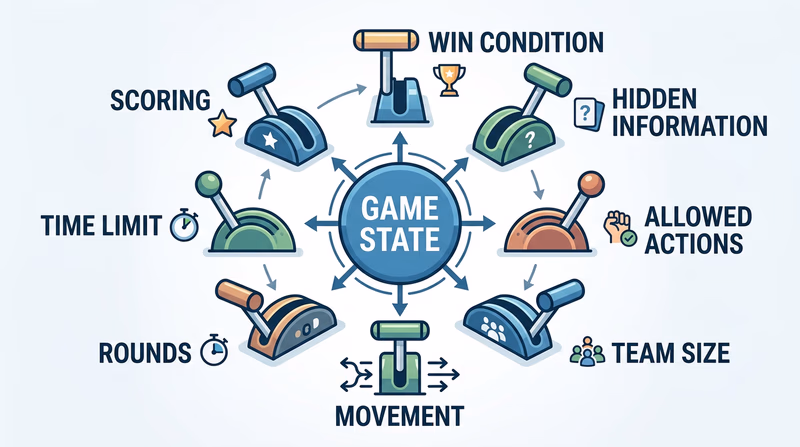
A lever is a rule that moves the rest of the system. Good levers include:
- scoring values
- time limits
- number of turns or rounds
- movement limits
- team size
- allowed actions
- information players can see or hide
- win conditions
When you change one lever, other parts of the game shift too. More points for a risky move may make players more aggressive. A shorter timer may make the game feel chaotic. A cooperative goal may reduce trash talk and increase planning.
For each rule change, record three things
This will make your later discussion much stronger- What exactly changed? Write the new rule in one clear sentence.
- Why did you choose it? What problem or possibility were you testing?
- What do you predict? Explain how player actions and emotions will change.
Predict Actions and Feelings
A useful prediction includes both behavior and experience.
For example:
- “If we shorten the timer, players will take riskier actions and feel more pressure.”
- “If every player starts with more resources, the early game will feel friendlier and less punishing.”
- “If teams can only score from farther away, the game will become harder and players may feel more satisfied when they succeed.”
That is much stronger than saying, “It might be better.” Better in what way? Faster? Fairer? Funnier? More tense? More strategic?
Watch for Tradeoffs
Most design changes help something while hurting something else. That is normal. A faster pace may reduce downtime but also reduce thoughtful strategy. More randomness may increase surprise but lower fairness. Simpler rules may improve accessibility but reduce depth.
If you can identify a tradeoff before testing, you are already thinking like a real designer.
Try Several Different Kinds of Changes
Since the requirement says “several,” consider proposing three kinds of changes, such as:
- a change to objective or scoring
- a change to allowed actions
- a change to pace or structure
That mix will give you richer results in Req 4c, where you repeat the process with multiple changes.
Keep the Test Fair
Make sure the players understand the new rule before the round starts. If they are confused, your test may measure unclear instructions instead of game design. This lesson will matter again in Req 7a, where you write instructions for your own game.
IGDA — Game Design Resources Professional game development resources from the International Game Developers Association, including material on design and iteration. Link: IGDA — Game Design Resources — https://igda.org/resourcelibrary/Now it is time to test those predictions with real players and real reactions.
Req 4c — Observe New Reactions
Now you test your ideas in the real world. This is not about whether your changes are “good” or “bad.” It is about what actually happened when players met the new rules.
A rule change can affect three things at once: what players do, what they feel, and what kind of game experience the session becomes. Your job is to notice those shifts clearly.
Observe, Don’t Just Participate
If possible, spend part of the session watching instead of playing full-out. Designers often learn the most by noticing hesitation, confusion, excitement, and repeated behavior patterns.
Look for signs like these:
- players using different strategies than before
- players ignoring actions they used to rely on
- faster or slower turns
- more laughter, more frustration, or more tension
- confusion about how the new rule works
- one player or team becoming much stronger or weaker
Repeat the Process Three Times
The requirement asks you to repeat the process with three different changes. That means you need separate notes for each test. Treat them like three mini-experiments, not one giant blur.
A simple format works well:
| Change tested | What players did | How they seemed to feel | Surprise result |
|---|---|---|---|
| New scoring rule | Took more risks | More excited, less patient | Rounds ended faster |
You do not need to guess private thoughts, but you can observe visible reactions: cheering, slowing down, arguing, asking questions, or getting quiet.
What to watch during each test
Focus on evidence, not just opinions- Actions: Did player decisions change?
- Pace: Did the game speed up or slow down?
- Clarity: Did the change make the rules easier or harder to understand?
- Balance: Did one strategy or player gain too much advantage?
- Emotion: Did players seem more engaged, more stressed, more bored, or more confident?
Player Emotion Is Part of the System
Designers sometimes focus only on mechanics, but emotional experience matters just as much. A rule that creates suspense can be exciting. A rule that creates confusion can feel unfair. A rule that gives struggling players a chance to recover may feel encouraging.
That is why the requirement specifically mentions emotional experiences. The goal of game design is not just to move pieces around. It is to create an experience people remember.
Expect Surprises
Even smart predictions can be wrong. Players are inventive. They may exploit loopholes, ignore the intended strategy, or turn your “fair improvement” into a confusing mess. That is normal. In fact, it is valuable.
Surprises are where design learning happens. If players keep finding a shortcut you did not expect, that may reveal a balance problem. If they smile more under one change even though the score stays close, that may reveal a better emotional tone.
Keep Your Notes Usable
Later, in Req 4d, you will explain how accurate your predictions were. That is hard to do if your notes are vague. Write down specifics like “players stopped passing and took more direct shots” or “the new objective made teammates talk constantly.”
Those details are more convincing than “it was fun.”
International Game Developers Association Resource Library Professional resources and articles about design practice, iteration, and game development workflows. Link: International Game Developers Association Resource Library — https://igda.org/resourcelibrary/Next, you will step back and compare your predictions with the real results.
Req 4d — Analyze the Results
This requirement turns testing into learning. You are not done when the games are over. A designer has to look back and ask: what actually changed, and what does that teach me about rules?
The best discussion compares three things side by side:
- the original version of the game
- what you predicted for each rule change
- what really happened
That comparison is where design insight lives.
Separate Outcome from Opinion
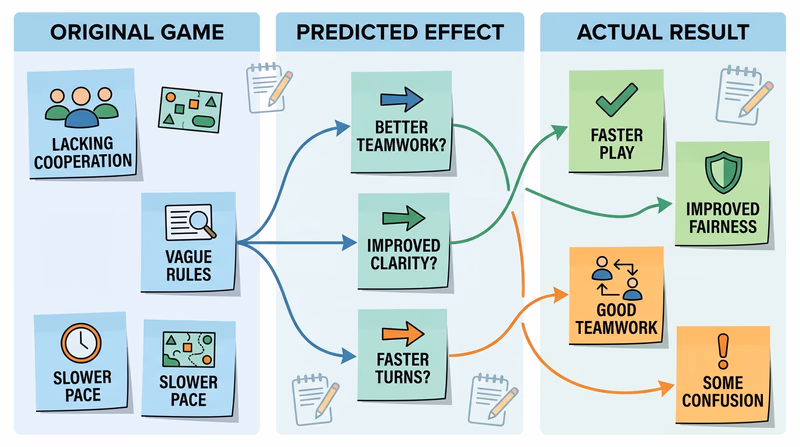
Start with facts. Did the game speed up? Did players cooperate more? Did one team gain a large advantage? Did confusion increase? Once you describe those outcomes, then explain whether that was good, bad, or just interesting.
This matters because a change can “work” in one sense and fail in another. Maybe it made the game faster, just like you predicted, but it also made it less fair. Both observations belong in your analysis.
Were Your Predictions Accurate?
You do not need perfect predictions to succeed here. In fact, a wrong prediction can lead to a great conversation if you explain why it turned out differently.
Maybe you thought a scoring change would encourage creativity, but it actually encouraged safe play. Maybe you expected more teamwork, but players became more competitive. Those surprises show that you are taking the design process seriously.
A strong analysis for each change
Use this structure when talking with your counselor- Prediction: What did you think would happen?
- Observed action change: What did players actually do differently?
- Observed experience change: How did the game feel different?
- Accuracy: Were you fully right, partly right, or mostly wrong?
- Lesson: What did this teach you about game design?
Look for Patterns Across All Three Tests
Do not treat each rule change as a separate island. Compare them. Did every change that sped up pace also reduce strategy? Did players respond more strongly to objective changes than to scoring changes? Did simple rule changes have bigger effects than expected?
Those patterns can help you later when you build and revise your own game in Req 6bc. In fact, this whole requirement is practice for prototyping.
Why This Matters for Your Own Game
When you design your own game, you will have favorite ideas. Every designer does. But testing teaches humility. Players do not always react the way you expect. That is why strong designers do not fall in love with their first version. They look for evidence.
In Req 5b, you will describe why someone would want to play your game. In Req 6bc, you will have to test whether your design really creates that experience. The habit you build here will help a lot.
Be Honest About What Failed
If one of your changes made the game worse, say so clearly. That does not hurt your work. It strengthens it. Game design is full of ideas that sound smart until real players meet them. Honest notes are more valuable than pretending every change was an improvement.
ESA — How Video Games Are Made Industry resources from the Entertainment Software Association about how game development works, including iteration and collaboration. Link: ESA — How Video Games Are Made — https://www.theesa.com/resources/You have now practiced analyzing and testing existing systems. Next, you will start designing one of your own from scratch.
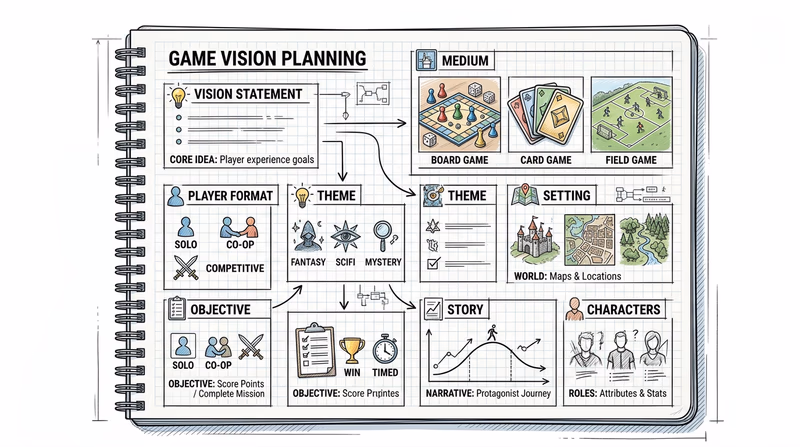
Req 5a — Vision, Theme, and Players
This is the moment where your own game stops being a vague idea and starts becoming a real design. A good vision statement is short, clear, and focused. It tells you what kind of experience you want to create before you get lost in details.
Since the parent requirement says, “Design a new game. Any game medium or combination of mediums is acceptable. Record your work in a game design notebook,” this page covers the first major design decisions you need to make:
- Vision statement — the core idea and experience you want to create
- Medium — where and how the game will be played
- Player format — who plays together, alone, or in teams
- Objective — what players are trying to achieve
- Theme — the mood, world, or concept wrapped around the mechanics
What a Vision Statement Does
A vision statement is not a full rulebook. It is more like a compass. It keeps your project pointed in the right direction.
A useful vision statement usually answers questions like these:
- What kind of game is this?
- Who is it for?
- What should players feel while playing?
- What makes it different from other games?
For example, a strong statement might say that your game is a fast cooperative card game for middle-school players where teammates race to solve a mystery before time runs out. That gives you direction right away.
Choose a Medium You Can Actually Build
You are going to prototype this game later. That means your best idea is not always the biggest idea. A paper card game, simple board game, or playground game may be much easier to prototype and test than a huge open-world video game concept.
Pick a medium that matches your time, tools, and players.
Questions before choosing your medium
Stay ambitious, but stay buildable- Can I make a playable prototype with what I have now?
- Can I test it with real players soon?
- Does this medium support the feeling I want?
- Can I explain and revise the rules without needing a huge team?
Define the Player Format and Objective
Your player format affects almost every later decision. A solo puzzle game needs different systems than a team sport. A competitive card game needs different balance than a cooperative scavenger hunt.
Your objective should be clear enough that players know what success looks like. Are they trying to score points, escape, survive, build something, reach a location, or solve a mystery? If the objective stays fuzzy, the whole design will wobble.
Theme, Setting, Story, and Characters
Theme answers the question, “What is this game about?” It could be space exploration, wildlife rescue, castle defense, neighborhood racing, camp cooking, or something completely original.
If your game benefits from a setting, story, or characters, add them now in simple form. You do not need a novel. A few strong sentences can do a lot. What matters is that these story elements support the play instead of distracting from it.
Keep the Scope Reasonable
A common beginner mistake is trying to build three games at once: one story game, one strategy game, and one collectible system all packed together. Simpler is better. If players cannot understand the goal quickly, testing will be much harder in Req 6a.
Game Design Notebook Planner Resource: Game Design Notebook Planner — /merit-badges/game-design/guide/game-design-notebook-planner/ MIT Education Arcade — Game Design Thinking An educational project that explores how games are designed for learning, systems thinking, and player engagement. Link: MIT Education Arcade — Game Design Thinking — https://education.mit.edu/project/the-education-arcade/🎬 Video: How to Write a Vision Statement — OnStrategy I Virtual Strategist — https://www.youtube.com/watch?v=7yBUBmciQBk
Next, you will answer a critical question: why would someone want to play your game in the first place?
Req 5b — Why Your Game Is Fun
This sounds simple, but it is one of the hardest questions in design. A game is not interesting just because it exists. Players need a reason to care.
That reason might be challenge, laughter, teamwork, story, creativity, competition, speed, discovery, or something else. In Req 1b, you explored different kinds of play value. Now you need to choose which value your own game is built to deliver.
Start with the Core Appeal
Ask yourself: if I invited someone to play this game tonight, what would I say to make them excited?
Your answer reveals the core appeal. Maybe you would say:
- “It is a fast bluffing game where nobody knows who to trust.”
- “You and your teammates race against the clock to rescue everyone.”
- “You get to build your own weird machine and see if it works.”
- “Every round creates funny arguments and surprise reversals.”
Those are all stronger than saying, “It is a game where players take turns.” Turns are structure. Appeal is the reason to care.
Match the Fun to the Audience
A family party game may need quick humor and simple rules. A strategy game for experienced players may need depth and tough decisions. A game for younger Scouts may need movement, clarity, and short rounds.
If your intended audience would not enjoy the kind of fun you are offering, the design will struggle no matter how clever the mechanics are.
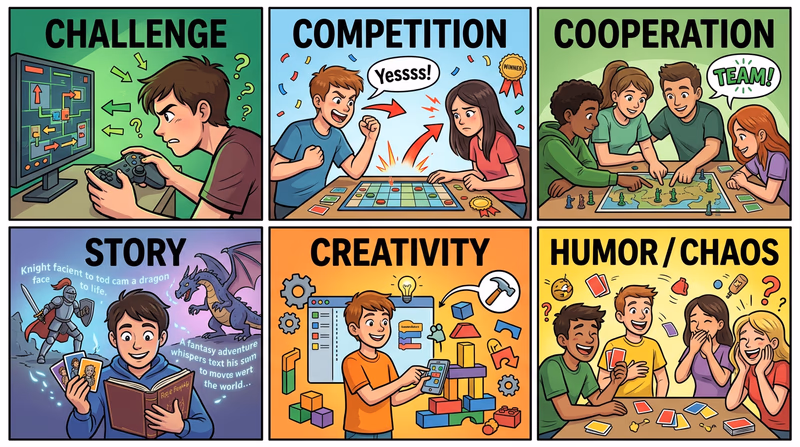
Ways a game can attract players
Pick the ones that fit your design best- Challenge: Players enjoy solving hard problems or mastering skill.
- Competition: Players want to beat an opponent or top a score.
- Cooperation: Players enjoy planning together and sharing success.
- Story: Players want to explore a world or role.
- Creativity: Players enjoy inventing, building, or customizing.
- Humor or chaos: Players enjoy surprise, laughter, and wild moments.
- Discovery: Players want to uncover new information, paths, or combinations.
Be Specific About the Experience
Try to finish this sentence: “Players will want to play my game because…”
Then keep going until the sentence includes real details. A strong answer might mention fast decisions, clever teamwork, dramatic reversals, or satisfying combos. A weak answer usually stays generic, like “because it is fun.”
Make Sure the Design Supports the Promise
If you say your game is fun because it is fast and exciting, but the rules force players to wait a long time between turns, your design and your promise are fighting each other. If you say it is creative, but players only have one obvious move, the game is not delivering on its goal.
That is why this requirement comes before Req 5c and Req 6bc. You need to know what the game is trying to do before you can test whether it does it.
Think Like a Player, Not Just a Creator
Designers often love their own ideas because they understand them deeply. Players do not start there. They need quick reasons to care. Try showing your concept to a friend and ask, “What sounds most interesting about this?” Their answer may show what your design is communicating — or failing to communicate.
Gamedesigning.org — Why Players Keep Playing Beginner-friendly articles about motivation, systems, and what makes game experiences stick with players. Link: Gamedesigning.org — Why Players Keep Playing — https://www.gamedesigning.org/learn/🎬 Video: How to Keep Players Engaged (Without Being Evil) — Game Maker's Toolkit — https://www.youtube.com/watch?v=hbzGO_Qonu0
Now that you know why players should care, the next step is turning that promise into clear rules and defined resources.
Req 5c — Rules and Resources
A game idea becomes playable when players know what they can do, what they are trying to do, and what tools they need. That is what rules and resources are for.
Since the parent requirement says, “Design a new game. Any game medium or combination of mediums is acceptable. Record your work in a game design notebook,” this page focuses on the structure that turns your concept into something testable:
- rules — the actions, limits, turn order, and win conditions
- resources — the materials, components, space, or information needed to play
Write Rules for Humans
Your rules should be clear enough that another person could try the game without needing to read your mind. Do not worry about making them perfect yet. The requirement says preliminary list, which means this version is allowed to change later.
Still, your early rules should answer the basics:
- How does the game begin?
- What can a player do on a turn or during play?
- What is not allowed?
- How does scoring or progress work?
- How does the game end?
- How do players win?
Define the Core Loop
The core loop is the repeating pattern of play. In many games, that loop is where the fun lives. If the loop is confusing or dull, no amount of cool theme will save the design.
For example, a loop might be:
- draw a card
- choose one action
- resolve the result
- score or update the board
- pass play to the next player
A sports game might use a movement-and-possession loop. A digital puzzle game might use a try-fail-learn-repeat loop. Write your loop in simple order.
Rules that should appear early in your notebook
You can refine the wording later- Setup: What players need and how to arrange it.
- Turn structure: What happens in what order.
- Actions: What each player is allowed to do.
- Limits: Movement caps, hand limits, time limits, or restrictions.
- Objectives: What counts as success.
- End condition: What makes the game stop.
Define Resources Carefully
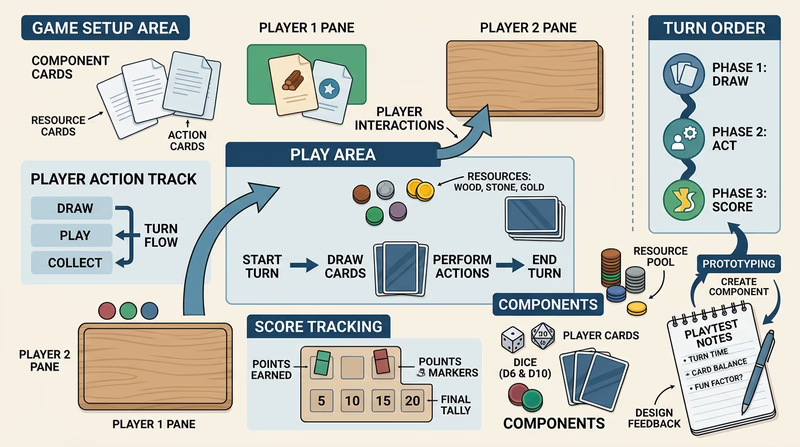
Resources are not just physical pieces. A resource can also be time, space, player attention, hidden information, stamina, or a shared pool of points.
In a board or card game, resources may include cards, dice, tokens, a board, markers, and a score sheet. In a playground game, they may include cones, field boundaries, safety gear, and team assignments. In a digital concept, they might include on-screen energy, inventory, or limited actions.
If a resource is important to decision-making, define it.
Keep It Prototype-Friendly
Since you will build a prototype in Req 6a, avoid writing rules that require materials you cannot produce. Fancy parts are optional. Clear systems matter more.
A strong prototype often begins with index cards, paper tokens, sticky notes, pencil sketches, or simple household objects. Designers use rough materials on purpose because they are easy to change.
Leave Room for Testing
Do not treat your preliminary rule list like a sacred document. It is a starting point. In Req 6bc, you are required to fix unclear rules, close loopholes, and change at least one rule, mechanic, or objective. That means change is not failure. It is part of the assignment.
Game Design Notebook Planner Resource: Game Design Notebook Planner — /merit-badges/game-design/guide/game-design-notebook-planner/ The Strong National Museum of Play — Game Design A major play and game museum with resources and examples that show how rules, components, and player interaction shape games. Link: The Strong National Museum of Play — Game Design — https://www.museumofplay.org/🎬 Video: How to write a Game Design Document — Game Dev Beginner — https://www.youtube.com/watch?v=bro4rwYVo0I
Once the rules exist on paper, the next step is making the components visible through sketches and drawings.
Req 5d — Drawing Game Elements
A game lives partly in the player’s mind and partly in the things the player sees. The board, cards, pieces, screens, score trackers, maps, or diagrams are not just decoration. They help players understand what actions are possible.
This requirement is about turning your ideas into visible form. Your drawings do not need to look professional. They just need to communicate the design clearly enough to support your prototype.
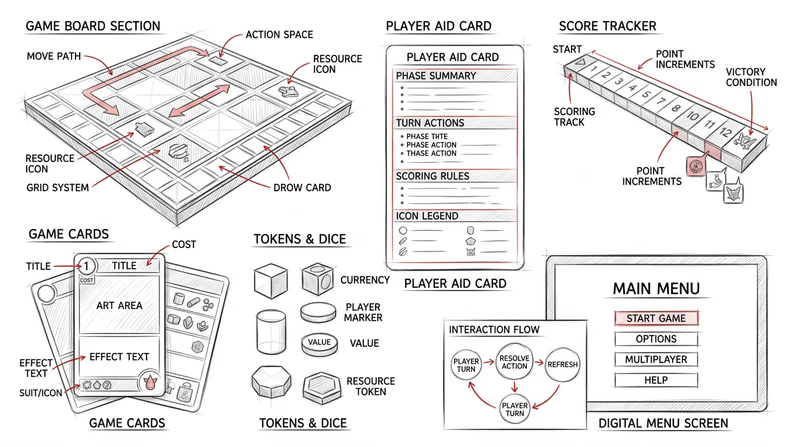
What Counts as a Game Element?
A game element is any visual or physical piece the player uses to play. Depending on your design, that could include:
- a board or map
- cards
- tokens or pawns
- score trackers
- character sheets
- item tiles
- a field diagram
- menus or screens for a digital concept
- icons, symbols, or labels
If the player needs to see it, choose it, move it, or understand it, it is probably a game element.
Draw for Function First
At this stage, clarity matters more than beauty. Your sketch should answer questions like:
- What information is shown here?
- Where does the player look first?
- What parts can change during play?
- Are labels readable?
- Does the layout help players understand their options?
A rough but clear sketch is more useful than a polished drawing that hides how the game works.
What your sketches should communicate
Make the invisible visible- Name of the element: Card, board section, token, player aid, menu, or map.
- Purpose: What the player uses it for.
- Important information: Numbers, symbols, instructions, or spaces.
- Interaction: How players move, choose, mark, or read it.
Think About Interface Design
This is where Req 2 becomes useful again. Your game elements are part of the interface. If your card layout is cluttered, your players may make mistakes. If your score tracker is confusing, players may stop trusting the results. If your field boundaries are unclear, arguments may replace fun.
Good element design reduces friction. It helps the rules feel easier, even when the game itself is thoughtful.
Sketch More Than One Version
You do not have to stop with the first drawing. Many designers make two or three layout ideas and choose the clearest one. That habit will help you later when blind testers try to use your materials without your help in Req 7bc.
Physical Games Need Readable Parts
If your design is physical, imagine another player sitting across the table or moving around outside. Can they recognize the elements quickly? Are symbols too small? Are colors the only way to tell pieces apart? If so, consider adding shapes, labels, or patterns too.
Safety Matters in Physical Designs
If your game uses physical movement, equipment, or outdoor play, the elements should support safe play. Mark boundaries clearly. Avoid components that create tripping hazards or force unsafe contact.
Game Design Notebook Planner Resource: Game Design Notebook Planner — /merit-badges/game-design/guide/game-design-notebook-planner/ Cooper Hewitt — Design Process A museum design resource about sketching, prototyping, and improving visual ideas through iteration. Link: Cooper Hewitt — Design Process — https://www.cooperhewitt.org/designprep/design-in-the-classroom/design-process/🎬 Video: 5 TIPS for Designing Better Maps & Levels — John Aljets — https://www.youtube.com/watch?v=WoNUaqWJrcI
You now have the key pieces of your design on paper. Next, you will turn those sketches and rules into a working prototype.
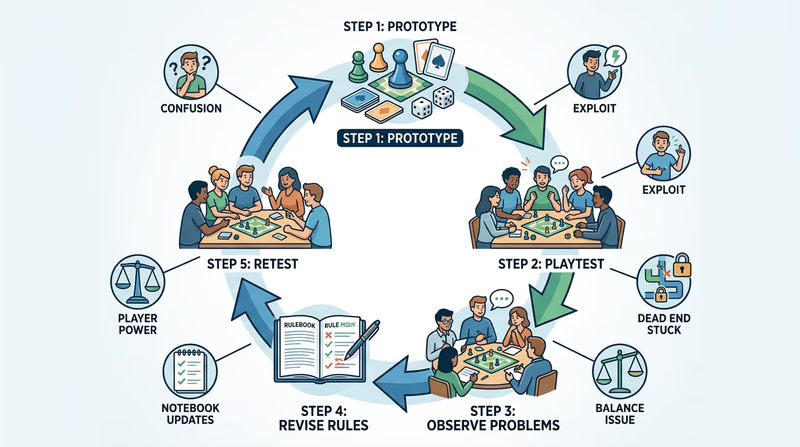
Req 6a — Build the Prototype
This page is where your game becomes real. A prototype is an early working version built for testing, not perfection. It should be playable enough to reveal what works, what confuses players, and what needs to change.
Because the parent requirement says, “Do the following: Note: You must have your counselor’s approval of your concept before you begin creating the prototype,” make sure that approval happens first. Once that is done, focus on building something fast, clear, and easy to revise.
This requirement covers three main jobs:
- build a playable version of the game from Req 5a–5d
- address player safety if the game includes physical movement or equipment
- record the work in your notebook so you can explain your process later
A Prototype Is Supposed to Be Rough
Many beginners wait too long because they want the first version to look impressive. That is not the goal. A good prototype answers questions. Can players understand the objective? Do the turns work? Is the game too short, too long, too easy, too confusing, or unexpectedly fun?
Paper scraps, index cards, sticky notes, and hand-drawn boards are all fine. If your game is active, cones, tape, and clear boundary markers may be enough for a first version. If it is digital in concept, you can still prototype menus, screens, and state changes on paper.
Build Only What You Need to Test
You do not need every future feature in version one. Focus on the minimum set of elements required to play one full session. For example:
- enough cards to test the main loop
- a basic board with key spaces marked
- tokens that stand in for fancier pieces later
- a simple score sheet
- a timer if pace matters
Prototype priorities
What version one needs most- Clear setup: Players can begin without guessing.
- Core actions: The main decisions or moves are possible.
- Visible progress: Scores, rounds, or objectives can be tracked.
- Temporary components: Cheap, editable materials replace polished parts.
- Notebook record: Date, version notes, and what you included.
Safety Is Part of Design
If your game involves movement, throwing, tagging, running, physical contact, or special equipment, safety belongs in the rules from the very beginning. A game is not successful if it creates avoidable risk.
Think about boundaries, spacing, contact rules, equipment choice, and the age of the players. Could someone trip, collide, or misuse the equipment? Could unclear instructions cause a dangerous situation?
Record the Version Clearly
Your game design notebook should show what version you built and what it contained. A good entry might include:
- the date
- the game version number or label
- the materials you used
- the rules included in this version
- what you hoped to learn from testing it
These notes will make Req 6bc and Req 7bc much easier.
Game Design Notebook Planner Resource: Game Design Notebook Planner — /merit-badges/game-design/guide/game-design-notebook-planner/ Games for Change — Student Game Design Examples and resources showing how prototypes help young designers build, test, and improve game ideas. Link: Games for Change — Student Game Design — https://www.gamesforchange.org/🎬 Video: How to Prototype Games so FAST that it feels ILLEGAL — Soul Engine Studio — https://www.youtube.com/watch?v=arxcB32hrHc
Once the prototype exists, the real work begins: test it, revise it, and test it again.
Req 6bc — Test, Change, Repeat
This requirement covers two connected steps in the same testing cycle:
- Req 6b — test your prototype, fix unclear rules and exploits, and make at least one important change
- Req 6c — repeat that process at least two more times and record the results
If Req 6a was about building, this page is about improving. This is where game design becomes iteration — the repeated cycle of testing, learning, changing, and testing again.
Req 6b — First Real Playtest
The first playtest almost always reveals problems. That is good news. It means the players are teaching you about your design.
Compare what happens in play to what you promised in Req 5b. If you said the game would feel fast and exciting, did it? If you said it would create teamwork, did players actually talk and coordinate? If not, that gap matters.
What Problems to Look For
The requirement names four big trouble spots:
- unclear rules — players do not know what they are allowed to do
- holes in the rules — situations happen that the rules do not cover
- dead ends — the game stalls or players run out of meaningful choices
- rule exploits — a player finds a strategy that breaks fairness or fun
When you spot one of these, do not just patch it quickly. Ask what caused it.
Make a Meaningful Change
You must change at least one rule, mechanic, or objective and explain why. A strong change is tied to an observed problem.
For example:
- change the scoring because one strategy dominates
- change turn order because downtime is too long
- change an objective because players are confused about how to win
- change a resource limit because the early game feels too punishing
Record each test round
This makes your notebook useful instead of vague- Version tested: What build or ruleset was used?
- Players: Who played, and how many?
- Expectation: What were you hoping this version would do?
- Problems observed: Confusion, imbalance, boredom, loopholes, dead ends?
- Change made: What did you revise and why?
- Result: Did the change have the effect you expected?
Req 6c — Repeat at Least Two More Times
One fix is not enough. Games improve through repeated testing. When you repeat the cycle, you learn whether your first solution created a new problem, solved the old problem, or revealed a deeper issue underneath.
By the third or fourth test, patterns start to appear. Maybe players always get stuck in the same phase. Maybe everyone loves one part of the game and rushes through the rest. Maybe a rule you thought was central turns out not to matter much at all.
Compare Expected Effect vs. Actual Effect
This is the heart of the requirement. Every change is a prediction. Did it do what you thought it would do?
You might say:
- “I shortened the round timer to increase urgency, and it worked, but it also made younger players feel rushed.”
- “I added a shared team goal to improve cooperation, but one strong player still controlled most decisions.”
- “I simplified the setup, and that change helped immediately.”
That kind of answer shows real design thinking.
In Req 4d, you analyzed how rule changes affected an existing game. Now you are doing the same work on your own design. That connection is the whole point of the badge.
🎬 Video: Making Your First Game: Minimum Viable Product - Scope Small, Start Right - Extra Credits — https://www.youtube.com/watch?v=UvCri1tqIxQ
Next, you will prepare something your players can follow without your help: a real instruction sheet.
Req 7a — Write Clear Instructions
A great game is not truly finished until new players can learn it. That is why instruction writing is a design skill, not just a writing task. If your players cannot set up the game, understand their options, or tell when the game ends, the design will fail even if the idea itself is strong.
This requirement asks for a complete instruction sheet. That means a first-time player should be able to look at your rules, set up the game, and begin without needing you to rescue them every few minutes.
What the Instruction Sheet Must Include
The requirement already gives you the main sections. Make sure your sheet clearly covers:
- the objective of the game
- setup
- how play works
- how the game ends
That sounds short, but each section should be specific enough to remove guesswork.
Put Information in Player Order
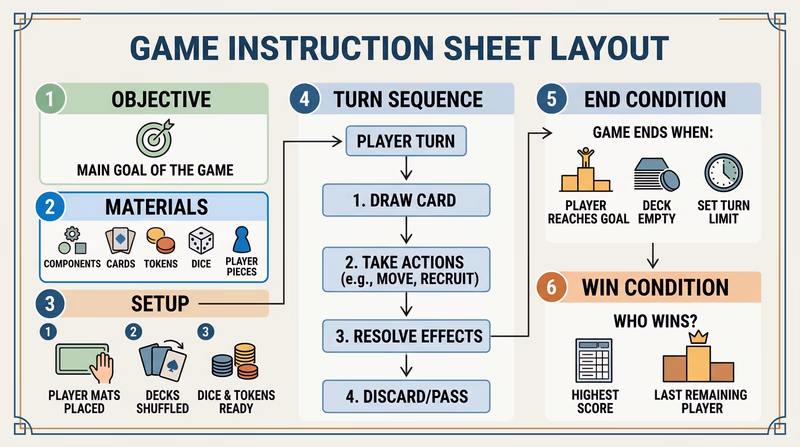
Do not explain the most advanced rule first. The best instruction sheets follow the order players will actually experience.
- What is this game and what are players trying to do?
- What materials are needed?
- How do you set everything up?
- What happens on a turn or during play?
- How does scoring or progress work?
- What ends the game?
- How do you know who won?
This is sometimes called procedural order. It helps the rulebook feel easier because it matches the player’s real questions.
Signs your instruction sheet is clear
A new player should be able to answer these quickly- What am I trying to accomplish?
- What do I need before starting?
- What do I do first?
- What can I do on my turn?
- What am I not allowed to do?
- How does the game end?
Use Plain Language
Short sentences help. So do bullet points, numbered steps, headings, and examples. Avoid writing rules in a way that only makes sense because you already know the game.
If a term is specific to your design, define it the first time you use it. If the setup includes unusual parts, label them clearly. If timing matters, say exactly when something happens.
Anticipate Common Questions
Think back to your playtests in Req 6bc. Where did players get confused? Those moments tell you what the rule sheet must explain better.
A strong instruction sheet often answers questions before they are asked.
Include Examples if Needed
Some rules are much easier to understand with a short example. This is especially true for scoring, tie-breaking, turn order, or special effects. A two-sentence example can save a lot of confusion.
Blind Testing Is Coming Next
This page matters because Req 7bc asks you to blind test your game. That means a new group will use your instructions without coaching from you. If the sheet is weak, the blind test will show it immediately.
Game Design Notebook Planner Resource: Game Design Notebook Planner — /merit-badges/game-design/guide/game-design-notebook-planner/ Write the Docs — Clear Technical Writing Tips General writing guidance that helps with clarity, structure, and user-focused instructions. Link: Write the Docs — Clear Technical Writing Tips — https://www.writethedocs.org/guide/writing/beginners-guide-to-docs/🎬 Video: How to Write a RULEBOOK - Designing a New Board Game — Jesse Ross — https://www.youtube.com/watch?v=eaayIuMtAfQ
Next, you will put your rules to the hardest test yet: handing the game to fresh players and staying silent.
Req 7bc — Blind Test and Reflect
This requirement covers two final design tests that matter a lot:
- Req 7b — let a new group try the game using only your instructions and prototype
- Req 7c — discuss what you learned, share your notebook, and suggest improvements
Blind testing is one of the most honest tools in game design. When you stop explaining and just watch, your design has to stand on its own.
Req 7b — Let New Players Try It Without Help
A blind test shows whether your rules, layout, and components really communicate the game. Players who already know your design are often too forgiving. Fresh players reveal the truth quickly.
As you observe, resist the urge to help. If players misread a rule, skip a setup step, or interpret a card the wrong way, that is data. It does not mean the players failed. It means the design or the instructions need work.
What to observe during a blind test
These moments are especially valuable- Setup confusion: Do players know how to begin?
- Rule misunderstandings: Which instructions get misread or ignored?
- Component confusion: Are cards, zones, or markers hard to interpret?
- Natural strategies: What do players try without being coached?
- Emotional response: Do they seem curious, frustrated, engaged, amused?
Req 7c — Share the Notebook and Reflect

This final conversation is about growth. Your notebook should show the journey from concept to prototype to revised design. Your counselor is not only looking at the finished game. They are also looking at how you learned from the process.
What You Learned About Design
Strong reflections often include lessons like these:
- players do not experience the game the way the designer imagines
- unclear instructions can ruin good mechanics
- small rule changes can have huge effects
- repeated testing is necessary, not optional
- fun must be supported by structure, not just theme
Those lessons connect directly back to Req 4d, where you practiced analyzing how changes affect player experience.
What You Like Most — and What Still Needs Work
Be specific. Maybe you like the teamwork, the pace, the theme, or the way the scoring creates tension. Maybe the part you like most is the one players reacted to most strongly.
Then suggest at least one more change. A thoughtful improvement idea shows that you see design as a process instead of a finished product.
NPR — How Game Designers Use Playtesting General reporting on game design often highlights the role of testing, feedback, and revision in making games better. Link: NPR — How Game Designers Use Playtesting — https://www.npr.org/You have now completed the full design cycle. The last requirement lets you explore real people who teach or work in the field.
Req 8 — Choose a Professional Path
You only need to complete one of these two options. Both are about learning from real people, but they give you different kinds of insight.
- Req 8a focuses on someone working in the game development industry.
- Req 8b focuses on someone who teaches game development and can explain what skills matter in the classroom.
This overview page is here to help you choose the option that fits your access, interests, and goals.
Option Summaries
Req 8a — Interview a Game Developer: Talk with a professional who works in the game development industry. This option helps you understand real studio roles, pipelines, teamwork, deadlines, and how one person’s job fits into a larger production process.
Req 8b — Meet a Game Design Educator: Meet with a professional in game development education. This option helps you learn what skills teachers emphasize, how students build those skills, and what kinds of habits prepare someone for future design work.
How to Choose
Choosing Your Option
Think about access, interests, and what you want to learn- Access: If you already know someone in industry, Req 8a may be easier. If a local teacher, camp leader, club mentor, or college instructor is available, Req 8b may be more practical.
- What you will gain: Req 8a gives you a closer look at real jobs and production teamwork. Req 8b gives you a clearer view of the skills and habits that help people prepare for those jobs.
- Conversation style: Req 8a often focuses on projects, pipelines, and job roles. Req 8b often focuses on learning, creativity, teamwork, and foundational skills.
- Future interest: If you are curious about careers right now, Req 8a may fit better. If you want to improve yourself as a learner and designer, Req 8b may be a great choice.
Whichever option you choose, prepare your questions ahead of time and bring your notebook. Real conversations are much better when you have thought about what you want to learn.
🎬 Video: Game Development for Dummies | The Ultimate Guide — Thomas Brush — https://www.youtube.com/watch?v=eANjGomWZp4
Req 8a — Interview a Game Developer
A finished game may look like one smooth product, but it is usually the result of many specialists working together. Designers, writers, artists, programmers, producers, audio teams, quality assurance testers, community managers, and marketers all contribute in different ways.
This requirement helps you see the real people behind the games. Your goal is not only to learn what one person does all day. It is to understand how their role connects to the larger development process.
Get Permission and Prepare
Because the requirement says you need parent or guardian permission and counselor approval, take care of both before the visit or interview. Then prepare questions that help you learn about both the job itself and its place in the pipeline.
Roles You Might Meet
A “professional in the game development industry” could be many kinds of people, including:
- game designer
- programmer
- technical artist
- animator
- level designer
- producer
- writer or narrative designer
- quality assurance tester
- audio designer
- user experience or interface designer
Each role sees the game from a different angle.
Strong interview questions
Questions that reveal both the job and the process- What does a normal day in your role look like?
- What part of the game do you work on most directly?
- Who do you collaborate with most often?
- At what stage of development does your work matter most?
- What skills are most important for your job?
- What is something people misunderstand about your role?
- How does feedback or playtesting affect your work?
Understand the Pipeline
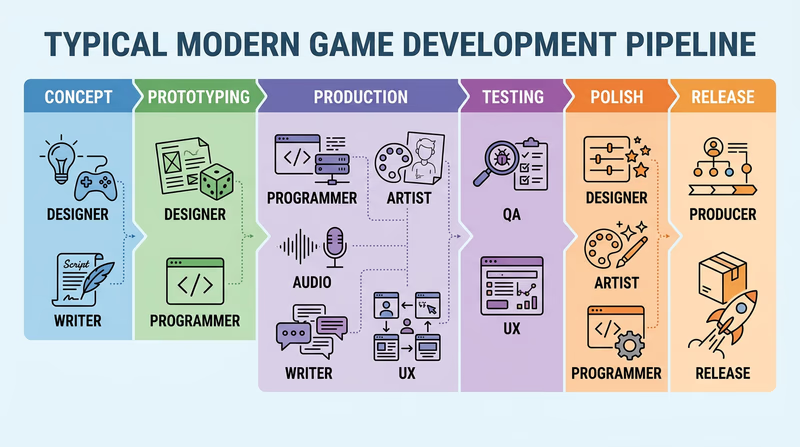
The overall development process usually includes concept development, prototyping, production, testing, revision, polishing, and release. Ask your interviewee where their role is strongest. Some jobs are central early in development. Others become especially important during production or testing.
That big-picture view can help you understand why game development is so collaborative. Even a great idea needs many people to turn it into a finished experience.
Take Notes for the Counselor Discussion
Write down specific examples, not just general statements. If the professional says they spend a lot of time rewriting features after testing, that is more useful than just writing “they improve the game.” Try to capture the role, the responsibilities, the collaborators, and how the person helps move the project forward.
International Game Developers Association A professional organization for game developers with resources about roles, communities, and career pathways in the industry. Link: International Game Developers Association — https://igda.org/ Entertainment Software Association Industry information about how the video game industry works and the many people involved in making games. Link: Entertainment Software Association — https://www.theesa.com/If you would rather focus on learning and teaching skills than on a studio role, the next option may fit you better.
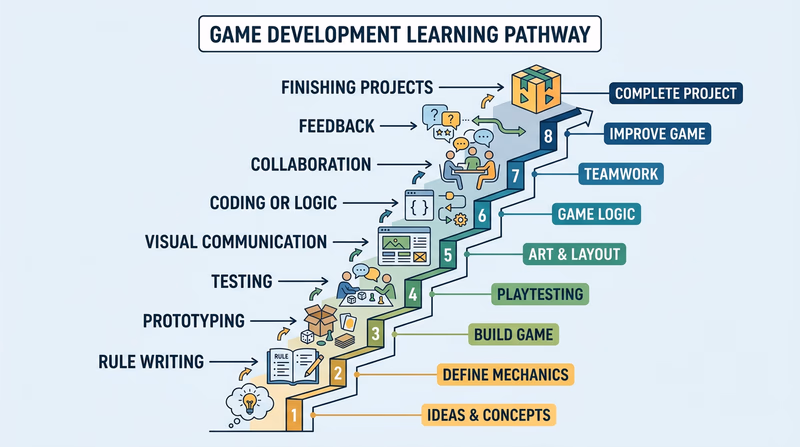
Req 8b — Meet a Game Design Educator
A teacher or mentor in game development education can give you a different kind of insight than an industry interview. Instead of focusing mostly on one job, they can explain what skills students need to practice before they are ready for bigger projects.
This option is a great fit if you want to understand how designers grow. Good game design classes usually teach much more than software. They emphasize communication, iteration, teamwork, systems thinking, and the ability to accept feedback.
Who Counts as a Game Development Educator?
This could include:
- a teacher who runs a game design class
- a college or technical school instructor
- a camp leader or workshop mentor
- an educator who teaches coding, design, or interactive storytelling with game projects
The key is that the person helps learners build game development skills in an organized teaching setting.
Skills Educators Often Emphasize
Most educators highlight a blend of creative, technical, and teamwork skills. Common examples include:
- idea development and brainstorming
- writing clear rules and documentation
- prototyping quickly
- testing and revising
- visual communication
- coding or logic building
- collaboration and communication
- giving and receiving feedback
- finishing projects instead of only starting them
Helpful questions for an educator
These can lead to a strong discussion- What skills do beginners need first?
- What mistakes do students make most often?
- How do you teach playtesting and revision?
- Which classroom habits matter most for long-term success?
- How do students learn to work on teams?
- What matters more: technical skill or design thinking? Why?
Notice the Difference Between Tools and Habits
A lot of people think game development education is mostly about learning software. Tools matter, but educators often care even more about habits. Can students explain an idea clearly? Can they accept criticism without giving up? Can they revise based on evidence? Those habits matter in almost every design environment.
This should sound familiar. Through Req 6bc and Req 7bc, you already practiced some of the most important classroom and industry habits: iteration, observation, and reflection.
Bring It Back to Your Own Experience
A great counselor discussion will connect the educator’s advice to your own badge work. Maybe the educator emphasizes fast prototyping, and you saw why that matters in your own tests. Maybe they stress teamwork, and you saw how player communication changed your blind test.
That connection shows you are not just collecting quotes. You are learning from them.
Games for Change Student Challenge An example of educational game design programs that emphasize creativity, teamwork, iteration, and social impact. Link: Games for Change Student Challenge — https://www.gamesforchange.org/studentchallenge/🎬 Video: The Realities of Life in Game Development — Full Sail University — https://www.youtube.com/watch?v=7U_deCkLt0A
You have finished the required pages. The last page of this guide will show you where to go next if you want to keep learning game design beyond the badge.
Extended Learning
A. Introduction
Congratulations — you have completed the Game Design merit badge! You have analyzed existing games, tested rule changes, built a prototype, revised it through playtesting, and learned how real people teach and build games. That is real design work. If you enjoyed this badge, there are many ways to keep going, from tabletop design clubs to coding camps to museum exhibits about play and invention.
B. Deep Dive: Why Balance Is Harder Than It Looks
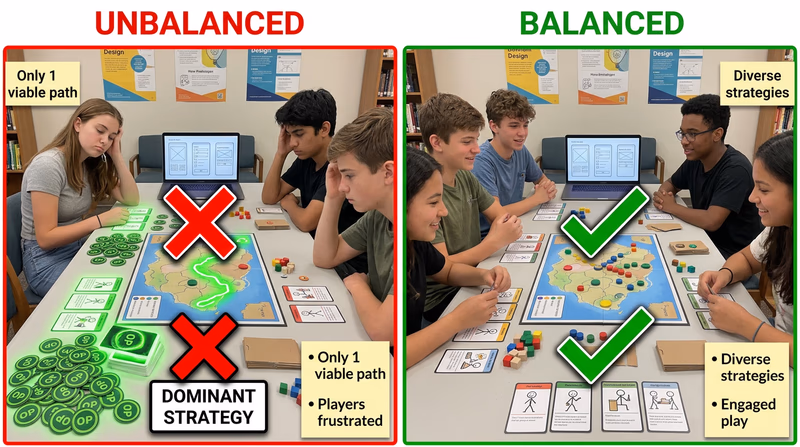
A game feels balanced when players believe their choices matter and no single strategy crushes everything else too easily. That sounds simple, but balance is one of the hardest jobs in design. Even small changes can ripple through the whole system. If one card costs too little, one path scores too quickly, or one player role has too many advantages, the game may still function while feeling unfair.
Designers often learn that perfect balance is not always the goal. In some party games, a little chaos adds humor. In some story-driven games, uneven powers may fit the theme. The real question is whether the game creates the experience it promises. If the game says it is competitive and strategic, players should not feel that luck decides everything. If it says it is cooperative, one dominant player should not end up making every important decision.
A useful balance habit is to test edge cases. Ask what happens if a player repeats the strongest-looking strategy every round. Ask what happens if someone falls behind early. Ask whether beginners and experienced players both have a way to stay engaged. These questions reveal weak spots before players turn them into frustrations.
C. Deep Dive: How Digital and Tabletop Design Borrow From Each Other
People sometimes divide games into “digital” and “non-digital” as if they have nothing in common. In reality, designers in both areas borrow ideas constantly. Tabletop games use progression systems, unlocks, and branching stories that feel video-game inspired. Digital games use card mechanics, drafting, deckbuilding, and turn structures that grew from physical games.
That overlap is useful for you as a learner. Even if you do not know how to code yet, you can still practice the heart of design through paper prototypes. You can explore pacing, objectives, balance, and replay value with simple materials. Later, if you move into digital design, those lessons still matter. The platform changes, but player psychology does not.
This is one reason many professional digital designers still prototype on paper. It is faster to test a system with cards and notes than to spend weeks building a feature in software that turns out not to be fun.
D. Deep Dive: Games That Teach, Train, and Solve Problems
Games are not only for entertainment. They can also teach history, model science systems, build teamwork, and help people practice difficult decisions in safer environments. Teachers use games to make abstract ideas more concrete. Emergency responders use simulations to practice procedures. Scientists and planners use game-like models to explore possible outcomes.
The challenge is that educational games still need real play value. If the game only repeats facts without meaningful decisions, players stop seeing it as a game. The strongest learning games let players test ideas, see results, and try again. That active loop makes the lesson stick.
If you want to keep exploring after this badge, designing a small educational game can be a great next project. Pick a subject you care about and ask what decisions would make that topic come alive for players.
E. Real-World Experiences
Board Game Cafes and Local Game Stores
Game Design Camps and Workshops
Museum Exhibits About Play and Design
Local Game Jams or Student Showcases
F. Organizations
A professional community for people across many game development roles, with chapters, resources, and career information.
Organization: International Game Developers Association — https://igda.org/
Supports games that teach, inspire, and address real-world issues, with student programs and design challenges.
Organization: Games for Change — https://www.gamesforchange.org/
A museum devoted to play, games, toys, and the history of interactive entertainment.
Organization: The Strong National Museum of Play — https://www.museumofplay.org/
Provides information about the video game industry, the people who work in it, and the impact of games in culture and learning.
Organization: Entertainment Software Association — https://www.theesa.com/