Gardening Merit Badge — Complete Digital Resource Guide
https://merit-badge.university/merit-badges/gardening/guide/
Introduction & Overview
A packet of seeds does not look like much. It is small, dry, and easy to overlook. But with the right soil, water, sunlight, and care, that packet can turn into salad greens, bright flowers, pollinator habitat, or even food for your family. Gardening is one of the clearest ways to see how living things respond to attention and time.
The Gardening merit badge teaches you how plants grow, how to care for them safely, and how gardens connect people to science, nutrition, and the outdoors. You will grow real plants, solve real problems, and learn how gardens support pollinators, wildlife, and healthy communities.
Then and Now
Then — Gardens for Survival and Skill
For thousands of years, people gardened because they had to. Families grew beans, squash, grains, herbs, and fruit close to home because fresh food was not shipped from across the continent. Monasteries kept herb gardens for medicine. Indigenous peoples across the Americas developed deep knowledge of growing systems suited to local climates. During the world wars, millions of people planted “Victory Gardens” to help feed their communities and reduce pressure on the food supply.
- Purpose: Grow food, medicine, and useful plants close to home
- Tools: Hand tools, saved seed, compost, local knowledge
- Mindset: Work with the seasons and make the most of what your land can provide
Now — Gardens for Food, Habitat, and Community
Today, people still garden for fresh food, but that is only part of the story. School gardens teach science. Native plant gardens support bees and butterflies. Community gardens help neighborhoods share space and produce. Hydroponic systems let people grow plants indoors. Even a few containers on a porch can become a working garden.
Modern gardening blends old skills with new ideas. Gardeners now think about pollinator decline, soil health, water conservation, and local food systems — not just what looks good in a flower bed.
- Purpose: Grow food, support wildlife, learn science, and build healthier places to live
- Tools: Raised beds, seed-starting trays, drip irrigation, compost bins, hydroponic systems
- Mindset: Grow thoughtfully, observe carefully, and improve the ecosystem around you
Get Ready! This badge puts you in charge of living things. You will plan, plant, observe, troubleshoot, and stick with a project long enough to see results. That is what makes gardening satisfying — and what makes it real.
Kinds of Gardening
Gardening is not just one activity. Different gardeners focus on different goals, spaces, and types of plants.
Vegetable Gardening
Vegetable gardens are built to produce food you can harvest and eat. They may include tomatoes, beans, lettuce, peppers, carrots, squash, or dozens of other crops. Vegetable gardening teaches timing, soil preparation, watering, and harvest planning. It also makes nutrition feel more real because you see exactly where food comes from.
Flower Gardening
Flower gardens focus on color, fragrance, and beauty, but they do much more than decorate a space. Many flowers attract pollinators such as bees, butterflies, and hummingbirds. Some bloom quickly from seed, while others need more planning and patience. Flower gardening is a great way to learn about plant life cycles and seasonal bloom times.
Pollinator and Wildlife Gardening
These gardens are designed to support living things other than people. Native flowering plants provide nectar and pollen. Shrubs and grasses offer shelter. Shallow water sources help birds and insects. A pollinator garden may look beautiful, but its real job is to become habitat.
Container Gardening
Not everyone has space for in-ground beds. Container gardening lets you grow plants on patios, balconies, porches, and driveways. Containers warm up quickly, drain differently than garden soil, and often need more frequent watering, but they make gardening possible in small spaces.
Specialty Gardening
Some gardeners focus on a specific method or environment. Hydroponic gardens grow plants without soil. Water gardens create habitats in tubs or ponds. Composting and vermicomposting turn waste into useful material for the garden. Beekeeping supports pollination and honey production. These systems show that gardening can be both creative and scientific.
You now have a picture of what gardening includes. Next, start where every good gardener starts: working safely and knowing how to handle problems in the garden.
Req 1a–1b — Garden Safety & First Aid
This requirement covers two basic skills every gardener needs before planting much of anything:
- How to recognize hazards in the garden
- How to prevent and treat common gardening injuries and health problems
A garden may look peaceful, but it contains plenty of ways to get hurt if you stop paying attention. Sharp tools, hidden thorns, hot sun, heavy lifting, biting insects, and chemical products can all turn a fun work session into a problem fast. Safe gardening is not about being nervous. It is about noticing hazards early and building habits that keep small problems from becoming serious ones.
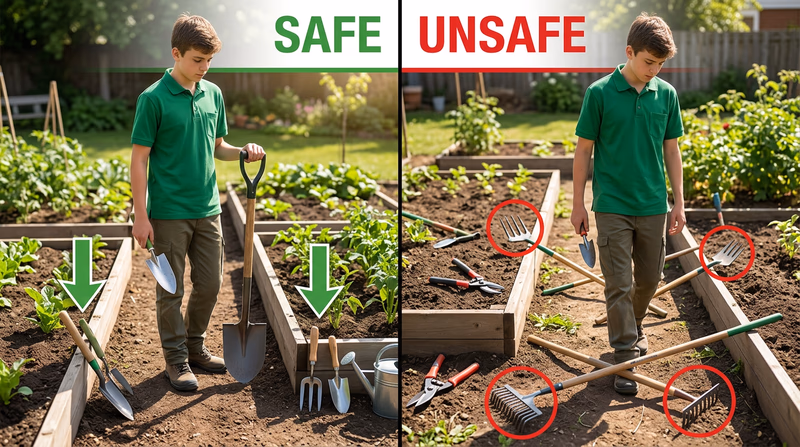
Requirement 1a: Garden Hazards and Prevention
The Most Common Gardening Hazards
Sharp Tools and Blades
Trowels, pruners, hoes, shovels, and knives are useful because they cut, dig, and scrape. That also means they can cut skin quickly. Many injuries happen when someone leaves a tool on the ground, carries it carelessly, or tries to use the wrong tool for the job.
Good prevention starts with simple habits. Carry pointed tools with the sharp end down. Keep tools in one work area instead of scattering them around the bed. Use gloves when appropriate, but do not assume gloves make you invincible. Clean and store tools after use so rusty edges and stuck dirt do not create extra risk.
Heat, Sun, and Dehydration
Gardening often happens outdoors in warm weather, and many Scouts keep working longer than they realize because they are focused on the job. Heat exhaustion can sneak up on you. Early signs include heavy sweating, headache, dizziness, muscle cramps, weakness, nausea, and irritability.
Prevent heat problems by drinking water before you feel thirsty, taking breaks in shade, wearing a hat, and working during cooler morning or evening hours when possible. If someone becomes dizzy, weak, or overheated, stop work immediately, move them to shade, loosen tight clothing, give cool water if they are awake and alert, and ask an adult for help.
Repetitive Motion and Heavy Lifting
Gardening can also strain your body. Repeated bending, twisting, digging, and carrying bags of soil can injure your back, shoulders, knees, or wrists. Even if you are strong enough to move something, poor lifting technique can still cause pain.
Use your legs when lifting. Keep loads close to your body. Break big loads into smaller ones. Ask for help with heavy bags, large pots, or wheelbarrows on slopes. If a job feels awkward, slow down and rethink how to do it.
Thorny Plants, Splinters, and Hidden Objects
Rose stems, berry canes, wooden stakes, broken pots, and wire cages can scratch or puncture skin. Soil itself may hide sharp stones, glass, nails, or metal fragments in neglected areas.
Before you reach into a thick plant or brush pile, look first. Wear work gloves for thorny or rough jobs. Closed-toe shoes matter too. Sandals are a bad idea in nearly every garden.
Insects, Stings, and Allergic Reactions
Gardens attract pollinators, which is great for plants but means you may be near bees and wasps. Mosquitoes, ticks, ants, and spiders may also be present depending on where you work.
Most bites and stings are annoying rather than dangerous, but severe allergies are different. Anaphylaxis is a fast, serious allergic reaction that can include trouble breathing, swelling of the face or throat, hives, vomiting, and dizziness. A person with a known severe allergy may carry an epinephrine auto-injector.
🎬 Video: How to Be Safe in the Garden — https://youtu.be/XWNaWVOar3Q?si=5bJv6elbMcRZ92oX
Pesticides, Fertilizers, and Irritating Plants
Not every garden uses chemical products, but many do. Fertilizers can irritate skin and eyes. Pesticides can be dangerous if breathed in, swallowed, or absorbed through skin. Even some plants can irritate skin — poison ivy is the classic example, but sap from some ornamentals can also cause rashes.
The safest rule is this: use the least hazardous method that works. Often that means hand-pulling weeds, removing pests by hand, improving plant health, or using barriers before reaching for a chemical spray. If a product is used, read the label first, wear the recommended protection, and wash hands after handling it.
🎬 Video: Pesticide Safety — https://youtu.be/fMidlx7VB0A?si=v5o_p4iwXa6Dxy8A
Requirement 1b: Preventing and Treating Common Garden Health Problems
Preventing Common Garden Injuries
Before You Start Gardening
A quick safety routine that prevents most problems- Wear closed-toe shoes: Protect your feet from tools, thorns, and dropped pots.
- Dress for the weather: Hat, sunscreen, and light layers for heat; long sleeves if insects or plant irritation are a concern.
- Use gloves for the right tasks: Helpful for thorny plants, rough wood, and dirty soil, but still work carefully.
- Check your tools: Loose handles, rusty blades, or cracked plastic make accidents more likely.
- Know your products: Read fertilizer or pesticide labels before opening them.
- Keep water nearby: Hydration is part of garden safety, not an extra.
Common Garden Health Problems and First Aid
Cuts and Scratches
Wash the area with clean water and mild soap. Apply pressure if it is bleeding. Cover it with a clean bandage. Watch for signs of infection such as redness that spreads, warmth, swelling, pus, or increasing pain.
Small scratches are common in the garden, especially around tomato cages, thorny stems, and rough wood. They seem minor, but dirty scratches should still be cleaned because soil carries bacteria.
Puncture Wounds
Puncture wounds are more serious than they look because the opening is small but the damage can go deep. A nail, thorn, or sharp stake can drive dirt and bacteria below the skin. Wash the wound, cover it, and tell an adult right away. Deep punctures should be evaluated by a medical professional. Tetanus protection may matter.
Insect Bites and Stings
For ordinary bites or stings, wash the area, use a cold pack to reduce swelling, and avoid scratching. If a bee stinger is still present, remove it promptly by scraping it away with a fingernail or card edge. Watch for worsening swelling or allergic symptoms.
Heat Reactions
Heat cramps, heat exhaustion, and heat stroke are on the same danger spectrum. The response is always to stop, cool down, hydrate if appropriate, and get help early. Do not try to “push through” heat illness.
Exposure to Pesticides and Fertilizers
If a product gets on skin, rinse with lots of water. If it gets in the eyes, flush the eyes with clean water right away and keep flushing. If a product is swallowed or inhaled, get adult help immediately and use the label directions or Poison Control guidance. The label is not decoration — it tells you exactly what to do in an exposure emergency.
Thinking Like a Safe Gardener
The best gardeners pay attention before something goes wrong. They notice the weather, inspect their work area, put tools away, and stop when they are too tired or too hot to work carefully. That same observation skill will help you in later requirements when you track plant growth, pests, and pollinators.
If you have earned or are working on First Aid, some of this will feel familiar. The difference here is context. In a garden, prevention matters just as much as treatment. A Scout who remembers water, gloves, safe lifting, label reading, and careful tool handling will avoid many injuries altogether.
CDC — Protect Yourself From Tick Bites Practical guidance for avoiding ticks while working outdoors in grass, brush, and garden spaces. Link: CDC — Protect Yourself From Tick Bites — https://www.cdc.gov/ticks/prevention/index.html Poison Control What to do if someone is exposed to a chemical, plant, or garden product. Includes the U.S. Poison Help number. Link: Poison Control — https://www.poison.org/You now know how to work more safely and how to respond when common garden injuries happen. Next, put that safety mindset to work by growing vegetables from both seeds and seedlings.
Req 2a — Growing Vegetables
This requirement has two hands-on growing projects:
- Grow six vegetables through harvest
- Use both seeds and seedlings so you experience each starting method
You can read about gardening forever, but Requirement 2a makes you prove you can actually grow food. That means choosing crops wisely, matching them to your season and space, and staying consistent long enough to reach harvest. This is where gardening turns from an idea into a responsibility.
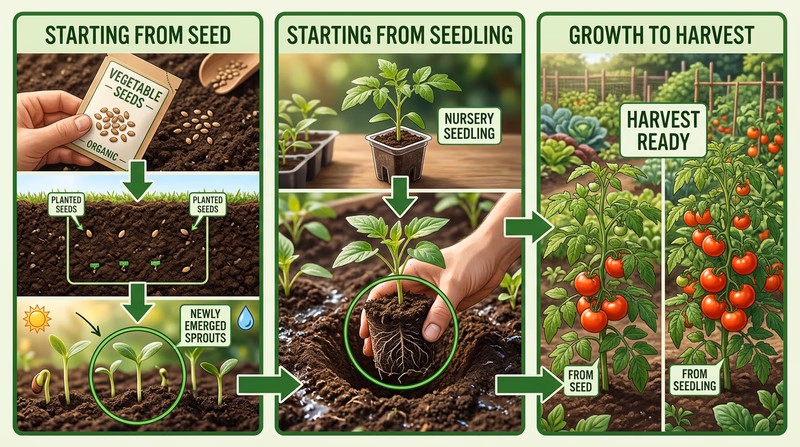
Seeds vs. Seedlings
A seed is the plant’s starting package. It contains a tiny embryo and stored food. Starting from seed teaches you germination, patience, and timing. It usually costs less, but it takes more time and close attention early on.
A seedling is a young plant that has already sprouted. Starting with seedlings gives you a head start and lets you grow crops that need a longer season. It also teaches transplanting, root care, and how to help a plant adjust to a new environment.
For this requirement, you need both experiences because gardeners use both methods in real life.
🎬 Video: Seed Starting 101 — https://youtu.be/bRWac1OpxPY?si=h96A-L4r9Yb5Qcy3
Choosing Six Vegetables That Make Sense
Do not pick crops only because they sound interesting. Pick vegetables that fit your climate, available light, and the amount of time you have. A smart list often includes fast growers plus one or two longer-term plants.
Good seed-started choices often include radishes, lettuce, bush beans, peas, carrots, or spinach. Common seedling choices include tomatoes, peppers, cucumbers, squash, or broccoli, depending on your season.
You are not required to grow the “hardest” vegetables. You are required to grow six successfully. A Scout who grows six practical crops well is showing more gardening skill than one who picks fancy plants and loses half of them.
How to Pick Your Six Vegetables
Build a realistic plan before you plant- Include cool-season or warm-season crops that match your current weather.
- Make sure your site gets enough sun. Most vegetables need 6–8 hours of direct sun.
- Choose crops with different growth speeds so you can observe change over time.
- Ask your counselor if container growing is appropriate for your setup.
- Avoid overcrowding. Six vegetables does not mean six huge beds.
What Vegetables Need to Reach Harvest
Sunlight
Most food crops need strong light. Leafy greens can tolerate a bit more shade than tomatoes or peppers, but nearly all vegetables do best in full sun. If your garden gets only partial sun, choose crops that can handle it and be realistic about yield.
Soil
Healthy soil should drain well but still hold moisture. It should feel crumbly rather than packed hard like clay or loose like dry dust. Compost improves many soils by adding organic matter and helping roots grow through the ground more easily.
Water
Vegetables need consistent moisture. Too little water slows growth and causes bitterness, wilting, or blossom drop. Too much water can rot roots and invite disease. Water deeply enough that moisture reaches the root zone instead of just wetting the surface.
Space
Crowded plants compete for light, air, nutrients, and water. Crowding also traps moisture and makes disease spread more easily. Read plant tags or seed packets and believe them. Mature spacing matters.
Time and Observation
Vegetable gardening is not a one-day task. You need to check for weeds, moisture, pest damage, yellowing leaves, and ripening produce. Harvesting at the right time matters too. A zucchini picked at the right time tastes much better than one left to become a giant club.
Starting Three Vegetables From Seed
Plant seeds at the proper depth. A common rule is to plant a seed about two to three times as deep as the seed is wide, but always check the packet. Tiny seeds should be shallow. Large beans and peas can go deeper.
Keep the seedbed evenly moist during germination. That does not mean soggy. Seeds need water and oxygen. If the soil crusts over or dries out repeatedly, young sprouts may fail.
Once seedlings emerge, thin them if needed. Thinning feels harsh at first, but crowded seedlings will never reach full size. Giving the strongest plants room is part of successful gardening.
Transplanting Three Seedlings
Seedlings need a gentle transition. If they came from a greenhouse or indoor shelf, harden them off first by exposing them gradually to outdoor sun, wind, and temperature changes over several days.
When transplanting, water the plant before moving it, handle it carefully, and disturb the roots as little as possible. Plant it at the correct depth and water it in well so the soil settles around the roots. Watch for transplant shock in the first few days — drooping, slowed growth, or sun stress.
Reaching Harvest
Harvest is more than pulling food off a plant. It is the point where flavor, texture, and maturity come together. Leaf crops like lettuce may be harvested as baby leaves or full heads. Root crops need enough time to size up underground. Fruiting crops such as tomatoes and cucumbers need to be picked regularly once they begin producing.
This is also where observation matters. Look for color change, size, firmness, and the days-to-harvest range listed on the seed packet or tag. Talk with your counselor about what worked and what did not. Maybe one crop loved your conditions while another struggled. That is useful information, not failure.
What to Observe and Discuss
Your counselor does not just want proof that a vegetable existed. They want to hear what you noticed through the process. Good observations include:
- Which vegetables sprouted fastest
- Which plants needed the most water
- How seedlings responded after transplanting
- Which plants attracted insects
- Whether weather helped or slowed growth
- How long it took to reach harvest
- What you would change next time
Those observations prepare you well for Req 4, where you will test germination scientifically, and for Req 7, where you will identify pests and solutions.
University of Minnesota Extension — Growing Vegetables Reliable growing guides for common vegetables, including planting depth, spacing, and harvest timing. Link: University of Minnesota Extension — Growing Vegetables — https://extension.umn.edu/planting-and-growing-guides/growing-vegetablesGrowing vegetables teaches you how food crops respond to your care. Next, you will apply many of the same ideas to flowers, where your goal is not harvest but strong growth and blooming.
Req 2b — Growing Flowers
Flowers ask you to notice a different kind of success than vegetables do. With vegetables, you are usually aiming for something to eat. With flowers, you are watching for buds, bloom timing, color, plant shape, and pollinator activity. That makes this requirement a great test of patience and observation.
Why Grow Flowers?
Flower gardens do more than look nice. They attract pollinators, improve landscapes, provide cut flowers, and help gardeners learn about annuals, perennials, bloom cycles, and plant care. Some flowers bloom fast and loudly, while others spend weeks building roots and leaves before putting on a show.
If you grow vegetables and flowers together, you may notice that flowers also make the whole garden work better. Blooming plants attract bees and other pollinators that help nearby crops. They can also bring in beneficial insects that feed on garden pests.
Choosing Six Flowers Wisely
As with vegetables, pick flowers that fit your season and conditions. Good seed-grown options often include zinnias, marigolds, cosmos, sunflowers, or nasturtiums. Common seedling choices might include petunias, impatiens, salvia, begonias, or bedding annuals from a nursery.
The main goal is to grow three from seed and three from seedlings all the way to flowering. That means your choices should have a realistic chance of blooming while you are working on the badge.
🎬 Video: How to Start Seeds Indoors — https://youtu.be/kcLMLyTAKmo?si=Suj-BOnu6B6-ELxu
Questions to Ask Before Choosing Flowers
Strong choices make this requirement much easier- Is this flower an annual or perennial?
- How much sun does it need?
- How tall and wide will it get?
- How long does it usually take to bloom?
- Is it a good choice for containers, beds, or borders?
- Will it help pollinators in your area?
Growing Flowers From Seed
Flower seeds vary a lot. Some, like marigolds and zinnias, are easy starters. Others are slower or fussier. Read the packet for depth, spacing, and timing. Tiny flower seeds are especially easy to bury too deeply.
As seedlings emerge, watch for light needs. Weak, stretched seedlings usually mean they are reaching for more light. Rotate trays if needed, thin crowded sprouts, and keep air moving so stems stay stronger.
Starting flowers from seed gives you a close look at the whole life cycle: germination, leaf growth, bud formation, blooming, and sometimes seed formation again later.
Growing Flowers From Seedlings
Seedlings let you jump closer to bloom time, but they still need care. Hardening off matters here too. A greenhouse-grown petunia can get scorched fast if moved directly into strong outdoor sun.
When planting seedlings, think about the mature plant, not just the small one in your hand. Crowded flower beds may look full at first but can become tangled and disease-prone later. Good spacing helps air move through the bed and gives blooms room to develop.
Getting Plants to Bloom
Flowers usually need the same basics as vegetables — light, water, nutrients, and space — but bloom production depends especially on the right amount of sun and proper timing. Many flowering annuals need full sun to produce their best color and quantity of blooms.
If a flower plant stays green but never blooms well, ask a few questions:
- Is it getting enough sun?
- Was it planted too early or too late for the season?
- Did it get too much nitrogen fertilizer, which can produce leaves instead of flowers?
- Is it stressed by drought, crowding, or pests?
What to Observe Through Flowering
The requirement says to grow the plants through flowering, so your observations should include what happened before and during bloom. Notice when buds first formed, how long they took to open, whether the flower color matched the tag or packet, and which flowers attracted bees or butterflies.
Compare your seed-grown flowers to your transplanted seedlings. Which grew faster? Which handled weather better? Which bloomed first? Seedlings may start ahead, but some seed-grown flowers catch up quickly once conditions are good.
Avoiding Common Flower-Growing Problems
Flower gardeners run into many of the same problems vegetable gardeners do: poor soil, under- or overwatering, crowding, and pests. But flower gardens also face a few appearance-related issues that matter more when your goal is blooming.
Leggy plants usually need more light. Mildew often appears when air circulation is poor. Chewed petals may mean beetles or caterpillars are feeding. Buds that drop before opening may mean the plant got stressed by heat or inconsistent moisture.
Blooming as a Sign of Plant Health
A flower is a sign that the plant has reached a new stage of growth. That is why this requirement matters. A plant that flowers has moved beyond survival into reproduction. For a gardener, that means your care has supported a full, important part of the life cycle.
This page also connects naturally to Req 6, where you will study pollinators. Once you have seen bees visiting your own flowers, that later discussion becomes much more real.
Royal Horticultural Society — Annuals and Biennials Clear explanations of common flowering plant types and how gardeners use them in beds and containers. Link: Royal Horticultural Society — Annuals and Biennials — https://www.rhs.org.uk/plants/types/annuals-biennialsYou have now grown flowers all the way to bloom. Next, step back from cultivation and think about what garden crops contribute to nutrition and healthy eating.
Req 3abc — Nutritional Value of Garden Crops
This requirement covers three groups of crops that gardeners commonly grow and eat:
- Root or tuber crops
- Vegetables that bear above the ground
- Fruits
When gardeners talk about a crop being “worth growing,” they often mean more than taste or appearance. They also mean nutrition. This requirement is asking you to connect gardening to health by understanding what different crops contribute to the human diet.
What “Nutritional Value” Really Means
Nutritional value includes the vitamins, minerals, fiber, water, and energy a food provides. It can also include how that crop helps your body function — for example, supporting vision, digestion, immune health, or steady energy.
You do not need to memorize a giant chemistry chart. What you do need is a clear way to explain why certain crops are useful foods and what each one contributes.
Root and Tuber Crops
Root and tuber crops grow underground and store energy for the plant. Because of that, many are rich in carbohydrates, but they can also provide fiber, vitamins, and important minerals.
Potatoes
Potatoes are often treated like junk food because of fries and chips, but the plain potato itself is a useful food. It provides carbohydrates for energy, potassium for muscle and nerve function, vitamin C, and some fiber, especially when eaten with the skin.
🎬 Video: Potatoes — https://youtu.be/3qCh8KZw_e0?si=f9aIa5z8f8LDDeLm
Sweet Potatoes
Sweet potatoes are especially known for beta carotene, which the body converts into vitamin A. Vitamin A supports vision, immune function, and skin health. Sweet potatoes also provide fiber and carbohydrates.
🎬 Video: Sweet Potatoes — https://youtu.be/o7ZwuSd8KRg?si=EEj5qNHCID4FDxYX
Taro
Taro is a starchy tuber grown widely in tropical and subtropical regions. It provides carbohydrates for energy and also contributes fiber and minerals. Taro must be cooked properly before eating because raw taro can irritate the mouth and throat.
🎬 Video: Taro — https://youtu.be/0VjgXZBKfuQ?si=Uw0UYQkPgWfgqQfx
Vegetables That Bear Above the Ground
These crops develop their edible parts above the soil line. Nutritionally, they often contribute water, fiber, vitamins, and protective plant compounds called phytonutrients.
Lettuce
Lettuce is low in calories and high in water, which makes it refreshing and useful for hydration. Darker leafy lettuces also provide vitamin K, folate, and some vitamin A. On its own, lettuce is not a high-energy food, but it adds volume, freshness, and nutrients to meals.
🎬 Video: Lettuce — https://youtu.be/kzX-0rUbkOo?si=9hpUmjCR-dFy9sTi
Tomatoes
Tomatoes provide vitamin C, potassium, and the antioxidant lycopene, which gives red tomatoes their color. Lycopene has been studied for its role in protecting cells from damage. Tomatoes are also versatile because they can be eaten raw or cooked.
🎬 Video: Tomatoes — https://youtu.be/niTBMlWtW5w?si=gksvt0kr-ZljJtEh
Cucumbers
Cucumbers are mostly water, which makes them hydrating and crisp. They also provide small amounts of vitamin K and other nutrients. Their nutritional value is not about being calorie-dense. It is about hydration, freshness, and variety in a healthy diet.
🎬 Video: Cucumbers — https://youtu.be/MVXr7HEMQMU?si=2fpKBoE4NAxMTNdx
Fruits
Fruits are often sweet because they contain natural sugars, but that does not make them unhealthy. Whole fruits also provide fiber, water, vitamins, and protective plant compounds.
Apples
Apples provide fiber, especially in the skin, along with vitamin C and plenty of water. Their fiber helps digestion and can help you feel full longer than a sugary snack with no fiber.
🎬 Video: Apples — https://youtu.be/0yEPKXlYQqQ?si=MLy5YBr_XZ34hQEN
Oranges
Oranges are famous for vitamin C, which supports immune function and helps the body repair tissue. They also provide water, fiber, and folate.
🎬 Video: Oranges — https://youtu.be/DkxhGscNC18?si=iny8kROTvx7-PKkq&t=1
Grapes
Grapes provide water, natural sugars for quick energy, and antioxidants, including compounds that help protect cells. Like many fruits, their value is strongest when eaten as whole fruit rather than heavily sweetened products.
🎬 Video: Grapes — https://youtu.be/NLS15CrmEYU?si=6Sl4-RSS8dd2d0BS
Comparing the Three Crop Groups
| Crop Group | Main Strengths | Common Nutrients |
|---|---|---|
| Root/tuber crops | Energy storage foods | Carbohydrates, fiber, potassium, vitamin A or C depending on crop |
| Above-ground vegetables | Low-calorie nutrient density | Water, fiber, vitamin K, vitamin C, folate, antioxidants |
| Fruits | Sweetness plus hydration and vitamins | Vitamin C, fiber, water, natural sugars, antioxidants |
This table is helpful when you explain nutritional value to your counselor. You are showing that different crops do different jobs in a healthy diet. No single crop does everything.
Why This Matters to Gardeners
A gardener who understands nutrition makes better planting choices. If your family wants more salad greens, vitamin-rich roots, or fresh fruit snacks, you can choose crops that support those goals. A garden can become part of your meal planning, not just your landscaping.
This requirement also connects back to Req 2a. When you grow vegetables yourself, the nutritional discussion becomes personal. You are not just talking about potatoes or tomatoes in theory. You may be eating something you raised.
USDA MyPlate — Vegetables A simple guide to vegetable groups, nutrients, and why variety matters in a healthy eating pattern. Link: USDA MyPlate — Vegetables — https://www.myplate.gov/eat-healthy/vegetables USDA MyPlate — Fruits An easy-to-understand overview of the nutritional benefits of fruits and how they fit into balanced meals. Link: USDA MyPlate — Fruits — https://www.myplate.gov/eat-healthy/fruitsYou have now connected gardening to nutrition. Next, move into a more scientific gardening skill: testing seeds to see how well they germinate and thinking about why some fail.
Req 4 — Seed Germination Testing
Gardeners do not just plant seeds and hope. Good gardeners test, compare, and learn. This requirement introduces one of the most practical science skills in gardening: checking whether seed is still alive and likely to grow well before you depend on it for a project.
What Germination Means
Germination is the moment a seed begins growing. The seed coat softens, the embryo wakes up, and the first root pushes out. If enough seeds germinate, you can trust the packet or saved seed lot. If very few sprout, you know the seed is old, damaged, or stored poorly.
A germination test does not tell you everything about future plant health, but it gives you a very useful starting point: what percentage of your seeds are likely to sprout under decent conditions.
🎬 Video: Seed Germination Test — https://youtu.be/E0jzPVGiKHs?si=6sRjzeuX1P0CgsSA
Why 100 Seeds?
Using 100 seeds makes the math easy. If 87 sprout, your germination rate is 87%. If 64 sprout, your rate is 64%. That lets you focus on observation instead of complicated calculation.
This is also how gardeners and seed companies think. Germination is commonly described as a percentage because no seed batch is perfect.
A Simple Way to Run the Test
Many gardeners use the paper towel method because it makes the results easy to see.
- Count out 100 seeds.
- Moisten a paper towel so it is damp but not dripping.
- Spread the seeds so they are not all touching.
- Fold the towel over them and place it in a plastic bag or container that helps hold moisture.
- Keep the setup in a location with the right temperature for that crop.
- Check daily for moisture and sprouting.
- Count how many seeds germinate by the expected time.
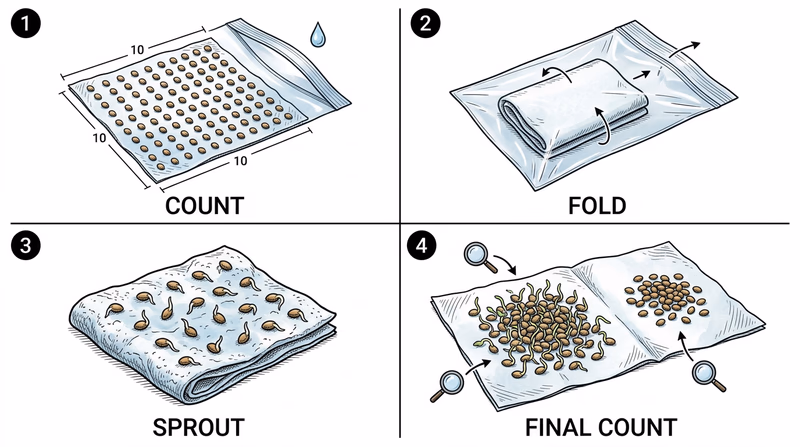
Some seeds sprout in a few days. Others take longer. Use a reasonable timeframe for the crop you chose.
What Counts as Germinated?
Use a consistent standard for your 100-seed test- The seed coat has opened.
- A root tip has clearly emerged.
- The sprout is alive, not moldy or collapsed.
- You count each seed once, even if growth is slow after that.
Calculating the Germination Percentage
The formula is simple:
Number of seeds that germinated ÷ 100 = decimal form
Move the decimal two places to get the percentage.
With 100 seeds, you can usually skip the decimal step and just say the number of seeds that sprouted equals the percentage. For example:
- 92 germinated = 92% germination
- 75 germinated = 75% germination
- 41 germinated = 41% germination
That percentage helps you make decisions. A very high rate means the seed is vigorous and likely dependable. A low rate means you may need to sow more thickly or avoid using that seed lot altogether.
Why Some Seeds Fail to Germinate
This part of the requirement matters just as much as the counting. Not all failures mean the seed was “bad” in the same way. Different causes point to different lessons.
Seed Age
Many seeds lose viability over time. Some stay useful for years if stored well. Others decline faster. Old seed may still germinate, but at a lower percentage.
Poor Storage
Heat, moisture, and humidity damage seed. A seed packet forgotten in a hot garage or damp shed may lose viability much faster than one kept cool and dry.
Wrong Moisture Level
Seeds need water to start metabolic activity, but too much water can deprive them of oxygen or encourage rot and mold. Too little water leaves them dormant.
Temperature Problems
Different crops germinate best in different temperature ranges. If the environment is too cold or too hot, germination may be delayed or reduced.
Mechanical Damage or Immature Seed
Crushed seed, cracked seed coats, or seed collected before it was fully mature may never germinate properly.
Natural Variation
Even in a good batch, a few seeds may simply be weaker than others. Living things vary.
What Your Results Mean for Gardening
Suppose your germination rate is only 55%. That does not automatically mean the packet is useless. It means you should adjust expectations. You may need to plant extra seed, switch to fresher seed, or improve storage next time.
If your rate is 90% or higher, that is a strong sign your seed is in good shape. That kind of information is especially useful when planning Req 2a or a longer project in Req 8.
Thinking Like a Plant Scientist
This requirement is a great example of why gardening overlaps with science. You are forming a question, running a test, collecting results, and interpreting them. You are also learning to separate opinion from evidence. Instead of saying, “I think these seeds are probably fine,” you can say, “I tested 100 seeds and 83 germinated, so I know this seed lot is still pretty reliable.”
Iowa State University Extension — Testing Vegetable Seeds for Germination A straightforward guide to running a home germination test and interpreting the results. Link: Iowa State University Extension — Testing Vegetable Seeds for Germination — https://yardandgarden.extension.iastate.edu/how-to/test-germination-saved-seedYou have now tested seed like a gardener and a scientist. Next, step outside your own plot and learn from professionals, educators, and growers in the wider gardening world.
Req 5 — Visiting Garden Experts
A great gardener learns from plants, but also from people who work with plants every day. Requirement 5 gets you out of your own yard and into places where gardening knowledge is organized, tested, and shared. This visit should give you ideas you could not get from guessing on your own.
What These Places Actually Do
County Extension Office
An extension office connects research-based information to the public. Extension agents answer practical questions about soils, pests, plant diseases, watering, lawns, trees, food gardening, and local growing conditions. They often know exactly what works in your region because that is their job.
Nursery or Garden Center
A good nursery teaches you about plant selection, local timing, watering needs, containers, and what grows well nearby. The best ones do more than sell plants. They help gardeners match the right plant to the right place.
Farm, Botanical Garden, or Arboretum
These sites let you see larger systems at work. A farm shows production gardening or agriculture at scale. A botanical garden or arboretum shows plant diversity, labeling, design, conservation, and sometimes native habitat restoration. A university or agricultural college may show you research, greenhouse work, or trial gardens.
🎬 Video: Eyes on Agriculture — https://youtu.be/zMB6lTyXdnE?si=LtY7M54LNZpkafpn
What to Look For During Your Visit
Do not wander around and only say, “It was interesting.” Go with questions. Look for systems, decisions, and reasons.
Questions to Take on Your Visit
These will help you build a stronger report- What plants grow best in this area, and why?
- What soil challenges are common here?
- What pests or diseases cause the most trouble?
- How do experts decide when to plant?
- What do beginners usually get wrong?
- How do they conserve water, improve soil, or help pollinators?
You can also observe details such as irrigation systems, signage, mulch use, greenhouse structures, composting areas, pollinator plantings, or spacing between crops.
Turning the Visit Into a Strong Report
Your report should go beyond a travel summary. Tell your counselor what you learned, not just where you went. Strong topics might include:
- A new planting method or tool you saw
- Advice about local growing seasons
- How professionals manage pests responsibly
- Why certain plants were grouped together
- How pollinators or native plants are supported
- What surprised you most
Try organizing your report around three ideas:
- Where you went and why it matters
- What you observed
- What you learned that will change your own gardening
That last part is especially important. A visit becomes more valuable when you can say, “Because of this trip, I would now start tomatoes later,” or, “I learned why mulch makes such a difference in water retention.”
How This Requirement Helps the Rest of the Badge
This visit can support many later discussions. You may see pollinator plantings that connect to Req 6. You may learn pest control methods that help with Req 7. You may even discover a project idea for Req 8.
That is why this requirement matters. Good gardeners do not stay isolated. They learn from people with deeper experience, then bring that knowledge back to their own work.
National Institute of Food and Agriculture — Cooperative Extension System Explains how the Cooperative Extension System connects universities with local communities and practical education. Link: National Institute of Food and Agriculture — Cooperative Extension System — https://www.nifa.usda.gov/about-nifa/how-we-work/extension/cooperative-extension-systemOnce you have seen how experts think about plants and growing systems, you are ready to study one of the most important partnerships in gardening: the relationship between flowers, food crops, and pollinators.
Req 6 — Pollinators & Honeybees
A garden can be full of healthy plants and still fail if pollination does not happen. Flowers are not just decoration. For many crops, they are the stage where fruits, seeds, and future harvests begin. Honeybees are one of the best-known pollinators, which is why gardeners, farmers, and beekeepers care so much about them.
What Pollination Is
Pollination is the movement of pollen from the male part of a flower to the female part so fertilization can happen. Once that happens, the plant can produce seeds and often fruit. Some plants are pollinated by wind, but many food crops depend on animals — especially insects.
Honeybees are used because they visit many flowers, move efficiently from bloom to bloom, and can be managed in hives that beekeepers transport where they are needed. When a bee visits a flower for nectar or pollen, grains of pollen stick to its fuzzy body. As it visits the next flower, some of that pollen is transferred.
Why Honeybees Are So Useful in Food Crops
Honeybees are not the only pollinators. Native bees, butterflies, moths, flies, beetles, birds, and even bats pollinate different plants. But honeybees are especially important in agriculture because they can be managed on a large scale.
Farmers may bring in hives during bloom time for crops such as almonds, apples, berries, melons, squash, cucumbers, and other fruiting plants. Without enough pollinator visits, a crop may produce fewer fruits, misshapen fruits, or poor seed set.
🎬 Video: All About Bees — https://youtu.be/Kdm9daKTRsc?si=I5GPFtrnBBb3RwPu
🎬 Video: Why Bees Are Important — https://youtu.be/Jzp6H8BAJ7o?si=GSLeo8yCvfJUS-4e
What Bees Gain From the Relationship
Pollination is not a one-way favor. Bees collect nectar for energy and pollen as a protein source for the colony. Flowers benefit from pollination, and bees benefit from food. That is one reason diverse gardens with staggered bloom times are so valuable. They feed pollinators across more of the season.
Problems Facing Bee Populations Today

The requirement asks you to discuss current problems, so you should know the big ones clearly.
Habitat Loss
Bees need more than flowers. They also need nesting sites, safe overwintering areas, and a steady food supply across seasons. As meadows, hedgerows, and diverse plantings disappear, bees lose those resources.
Pesticide Exposure
Some pesticides can kill bees directly. Others may weaken navigation, foraging, or colony health even when the effect is not immediate. The danger depends on the product, timing, dose, and how it is used.
Disease and Parasites
Honeybee colonies can be harmed by mites, diseases, and other stressors that weaken the hive. A famous example is the Varroa mite, a parasite that feeds on bees and spreads disease within colonies.
Poor Nutrition
A landscape full of only one blooming crop for a short season can leave bees without diverse nutrition before and after that bloom. Bees do better when they can gather from many plant species over time.
Climate and Weather Stress
Unusual weather patterns can shift bloom times, reduce forage, or create mismatches between when pollinators are active and when flowers are available.
What Happens if Pollinators Disappear?
Humanity would still have food, but the food system would change dramatically for the worse. Many crops that provide vitamins, variety, and flavor would drop in production or become more expensive. Fruits, nuts, many vegetables, and seed crops would be hit especially hard.
That would affect nutrition, farm income, biodiversity, and ecosystems beyond agriculture. Pollinators do not just serve people. They help wild plants reproduce too, which supports food webs for birds, insects, and other animals.
If There Were No Pollinators
The impact would spread far beyond honey- Fewer fruits and vegetables would be produced.
- Some foods would become harder to find or much more expensive.
- Wild plant reproduction would drop in many habitats.
- Animals that depend on seeds, fruits, and those plants would be affected.
- Diets would become less diverse and often less nutritious.
What Gardeners Can Do to Help
Gardeners are not helpless here. Even a small yard or school garden can support pollinators.
- Plant a variety of flowers that bloom at different times.
- Include native plants when possible.
- Avoid spraying pesticides during bloom, especially when bees are active.
- Leave some nesting habitat for native pollinators.
- Provide shallow water sources with safe landing spots.
This also connects strongly to Req 8d if you choose a water garden and to Req 8e if you explore the honey super option.
USDA — Pollinator Research and Action An overview of why pollinators matter, the challenges they face, and what people can do to help. Link: USDA — Pollinator Research and Action — https://www.usda.gov/pollinatorsYou have now explored one of the most important partners in any garden. Next, look at the other side of the gardening challenge: the insects and diseases that damage plants, and how to respond wisely.
Req 7 — Garden Pests & Organic Solutions
Nothing tests a gardener’s patience like walking outside and finding holes in leaves, sticky stems, yellowing spots, or a plant that seemed healthy yesterday but looks terrible today. Requirement 7 is not asking you to panic. It is asking you to identify problems accurately and think in solutions.
Start With Identification, Not Spraying
One of the biggest gardening mistakes is treating every problem the same way. But pests are not all alike. Aphids do not behave like tomato hornworms. Powdery mildew is not the same as blight. If you misidentify the problem, you may waste time, harm helpful insects, or make the situation worse.
That is why the first job is observation. Look closely at the leaves, stems, roots, soil surface, and overall pattern of damage. Is it chewing, sucking, spotting, wilting, mold, or rot? Is it on one plant or many?
🎬 Video: 5 Organic Methods to Control Pests in Your Garden, Finally a Way to Fight Back! — https://youtu.be/JXEtmKRnMZk?si=itMLTvAvBfDXA8w4
🎬 Video: 7 Pests You Probably Have in Your Garden (and What to Do) — https://youtu.be/em5t8bScq9s?si=kj3Qye8wAYMEvWhA
Five Good Pest Examples to Know
You may choose different pests based on your area, but here are five strong examples that help you understand the requirement.

1. Aphids
Aphids are tiny soft-bodied insects that gather on stems and leaf undersides. They suck plant juices and can leave behind sticky honeydew.
- Organic solution: Blast them off with a firm spray of water or remove heavily infested plant tips.
- Second solution: Encourage natural predators such as lady beetles, lacewings, and syrphid fly larvae; insecticidal soap may also be used carefully.
2. Tomato Hornworms
These large green caterpillars can strip tomato plants fast because they blend in so well.
- Organic solution: Hand-pick them off the plant.
- Second solution: Encourage beneficial wasps and inspect plants daily so you catch damage early.
3. Slugs or Snails
These pests chew irregular holes, especially on seedlings and leafy greens, and are often most active at night or in damp conditions.
- Organic solution: Hand-pick at night or use barriers and traps.
- Second solution: Reduce hiding places by cleaning up dense debris and watering earlier in the day so surfaces dry sooner.
4. Powdery Mildew
This plant disease appears as a pale, powdery coating on leaves. It often thrives when air circulation is poor.
- Organic solution: Remove badly affected leaves and improve spacing and airflow.
- Second solution: Choose resistant varieties or adjust watering and pruning practices to reduce conditions that favor disease.
5. Blight or Leaf Spot Disease
Some diseased plants show dark lesions, yellowing, spreading spots, or dying foliage. Tomatoes are famous for this kind of problem.
- Organic solution: Remove infected plant material and avoid overhead watering that splashes spores.
- Second solution: Rotate crops and do not plant the same family in the same place every year.
The Logic Behind Organic Solutions
An organic method is usually one that relies on cultural control, physical removal, biological help, or approved organic products rather than conventional synthetic pesticides. Organic does not mean effortless, and it does not always mean weak. It often means you are working with garden systems instead of trying to overpower them instantly.
Examples of organic control include:
- Hand-picking insects
- Row covers or barriers
- Pruning infected leaves
- Crop rotation
- Better spacing and airflow
- Mulching to reduce soil splash
- Encouraging beneficial insects
That systems-based thinking fits well with Req 6, where you learned not all insects are enemies. Some of the insects in your garden are helpers.
A Smarter Pest Response
Use this order before reaching for any product- Identify the pest or disease as accurately as you can.
- Ask how serious the damage really is.
- Try a cultural or physical fix first.
- Protect beneficial insects and pollinators.
- Use a product only if needed and only after reading the label carefully.
Why Garden Problems Happen
Pests and diseases often show up where plants are already stressed. Overcrowding, poor airflow, inconsistent watering, weak soil, wrong-season planting, and damaged roots all make plants easier targets. That means pest control is often partly about better gardening, not just killing the pest.
A healthy plant in the right place can sometimes tolerate minor damage just fine. A stressed plant may collapse under the same pressure. Gardeners need to judge the difference.
Recommending Two Solutions Clearly
When you discuss this requirement, do not just name a pest and say, “Use spray.” Explain why each solution makes sense.
For example: “I identified aphids by their clusters on tender stems and sticky honeydew. One organic solution is a strong spray of water to knock them off. Another is encouraging beneficial insects or using insecticidal soap if the infestation is severe.”
That shows your counselor you understand both identification and response.
University of California IPM — Home and Landscape Pests A strong identification and management resource for common garden insects, diseases, and integrated pest management strategies. Link: University of California IPM — Home and Landscape Pests — https://ipm.ucanr.edu/PMG/menu.homegarden.htmlYou have now learned to think like a detective when problems appear in the garden. Next, you will choose one long-term project and apply those observation skills week after week.
Req 8 — Choose Your Garden Project
For this requirement, you choose exactly one project. Each option teaches gardening in a different way. Some focus on soil building, some on growing systems, and some on pollinators or water features. Read the options as project paths, not just as a list.
Garden Observation Log Resource: Garden Observation Log — /merit-badges/gardening/guide/garden-observation-log/Your Six Options
Req 8a — Compost Bin Project: Build a compost bin and maintain it for 90 days. This option teaches decomposition, soil improvement, and how waste becomes a resource.
Req 8b — Vermicompost Bin Project: Build a worm compost bin and maintain it for 90 days. This option is great if you like close observation and want a project that can often work indoors or in a sheltered space.
Req 8c — Hydroponic Garden Project: Build a hydroponic system and grow plants without soil. Choose this if you want a more technical, experimental project that focuses on water, nutrients, and controlled growing conditions.
Req 8d — Water Garden Project: Build and maintain a small water garden. This option blends plant care, design, and habitat thinking, and it works well if you are interested in ornamental gardening.
Req 8e — Honey Super Project: Prepare and remove a honey super with an active hive or colony. This option fits Scouts who already have access to trained beekeeping support and want to see the pollination-honey connection up close.
Req 8f — Soil Garden Project: Grow a garden in soil from seeds or plantings through harvest or for 90 days. This is the broadest and often most familiar path, and it works well for Scouts who want a traditional growing project.
How to Choose
Choosing Your Option
Think about access, time, and what you want to learn- Space available: A compost bin or soil garden may need outdoor space. A worm bin may fit in a garage or sheltered area. A hydroponic setup can sometimes work indoors.
- Equipment needed: Hydroponics and beekeeping often need more specialized gear. Compost and soil gardens can be simpler to start.
- Time and monitoring: All options need weekly observations, but some need more frequent checks for moisture, pests, temperature, or nutrient balance.
- Support from adults: The honey super option especially requires experienced supervision. Water gardens may also need careful setup and maintenance.
- What you will gain: Composting teaches soil health, hydroponics teaches controlled systems, water gardening teaches habitat and design, and a soil garden teaches the broadest traditional gardening skills.
Matching the Project to the Scout
If you enjoy science experiments and troubleshooting systems, hydroponics may be the best fit. If you like ecology and recycling, compost or vermicompost gives you a strong systems view of how nutrients cycle. If you want the most direct practice with planting, watering, and harvest, the soil garden option is hard to beat.
A Scout with access to a family member, mentor, or counselor who keeps bees may get a rare and memorable experience from the honey super option — but only if that support is already in place. It is not the easiest option to start from scratch.
Weekly Observations Matter
Whatever project you choose, your weekly notes should include changes over time. Record what you did, what you noticed, what problems came up, and how the system responded. That is what turns a project into evidence you can discuss with your counselor.
This builds on Req 4, where you learned to observe carefully and interpret results, and Req 7, where you learned to diagnose problems.
EPA — Composting at Home A reliable overview of home composting that helps compare compost-based project options. Link: EPA — Composting at Home — https://www.epa.gov/recycle/composting-homeYou have looked at the full menu of projects. Next, start with the first option and see what a successful compost bin project involves.
Req 8a — Compost Bin Project
Compost is one of gardening’s best magic tricks. You take scraps, dead leaves, and yard waste that look useless, and over time they become dark, crumbly material that improves soil. But the process is not really magic. It is biology. Tiny organisms are doing the work, and your job is to create the conditions they need.
🎬 Video: 5 Minute Compost Bin — https://youtu.be/B43nL_xGs5Q?si=mLxGeUVlKRMG2T9n
What a Compost Bin Does
A compost bin helps control the breakdown of organic material. Browns such as dry leaves, shredded paper, and straw provide carbon. Greens such as fruit scraps, coffee grounds, and fresh grass clippings provide nitrogen. Microorganisms use both, along with water and oxygen, to decompose the pile.
If the balance is right, the pile warms up and breaks down faster. If it is too dry, too wet, or badly unbalanced, decomposition slows and odors may develop.
Building a Bin That Works
A compost bin does not have to be fancy. It can be made from wire mesh, pallets, wood, or a purchased container. What matters is that it can hold material, allow some airflow, and be placed where you can manage it.
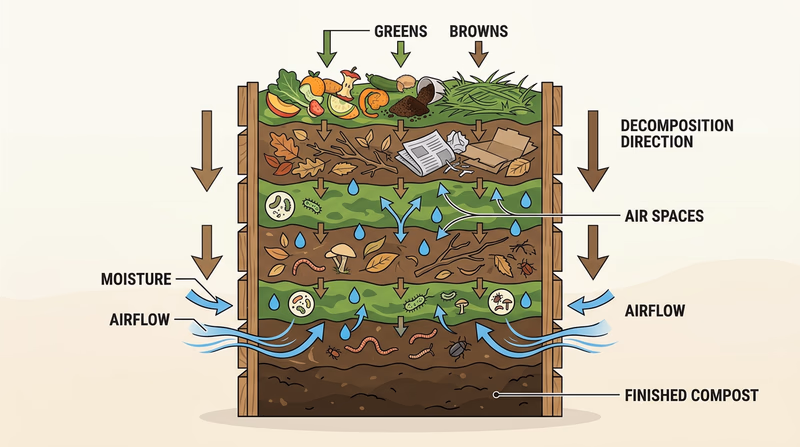
Choose a site with decent drainage and convenient access. If the bin is too far away or hard to reach, people stop using it well.
Keys to a Good Compost Setup
Make the system easy to maintain for 90 days- Put the bin where it is easy to reach with scraps and yard material.
- Include airflow so the pile does not stay soggy and stagnant.
- Keep a mix of browns and greens available.
- Turn or stir the pile often enough to add oxygen.
- Maintain moisture like a wrung-out sponge, not a swamp.
What to Add — and What to Avoid
Good compost ingredients include leaves, grass clippings, fruit and vegetable scraps, coffee grounds, tea leaves, and small plant trimmings. Avoid meat, dairy, greasy foods, and anything likely to attract pests or smell terrible. Also avoid adding diseased plant material unless you know your pile gets hot enough to kill pathogens.
What to Observe Over 90 Days
Your weekly observations might include pile temperature, moisture, smell, size, visible decomposition, and what materials are breaking down fastest. You should also note what changes you make — such as adding more dry leaves, turning the pile, or watering it.
A healthy compost system usually shrinks as materials break down. The texture changes too. Sharp edges soften. Bright green waste darkens. The whole pile starts to look more uniform.
Problems You May Run Into
A compost project is great because it gives you real problems to solve. A pile may stay cold, go slimy, dry out, or attract flies. Those are not project failures. They are chances to observe and adjust.
Why This Option Matters to Gardeners
Composting teaches one of the most important ideas in gardening: waste is part of the cycle. Leaves fall, scraps break down, nutrients return to the soil, and new plants grow from that improved ground. If you complete this project well, you will understand soil building much more deeply than someone who only buys bags from a store.
EPA — Composting Basics A practical guide to starting and maintaining a compost pile or bin at home. Link: EPA — Composting Basics — https://www.epa.gov/recycle/composting-homeYou have seen how composting builds healthier soil. Next, compare that with a related but more specialized system: composting with worms.
Req 8b — Vermicompost Bin Project
A vermicompost bin is like a tiny recycling system run by living workers. Instead of relying mostly on heat and microbes in a larger pile, this project uses composting worms to break down food scraps into nutrient-rich castings. If you like close observation and systems that change week by week, this is an excellent option.
🎬 Video: How to Build a Worm Composter: A Simple DIY Vermicomposting Project — https://youtu.be/C31jh3ohFwc?si=JaK1BOm1Zdj-9Cao
What Makes Vermicomposting Different
The worms most often used are red wigglers, not ordinary deep-burrowing earthworms from the yard. Red wigglers thrive in rich organic material near the surface and do well in bins. They help turn scraps and bedding into castings, which gardeners value as a soil amendment.
A worm bin usually includes bedding such as shredded paper or cardboard, moisture, food scraps, and airflow. The worms need a stable environment — not too hot, not too cold, not too wet, and not too dry.
Building a Bin That Supports Worm Life
Many worm bins are plastic totes or stacked systems with drainage and air holes. The exact design can vary, but the living conditions matter most. Bedding should be moist like a wrung-out sponge. Food should be added in moderation so it can be processed before rotting badly.
Worm Bin Basics
Your bin should support both worms and decomposition- Use red wigglers or another composting worm recommended for bins.
- Add moist bedding to create a soft living environment.
- Feed small amounts at first and bury scraps in the bedding.
- Keep the bin out of extreme heat or freezing temperatures.
- Watch for odor, excess liquid, or escaping worms as warning signs.
Good Worm Food and Bad Worm Food
Worm bins do well with fruit and vegetable scraps, coffee grounds, tea, and small amounts of other plant-based material. Avoid oily foods, meat, and large amounts of dairy. Citrus and onions may be tolerated in small amounts but can create issues if overdone.
Chop food smaller if you want it to break down faster. That gives both microbes and worms more surface area to work on.
What to Observe Weekly
This project is perfect for weekly notes. Look at how quickly food disappears, whether bedding stays balanced, whether castings are building up, and whether the worms seem active. You may also notice how the bin smells. A healthy worm bin usually smells earthy, not rotten.
You can also compare what types of scraps seem to break down fastest. That kind of pattern recognition is exactly what your counselor will want to hear about.
Solving Common Worm Bin Problems
Worm bins are small enough that imbalance shows up quickly. Too much wet food can cause odor. Too little moisture can stress the worms. High heat can kill them. Fruit flies may appear if scraps are left exposed.
Why This Project Helps Gardeners
Vermicomposting teaches nutrient cycling in a hands-on way, but on a smaller and more controlled scale than a full compost pile. It also helps gardeners understand that healthy soil depends on living systems. Worms, microbes, fungi, and decomposers all contribute to the bigger picture of plant health.
If you choose this option, mention how it compares with Req 8a. Both projects recycle organic matter, but the methods, scale, and pace are different.
Cornell Composting — Vermicomposting A strong educational resource on worm composting systems, care, and troubleshooting. Link: Cornell Composting — Vermicomposting — https://compost.css.cornell.edu/worms/You have now looked at decomposition through worms. Next, switch to a completely different growing system: raising plants without soil at all.
Req 8c — Hydroponic Garden Project
Hydroponics surprises many people the first time they see it. Plants are growing strongly, but there is no garden soil anywhere. That works because soil is not food for the plant. Soil is mostly a support system and nutrient-holding environment. In hydroponics, water and dissolved nutrients replace many of soil’s jobs.
🎬 Video: Hydroponics Bucket Grower for UNDER $40! — https://youtu.be/JZCNd4THUhs?si=9vDD-oMODBjJM8-z
🎬 Video: How To Build Your Own Hydroponics System — https://youtu.be/Z_3ccmK6NVM?si=e0HLkGdP-M1otv22
How Hydroponics Works
A hydroponic system gives roots access to water, oxygen, and dissolved nutrients without relying on ordinary soil. Some systems suspend roots directly in nutrient solution. Others use media such as clay pellets, rockwool, or perlite to hold the plant upright.
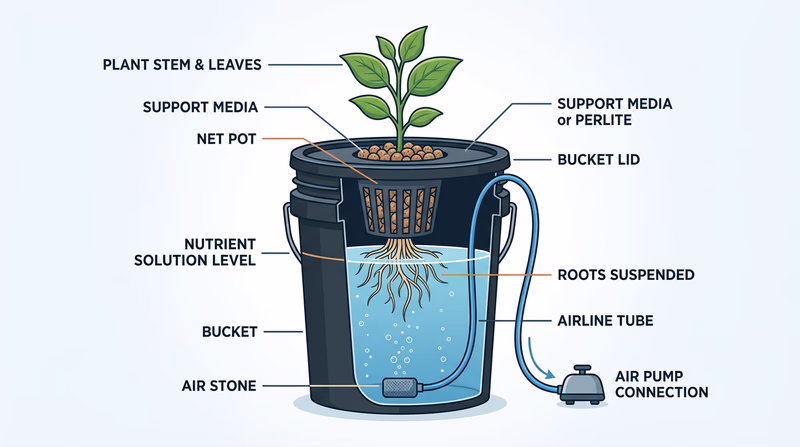
The three big ideas are:
- Roots still need oxygen
- Plants still need nutrients
- Light still drives growth
Because everything is more controlled, hydroponics can produce fast growth — but it also means problems can show up quickly if the system slips out of balance.
Choosing Plants for the System
Beginners often do best with leafy greens, basil, or other herbs because they grow quickly and are forgiving. Fruiting plants such as tomatoes or peppers are possible, but they usually need more support, light, and nutrient management.
If you choose ornamental plants instead, make sure they are suitable for the system you build and that your goal is flowering or healthy 90-day maintenance.
Hydroponic Success Factors
These matter more than fancy equipment- Strong enough light for the plants you choose
- A stable nutrient solution
- Clean water and containers
- Enough oxygen around the roots
- A system size that matches your available space and time
Building a Simple System
Your system might be a bucket grower, a small deep-water culture setup, or another straightforward design approved by your counselor. Keep the design simple enough that you can maintain it well for the full project.
Pay attention to leaks, algae growth, reservoir cleanliness, and root health. In hydroponics, maintenance is not just a side task. It is part of the gardening.
What to Observe Over Time
Hydroponics gives you lots to watch. Compare root growth to leaf growth. Notice water use, nutrient changes, and how plants respond to light intensity. Look for yellowing, stunted growth, root discoloration, or rapid improvement when conditions are corrected.
This option is especially good for Scouts who enjoy troubleshooting. If something goes wrong, the system often gives visible clues quickly.
Common Hydroponic Problems
Because hydroponics is controlled, it can also be less forgiving. If the nutrient balance is off, leaves may yellow. If roots do not get enough oxygen, they may rot. If light is weak, plants may stretch and become pale.
Why This Option Matters
Hydroponics teaches that gardening is really about meeting plant needs, not about dirt alone. It also introduces a more technical side of plant science that is used in commercial greenhouses, research, and food production systems.
This option connects well to Req 4 because both require careful observation and evidence-based thinking. It also helps you appreciate how flexible gardening can be when space or soil quality is limited.
University of Florida IFAS — Hydroponic Gardening A clear introduction to hydroponic gardening systems, plant choices, and practical home-growing considerations. Link: University of Florida IFAS — Hydroponic Gardening — https://gardeningsolutions.ifas.ufl.edu/design/types-of-gardens/hydroponic-gardening/You have now explored a soil-free growing system. Next, compare that technical approach with a project that blends plants, water, and design in a more decorative setting.
Req 8d — Water Garden Project
A water garden feels different from other gardening projects the moment you see it. The surface reflects the sky, moisture changes the air around it, and the plants are adapted to an environment where too much water is not a problem but the whole point. This option is part gardening, part design, and part habitat building.
🎬 Video: How to Create a Water Garden in a Pot — https://youtu.be/Y2ZL-9hRtLc?si=wxK-wWUh_DNaTdsX
What Makes a Water Garden Work
A water garden still needs the gardening basics: light, plant choice, maintenance, and observation. But now you also need to think about water depth, container stability, algae, and how plants behave in or around standing water.
Container water gardens are often the easiest starting point because they are small and manageable. A shallow decorative pond can work too, but it needs safe planning and careful upkeep.
Choosing Plants for a Water Garden
Water gardens often use a mix of plant types:
- Submerged or oxygenating plants that live mostly underwater
- Floating plants that rest on the surface
- Marginal plants that grow at the edges with roots in wet conditions
The right plant mix depends on the size and depth of your setup. Your counselor can help you keep the project realistic.
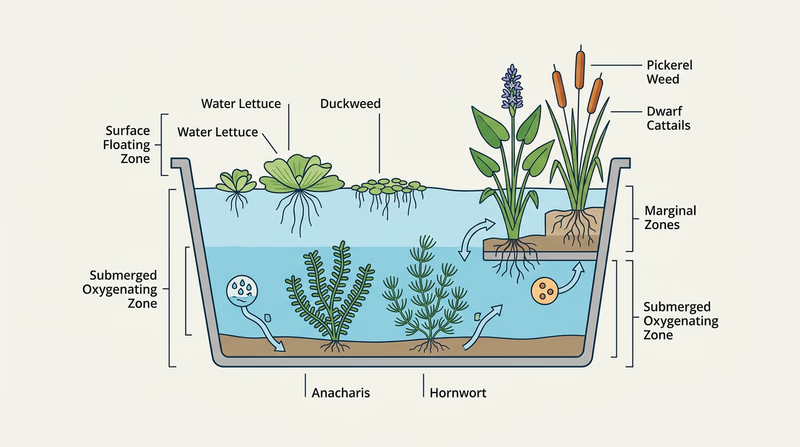
Maintenance Over 90 Days
Your weekly observations should include water level, plant health, algae growth, leaf color, new growth, and whether the setup attracts insects or other small wildlife. If the water gets cloudy or green, that is an observation worth discussing, not something to hide.
A water garden is a small ecosystem, so changes in sunlight, nutrient buildup, and decaying plant material can affect the whole setup.
Water Garden Watch List
These details tell you whether the system is staying balanced- Is the water level holding steady?
- Are leaves yellowing, rotting, or crowding the surface?
- Is algae increasing?
- Is the container or pond staying stable and safe?
- Are you seeing insects or pollinator visits around the edges?
Safety and Responsibility
Even a small water feature deserves careful attention. Standing water can become slippery, and deeper ponds need more supervision and stability than many people expect.
Why This Option Helps Gardeners
Water gardens teach balance. Too much sun may increase algae. Too much decaying material can foul the water. The wrong plant mix can crowd the system. That makes this option a good fit for Scouts who enjoy observation and gradual adjustment.
It also connects nicely to Req 6, because water gardens may support pollinators and other small wildlife when designed thoughtfully.
Missouri Botanical Garden — Water Gardens A reputable botanical-garden resource hub that can support research into plant care, pond conditions, and water-garden planning. Link: Missouri Botanical Garden — Water Gardens — https://www.missouribotanicalgarden.org/gardens-gardening/your-garden/help-for-the-home-gardener/advice-tips-resources/gardening-helpYou have now explored gardening with standing water. Next, move into the option most directly connected to pollination and honey production: preparing and handling a honey super.
Req 8e — Honey Super Project
This is the most specialized option in Requirement 8. It connects gardening to pollination, beekeeping, and food production all at once. A honey super is the box section of a hive where bees store surplus honey. Working with one helps you see how managed bees support crops and how beekeepers harvest honey responsibly.
🎬 Video: Setting Up Your Honey Super — https://youtu.be/TGdH4vtR3JM?si=o8S51hqQASjVsbxc
What a Honey Super Is
A super sits above the brood area of a hive and holds frames where bees store honey. Beekeepers add it when nectar flow is strong and remove it when frames are filled and ready for harvest. The timing matters because removing a super too early or too late can create problems for both bees and beekeeper.
Why This Option Requires Support
This is not a beginner-solo activity. Working around an active hive requires adult supervision, protective gear, calm behavior, and access to someone who knows safe beekeeping practice. If that support is not already available, another project option may be a better fit.
Preparing a Super for Use
Preparing a honey super may include assembling or checking the box, making sure frames are in good shape, confirming equipment is clean and ready, and placing it correctly when the colony can use it. The details depend on the equipment style your beekeeper mentor uses.
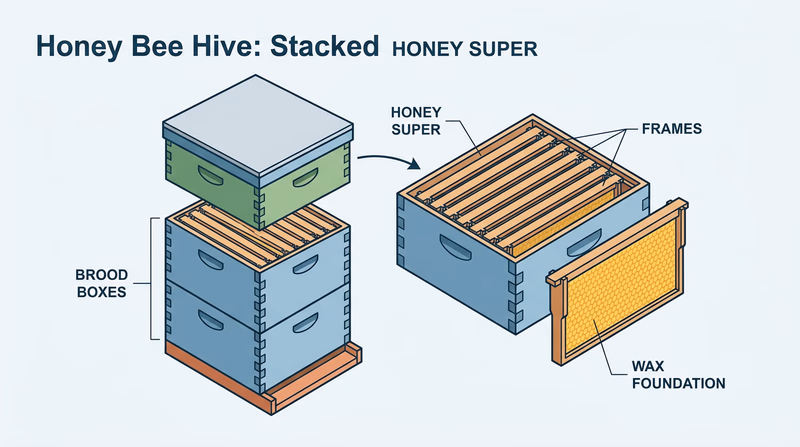
Your job is not to memorize every beekeeping tradition. Your job is to understand what the super does and how it fits into the colony’s work.
Removing a Filled Super
A filled super is heavy and full of the bees’ stored surplus honey. Removal needs to be done calmly and at the right time. Bees may be brushed or cleared from frames using methods approved by the supervising beekeeper. After removal, the honey must be handled cleanly so it stays safe and marketable.
Preparing Honey for Sale
Preparing honey for sale usually involves extraction, straining if appropriate, clean containers, careful labeling, and good sanitation. This part of the requirement helps you understand that honey is an agricultural product. It moves from living colony to human use through a process that must be handled cleanly and responsibly.
What to Observe in This Project
Focus on process, timing, and bee management- When and why the super was added
- What made the frames ready for removal
- What protective gear and tools were used
- How bees were handled respectfully and safely
- How the honey was kept clean during preparation
Why This Option Matters in Gardening
This option may sound more like beekeeping than gardening, but the link is strong. Honeybee colonies are managed partly because of the pollination service they provide, which you studied in Req 6. Seeing the honey super process helps you understand that pollination and food systems are connected in practical ways.
Questions Worth Discussing With Your Counselor
- How did this hive support pollination in the local area?
- What signs showed the super was ready?
- What sanitation steps mattered when preparing honey?
- What did you notice about the bees’ behavior during the process?
- Would this be practical for most Scouts, or does it depend on special access?
You have now seen the most hive-focused project option. Next, return to the broadest and most traditional gardening project in the set: growing a soil-based garden of your own.
Req 8f — Soil Garden Project
This option is the classic gardening project. You choose a site, choose plants, work with real soil, and keep the garden going long enough to harvest or complete a full 90-day stretch. It is flexible, practical, and one of the best ways to show broad gardening skill.
🎬 Video: Start a Garden | Step-by-Step | Gardening Tips — https://youtu.be/EPmV8iqZIps?si=OsN9RZoNPdfpWJxb
Planning the Garden
The requirement says your garden should include at least three types of plants approved by your counselor. That means you need a thoughtful plan, not random planting. Pick plants with a realistic chance of success in your season and space.
You can do this outdoors in a bed, raised bed, or containers. Indoor container gardening can also work if the light is strong enough and the containers are appropriate.
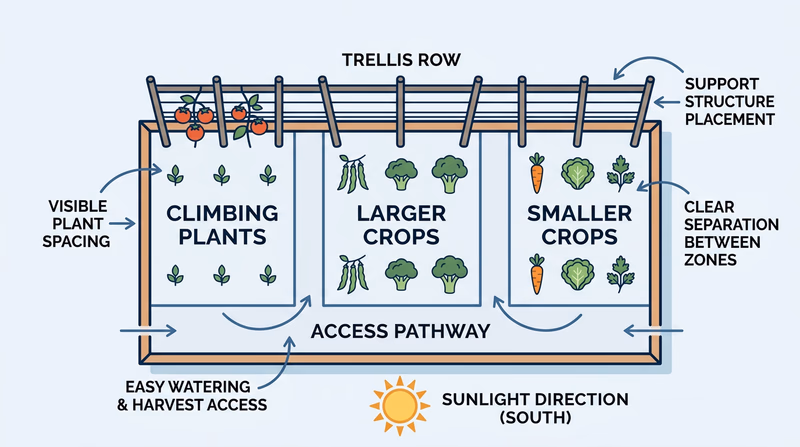
Build a Strong Garden Plan
Think through the project before you start planting- Choose a site with suitable light for your plants.
- Make sure containers or beds drain properly.
- Pick three plant types with similar care needs when possible.
- Confirm spacing, support needs, and time to harvest.
- Decide how you will water consistently.
Soil Is the Foundation
Soil is more than brown stuff that holds roots. It stores water, supplies nutrients, supports microorganisms, and gives plants physical anchoring. Good garden soil drains well but does not dry instantly. It holds nutrients without becoming compacted like brick.
This is where lessons from Req 8a or Req 8b can help. Compost and worm castings improve the growing environment, which can directly help this project succeed.
Starting From Seed or Plantings
You may begin from seeds, transplants, or a mix, depending on your counselor’s approval and your season. Seeds teach patience and early-stage care. Plantings or transplants give you a head start. Either way, you need to maintain the garden through harvest or for 90 days.
Good observations include how quickly different plants establish, how often they need water, when they begin flowering or fruiting, and what problems come up.
Maintaining the Garden Week by Week
A real garden changes constantly. One week you may be thinning seedlings. The next you may be staking tomatoes, pinching herbs, or checking for pests. Water needs may rise with heat. Rain may change your whole routine.
That is why weekly observations are part of the requirement. They show you noticed the garden as a living system instead of planting once and forgetting it.
What Success Looks Like
Success does not mean every plant becomes perfect. Success means you made decisions, cared for the plants steadily, learned from setbacks, and brought the project to harvest or the required project length. Counselors want to see understanding, follow-through, and evidence of care.
A Scout who can explain why basil thrived, why beans needed support, or why one container dried out faster than another is showing real gardening skill.
Why This Option Is So Valuable
This project brings together most of the badge. You use safe habits from Req 1a–1b, growing knowledge from Req 2a and Req 2b, and problem-solving skills from Req 7. It is the broadest single test of what you have learned.
University of Illinois Extension — Vegetable Garden Basics A practical overview of planning, planting, and maintaining a home vegetable garden. Link: University of Illinois Extension — Vegetable Garden Basics — https://extension.illinois.edu/vegetables/home-vegetable-gardeningYou have now seen all six project paths in Requirement 8. Next, finish the badge by choosing between careers in gardening or gardening as a healthy lifelong hobby.
Req 9 — Careers or Healthy Living
For this final requirement, you choose exactly one path. One option looks outward at professional work in gardening-related fields. The other looks inward at how gardening can shape your own health, habits, and long-term goals.
Your Two Options
Req 9a — Gardening Careers: Research three career opportunities, then go deep on one. This option is best if you want to see how gardening skills connect to jobs, training, and long-term career growth.
Req 9b — Gardening as a Hobby & Healthy Lifestyle: Explore how gardening could become part of your personal life. This option is best if you are more interested in long-term habits, wellness, community, and enjoyment than in a job path.
How to Choose
Choosing Your Final Option
Pick the one that matches what you want to learn- Interest in careers: If you like researching jobs, education paths, and salaries, choose 9a.
- Interest in personal growth: If you want to think about hobbies, health, stress relief, or food growing at home, choose 9b.
- Available sources: Career research may lead you to colleges, certifications, and industry groups. Hobby research may lead you to clubs, community gardens, and local classes.
- What you will gain: Option 9a builds career awareness; Option 9b helps you picture gardening as part of everyday life.
What Both Options Have in Common
Whichever path you choose, the requirement asks you to do more than list facts. You need to think about future action. That means connecting your research to your own interests, goals, or questions.
A strong discussion with your counselor will explain not only what you found, but also what it means for you.
Why This Is a Good Final Requirement
The earlier requirements teach what gardeners do. This final choice asks what gardening could mean beyond the badge. That is a fitting way to end. A merit badge should open a door, not just close a checklist.
American Public Gardens Association A helpful starting point for learning how public gardens, education, conservation, and horticulture connect in real organizations. Link: American Public Gardens Association — https://www.publicgardens.org/You are at the final choice in the guide. Next, start with the career path and see how gardening knowledge can turn into professional work.
Req 9a — Gardening Careers
Gardening is not only a hobby. It can lead to real work in science, design, food production, education, public spaces, and environmental care. This requirement asks you to think past the backyard and into professions where plant knowledge matters every day.
🎬 Video: Gardener - Career Spotlight — https://youtu.be/RVIvWuZ-TUk?si=Iyu26yzBvJHanASD
Three Strong Career Categories to Explore
You can choose almost any career that depends on plant-growing skill, but here are three strong examples to get you started.
Horticulturist or Professional Gardener
This kind of career focuses on growing and maintaining plants in landscapes, greenhouses, nurseries, estates, campuses, parks, or public gardens. Skills include plant identification, pruning, watering, soil care, pest management, and seasonal planning.
Landscape Designer or Landscape Professional
Landscape professionals combine plants with design, outdoor spaces, and client needs. Some focus more on design and planning. Others focus on installation and maintenance. This field can include residential, commercial, or public projects.
Agricultural or Extension Educator
Some plant careers focus on teaching and advising. Extension professionals, agricultural educators, greenhouse managers, and garden program coordinators help communities solve problems and learn effective growing practices.
You might also research greenhouse production, urban farming, arboriculture, botanic-garden work, turf management, or plant science.
What to Research for Your Chosen Career
The requirement gives you a very clear list. For your chosen career, look into:
- Training and education
- Certification or licensing, if any
- Experience needed to get started
- Typical costs of entering the field
- Employment outlook
- Starting salary
- Advancement opportunities
- Long-term career goals or paths
This is not just a list of boxes. Each category helps you understand how realistic and attractive the field is.
Questions to Ask About a Career
Use these to organize your research- Do people usually start with a degree, certificate, apprenticeship, or entry-level work?
- Are there seasonal jobs that help people build experience?
- What tools or certifications cost money at the beginning?
- Is the work mostly outdoors, indoors, or mixed?
- What kind of advancement is possible after a few years?
Thinking About Fit
A good career fit is not only about salary. It is also about what kind of work you enjoy. Do you like physical outdoor work? Do you like design and planning? Do you enjoy teaching others? Do you want work tied to science, food, conservation, or public spaces?
Your counselor will likely care about your reflection here. Saying “I researched this job and here is why it does or does not fit me” shows much more maturity than simply repeating facts.
Where to Find Reliable Career Information
Use strong sources, not random opinion posts. Good sources include university horticulture programs, the U.S. Bureau of Labor Statistics, major botanical gardens, extension systems, and professional associations.
How to Present What You Learned
A strong discussion with your counselor might sound like this:
- Here are three gardening-related careers I identified.
- Here is the one I researched deeply.
- Here is how people train for it and what it costs to get started.
- Here is the job outlook and advancement path.
- Here is whether I could see myself doing it and why.
That structure keeps your research focused and personal.
This option also connects well to Req 5, because a visit to a nursery, university, or botanical garden may introduce you to people already doing this work.
U.S. Bureau of Labor Statistics — Landscaping and Groundskeeping Workers Career outlook information, pay data, and work descriptions for plant-focused grounds and landscape jobs. Link: U.S. Bureau of Labor Statistics — Landscaping and Groundskeeping Workers — https://www.bls.gov/ooh/building-and-grounds-cleaning/grounds-maintenance-workers.htm AmericanHort A horticulture industry organization that helps show how professional plant work connects to careers, training, and advancement. Link: AmericanHort — https://www.americanhort.org/You have now looked at gardening as work. Next, compare that with the other final path: how gardening can become part of your own healthy lifestyle and long-term goals.
Req 9b — Gardening as a Hobby & Healthy Lifestyle
A lot of merit badges teach skills you may use once in a while. Gardening is different. It can become part of everyday life. It can shape what you eat, how you spend time outdoors, how you handle stress, and how you contribute to your home or community.
🎬 Video: Benefits of Gardening as a Hobby and Why You Should Be a Gardener — https://youtu.be/iVecXN-JQ64?si=Oi7akvlN2S3UerRT
How Gardening Fits a Healthy Lifestyle
Gardening supports health in more than one way.
Physical Activity
Digging, planting, weeding, lifting, and watering all involve movement. It is not the same as sports training, but it is real physical work that gets you outside and active.
Better Food Awareness
People who grow vegetables or herbs often become more interested in eating them. Fresh food from the garden can make healthy choices feel more normal and satisfying.
Stress Relief and Mental Focus
Many gardeners find the work calming. Repetitive outdoor tasks, close observation, and steady progress can reduce stress and help people slow down.
Sense of Responsibility
Plants do not care whether you are busy. They still need water and attention. That makes gardening a habit-building hobby. It teaches consistency.
What You Might Need to Enjoy It More
The requirement asks you to research extra training, expenses, and organizations that could help you enjoy gardening more and get more benefit from it.
Training
You may not need formal classes to begin, but local workshops, extension programs, community garden orientations, botanic garden classes, or online courses can improve your skill fast.
Expenses
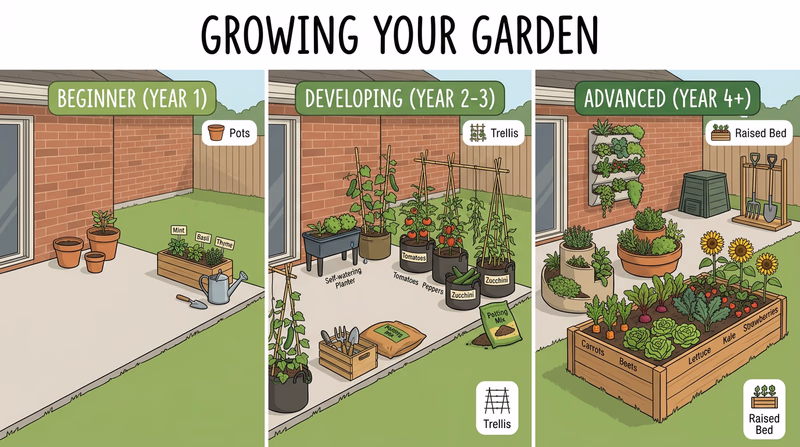
Gardening can be inexpensive or fairly costly depending on what you do. A few packets of seed and containers cost much less than raised beds, grow lights, irrigation, and specialty tools. Your counselor will likely want to hear that you understand both starter costs and ongoing costs.
Organizations and Affiliations
Community gardens, local garden clubs, native plant societies, Master Gardener programs, public gardens, and extension systems can all help you learn, meet other gardeners, and stay motivated.
What to Research for This Option
Build a realistic picture of gardening as a long-term hobby- What kind of gardening interests you most: vegetables, flowers, pollinators, native plants, containers, hydroponics?
- What would you need to buy to get started?
- What local groups, gardens, or classes could help you improve?
- What short-term goals could you achieve this season?
- What long-term goals could you pursue over several years?
Setting Short-Term and Long-Term Goals
The requirement specifically asks you to share short-term and long-term goals. That means your discussion should include actions, not just ideas.
A short-term goal might be growing salad greens in containers, joining a community garden, starting a pollinator bed, or learning to compost successfully this year.
A long-term goal might be building a larger home garden, supplying some family produce each summer, learning native plant landscaping, or volunteering regularly in a public garden.
Why This Option Matters
This option is about seeing gardening as a lifestyle, not just a project. It invites you to ask what role plants and outdoor care might play in your own future. That could mean healthier eating, more time outside, more confidence in growing food, or stronger community involvement.
It also connects with nearly every earlier part of the badge. If you liked the projects in Req 8, this option helps you imagine continuing one of them after the badge is complete.
National Garden Clubs A nationwide organization that can help gardeners find clubs, projects, and educational opportunities. Link: National Garden Clubs — https://gardenclub.org/ American Community Gardening Association A useful resource for learning how community gardens support food access, education, and local involvement. Link: American Community Gardening Association — https://www.communitygarden.org/You have completed the final requirement path. Next, go beyond the badge with deeper ideas, real-world experiences, and organizations that can keep your gardening journey growing.
Extended Learning
A. Keep Growing
You have done more than plant a few things for a requirement. You have learned how gardens work, how to observe change over time, and how to connect plants to food, pollinators, and healthy ecosystems. That is a strong foundation. The best part is that gardening rewards people who keep going season after season.
B. Soil Health Is the Long Game
A lot of new gardeners focus on the visible part of the garden: the leaves, flowers, fruits, and harvest baskets. Experienced gardeners know the hidden part matters just as much. Soil health is the long game. If you improve soil structure, organic matter, drainage, and biological life, many other problems become easier to manage.
Healthy soil stores water better, supports stronger roots, and helps plants recover from stress. It also makes nutrients more available. That is why compost, mulch, cover crops, and careful disturbance matter so much. Instead of treating soil as dead material, think of it as a living community.
This deeper view changes how you garden. You stop asking only, “What can I feed the plant today?” and start asking, “How do I improve the system this plant depends on?” Over time, that mindset can reduce runoff, lower fertilizer waste, and improve the resilience of your garden through heat or dry spells.
Even if you never become a farmer or horticulturist, understanding soil health gives you a powerful way to think about land. It connects home gardening to conservation, climate resilience, and long-term stewardship.
C. Gardening With Native Plants
One of the most exciting directions in modern gardening is the use of native plants. These are plants that evolved in a region over long periods of time and formed relationships with the insects, birds, and other wildlife there. A native planting can be beautiful, but it also functions as habitat.
Native plant gardening asks different questions than traditional ornamental gardening. Instead of only asking which flowers look best in a bed, you ask which plants support caterpillars, feed bees through the season, or provide seeds for birds. That ecological approach turns gardening into habitat restoration on a small scale.
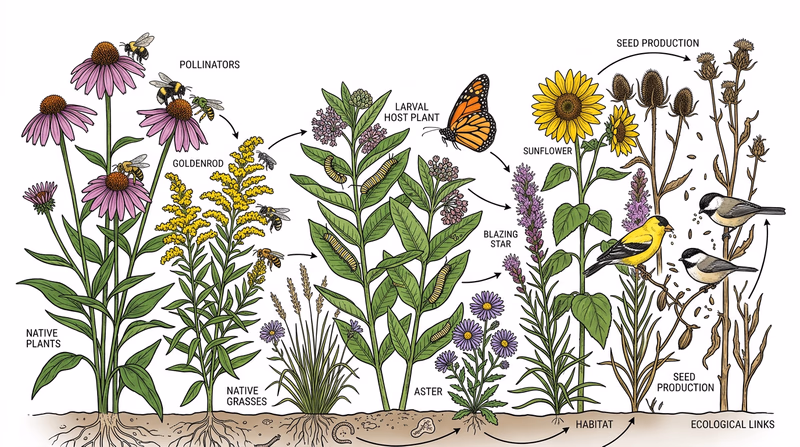
Native plants are not maintenance-free, and they are not identical in every region. But when chosen well, they often fit local conditions better than imported species because they are adapted to the climate and soil. That can mean fewer inputs over time and a stronger connection between your garden and the living things around it.
If the pollinator section of this badge interested you, native plant gardening is one of the most meaningful next steps you can take. It lets you put that knowledge into action in a way that supports entire food webs, not just one species.
D. Season Extension and Year-Round Gardening
Many people think gardening ends when summer does. In reality, experienced gardeners often stretch the season much farther. They use row covers, cold frames, hoop tunnels, mulches, indoor seed-starting shelves, and careful crop timing to keep plants going earlier in spring and later into fall or winter.
Season extension is a practical lesson in microclimates and planning. A garden bed on the south side of a building may warm faster. A low tunnel may protect greens from frost. Indoor lights may let you start seedlings weeks before outdoor planting time. These techniques can dramatically change what is possible in a small space.
This kind of gardening also teaches patience and foresight. You often need to plan backward from a desired harvest window. That means looking ahead, counting days, and understanding how temperature and day length affect growth. It feels more like strategy than simple planting.
For Scouts who enjoy problem-solving, season extension is a great next challenge. It combines science, timing, and hands-on experimentation — and it can make a home garden more productive across much more of the year.
E. Real-World Experiences
Visit a community garden
Community gardens show how gardening can support food access, neighborhood connection, and shared learning. Notice how plots are organized, what crops are most common, and how people solve irrigation, composting, and tool-sharing challenges.
Tour a botanical garden or arboretum in a new season
If you already visited one for the badge, go back during a different season. You will notice how plantings change, how bloom timing shifts, and how public gardens use succession to keep spaces interesting all year.
Volunteer at a native plant sale or pollinator garden workday
This gives you practical plant-handling experience and a close look at which plants local experts recommend. It is also a good way to ask questions and meet skilled gardeners.
Visit a farmers market and talk to growers
Ask what crops are hardest to grow well, what pests are most common, and how weather affected the season. This helps connect gardening to local food systems and real production choices.
Join a seed-starting workshop or seasonal gardening class
Hands-on classes can help you build confidence quickly, especially if you want to move from one successful project to a larger long-term hobby.
F. Organizations to Know
Cooperative Extension System
The Cooperative Extension System connects universities with local communities. Extension offices provide research-based help on soils, pests, plant diseases, home gardening, and much more.
Cooperative Extension System Learn how extension offices provide practical, research-based help for gardeners and communities. Link: Cooperative Extension System — https://www.nifa.usda.gov/about-nifa/how-we-work/extension/cooperative-extension-systemAmerican Public Gardens Association
This organization supports botanical gardens, arboreta, and public horticulture programs. It is a strong way to learn how public gardens combine education, conservation, and plant science.
American Public Gardens Association Explore public gardens, plant conservation, and educational programs in horticulture. Link: American Public Gardens Association — https://www.publicgardens.org/National Garden Clubs
National Garden Clubs connects local clubs, youth programs, and service-minded gardening efforts. If you want a gardening community, this is a helpful place to look.
National Garden Clubs Find gardening clubs, educational opportunities, and community projects across the United States. Link: National Garden Clubs — https://gardenclub.org/American Community Gardening Association
This group highlights how gardens strengthen neighborhoods, education, and food access. It is especially useful if you are interested in shared growing spaces.
American Community Gardening Association See how community gardens support education, food access, and neighborhood involvement. Link: American Community Gardening Association — https://www.communitygarden.org/Pollinator Partnership
If the pollinator side of gardening caught your attention, Pollinator Partnership offers practical resources on helping bees and other pollinators with habitat and plant choices.
Pollinator Partnership Resources on pollinator habitat, plant choices, and how to support pollinators in real landscapes. Link: Pollinator Partnership — https://www.pollinator.org/