Geocaching Merit Badge — Complete Digital Resource Guide
https://merit-badge.university/merit-badges/geocaching/guide/
Introduction & Overview
A waterproof box tucked under a park bench does not look like much until your GPS arrow points straight at it and you realize you just found something hidden by another adventurer. Geocaching turns hiking, map reading, and problem-solving into a real-world treasure hunt. It teaches you how to navigate, how to care for the outdoors, and how to be part of a worldwide community built on trust and discovery.
This badge matters because geocaching mixes outdoor skills with modern technology. You will use GPS, maps, and careful observation, but you will also learn good judgment. A great geocacher does not just find containers — they protect places, follow rules, and leave every site better than they found it.
Then and Now
Then — Navigation Before Satellites
Long before anyone hid a plastic box with a logbook inside, people still needed to find their way. Scouts learned to use maps, compasses, landmarks, and pace counting. Sailors crossed oceans by studying stars. Explorers followed rivers, ridgelines, and hand-drawn maps. The challenge was always the same: know where you are, know where you are going, and get there safely.
- Main tools: Paper maps, compasses, landmarks, and observation
- Main goal: Travel accurately without getting lost
- Main lesson: Good navigation depends on preparation, not luck
Now — A Global Treasure Hunt
Geocaching began in 2000, soon after the U.S. government improved civilian GPS accuracy. Almost immediately, people started hiding containers and posting their coordinates online so others could find them. What started as a fun experiment grew into a worldwide activity with millions of geocaches and a huge online community.
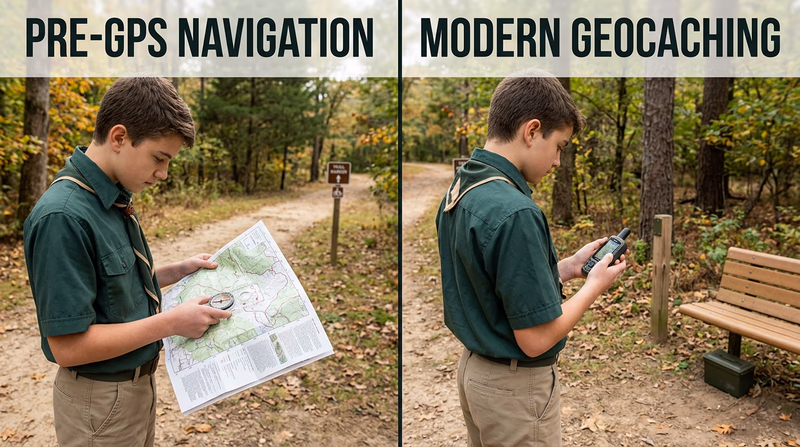
Today, geocachers use phones or GPS receivers to search for hidden caches in city parks, forests, trails, historic districts, and public spaces. The technology is newer, but the best habits are old-fashioned: pay attention, respect the land, and be honest in your logging and stewardship.

- Main tools: GPS receivers, smartphones, apps, and online cache listings
- Main goal: Combine navigation, exploration, and outdoor ethics
- Main lesson: Technology helps, but judgment still matters most
Get Ready! This badge will ask you to think like an explorer and act like a steward. Bring curiosity, patience, and a pencil — and be ready to look twice, because the cache is often hiding in plain sight.
Kinds of Geocaching
Geocaching is not just one kind of activity. Different cache types and different goals make each hunt feel a little different.
Traditional Geocaching
This is the classic version. You are given coordinates for a hidden container, then you travel to that spot and search carefully. Most Scouts start here because it teaches the basic rhythm of the hobby: navigate, observe, sign the log, and replace the cache exactly as you found it.
Puzzle and Multi-Stage Caches
Some caches require more than walking to one set of coordinates. A puzzle cache may ask you to solve a riddle or decode information before you can begin. A multi-cache sends you to one location first, where you gather a clue that leads to the next location. These caches reward patience and careful thinking as much as navigation skill.
Urban and Trail Caches
Some caches are hidden in busy public spaces where you have to search without drawing attention from people nearby. Geocachers call those bystanders muggles. Other caches are deep on trails where the bigger challenge is terrain, distance, or weather. Both kinds teach different skills.
Trackables and Mission-Based Caching
Some geocaching adventures are about more than one find. A trackable, such as a Travel Bug®, is meant to move from cache to cache while people log its journey online. Programs like Cache to Eagle® and CITO connect geocaching with service, conservation, and Scouting stories. These experiences turn geocaching into something bigger than a hunt — they make it a way to share values and help a community.
Now that you know what geocaching is and how wide the hobby can be, start with the most important part: how to stay safe, prepare well, and look after your team.
Req 1 — Safety, First Aid, and Planning
This requirement covers the three habits that make every geocaching trip better:
- Spot hazards before they become problems
- Know basic first aid for outdoor situations
- Make a real plan before you head out
Geocaching feels like a game, but it happens in real places with real weather, terrain, plants, insects, and people. A Scout who can find a cache safely is far more prepared than someone who only knows how to follow an arrow on a screen.
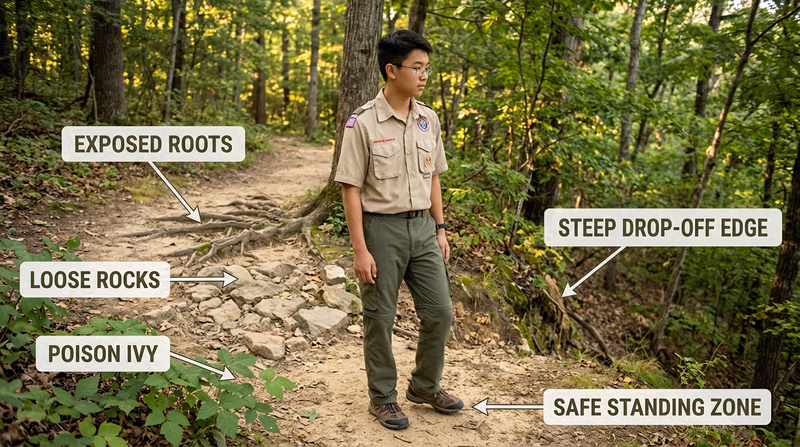
Requirement 1a: Common Hazards on a Geocaching Trip
A geocache can be hidden almost anywhere legal and appropriate: beside a trail, near a fence line, in a city park, along a shoreline, or at the edge of the woods. That variety is what makes geocaching fun, but it also means the hazards change from place to place. The smartest geocachers do not just ask, “Where is the cache?” They ask, “What could go wrong here, and how do I avoid it?”
Terrain and footing hazards
Many cache locations involve uneven ground. You might cross roots, loose gravel, mud, wet leaves, rocks, or steep slopes. Slips, twisted ankles, and falls are some of the most likely problems on a geocaching trip.
To prevent these problems:
- Wear shoes or boots with good traction.
- Slow down when you get close to ground zero instead of rushing.
- Look at the ground before stepping off a trail or over a log.
- Keep your hands free when moving through rough ground.
If someone falls, stop moving, check for pain, swelling, or bleeding, and decide whether they can walk safely or need help. Do not turn a small injury into a bigger one by pushing ahead carelessly.
Weather and exposure hazards
Heat, sun, cold, rain, wind, and lightning can all turn a fun hunt into a bad day. A cache that is easy in cool weather may be risky during a heat wave or a thunderstorm.
Anticipate weather hazards by checking the forecast before you leave. Dress in layers when it is cold. Bring sun protection and extra water when it is hot. If thunder is close enough that you can hear it, stop the activity and move to proper shelter. Geocaching is never worth risking heat illness, hypothermia, or a lightning strike.
Plants, insects, and animals
When you reach into brush, under logs, or around rocks, you may encounter thorny plants, poison ivy, ticks, spiders, snakes, wasps, or ants. That does not mean geocaching is unsafe. It means you need to search carefully and never grab where you cannot see.
Good prevention includes long pants in brushy areas, insect repellent when appropriate, and checking your body for ticks after the trip. If you see wildlife, back away and give it space. A cache hunt should never disturb an animal or its habitat.
Property, traffic, and “muggle” hazards
Some geocaches are in busy public places. That creates different risks: traffic, strangers, and the temptation to step into places you should not go. Never enter private property, cross fences, climb unsafe structures, or search in places marked closed or restricted.
If a location seems wrong, trust your judgment. The posted coordinates might be off slightly, or the cache may have shifted. Back off, re-check the listing, and think before acting.
Before You Search
Quick hazard scan at every cache site- Look around first: Check traffic, terrain, water, drop-offs, and other people nearby.
- Check the weather: Heat, cold, storms, and fading daylight change your risk level fast.
- Watch your hands: Never reach into a place you cannot see clearly.
- Know your limits: If the site needs climbing, wading, or risky scrambling, stop unless that activity is clearly safe and allowed.
Requirement 1b: First Aid and Prevention for Common Problems
Most geocaching first aid is simple, but simple only works if you remember the basics. Your job is not to be a doctor. Your job is to prevent problems when possible, recognize trouble early, and respond calmly.
Cuts and scrapes
Cuts and scrapes are common when searching through brush, reaching near rough surfaces, or slipping on rocky ground. Prevent them by wearing appropriate clothing and searching carefully instead of plunging your hands into hiding spots.
For minor cuts and scrapes, wash the area with clean water, remove dirt if you can do so gently, apply a clean bandage, and watch for signs of infection. If bleeding is heavy or will not stop, apply direct pressure and get help.
Snakebite, insect stings, and tick bites
The best snakebite prevention is simple: watch where you step and place your hands, and never try to touch or move a snake. If someone is bitten, keep them calm, limit movement, and seek medical help right away. Do not cut the wound, suck out venom, or apply a tourniquet.
For insect stings, move away from the insects first. Remove a visible stinger by scraping it out, wash the area, and use a cold pack to help with swelling. Watch closely for an allergic reaction, especially trouble breathing, swelling of the face or throat, or dizziness. That is an emergency.
Ticks are common in grassy and wooded areas. Wear long clothing when appropriate, use tick prevention measures, and do a full tick check after the trip. Remove a tick promptly with fine-tipped tweezers, pulling steadily near the skin.
Poisonous plants
Poison ivy, poison oak, and poison sumac are easier to avoid than to treat. Learn what the plants in your area look like. Stay on durable paths when possible, and do not crawl into vegetation just to chase a difficult cache.
If skin contacts a poisonous plant, wash the area as soon as possible and avoid spreading the plant oil by touching other parts of your body. A rash may need medical attention if it is severe or affects the face or breathing.
Heat illness, sunburn, and dehydration
Geocaching often involves walking farther than you expected because the search area, wrong turns, and extra exploring add distance. Heat exhaustion and dehydration can sneak up on you.
Prevent heat problems by drinking water regularly, wearing light clothing in hot weather, resting in shade, and planning strenuous searches for cooler parts of the day. Sunburn is also an injury. Use sunscreen, a hat, and protective clothing.
Heat exhaustion often includes heavy sweating, weakness, headache, nausea, dizziness, and cool clammy skin. Move the person to shade, loosen clothing, cool them, and give water if they are alert.
Heatstroke is an emergency. Warning signs include confusion, altered behavior, fainting, and very high body temperature. Get emergency help immediately and begin cooling the person.
Cold reactions and hypothermia
Cold weather geocaching brings its own risks. Wet clothing, wind, and long inactive periods can chill you faster than you expect. Dress in layers, keep extra dry clothing if conditions call for it, and avoid cotton in cold wet conditions when possible.
Hypothermia may begin with shivering, clumsiness, and poor judgment. Move the person to shelter, remove wet clothing, warm them gradually, and get help. Do not ignore mental confusion in cold weather. That can be a serious sign.
Requirement 1c: Planning a GPS-Based Activity
Good geocaching trips start before anyone leaves home. GPS is helpful, but it does not replace planning. Batteries die. Signals drift. Trails close. A cache that looks close on a map might actually require a much longer walk.
Use the buddy system
Geocaching is better with another person anyway. A buddy helps with navigation, keeps the search fun, and adds a layer of safety if someone gets hurt, lost, or needs help. Stay together, especially near roads, water, steep ground, or remote trails.
Share the plan with others
Before you head out, tell a parent, guardian, or other responsible adult where you are going, who is going with you, when you expect to return, and how to reach you. If your plan changes, update them when you can. This matters even for short local trips.
Think through route, weather, and terrain
Study the cache location before the trip. Ask yourself:
- Where will we park or begin?
- How long is the walk really?
- Is the area urban, wooded, hilly, wet, or remote?
- What weather is expected during the whole trip, not just at the start?
- Do we have a backup route if a trail is closed or the area is too crowded?
Dress and pack for the conditions
Proper attire depends on where you are going. Trail geocaching may call for sturdy footwear, long pants, rain gear, and water. Urban caching may still need sun protection, a charged phone, and a pencil for the logbook. Bring more water than you think you need, especially in warm weather.
Simple Geocaching Trip Plan
What to decide before leaving home- Who is going: Use the buddy system and make sure everyone knows the plan.
- Where you are going: Save the cache location, parking area, and route.
- What the weather is doing: Check forecast, temperature, storms, and sunset time.
- What you are wearing and carrying: Match clothing and gear to terrain and conditions.
- Who knows your plan: Leave your route and return time with a parent, guardian, or leader.
Geocaching works best when all three parts of this requirement connect. Planning helps you avoid hazards. Good hazard awareness reduces injuries. Good first aid knowledge helps when prevention is not enough. In Req 2, you will build on that by learning the ethics that keep geocaching fun for everyone.
Req 2 — Geocaching Etiquette and Leave No Trace
This requirement is about the rules that protect geocaching itself. It covers three big ideas:
- Why cache placement must not damage the land
- How geocachers act responsibly when hiding, seeking, and maintaining caches
- How Scout outdoor ethics apply every time you search
A geocache may be small, but bad behavior around one can damage trails, disturb wildlife, annoy land managers, or get caches removed. Good etiquette keeps the hobby welcome in public places.
Requirement 2a: Why You Never Bury a Cache
If a cache were buried, seekers would have to dig for it. That simple fact creates a long list of problems. Digging damages roots, disturbs soil, increases erosion, and can harm fragile plants or habitat. It also makes public land managers much less likely to support geocaching, because buried objects can look suspicious and destructive.
A hidden cache should be concealed, not excavated. Tucked under natural cover that can be replaced gently is very different from burying something underground. If finding the container requires digging, the cache has been placed poorly.
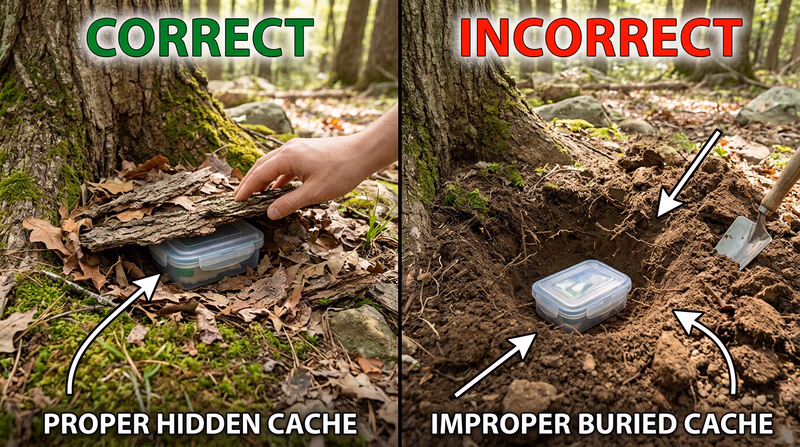
Why buried caches are a problem
- They invite repeated digging by every future seeker.
- They damage soil structure and plant life.
- They can disturb archaeological or historic resources.
- They make geocachers look careless and disrespectful.
- They are harder to maintain and easier to lose.
Requirement 2b: Geocaching Etiquette for Hiding, Seeking, and Maintaining
Geocaching works because people trust one another. Cache owners trust finders to put things back correctly. Finders trust owners to choose safe, legal, well-maintained locations. Good etiquette is what keeps that trust working.
When you are seeking a cache
Search quietly and carefully. Avoid making the hiding spot obvious to bystanders. Respect the area, especially if other visitors are around. Sign the log neatly, return items exactly as found unless the cache allows trading, and place the container back so the next seeker gets the same experience.
If you cannot find the cache, that is okay. Not every search becomes a find. Read the listing again, check the hint, and decide whether to try later. Do not turn the area upside down just to avoid logging a DNF, which means did not find.
When you are hiding a cache
A good cache location is legal, safe, publicly accessible, and not environmentally sensitive. The container should keep the log dry, the description should be accurate, and the coordinates should be as precise as possible. Cache owners also have to think about whether the spot will attract damaging search behavior. If dozens of people stomping around the site would harm the area, it is not a good cache location.
After you submit a cache listing, it is reviewed before publication. That review process helps protect the game, the environment, and landowner relationships.
When you are maintaining or dismantling a cache
A cache owner stays responsible for the cache after it is published. That means replacing damaged logbooks, checking container condition, responding to maintenance problems, and archiving the cache if they can no longer care for it. Abandoned caches become litter. Responsible cache owners do not let that happen.
Good Geocaching Etiquette
What responsible geocachers do- Be discreet: Do not reveal the cache to bystanders or spoil the location for others.
- Protect the site: Search gently and replace the cache exactly as you found it.
- Log honestly: If you found it, log it. If you did not, log that too.
- Own the responsibility: If you hide a cache, maintain it or archive it when you cannot.
Requirement 2c: Leave No Trace and the Outdoor Code in Geocaching
This is where geocaching becomes very Scout-like. Finding hidden containers outdoors is exciting, but your search should never leave obvious damage behind. Leave No Trace and the Outdoor Code give you a clear way to think about what good geocaching looks like.
Leave No Trace in geocaching
Plan Ahead and Prepare means checking the weather, route, permissions, and terrain before you leave. It also means knowing whether the cache is appropriate for your group.
Travel and Camp on Durable Surfaces means staying on trails or durable ground when possible instead of trampling vegetation just because your GPS arrow points off to one side.
Dispose of Waste Properly means packing out your trash and picking up litter when you can.
Leave What You Find is especially important in geocaching. Do not move natural objects more than necessary, and return anything you do move to its exact position.
Minimize Campfire Impacts may not matter on every cache hunt, but the principle reminds you to reduce your overall effect on a site.
Respect Wildlife means not pushing into nests, dens, or habitat just to reach a container.
Be Considerate of Other Visitors means staying respectful in shared public spaces. Not everyone in a park wants to watch someone tearing around in circles because they are chasing coordinates.
The Outdoor Code in geocaching
A Scout is clean in the outdoors by leaving the place better than they found it.
A Scout is careful by preventing damage to trails, plants, structures, and cache sites.
A Scout is considerate by respecting other visitors, land managers, and the people who maintain the cache.
A Scout is conservation-minded by understanding that the health of the place matters more than getting one more smiley online.
Leave No Trace — The 7 Principles The official Leave No Trace overview, useful for connecting each principle to your choices on a geocaching trip. Link: Leave No Trace — The 7 Principles — https://lnt.org/why/7-principles/ Geocaching.com — How to Play A helpful starting point for understanding how the geocaching community expects seekers to find, log, and replace caches. Link: Geocaching.com — How to Play — https://www.geocaching.com/play Outdoor Code A Scout-focused reminder that outdoor fun and outdoor responsibility always go together. Link: Outdoor Code — https://www.outdoorcode.org/The best geocachers do not treat ethics as extra rules. They treat them as part of the game. In Req 3, you will learn the words and ratings geocachers use to describe what they are doing and what they find.
Req 3 — Geocaching Terms and Ratings
Every hobby has its own language. In geocaching, the words matter because they help you understand the listing before you ever leave home. A Scout who knows the vocabulary can decide whether a cache is a good fit, what gear to bring, and what to expect once they arrive.
The core terms every Scout should know
Waypoint
A waypoint is a saved location described by coordinates. In geocaching, the cache location itself is usually the main waypoint, but parking areas, trailheads, or stages in a multi-cache can also be saved as waypoints. Think of a waypoint as a digital map pin with exact location data.
Log
A log can mean two related things. There is the physical logbook inside the cache where you sign your name and date. There is also the online log you post afterward to record whether you found it, did not find it, or noticed a problem. Both forms of logging matter because they create the history of the cache.
Cache
A cache is the hidden container itself. It may be tiny, small, regular, or another listed size, but it usually contains at least a logbook. Some caches also include trade items or trackables. A cache is not random litter because it is intentionally placed, described online, and maintained by an owner.
Accuracy
Accuracy is how close your GPS reading is to your true location. GPS is good, but it is not perfect. Trees, buildings, weather, and device quality can all affect the reading. That is why geocaching always requires observation in addition to technology.
Difficulty rating
The difficulty rating tells how hard the cache is to find or solve. A low-difficulty cache is usually straightforward. A higher-difficulty cache may have a very clever container, a challenging hiding style, or a puzzle that takes real effort.
Terrain rating
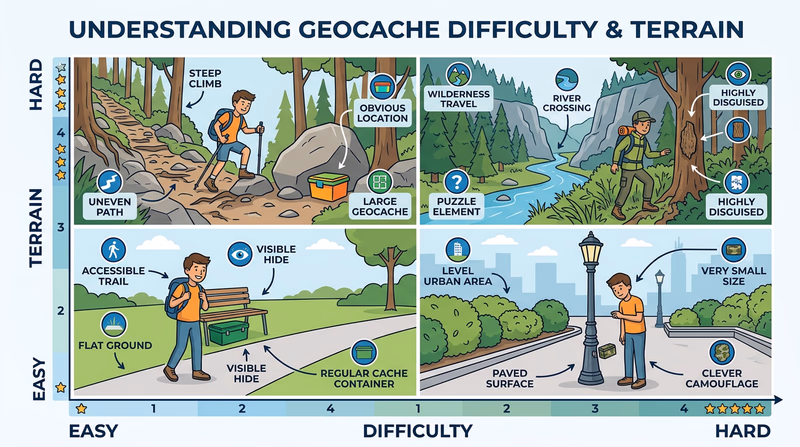
The terrain rating tells how physically challenging it is to reach the cache. A low-terrain cache may be accessible from a sidewalk or short easy trail. A higher-terrain cache may involve steep ground, longer hiking, uneven footing, or special conditions.
Attributes
Attributes are small symbols on a cache listing that quickly tell you useful facts. They may suggest whether the cache is kid-friendly, available at night, winter-friendly, short-hike, dog-friendly, or has other special conditions. Attributes help you decide if a cache fits your time, group, and gear.
Trackable
A trackable is an item with a unique tracking code that is meant to travel from cache to cache. Travel Bugs® and geocoins are common examples. People log their movements online so the owner can watch the journey.
Five more useful geocaching terms
You need five additional terms for your counselor discussion. Here are several strong choices. Pick the ones you understand best and explain them in your own words.
Muggle
A muggle is a non-geocacher who may not know what you are doing. You should be polite around muggles and avoid drawing attention to the cache location so it does not get disturbed or removed.
DNF
DNF means did not find. Logging a DNF is not failure. It is honest information that helps future seekers and alerts the owner if the cache may be missing.
TFTC
TFTC stands for Thanks For The Cache. It is a common short log phrase online, though a better log often includes a specific sentence or two about your experience.
Ground zero
Ground zero is the spot where your GPS says you have reached the listed coordinates. Geocachers often shorten it to GZ. Once you reach GZ, your search shifts from navigation to observation.
Hint
A hint is optional text in the cache listing that gives seekers extra help. Good geocachers try the search first, then use the hint when needed instead of destroying the area in frustration.
Reviewer
A reviewer is the person who checks new cache listings before they are published. Reviewers help make sure caches meet guidelines and are placed appropriately.
FTF
FTF means first to find. It describes the first person to locate a cache after publication.
How ratings and terms work together
When you read a cache listing, do not focus on only one piece of information. Combine several clues:
| Listing clue | What it tells you |
|---|---|
| Difficulty | How hard the hide or puzzle may be |
| Terrain | How physically demanding the trip may be |
| Attributes | Special conditions, accessibility, or timing clues |
| Hint | Extra help if the location is tricky |
| Recent logs | Whether the cache is active, damaged, or hard to find |
A cache with low terrain but higher difficulty might be an easy walk to a very sneaky hide. A cache with low difficulty but high terrain might be obvious once you get there, but the hike itself may be the hard part.
Before You Attempt a Cache
Use the listing language to prepare- Read the difficulty and terrain ratings together: One measures challenge of the find, the other measures challenge of the trip.
- Check the attributes: They can tell you whether the cache fits your situation.
- Save helpful waypoints: Parking, trailheads, and stages matter.
- Read recent logs: They often reveal whether the cache is healthy, wet, crowded, or missing.
Now that you can speak the language of geocaching, you are ready to understand the technology under it. Req 4 shows how GPS works and how to teach another person to use it with the Teaching EDGE method.
Req 4 — How GPS Works and How to Teach It
Your GPS receiver feels almost magical the first time it guides you straight to a hidden container. But the magic is really timing, math, and satellites. Understanding what your device is doing helps you trust it wisely instead of blindly.
How GPS works
GPS stands for Global Positioning System. A network of satellites orbits Earth and constantly sends timing and location signals. Your receiver listens to several of those satellites at once and uses the travel time of the signals to calculate where you are.
To get a useful position, your device usually needs signals from at least four satellites. With those signals, it estimates your latitude, longitude, elevation, and time. The process is called trilateration. Your unit is not asking the satellites where you are. It is measuring how far away the satellites seem to be, then solving the position from those distances.
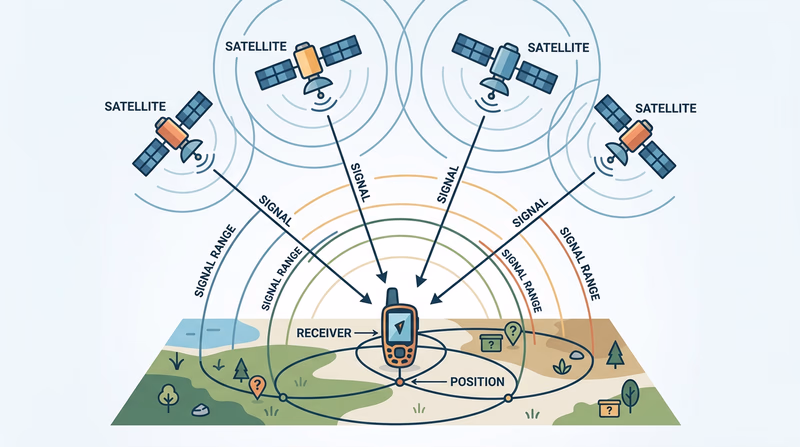
Why GPS is not perfect
GPS is usually very good, but several things affect accuracy:
- Trees and canyon walls can block or reflect signals.
- Tall buildings can interfere in urban areas.
- Cheap or older receivers may be less precise.
- Weather and satellite geometry can slightly affect readings.
- Your device settings may not match the listing format.
That is why geocaching always needs both technology and common sense. If your unit says you are there but the hiding spot makes no sense, pause and think.
Teaching GPS with the EDGE method
Scouting’s Teaching EDGE method gives you a simple way to show your counselor that you can do more than push buttons. EDGE stands for Explain, Demonstrate, Guide, Enable.
Explain
Start by describing what the feature does. For example: “A waypoint is a saved coordinate. Marking a waypoint lets me save an important place, like a cache site or trailhead, so I can return to it later.”
Demonstrate
Next, show the skill while talking through it. Open the waypoint screen, save the current location, and show how the name or symbol can be changed.
Guide
Then let the other person try while you coach them. Give short instructions and correct only what is needed.
Enable
Finally, have them do it on their own. If they can repeat the task without your help, you have taught it well.
What to Demonstrate
Skills your counselor expects to see- Mark a waypoint: Save a location in the unit.
- Edit a waypoint: Change the name, symbol, or saved details.
- Change field functions: Customize which data fields appear on the screen.
- Change coordinate system: Switch the device to the format needed for the activity.
Marking and editing a waypoint
A waypoint can mark almost anything useful: parking, a trail junction, a final cache location, or a meeting point. The exact button names vary by device, but the steps are similar.
- Go to the waypoint or mark screen.
- Save the current position.
- Rename it so it means something later, such as “Trailhead” or “Cache 1.”
- Edit the symbol if that helps you recognize it.
- Save the changes.
Editing matters because a list of unnamed or poorly named waypoints becomes confusing fast.
Changing field functions
Many GPS screens let you choose what data appears in small information boxes, often called fields. You might show distance to destination, heading, elevation, speed, time of day, or estimated arrival time.
For geocaching, useful fields often include:
- Distance to destination
- Bearing or heading
- Accuracy
- Elevation
- Time
Changing field functions helps you tailor the screen to the job. A hiking screen may need different information than a simple urban cache walk.
Changing the coordinate system
This part trips up many beginners. A GPS unit can show coordinates in different formats. If the cache listing is written in one format and your unit is set to another, the numbers will not match correctly.
For example, a cache might be listed in degrees and decimal minutes, while your device could be set to decimal degrees or another system. You do not need to memorize every format. You do need to recognize that the setting matters and know how to change it.
How to prepare for your counselor demonstration
Practice with your own device before the meeting. Use a nearby park, trailhead, or even your driveway as a test waypoint. Mark it, rename it, edit it, switch a screen field, and change the coordinate format back and forth until the steps feel natural.
You do not need a fancy speech. You just need a clear explanation and a calm demonstration. If you narrate what you are doing and why, your counselor will see that you understand both the tool and the teaching method.
🎬 Video: How GPS Receivers Work — HowStuffWorks — https://www.youtube.com/watch?v=iInmjjQ0oBE
🎬 Video: Garmin GPSMAP 64 Series: Geocaching Quick Start with GPS City — GPSCity — https://www.youtube.com/watch?v=_IFw6-SLhgQ
In Req 5, you will connect GPS skills to older navigation tools. That is a big part of becoming a confident navigator instead of someone who depends on only one device.
Req 5 — Maps, Compass, and Navigation Choices
This requirement covers two connected ideas:
- How to use a map and compass as real navigation tools
- How GPS and traditional navigation help in different ways
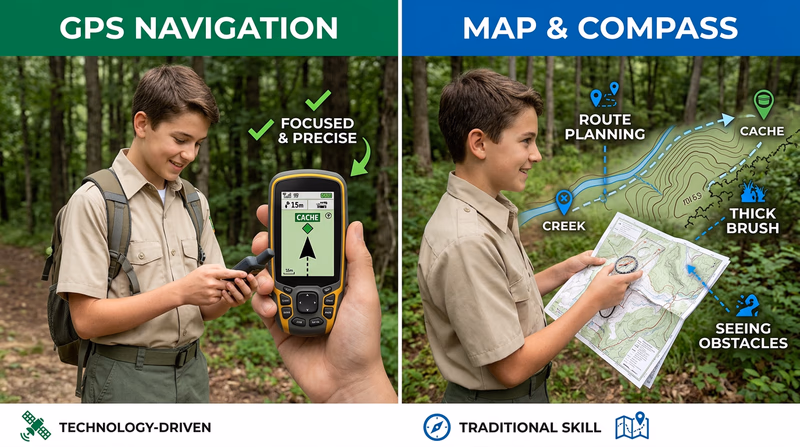
If your battery dies, your phone loses signal, or your receiver acts strangely under heavy tree cover, your geocaching trip should not fall apart. Strong geocachers are never trapped by depending on only one method.
Requirement 5a: Why Map and Compass Still Matter
A GPS can tell you where you are standing. A map and compass help you understand the bigger picture: ridges, streams, roads, trails, property boundaries, and safer routes. That wider view is one reason traditional navigation is still important.
What a map does
A map shows the layout of the land. It helps you see distance, terrain, trail connections, and nearby features. When you head toward a cache, a map may reveal that the shortest straight-line path is actually a bad idea because it crosses a creek, steep slope, or private property line.
What a compass does
A compass gives direction. It helps you orient the map, follow a bearing, and keep your sense of direction when everything in the woods starts to look the same. Even a simple compass can stop you from drifting the wrong way.
Why this matters in geocaching
Geocaching is not only about reaching a coordinate. It is about reaching it smartly. A map and compass help you choose the best route, avoid hazards, and get back out again.
Map and Compass Basics
What to be ready to show your counselor- Orient the map: Turn it so the map matches the land around you.
- Identify key features: Trails, roads, streams, parking, hills, and boundaries.
- Use the compass for direction: Know which way you are traveling and how to stay on course.
- Compare the route: Decide whether the direct path is really the best path.
Requirement 5b: GPS Navigation vs. Map Reading
GPS and map reading are both navigation systems, but they do not think the same way.
Similarities
Both methods help you figure out where you are, where you want to go, and how to travel between those points. Both are more useful when you plan ahead. Both also work better when you understand the terrain instead of blindly following directions.
Differences
GPS is usually faster and more precise for reaching a coordinate. It can guide you directly toward a cache and show distance remaining in real time.
Map reading gives better context. It shows the shape of the land, nearby routes, and bigger patterns that a small device screen may hide. A paper map also does not run out of battery power.
Benefits of GPS
- Fast access to exact coordinates
- Helpful for marking and returning to waypoints
- Easy to track distance and direction changes
- Great for urban caches or direct navigation to a listed spot
Benefits of map and compass
- Gives a wider picture of the area
- Works without batteries or signal
- Helps with route planning and emergency backup
- Encourages strong observation and terrain awareness
| Skill | GPS navigation | Map and compass |
|---|---|---|
| Best at | Reaching a specific coordinate | Understanding the whole area |
| Weakness | Depends on battery, settings, and signal quality | Slower and requires practice |
| Great use in geocaching | Final approach and saved waypoints | Route planning, backup, and safer travel |
By now you know how to prepare, how to behave ethically, how GPS works, and why map-and-compass skills still matter. That sets you up well for Req 6, where you will describe the basic process of finding your first cache and practice waypoint skills again.
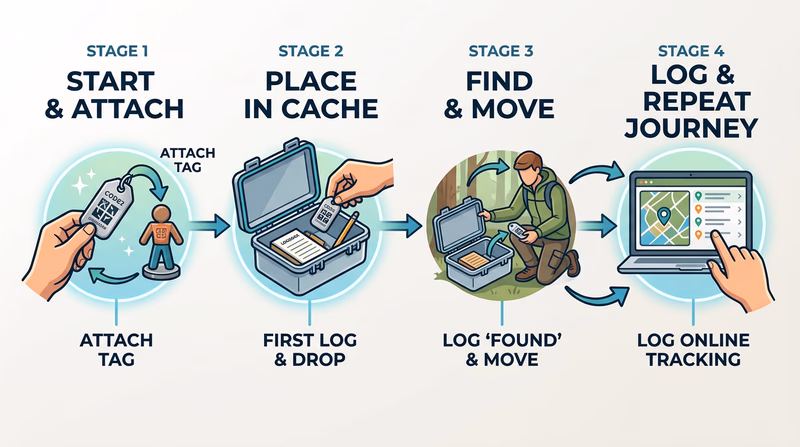
Req 6 — The Four Steps to Finding a Cache
Your first successful cache find usually feels the same for almost everyone. First you think, “This seems easy.” Then you get close and realize the container is much better hidden than you expected. Then, after slowing down and looking carefully, you finally spot it. That little moment of discovery is the reward geocachers come back for.
The four basic steps
There are many ways to describe geocaching, but a beginner-friendly version of the process looks like this:
1. Choose a cache and prepare
Read the listing before you leave. Check the difficulty, terrain, hint, size, attributes, and recent logs. Make sure the cache fits your skill level, time, and conditions. Bring what you need, especially water, appropriate clothing, and a pen for the log.
2. Navigate to the area
Use your GPS receiver or app to travel toward the cache coordinates. This part gets you close, but not usually all the way. Watch how the distance changes, and use your map-and-compass sense from Req 5 to pick a smart route instead of simply walking in a straight line.
3. Search carefully at ground zero
Once you arrive near the coordinates, slow down. Accuracy may vary, so look for hiding places that match the terrain, hint, and cache size. Search gently and discreetly. This is where patience matters most.
4. Sign, replace, and log the cache
When you find the cache, sign the physical logbook. Then put everything back exactly as you found it so the next geocacher gets the same challenge. Later, post your online log honestly.
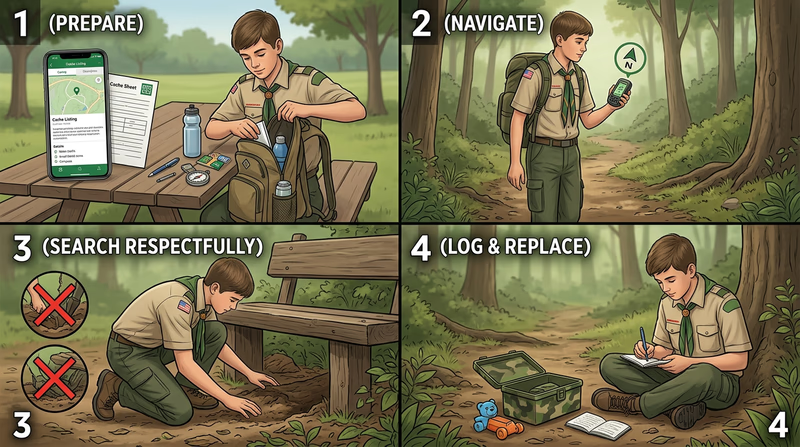
Four-Step Cache Hunt
A simple sequence to remember- Prepare: Read the listing and gather the right gear.
- Navigate: Use coordinates to get close to the cache area.
- Search: Slow down and observe carefully at ground zero.
- Log and replace: Sign the log and restore the hide exactly.
Why the last few feet are the hardest
Many beginners think the GPS should lead them directly to the container like a glowing arrow in a game. Real geocaching is messier than that. The last few feet usually depend on observation, not perfect coordinates. You may need to compare likely hiding spots, read the hint, and look from different angles.
That is one reason geocaching builds patience. If you rush, you miss clues. If you slow down, the hide often starts to make sense.
Marking and editing a waypoint again
This requirement also asks you to mark and edit a waypoint, which connects back to Req 4. A good real-world way to practice is to mark a useful location during your trip, such as:
- your parking area
- the trailhead
- the cache site after you find it
- a meeting point for your group
After saving it, rename it clearly so you can find it later. A waypoint called “001” is much less useful than one called “Parking” or “Creek Crossing.”
How to explain this to your counselor
Your counselor is looking for a clear, practical explanation, not a fancy speech. You might explain it like this in your own words:
- First I choose a cache and read the listing so I know what kind of trip I am taking.
- Then I navigate to the area using GPS and other route-planning skills.
- When I get close, I slow down and search carefully because the coordinates are not perfect.
- After I find it, I sign the log, replace the cache exactly, and log the result honestly online.
That answer shows you understand the whole experience, not just the moment of finding the box.
🎬 Video: Geocaching Basics: A High Tech Scavenger Hunt! — Tom Buck — https://www.youtube.com/watch?v=I1YNcvbytxw
In Req 7, you will move from practice to the real thing by researching local public caches and finding one yourself with permission and preparation.
Req 7 — Research and Find a Public Cache
This is the requirement where geocaching becomes real. You are no longer just learning definitions or talking through examples. You are researching actual caches near you, comparing them, and then going out to make a find. That means good choices matter.
Step one: get permission and set up the search
The requirement is very clear: ask your parent or guardian before creating an account or starting the online search. Once you have permission, use Geocaching.com to look for public caches in your area.
Do not pick the first cache you see just because it is close. Read the listing like a navigator. You are trying to choose a cache that is safe, realistic, and interesting.
Step two: compare three caches
When you review three nearby caches, pay attention to the information that tells you what the experience will be like. Share the posted information with your counselor in a clear, organized way.
Useful things to note include:
- cache name
- cache type
- difficulty rating
- terrain rating
- size
- location type or setting
- hint and attributes
- recent logs and maintenance notes
A short table or notebook entry makes this easy to discuss later.
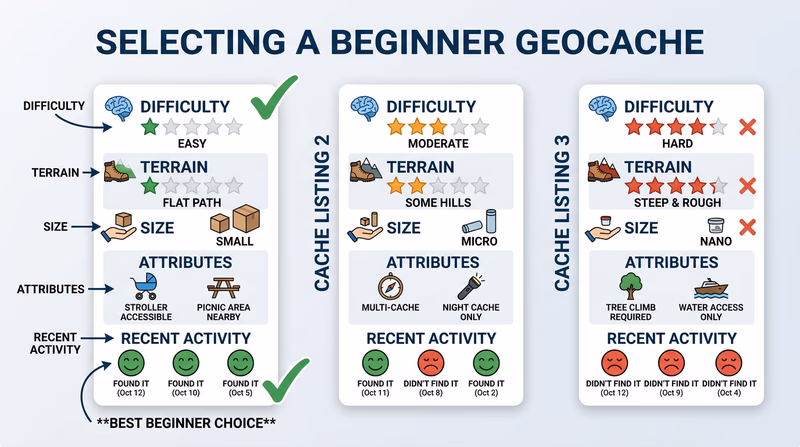
| Cache detail | Why it matters |
|---|---|
| Difficulty | Tells how challenging the hide or puzzle may be |
| Terrain | Tells how physically demanding the trip may be |
| Attributes | Gives clues about accessibility, timing, or special conditions |
| Recent logs | Helps you know if the cache is active and worth attempting |
| Hint | Can save time and prevent damage if the final search is tricky |
Step three: choose one good first cache
Your first cache should usually be simple. A traditional cache with lower difficulty and terrain is often the best choice for a Scout getting started. That gives you a better chance to practice the process without turning the whole outing into frustration.
Avoid choosing a cache that is too advanced just because it sounds cool. A first success builds confidence and teaches you what to expect.
Step four: go find it
Once you choose your cache, use the planning habits from Req 1 and the four-step process from Req 6. Bring a pen, water, and the right clothing for the conditions. Pay attention to safety, etiquette, and the environment.
When you find the cache, sign the physical log and replace the container exactly as you found it. Then log your find online later with permission.
What to tell your counselor afterward
Your counselor will want to hear not only that you found the cache, but also how you chose it and what you learned. A good discussion might include:
- why you selected that cache from the three options
- what the listing told you before the trip
- what matched the listing and what surprised you
- how the actual search compared with the GPS reading
- what you would do differently next time
A Strong Req 7 Report
What to bring to the counselor discussion- Three cache comparisons: Show the posted information for each one.
- Reason for your choice: Explain why your final pick was the best fit.
- What happened on the hunt: Describe the route, search, and find.
- What you learned: Share one or two lessons for your next geocaching trip.
This requirement gives you the confidence of a real find. Next comes Req 8, where you pick one longer geocaching project and decide what kind of adventure fits you best.
Req 8 — Pick Your Geocaching Project
You must choose exactly one of these four options. Each one teaches something different. One focuses on Scouting service history, one on trackables and long-term logging, one on the responsibility of owning a cache, and one on conservation leadership.
Your options
- Req 8a — Cache to Eagle Service Stops: Visit caches connected to Eagle Scout service projects and explain how the series shares Scouting service with the public. This option is great if a Cache to Eagle® series exists in your council and you want to connect geocaching with community impact.
- Req 8b — Travel Bug Mission: Design a Scouting-themed Travel Bug®, release it, and monitor its journey for 30 days. This option is best for Scouts who enjoy creativity, tracking progress over time, and keeping a good log.
- Req 8c — Hide and Maintain a Cache: Create a public cache, make a three-month maintenance plan, monitor it, and archive it when you can no longer care for it. This option is for Scouts who want the deepest look at how responsibility and stewardship work in geocaching.
- Req 8d — Cache In Trash Out Leadership: Practice CITO and then either create CITO containers or host a cleanup event. This option is strongest for Scouts who like service, environmental action, and leading other people.
How to choose
Choosing Your Option
Compare what each path asks you to do and what you gain- Time required: Req 8b and Req 8c both include a 30-day monitoring period, while Req 8a may be completed more quickly if the series exists nearby.
- Location needs: Req 8a depends on local Cache to Eagle opportunities. Req 8c needs a legal, appropriate place for a cache. Req 8d works well wherever a cleanup need exists.
- Main skill you build: Req 8a builds observation and interpretation, Req 8b builds tracking and recordkeeping, Req 8c builds ownership and maintenance habits, and Req 8d builds service leadership.
- Best fit for your style: Choose 8a if you like learning from real places, 8b if you like following an ongoing story, 8c if you want to build something for others, or 8d if you want to improve a place directly.
Whatever option you choose, pick the one you can actually complete well. This is not about choosing the flashiest project. It is about choosing the path that lets you learn, stay organized, and show your counselor the full experience.
Req 8a — Cache to Eagle Service Stops
This option turns geocaching into a tour of Scouting service. Instead of finding a cache just for the hunt, you are finding locations that highlight Eagle Scout service projects and the positive changes they created. That makes this option part navigation exercise and part storytelling exercise.
What Cache to Eagle is meant to do
A Cache to Eagle® series links geocaches with Eagle Scout service project sites. The goal is not just to show that a project happened. It is to help the public notice the work Scouts do for their communities. A trail sign, restored habitat, memorial bench, school improvement, or accessibility project can become part of a larger story when geocachers visit the site and learn what was done there.
How to approach the three visits
Do not rush from point to point only trying to collect three smileys. Slow down and study each location. Ask yourself:
- What problem did this project solve?
- Who benefits from it now?
- What skills did the Scout likely need to complete it?
- How does the cache listing help explain the project to visitors?
A strong report to your counselor includes details from each location, not just the names of the caches.
What to look for at each site
You are not expected to know every project detail on sight. Observe the place carefully, read the cache listing, and note the visible impact.
For each cache, try recording:
- the cache name and location
- the type of project highlighted
- the community benefit
- something you noticed in person that the listing helped explain
- how the stop changed your understanding of Eagle Scout service
At Each Cache to Eagle Stop
Questions to help you build a strong counselor discussion- What project is being highlighted? Describe what was built, restored, improved, or organized.
- Who benefits from it? Think about the people or place served by the project.
- What evidence do you see on site? Look for signs, structures, cleaner spaces, restored areas, or accessibility improvements.
- How does the cache teach the public? Notice whether the listing or location helps visitors understand Scouting service better.
Why this program matters
Cache to Eagle helps share Scouting service with people who may know very little about Scouting. A geocacher might visit for the fun of the search and leave with a new understanding of what an Eagle project can accomplish. That gives the program a public education purpose in addition to the geocaching challenge.
It also teaches you something important: service projects are not only about the day they are completed. Good projects keep helping people after the ribbon-cutting is over.
🎬 Video: Eagle Scout Pride Virtual Cache — JOY aka GeocachingJoy — https://www.youtube.com/watch?v=i3D8nrYruHo
This option emphasizes how geocaching can highlight service and public good. If you want a very different kind of project, Req 8b focuses on designing and tracking a Scouting-related Travel Bug® over time.
Req 8b — Travel Bug Mission
A Travel Bug® turns geocaching into a long-distance story. Instead of finding one container and going home, you create a trackable item with a mission and then watch how other geocachers move it from place to place. This option is fun because it combines creativity, Scouting values, and recordkeeping.
What makes a good Scouting-related Travel Bug
A Travel Bug starts with a trackable tag, but the attached item gives it personality. For this requirement, the item should connect clearly to a value of Scouting, such as helpfulness, bravery, friendliness, thriftiness, reverence, or conservation-minded behavior.
That does not mean it needs to be large or expensive. In fact, smaller and sturdier is usually better. The item should survive travel, fit in many public caches, and be easy for other geocachers to move.
Give it a mission
A good Travel Bug has a purpose. The mission could be to visit Scout camps, state parks, conservation areas, historic sites, or places connected to service. The mission should match the value you chose.
For example, a Travel Bug about conservation might aim to visit parks and protected areas. A Travel Bug about helpfulness might encourage geocachers to share one kind act in their online logs.
Good mission questions
- Where should this Travel Bug try to go?
- What Scouting value does it represent?
- What kind of logs would you like people to leave?
- Is the attached item durable enough for a long trip?
Travel Bug Design Checklist
What to think through before release- Choose one Scouting value: Make the message simple and clear.
- Pick a durable attached item: Light, sturdy, and family-friendly works best.
- Write a mission goal: Give other geocachers a reason to move it.
- Plan your 30-day log: Decide how you will track locations, dates, and notes.
Releasing and monitoring it
After you activate the Travel Bug and attach the item, release it into an appropriate public cache with permission and care. Then monitor its movement online for 30 days. Your log should show what happened during that period, even if the Travel Bug does not travel far.
A good log can include:
- date released
- name and location of the release cache
- mission statement
- dates of movement
- who moved it and where it went
- anything surprising you noticed about its journey
Do not be discouraged if the Travel Bug moves slowly. Real geocaching depends on other people, and that is part of the lesson.
What this option teaches
This is really a lesson in follow-through. You are creating an item with a purpose, then patiently tracking what happens over time. That makes it different from a one-day project. It also helps you see geocaching as a community activity, because your Travel Bug depends on other people acting honestly and helpfully.
How to discuss it with your counselor
Be ready to explain three things clearly:
- What Scouting value you chose and why
- How your Travel Bug design and mission supported that value
- What happened during the 30-day monitoring period
Even if the bug barely moves, you can still talk about what you learned from planning, releasing, and logging it.
Geocaching.com — Travel Bug FAQ An official overview of how Travel Bugs work, what they are meant to do, and how geocachers track their journeys. Link: Geocaching.com — Travel Bug FAQ — https://www.geocaching.com/track/travelbugfaq.aspxThis option shows how geocaching can carry a message from one cache to another. If you want an option with even more direct long-term responsibility, Req 8c focuses on hiding, maintaining, and eventually archiving your own public cache.
Req 8c — Hide and Maintain a Cache
Hiding a cache may sound like the most exciting option in Requirement 8, but it is also the most serious. The moment your cache goes public, other people begin trusting you. They trust you to choose a safe location, write an accurate listing, keep the container in good shape, and remove it when you can no longer care for it.
Choose a location for the long term
A good geocache site is more than a clever hiding place. It should be legal, publicly accessible, safe, and durable enough to handle repeat visits without damage. Ask yourself whether dozens of seekers could visit over time without trampling plants, bothering neighbors, or creating a trail where none should exist.
That question matters because cache ownership is really land stewardship. If the site cannot handle traffic well, it is the wrong site.
Build a real maintenance plan
Your counselor needs to see that you can care for the cache for three months. A maintenance plan should include:
- how often you will check the listing and logs
- what you will do if the container gets wet or damaged
- how you will replace a full or ruined logbook
- how quickly you will respond to problems
- what you will do if you must stop maintaining the cache
A weak plan says, “I will check it sometimes.” A strong plan says, “I will review logs each week, inspect the container in person when needed, replace damaged materials quickly, and archive the cache if I can no longer maintain it responsibly.”
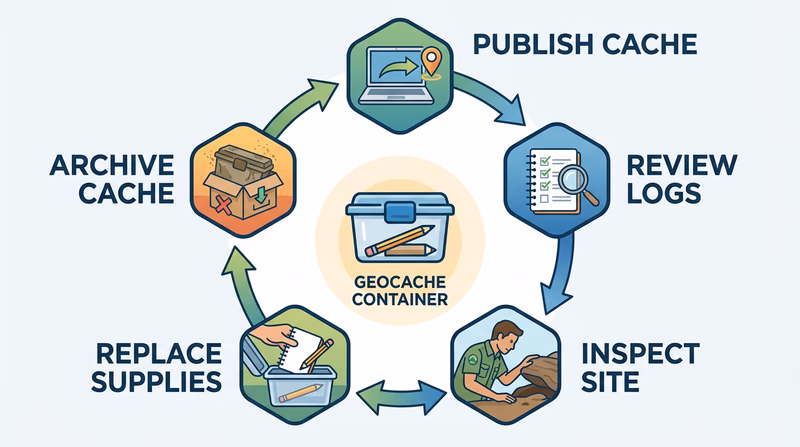
Three-Month Maintenance Plan
What your counselor should see in your plan- Check logs regularly: Review the listing often enough to spot problems quickly.
- Inspect the cache when needed: Respond to wet containers, missing logs, or repeated DNFs.
- Replace supplies: Keep a dry logbook and container in good condition.
- Know your exit plan: Archive the cache when you can no longer maintain it.
After publication: pay attention
A cache does not become self-managing once it is listed. Watch the online logs for 30 days as the requirement says. The logs will tell you a lot:
- Are seekers finding it consistently?
- Is the description clear?
- Is the container staying dry?
- Is the site handling traffic well?
- Are there signs the cache should be moved or archived?
This monitoring period teaches you that cache ownership is an ongoing responsibility, not a one-time project.
When to archive the cache
Archiving is not failure. It is the responsible end of the job when you can no longer care for the cache. If you move away, lose access, stop checking the logs, or realize the location no longer works well, the right move is to archive it and remove the container. Leaving an abandoned cache behind turns the hobby into litter.
🎬 Video: Everything you'll need to hide your first cache - geocaching for beginners — Hunt & Honey Homestead — https://www.youtube.com/watch?v=n-pPWc0nCYA
This option gives you the closest look at what keeps geocaching working over time. If you want an option centered more directly on environmental service, Req 8d focuses on CITO and helping public cache areas stay clean and healthy.
Req 8d — Cache In Trash Out Leadership
CITO stands for Cache In Trash Out. It is one of the clearest examples of geocaching at its best. Instead of only enjoying parks, trails, and public spaces, geocachers also help care for them. That turns a treasure hunt into stewardship.
What CITO means
Cache In Trash Out is a community environmental effort connected to geocaching. It usually includes activities such as trash cleanup, invasive species removal, trail improvement, or similar service work that helps outdoor spaces stay healthy and welcoming.
At its heart, CITO means this: if geocachers benefit from a place, geocachers should help protect that place too.
How you might already practice CITO
You do not have to wait for a major event to start practicing CITO. Many geocachers carry a small bag and remove litter during ordinary cache hunts. That simple habit is already part of the spirit of CITO.
To discuss this well with your counselor, describe a real example. Maybe you packed out trash you found near a cache, removed litter from a trailhead, or joined an organized cleanup day. Explain what you did and why it mattered.
Two ways to complete the second part
The requirement gives you two paths after explaining CITO.
Option 1: Create CITO containers
A CITO container is a small, practical way to encourage cleanup at cache sites. The container might include disposable gloves and a small trash bag so a geocacher can pick up litter safely while visiting the area. If you choose this path, think about durability, weather, and keeping the supplies usable.
Option 2: Host a CITO event
Hosting a CITO event is the bigger leadership choice. You need a location, a plan, the right people, and a clear cleanup goal. This option teaches event planning, communication, and follow-through.
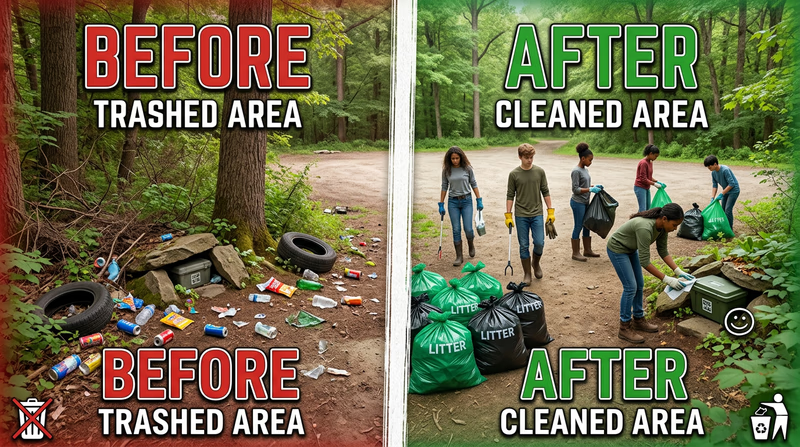
What Makes CITO Effective
Whether you create containers or host an event- Pick a place that needs help: Focus on a real problem, not a made-up one.
- Plan for safety: Gloves, supervision, weather, and disposal all matter.
- Make the service visible: Explain to participants why the cleanup improves the site.
- Leave the place better: The result should be easy to see when the work is done.
Why CITO matters to geocaching
CITO helps land managers and the public see geocachers as partners instead of just users of outdoor space. That reputation matters. When people see that the geocaching community cleans up trails, removes trash, and cares about natural areas, they are more likely to welcome the hobby.
CITO also fits the Outdoor Code perfectly. A Scout is clean, careful, considerate, and conservation-minded. This option lets you prove all four at once.
🎬 Video: Tutorial Creating an [CITO] Event Geocache with #KeepersOfTheCacheFlo — KeepersOfTheCacheFlo — https://www.youtube.com/watch?v=1HefhojIPmg
This option shows how geocaching can serve the land directly. In Req 9, you will take another leadership step by planning and running a geohunt for a youth group.
Req 9 — Plan and Run a Geohunt
This requirement asks you to stop being just a participant and become the organizer. A good geohunt is part navigation challenge, part lesson, and part game. If it is well planned, the players have fun and learn real GPS skills at the same time.
Start with a theme
A theme gives the geohunt personality. It might be nature, local history, Scout skills, conservation, camp landmarks, or a simple adventure story. The theme helps you decide what the waypoints represent and how players move through the course.
For example, a conservation geohunt might send players to stations about water, wildlife, litter prevention, and trees. A camp history geohunt might use waypoints that teach the story of different landmarks.
Design the course
Your course needs at least four waypoints, but the best courses are not just four random dots on a screen. The waypoints should make sense as a sequence. They should also be safe, easy to supervise, and suitable for the age of the players.
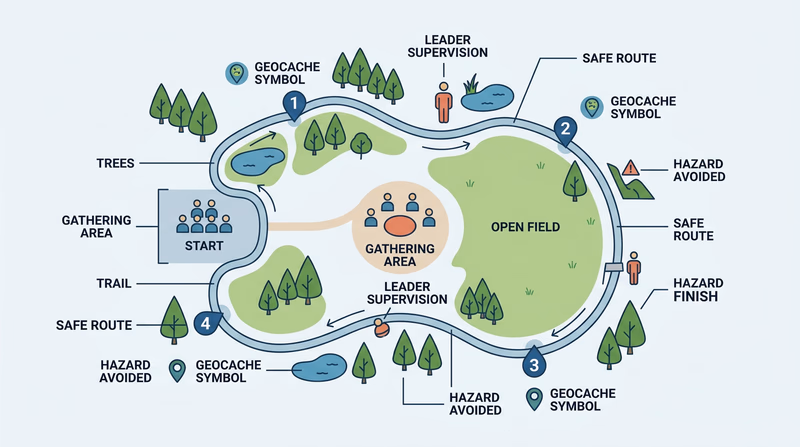
When designing the course, think about:
- how far players will walk
- whether the route crosses roads or other hazards
- where leaders can supervise the group
- whether the terrain matches the age and skill of the participants
- what each waypoint teaches or reveals
Strong Geohunt Design
What to build before the event- Clear theme: Give the hunt a story or purpose.
- At least four waypoints: Make each one count.
- Safe route: Avoid hazards, confusion, and poor supervision areas.
- Simple player materials: Maps, clue sheets, waypoint lists, or scorecards.
Teach GPS before the game starts
This requirement specifically says you must teach the players how to use a GPS unit. That means the geohunt should begin with instruction, not confusion. Show the players how to read direction and distance, how to move toward a waypoint, and what to do when they get close.
Keep the lesson short and practical. A long lecture will drain the energy out of the game. A quick demonstration followed by hands-on practice is usually best.
You can use the same EDGE ideas from Req 4: explain, demonstrate, guide, and then let them try.
Run the event and watch what happens
Once the players start, your job shifts from planner to leader. Observe whether the waypoints are clear enough, whether the groups understand the devices, and whether the pace matches the age level.
Do not be surprised if something needs adjusting. Real events almost always teach you what the paper plan missed.
Materials to save for your counselor
The requirement asks you to share the materials you used and developed. That might include:
- waypoint list
- map of the course
- clue sheet or scorecard
- safety plan
- teaching notes
- event schedule
The more organized your materials are, the easier it will be to explain the event afterward.
Telling your counselor about the experience
After the event, reflect on what worked and what did not. Your counselor will likely care about both. A strong reflection includes:
- what your theme was and why you chose it
- how the course was laid out
- how you taught GPS skills
- how the players responded
- what you would improve if you ran it again
That reflection shows leadership. Good leaders do not just complete an event. They learn from it.
Geocaching started with a simple find, but this requirement shows how far the badge can go. You are now planning, teaching, leading, and evaluating — all with navigation as the core skill.
Extended Learning
A. Congratulations
You have done more than look for hidden containers. You have learned how to plan trips, use GPS wisely, navigate with backup tools, care for outdoor spaces, and think like both a seeker and a steward. That mix of technology, observation, and responsibility is what makes geocaching such a strong Scout activity.
If you enjoyed this badge, you have only scratched the surface. Geocaching can keep growing with you for years because every new place, cache type, and leadership role adds another layer to the adventure.
B. Beyond Traditional Caches
Traditional caches are the easiest way to begin, but they are not the end of the hobby. As your confidence grows, you can try multi-caches, puzzle caches, EarthCaches, letterbox hybrids, and event caches. Each one develops a different skill.
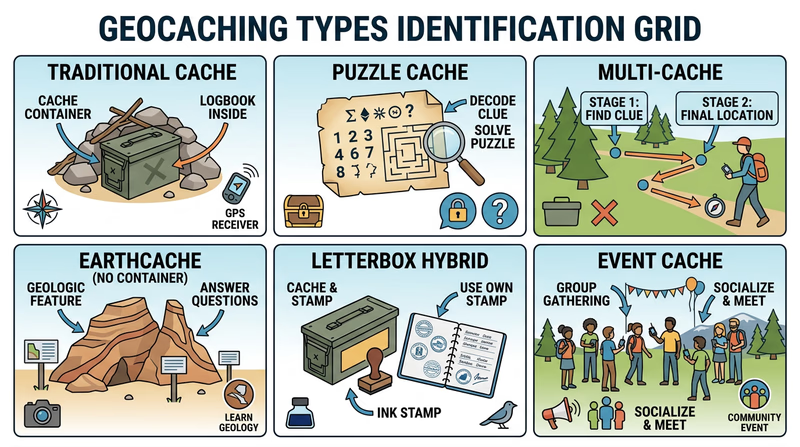
Puzzle caches build patience and logical thinking before the trip even begins. Multi-caches reward careful observation because each stage reveals information for the next one. EarthCaches are especially interesting for Scouts who like geology, because they teach you about the land itself instead of sending you to a container.
Trying more advanced cache types can also make you a better planner. You start to notice which caches need longer time windows, better route study, or more gear. That deeper preparation is a sign that you are moving from beginner geocacher to experienced one.
Another benefit of advanced cache types is that they make you read listings more carefully. A beginner may only notice the coordinates. A stronger geocacher studies the hint, the attributes, the ratings, and the recent logs to understand the full challenge before leaving home.
As you explore these types, keep the same habits you learned in the badge: stay safe, protect the site, and log honestly. The challenge may get harder, but the standards do not change.
C. Geocaching as Citizen Observation
Geocaching can sharpen the same observation habits that scientists, naturalists, and search-and-rescue teams value. When you hunt for a cache, you learn to notice small disturbances, patterns in terrain, likely hiding spots, and the way a place fits together.
Those same habits help with birding, conservation work, trail stewardship, and outdoor leadership. A Scout who notices where water is flowing, where vegetation is being trampled, or where people are making social trails is already thinking beyond the cache.
This is one reason geocaching fits so well with other merit badges. The observation skills connect naturally to Bird Study, the route planning connects to badges like Hiking, and the environmental awareness connects to outdoor ethics across Scouting.
You can strengthen this skill by keeping short field notes after each trip. Record what the listing led you to expect, what the site actually looked like, and what clues led to the find. Over time, you will notice that your “search sense” improves.
Geocaching also teaches humility. Sometimes the clue is obvious only after you find it. That is good practice for any kind of outdoor learning. It reminds you to slow down, observe, and stay curious.
D. Stewardship and Leadership in the Hobby
One of the most mature ways to grow in geocaching is to become someone who improves the experience for others. That can mean maintaining a great cache, writing thoughtful logs, participating in CITO, or planning activities for younger Scouts.
Thoughtful logs matter more than many people realize. A one-line entry proves a cache was found, but a better log gives useful context. It can tell the owner whether the container is wet, whether the coordinates seemed accurate, or whether the area has changed. Good logs make the whole game healthier.
Leadership also shows up in the way you guide less experienced geocachers. A Scout who helps younger players learn GPS basics, search gently, and protect the site is doing more than teaching a hobby. They are shaping the next generation of responsible users.
You may also discover that geocaching is a good way to introduce people to parks, trails, and local history. A well-planned geohunt or a service-oriented caching activity can turn a familiar place into a new adventure. That is real leadership: helping others see a place differently and treat it with care.
The longer you stay involved, the more you will see that the best geocachers are not only clever finders. They are patient teachers, careful planners, and dependable stewards.
E. Real-World Experiences to Try
- Attend a geocaching event: Watch how experienced geocachers share tips, stories, and community expectations.
- Visit a new kind of landscape: Try caches at a shoreline, historic district, wildlife area, or trail system you have not explored before.
- Pair a cache trip with service: Bring gloves and a small trash bag so your outing includes CITO in action.
- Run a youth geohunt again: Improve the course from Req 9 and try it with a different age group.
- Explore a puzzle or EarthCache: Stretch your skills beyond traditional hides.