Req 6 — The Four Steps to Finding a Cache
Your first successful cache find usually feels the same for almost everyone. First you think, “This seems easy.” Then you get close and realize the container is much better hidden than you expected. Then, after slowing down and looking carefully, you finally spot it. That little moment of discovery is the reward geocachers come back for.
The four basic steps
There are many ways to describe geocaching, but a beginner-friendly version of the process looks like this:
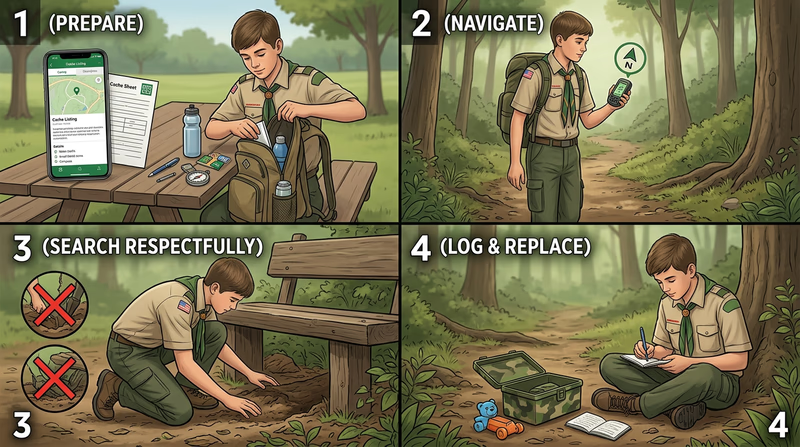
1. Choose a cache and prepare
Read the listing before you leave. Check the difficulty, terrain, hint, size, attributes, and recent logs. Make sure the cache fits your skill level, time, and conditions. Bring what you need, especially water, appropriate clothing, and a pen for the log.
2. Navigate to the area
Use your GPS receiver or app to travel toward the cache coordinates. This part gets you close, but not usually all the way. Watch how the distance changes, and use your map-and-compass sense from Req 5 to pick a smart route instead of simply walking in a straight line.
3. Search carefully at ground zero
Once you arrive near the coordinates, slow down. Accuracy may vary, so look for hiding places that match the terrain, hint, and cache size. Search gently and discreetly. This is where patience matters most.
4. Sign, replace, and log the cache
When you find the cache, sign the physical logbook. Then put everything back exactly as you found it so the next geocacher gets the same challenge. Later, post your online log honestly.
Four-Step Cache Hunt
A simple sequence to remember
- Prepare: Read the listing and gather the right gear.
- Navigate: Use coordinates to get close to the cache area.
- Search: Slow down and observe carefully at ground zero.
- Log and replace: Sign the log and restore the hide exactly.
Why the last few feet are the hardest
Many beginners think the GPS should lead them directly to the container like a glowing arrow in a game. Real geocaching is messier than that. The last few feet usually depend on observation, not perfect coordinates. You may need to compare likely hiding spots, read the hint, and look from different angles.
That is one reason geocaching builds patience. If you rush, you miss clues. If you slow down, the hide often starts to make sense.
Marking and editing a waypoint again
This requirement also asks you to mark and edit a waypoint, which connects back to Req 4. A good real-world way to practice is to mark a useful location during your trip, such as:
- your parking area
- the trailhead
- the cache site after you find it
- a meeting point for your group
After saving it, rename it clearly so you can find it later. A waypoint called “001” is much less useful than one called “Parking” or “Creek Crossing.”
How to explain this to your counselor
Your counselor is looking for a clear, practical explanation, not a fancy speech. You might explain it like this in your own words:
- First I choose a cache and read the listing so I know what kind of trip I am taking.
- Then I navigate to the area using GPS and other route-planning skills.
- When I get close, I slow down and search carefully because the coordinates are not perfect.
- After I find it, I sign the log, replace the cache exactly, and log the result honestly online.
That answer shows you understand the whole experience, not just the moment of finding the box.
In Req 7, you will move from practice to the real thing by researching local public caches and finding one yourself with permission and preparation.