Req 7 — Research and Find a Public Cache
This is the requirement where geocaching becomes real. You are no longer just learning definitions or talking through examples. You are researching actual caches near you, comparing them, and then going out to make a find. That means good choices matter.
Step one: get permission and set up the search
The requirement is very clear: ask your parent or guardian before creating an account or starting the online search. Once you have permission, use Geocaching.com to look for public caches in your area.
Do not pick the first cache you see just because it is close. Read the listing like a navigator. You are trying to choose a cache that is safe, realistic, and interesting.
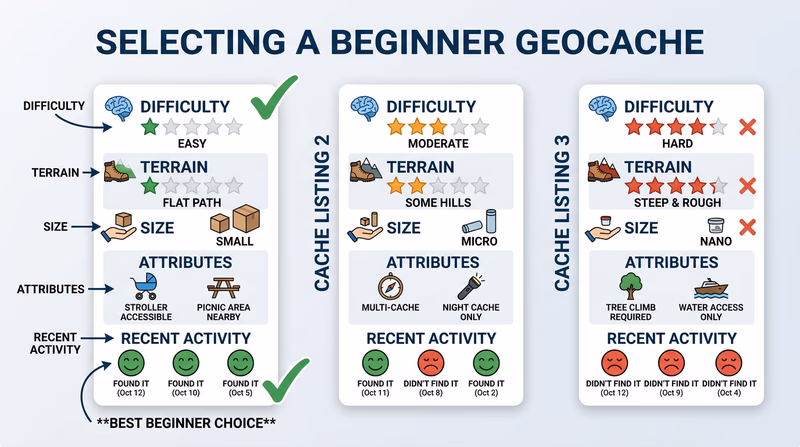
Step two: compare three caches
When you review three nearby caches, pay attention to the information that tells you what the experience will be like. Share the posted information with your counselor in a clear, organized way.
Useful things to note include:
- cache name
- cache type
- difficulty rating
- terrain rating
- size
- location type or setting
- hint and attributes
- recent logs and maintenance notes
A short table or notebook entry makes this easy to discuss later.
| Cache detail | Why it matters |
|---|---|
| Difficulty | Tells how challenging the hide or puzzle may be |
| Terrain | Tells how physically demanding the trip may be |
| Attributes | Gives clues about accessibility, timing, or special conditions |
| Recent logs | Helps you know if the cache is active and worth attempting |
| Hint | Can save time and prevent damage if the final search is tricky |
Step three: choose one good first cache
Your first cache should usually be simple. A traditional cache with lower difficulty and terrain is often the best choice for a Scout getting started. That gives you a better chance to practice the process without turning the whole outing into frustration.
Avoid choosing a cache that is too advanced just because it sounds cool. A first success builds confidence and teaches you what to expect.
Step four: go find it
Once you choose your cache, use the planning habits from Req 1 and the four-step process from Req 6. Bring a pen, water, and the right clothing for the conditions. Pay attention to safety, etiquette, and the environment.
When you find the cache, sign the physical log and replace the container exactly as you found it. Then log your find online later with permission.
What to tell your counselor afterward
Your counselor will want to hear not only that you found the cache, but also how you chose it and what you learned. A good discussion might include:
- why you selected that cache from the three options
- what the listing told you before the trip
- what matched the listing and what surprised you
- how the actual search compared with the GPS reading
- what you would do differently next time
A Strong Req 7 Report
What to bring to the counselor discussion
- Three cache comparisons: Show the posted information for each one.
- Reason for your choice: Explain why your final pick was the best fit.
- What happened on the hunt: Describe the route, search, and find.
- What you learned: Share one or two lessons for your next geocaching trip.
This requirement gives you the confidence of a real find. Next comes Req 8, where you pick one longer geocaching project and decide what kind of adventure fits you best.